5 minute read
Borrowing Pixels: Problem Solving in Photoshop
B o r r o w i n g P i x e l s Problem Solving with Photoshop
Every time photographers take pictures, we have to constantly solve problems. The background is distracting, the lighting isn’t quite right, there’s too much contrast, the depth of field is too shallow, the wrong lens was used . . . and on and on. Many problems can be rectified at the time of shooting; many can’t. B.P. -- before Photoshop -- we just had to live with our mistakes or with the less-than-ideal results. Now, however, many problems can be solved. I have a new Photoshop online course starting in June that addresses the many problems we face every time a camera is in our hands (click HERE for more information).
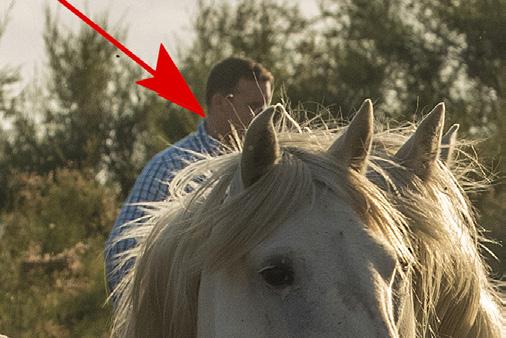
A case in point is the photo below. I shot this during my White Horses of the Camargue photo tour in France, and with action photography, you have to take a lot of shots to get one that’s good. Things happen fast, and it’s impossible to think, plan, and pay attention to every detail. There just isn’t time. So, as the herd of horses were driven down a path toward my group of


photographers, we weren’t able to eliminate the French cowboys who were working hard to create the best photo opportunities for us. You can see in the original capture on the previous page one of those cowboys, and it hurts the image. The problem, of course, is it’s not easy to clone him out because the backlit mane of the lead horse is right in front of his blue shirt. In the cropped detail at the upper left, you can see this clearly. I actually tried to clone out the cowboy, but hair is translucent and the blue color bleeds through the blond hair. The clone tool, in this case, didn’t do the job.
In the corrected version below, and in the cropped detail at upper right, you can see I’ve

fixed the problem so there is no evidence of the original issue. Here are the steps I took to make this happen.
1. If the clone tool wasn’t going to work, the only solution was to select another area of the image and paste that in the appropriate place. In other words, I had to identify a small portion of another mane and use it to cover up the area where the cowboy was.
Most importantly, the mane(s) I was looking for had to have the out of focus vegetation behind the flying hair. That was the key.
2. The two manes I chose are indicated by the green arrows, below.
3. Next, I had to cover up the cowboy with vegetation. Precision wasn’t important at this point. I cloned out the blue shirt and the man’s head including the mane in front. You’ll see why this was important shortly.
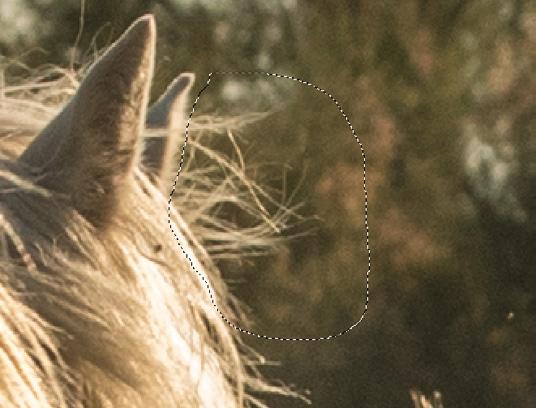
4. Using the lasso tool, I made a selection of a section of mane (left arrow, bottom photo) that included vegetation and the edge of the mane (screen capture immediately below). I


5. I chose the pulldown menu command, Edit > copy, to place this selection in the ‘clipboard,’ Photoshop’s temporary holding place.
6. Edit > paste was next, and this placed the selection into the picture of the horses. This was now Layer 1.
7. Notice that the area of the mane I selected and placed in the clipboard was on the right side (our right) of the horse’s head, but the area where the cowboy was located, and the area that needs to be repaired, was on the left side (our left) of the other horse’s head. This means I had to flip the layer, and I did this with Edit >
transform > flip horizontal.
8. Using the keyboard shortcut Command/ Ctrl T, a box formed around the layer which gave me the ability to either resize or rotate it. I positioned the cursor outside the box and rotated the small portion of mane until it was oriented correctly.
10. I then made a layer mask with the command, Layer > layer mask > reveal all.
11. With the foreground and background color boxes at the bottom of the tools palette black and white, respectively, I selected the brush tool and brushed away vegetation from around the flyaway hairs of the mane.
This is why I had to clone out the cowboy in step 3. Brushing away the vegetation from the layer revealed the cloned vegetation from step 3 beneath. This isn’t a precise operation because the green vegatation attached to the blond hair blended with the cloned greenery.
12. I then flattened the image.
13. At this point, I felt I still needed additional flyaway hair on the mane, so I repeated this process using the mane indicated by the second green arrow on the right (previous page). That selection is shown below.
When this selection copied to the clipboard, pasted into the photograph, flipped horizontally, and moved into place, the reconstructed mane looked good.
With the clone tool, I did a little touch up, flattened the file using Layer > flatten image, and then the repair was finished.
In this picture, there was enough material to ‘borrow pixels’ and use them to cover up another area. If this were not the case, I would have looked for a backlit blond mane in other frames taken at the same time and used those selected areas. This is one reason to always use a fast frame rate when shooting action. You’ll have a lot of material should you need to creatively address problematic issues in your pictures. §


