
6 minute read
Joe's How-To

Focus Stacking
By Joe Doherty
One of the earliest things I learned when I picked up a camera was the relationship between aperture and depth of field. The rule was pretty simple – a smaller aperture meant that more was in focus. So I shot everything at the smallest aperture possible. But that didn’t work out so great, and it took me a while to learn why not. At some point every lens hits a point of diminishing returns for sharpness. Smaller apertures lead to more diffraction, or blurring. A photo could be sharp with shallow depth-of-field at f8, or un-sharp with great depth-of-field at f22. That was the trade-off.
In addition, even with a small aperture not everything was in focus. The lack of infinite depth of field required me to make both technical and artistic choices. When photographing a wildflower it was important to maneuver the camera into a position where all of the important bits of the subject were in the same plane relative to the camera, so that they would be sharp as the foreground with the background blurred away. Creativity is how the we react to such constraints.
Today that constraint is at least partially gone, relieved by digital imaging and the technique of focus stacking. It is now possible to produce images with an amazing depth of field at the maximum sharpness of a lens. This is accomplished by shooting multiple frames of the same subject, changing the focus between frames, and blending them together using software.
Some subjects are difficult to focus stack because parts of them move in-between exposures (e.g., a field of waving grasses and wildflowers). I’ve found the most success with close-up images of relatively stationary objects. For this column I’ll use a recent photograph of oyster mushrooms I found in a forest north of Trinidad, California.
It’s important to know something about your lens before you start shooting. Specifically, you should know at what f-stop diffraction starts to become noticeable. On my lenses that’s typically around f8 or f11, depending on the focal length. Given that, I try to shoot all of the images I intend to focus stack at around f8 or f11. This gives me frames that are as sharp as possible along with depth of field that makes blending easier.
It takes a lot of trial and error to determine how many frames you need to shoot. It boils down to two things: how far apart are the nearest and farthest things you want in focus; and how much does the depth of field overlap across the frames. Before making any exposures I use the manual focus ring on my lens to get a feel for how much I need to turn it in order to get both ends of the stack in focus.
From experience I have an idea for how much I can turn the ring and stay within the depth of field of the previous shot. There are probably tables and guidebooks that tell how much that should be, and that’s good background information, but in the field it’s better to have an intuitive feel for it. There is no substitute for experience.
Some cameras (my Nikon D850) can be set to automatically change the focus between shots. Nikon calls it “focus shifting,” and it allows me to choose how many frames to shoot (up to nine) and how much to shift the focus in between exposures. I found this very
useful when I was shooting wild azaleas. It wasn’t possible to use a tripod, so I did a series of “motor drive” exposures while hand holding the camera. It took 4 or 5 runs of 9 frames each to get it right. Not all of my lenses are autofocus, however, so that won’t work in every circumstance. For the examples in this column, I used a 1970s era 55mm Micro-Nikkor.
Fig. 1
When shooting these oyster mushrooms my experience told me that five frames would be enough to bring together the nearest and farthest points that I wanted in focus (Figure 1).
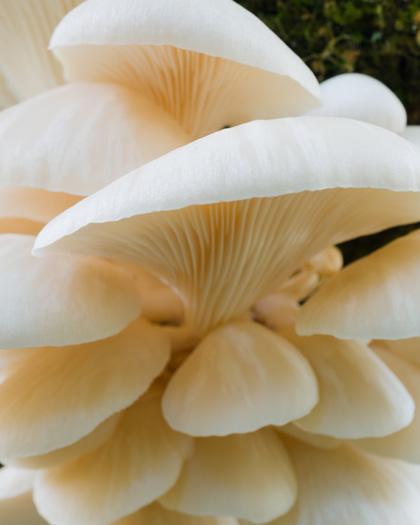
Fig. 2a Fig. 2b

Having made these exposures and brought them into Lightroom, there is a decision to make. Do I process the photograph before or after blending? I don’t have an opinion on that question. I think that as long as the processing is identical across all of the frames it shouldn’t be a problem. Since this was made in relatively flat light I processed it very little before blending.
The next step is to select all of the images in Lightroom and edit them as layers in Photoshop. This is done through the menu Photo/ Edit In/Open as Layers in Photoshop . . . . The same options can be found by right-clicking the images and selecting the “Edit In” option. It might take some time to open them, but once finished you should see something like Figure 3. Before proceeding to the next step, be sure to select all layers. I do this by clicking on the top layer, holding down the shift key, and clicking the bottom layer.
My first exposure was on the closest point (Figure 2a) and the fifth exposure was on the furthest point (Figure 2b).

Fig. 3
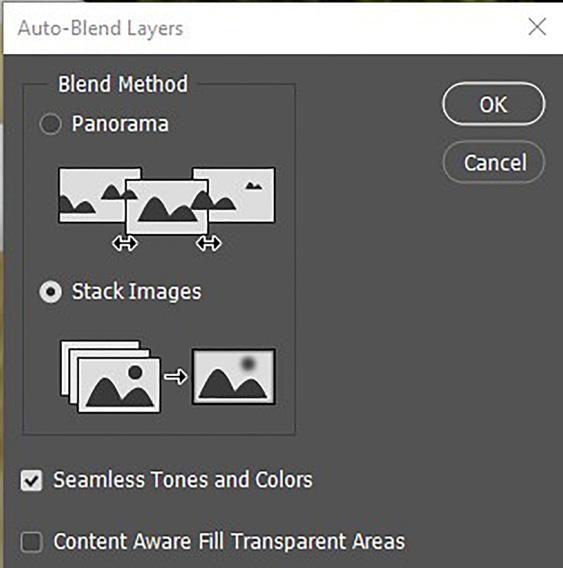
Once all of the layers are selected, the process of focus stacking begins. Start with Edit/Auto Align Layers, which will . . . well, align the layers (Figure 4a). (If both Auto Align and Auto Blend are grayed out in the menu, it might be because the layers are not selected.) You might notice some of the frames are slightly resized during this process. This is because of something called “focus breathing.” As you change the focus, the size of the image on the sensor changes slightly. Auto Align Layers will resize your image to correct for that. After aligning the image, use Edit/Auto Blend Layers to put them together (Figure 4b). Auto Blend Layers creates a set of masks
that allow only the sharp parts of each layer to come through. At this point you will want to closely examine the image to see if it has done the job correctly. Small adjustments are possible by making changes to the masks, which is a tedious but sometimes rewarding pastime.
Fig. 4a Fig. 4b

If you are satisfied then save the file. I like to flatten the layers before saving, which reduces the size of the file a lot and makes it easier to open up again in Lightroom. You may want to keep the layers, if you think you’ll want to edit the masks in the future.
Fig. 5

The end product should be an image in which the nearest and farthest points are sharp (Figure 5). The transition from close to far should appear seamless, and there should be no weird blurry areas. The effect is to replicate how a person actually sees an object in person, with the eye quickly adjusting focus as it flits from detail to detail.
This how-to uses Lightroom and Photoshop because those two come bundled together in a monthly plan that is commonly used among SCCC members. But another program, Helicon Focus, is reported to be better at focus stacking than Photoshop.
That is probably true, and if you want to do further exploration on the topic I recommend adding Helicon to your collection of processing tools.
26
