23 minute read
Studio Pro Powered by ReChat


An Introduction to Studio Pro by ReChat
Studio Pro by ReChat
Advertisement
Studio Pro has retime sync with Google and Outlook calendars and contacts. It allows you to: 1. Manage and Tag your CRM (Customer Relationship Management) 2. Property marketing including email campaigns, showsheets, websites and more. 3. Manage your deals and transactions with DocuSign integration 4. Market directly to agents
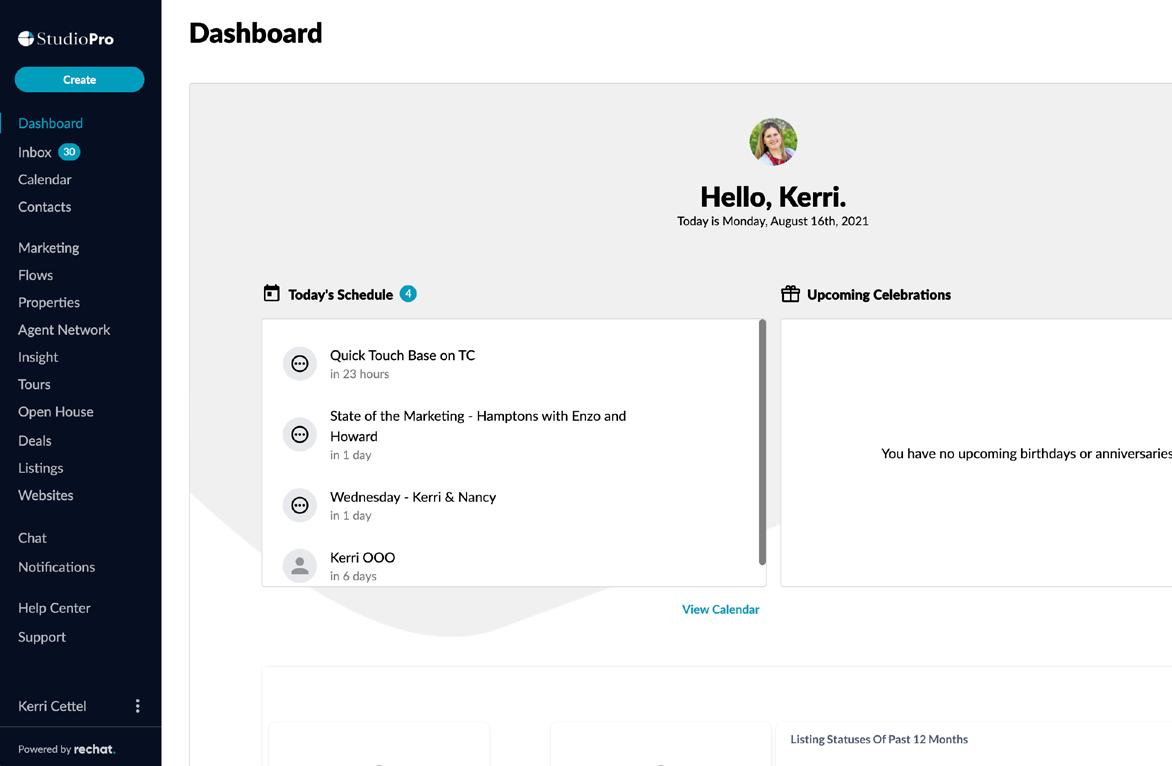
Daily Email
Every morning at 6am ReChat will send a daily email which will give you an overview of all the important aspects for the day such as: daily schedule, upcoming celebrations for the week including birthdays and wedding and home anniversaries, latest deals, and insights into the emails you sent in the past 3 days.
Studio Pro Desktop Access
douglas.elliman.com > Agent Apps > Studio Pro


Get the ReChat App from the App Store
Rechat will ask you for permission. Say yes to all permissions in order for your app to be fully-functional. 1. Turn on your notifications: You want notifications to be on so you can get notified when your office or clients message you, when your contacts open your emails or when new listings hit the market.
2. Share your location while the app in use: This will allow your map experience to work well.
Then, when you visit the Properties tab on your phone, you can quickly see all MLS listings that are for sale around you. 3. Access Your Contacts: Studio Pro will never message or spam your contacts or share them with anyone. But by enabling access to contacts you can then easily use your iPhone contacts in your CRM instead of having to manually enter them into your database.
• Connect with Outlook • Connect with Google • Upload CSV file
Content to Google or Outlook Email Accounts
Studio Pro is deeply-integrated with Microsoft Outlook and Google, so with a few simple clicks you can have your data flowing in and out of Studio Pro. Any updates in Studio Pro will update those accounts, and any update on those accounts will update Studio Pro.
Connecting your account takes less than 2 minutes: 1. Go to Contacts 2. Top right of the page click Connect with Outlook/Google. You can also upload a custom csv file of your contacts right out of Excel. 3. Enter your Outlook login and say YES to all the permissions so your app can be fully functional.
Please note: The sync will begin right away but it might take a while as there is usually a lot of history in Calendar, Emails and Contacts to bring over and process, but this work happens in the background so you can continue using the app.
Connecting Studio Pro with your Outlook account is the single most important thing you can do for your CRM to be useful.
When your account is connected, any email you send out of Studio Pro will actually be sent from your Outlook account, and you’ll be able to find it in your Outlook sent folder.
All emails you send from Studio Pro will provide you with full insight about who opened or clicked on the links inside of them.
Studio Pro will also track your last touches with a contact and notify you if you are falling out of touch with them.
Connecting Studio Pro to Outlook is completely safe. We have the same integration as with Google, and we have to pass an extensive annual audit which looks at many aspects of our product and company to make sure we keep your data safe.
Your data and contacts are yours, and we do not share them with anyone including your broker. Only you have access to them and if you ever want to leave Studio Pro, you can download and then delete them and take them with you.
Create a Contact Manually
1. Select the Create button on the side navigation bar and choose Contact.
2. Add contact details, full name, email, phone, tags*, birthdays, anniversaries and deals you have with the contact, and save.
If you are an assistant or work in a team and you are creating the contact for another user, you should click on Owner and select the user you are adding the contact on behalf of. Please note that you will still be able to view the contact and make updates to it.
Managing Duplicates
There are two ways to manage duplicates in Studio Pro:
1. Studio Pro auto-detects contacts that appear to be duplicates based on their email or phone number, and will notify you at the top of the Contacts view if there any 2. You can manually select a few contacts and at the bottom of the page choose the Merge option to merge them all into one. Tip: The contact you select first will be the photo and name you see in the main dashboard.
Tags*
Tags are labels you create to help organize your contacts. It is the simplest way to organize and categorize your contacts. Tagging lets you easily sort, filter, segment and target contacts with campaigns designed around their specific interests and actions. It makes it easy to look up specific contacts quickly, and to be able to market to them with a click.
We recommend creating a tag for every key group of contacts you’d like to send a message to. You can easily create any custom tag in Studio Pro CRM.
Some tags recommended for Realtors are as follows:
Buyer
Seller
Past Client
Hot list (contacts who are planning on purchasing within the next 3 months)
Warm list (contacts who are planning on purchasing within the next 3-12 months)
Hobbies: If you share specific hobbies with your contacts like Wine, Car, Travel or Sports teams.
Mother and Father are good tags so you can send Happy Mother’s or Father’s day cards.
Investor
Land
Commercial
Tagging by neighborhoods, zip codes and pockets might also be helpful.
Vendor: Used as a generic tag or the type of specific service they offer.

Creating Custom Tags
1. In the bottom left corner click your name and click Account Settings.
2. On the top bar of Account Settings, the second tab is Manage Tags.
3. From here you can add and delete custom Tags.
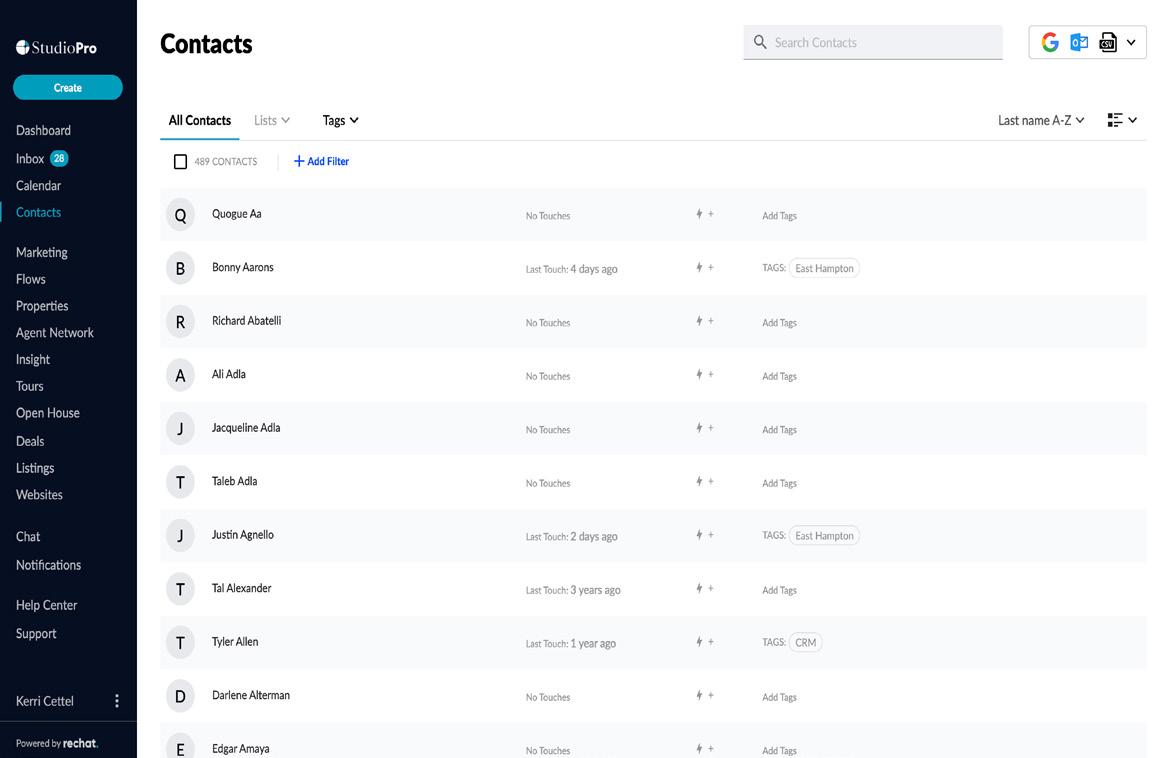
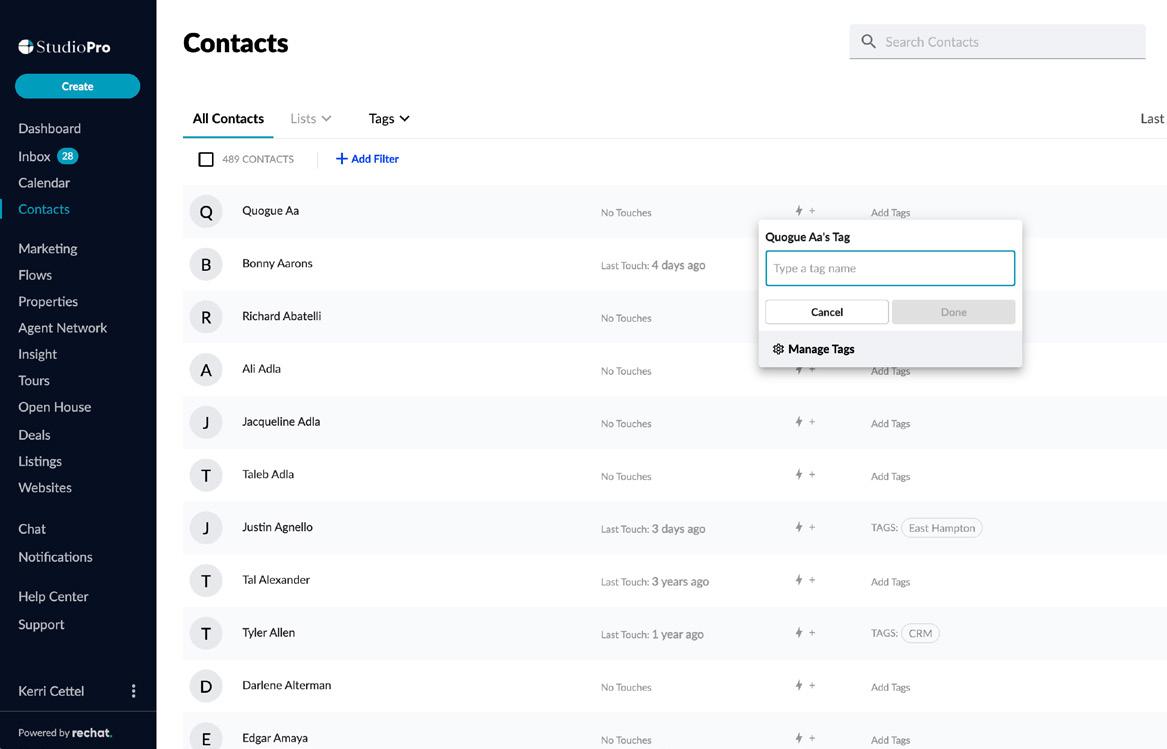
Adding Tags to Contacts
1. From the main menu click on Contacts. 2. Select the contact you want to tag by hovering over them and enabling the checkbox. 3. At the bottom of screen, a toolbar opens up. Click Tag on the toolbar. 4. A dialog opens up with the list of your tags. Select the tags you want to apply to contacts you selected. 5. Click Save.
Set It and Forget It Follow Ups
Setting follow-ups and acting on them is arguably the single most important activity you should do regularly in your CRM. In Studio Pro when you input the Birthday or Anniversary for a contact you can also select an eCard to be automatically sent to them for that event, every year, unless you go make an edit.
1. Go to a Contact’s profile where all of their details are saved 2. On the left hand column you can scroll to find all celebration dates for birthdays and anniversaries 3. Click on one to add the date 4. You can also select an eCard or press Change on top right to change it
You only have to come and update this if you want to change the card or message you are sending, otherwise you are set and your contacts will get the special message from you without you ever having to break a sweat. Studio Pro will automatically display birthday and anniversary reminders on the Daily and your Calendar.

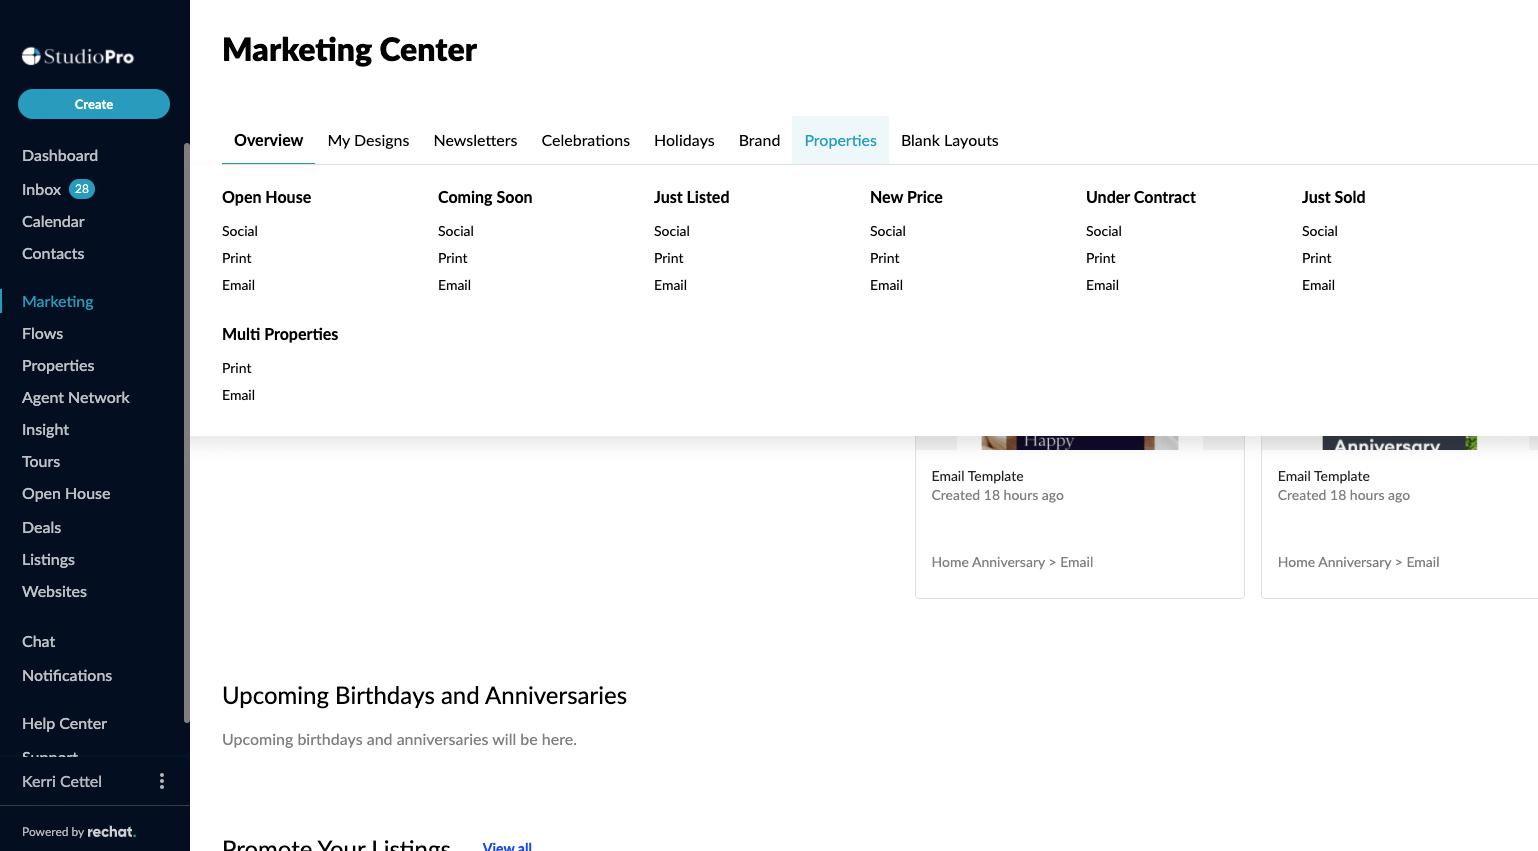
Marketing Your Listing
1. Click on Marketing in your main navigation menu. 2. Hover over the Properties tab on top to see the options available for each category and stage of the life cycle. 3. Select the category or sub-category that interests you, based on the stage of the deal and the type of marketing you are looking to do. 4. Select Customize on the template you like the most. 5. Select your listing: Studio Pro will display your deals and MLS listings, or you can search any listing from the MLS as well. 6. You are now inside of the design edit mode, and you should find your template in the middle of the page. If you selected an MLS listing, the information should be prepopulated and ready to go. 7. You can click on the template to make edits. If you click on a listing photo, you can quickly find all the other photos from the listing on the right column, both from MLS and Deals if you have uploaded photos there. 8. Once finished press Continue to get the compose view.
Tips
For Social Posts: Either text the design to yourself or download and share it.
For eBlasts: Choose where it is sent from and who you are sending it to. You can use tags and lists here as well.
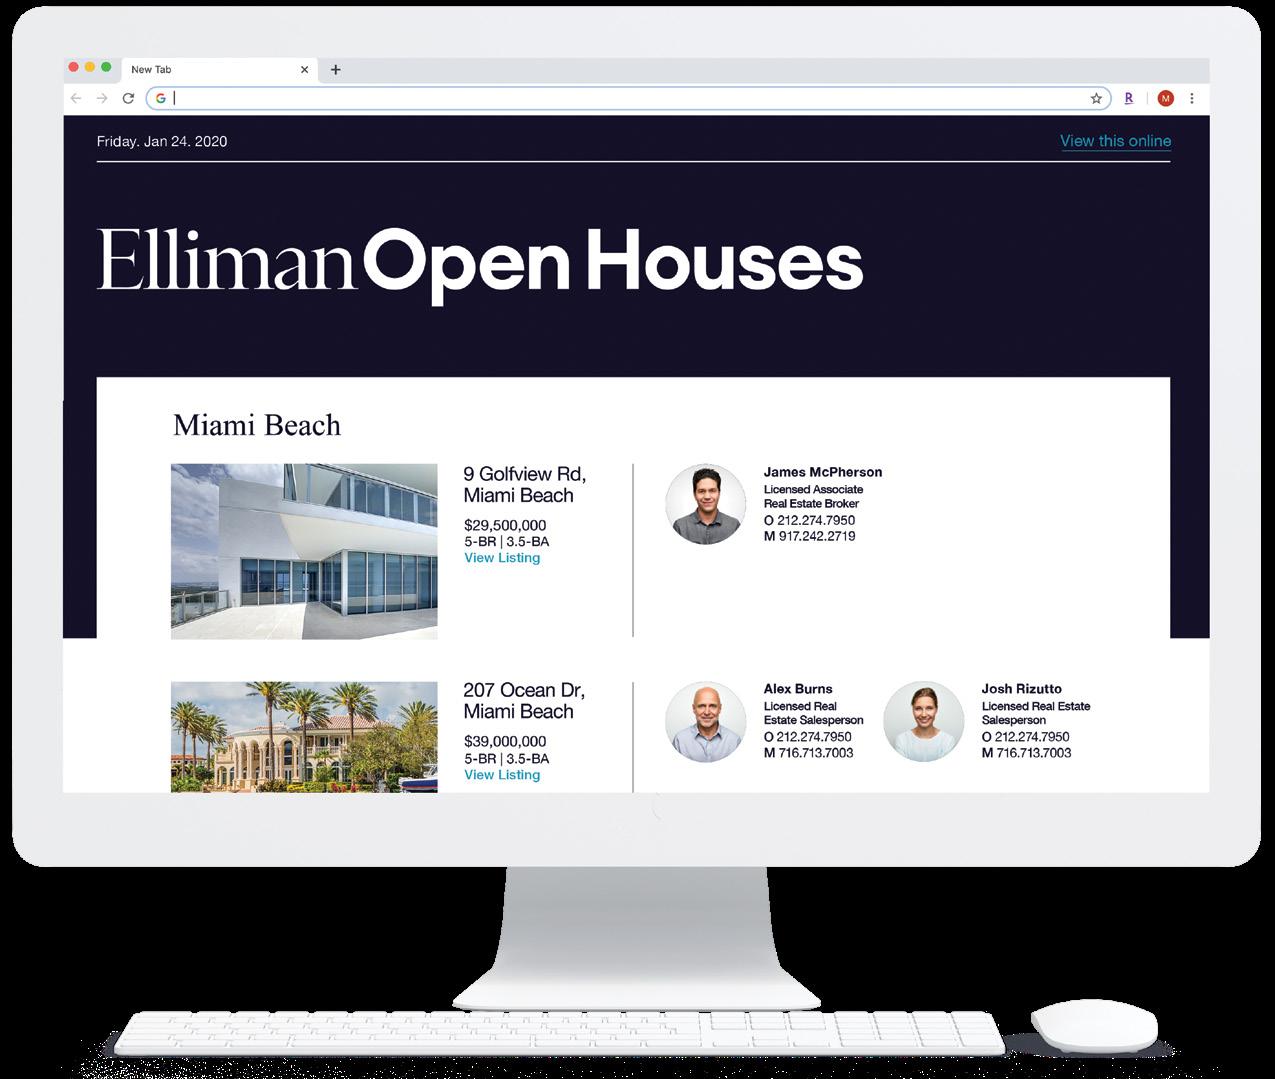
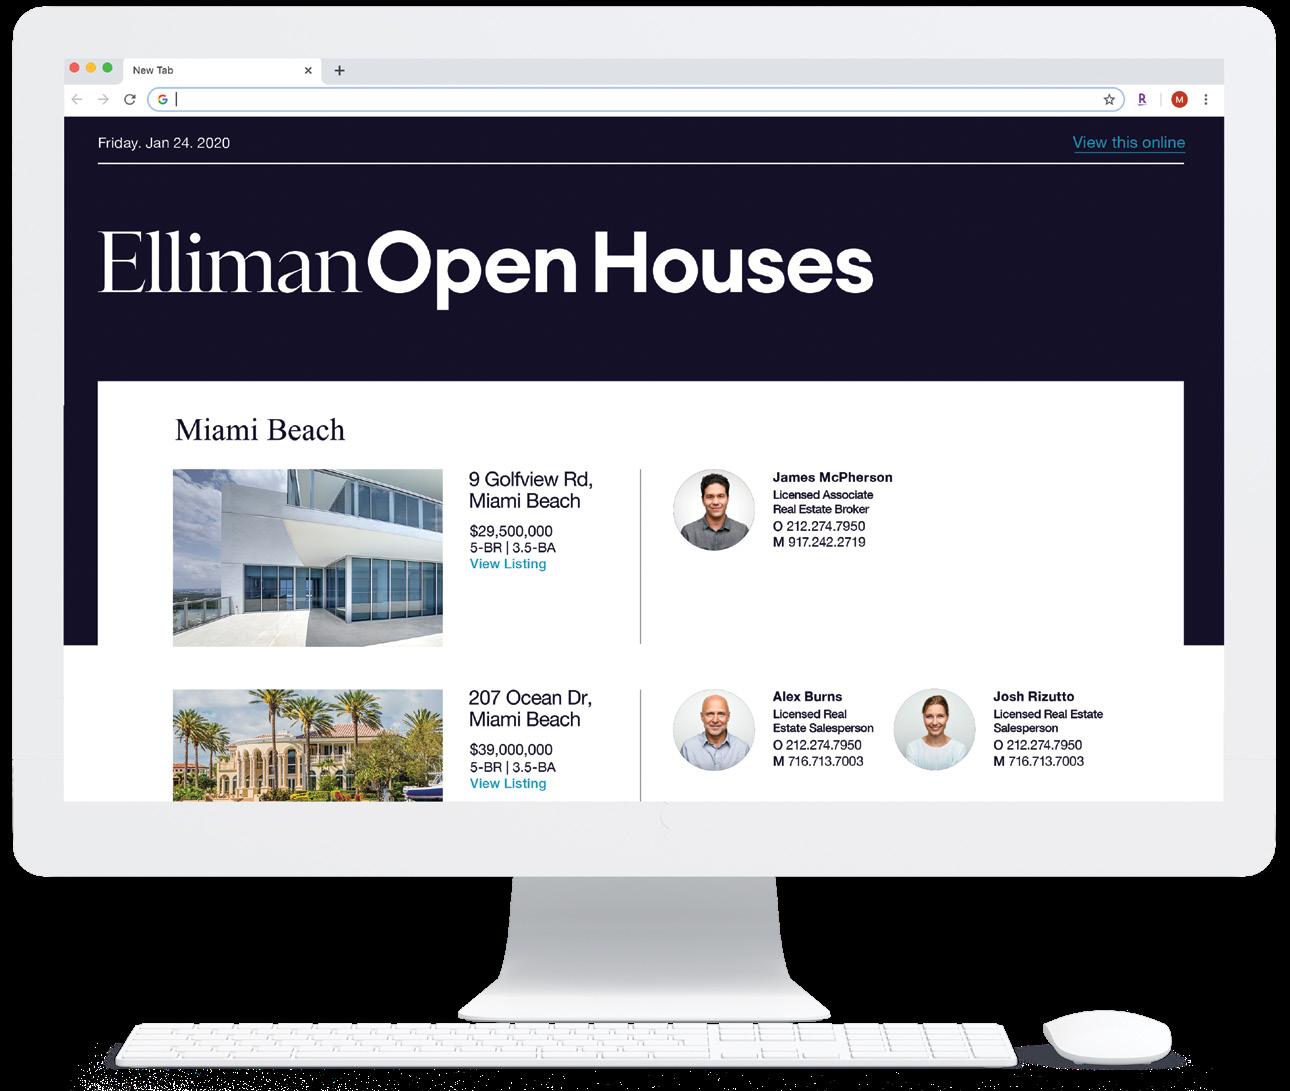
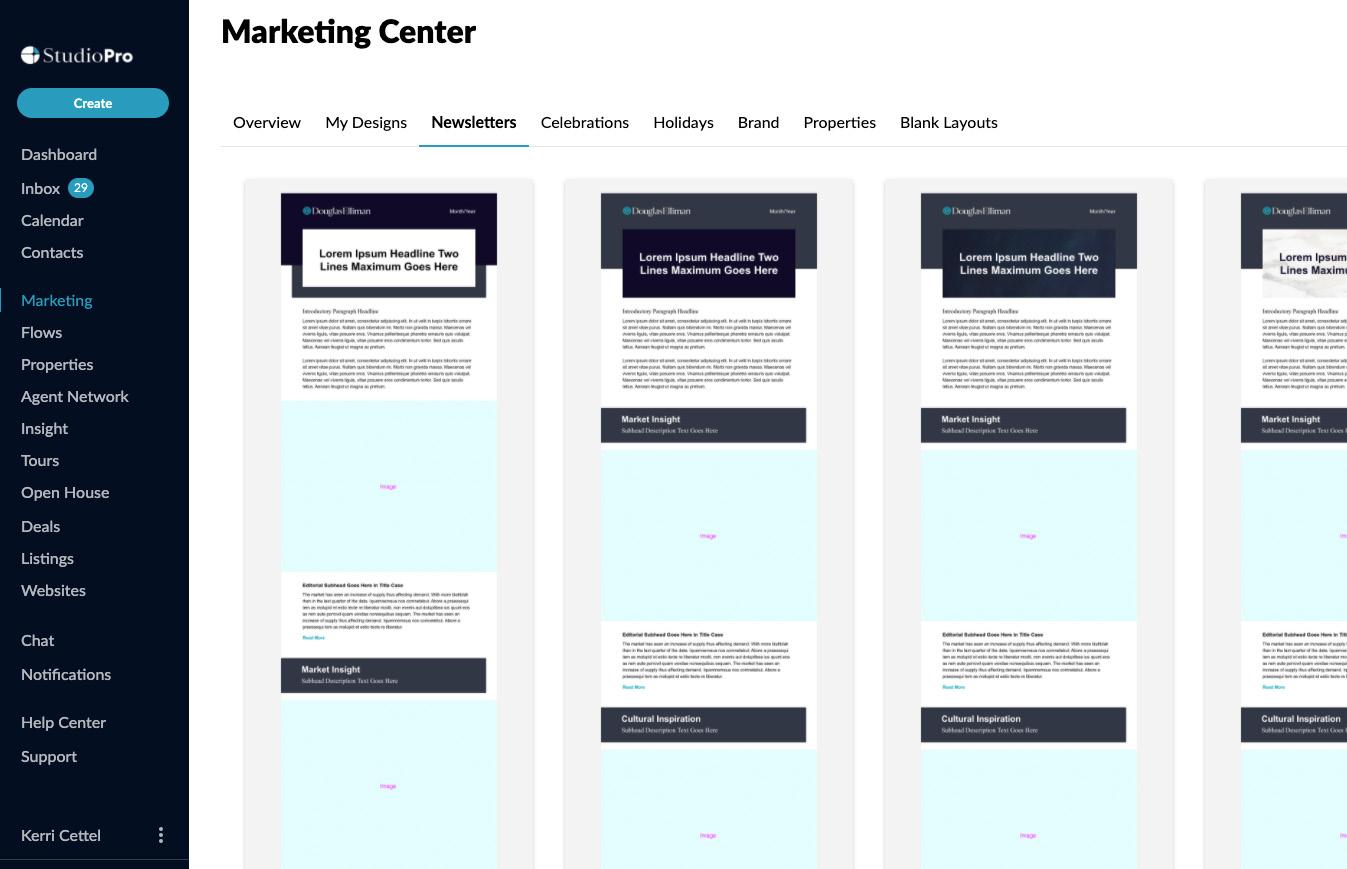
Multi Property Marketing & Newsletters
This category is quite popular and used by agents who are promoting and sharing multiple listings at the same time. Many agents use these templates for weekly newsletters they send out to their sphere, promoting different listings and open houses. 1. Go to Marketing on the main navigation menu. 2. Go to Newsletter tab. 3. Pick a template and press Continue. 4. Inside the design editor you can now use the Blocks* on the right side of the page to drag-and-drop whatever content you want to add to your newsletter and design a high quality custom template within a few minutes.
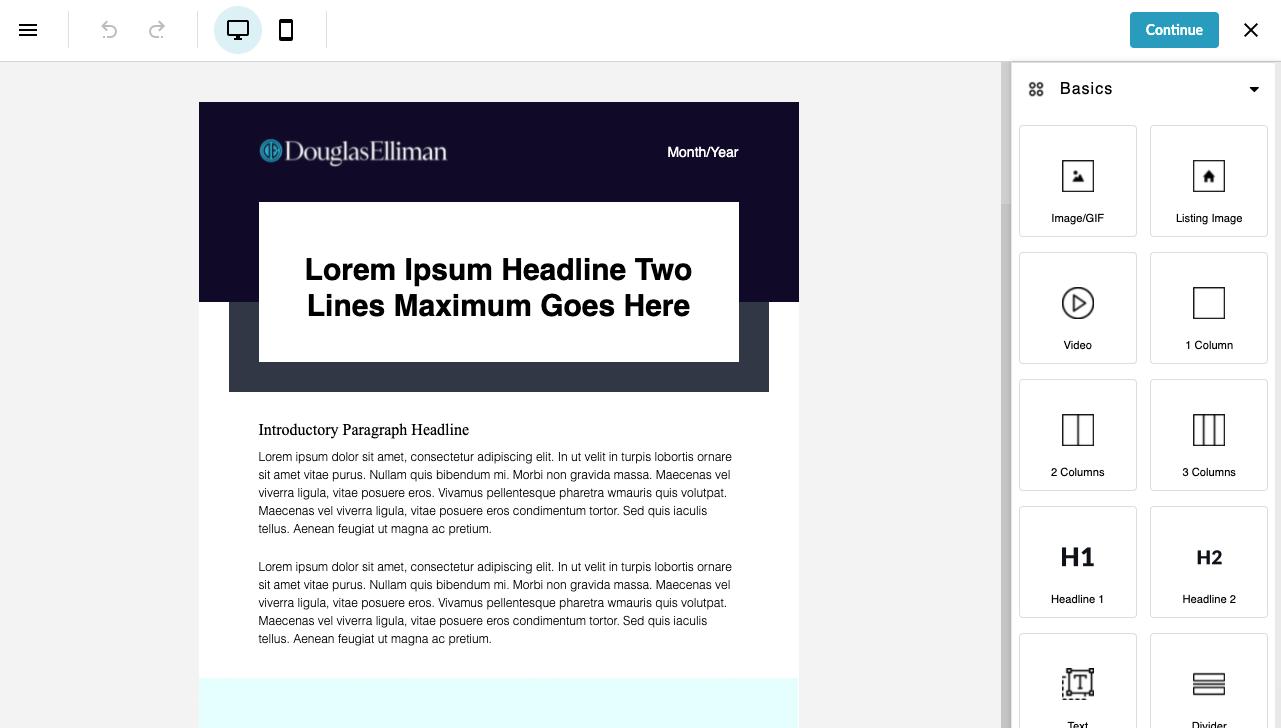
Customizing with Blocks*
Blocks are inside of the design editor and by dragging and dropping them you can add different content types and designs to your emails. The blocks are broken down into multiple categories, as listed below:
Basics: • Video block from YouTube and Vimeo
• Photo block: You can upload your own photo, but if your company has their own stock photos on Studio Pro you’ll find those under Team Library, or you can search our high quality photos and GIFs
• Text boxes
• Buttons
Listings: Different designs to add one or multiple listings to your emails. Once a listing is added, you can edit the info or click on photo to change it from the right side of the page.
Agent: This block will allow you to add yourself or another agent to your marketing piece.
Articles: Go to any blog, online magazine, paper or other content source and then paste the link into the Article block and have the information inserted into your eBlast.
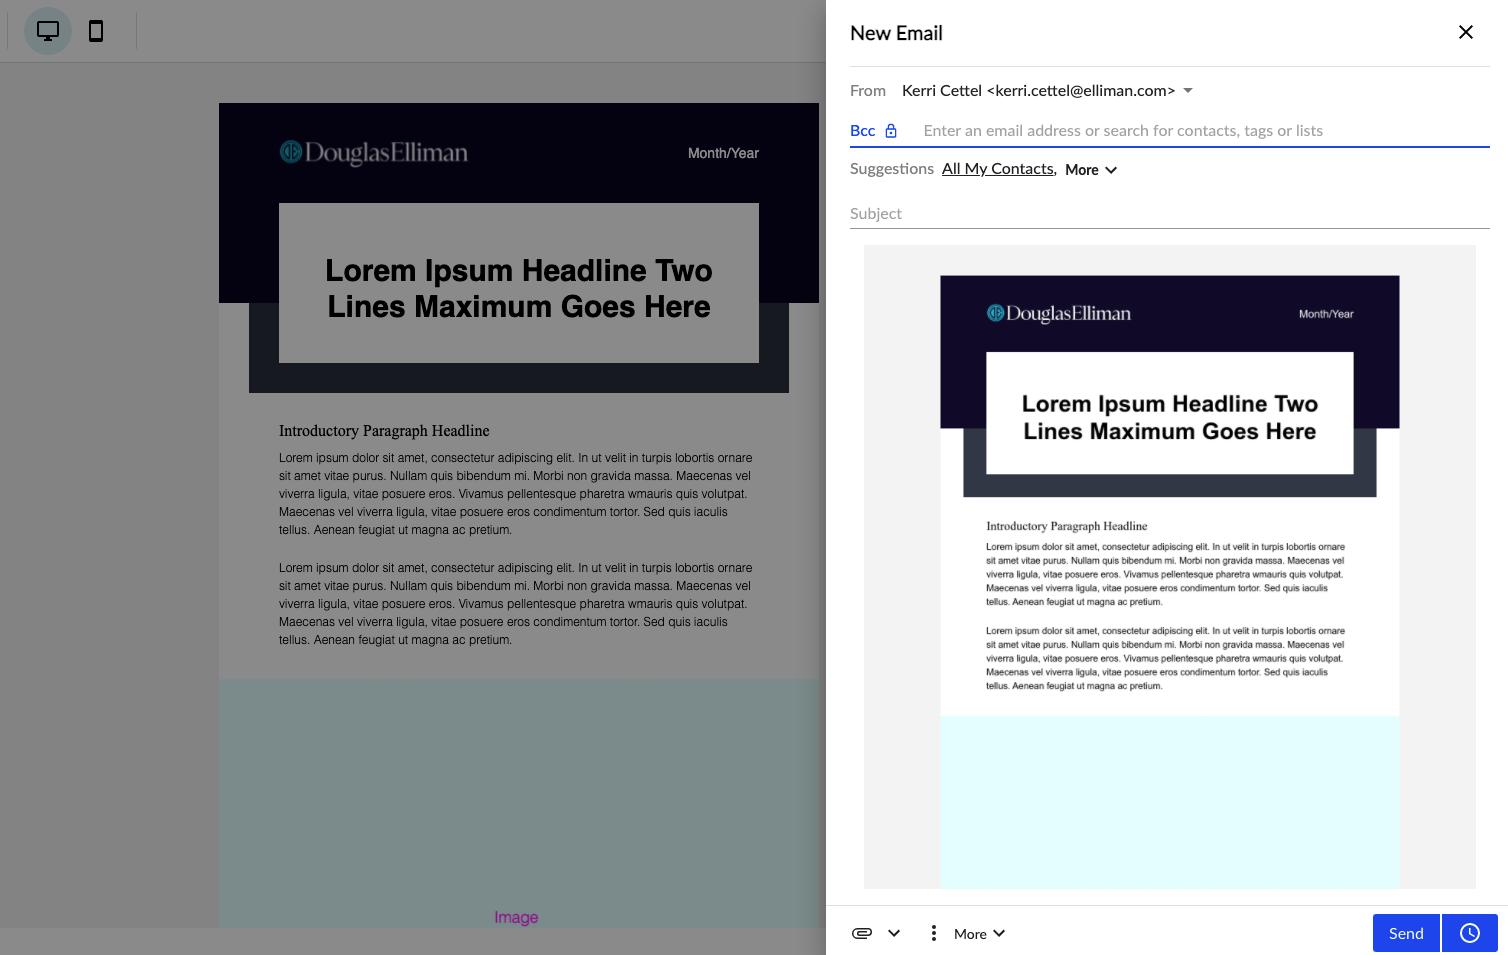
Test the Mobile View
Once you’re happy with your content, it’s always a good idea to check how your email looks in a mobile view. Studio Pro makes it super easy to do so. 1. On top of the page, there is a Phone icon to the right of the computer screen icon. Click on it.
2. The page will shrink down to size of a generic cell phone, showing you how it will look on a smaller device.
3. To go back to desktop view, click on the Screen icon. Make sure your email looks good on both a phone and a computer.
Scheduling and Sending Emails
Once your email is ready, click Continue on top-right of the builder. You can select recipients by: 1. Typing in any email address 2. Search for any contact within your CRM 3. Add all contacts within a certain Tag in your CRM 4. Add all contacts from your CRM You can immediately send or use the schedule button to send your blast out on a specific day and time.
Send / Schedule Buttons
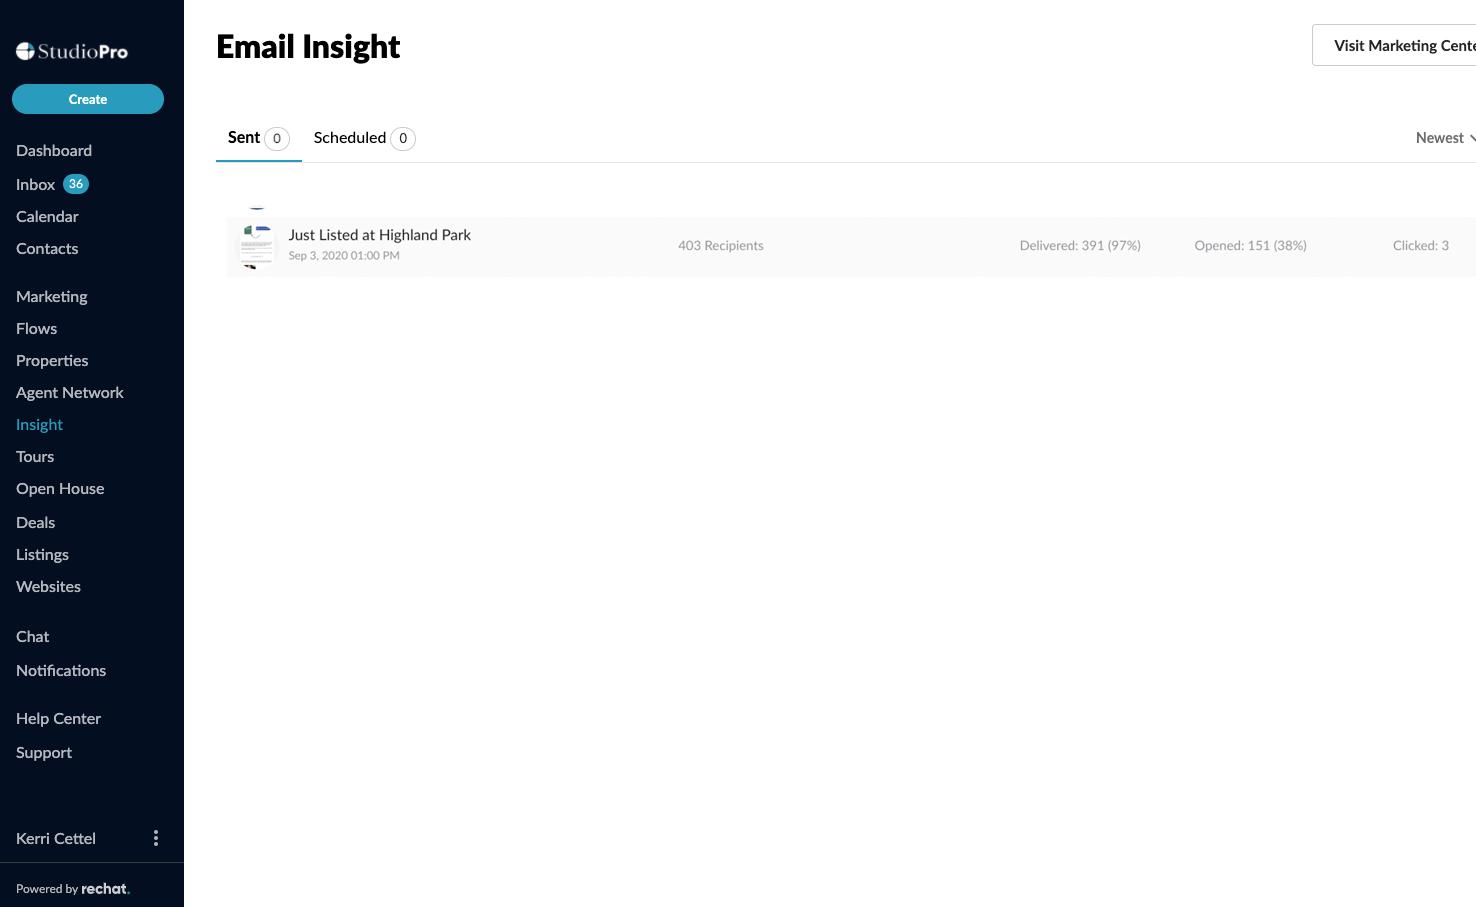
Get Insights
Once you send an email campaign, you can follow and see which emails were delivered, bounced, opened, clicked and unsubscribed.
In the example below, you can see that this campaign was sent to 403 recipients.
It was delivered to 391
It was opened by 151
And clicked by 3
Market your listings to nearby agents using the Agent Network
1. From the Agent Network tab, select a Listing or Address. You can search for an address or MLS# or select from your current listings. 2. After selecting a listing, you can view the list of nearby agents, and change the radius surrounding the listing you wish to promote. You can also select/deselect which agents to send to.
3. Once you have chosen your audience, you can select from a list of listing templates and add any customizations before sending your email.
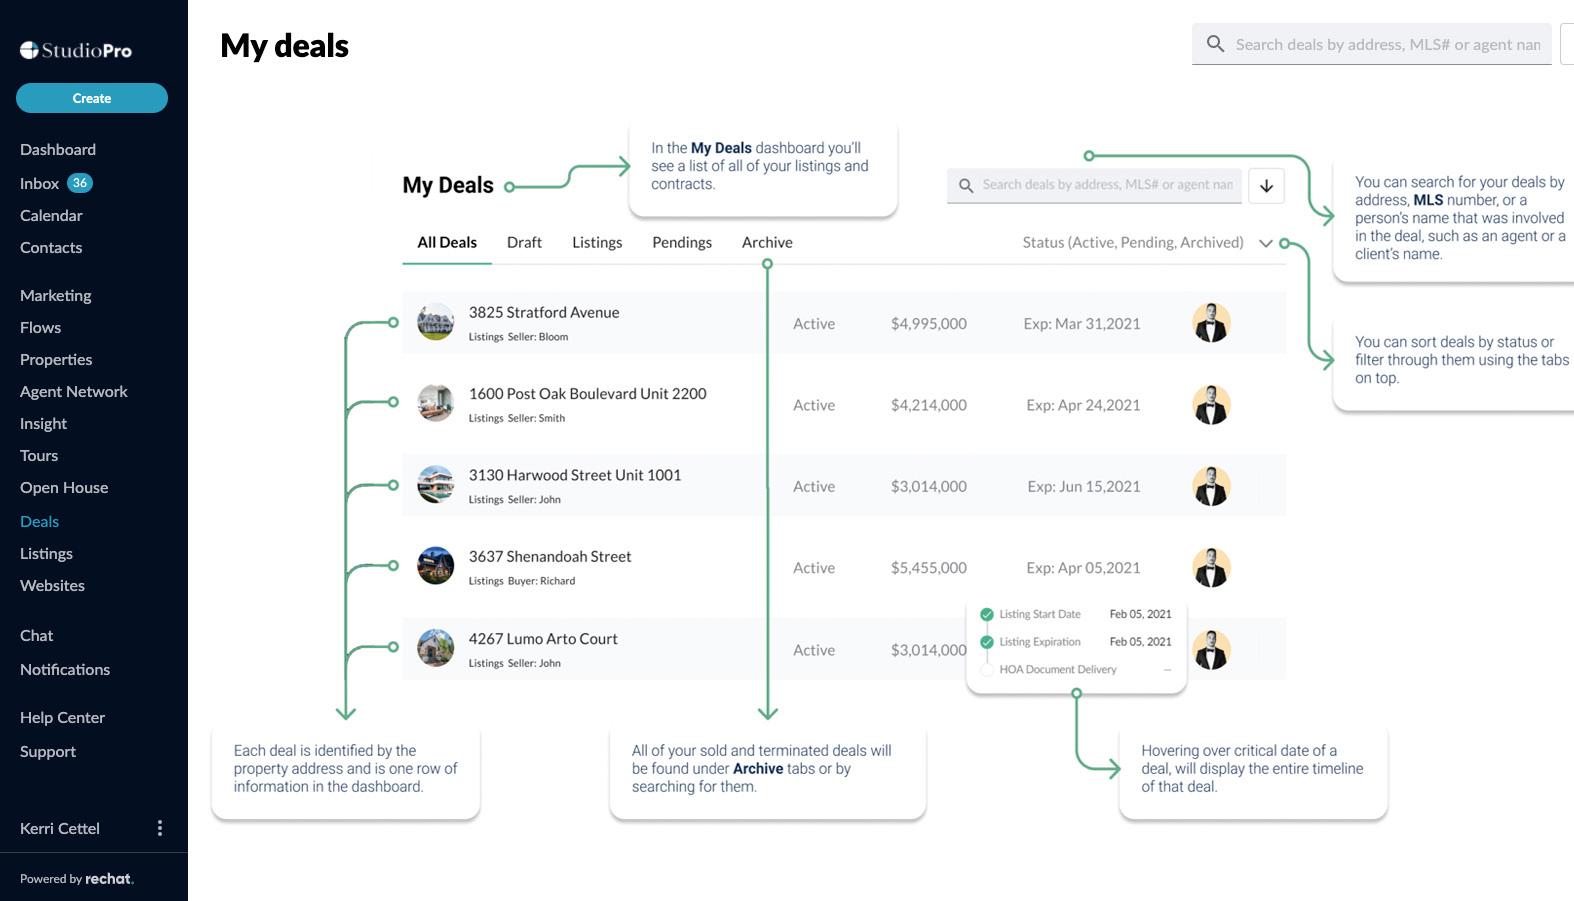
Deal’s Dashboard
With Deals you can manage listings for your sellers, and offers you receive on them, and contracts for your buyers. Inside of a deal you can manage your documents, complete forms digitally, send documents to clients for e-signature, and work with your back-office to get approvals to close your deals and get paid. 1. To access your deals dashboard, select Deals on your main navigation menu. 2. Under the My Deals tab you’ll see a list of all of your listings and contracts. 3. Each deal is identified by the property address and is one row of information in the dashboard.
4. Hovering over critical date of a deal will display the entire timeline of that deal. 5. You can search for your deals by address, MLS number, or a person’s name who was involved in the deal, such as an agent or a client name. 6. You can sort deals by status or filter through them using the tabs on top. 7. All of your sold and terminated deals will be found under Archive tabs or by searching for them.


Create A New Deal
1. To input a new listings, always start by Creating a
Deal. To do so, select the Create button in the main navigation menu and select Deal 2. You will then be asked a series of basic questions, similar to how you would interact with your assistant, to share the pertinent information on your listing. Address, type of property, etc.
Tips
You should have your contacts synced into your CRM first, so when creating a deal you can quickly look them up without having to retype all of their information.
Any information you add while creating a deal will later be used to populate your forms inside of that deal for you.
If you are creating a deal for a listing that is already in the MLS, you can simply select that listing and the deal will be autopopulated with the MLS information so you don’t have to retype it.

Deal Profile View
1. Inside of your deal you will find all of the key information about your listing and the required documents.
2. On top, you’ll find the property address and some key actions for your deal. 3. Once the listing is in the MLS, you can enter the MLS number right under the deal address, which would then connect your deal to its respective MLS listing and have its information auto-populated from the MLS.
4. Under the first tab, on the left side of the page, you will find all of your deal’s key facts such as the critical dates, key contacts, and key listing and contract information. This information will then be used to auto-populate the required forms in that deal. 5. On the right side you will find your Listing Folder which includes a list of recommended forms you will need to complete to meet compliance and close the particular deal you are working on. 6. The documents are listed in the order in which you would most likely need to complete them, and some are marked As Required by Your Office which means they are mandatory for that particular deal.
7. If you need a form that does not appear on the list, you can press on Add New Checklist Item at the bottom of your Listing Folder to then select any form you’d like or add a custom folder to upload your own documents.
Editing Forms in Studio Pro
1. Select the title of a form under the Listing Folder, or select the Edit Form button in front of the respective form. 2. You will then be able to see an editable version of the PDF document which you can edit right in your browser.
Collecting eSignatures
Once you complete one or more documents you can then send them out for e-signature right through your Studio Pro powered by Studio Pro app. Studio Pro is deeply integrated with Docusign. You will need to have your own DocuSign account to enable this feature. The first time you attempt to send your documents for signature, you will be prompted to log into your DocuSign account to have it connected to your Studio Pro account.
1. Once you save your updates on a form, you will then be presented with a DocuSign button in front of the form. 2. In the DocuSign compose view (as shown in the image below), you can select who should receive the documents, in which order if that matters, and also whether they are required to sign or are just being CC’d to get a copy of the files. 3. You can select Add More Attachments, to have multiple files sent to be signed together as part of one DocuSign envelope. 4. Once you are done selecting your documents, you will then see them opening up automatically within the DocuSign experience where you have all the usual DocuSign features to further make updates to the documents.

Tips
1. Studio Pro gives you real time insight into your documents and will let you know if they are being viewed or are signed. You can always void documents or make updates and resend.
2. Once the documents are signed, they will automatically be added to the appropriate folder inside of your deal for you, and if you had chosen to have your office notified (and your deal is visible to admin) then Studio Pro will automatically alert your admin for you once everything is signed.
3. It’s recommended to put yourself last in the order of signers so you get to see the final signed copy by all parties before signing it yourself.
4.Studio Pro is made for teams. Your assistant or other team members could send the DocuSign document on your behalf if they are doing the paperwork for you. They can choose the email sender inside the DocuSign compose view in Studio Pro.
5. Studio Pro will automatically put all signature spots on your forms for you so you don’t have to drag-and-drop signatures on the pages, saving you time and improving accuracy.
6. Studio Pro will wait until a document is fully-executed and then automatically notify your admintrative assistant to review it. This only works if your deal is visible to you admin.
Uploading Documents
1. You can drag-and-drop the documents into your deal which will prompt you to select where to save them and if you want to split them. 2. You can select Upload button in the Unorganized Folder inside of your deal. 3. You can forward the documents to the unique deal email address provided for each deal.
Any emails sent or forwarded to that email address will automatically import the documents into the deal for you. This email address can be found in the Unorganized
Folder section at the bottom of the deal.
Splitting Documents
If you are uploading one big scanned document which combines multiple files into one, you can then use the Splitter in Studio Pro to break your document into multiple documents and save them separately into your deal. 1. Select on Split 2. Then inside of the splitter view, you will find all the files from your document on the left column, and then you can drag and drop or select the files you want and have them moved to the right side. 3. Once finished press Save, to save it as a new file.
Messaging Back-office
All deals you create in Studio Pro are initially in draft mode and not visible to your admin. This will allow you to work with your clients and only make your deals accessible to your office when you are ready to do so.
1. In order to communicate with your admin, have them review your paperwork or do other things for you, you will first need to make your deal Visible to Admin. 2. On top of your deal, you’ll find the button you can use to make a deal visible. If you are missing any key information that your admin requires before reviewing the deal, you will be asked to input that information before being able to make the deal visible. 3. In front of each form there is a button with a drop-down that will let you Notify Office, which will send them a request to review that document within your deal. 4. In addition, there is a chat icon in front of each document that is the Activity Room for that document. Inside the activity room you’ll be able to see an audit trail of all activities on the particular document and also you have the ability to send messages to your office. 5. Your admin will review your documents that are submitted for their attention, and will either Accept or Decline them, which typically would include a comment as to why the document is being declined.
Manage Listing Photos
Within your deal you also have the ability to manage your photos so you have everything for your listing in one place.
1. To manage photos you have to select the Photo tab on top of the page. Any photos added to the deal will later be available to you when doing marketing for that particular deal.
2. You can drag-and-drop your photos into your deal, or select Upload. You can add captions to them or drag them around to arrange their order.
3. If your office inputs your listings into the MLS system for you, or if the marketing team needs high quality photos of your listing, this is a great way to manage and share them with your office.
4. You can use the Message Office button to communicate with your admin and notify them about updates you have made to your photos.
You can select photos you want and then press download at the bottom of the page, which will then download a zip file for you with all of the selected photos, in the same order you had sorted them inside of your deal.


Order Yard Signs
Make sure your deal is visible to admin so they can see your request.
1. Select Yard Sign 2. Choose the type of service you want 3. Leave your comments 4. Then notify your office
Tips
You can use the Open House registration page offline if you don’t have an internet connection where you are hosting the open house. Just have the registration page opened while you have internet prior to getting there, then have your laptop, phone or tablet, opened up and have walk-ins sign up. Once you get reconnected to the internet all of your leads will automatically be added to your CRM.
Make sure your deal is visible to admin so they can see your request. Post Open House on MLS
1. Select Open House button, then time and date. 2. Select Virtual and add the URL if it’s a virtual open house. 3. You will also be asked if you’d like to create a registration page for it, select Yes and Studio Pro will create a landing page you can use at your actual Open House to have everyone register right into your app instead of signing up on a piece of paper. 4. All leads you capture from the MLS registration page will automatically be added to your CRM and tagged as Lead and
Open House so you can reach out or market to them later.

Accepting Offers
1. In order to accept an offer on your listing, you will need to select the Accept Offer button on the top of your deal. 2. You will then be asked a series of questions about the offer, in the same question-and-answer format that you used to create your deal. 3. A new folder will then be added to your listing which will have the list of the documents that are required for the offer to be added.
Counter Offer
1. If you’d like to counter the offers you have received, first you will need to upload the document into Rechat as explained in the previous step. 2. Then move the document to the appropriate file in the Contract or Listing folder, and press DocuSign. 3. Inside of your DocuSign experience you will then be able to make any updates as you wish, add initials and send out to your clients for signature. 4. Once you are notified that the revisions are signed, you can then use the Email button inside of your deal to select the marked up documents and send it to the buyer’s agent.
Closing Out Deals
Once you have all required files completed and submitted to the office, you should see a series of green Approves across your folder, which means your deal can now be processed by your admin and the CDA production can begin for closing.