20 minute read
A Primer on Grease Testing for Performance and Condition Monitoring
Michael D. Holloway 5th Order Industry LLC Highland Village, TX
Max Martinis Whitmore Manufacturing LLC and Jet-Lube Rockwall, TX
Grease manufacturers use one set of tests to characterize greases and provide useful information for technical data sheets, while end-users rely on a different set of tests to monitor the condition of inservice greases. This paper begins with a review of grease chemistry. It then explores the tests that are used for each purpose – grease selection and condition monitoring of greased bearings. Conventional as well as new tests are presented.
Components
There are three components of a grease - the base oil, the thickener, and performance additives. Traditionally, the base oil was considered the major component. In many conventional greases, it can be from 70 to 95% of the grease. For this reason, many bearing manufacturers consider the base oil viscosity to be a predominant factor in grease selection and approval for their products. The fact remains that, with recent technological developments in the two other components (thickeners and performance additives), the base oil has become less of a determining factor and more of a component that can have synergistic effects with other components.
The second component is the thickener. This is what gives the grease its body. The thickener is typically how grease is characterized. Producing a thickener can be a complicated process. One manufacturer may attempt to produce one type of thickener for grease only to have it fall short in performance compared to other products of the same thickener type. The raw materials and the manufacturing process will dictate if a thickener will provide superior or marginal performance. Thickener types include simple metal soaps, complex soaps, synthetic organic thickeners, and inorganic gelling agents. Thickeners can account for between 2 and 40% of a grease formulation.
The performance additives incorporated into the grease formulation provide specific functionality such as rust and corrosion resistance, oxidation resistance, anti-wear characteristics, extreme pressure handling, and even improved lubricity. These chemicals, both solid and liquid, can account for between 1 and 25% or more of the final grease formulation, depending on what performance criteria and targets need to be met. Table 1 lists the various general types or classes of base oils, thickeners, and performance additives.
Table 1 Components
Grease Testing and Selection
Attempting to understand which grease is best for a given application can be a difficult task. Various controlled test methods have been established to make the selection process less painful.
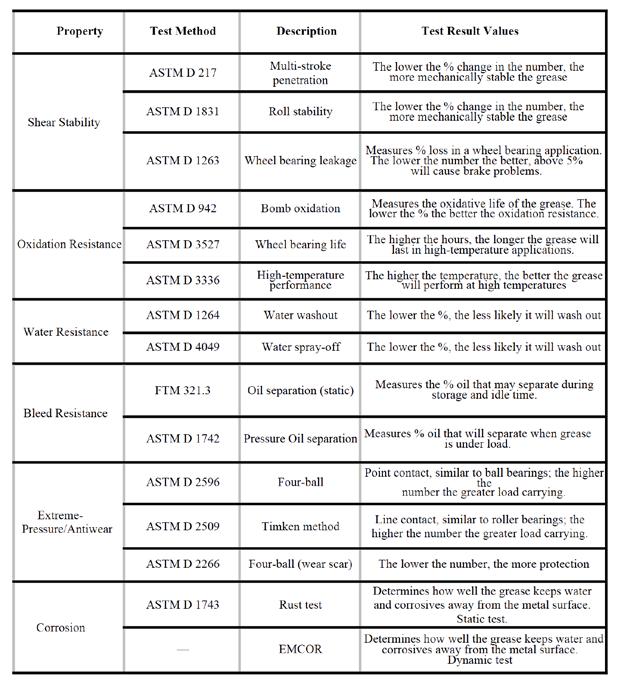
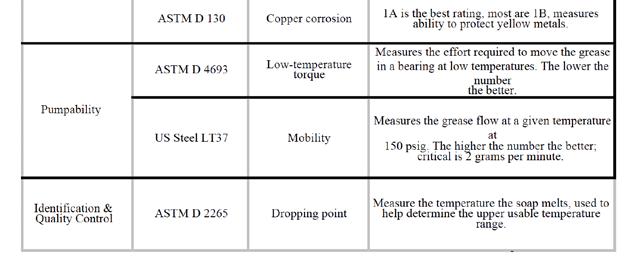
Standardized tests have been developed to provide for the determination and verification of performance characteristics of greases. A short list of the ASTM tests for characterizing grease is presented in Table 2. When selecting a grease for a specific application, the overall properties of the grease should be considered. Table2 describes the test methods and how to interpret the test results. It is essential that the end-user evaluate the data prior to using a grease in a given application. The grease supplier should provide the customer with the desired test results.
Table 2 Standard Tests


These tests only provide a roadmap for final selection of a grease product. In order to truly determine the best grease for a particular application, a field study must be carried out. Choosing the best grease for a field trial can be difficult if not exhausting. When evaluating the test data, it is helpful to develop a spreadsheet for easy comparisons. Table 3 is an example of such a comparison. There is a challenge in trying to understand which test or tests best mimic the actual environment that the grease will be experiencing. In order to make an accurate and informed decision on grease selection for any given application, a few tests stand out as good barometers of performance.

Table 3 Grease Comparison
Many facilities use several different greases, which can lead to costly misapplication mistakes. There has been a concerted effort to minimize the number of greases used in some facilities. This technique is known as lubricant consolidation. Maintenance teams are in search of a few greases to take the place of several that are being used.
Grease Applications in Principle
The primary function of grease is to separate two metal surfaces. This provides the best protection against wear. The grease will actually flow and create a fluid film layer between the two surfaces. The combination of oil, thickener, solid lubricants and performance additives work synergistically to lubricate and protect the part with a fluid film (Fig. 1). Under perfect conditions this will keep wear to a minimum. Conditions are not always perfect.
Fig. 1 Protective film

Under heavy load conditions, grease is squeezed and forced to the edges of the bushing or race. For example, as the bucket of an excavator smashes into asphalt, the bucket pin (journal) slams against the bushing with incredible force, squeezing the grease and creating a marginal lubrication condition. This is considered thin film lubrication (Fig. 2).
Fig. 2 Thin film

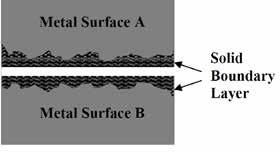
When grease is put under continuous extreme pressure by heavy use, the thin film breaks down. Lubrication becomes dependent on other components and not necessarily the oil component of the grease. In this scenario, the lubricant is under so much pressure that it is momentarily squeezed out to the point that only certain performance additives, such as anti-wear additives, shock load reducers, adhesive / cohesive polymers, extreme pressure additives, and solid lubricants, form a boundary layer between the metal parts. These performance additives fill in asperities and plate onto the metal surface where they produce a solid boundary layer film for protection (Fig. 3).
Fig. 3 Solid Film

Grease can be fortified with lubricating solids such as molybdenum disulfide or graphite while incorporating high concentrations of anti-wear agents and a lubricating thickener such as calcium sulfonate. This allows the grease to absorb shock and withstand pressure. The combination of various performance additives, lubricating solids, and lubricating thickeners can supplement the base oil and relieve it from carrying the total lubricating burden.
Addressing the various lubrication problems with grease performance solutions can reduce mechanical part failures dramatically. When selecting grease for an application, looking to solve the problem should be the main consideration. Table 4 summarizes probable causes of bearing failures and the type of damage they can create. Lubricant quality and performance play a very important role in the longevity of bearings and have a direct impact on almost all facets of failure modes.
Table 4 Bearing Failure Modes
Grease Applications in Practice
Various grease technologies are available that are designed to extend the operating life of the various components and help to decrease downtime, parts replacement, and labor costs. Greases are applied in many types of equipment where conditions can affect grease and cause problems: extreme heat, excessive pressure, water washout, and contamination all can degrade grease and leave the mechanical components unprotected. These problems, if not addressed, can manifest into equipment failure, resulting in downtime, parts replacement, and labor costs. The problems can be characterized in three main groups:

1. Excessive Load: force applied to a bearing or journal that exceeds the load carrying capability of the grease. The result: metal contact, premature wear, and increased heat.
2. Excessive and/or Localized Heat: operational heat that is generated during extended operation or localized heat that is generated as metal asperities collide, producing temperatures in excess of 2000 C. The result: breakdown of grease and cold welding (galling).
3. Contamination: mud, water, and steam can wash away grease, leaving metal unprotected. Dust, fibers, and abrasive particles can combine with grease and grind away metal. Acids, caustics, and cleaning solutions can break grease down and corrode metal. The result: premature wear and grease breakdown.
Lab Tests That Mimic Problems in Applications
Many ASTM tests are effective at fundamentally understanding the performance of grease. These tests are run in a controlled environment to reduce variables and provide reproducible results. Certain tests stand out as indicators of grease performance under specific circumstances. The selection of the following tests is the result of comparing test results with actual applications. The greases that demonstrate the highest performance in the following tests also have proven to provide the best protection, wear reduction, and overall lubrication. These tests only should serve to direct a decision and not be the deciding factor to choose a grease for a particular application.
Ball Weld (ASTM D2596) and Wear (ASTM D4172)
This pair of tests (Pic. 1) measures the ability of grease to withstand extreme pressure and provide protection from wear in a dynamic environment. Three steel balls are placed at the bottom of a fixture (Pic. 2). The fixture is filled with the grease of interest. A fourth ball is held in a chuck and rotated against the three balls. In D2596, a series of loads is applied to the fourth ball (Pic. 3). The load at which the balls begin to gall or seize is considered the weld point. In D4172, a single load is applied for a specific period of time, and then the size of the wear scar is measured. The higher the weld point, the more stress the grease can withstand. The smaller the wear scar, the better protection the grease will provide while under dynamic stress. These are perhaps the best test methods available for determining a lubricant’s ability to withstand load and protect from wear. Superior greases will have weld loads above 600 kg and scar diameters below 0.40 mm.
Pic. 1
4-Ball Test Instrument
Pic. 2
Test Balls in Fixture

Pic. 3 Forth Ball Held in the Chuck
Dropping Point (ASTM D2265)
This test determines the temperature at which the grease changes from a semi-solid to a liquid. A sample of grease is placed in a small sample cup with a thermometer (Pic. 4). The sample is placed in an oven (Pic. 5). The temperature at which a drop of oil comes out of the cup and falls to the bottom of the tube is the dropping point. Clay-based (bentonite) grease, also known as non-melt grease, does not exhibit a dropping point. At temperatures above 280 to 300 C range, the base oil may evaporate, leaving behind an abrasive clay. Table 5 compares the dropping points of various greases.
Pic. 4 Sample Cup and Thermometer
Pic. 5 Test Oven
Table 5 Dropping Point Comparison According to Thickener

Water Washout (ASTM D1264)
Measures grease resistance to washing out of a bearing. Grease is packed into the bearing and weighed (Pic. 6). A cover plate is placed over the bearing housing (Pic. 7). The bearing housing is then subjected to a water spray (Pic. 8). After the exposure, the bearing housing with grease is dried, then weighed again. The difference of the weight is recorded. The lower the value, the less grease has washed out and the greater the resistance to water washout.
Pic. 6 Bearing Ready to Be Packed

Pic. 7 Cover Plate
Pic. 8 Test Fixture
Bomb Oxidation (ASTM D942)
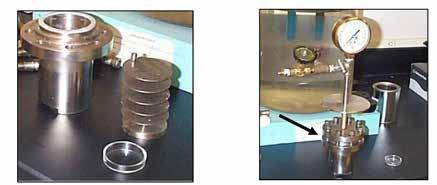
This test measures the oxidation resistance of a grease. This can be helpful in determining the storage life as well as application longevity. Glass dishes holding the grease samples are placed on a rack and put inside an airtight chamber or “bomb” (Pic. 9). The sample is heated to 100 C under 100% oxygen and 110 psi measured with a pressure gauge (Pic. 10). As the grease sample oxidizes, oxygen is absorbed and reacts with the base oil and other ingredients, which causes the pressure to drop. The lower the change in pressure, the slower the oxidation and the longer the grease will last in applications.
Pic. 9 Bomb and Samples

Pic. 10 Pressure Gauge
Table 6 Oxidation Resistance According to Thickener

Worked Penetration (ASTM D217, ASTM D4950, ISO 6743-9)
These tests measure the change in grease consistency after it has been physically stressed. The test vessel (Pic. 11) is filled with grease and a stress plate is screwed on to the vessel. The vessel is then placed on a mechanical unit that “works” the grease for a predetermined number of strokes (Pic. 12). The consistency of the grease is then measured using a grease penetrometer (Pic. 13).
Pic. 11 Test Vessel and Work Plate
Pic. 12 Working Unit
Pic. 13 Penetrometer
To measure grease consistency, the sample holder is filled with grease and put onto the cone penetration unit. The cone is dropped down into the grease. The penetration value is determined by measuring how deep the cone sinks into the grease. The harder or ‘heavier’ the grease, the lower the number; the softer or ‘lighter’ the grease the higher the number. NLGI has designated a range of values for the depth of penetration of the cone in tenths of a millimeter at 25 C. Table 7 represents the penetration values for the various grades of grease.
Table 7 NLGI Penetration Table [1]

The NLGI 2 grade is the most popular grade. The NLGI 1 is used primarily in climates below 0 C or in centralized lubrication systems where grease pumpability through narrow passages may be difficult. The “ought” or 0, 00, and 000 greases are used in special bearings and certain gears. There are 4, 5, and 6 grade greases that are very thick and have very specialized applications.
Additional Tests
There are a few tests that do not represent an application environment or are affected by test variables that skew the results. One test is the Timken OK Load Test, which was developed many years ago by the Timken Bearing Corporation to evaluate cutting fluids. Over the years, it has been used to evaluate load carrying capacity of lubricants.
This test uses a tapered roller bearing race mounted on a rotating spindle (Pic 14). The race rubs on a test block, which is mounted on a movable arm (Pic. 15). The arm acts like a cantilever with a weight on the other end to produce a force on the race (Pic. 16). Grease is continuously fed into the contact area as load is applied (Pic 17).
Pic. 14 Spindle
Pic. 15 Test Fixture

Pic. 16 Applied Load
Pic. 17 Purging Grease
The Timken OK Load Test is run for ten minutes, after which the race and block are examined for scars. If the race and block pass, the test is run again at an increased load. This sequence is carried out until the test pieces show signs of failure.
There are several shortcomings to the Timken OK Load Test. First of all, there are very few, if any, applications where fresh grease passes continuously through the bearing or journal. Secondly, it is
difficult to determine the true onset of the scoring. It is only after each test sequence that the bearing and test blocks are examined.
The results obtained from this test do not correlate to those of the 4-Ball Test. According to statistical analyses, the precision of the Timken Test is limited. Repeatability refers to the difference between successive results obtained by the same operator with the same apparatus under constant operating conditions on identical test material. The repeatability for this test is 30% of the mean value. Reproducibility is defined as the difference between two single and independent results obtained by different operators working in different laboratories on identical test material. The reproducibility of this test is 70 % of the mean value.
Another test that produces questionable results is the portable FLC Lubricating Tester (Pic. 18). A small journal is held against a rotating race (Pic. 19). Load is applied as the race is rotated. An ampere meter is used to measure the energy requirements needed to spin the race at a prescribed rate. Force is applied manually on the journal. There is also a torque-measuring device located on the force arm. The force arm torque is adjusted by a turnbuckle (Pic. 20). Failure occurs when the amperes exceed acceptable limits or when the lubricant film ruptures, resulting in seizure.
Pic. 18 FLC Test
Pic. 19 Bearing Load

Pic. 20 Adjustable Resistance
Results from the FLC Tester can be manipulated by varying the rate of torque on the force arm. A slow increase will produce one set of results, while a rapid increase could produce a different set of results. Also, by rapidly increasing the force, a grease containing molybdenum disulfide will quickly plate or “burn” onto the surface. Furthermore, if the force is rapidly increased at the beginning of the test, then the test block will actually last longer at higher loads, thus producing a deceptively high indicator of lubricating performance.
Grease Selection - Properties vs. Functionality
The following steps can be used as a template for making an informed and accurate decision about grease selection. Consider the following:
Environment –Where will the equipment typically operate? • High, dry heat (above 65 C) • High, moist heat (above 65 C) • Low temperature (below 0 C) • Steam – direct or indirect • Submerged in water (fresh or salt)
Sand, grit, loose dirt Drastic temperature fluctuations Acids, caustics, solvents
Conditions – What are the operating conditions? • Heavy loads • High speeds • Continuous shocks • Dissimilar metals in bearings, bushings, or journals
Also consider the fact that, if several different greases are being used at one facility, a misapplication is likely to occur at some point. In certain cases, some greases may be incompatible. Mixing incompatible greases may cause an immediate failure. Table 8 summarizes the various grease technologies. This table may prove valuable in making informed choices.

Table 8 Grease Technology Comparison

Condition Monitoring of Grease
After a grease is in service, it undergoes changes due to contamination as well as extreme operating and environmental conditions. Several tests have been developed that can determine the health of grease as well as provide warning signs of impending bearing failure. These in-service tests can help identify misapplications, wear conditions, contamination, and potential grease failure.
Consistency
The consistency of grease can change – harden, soften, or dry out – during service. It can be difficult to collect a large enough sample of in-service grease for a cone penetration test. Instead, a specially designed, patented device can be used to collect and test a small grease sample from an application such as a port on a machine. Then a laboratory instrument can be used to measure the applied load to extrude grease at various speeds through an orifice slot. Test results can be compared with data for fresh grease to determine whether there has been a change in consistency.
Contamination
FTIR and other spectrometric techniques are utilized to determine whether grease has been contaminated by other greases, water, other fluids and particles.
Oxidation
The onset of oxidation (the point at which the base oil begins to polymerize) can be measured with several tests. Measuring the residual functionality of antioxidants in the grease through various methods can determine if the re-greasing interval is sufficient for the equipment. FTIR can also be used to measure the progression of oxidation through the development of a peak indicative of the hydrocarbon crosslinking and the development of the essential polymer structure.
Colorimetry
Colorimetry testing utilizes a patent-pending method that includes a visible light spectrometer, a light-path sample cell, and a thin-film grease substrate to gather a visible light spectrum (from 400 to 700 nm) of the grease sample. This method can be used to validate observed appearance changes in greases such as darkening due to aging or overheating, characterize use of dyes in formulations of new greases and even approximate concentrations of certain particulate contaminants such as coal dust.
FTIR
FTIR is used to ‘fingerprint’ the molecular bonds and chemistry of a grease. A thin strip of grease can be analyzed by the beam of an FTIR. Similarly, this is done with the baseline grease. The two spectra are overlaid, and the analyst looks for differences between the two. Oxidation and grease mixing are detected through this methodology.
RDE Spectroscopy
In Rotating Disc Electrode atomic emission spectroscopy, a grease sample is dissolved in solvent and analyzed with the RDE. This method is useful for detecting certain wear particles such iron and Babbitt particulates as well as additive elements that could point towards grease mixing. By comparing element levels to the original baseline of fresh grease, the presence of other greases and wear metals is easily detected.
Sweep Voltammetry
Sweep voltammetry refers to an instrument that works on the principle of linear sweep voltammetry. A small grease sample is mixed with a solvent, and a variable voltage is applied to the solution while the current flow is measured to determine the concentrations of antioxidants remaining in the sample, which indicate the remaining useful life of the lubricant. This test can be used to monitor antioxidant levels to determine if the re-greasing cycle is appropriate. The test is now being evaluated to understand the remaining useful life of anti-wear compounds that behave like antioxidants due to their polar nature.
Wear
Wear testing detects the amount of ferrous debris and other wear metals in the grease.
FdM+
The FdM+ is used as an overall monitoring device to detect wear particles. This test uses the idea of the Hall Effect to determine the amount of ferromagnetic material present in the sample. This is used a general flagging test to identify samples with excessively high levels of wear particles. Generally when the sample contains 5,000 ppm iron or higher, analytical ferrography is recommended.
Analytical Ferrography
Analytical ferrography is used as an advanced test to determine the amount, shape, composition, and wear severity of the particulates in a sample. A grease sample is dissolved in a solvent and poured through filter paper to collect debris particles. The solids on the filter paper are examined under a microscope. Their size, shape, color, as well as certain chemical characteristics are examined by an analyst against a database and other samples. Often, this approach can be used to quickly determine the root cause to a failure or identify the onset of a potential failure.
Rheometery
Rheometer testing is used as an advanced method to examine the consistency of grease. Using a cone and plate rheometer, normal force measurements can be used to determine oscillation stress, recoverable compliance, and other values.
Conclusions
Several basic tests and advanced methods are used to understand the properties of in-service greases and determine the performance levels of various greases. Care should be taken when assessing which grease is appropriate for an application. Data comparisons are highly suggested.
References
Lubricating Grease Guide, National Lubricating Grease Institute, Fourth Edition, Kansas City, Missouri, USA, 1996. Gunther, Raymond C., Lubrication, Chilton Book Company, New York, 1971. Grease Making Chemistry, Advanced Course Lubricating Grease Education Program, National Lubricating Grease Institute, A.P. (Tony) Wenzler, 1999. 2002 Annual Book of ASTM Standards, Section 5, Petroleum Products. E.R. Booser, Editor. Handbook of Lubrication. CRC Press, Inc. Vol 1,2, 1984. Kowalik, G., Janosky, R., Advancements in Grease Sampling and Analysis Using Simple Screening Techniques, MRG Navigator, 2016. Wurzbach, R., Williams, L., Doherty, W., Methods for Trending Wear Levels in Grease Lubricated Equipment, Society of Tribologists and lubrication Engineers (STLE) Annual Meeting, Las Vegas, NV, USA, May 2010.


