Creating Textures and Patterns with Art Markers
In the realm of the visual arts, texture is a vital element that adds depth and realism, drawing the viewer's eye into the piece and encouraging them to engage with the artwork. While the texture is often associated with tactile, physical art mediums like oils, acrylics, or pastels, art markers offer a surprising degree of versatility in this arena.
This article aims to explore the different techniques for creating texture and patterns using the humble yet dynamic art marker.
Art markers, known for their vibrant, uniform hues, and smooth application, may initially seem an unlikely candidate for creating a textural masterpiece. However, the secret lies not in the ink itself, but in the techniques used to apply it. Whether you are using alcohol-based, water-based, or paint markers, there are numerous strategies you can employ to add depth and character to your work.
Layering: Building Texture Through Color
Layering is a fundamental technique for creating texture with art markers. By applying one color over another, artists can create an array of visual effects, from simple shading to complex, multidimensional textures.

Light layers can be used to suggest subtle texture, while multiple, heavy layers can give the impression of a more pronounced, tangible surface.
Stippling: The Art of Dots
Stippling involves creating a pattern or texture with closely-spaced dots or specks. This technique is ideal for areas that need texture but not necessarily distinct lines, such as skin, fabric, or foliage. By varying the size and distribution of the dots, artists can control the intensity and depth of the perceived texture.
Hatching and CrossHatching: Masters of Shadows
Hatching is a technique that involves drawing closely spaced parallel lines, while cross-hatching employs intersecting lines.
These methods are fantastic for creating shadows, suggesting form, and adding depth. By varying the distance between lines and the angle of intersecting lines, one can create an array of textural effects.
Scumbling: A Dance of Colors
Scumbling involves scribbling or doodling loose, circular motions to build up color and texture. This technique can create an impression of roughness or complexity that works well for areas such as gravel, rough stone, or textured fabric.
Dry Brush: Rough Around the Edges
Though typically associated with paint mediums, a modified dry brush technique can be used with art markers for a textural effect.
By using the edge of a chisel tip marker with a small amount of ink, artists can create a grainy, rough texture that is perfect for areas such as weathered wood, rust, or coarse fur.
Gradients: The Smooth Transition
A gradient, or the smooth transition from one color to another, can suggest texture and depth. This can be achieved by slowly layering one color over another or using a blending marker. Gradients are particularly useful for suggesting curved or rounded forms.
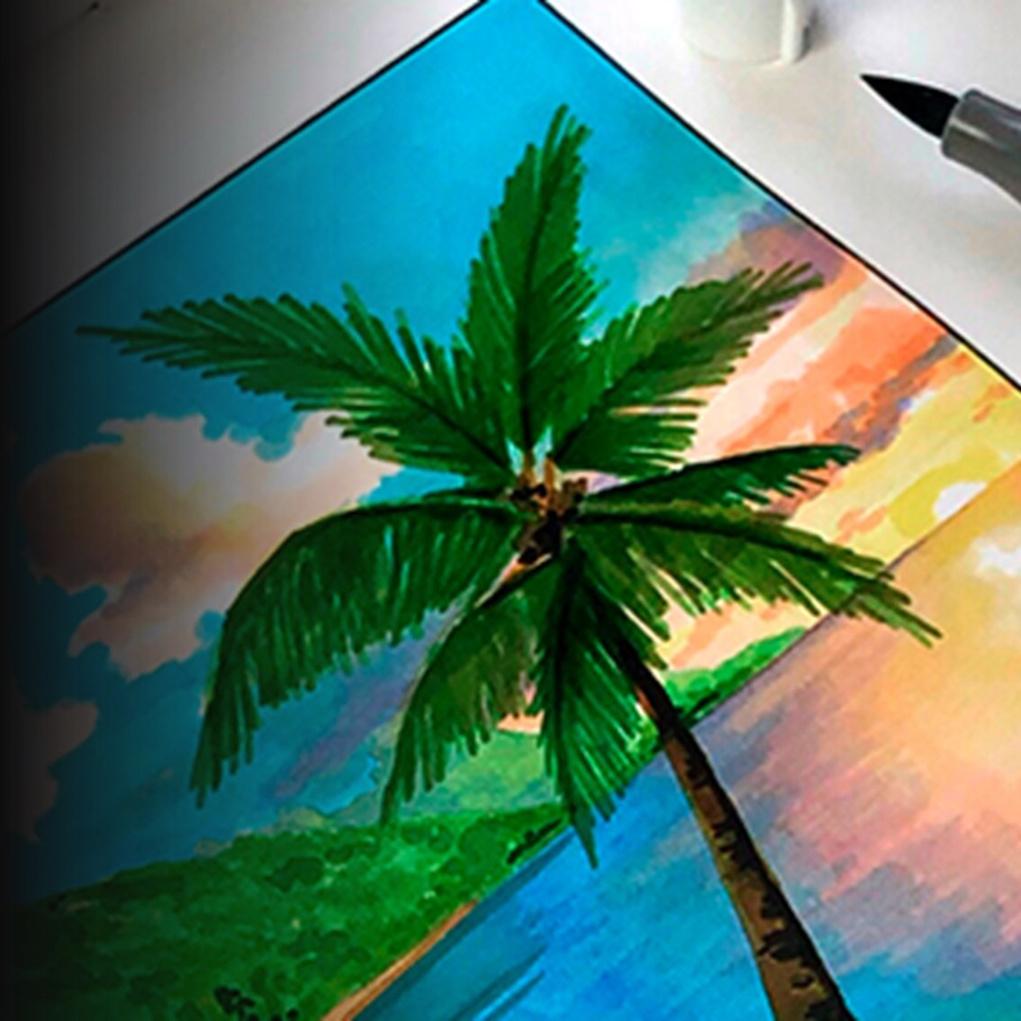
IllustrationCreating a Textured Seascape
As a case in point, let's explore how we might use Ohuhu Brush Markers to create a vibrant, textured seascape.
The ocean, with its ever-changing surface, offers a prime opportunity for demonstrating texture. To start, use a light blue marker and employ a scumbling technique to create the base layer of water. These loose, circular motions will create a rippled water effect, mimicking the movement of gentle waves. For areas of the sea that are farther away, use hatching with a slightly darker blue, creating the illusion of depth and distance.
Now, let's add some waves. Take a white Ohuhu Brush Marker and using a modified dry brush technique, lightly graze the chiseled edge over the surface to create the frothy caps of waves. Don't completely saturate the area with colorthe key is to let the paper show through slightly, mimicking the sporadic nature of sea foam.
Next, you might depict a rocky shoreline in the foreground. Use a selection of earth-toned markers and employ stippling to represent the uneven, granular texture of the rocks.
Finally, to create a gradient sunset sky, start with a deep orange at the horizon line, slowly blending into a lighter orange and then into pink and purple. With the Ohuhu Brush Marker's flexible nylon brush tip, gently layer the colors, overlapping as you transition from one to the next. The smooth gradient will create an illusion of a vast, open sky, thereby adding depth to your seascape.
Through this example, we see how Ohuhu Brush Markers, with their versatile brush tips and vibrant ink, can be manipulated to create a textured piece full of movement, depth, and life. The flexibility of these markers truly allows artists to push the boundaries of texture creation.