4 minute read
Don’t Hesitate to Renovate


Let There Be Lift! Installing an engine hatch lift.
Choose hatch lift components that are constructed of marine-grade material (such as stainless steel) and are robust enough to withstand the loads placed on them.
We need back up!
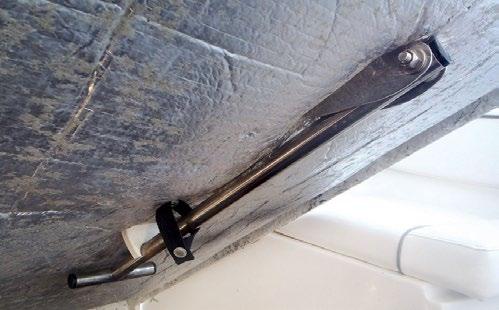
Every engine hatch should have a backup strut, regardless of the type of actuator used. If the actuator fails while the hatch is open, cracked heads or lost digits can be the result. One option is a kickstand-type unit — one that unclips from the underside of the hatch, pivots down and rests solidly against the deck or hatch drain channel.
CAPT. FRANK LANIER is an award-winning journalist, boat maintenance guru and owner of Capt F.K. Lanier & Associates, Marine Surveyors and Consultants: CAPTFKLANIER.COM. A dding an engine hatch lift is one of those rare upgrades that covers the holy trifecta of boat project goals: Added convenience, increased safety and easy installation. Engine hatches are heavy and awkward to handle under the best of conditions, but even more so in rough weather. Here’s a look at the basics of selecting and installing one.
Types of actuators The first step in selecting a linear actuator (a fancy term for the hatch ram) is determining which type best suits your needs. While electric actuators are probably the most popular, you can also choose from mechanical, pneumatic and hydraulic units.
Electric actuators convert rotary motion to linear motion using an electric motor. They’re the simplest actuators to install and one of the cleanest, as they don’t require oil or gas to operate.
Mechanical actuators also convert rotary to linear motion; however, unlike electromagnetic units they do so using mechanical means (gears, screws, chains, etc.). As a result, they tend to be more powerful than electrical units and a better choice for high-torque installations.
Pneumatic actuators utilize pressurized gas or oil. The cylinders used in pneumatic (as well as hydraulic) actuators inherently produce linear motion. Pneumatic actuators provide rapid raise, lower, start and stop capabilities, making them a good choice for installations requiring high-speed operation. On the downside, they’re less efficient than mechanical or electric units and require more space. They’re also noisy and prone to leaks.
Hydraulic actuators utilize oil and are primarily used for applications where high force and output are required. They provide more precise control than pneumatic units. Hydraulic actuator cons include oil leaks, slower operation speeds and the need for ancillary equipment (pumps, fluid reservoirs, etc.), as well as the extra space required to install them.
Sizing the actuator The weight of your engine hatch determines how much force the actuator has to provide. The most accurate way to determine this is to remove the hatch and weigh it. If that’s not possible and you have to guesstimate the weight, be sure to err on the side of caution and go heavier, rather than lighter.
When planning your system be sure to include a manual brace for use as a safety backup while the hatch is raised or to enable you to keep the hatch open should the system fail.
Next up is determining the length of the actuator you’ll need. With the hatch closed, measure the distance between where the actuator will be mounted in the engine compartment (typically on centerline or close to it) and where it will attach to the hatch; this number is your compression length. Now open the hatch to the desired position and measure the distance between the above points again; this measurement is the total length of the actuator needed when extended. Subtracting the first measurement (compression length) from the second measurement (extended length) provides the minimal “stroke length,” or range of operation needed.
Actuators are rated by the pounds they can push. Again, go larger where appropriate. Make sure it’s constructed of marine-grade materials, like stainless steel. Another good feature is a slip clutch, which protects the actuator against overloading.
Installation considerations While you’ll want to follow the manufacturer’s installation instructions, here are a few general tips. • Install the actuator in a dry location, protected from spray and located above the normal accumulation of bilge water. • Ensure the actuator unit and hatch attachment is firmly mounted and that all mounting hardware is robust enough to withstand the loads placed on them. Mount the actuator base to a structural surface that can take the weight of the unit and hatch. • Position brackets and actuator so the weight load is carried along the center axis of the actuator. • Install brackets so that the actuator arm rises high enough to lift the hatch to its fully open position. • Use the correct size wire for power runs to electrical actuators. Wire gauge that’s too small can cause premature motor failure (due to voltage loss) or even a fire. You’ll also want to ensure power is provided using a properly sized fuse or circuit breaker. • Locate the control switch where it can easily be reached with the hatch in the open and closed position. Unless it’s labeled as such, don’t install the actuator control switch in an area that requires equipment be ignition protected. • Make sure your installation includes an emergency release or other fail-safe to access the engine compartment. Most units have a pull-pin to release the lift arm should the system fail. ★


