11 minute read
HALLOWEE’N MANIA
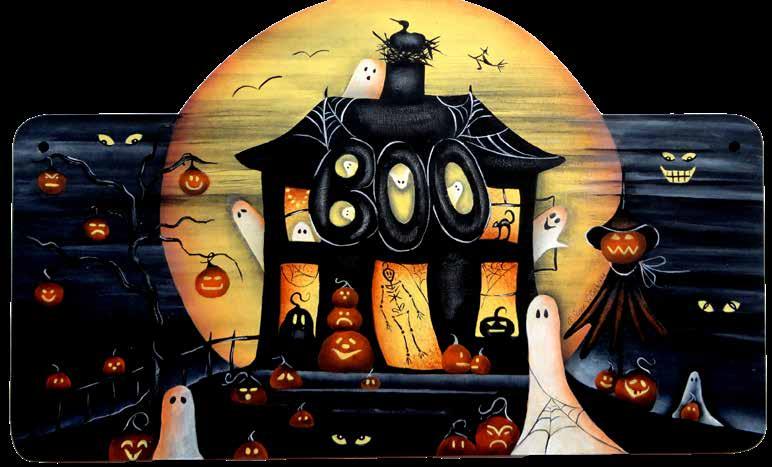
HALLOWE’EN MANIA It is a wild night and there’s a whole lot of eyes out there...beware!! This pattern will ‘spook’ you into practicing mostly what you already know. There are washes, sponging, floated color as well as the usual base coating and line work. Hang where you will definitely want the most impact!! BOO!!
By Susan V. Cochrane

I have been drawing all of my life and am self-taught. I first picked up a paint brush in 1984 and the interest continued with the self-publishing of two books and hundreds of patterns, many appearing in magazines and internet ezines.
SUPPLIES:
STANDARD ACRYLIC PAINTING TOOLS
SURFACE:
• Arched Plaque, Item No. 31-L305, www.cdwood.com
PAINTS: DecoArt® Americana® Acrylics:
• Banana Cream DA309 • Burnt Sienna DA063 • Lamp Black DA067 • Persimmon DA293 • Warm White DA239
MEDIUMS:
• DecoArt® Americana® Duraclear Varnish™ (Matte) DS21
BRUSHES BY ROYAL & LANGNICKEL™ MAJESTIC
• 1/2”, 5/8” Angular Shaders (Series R4160) • #2,4,6,8 Filberts (Series R4175) • 5/0, o Liners (Series R4595) • 2, 4, 6, 8, 10, 12 Shaders (Series R4150)

MISCELLANEOUS SUPPLIES:
• Eraser • Miracle Compressed Sponges (1 or 2 cut to 1” x 1”), www.amazon.com • Palette Paper (Waxed) • Paper Towels or Tissue • Sandpaper (#400 grit) • Tracing Paper • Water Container • White and Gray Graphite Paper
GENERAL INSTRUCTIONS:
The first coat of paint is your sealer. Erase transfer lines as you go. All base coats are solid. Wet the sponge in clean water, squeeze out all the water onto a paper towel. Dab the sponge into the desired color and dab it onto the palette 2-3, times, to remove most, but not all of the paint. Dab onto the surface varying the direction and pressure applied. Clean the sponge between color changes or use a fresh sponge.
PAINTING:
Transfer an outline for the moon. Base coat it with Banana Cream. Float Burnt Sienna around the outside edges, concentrating the float mainly at both sides. With Lamp Black, paint the background and the land. With the 5/8” Angular Shader or brush of choice, streaky float horizontally on the moon to create wispy shadows with Lamp Black. Streaky float Warm White horizontally on the sky next to the land. Some of the floats will continue across into the moon. Transfer the house shape, windows, and door. The windows and the door are already the base coat color. If they are not, paint them with Banana Cream. Float Burnt Sienna across the top, bottom or left-hand side of the various windows and the door. Sponge over this float faintly with Burnt Sienna, just enough to break up the float and add a little texture.
HOUSE:
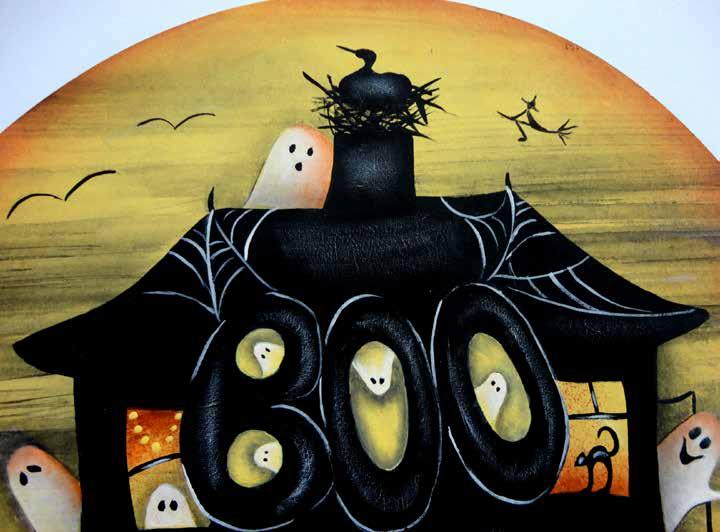
Base coat the house walls, chimney, and the roof with Lamp Black. Transfer the window pumpkins, the cat, the skeleton, webs, and window grids and paint them with Lamp Black. Transfer or freehand the pumpkin and cat eyes with Banana Cream. Dry brush the skeleton bones, the cat body and head and the window grids with Warm White. Float a touch of Lamp Black along the lower bottom edge in the top left window. Transfer and paint the ghost with Warm White and dot the eyes with Lamp Black. Dot the ornaments above the ghost with Banana Cream. Transfer the letters BOO and the cobwebs holding the letters. Paint the letters with Lamp Black and partially outline them with Warm White.
Dry brush Warm White on the letters away from the edges. Paint the open spaces in the letters with Banana Cream. Transfer and paint the ghosts inside the open spaces using Warm White. Dot the eyes with Lamp Black. Float Banana Cream plus a touch of Lamp Black to shade the empty spaces around the edges of the letters and the ghosts. Paint the cobwebs with lines of Warm White.
WALLS, ROOF AND CHIMNEY:
Dry brush away from the edges using Warm White.
STEPS:
Float Warm White along the top edge of the first step at the base of the house walls. Paint a faint line of Warm White for the next step down. Dry brush some horizontal lines for the remaining steps.
GHOSTS:
Transfer and paint with one coat of Banana Cream and then paint with one coat of Warm White. Paint the eyes/ mouths with Lamp Black. Float Lamp Black on the background next to the ghost bodies on the moon and, when dry, on the ghost bodies 2,3,4 that are next to a wall or roof. Outline the window frame behind ghost 4 with Lamp Black. Float Burnt Sienna on the ghost bodies either on the left- or right-hand side. Paint the cobweb on Ghost 1 with Lamp Black. Transfer the craggy tree, the fence, the pumpkin witch, all eyes in the sky and all remaining pumpkins.
TREE:
Paint the tree with Lamp Black. Outline the trunk and branches randomly with thin lines of Warm White. Dry brush the trunk and some branches with Warm White.

FENCE:
Paint the fence with Lamp Black and add partial lines of Warm White.
PUMPKIN WITCH:
Paint the head with Persimmon and the eyes and mouth with Banana Cream. Paint the hat and ‘gown’ with Lamp Black if not already painted. Outline the brim of the hat and paint the tie with broken lines of Warm White. Dry brush the folds of the ‘gown’ and the brim of the hat with Persimmon.

EYES IN THE SKY:
Paint the eyes and mouth with Banana Cream. Paint the irises and line the teeth with Lamp Black. Line/dot the pupils with Warm White.
REMAINING PUMPKINS:
Paint with one coat of Persimmon, and the stems are Lamp Black with some outlined partially with Warm White. Paint the eyes and mouths with Banana Cream. Float a touch of Lamp Black on the top next to the stems and along the bottom edges.

STORK, NEST, WITCH AND BATS:
Transfer and paint with Lamp Black. Dry brush the body of the stork with Warm White.

FINISHING:
Apply 2-3 coats of varnish.
Hang and spook the neighborhood!
Enlarge to the size to the surface of your choice.
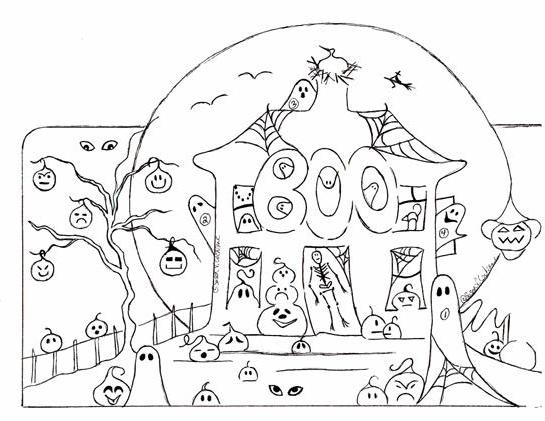
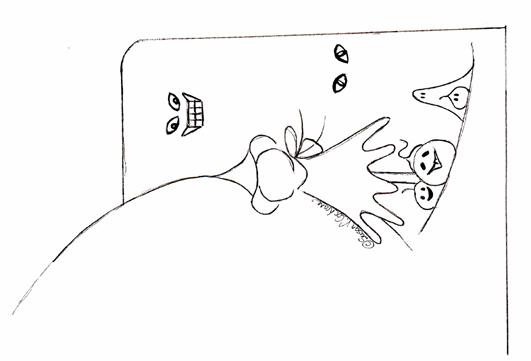
Note to reproduction companies/stores: The bearer of the original color magazine has full rights to have this drawing reproduced and enlarged one time for personal use. This notice has been printed in red ink for verification of authenticity.
A Look into the Historical Florals of Decorative Painting
By Diane Marie Kellogg
Part 3

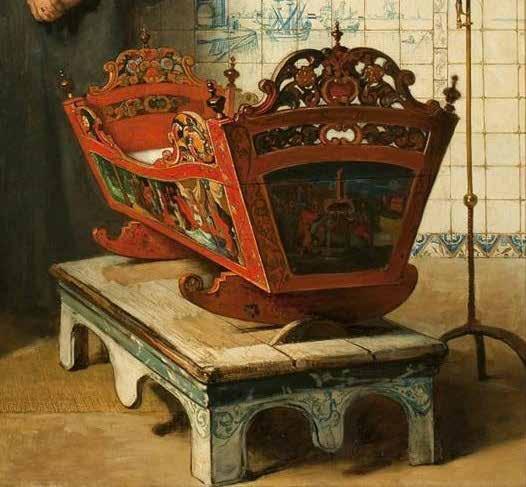
Welcome back. Part One of our series started in England and continued into France. Taking a loving look at the arts of canal boat painting, vardo painting, and tole painting. Now our journey continues into both the Netherlands and Norway for a fascinating look at both Hindenloopen and Rosemaling. The next stop on our floral filled trip is the Netherlands. Informally known as Holland, this is a country that brings to mind tulips and windmills, which have become symbols of this beautiful country. Is it any wonder that we find the origins of Hindenloopen here? Named after a harbor village from Friesland in the Netherlands, it began in the 17th century as a form of wood carving. The paint was added and created a colorful and recognizable style of design. Eventually, the designs were just painted, not carved.
(See photo on page 58).
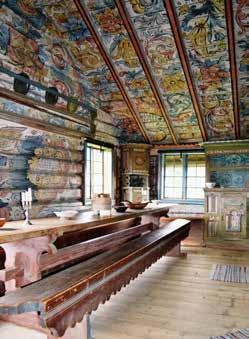
A portion of the painting, De Heer heeft gegeven, de Heer heeft genomen by Christoffel Bisschop, (1828-1904) used to show examples of the Hindeloopen style. I highly recommend a search for more of Christoffel’s art, more than one piece shows the Hindeloopen style within his paintings. Originally influenced by oriental art brought home by Dutch travelers, they mimicked porcelain by painting similar designs on wood. Acanthus scrolls and small flowers form the basis of the designs, with flowers such as poppies, daisies roses and, of course, tulips. Traditional colors include greens, blues, and reds. Pieces are also painted in different shades of a single color. The sides and bottoms of pieces were often painted using a marbleized effect. Birds and scenery are also used, the bird is meant to scare off evil spirits while the scenery is often painted very simply. This form of art would suffer a decline in the 18th and 19th centuries only to experience a revival in the late 19th century, where new forms developed including the Roosje and Huttinga styles. From here we head on to Norway and the very popular art of Rosemaling. Rosemaling translates to ‘rose painting’. A form of decorative painting, usually done on wood, that uses C and S strokes, along with scroll and line work to create a plethora of florals. Both subtle and vibrant colors can be used. The carved scrolls of Viking boats have been suggested as the precursor of rosemaling. Heddal Bygdetun is an open-air museum in Notodden, Norway that displays buildings from old farming communities that date back to the late 1800s. While there are many styles of rosemaling, three of the main styles are named for the locations where they originated, Telemark, Hallindal, and Rogaland. Each has a unique take on rosemaling. Telemark uses a Rococo style with flowing, disproportionate designs, and translucent backgrounds. Hallindal uses a Baroque style with strong colors and proportional design. Rogaland uses an oriental style with darker backgrounds, latticework, and more realistic florals. Beginning in the mid 18th century, rosemaling was a 2-D adaptation of the Baroque and Rococo artistic styles that were introduced into rural civilization. Poorer members of society trained then traveled, painting churches and homes. Regional styles developed as they moved from one place to the next. Norwegian immigrants brought this beautiful style of painting to the United States, often seen on the painted trunks they carried their belongings in. In 1860, rosemaling suffered a decline in popularity but it experienced a revival in 20th century America,


Photo Credit – Public Domain Pictures, Pixabay.com
Photo ‘ Rambergstugo at Heddal Bygdetun’ by Lisa Amalie Elle
An example of the Raudsaumsmalingin style, painted by Jan Boettcher.


Photo Credit – Jan Boettcher, used with permission. This design is a non-traditional style, created by Bjorg Kleivi, painted on a non-traditional surface. Stave Church photo by Micha L. Rieser
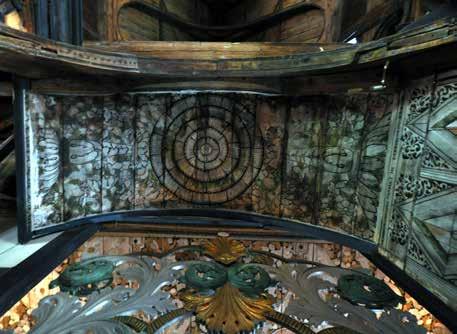
with Norweigen-Americans becoming interested in their ancestor’s art. Per Lysne is often credited with the revival, trained in Norway for rosemaling, he worked in the states as a wagon painter. When business slowed during the Great Depression, he started rosemaling again. I interviewed Jan Boettcher, a painter, and teacher who started her journey into rosemaling in 1980. With a heritage of Norwegian, Danish, and German she followed in her NorwegianAmerican ancestor’s footsteps, looking to paint as earlier ancestors had. Her grandmother’s family had come to the states from the Valdres area of Norway. Since her first class, she has continued to learn, taking classes at Vesterheim and in Norway. Jan uses oils, following tradition. She does, however, also paint on nontraditional pieces.
She studies old pieces for ideas and possibilities, she may use one aspect of the piece to work out a new design. She points out that many aspects of rosemaling are symbolic, referencing the original painting of churches and that even the strokes have a ‘meaning or a symbolism’. She plans to write a book on Rosemaling in the future. As a teacher, she not only teaches the painting but also the history of rosemaling. She has graciously given us two Hallindal designs to use in our own art. See pages 62-63. Rosemaling and Jan from her website and social media pages.
Contact Jan Boettcher
www.turnofthecentury-in.com
Facebook – Jan Boettcher and also the Thorntown Malers.
Classes she recommends:
• www.artfulwebinars.com, an online class in
October.
She will also be teaching at Fletcher Farm, www.fletcherfarm.com in August 2020. I highly recommend you learn more about
She also recommends online classes at www. oilpaintingexpressions.com.


SOURCES
• Aretezan.Com,
‘Hindeloopen’,
Traditional Folkart • Wikimedia Commons,
Public Domain, De
Heer heeft gegeven, de
Heer heeft genomen by Christoffel Bisschop, (1828-1904) • Aretezan.com,
‘Rosemaling’, Traditional
Folkart • Wikipedia.com,
‘Rosemaling’ • Jan Boettcher, www. turnofthecentury-in.com • Pixabay.com • WikimediaCommons. com
An example of the Telemark style, painted by Jan Boettcher.
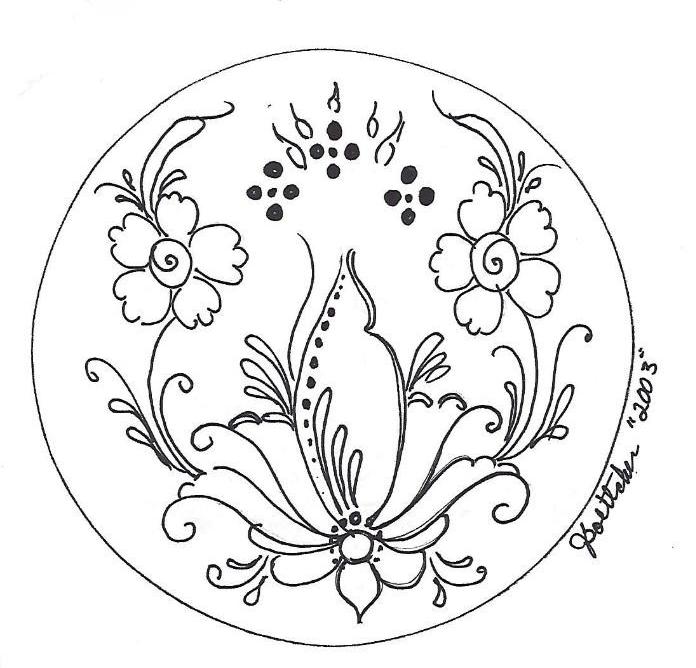
Enlarge to fit the surface you choose.
Hallindal designs ©2003, compliments of Jan Boettcher, used with permission.
Note to reproduction companies/stores: The bearer of the original color magazine has full rights to have this drawing reproduced and enlarged one time for personal use. This notice has been printed in red ink for verification of authenticity.
Enlarge to fit the surface you choose.
Hallindal designs ©2003, compliments of Jan Boettcher, used with permission.

Note to reproduction companies/stores: The bearer of the original color magazine has full rights to have this drawing reproduced and enlarged one time for personal use. This notice has been printed in red ink for verification of authenticity.


