9 minute read
Take Care of Your Gear So It Take Care of You

by Ali Gray, Mazama Publications Committee
It’s inevitable. On a ski tour, snowshoe or winter hike, or day at the resort, you or someone you know will eventually have a gear malfunction. Probably at the top of the skin track or lift, and likely on the first day out for the season. A loose screw. A broken buckle. A cracked or frayed strap. A stuck zipper. Old skin glue that just won’t stick. Ski or board bases that stick to the snow rather than glide blissfully down it. But we can help eliminate those “oh no” moments by doing a little pre-season prep work (and throughout the season too!).
Temperature extremes and moist air can wreak havoc on our gear, and we have plenty of both in the Pacific Northwest. Hot temperatures (like in a summertime south-facing garage) can deform plastics and damage protective coatings and seals. Years of hot-to-cold temperature swings (and especially the sun) can make plastics and some fabrics brittle as they age. Gear stored in damp basements (especially soft goods like clothing, tents, and sleeping bags) can get moldy and even start to rot. If possible, store your gear in plastic, air-tight containers away from excessive heat or cold, and out of damp basements and other humid locations. Don’t tightly roll or stuff items (especially those with insulation that needs to retain loft) into cramped bags or boxes, and make sure to completely dry out your items before storing them away.
And don’t forget, they don’t call it “wear and tear” for nothing! If you’re anything like me, you’re hard on your gear, and a little maintenance can help keep your valuable (emotionally and monetarily) stuff going and going and going.
PRE-SEASON PREP
Getting ready to head out into the snow for the first time this season? Here are a few things to check at home, rather than finding an issue high up a mountain in a snowstorm. Our local gear shops carry ski tuning materials, fabric care products, and any other tools you’ll need, and you can usually get replacement screws, buckles, and other odds and ends from the manufacturer. Let’s keep our gear in good shape and ready-to-use for years to come!
Skis and snowboards
Bindings:
Inspect any screws, movable pieces, buckles, straps, and the overall integrity of the materials for any damage or looseness.
Click your boots into your bindings and try out all their uphill/ downhill/riser configurations to make sure everything works as expected.
For alpine ski bindings, check your DIN (the little heel and toe-piece numbers that determine how easily your skis pop off in a fall)— talk with a local ski shop if you’re unsure what the setting should be.
Bases:
Check for base damage and fill any scrapes with P-Tex (polyethylene base material). Keep in mind though, if you can see the core of your ski through the base material, it’s probably time for professional help or even a replacement— moisture can get into your ski or board and cause it to rot.
Apply a fresh coat of hot wax, using the correct wax type/temperature for the current conditions.
Edges
□ Check your edges for burrs or damage. Use a ski tuning file to lightly remove burrs and sharpen your edges if needed (a sharpening tool helps hold your file steady).
Boots:
□ Put your boots on (check for any insect friends first!) and make sure they still fit.
□ Tighten down buckles, straps, BOAs, and laces to check for damage and integrity.
□ Storing your boots over the summer loosely buckled or laced will help them maintain their shape.
Skins:
□ Check the “fuzz” side for any thin spots or cuts.
□ Check the glue—remove any debris, and see if it’s starting to get old and globby.
□ Attach skins to your skis or board and make sure the toe and tail pieces work properly, and that they’re sized correctly.
□ If your skins no longer stick to your bases or the glue looks...globby and nasty, it may be time for a re-glue. There are services you can send your skins into, or you can do it at home. I re-glued my own skins a few seasons ago, and it actually wasn’t as bad as I thought it would be. There are plenty of resources online to help you get started.
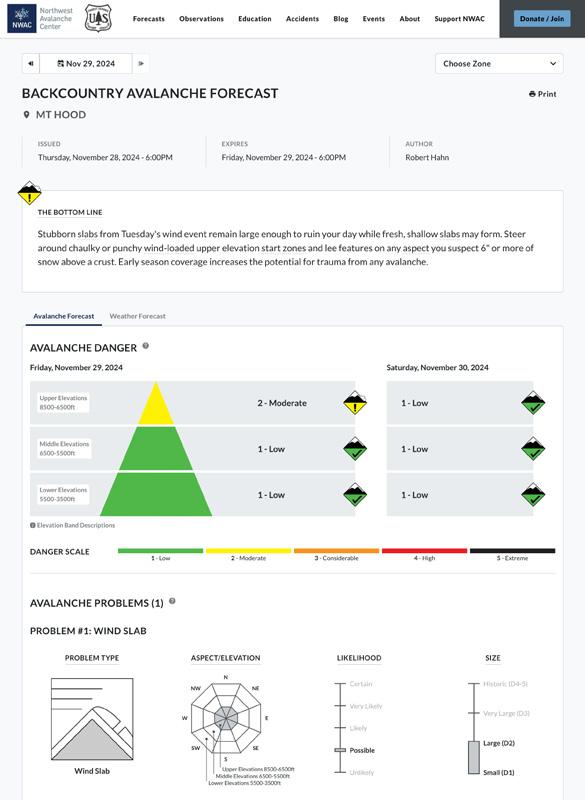
Avalanche safety gear
Take an avalanche course if you haven’t already, or a refresher if it’s been a few years. Get out and practice with friends at the beginning of the season, and a few times during the winter on those lessstellar days.
Beacon:
Replace the batteries. Never store the batteries in your beacon over the summer! They can corrode and ruin your beacon (I speak from experience). This goes for things like headlamps and radios too.
Do a beacon check with a second beacon before you head out the first time (at home, not the trailhead—but always do a check at the trailhead too!). Test the beacon’s search, receive, and any other important features it may have.
Check your beacon manufacturer’s website to see what they recommend, but best practice is to replace your beacon about every five years. You can also send in your beacon for a professional test through the manufacturer
Shovel: Check your shovel for cracks or other damage, and make sure the handle attaches properly.
Probe: Deploy your probe. All the segments should fit together securely, and look over the cable for any kinks or weaknesses.
Airbag: If you’re lucky enough to own an airbag, follow the manufacturer’s instructions for maintenance.
Snowshoes
Clean and dry your snowshoes after each use. Water left on any metal can cause it to corrode (clean off any corrosion with steel wool) and mud and other debris can clog up your bindings.
Make sure all straps and buckles work properly, and any screws and rivets are tight.
Inspect the traction spikes or bars on the bottom and make sure they’re not bent or damaged.
If your snowshoes have heel risers, check that they work and hold your weight.
Get a new pair of boots? Adjust your bindings at home rather than at the cold trailhead!
Boots for hiking and snowshoeing
Gore-Tex and other waterproof materials require regular cleaning to maintain function. Are your boots caked with mud from the summer? (I know mine are.) Use an old toothbrush or similar with lukewarm water to lightly remove dirt and other debris. Removing the laces first can help.
If needed, you can buy a spray-on DWR (durable water repellant) to give a waterproof boost to your older boots.
If you head out to the trails with micro-spikes or similar boot traction devices, put them on with your boots to make sure they don’t need any adjusting or repair.
Nordic gear
Lucky you, Nordic gear is way easier to care for than alpine gear! The same goes—check any screws or glue for your bindings, and that they’re securely attached to the skis.
Inspect your boots for damage and make sure they still fit. Check that your boots properly click into your bindings.
If your skis have edges, make sure they’re sharp and burr-free, and wipe off any rust.
Clean the bases. Mine have fishscales so there’s not much else I need to do. If you have waxable skis, the steps are the same as with alpine skis.
Clothing
Try on your clothing and outerwear to see if it still fits (especially postholidays, umph!). Empty the pockets (this usually ends with a “yay” or an “eeew”) and make sure all the zippers and snaps work.
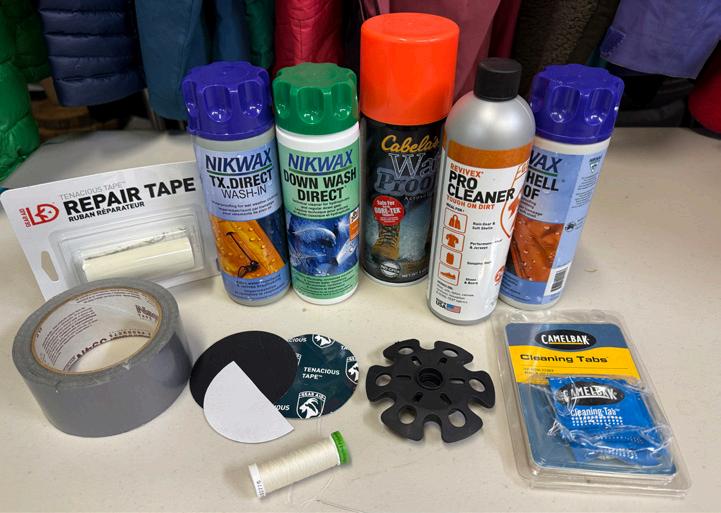
Wash all your clothing! This is easy for the next-to-skin stuff, but your midlayers and outerwear need cleaning love too. Follow the manufacturer’s recommendations, or use a cleaning product like Nikwax—they have special cleaners for down, softshell, Gore-Tex, etc. Washing your clothing will not only make it smell better, it will improve waterproofness and breathability, and help extend the lifetime of the product.
Check your pockets for holes—losing keys, snacks, or other items is always a bummer.
Mend any holes with a needle and thread, or use something like Tenacious Tape to patch a tear in outerwear. Some manufacturers will repair their products, so that’s worth looking into if needed, or there are companies and gear shops you can mail items to for repairing anything from tears to zippers.
Other items
A few other items need love and care (and occasional replacement).
Helmet manufacturers recommend replacing your helmet every five years or after a severe fall. This is up to you, but regardless, check for any large dents or cracking in the shell or protective foam. Damage? Probably time to replace it.
Try on your goggles or sunglasses and make sure they didn’t get scratched up over the summer (or you forgot about that super annoying scrape right in front of your eye). Make sure the lenses are secure, and find any alternate lenses if you have them.
Look over your backpack—zip and unzip all the zippers, check for any tears or holes, replenish any items like sunscreen or lip balm that live there, and remove that nasty half-eaten granola bar from the hip belt pocket.
Check over your poles—if they telescope make sure they still slide freely and the clamps work, and replace any loose or damaged baskets or tips.
If you use radios in the backcountry (kudos to you if you do!) make sure the batteries haven’t corroded and are recharged, and that the radio functions properly.
Ongoing maintenance
It’s not a bad idea to check your important pieces of equipment a few times throughout the season (think boots and bindings).
Carry a multi-tool and small repair kit (a Voile strap or two, duct tape, a pole basket, important replacement screws, a bit of bailing wire, etc.) when you head out in case of emergency.
Keep those skis and boards waxed (using a rub-on wax is better than nothing!). I usually just wax for cold conditions at the beginning of the season and again for warmer conditions in the spring when the snow starts to get sticky.
Repair any ski/board base and edge damage as it occurs. I usually just ignore smaller dings, but any larger chunks out of your bases or edges should be addressed. Think base damage deeper than a few millimeters or edge damage that feels rough and catchy to your bare fingers.
Clean and DWR your hiking/snow boots and outerwear if it gets dirty or starts losing waterproofness. Make sure to thoroughly dry out your gear before storing it (or using it again the next day!). This can be hard in small and humid spaces, but it’s worth it. Hang up or lay out your clothing, gloves, and whatnot to prevent mildew (and nasty smells), and wipe off your skis and snowshoes to prevent rust and corrosion.
Use soap and water or cleaning tablets in water bottles and especially water reservoirs and hoses. I’m bad at remembering to do this, and have said “ewww” quite a few times when taking a closer look at my heavily-used reservoir.