
6 minute read
Tech Today


Vehicle Safety and Blind Spot Monitoring, Part 2
Testing and fine-tuning of blind-spot monitoring solutions is essential to ensuring the client is content with their purchase. Let’s take a deeper look into these systems and the end-result of the installation.
WORDS BY DAVE MACKINNON
The business of collision avoidance system installation is not only profitable—it’s a great way to get your clients thinking about all the non-audio and remote start solutions available from mobile electronics retailers like yours. In the last issue, we took a close look at radar and microwave-based blind-spot warning systems. In this article, we’ll discuss camera-based systems. Even when appropriately adjusted, side-view mirrors don’t offer the field-of-vision that a high-quality camera-based warning system delivers. As such, these solutions are an excellent way to avoid accidents when driving a large vehicle, especially on the freeway.
What is a Camera-Based Blind Spot Monitoring System?
In the simplest of terms, a camera-based blind spot monitoring system uses a camera mounted on the left and right side-view mirrors to let the driver know if there is a vehicle or object in an adjacent lane. The camera system’s image is displayed on a screen in the dash automatically when the turn signal is activated.
As we’ve talked about in the past, there are both active and passive safety systems available. A camera-based blind-spot warning system would be considered passive, as the driver needs to remember to look at the screen before changing lanes. There is no warning buzzer or beeper
to act as a reminder. With that in mind, peripheral vision is often adequate to notice when there’s something out of the ordinary in the displayed image.
Installation and Functionality
As a retailer, you’ll have two basic tasks to perform to add a camera-based safety system to your client’s car or truck. These are the steps involved in camera installation and vehicle integration. You’ll want to start the project by taking care of connecting the camera system to the factory display, a third-party rearview mirror with an LCD screen or an aftermarket radio.
For vehicles with color displays in the dash, companies like iBEAM offer dozens of different platform-specific interfaces that will allow you to feed the camera image into a factory-installed screen. These systems typically watch for turn-signal commands on the CAN network to trigger the camera switching. In terms of applications, iBEAM has modules for Audi, Mazda, Chrysler, BMW, General Motors and Volkswagen applications.
Suppose you are adding a camera system to an aftermarket source unit or a new rearview mirror. In that case, a module like the AX-ADDCAM from AXXESS will take care of camera switching and automatic triggering of the display. The system can even display an image from a forward-facing camera automatically until the vehicle is traveling at 15 miles per hour to further reduce the chance of an accident.
Camera Installation
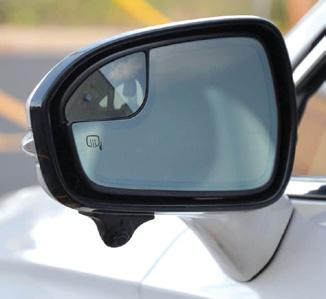
The second task is to address the installation of the cameras on or in the side-view mirrors. This process will require physically mounting and adjusting the cameras, then routing the wiring into the door and, subsequently, into the vehicle on its way to the mounting location for the control or interface module. It will be worthwhile to check the rubber grommet between the door and the vehicle’s chassis to see how much space is available to run power and video signal wiring. If there’s a connector in this location, budget your installation time

The Brandmotion 9002-2904V2 side-view camera kit includes two cameras, each in an angled mounting pod, and a camera switching module that makes it easy to integrate this system with an OEM or aftermarket infotainment display or monitor.

The AX-ADDCAM from iBEAM is a programmable camera switching module that will control four inputs with positive or negative triggers or through the CAN network. This is an ideal solution for integrating additional cameras to a rearview mirror display screen or an aftermarket source unit.

The Pioneer DMH-WT7600NEX is a floating face multimedia receiver with a 9-inch capacitive touch display and dual camera inputs. This radio style allows you to install a large screen in a vehicle where there is only a single-DIN chassis.
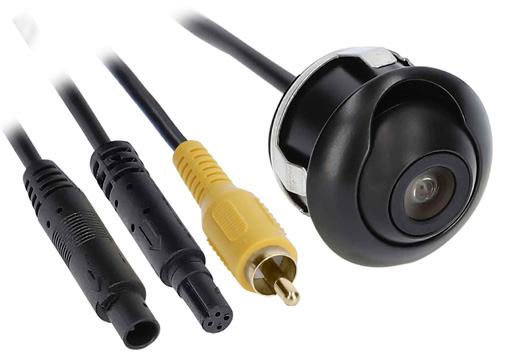
The eye-ball mount and 170-degree viewing angle of the TE-RSC from iBEAM allows your installation team to fine-tune what the driver will see when changing lanes. An aftermarket review mirror like those from Gentex is an excellent way to show the image from a blind-spot camera system in vehicles where the radio can’t be replaced, or there’s no way to interface with the factory infotainment system.
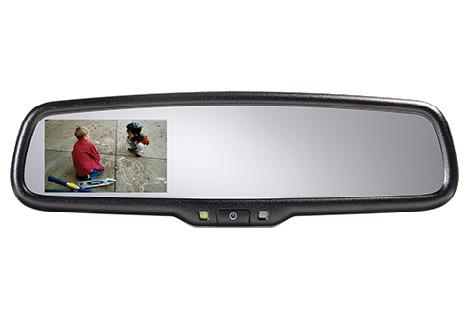
An aftermarket review mirror like those from Gentex is an excellent way to show the image from a blind-spot camera system in vehicles where the radio can’t be replaced, or there’s no way to interface with the factory infotainment system.
accordingly. You may need to cut the RCA connector off a cable and replace it with a new one once the wires have been run. With that said, many camera solutions come with a low-profile inline connector that can pass through a small opening. Check out the wiring in the systems you offer before quoting the project to a client. Little details like this can affect installation time.
Just as we talked about several issues ago in our discussion of backup camera solutions, not all cameras are created equally. There may be different exposure and brightness requirements for a side-view camera than for a backup camera. You’ll need to ensure these cameras work equally well during the day as at night, so how the camera handles bright headlights or seeing the sun in the image is a consideration.
As with any multi-faceted solution like this, it’s worth testing the system on a shop or employee-owned vehicle before offering it to your clients. You will not only know the ins and outs of the installation and control module programming, but you’ll have an understanding of the system’s functionality. Most importantly, you’ll have a way to demonstrate the system to a potential client.
The Last Step: Fine-Tuning the Installation
Just as we make the calibration of a digital signal processor the last step in an audio upgrade, ensuring the cameras installed in a blind-spot safety system is, aside from a functionality test, the last step in the installation. As mentioned earlier, you can wire the cameras to the interface but leave the final alignment on the mirrors until you can see the image on the screen in the vehicle.
Unlike a rearview mirror, these cameras have a wide field of vision, often well over 100 degrees. The camera should be aimed so that very little to almost none of the vehicle is visible in the image, allowing something like a motorcycle to be seen if it’s directly adjacent to the back door.
Of course, once everything is mounted and integrated into the car or truck, give all the features a run-through while in the shop—with and without the engine running—and if it’s acceptable to your client, on the road. Watch for any video noise, switching delays or inconsistencies that may result in your client coming back to the shop with a negative experience. We all know getting things right the first time is crucial.
Camera-based blind-spot warning systems are great for cars, pickup trucks and SUVs, but even better for vans, motorhomes and recreational vehicles. Having a solution on display in your store and details of these service offerings on your website is crucial to getting into this business.
Of course, if you are serious about collision avoidance solutions, you should register your store with the team at the Vision Zero Automotive Network (www.vzan.org) and become a Preferred Retailer. There is no cost to register, and once approved, your facility will be listed on the dealer locator.
Brandmotion side-view cameras are designed for surface installations and include a housing that angles the camera downward. This camera type is ideal for mirror assemblies that have a limited amount of space inside..
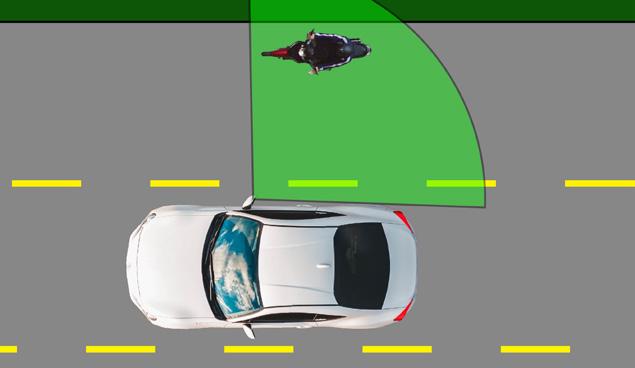
In this example, the camera is adjusted to show as much of the area beside the vehicle as possible. This configuration dramatically reduces the chances of changing lanes and causing an accident..

Your clients don’t need to see where their vehicle is. Adjust the cameras so they can see what’s beside them.
Dave MacKinnon has worked in the mobile electronics industry since 1988 in almost every capacity, including roles as a Retail Salesperson, Installer, Sales Representative, Technical Trainer and Product Development Manager for some of the largest car audio companies in the world. Dave started his writing career in 2000 as the Technical Editor of a Toronto-based car audio magazine and has reviewed more than 450 products. Formally trained as an Electronics Technician, Dave is considered an industry expert when it comes to explaining how mobile audio components work, and he has crafted thousands of articles to share that knowledge. He’s currently the Head Writer for 1sixty8 media and the Editorin-Chief at BestCarAudio.com.


