11 minute read
conscious eating


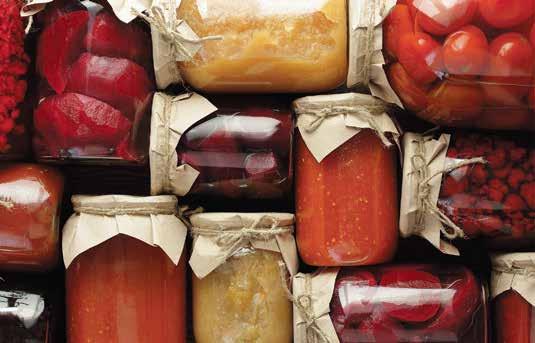
Preserving the Harvest
Classic Ways to Store Garden Bounty All Year
Advertisement
by Julie Peterson
teatian/AdobeStock.com
Whether gardening, purchasing at farmers’ markets or ordering from a community supported agriculture farm, preservation techniques capture the bounty of the harvest and ensure availability of fresh flavors year-round.
DEHYDRATING
“Dehydrating machines can be purchased for about $50, but an oven that goes down to a temperature of 150 or less will work,” says Brekke Bounds, educator at City Grange, a garden center in Chicago. Before dehydrating, consider the end use. Peaches or cherries can be cut into bite-size pieces. Roma or cherry tomatoes, sliced or cut in half and dried, can go in winter soups and stews. “Apple chips are super-easy,” Bounds says. “Core and slice with a mandoline, dunk in a lemon solution, sprinkle with cinnamon, dehydrate and store in an airtight jar.”
Foods can be seasoned or marinated before drying. “We make zucchini bacon for vegan BLTs,” says Anthony Damiano, chef proprietor at Counter Culture restaurant, in Vero Beach, Florida. Dried herbs chopped in a food processor can be stored in airtight containers and used up to a year later as flavorful salad toppings or soup mixes.
CANNING
“One of my go-to methods is water bath canning,” says Emily Paster, author of The Joys of Jewish Preserving. “It’s a really safe and effective method of home preservation for high-acid foods. Certain kinds of microorganisms, most specifically botulism, can’t live in a high-acid environment.” Fruits that go into jams and jellies are typically acidic enough, but levels can be increased with lemon juice. Vegetable pickles become acidic through the addition of vinegar. Heat-sealed jars are shelf-stable if the seals remain intact.
Paul Fehribach, chef and co-owner of Big Jones, a restaurant in Chicago, gives canning tips in The Big Jones Cookbook. For pickles and preserves, he recommends using a simple canning kit with a tool to lift jars in and out of boiling water, a jar rack that sits in the bottom of a stock pot and Mason jars with new canning lids to hold the food.
Both Paster and Fehribach suggest using professionally tested recipes. “Go to a reliable source, whether it’s a cookbook or a website, because there are some food safety issues. Recipes have been calibrated to have the right ratio of water and vinegar to vegetables to ensure it’s acidic enough,” says Paster. “Pickles are a great place to begin because they’re really hard to mess up.”
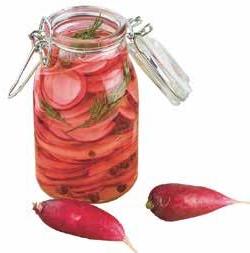
REFRIGERATOR PICKLING
The pickling process can be done without water bath canning, but the jars must remain refrigerated. The fun is in the quickness and variability of the recipes. Beyond traditional cucumber pickles, excellent pickles can be made with green beans, carrots, onions, cauliflower and green tomatoes. Brine can be dill, spicy or sweet. Damiano makes refrigerator pickles with a variety of local organic produce, including radishes, okra and other vegetables. The pickles are great for eating and can be used in salads and recipes like plant-based tostadas.
FERMENTING
“Fermentation is an essential part of how people everywhere make effective use of food resources,” says Sandor Ellix Katz, fermentation revivalist in Liberty, Tennessee, and author of The Art of Fermentation. “Fermentation produces alcohol, helps preserve food by producing acids and makes foods more digestible, more nutritious, more delicious and sometimes less toxic.”
Cultures around the world developed fermentation techniques as a practical method

to prevent food decomposition. Studies show that fermented foods and beverages provide beneficial probiotics to the gut microbiome. Anyone can give fermentation a try with ordinary kitchen tools—a knife, cutting board, mixing bowl and a jar. “Certain ferments, such as yogurt or tempeh, require specific temperature ranges,” advises Katz.
COLD STORAGE
Many fruits and vegetables freeze well, but a basement or backyard root cellar is a no-electricity, cold storage method. Items that store well in a root cellar include most root crops and firm fruits like apples and pears. “Root cellars use the natural, cool, moist conditions underground for fruit and vegetable storage. Earth-sheltered options work best for cooler climates where the ground temp is naturally cooler,” says Laurie Neverman in Denmark, Wisconsin, creator of CommonSenseHome.com. Those with no outdoor spot or cold basement room can still use cold storage. “Some crops like onions, garlic, potatoes, winter squash, apples and carrots keep well in dark, dry, cool room temperatures of about 55 degrees,” says Neverman.
Food preservation methods extend the blessings of the harvest. A little preparation now will provide edible delights for months to come.
Julie Peterson writes from rural Wisconsin. Reach out at JuliePeterson2222@gmail.com.
Food Preservation Resources

NatioNal CeNter for Home food PreservatioN: nchfp.uga.edu
Ball & Kerr reCiPes aNd ProduCts for CaNNiNg: FreshPreserving.com Complete Dehydrator Cookbook, by Carole Cancler The Pickled Pantry: From Apples to Zucchini, by Andrea Chesman Root Cellaring: Natural Cold Storage of Fruits & Vegetables, by Mike and Nancy Bubel This easy kimchi recipe turns common garden veggies into a spicy probiotic ferment that’s loaded with good bacteria and health benefits.
yiEld: 32 sErvings
4 Tbsp sea salt and 4 cups water 1 lb Chinese cabbage (napa or bok choy preferred, but other cabbage will do) 1 daikon radish or a few red radishes 1 to 2 carrots 1 to 2 (minimum) onions (or shallots or leeks) 3 to 4 (minimum) cloves garlic 3 to 4 hot red chilies to taste (seeds removed, dried is fine, nothing with preservatives) 2 to 3 Tbsp (minimum) fresh grated ginger root
Prepare brine in a nonreactive container such as a glass bowl or large measuring cup. Mix water and salt, and stir thoroughly to dissolve salt. Cut up cabbage, radishes and carrots. (Add in other vegetables as an option.) Mix vegetables together and move them into fermentation vessel. Cover vegetables with brine. Use a fermentation weight or plate with a heavy object to weigh the vegetables down and keep them below the brine. (Mix more brine if needed to make sure vegetables are completely submerged.) Put a cloth over the fermentation vessel and wait for vegetables to soften (a few hours or overnight). Drain the brine from the vegetables, reserving it. Give the vegetables a taste. They should be salty, but not too salty. Sprinkle on additional salt, if needed, and mix; rinse if too salty. Mix the onion, garlic, chilies and ginger into the drained vegetables and blend well. Pack the vegetable mix into the fermentation vessel. Use the fermentation weight or plate to press it down until the brine covers the kimchi-in-progress. Add a little brine back, if needed, to make sure the vegetables are completely covered. Cover the fermentation vessel with a cloth and leave it on the counter for about a week. Taste test to check the fermentation. When happy with the flavor, the kimchi is done. Store in the refrigerator in a glass container to stop the fermentation. Recipe by Laurie Neverman at CommonSenseHome.com.
Natural Awakenings recommends using organic, non-GMO (genetically modified) and non-bromated ingredients whenever possible.
Tepache is a wonderful, effervescent, lightly fermented pineapple beverage. It’s made from the skins and core of pineapple, making use of the parts typically discarded.
yiEld: aBout 1 quart
½ cup sugar, or more, to taste (ideally piloncillo, panela or another unrefined sugar, but any type of sugar will work) Peel and core of 1 pineapple (eat the rest of the fruit), cut into 1- to 2-inch pieces 1 cinnamon stick and/or a few whole cloves and/or other spices (optional)

Dissolve the sugar in about 1 cup of water. Place the pineapple skin and core pieces and spices into the vessel. Pour the sugar water over the pineapple, then add additional water as needed to cover the pineapple. Cover with a loose lid or cloth and stir daily.
Ferment for 2 to 5 days, depending upon temperature and desired level of fermentation. It’ll get fizzy, then develop a pronounced sourness after a few days. Taste each day after the first few to evaluate developing flavor. Strain out the solids. Enjoy fresh or refrigerate for up to a couple of weeks.
Recipe is an exclusive first look from the forthcoming book, Sandor Katz’s Fermentation Journeys (Chelsea Green Publishing, October 2021).
Pickled Watermelon Radishes
1 to 2 watermelon radishes ¼ cup white wine vinegar ¼ cup rice wine vinegar ½ cup water 1 tsp pink Himalayan salt 1 tsp sugar 2 cloves garlic, peeled 1 tsp ginger, microplaned ½ tsp peppercorns, lightly crushed Wash and peel watermelon radishes. With a sharp knife or mandoline slicer, slice radishes into round discs. In a non-reactive saucepan, bring the water, white wine vinegar, rice wine vinegar, salt and sugar to a boil. Simmer for 1 minute or until the sugar and salt are dissolved. Remove from heat and add the garlic, ginger and peppercorns. Pour the hot liquid including the garlic and peppercorns over the radishes. Let cool to room temperature, then cover and refrigerate. Recipe by Chef Anthony Damiano at Counter Culture, in Vero Beach, Florida.
toss until coated in marinade. Let sit for several hours or overnight. Place in a single layer on dehydrator trays, making sure not to overlap. Set the dehydrator to 145° F and let the strips dehydrate for 4 to 6 hours. Remove them when they are crispy. Thicker strips may take longer. Eat immediately or store in an airtight container.
Zucchini Bacon
2 medium zucchini 2 Tbsp grape seed oil 2 Tbsp soy sauce 2 tsp maple syrup 1 tsp liquid smoke Pinch chipotle chili pepper powder Freshly ground black pepper
In a large bowl, combine oil, soy sauce, maple syrup, liquid smoke, chipotle chili pepper powder and season generously with black pepper. Whisk to combine. Using a vegetable peeler or mandoline, slice zucchini length-wise into thin strips. Place strips in bowl and

Recipe by Chef Anthony Damiano at Counter Culture, in Vero Beach,
Florida.
THE BENEFITS OF Aloe Vera
by Gina Saka
Aloe vera grows all over the world and is native to Africa, Madagascar and the Arabian Peninsula. This shrubby succulent has a range of benefits and has been used as an herbal remedy for more than 5,000 years. It appears in ancient Chinese and Sumerian writings from 3000 B.C., and even the Egyptian queen Cleopatra used it in her beauty routine. Its attributes have been recognized all this time and continue to be celebrated to this day.
HOW TO HARVEST ALOE
First, it’s important to know how to harvest aloe vera. There are plenty of ready-to-use products available for topical, oral or internal purposes, but often the best option is to just grab a leaf and use it straight up. Here are recommendations for those with access to an aloe plant: n Pick the largest, densest leaves from a mature plant and carefully cut close to the stem with a serrated scissor or knife. Remove around three to four at a time from a single plant. Be sure to check that the leaves don’t have mold or other damage. n Next, hold the leaf cut-side down and allow the yellow sap (aloin) to drain from it, then wash and dry the leaves. Either save the aloin if using it or discard it. n Remove the sharp edges of each leaf with a knife as well as the sharp end from the top. Then, carefully cut the leaf into manageable pieces and slice off the bottom of it to expose the gel. Next, either use a spoon to carve the aloe gel off the leaf or slice off the top leaf to have a neat square of aloe. n The gel has some pulp. To smooth the gel, it can be blended until smooth. One may also strain out the gel to remove the pulp. The gel is then ready to use.
ALOE VERA BENEFITS
There are many applications for aloe whether it’s directly on the skin, in the mouth for teeth and gum care or even in smoothies or juices for an internal cleanse. Here’s more information about the aloe vera benefits topically, internally and orally.
TOPICAL
Topically, aloe is well known for soothing sunburns. It also helps with wound healing and moisturizing. It also has vitamin C, E and A, which help with anti-aging; and antimicrobial and anti-inflammatory properties that help fight acne, blemishes and infections. Additionally, it is good for the hair, can promote hair growth, condition the scalp and fight dandruff.
INTERNAL
Adding aloe vera gel to juices and smoothies has a range of benefits. Aloe vera juice is becoming more and more popular, and is great for digestion, hydration, liver function and relief from constipation. It’s also full of nutrients, including vitamins B, C, E and folic acid, in addition to smaller amounts of calcium, sodium, selenium, magnesium, potassium, manganese and zinc.
ORAL
Aloe can be used as a mouthwash when mixed with water. It has antimicrobial, antiseptic and anti-inflammatory properties that minimize the growth of bad bacteria in the oral cavity and fight against gingivitis, gum infections, canker sores and more. It also helps speed healing and relieve the pain associated with dental procedures.
The wonders of aloe are plentiful. Use this soothing succulent to relieve skin, boost diet and protect oral health. When taking aloe products internally or orally, be sure that the product is intended for internal use. Many topical aloe products contain artificial additives and perfumes that are toxic to consume.


