
6 minute read
Activity Sample Pages

from Digi Booklet 2021

Lesson 17: Capturing and Manipulating Digital Images
Objective(s):
Advertisement
By the end of this lesson you will be able to:
Capture a digital image Manipulate a digital image
Activity 1
Look at the digital images below. What is different about each image?
1 2 3
The first image is a photograph of an artist’s drawing. The second image has been created using design software. The third image has been manipulated (changed).
Spot the differences between Image 2 and Image 3:
1.
2.
3.
We capture images using a digital camera, mobile phone or a webcam. Why would you take a photograph of a person or a place? Tell your teacher and write your answer below:
Why would you take a photograph of an image?
© NCC Education 2020 All Rights Reserved
Activity 2
Take a picture of yourself using a digital camera or phone. Your teacher will help you.
Now your teacher will help you to upload your image onto the computer.
Use the design software to manipulate (change) your image.
Which is your favourite effect?
Can you make your photograph look like a drawing?
How about adding a frame and some text?
Remember to save your image!
TOPTIPS! You could put all your classmates’ images together and make a class collage.
Guidance notes for teachers
Activity 1
Discuss the images in the student guide with the class. Explain that to manipulate an image means to make small changes.
Working in pairs, the students write down three differences. Their answers will likely include: • Text has been added to image 3 • Image 2 is surrounded by a frame • Image 3 has eyebrows (stickers)
Ask the children why we take photographs. It is usually to remember an event or family occasion. When we manipulate (change) an image it creates a mood. Give the example that sepia colours age an image and make it look like something happened in the past.
Activity 2
You may choose to arrange the class into groups of 2-3. Help the students to take portraits of one another and upload their images onto the computers.
Encourage the students to try as many variations as possible using the following image editing software (suggested, alternative resources may also be used):
• Photo Face Fun: http://www.photofacefun.com/
You may choose to demonstrate aspects of the software to the whole class and check understanding before the students start work on manipulating their own images.
If put together in a class collage, the final photographs would make a fun and interesting display.
© NCC Education 2020 All Rights Reserved
Activity Sample Pages
Lesson 25: Programming a Robot Lawnmower

Objective(s):
By the end of this lesson you will know more about: • How robotic machines are programmed
Activity 1
Do you have a garden or local park with a lawn?
Who cuts the grass there?
There are many different computer-controlled automated systems for your home. But there are also systems for people’s gardens. Even robotic lawnmowers that can cut your grass!
Your teacher will show you a robotic lawnmower in use.
Programming a machine like this means using sensing to respond to grass edges and objects.
Let’s practise: In this lesson we will program a robotic lawnmower using Scratch.
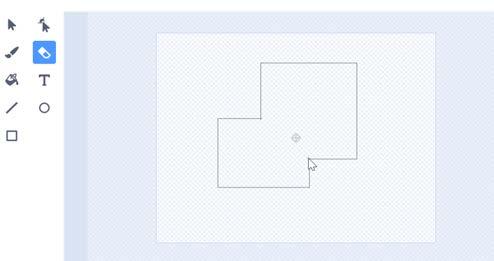
Firstly, create the grass area that the robot is going to cut:
Create a sprite like the one here by drawing two overlapping rectangles.
77 of 109
© NCC Education 2020 All Rights Reserved
Use the Eraser to rub out the overlapping lines, like this:
Now create a second sprite to be your lawnmower. Just a simple shape will do:
A small red circle (filled in) would be ideal, like this:
You can delete the cat sprite.
Here is the code for the grass area.
The size is set at 100 but if it is too small (or even too big) you may change the value to see the whole area in the workspace.
78 of 109
© NCC Education 2020 All Rights Reserved
Activity Sample Pages
Lesson 29 – Data Analysis
By the end of the lesson you will understand more about:
• How to carry out simple data analysis
Activity 1
Work with your group again from the last lesson.
Pass a copy of your questionnaire to each Member of your class.

You will also receive a copy of each group’s questionnaire to complete.
Return the completed questionnaires to the appropriate groups.
Activity 2
You are going to collate the data and analyse the answers using a spreadsheet.
You should be able to make a few early judgements about your data simply by reading the numbers.
Represent some of your data as a chart or graph, like the MS Excel example below:

143 of 146
© NCC Education 2020 All Rights Reserved
Lesson 3: Understanding Computer Memory
Objective(s):
By the end of this lesson you will be able to:
Explain the function of different types of memory
Activity 1
There are different types of internal memory inside computers. Each memory type has a different role to play.
Registers
The CPU of a computer contains a range of registers; each register does a different job.
Memory Address Register (MAR)
Stores a location in memory that the computer wants to read data from or write data to.
Instruction Register (IR)
Stores instructions that have been fetched from the main memory. The instruction is then passed to the Control Unit which decodes it in order for it to be executed.
Cache Memory
Temporarily stores data and instructions which are used frequently. If data is stored in a cache rather than the main memory it can be accessed quicker.
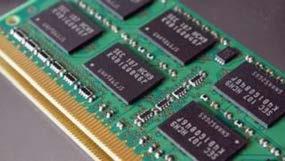
Random Access Memory (RAM)
Holds data temporarily, stores any programs that are being run (including the operating system) and the data being processed. When the computer is switched off, the content of the RAM is lost.
RAM exists in different formats such as DDR (Double Data Rate). The format found in most modern PCs is DDR3.
Read Only Memory (ROM)
Used when the computer is booted. ROM is pre-programmed and built into the computer and it provides start-up instructions. The content of this memory cannot be changed and the memory remembers its contents even when the computer is switched off.
The ROM exists in a small chip called the Basic Input Output System (BIOS) chip and it is fitted onto the motherboard of the PC. Newer PCs use a different type of chip called a Unified Extensible Firmware Interface (UEFI) instead of BIOS.
© NCC Education 2020 All Rights Reserved

NCC Education Ltd
The Towers Towers Business Park Wilmslow Road Didsbury Manchester M20 2EZ United Kingdom
Tel : +44 (0) 161 438 6200 Time : Monday to Friday 08:30 - 17:00
If you have any questions in relation to Digi, please contact https://www.nccedu.com/qualifications-level/digi/
To learn more about NCC Education, our programmes, affiliations and partnerships visit our website and connect with us throught our social platforms.

