6 minute read
Engineering in Excellence


RTR LAD CPD Engineering Project –Drift Trike build
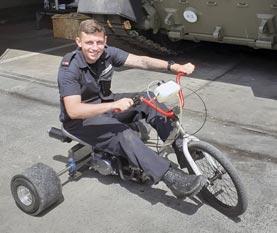
The finished trike
Advertisement
Colin Furze - Drift Trike http://www.colinfurze.com/drift-trike.html Build team – Cfn Isherwood (VM2), Cfn Gray (RM3), WO1 (ASM) Bush. Welding instructors – Capt C Milne (previous EME), Cpl Rostron (RM1). Scribes – Cfn Isherwood and WO1 (ASM) Bush. EME – Capt G McKenna.
WO1 (ASM) Bush
If you are looking for an interesting project that will enhance your engineering skills with a great toy as the resultant product have a look at Colin Furze on YouTube. Some of his builds are completed with basic tool kits opening them up to those new to engineering and perfect for REME engineers of all competencies. His version is built without the use of welding equipment
Drift trike 711s
simplifying it, we decided to use a welder to teach the skill.
During the national lockdown I spent some time looking for a project to test the engineering skills of some of the junior tradesmen within the LAD once we could return to work in a more normal capacity. The Colin Furze Drift Trike looked like an interesting build and the most fun once completed.
Recruiting a build team was easy once the YouTube instructional video had been seen by all, Cfn Isherwood and Gray offered their help immediately. We then set about sourcing the parts required and planning the build.
Cfn Isherwood
After watching the video, I wanted in. The opportunity to build something like this from scratch looked amazing and just what I needed when returning to work after a period of being dispersed.
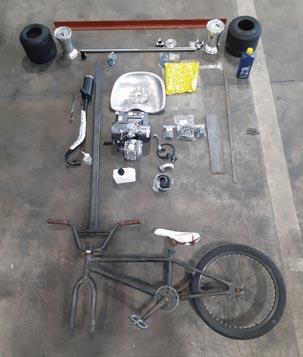
Essentially this build is the front end of a BMX, the rear axle of a go-kart held together by a bespoke fabricated chassis made from box and angle iron, a 110cc pit bike engine to power it and UPVC sleeves fitted to the rear tyres. The sleeves serve three purposes; firstly, for fun, drifting this trike is great fun and secondly to prevent the trike reaching its max speed of 60mph. So, safety has been considered. Thirdly from an engineering perspective they replace the differential or freely rotating hubs by allowing power to be lost through less friction with the road surface.
Chassis
Made from box and angle measuring, cutting and welding were key to this. We had to consider: • The chassis length would accommodate the engine. Wide enough to support the axle and house the bearings. • Ground clearance. • How to fix it to the BMX.
Rear axle and rolling chassis
The next stage was to attach the chassis to the BMX this involved cutting an arc into the box to maximise the material contact with the BMX crank housing and welding them together.
The completed chassis
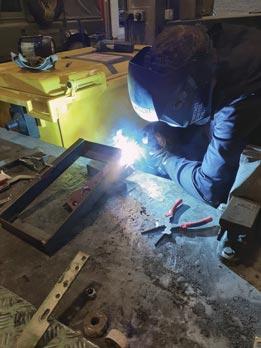
Cfn Gray welding the chassis
Setting up the rear axle was tricky in that the height was dictated by the size (top-bottom) of the bearing housings and the diameter of the sprocket, not creating a harsh angle between the engine output and the rear axle. This took a lot of measuring to find the right positions for all components, this was achieved and the bearings fitted over horizontal cut-outs for ease of removing the axle once the bearings were detached.
Drive
The engine has four mounting bolts on its underside that we fabricated a plate to secure it to the chassis. The position of the plate would also determine chain tension.
In order to tension the chain first we needed to drill out the centre of the sprocket so it could be fitted to a go-kart hub secured with a key to the axle. This involved finding the exact centre which was tricky and I suggest you watch the video to see the method, pics attached to provide an idea. Three broken hole saws later and we had the sprocket and carrier bolted together and fitted. Thanks go to our then EMELt Lt Garraway (8 Fd) for drilling the hole!
Fuel and Electrics
Not many junior tradesmen have experience with carburetted engines, working with a simple pit bike engine like this made the fuel and air delivery method easy to understand. The fuel tank is very basic, attached to the handlebars and we decided to fit an in-line paper filter that are very cheap to buy and protect the carb and engine.
The engine is 110cc, 4-speed semi-automatic with a kick start. Fitting and setting it up was very straight forward as the engine came with all its required ancils. As for the electrics this was simple too, all colour coded, we added extra heat shrink for more
Finding the centre of a 10mm dia hole Ready for drilling Drilling the sprocket using the centred pilot hole
Rear axle set up Fuel and electrics left to go on

protection and carefully thought through routing to prevent cables melting on the engine and exhaust.
Seat
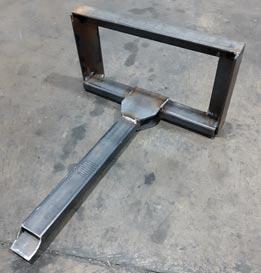
A metal tractor seat fitted over the rear axle. Using the box to set the height, and the inner circumference of an old brake disc to add strength means the rider can adjust their position forward and rearwards on the seat without bending it and remain a safe distance from the exhaust.
Lessons learned
We would often stop the build and talk things through using a white board to explain various systems also drawing on the knowledge of other members of the LAD who provided input where needed.
Going into this both myself and Dec Gray had no welding experience. The EME kindly offered his assistance and taught us how to complete what we needed to and some of the theory behind it. This was a great skill to learn and I hope to do more of it on future projects.
We also learned the importance planning each step of the build as a decision in the early stages could affect an action further on meaning planning was key as was making decisions dynamically and solving issues as they arose. There were a few occasions where we needed to conduct re-work thinking problems through in detail and preventing them from occurring again.
Understanding how a carburetion works was really interesting. We stripped the carb to see in detail the components and discuss its operation. It’s a simple system and seems common on these small bike engines so definitely worth understanding if you do a similar build to us. The effort in the evenings was well worth it; its fun to use and most of all we built it, we understand it and can repair it and even modify it if we wish.
WO1 (ASM) Bush
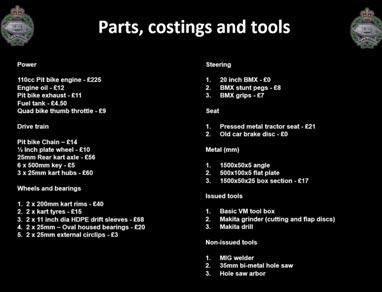
If interested to complete a project like this one I have added a parts list and costings to assist you in planning. If you want to know more about our build please get in touch with the LAD and ask for any of the build team, all of which would be happy to help. I have added a link to Colin Furze’s webpage above or find him on YouTube for other project ideas.
Brake disc seat mount