
10 minute read
Homemade Bread Recipes, Canning Jar Cookie Mixes, and More


KITCHEN GIFT GUIDE
Homemade Bread Recipes, Canning Jar Cookie Mixes, and More
By eRin PHilliPs


AS WE PREPARE FOR THE HOLIDAYS, I always take a day to make gifts from the kitchen to share with friends, teachers and co-workers. One of my favorites is a homemade bread recipe from my grandmother. In the last few years, I have also discovered the fun of making “recipe-in-a-jar” creations. These are creative gifts with endless possibilities. Homemade Bread Recipe: Pumpkin Bread in a Coffee Can
My grandma was very actively involved in her church, and around the holidays, she liked to bring gifts for people in the congregation. She would save coffee cans for months ahead of time so she had a big supply ready for baking at Christmas. She lived in suburbia, but she felt the spirit of simple homesteading: putting everything to good use and finding new purposes for items that others might throw away. My grandma Bettie passed on her homemade bread recipe to my mother and then to me as well, and I’d like to share my experience with baking it as a gift of the kitchen this year.
First I had to drink a lot of coffee — not a difficult task for me! I saved three coffee cans, removed the labels from the outside, and cleaned them out well.
I will add a step here, which I forgot to do initially. If your cans have a lip around the top, use a can opener to cut it out.
Removing the rim will allow the bread to slide out of the can when it is cooked. I didn’t even think about the necessity of this until I went to remove a loaf for my family and it wouldn’t come out! These are the little details grandmas don’t write down in homemade bread recipes. If you forget this step, you can remove the lip after the bread is baked, like I did, but it is more challenging with the bread risen up out of the can.
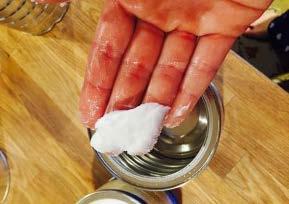
Another important part of the bread coming out of the coffee cans is properly greasing and flouring them. This is something I dreaded as a child because I didn’t like the feel of the Crisco we used.
Start with a big glob of Crisco on your fingers and get in there!
Rub it all around, coating every surface of the inside of the can. When you finish greasing the cans, you will have what I always referred to as “Crisco hands.” Your best bet for getting it off is to rub your hands together like you were putting on lotion. Rub as much in as you can; then get a dry paper towel and wipe off any excess. Your hands will be baby soft! Whatever you do, don’t try to wash your hands with water. You’ll end up with a goopy mess and you’ll miss out on some serious moisturizing.
Then you have to “flour” the cans as well. I made a little video to explain the process I use for this homemade bread recipe in a can:
www.youtube.com/ watch?v=BZ5wgSqhPGw
So, your cans are ready to go. Put them aside while you make your batter. It’s time to preheat the oven too. Set it to 350 degrees F. I used my stand mixer but you can use a mixing bowl and a spoon if that’s what you have available. Start with

If your cans have a lip around the top, use a can opener to cut it out.
Start with a big glob of Crisco on your fingers and get in there! the first six ingredients you need for this homemade bread recipe: nutmeg, cinnamon, sugar, oil, eggs, and salt.
I used our tiny pullet eggs for my baking so I added an extra one since they are so small. As part of our self-sustaining living, we always have a bowl in the fridge for kitchen scraps. When it gets full, we grind it up in the food processor and give it to the chickens. I added my egg shells to this bowl; they provide good calcium for the girls. As long as they are ground up well, they don’t realize they are eating egg shell so (knock-on-wood) it doesn’t lead to egg eating.
Once you have these mixed together, start adding the other ingredients, one at a time. Usually, I don’t like to use commercially canned vegetables, but I didn’t make any canned pumpkin this year, so I got some at the store. I found an organic store brand pumpkin.
I should take a moment to talk about the walnuts. It is really important that you use black walnuts. They have a distinctive flavor that really defines the taste of the pumpkin bread recipe. These are the ones I used.
Before you add the nuts and raisins to your batter, you need to “flour” these as well so that they won’t sink to the bottom of your bread while it’s baking. To do this, put the nuts and raisins in a large bowl or mixing cup. Add some flour on top.
Now shake it very gently. You can get your fingers in and mix them around as well.
Now throw them in too and mix, mix, mix!
You’re ready to fill your prepared coffee cans. Divide the batter evenly between the three cans, and put them in the oven.
The homemade bread recipe says they should cook an hour, but I find they usually take closer to 80 minutes. To check them, stick a sharp knife down in the middle. They are done when the knife comes out clean.
When the bread comes out of the oven, let it sit until it cools. Then cut some squares of plastic wrap to cover the top. Use a pretty fabric bow to tie the plastic wrap down and give it some holiday cheer. You could decorate the can or write a message with a sharpie marker as well. Recipe-In-A-Jar
Another thing I have gotten into making the last couple years is a recipe-in-a-jar. The idea is that you put all the dry ingredients for a recipe into a pretty jar and give it as a gift. Not only is it beautiful to look at, with all the layers of ingredients, but it is also a fun project for families to do together around the holidays.
When I started, I used prescribed recipes I found in a magazine, but soon I discovered you could do this with many different kinds of foods if you just followed a few rules:


* Pick a recipe with mostly dry ingredients. I try to find something with three or less “wet” or fresh ingredients that will have to be added. * Consider the jar. You can use any canning jar you have, but vintage or unique jars will only add to the charm of your gift. If you are reusing old jars, just make sure the sterilize them before you add any food. * Consider the size of the jar. I typically use quart jars for baking recipes and pint jars for soups. You may need to size your recipes down so that the ingredients will fit in a jar. I have found that if you cut a typical cookie recipe in half, it will fit in a quart jar. * Consider what will layer well. When you are putting the ingredients in the jar, don’t just add them in order; think about what will stay in separate layers and be visually appealing. * Add ingredients carefully. I use my wide mouth funnel to allow for easy pouring of ingredients into the jar then carefully spread them into even layers. Try not to splash things around too much (especially flour and sugar) or the inside of your jar won’t stay clean and it won’t be as pretty when you are finished. * Allergies. In today’s world, you have to be careful about your ingredients and making sure you put a warning on the jar if it contains allergens, especially nuts.

This year, I made two kinds of jars: soup mixes and cookie mixes.
SOUP MIXES
In years past, I made up mixtures of beans, grains, spices and more to put in my jars. This year, I was short on time so I took the easy route: pre-made soup mixes. If you go to your grocery store, you will find many options in the soup aisle.
I chose two from Bob’s Red Mill: Whole Grain and Beans and Vegi. I selected these because I know the company makes a quality product and because they are visually a nice mix of colors and textures.
When I got them home, I divided the mixes between four pint jars (each bag will fill two). I put on the lids, topped them with a circle cut from pretty cotton fabric, and tightened the bands down. Finally, I took the directions from the bag and made a little tag to attach to the jar. Whoever you give your recipe-in-a-jar to will need to know how to make it. Make sure your directions match the quantity you are providing in the jar.
Finally, print and cut out your tag. Punch a hole in it, and use a piece of ribbon to tie it to the jar. COOKIE MIXES
This time of year, if you walk down the baking aisle, you will find all kinds of special items. I got several kinds of chips and candies to use. When I got them home, I modified the recipes from the backs of the bags for my jars. Here are several examples.
Chocolate Chip Cookies
I followed this recipe almost exactly, cutting it in half to fit in my pint jar.
Christmas M&M’s Cookies
For this jar, I used the Chocolate Chip Cookie recipe but switched out Christmas M&M’s for the chocolate chips. The red and green M&M’s are so festive. My stepsons always choose this one to take for their teachers.
White Chocolate Cranberry Cookies
This was originally meant to be baked as a blondie bar, but I cut it down for the jar and modified my directions to make a cookie. I also put walnuts in instead of macadamia nuts because that’s what I had in my freezer.
Mint Chocolate Delights
I followed this recipe fairly closely, cutting it in half for the jar. The cocoa powder, along with the mix of green and brown chips make this one quite festive as well.
Oatmeal Chocolate Chip Cookies
I cut this recipe in half and simplified the ingredients for my jar (by removing the white sugar and the raisins). The oats give it nice texture variation.
As I prepared my jars, I made labels for each. By typing them as I worked, it helped me keep straight which recipe went with which jar, modifications I had made, and if I needed to add any nut warnings. When I was all finished, I printed my tags and cut them out.
Many of the cookie recipes call for vanilla extract. Another fun addition could be to make and include a homemade vanilla extract gift.
These are just a few ideas of easy recipe-in-a-jar gifts that I have made. Depending on the time you have to spend and how devoted you are to simple homesteading, you may make your recipes more homemade, less store-bought. Either way, though, they will be appreciated and enjoyed by the receiver! The possibilities are endless: mixes for tea, waffles, breads, meat rubs. ◊


