
5 minute read
Chironomids


John Kent has developed a reputation as an innovative fly tyer, and the skill Kent demonstrates doesn’t happen by accident. Kent is particular about the materials he chooses and the way he uses them.
When it comes to chironomid pupa patterns, tying thread is not created equal. A tying thread that lays flat allows minimal securing wraps to create smooth, thin flies -- an essential chironomid pupa pattern feature required to fool fussy, educated trout. For his tying needs, Kent prefers UTC 70 thread.
Advertisement
Each wrap twists the thread. Twisted threads increase bulk, making it challenging to obtain the slender, tapered look chironomid pupa patterns require. If you are right-handed and using a flat profile thread, you can remove thread twist at any point during the tying process by spinning the bobbin counter-
Designed By John Kent
ASB #3
clockwise when viewed from above. Flat threads can also be corded tight to increase thread strength by spinning the bobbin clockwise.
Kent realized that a slender, natural taper was one of the critical traits common to all successful chironomid pupa patterns. To build up a consistent taper, Kent forms an underbody over the front third of the hook shank using tying thread or Uni-Stretch on larger patterns. Under thread tension, Uni-Stretch compresses, reducing bulk, making it an excellent chironomid gill material. Brass or tungsten beads slide over the gill tie-in area without risk or worry.
After sliding the bead onto the shank, narrow end towards the hook eye, Kent attaches the tying thread behind the bead, winding it back to the midpoint of the shank.
Small-diametre beads also reduce underbody bulk, as it takes less material to expand to the outside diametre of the hole at the rear of the bead.
Kent is a big fan of contrasting ribs, wire or wire and Mylar. Double ribs are tied in together, so they behave as though they were one.
A body is only as smooth as the foundation below. Before winding the body and rib forward, fill any valleys with tying thread. To maintain the thin profile chironomid pupa patterns dictate, keep your thread wraps to a minimum. In our conversations, Kent stressed that every thread wrap has a purpose when he ties.
After tying off wire ribbing, break it using a pulling and twisting motion. This technique prolongs the scissors’ life, eliminates unnecessary thread wraps to cover exposed wire and avoids breaking thread on the sharp ends of the wire. Placing your thumbnail at the tie-off point and pinching the fly expedites the break-off.
As with many tiers, Kent prefers the simplicity of a thread thorax that slopes gently onto the rear of the bead.
Kent uses a variety of gill styles for his beadhead pupa patterns. White beads and beads combined with yarn or Uni-Stretch gills are standard. Another gill option Kent prefers involves applying a small circular dab of white fabric paint to the top of the bead.
With practice and discipline, you can fill your fly boxes with a myriad of realistic, tapered chironomid pupa patterns.


Tying Instructions
Tying Note: Coat the finished fly, including the bead with brushable superglue, Sally Hansen’s Hard As Nails nail polish or a UV cure resin.
Materials
Hook:
Daiichi 1120 or equivalent, #8 to #14
Thread:
70 Denier UTC, black
Underbody
(optional):
White Uni-Stretch
Body:
Anti-static bag
Rib #1:
UTC x-small black wire
Rib #2:
UTC x-small red wire
Thorax:
Tying thread
Bead:
Black tungsten
Gills:
Tulip white fabric paint
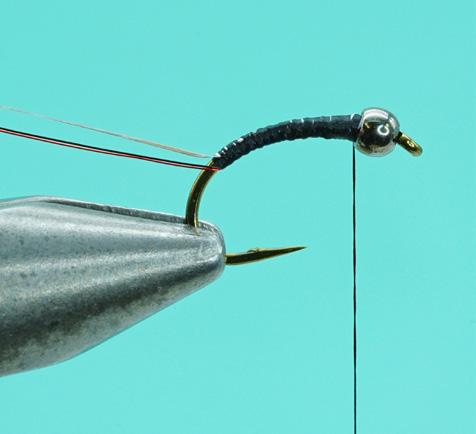
Slide a tapered black tungsten bead onto the de-barbed hook with the narrow end of the bead facing the hook eye. Using white Uni-Stretch on a bobbin, build an underbody over the front third of the shank. The finished taper of the front portion of the underbody should be same diametre as the hole of the tapered bead. As you build the underbody, remember to twist the bobbin as necessary to ensure Uni-Stretch lays flat. Attach the tying thread directly behind the bead and tie off the Uni-Stretch. Remove the excess Uni-Stretch.
1 2
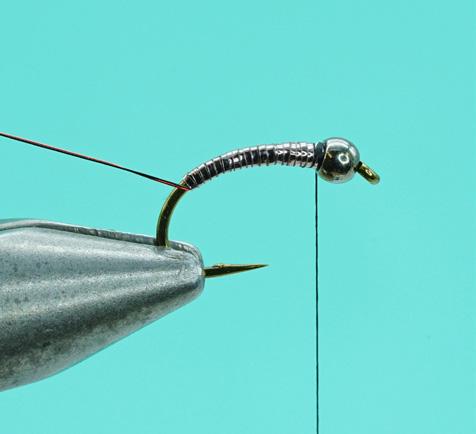
Tie in the wire ribbing together directly behind the bead, along the underside of the shank. Secure both ribs down the underside of the shank into hook bend mark using closetouching turns.
Trim one end of a .5-millimetre anti-static bag strip to a tapered point. Secure the anti-static body material by the point and bind it back to the bend. Using minimal flat wraps, wind the tying thread forward to the rear of the bead. Fill in any valleys along the way to ensure a smooth, tapered underbody foundation.
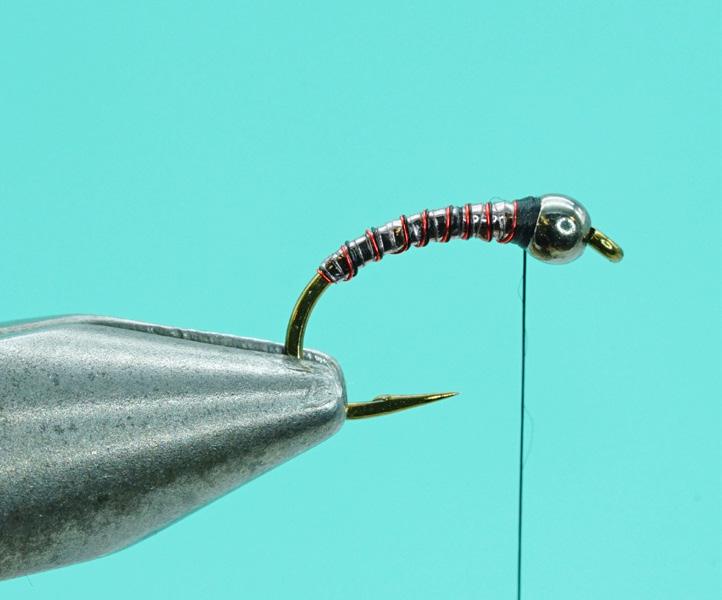
Form the body by winding the anti-static strip forward to the rear of the bead using close-touching turns. Tie off the body material at the rear of the bead and remove the excess.
Stroke both strands of the wiring ribbing together and wind forward using open turns to the rear of the bead. Use your thumbnail or scissors points to try and keep the wire strands laying against each other. Tie off the wire strands. Using a pulling and twisting motion, break away the excess
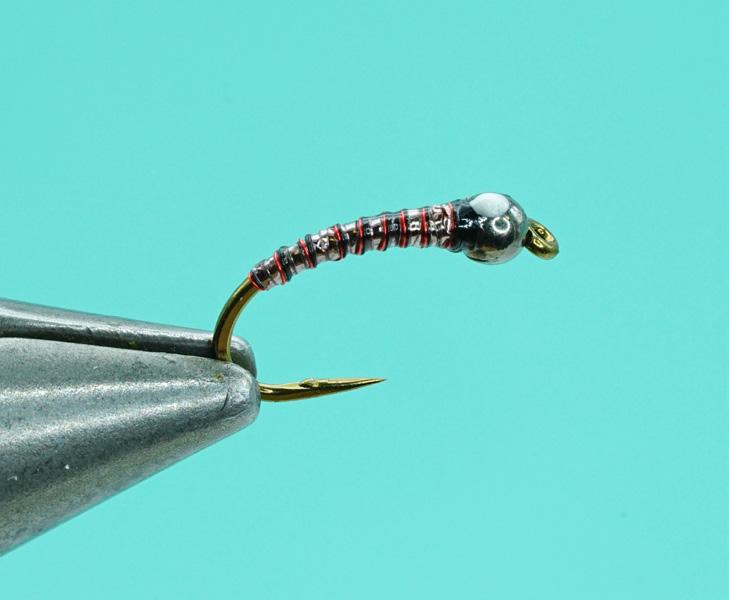
Spin the bobbin to remove any thread twist. Build a gradual neat, tapered thread thorax behind the bead. The finished thread thorax should be the same diameter as the outside wall of the bead and extend no further back onto the body than the length of the bead. Form a three-turn whip finish and remove the tying thread.
Add a drop of white fabric paint to the top of the bead. Once the fabric paint is dry, coat the body and bead using brushable superglue, nail polish or UV cure resin.

When trout are fixated on chironomids, trying to replicate or match the emerging pupa through pattern choice and presentation technique is the standard course of action. But what happens when this matchthe-hatch mantra isn’t working? Many fly fishers try smaller imitative patterns, shuffle through colour variations or choose flies with slender, natural profiles with little to show for the effort. Trout are feeding, so what’s the next option?

There are times when coming from the other end of the spectrum works unbelievably well. Exaggeration can be the key to success.
There are four main ways I exaggerate my chironomid pupa patterns: colour, size, pattern mobility and presentation.
Colour exaggerations focus on loud, perhaps even obnoxious, choices. John Kent’s flashy attractor-style chironomid pupa
Designed By John Kent Chironomids
Blind Eye Charlie
patterns, such as his Blind Eye Charlie, take advantage of this form of exaggeration. Kent integrates holographic Mylar and Flashabou with Mirage Opal Mylar or Flashabou into the bodies and ribbing on some of his best attractor patterns. These materials catch and reflect light, attracting fish from a distance. Fluorescent colours are another option, and fluorescent chartreuse and pink beads are also worth trying. Glo Brite floss provides subtle fluorescence when used for thoraxes, wing pads or butts. Flies incorporating fluorescent colours stand out in a crowd, remaining visible at depth.
Exaggerating size is another worthwhile tactic. Perhaps the perceived reward of a large, tasty pupa will be too much for foraging trout to pass up.
The main philosophy when using attractor patterns is having your fly stand out in a crowd, so it triggers a response. Besides colour and size, pattern mobility is another consideration. Blending natural movement into the fly to suggest life also works at times. Slender marabou tails on chironomid pupa or long, gangly stretch floss legs on bloodworm patterns are two of my favourite options. Mobile patterns suspended under an indicator come to life, animated by the surface chop against the indicator. The indicator’s bouncing motion transfers to the fly via the leader and tippet, providing a powerful trigger to otherwise closemouthed trout.
Presentation technique also factors into the exaggeration equation. Although not a tying technique, proper presentation is the key to any fly, regardless of pattern style, size or type. When it comes to chironomids, most presentation techniques are slow, matching the almost stagnant motion of the natural pupa. At times, a brazen approach is

