
24 minute read
Chapter 3: Skill Level Tasks


a. Place examination gloves on hands.
b. Ask the patient if the cast was exposed to water or if the cast padding was pulled out. NOTE: Depending on the length of time the cast has been on, the technician must look for soft spots, missing webril, and signs the cast was exposed to water.
c Locate the bony prominences (e.g., ulnar styloid, malleolus) and external pins (if applicable).
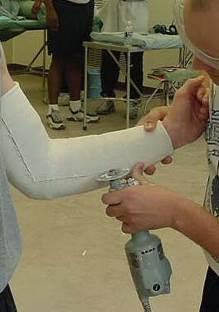
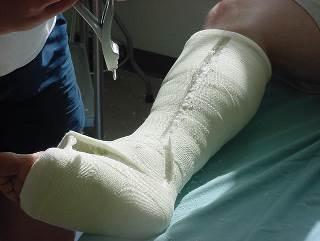
8. Cut the cast along the medial and lateral aspect. (See Figure 3-3 and a. Place a privacy pad or bed sheet on the patient's lap or above the cast area. b.Place the cast cutter plug in the electrical wall outlet. c.Grasp the cast cutter handle between the thumb and index finger. d. Rest the thumb on the cast handle maintaining contact throughout the procedure. e.Turn on the cast saw. f. Place the saw blade on the medial aspect. g. Apply pressure to the saw using an up and down motion of the wrist. When resistance is absent, lift the blade up and advance in the direction of the cut. h. Place the saw blade on the lateral aspect. i. Repeat substep 8.g. j. Turn the cast saw off and unplug cord from the wall outlet. a. Place the cast spreader edge in the precut line. b. Pull the handles together. a. Squeeze patient's fingers/toes; nail beds will turn white b. Release patient's fingers/toes; nail beds will return pink. a. Record the procedure applied and cast care instructions provided. b. Sign your name.
NOTE: All casts are cut along the medial and lateral aspect except for the long arm casts, which are cut along the anterior/posterior aspect.
CAUTION: Do not bring the blade out of the cutting groove, do not drag the saw, or leave it in one place too long. This will cause the blade to produce friction (heat up), and burn or cut the patient.
9. Separate the cast.
10. Cut the underlying cast padding.
11. Remove the anterior and posterior shells.
12. Inspect the patient's skin.
NOTE: Report the presence of any unusual skin conditions such as drainage, blisters, rashes, and pressure sores to the physician and follow the physician's instructions.
13. Check patient's capillary refill.
CAUTION If capillary refill is delayed for more than 2 seconds, inform physician and follow physician's instructions.
14. Give the patient verbal and written instructions on post cast care.
15. Annotate the procedure applied to the patient in the medical record or SF 513.
16. Escort or direct the patient to the front desk to make a follow-up appointment.
Evaluation Preparation: You must evaluate the students on their performance of this task in an operational condition related to the actual task.
1 Reviewed the order from the physician.
2 Gathered equipment and materials.
3. Told the patient your name and job title.
4. Positioned the patient supine in the middle of the bed or sitting in a chair.
5. Explained the procedure to the patient.
6. Donned safety equipment (patient and technician).
7. Inspected the cast.
8. Cut the cast along the medial and lateral aspect.
9. Separated the cast.
10. Cut the underlying cast padding.
11 Removed the anterior and posterior shells.
12 Inspected the patient's skin.
13 Checked patient's capillary refill.
14 Gave the patient verbal and written instructions on post cast care.
15 Annotated the procedure applied to the patient in the medical record or SF 513.
16 Escorted or directed the patient to the front desk to make a follow-up appointment.
Evaluation Guidance: Score each Soldier according to the performance measures in the evaluation guide. Unless otherwise stated in the task summary, the Soldier must pass all performance measures to be scored GO. If the Soldier fails any step, show what was done wrong and how to do it correctly.
Wedge a Cast
081-68B-1530
Conditions: You are presented with a physician's order to wedge a cast of an orthpedic patient. The patient is sitting or supine on an orthopedic examination bed and may be accompanied by a family member/chaperone. Nursing personnel and physician are available. You will need the patient's medical record or Standard Form (SF) 513, Medical Record - Consultation Sheet, the local standard operating procedure (SOP), workcart/station, marking pen, cast saw, cast spreader, eye protection, hearing protection, examination gloves, scissors, fiberglass rolls, hospital pads (chux) or bed sheet, bucket of tepid water with plastic bag, sink with faucet, plastic or wooden spacers, cast care booklet or equivalent, and trash receptacle.
Standards: Wedge the cast without causing harm to the patient. Apply the appropriate wedge procedure. Secure the wedge with fiberglass. The capillary refill returns within 1 - 3 seconds.
NOTE: Wedging is performed on a casted patient to correct bone and soft tissue deformities.
Performance Steps: a. Gather equipment.
1. Review the order from the physician.
NOTE: The physician draws a line at the site of the fracture.
2. Gather the equipment and materials.
NOTE: The physician's order, technician's preference, availability of supplies, and/or patient's extremity size determine which casting material (fiberglass/plaster) is used.
(1) Cast saw with vacuum.
(2) Cast spreader.
(3) Hearing protection.
(4) Eye protection.
(5) Scissors.
CAUTION: The temperature of the water must be tepid (70° - 80° F) to reduce further injury (possible burns) to the patient. The technician must change the water after each cast application, as the residue in the cast bucket will act as an accelerator causing the casting material to increase in heat emission.
(6) Bucket of tepid water with plastic bag b.Assemble materials.
(1) Fiberglass rolls (3 or 4 inch)
(2) Examination gloves
(3) Plastic or wooden wedges
(4) Hospital pads (chux) or bed sheets
(5) Cast care booklet or equivalent c. Place on work cart/station. a. Place examination gloves on hands. b. Ask the patient if the cast was exposed to water or padding was pulled out. c. Identify the location of the wound and the bony prominences. a. Place a hospital pad or bed sheet on the patient's lap or above the cast area. b. Plug the cast saw plug in the wall outlet. c.Grasp the cast saw handle between the thumb and index finger. d. Rest the thumb on the cast handle maintaining contact throughout the procedure. e.Turn the cast saw on. f Apply pressure to the saw using an up and down motion of the wrist along the cut line drawn by the physician. g. Lift the blade up, advancing in the direction of the cut. h.Turn the cast saw off. i. Unplug the cast saw cord from the wall outlet. a. Closed wedge procedure. b.Open wedge procedure. a. Squeeze patient's phalanges; nail beds will turn white. b. Release patient's phalanges, nail beds will return pink. c.Inform the physician and follow the physician's instructions. a. Provide the patient with a copy of the clinic hours and telephone number. Instruct the patient to call the cast clinic with any concerns or questions regarding their cast. For after duty hours concerns, instruct the patient to report to the emergency room. b. Provide the patient with a cast care booklet or written instructions. c.Instruct the patient to elevate the extremity above the heart, and extend, flex, and wiggle applicable extremities or phalanges (demonstrate for patient) to reduce swelling. d Instruct the patient on what not to do. a. Record the procedure applied and cast care instructions provided. b. Sign your name.
3. Tell the patient your name and job title.
CAUTION: The patient may be scared of the cast removal process. Demonstrate to the patient how the cast saw operates and what to expect during the removal process.
4. Explain the procedure to the patient.
5. Don safety equipment (patient and technician).
6. Inspect the cast.
NOTE: Always practice body substance isolation prior to applying traction, splints, or casts to patients.
7. Cut the wedge on the cast.
CAUTION: The dust that is produced during the removal of the cast is a carcinogenic. All cast saws must be attached to a cast cutter vacuum.
CAUTION Do not bring the blade out of the cutting groove, do not drag the saw, or leave it in one place too long. This will cause the blade to produce friction (heat up), and burn or cut the patient.
NOTE: Nursing assistant grasps the distal edge of casted extremity of the patient.
8 Perform the applicable wedge procedure (closed/open).
NOTE: The closed wedge is used for correction of bony deformity and produces impaction. The segment is removed and the cast is closed.
(1) Remove the cut section of the casting material.
(2) Close the opening by gently compressing the segments together (use other medical staff, if available).
NOTE: The open wedge is the sectioning of the cast and pulling apart of the two sections with a small block of wood or spacer inserted.
(1) Place the edge of the cast spreader in the cut section of the cast and pull the segments apart.
(2) Place the wooden or plastic wedge in the cut section of cast.
(3) Remove the cast spreader when the wedge is inserted.
9. Reapply fiberglass casting material to secure the wedge.
NOTE: Ensure the wedging correction is secure by going far enough proximally and distally from the segmented area and the cast repair is thoroughly dry.
10. Check the patient's capillary refill.
11. Give the patient verbal and written instructions on cast care.
(1) Do not stick anything down the cast.
(2) Do not remove the cast.
(3) Do not alter the cast (e.g., writing on it, coloring).
12. Annotate the procedure applied to the patient in the medical record or SF 513.
13. Escort or direct the patient to the front desk to make a follow-up appointment.
Evaluation Preparation: You must evaluate the students on their performance of this task in a field condition related to the actual task.
1 Reviewed the order from the physician.
2 Gathered the equipment and materials.
3. Told the patient your name and job title.
4. Explained the procedure to the patient.
5. Donned safety equipment (patient and technician).
6 Inspected the cast.
7 Cut the wedge on the cast.
8. Performed the applicable wedge procedure (closed/open).
9. Reapplied fiberglass casting material to secure the wedge.
10. Checked the patient's capillary refill.
11. Gave the patient verbal and written instructions on cast care.
12. Annotated the procedure applied to the patient in the medical record or SF 513.
13. Escorted or directed the patient to the front desk to make a follow-up appointment.
Evaluation Guidance: Score each Soldier according to the performance measures in the evaluation guide. Unless otherwise stated in the task summary, the Soldier must pass all performance measures to be scored GO. If the Soldier fails any step, show what was done wrong and how to do it correctly.
Conditions: You are presented with a physician's order to window a cast of an orthpedic patient. The patient is sitting or supine on an orthopedic examination bed and may be accompanied by a family member/chaperone. Nursing personnel and physician are available. You will need the patient's medical record or Standard Form (SF) 513, Medical RecordConsultation Sheet, the local Standard Operating Procedures (SOP), workcart/station, marking pen, cast saw, cast spreader, eye protection, hearing protection, examination gloves, scissors, roll of adhesive tape, elastic bandages, kerlix, webril rolls, hospital pads (chux) or bed sheet, sink with faucet, cast care booklet or equivalent, and trash receptacle.
Standards: Window the cast according to the physician's orders without causing harm to the patient. Treat the wound appropriately. Replace the segment and secure the segment with the appropriate material. The capillary refill returns within 1 -3 seconds.
NOTE: Windowing is used to remove a piece of the cast, usually square or rectangular, to allow for inspection and treatment of a wound or to relieve pressure at a specific point.
Performance Steps: a. Gather equipment. b.Assemble materials.
1 Review the order from the physician.
NOTE: The physician will draw a square, outlining the wound.
2. Gather the equipment and materials.
(1) Cast saw with vacuum.
(2) Cast spreader.
(3) Hearing protection.
(4) Eye protection.
(5) Scissors.
(1) Elastic bandages.
(2) Webril (2 or 3 inch)
(3) Kerlix (4 x 4s).
(4) Examination gloves
(5) Hospital pads (chux) or bed sheets
(6) Cast care booklet or equivalent
(7) Adhesive tape (1 inch) c. Place equipment and materials on the work cart/station. a. Place examination gloves on hands. b. Ask the patient if the cast was exposed to water or if the cast padding was pulled out. c. Locate the approximate location of the wound. a. Place a hospital pad or bed sheet on the patient's lap or above the cast area. b. Plug the cast saw cord into the wall outlet. c.Grasp the cast saw handle between the thumb and index finger. d.Turn on the cast saw. e. Apply pressure to the saw at a 45 degree anlgle using an up and down motion of the wrist and lifting the blade in the direction of the marked outline. f. Turn the cast saw off. g.Unplug cast saw from wall outlet. a. Place the cast spreader edge in the cut section of the cast. b. Pull the handles together. a. Inspect the skin/wound. b. Provide appropriate treatment for the wound, if necessary. a.Insert kerlix 4 x 4s to the wound site. b. Refit the window on the cast. a.Wrap the windowed cast with an elastic bandage. b. Secure the bandage with clips. c. Secure the clips with adhesive tape. a. Squeeze patient's fingers/toes; nail beds will turn white. b. Release patient's fingers/toes; nail beds will return pink. c.Inform the physician and follow the physician's instructions. a. Provide the patient with a copy of the clinic hours and telephone number. Instruct the patient to call the cast clinic with any concerns or questions regarding their cast. For after duty hours concerns, instruct the patient to report to the emergency room. b. Provide the patient with a cast care booklet or written instructions. c.Instruct the patient to elevate the extremity above the heart, and extend, flex, and wiggle applicable extremities or phalanges (demonstrate for patient) to reduce swelling. d. Instruct the patient on what not to do. a. Record the procedure applied and cast care instructions provided. b. Sign your name.
3. Tell the patient your name and job title.
CAUTION: The patient may be scared of the cast removal process. Demonstrate to the patient how the cast saw operates and what to expect during the removal process.
4. Explain the procedure to the patient.
5. Don safety equipment (patient and technician).
6. Position the patient supine in the middle of the bed.
7. Inspect the cast.
NOTE: Always practice body substance isolation prior to applying traction, splints, or casts to patients.
8. Cut a window at a 45 degree angle on the cast.
9. Separate the window from the cast.
10. Remove the window portion of the cast.
11. Cut the underlying cast padding with scissors.
12. Treat the wound, as applicable.
NOTE: Report the presence of any unusual skin conditions such as drainage, blisters, rashes, or pressure sores to the physician and follow the physician's instructions.
13. Repad the windowed cast.
NOTE: Webril can be used for additional cast padding, if necessary.
NOTE: If the patient needs to return for a wound check, dressing change, or suture removal, line the opening with webril to allow easy removal of the window.
14. Secure the window with an elastic bandage.
15. Check patient's capillary refill.
16. Give the patient verbal and written instructions on cast care.
(1) Do not stick anything down the cast.
(2) Do not remove the cast.
(3) Do not alter the cast (e.g., writing on it, coloring).
17. Annotate the procedure applied to the patient in the medical record or SF 513.
18. Escort or direct the patient to the front desk to make a follow-up appointment.
Evaluation Preparation: You must evaluate the students on their performance of this task in a field condition related to the actual task.
Performance Measures
1 Reviewed the order from the physician.
2 Gathered the equipment and materials.
3 Told the patient your name and job title.
4 Explained the procedure to the patient.
5 Donned safety equipment (patient and technician).
6 Positioned the patient supine in the middle of the bed.
7. Inspected the cast.
8. Cut a window at a 45 degree angle on the cast.
9. Separated the window from the cast.
10. Removed the window portion of the cast.
11. Cut the underlying cast padding with scissors.
12 Treated the wound, as applicable.
13 Repadded the windowed cast.
14. Secured the window with an elastic bandage.
15. Checked patient's capillary refill.
16. Gave the patient verbal and written instructions on cast care.
17. Annotated the procedure applied to the patient in the medical record or SF 513.
18. Escorted or directed the patient to the front desk to make a follow-up appointment.
Evaluation Guidance: Score each Soldier according to the performance measures in the evaluation guide. Unless otherwise stated in the task summary, the Soldier must pass all performance measures to be scored GO. If the Soldier fails any step, show what was done wrong and how to do it correctly. References
Subject Area 3: Client Intervention - Splinting and Prosthetics
Perform Residual Limb Care for the Amputee Patient
081-68B-1700
Conditions: A residual limb patient has presented to the orthopedic clinic or other hospital setting, with a written and/or verbal order from a physician, ready for stump care and the prosthetic phase of treatment. You will need the patient's medical record, Standard Form (SF) 600, Medical Record - Chronological Record of Medical Care, or SF 513, Medical RecordConsulation Sheet, the local standard operating procedures (SOP), a pen, a treatment table, a hospital gown or equivalent, examination gloves, various sized residual limb socks, elastic bandages (ace wraps) with clips, a bed sheet, a pillow, and a pillowcase.
Standards: Perform residual limb care according to clinic protocol without causing further harm to the patient. Apply the bandage diagonally with greater pressure on the distal aspect of the residual limb and anchored one joint above the residual limb. Observe proper safety precautions and monitor the patient for adverse reactions to the procedure. Residual limb care is used to prevent or control edema, decrease the severity and longevity of phantom sensation/pain, and maintain proper residual limb shape (a cone shape). An improperly applied bandage can cause edema, skin abrasions and create an undesirable shape or fleshly rolls, which make fitting or using a prosthesis difficult.
Performance Steps: a. Pen b. Treatment table. c.Hospital gown or equivalent d. Examination gloves e. Residual limb socks (various sizes) f.Elastic bandages (ace wraps) with clips g. Bed sheet h. Pillow i. Pillowcase a. Place examination gloves on hands. b. Assist in removing clothing and provide a hospital gown or equivalent, if necessary. c. Position the patient on the treatment table according to the area to be treated. a. Apply the bandage diagonally going from distal to proximal on the extremity. b. Overlap the bandages by 1/3 the width, avoiding any open areas. c.Anchor the bandages with the bandage clips one joint above the residual limb. a. Ask the patient if the pressure of the wrap is felt more in the distal area. If it is not, remove the bandages and rewrap. b. Ensure the bandages are anchored one joint above the residual limb. c. Ensure the bandages are wrapped diagonally, not circumferentially. a. Keep the residual limb wrapped at all times. b. Perform basic residual limb hygiene as directed. c. Change the bandages at least twice daily or when visibly soiled. d. Change the residual limb sock as needed.
1. Review the order from the physician.
2. Identify the treatment area and the applicable wrapping technique.
3. Gather equipment and materials.
4. Prepare the treatment table using a clean bed sheet, pillow, and pillowcase.
5. Tell the patient your name and job title.
6. Verify the patient's identity.
7. Explain the procedure to the patient.
8. Prepare the patient for treatment.
CAUTION: Always practice body substance isolation prior to providing treatment to patients.
CAUTION: Use caution around the incision point as not to disrupt the sutures or staples.
9. Remove the existing bandage, if applicable.
10. Inspect the limb for contraindications to residual limb care treatment.
11. Apply the bandages to the residual limb.
CAUTION: Applying the bandage circumferentially will cause a tourniquet effect on the residual limb.
NOTE: Pressure is greatest distally and decreased proximally (alleviated over a bony prominence). This will ensure the residual limb is cone shaped.
12. Verify the application of the bandage meets the standard.
13. Provide the patient with verbal and written instructions on residual limb care.
(1) Wash with antiseptic soap nightly.
(2) Dry the residual limb without abrading the skin.
(3) Apply topical medication as prescribed.
(4) Do not shave residual limb.
(5) Visually inspect the limb for signs of infection.
NOTE: Reapply the wraps every 3 to 4 hours. This exposes the residual limb to air and prevents the wraps from becoming loose.
(1) Visuaully inspect the residual limb each time the bandages are changed for signs of infection.
(2) Apply a new bandage as instructed.
(3) Check the wrapping technique after reapplication.
(a) Should not be too loose.
(b) Should not be too tight.
(c) Should not be any exposed areas of skin under the bandages.
NOTE: As soon as the sock is removed, gently hand wash it with mild soap and water. Rinse and lay flat to allow it to dry thoroughly. Vigorous scrubbing, hanging over clothesline, or drying in dryer will misshape the sock a.Out of the position of treatment. b.With clothing, if necessary. a. Record the procedure applied and cast care instructions provided. b. Sign your name.
14. Assist the patient, as needed.
15. Annotate the procedure applied to the patient and patient understanding of residual limb care in the medical record or SF 513/SF 600.
16. Escort or direct the patient to the front desk to make a follow-up appointment, as applicable.
Evaluation Preparation: You must evaluate the students on their performance of this task in a field condition related to the actual task.
Performance Measures GO NO GO
1. Reviewed the order from the physician.
2 Identified the treatment area and the applicable wrapping technique.
3 Gathered equipment and materials.
4 Prepared the treatment table using a clean bed sheet, pillow, and pillowcase.
5 Told the patient your name and job title.
6 Verified the patient's identity.
7 Explained the procedure to the patient.
8 Prepared the patient for treatment.
9 Removed the existing bandage, if applicable.
10. Inspected the limb for contraindications to residual limb care treatment
11 Applied the bandages to the residual limb.
12. Verified the application of the bandage meets the standard.
13. Provided the patient with verbal and written instructions on residual limb care.
14 Assisted the patient, as needed after completing the treatment.
15 Annotated the procedure applied to the patient and patient understanding of residual limb care in the medical record or SF 513/SF 600.
16. Escorted or directed the patient to the front desk to make a follow-up appointment, as applicable.
Evaluation Guidance: Score each Soldier according to the performance measures in the evaluation guide. Unless otherwise stated in the task summary, the Soldier must pass all performance measures to be scored GO. If the Soldier fails any step, show what was done wrong and how to do it correctly.
References
Required
SF 513
SF 600
Related
None
Subject Area 4: General Medical Remove a Patient's Ring
081-000-0094
Conditions: You have a patient who requires a ring to be removed. You will need a Penrose drain, water-soluble lubricant, and a 25 inch length of umbilical tape or string, or thick silk suture. You are not in a chemical, biological, radiological, nuclear (CBRN) environment.
Standards: Remove the patient's ring without causing further injury to the patient.
Performance Steps: a.Wrap the penrose drain circumferentially around the finger in a distal to proximal direction to reduce soft tissue swelling. For maximal effect, the wrap should stay in place for a few minutes. b. A 20 to 25 inch piece of string, umbilical tape or thick silk suture is first passed between the ring and the finger. If there is marked soft tissue swelling, the tip of a hemostat may be passed under the ring to grasp the string and pull it through the ring. c.The distal string is wrapped clockwise around the swollen finger (proximal to distal) to include the proximal interphalangeal (PIP) joint and the entire swollen finger. d.When the wrapping has been completed, the proximal end of the string is carefully unwound in the same clockwise direction, forcing the ring over that portion of the finger that has been compressed by the wrap. a.The ring cutter has a small hook that fits under the ring and serves as a guide for a saw-toothed wheel that cuts the metal. b.The cut ends of the ring are spread using large hemostats and the ring is removed.
1. Lubricate the digit with a water-soluble lubricant and apply traction on the ring while turning in a circular motion.
NOTE: Frequently a ring must be removed to prevent laceration of tissue or vascular compromise.
2. Attempt to remove the ring using the string-wrap method.
(1) The wrapping is begun next to the ring and should be snug enough to compress the swollen tissue.
(2) The successive loops of the wrap are placed next to each other to keep any swollen tissue from bulging between the strands.
3. If unsuccessful, a ring cutter should be used if there is excessive swelling.
4. Do not cause further injury to the patient.
Evaluation Preparation: You must evaluate the students on their performance of this task in a field condition related to the actual task.
Performance Measures
1. Lubricated the digit with a water-soluble lubricant and applied traction on the ring while turning in a circular motion.
2 Attempted to remove the ring using the string-wrap method.
3 If unsuccessful, a ring cutter was used if there is excessive swelling.
4 Did not cause further injury to the patient.
Evaluation Guidance: Score each Soldier according to the performance measures in the evaluation guide. Unless otherwise stated in the task summary, the Soldier must pass all performance measures to be scored GO. If the Soldier fails any step, show what was done wrong and how to do it correctly.
Treat a Casualty for Contusions or Abrasions
081-000-0098
Conditions: You have a casualty with a contusion or an abrasion. All other more serious injuries have been assessed and treated. You will need the casualty's medical record, normal saline, sterile water, gauze, exam gloves, marker, a needle, number 11 blade or tissue forceps, dressing materials, wrap, antibiotic ointment, splinting material, ice, and tape. You are not in a chemical, biological, radiological, nuclear (CBRN) environment.
Standards: Treat the casualty for contusions or abrasions without causing further injury
Performance Steps: a. Abrasions. b Contusions. a. Principles of management are as follows: b.Wound must be gently but thoroughly scrubbed with normal saline. c Remove all foreign matter that cannot be scrubbed out by using a needle, number 11 blade, or tissue forceps. d. Apply antibiotic ointment. e. Administer antibiotic therapy, if needed. Antibiotic therapy may be indicated for prophylaxis (consult medical officer). f.Give casualty instructions on wound care and signs and symptoms of infection. a. Ensure that there is no underlying fracture or evidence of any neurological or vascular involvement. b. Pad and splint injury, if needed. c. Manage complications appropriately (consult medical officer if question of underlying injury). d. Prescribe rest, ice, compression, and elevation (RICE).
1. Solicit the casualty's history.
2. Assess injury for underlying complications.
(1) Depth of wound (relates to method of anesthesia and cleaning).
(2) Amount of body surface (fluid loss can be significant in children).
(3) Amount of contamination (precursor to infection).
(1) Underlying fracture. Forceful impact of objects creating injury can result in fractures.
(2) Vascular involvement (extensive bleeding into tissue).
(3) Check distal circulation.
(4) Measure or mark the outline of the contusion.
(5) Measure circumference of injured extremity, and compare measurement to uninjured extremity.
(6) Neurological involvement. Test the sensation and movement of the injured part. Any signs of neurologic deficit may indicate a serious complication.
3. Treat the abrasion.
(1) Prevention of infection.
(2) Promotion of rapid healing.
(3) Prevention of "tattooing" from retained foreign bodies.
(1) Topical antibiotic ointment applied three times or four times a day.
(2) Dressing changed every 2 to 3 days with gentle cleaning.
(3) Monitor abrasion for signs and symptoms of infection.
4. Treat the contusion.
(1) Apply splint or cast to fractures (following medical officer's recommendation).
(2) Refer vascular or neurologic injury to a medical officer.
(1) Wrap injured area with a roller bandage to compress the wound and slow bleeding into the tissue.
(2) Apply ice to area over the wound
(3) If wound is significant, have casualty keep area elevated
5. Record all treatment in the casualty's medical record.
Evaluation Preparation: You must evaluate the students on their performance of this task in a field condition related to the actual task.
Performance Measures GO NO GO
1. Solicited the casualty's history.
2. Assessed the injury for underlying complications.
3. Treated the abrasion.
4. Treated the contusion.
5. Recorded all treatment in the casualty's medical record.
Evaluation Guidance: Score each Soldier according to the performance measures in the evaluation guide. Unless otherwise stated in the task summary, the Soldier must pass all performance measures to be scored GO. If the Soldier fails any step, show what was done wrong and how to do it correctly.
References
Required
None
Related
None
Perform a Wound Irrigation
081-000-0031
Conditions: You need to perform a wound irrigation. You will need protective pads, irrigating syringe, examination gloves, sterile gloves, mask, prescribed irrigating solution, sterile dressing, catch basin, sterile gauze sponges, a sterile solution basin, and Standard Form (SF) 600, Medical Record - Chronological Record of Medical Care You are not in a chemical, biological, radiological, nuclear (CBRN) environment.
Standards: Perform a wound irrigation without violating aseptic techniques or causing further injury to the patient.
CAUTION: All body fluids should be considered as potentially infectious so always observe body substance isolation (BSI) precautions by putting on clean gloves and an eye shield or face guard as a minimal standard of protection
Performance Steps: a.Open irrigation tray, using sterile technique, (establish a sterile field using the wrapper of the sterile solution basin). b. Verify the prescribed irrigating solution. c.Open the irrigation solution; place the cover on the table, with the inside facing upward. d. Carefully pour the solution from the supply bottle into the irrigation bottle/syringe, pour solution with the bottle label facing your palm (if the bottle has been opened previoiusly, pour off a small amount of the solution into a trash receptacle). e. Leave the cover off of the irrigation supply bottle, with the inside of the cover pointing upward. a. Hold the syringe just above the wound's top edge without touching it, and force fluid into the wound, slowly and continuously. b. Use enough force to flush out debris, but do not squirt or splash fluid. c.Irrigate all portions of the wound (do not force solution into the wound's pockets). d. Continue irrigating until the solution draining from the wound's bottom end is clear. e. Repeat steps 13a and 13c until the wound is clear of debris and/or drainage. f.Observe the drainage for blood or characteristics such as unusual color, odor, or consistency. a. Using sterile 4x4 pads, gently pat the wound's edges (unless the wound is to have a wet-to-dry dressing; then dry only the surrounding skin). Work from cleanest to most contaminated. b. Apply a sterile dressing to the wound. (See task 081-000-0030.) c. Remove the catch basin and protective pad, if they are still in place.
1. Identify the patient.
2. Explain the procedure to the patient.
3. Provide privacy, if possible, and position the patient at an angle that allows the irrigating solution to run from the upper end of the wound downward.
4. Place the waterproof protective pad and clean basin or irrigating pouch directly under the area to be irrigated.
5. Drape the patient with a bath blanket to expose only the wound.
6. Remove the used outer dressing and discard in a marked biohazard bag. Discard gloves and wash hands.
7. Prepare the irrigation equipment.
8. Put on a mask and eye protection.
9. Open the sterile dressing tray if one is to be used.
10. Put on sterile gloves. (See task 081-000-0007.)
11. Use sterile forceps to remove the inner dressings.
12. Carefully assess the amount and character of drainage, the size and condition of the wound and surrounding tissue.
13. Irrigate the wound.
NOTE: If signs of infection are observed, notify the medical officer immediately.
CAUTION: Use extra care when irrigating a wound in which an abscess has formed. Check all internal surfaces of the wound to inspect for "sinus tract" (resembles tunnels in which purulence or "pus" may be collected). This may require using the gloved hand or a sterile object to gently pull back the flesh. Be careful not to tear healing tissue.
14. Dry the wound and apply a sterile dressing.
NOTE: Moving from clean to contaminated helps to prevent the spread of pathogens. If the wound is dry, the dressings will remain dry longer and contamination will not spread.
15. Remove the mask, eye protection, and gloves.
16. Reposition the patient for comfort, if necessary.
17. Clean and store the equipment in accordance with local SOP.
18. Perform a patient care hand-wash. (See task 081-000-0006.)
19. Record the procedure on the appropriate medical form.
20. Do not violate aseptic technique, or cause further injury to the patient.
Evaluation Preparation: You must evaluate the students on their performance of this task in a field condition related to the actual task.
Performance Measures GO NO GO
1. Identified the patient.
2 Explained the procedure to the patient.
3 Provided privacy, if possible, and positioned the patient at an angle that allowed the irrigating solution to run from the upper end of the wound downward.
4 Placed a waterproof protective pad and clean basin or irrigating pouch directly under the area to be irrigated.
5. Draped the patient with a bath blanket to expose only the wound.
6. Removed the used outer dressing and discarded it in a marked biohazard bag.
7 Prepared the irrigation equipment.
8. Put on a mask and eye protection.
9. Opened the sterile dressing tray if one was used.
10. Put on sterile gloves.
11. Used sterile forceps to remove the inner dressings.
12. Carefully assessed the amount and character of drainage, the size and condtion of the wound and surrounding tissue.
13 Irrigated the wound.
14 Dried the wound and applied a sterile dressing.
15 Removed the mask, eye protection, and gloves.
16 Repositioned the patient for comfort, if necessary.
17 Cleaned and stored the equipment in accordance with local SOP.
18 Performed a patient care hand-wash.
19 Recorded the procedure on the appropriate medical form.
20 Did not violate aseptic technique, or cause further injury to the patient.
Evaluation Guidance: Score each Soldier according to the performance measures in the evaluation guide. Unless otherwise stated in the task summary, the Soldier must pass all performance measures to be scored GO. If the Soldier fails any step, show what was done wrong and how to do it correctly.
