
FROM THE MINT GARDENER SARAH SIMON

in Watercolor, Gouache, & Ink
MODERN WATERCOLOR BOTANICALS A Creative Workshop

FOREWORD 6 INTRODUCTION 8 THE ARTIST’S DESK: FOUNDATIONS OF WATERCOLOR TOOLS Stocking Up 12 Watercolor Paint ........................................................................ 15 Brushes 15 Paper 17 Pens, Pencils, & Erasers ............................................................... 19 Gouache & Watercolor 20 PREPPING TO PAINT Water Source 21 Priming Your Brush ..................................................................... 22 Creating Your Paint Palette 23 The Magic Sauce: Water-to-Paint Ratios ......................................... 24 Movement & Shine: Watercolor on Paper 25 BASIC WATERCOLOR TECHNIQUES Holding Your Brush 26 Watercolor Wash ....................................................................... 27 Boundaries ............................................................................... 27 Wet-in-Wet 28 Wet-on-Dry ............................................................................... 28 Glazing 28 Watercolor Blooms 29 Point-Pressure-Point ................................................................... 29 Blotting 29 COLOR EXPRESSION The Color Wheel 31 Range of Individual Colors ........................................................... 32 Color Harmony 32 Color Psychology ....................................................................... 35 COMPOSING A PAINTING Finding Inspiration ..................................................................... 36 Composition 36 Working in Botanicals ................................................................. 39 CONTENTS
BOTANICAL LESSONS: WATERCOLOR PROJECTS
LESSON 1 BUILD YOUR SKILLS: Technique Boxes 42 LESSON 2 PLAY WITH TECHNIQUE: Abstract Squares 56 LESSON 3 COLOR RECIPE: Swatch Charts ..................................................................................................... 62 LESSON 4 BOUNDARIES & BLENDING: Watercolor Blocks 72 LESSON 5 SIMPLE STROKES: Shapes, Marks & Lines 78 LESSON 6 COMPOUND STROKES: Point-Pressure-Point Botanicals ............................................................................... 92 LESSON 7 LOOSE LEAFY WREATH: Analogous Colors ............................................................................................... 106 LESSON 8 PALM FRONDS: Single Layer 112 LESSON 9 LOOSE PEONY: Analogous & Complementary Colors 120 LESSON 10 FLORAL BOUQUET: Layering & Complementary Colors ......................................................................... 124 LESSON 11 TROPICAL LEAVES: Layering Watercolor ............................................................................................ 130 LESSON 12 PLANT LADY: Watercolor & Ink 142 LESSON 13 TROPICAL TERRARIUM: Watercolor, Ink, & Gouache 152 LESSON 14 LAYERED WREATH: Layered Watercolor, & Gouache ............................................................................ 160 LESSON 15 DRAPING BOTANICALS: Ink, Pencil, Watercolor, & Gouache ........................................................................ 168 LESSON 16 WILDFLOWERS: Layering with Gouache 180 RESOURCES 194 ACKNOWLEDGMENTS ......................... 195 ABOUT THE AUTHOR 196 TRACEABLES .................................... 197
OFTEN, THE ART WORLD CAN FEEL A bit unreachable—like a cool kid’s club with a secret handshake. There are mystifying terms, inside phrases that are never really explained, and some intense emphasis on the best and most expensive tools. In this section, I break down all of those barriers.
I believe watercolor is accessible to anyone and really doesn’t require a big investment (at least not at first). I will help you stock up on supplies, explore basic techniques, and discover inspiration through color and botanicals. I’ll also walk you through composition and color harmony. My aim is to take any intimidation out of the process, so you can settle in and just create.
The truth is that watercolor is one of the most approachable ways to express yourself with paint, mainly because you only need a few materials to get started. And it’s extremely portable, allowing you to play with paint wherever you can sit down with a good cup of coffee—no easel needed!
By keeping it simple, you’ll be able to focus on learning the skills and experiencing the joy of exploring, trying new things, and expressing yourself through watercolor. That’s what it’s all about.
FOUNDATIONS OF WATERCOLOR 11
Watercolor is a negotiation between the artist & her tools.
TOOLS
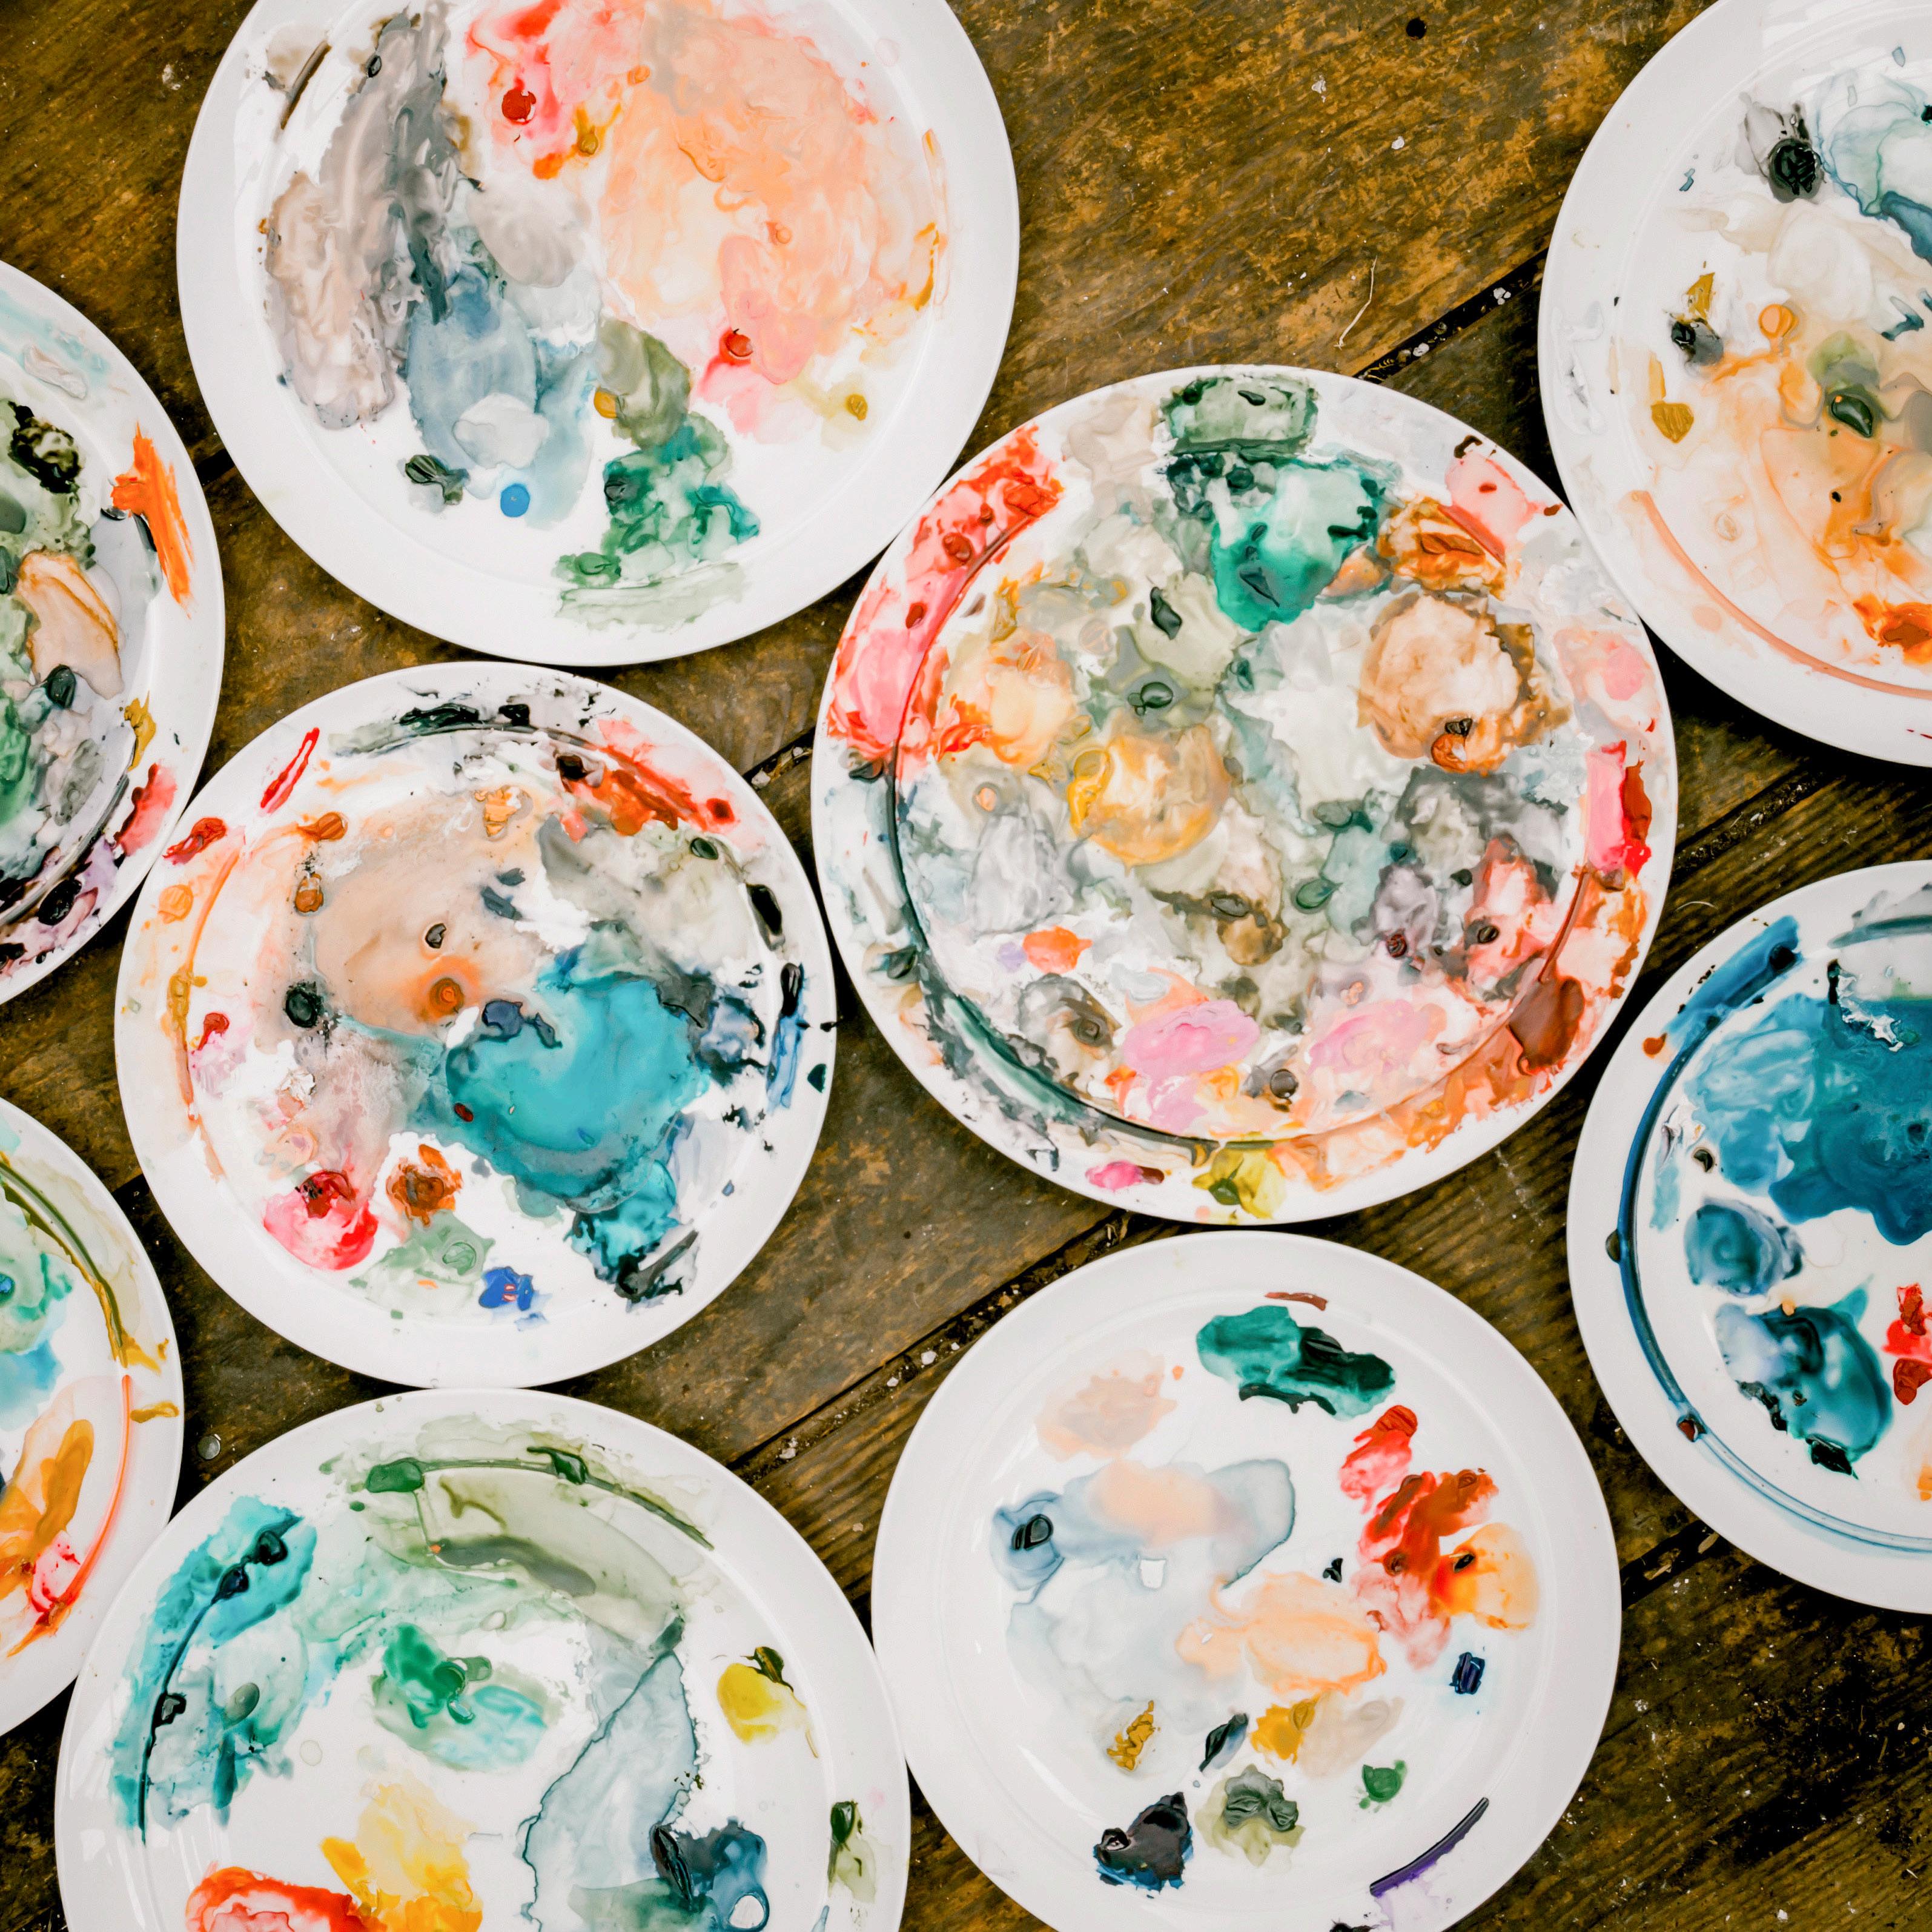
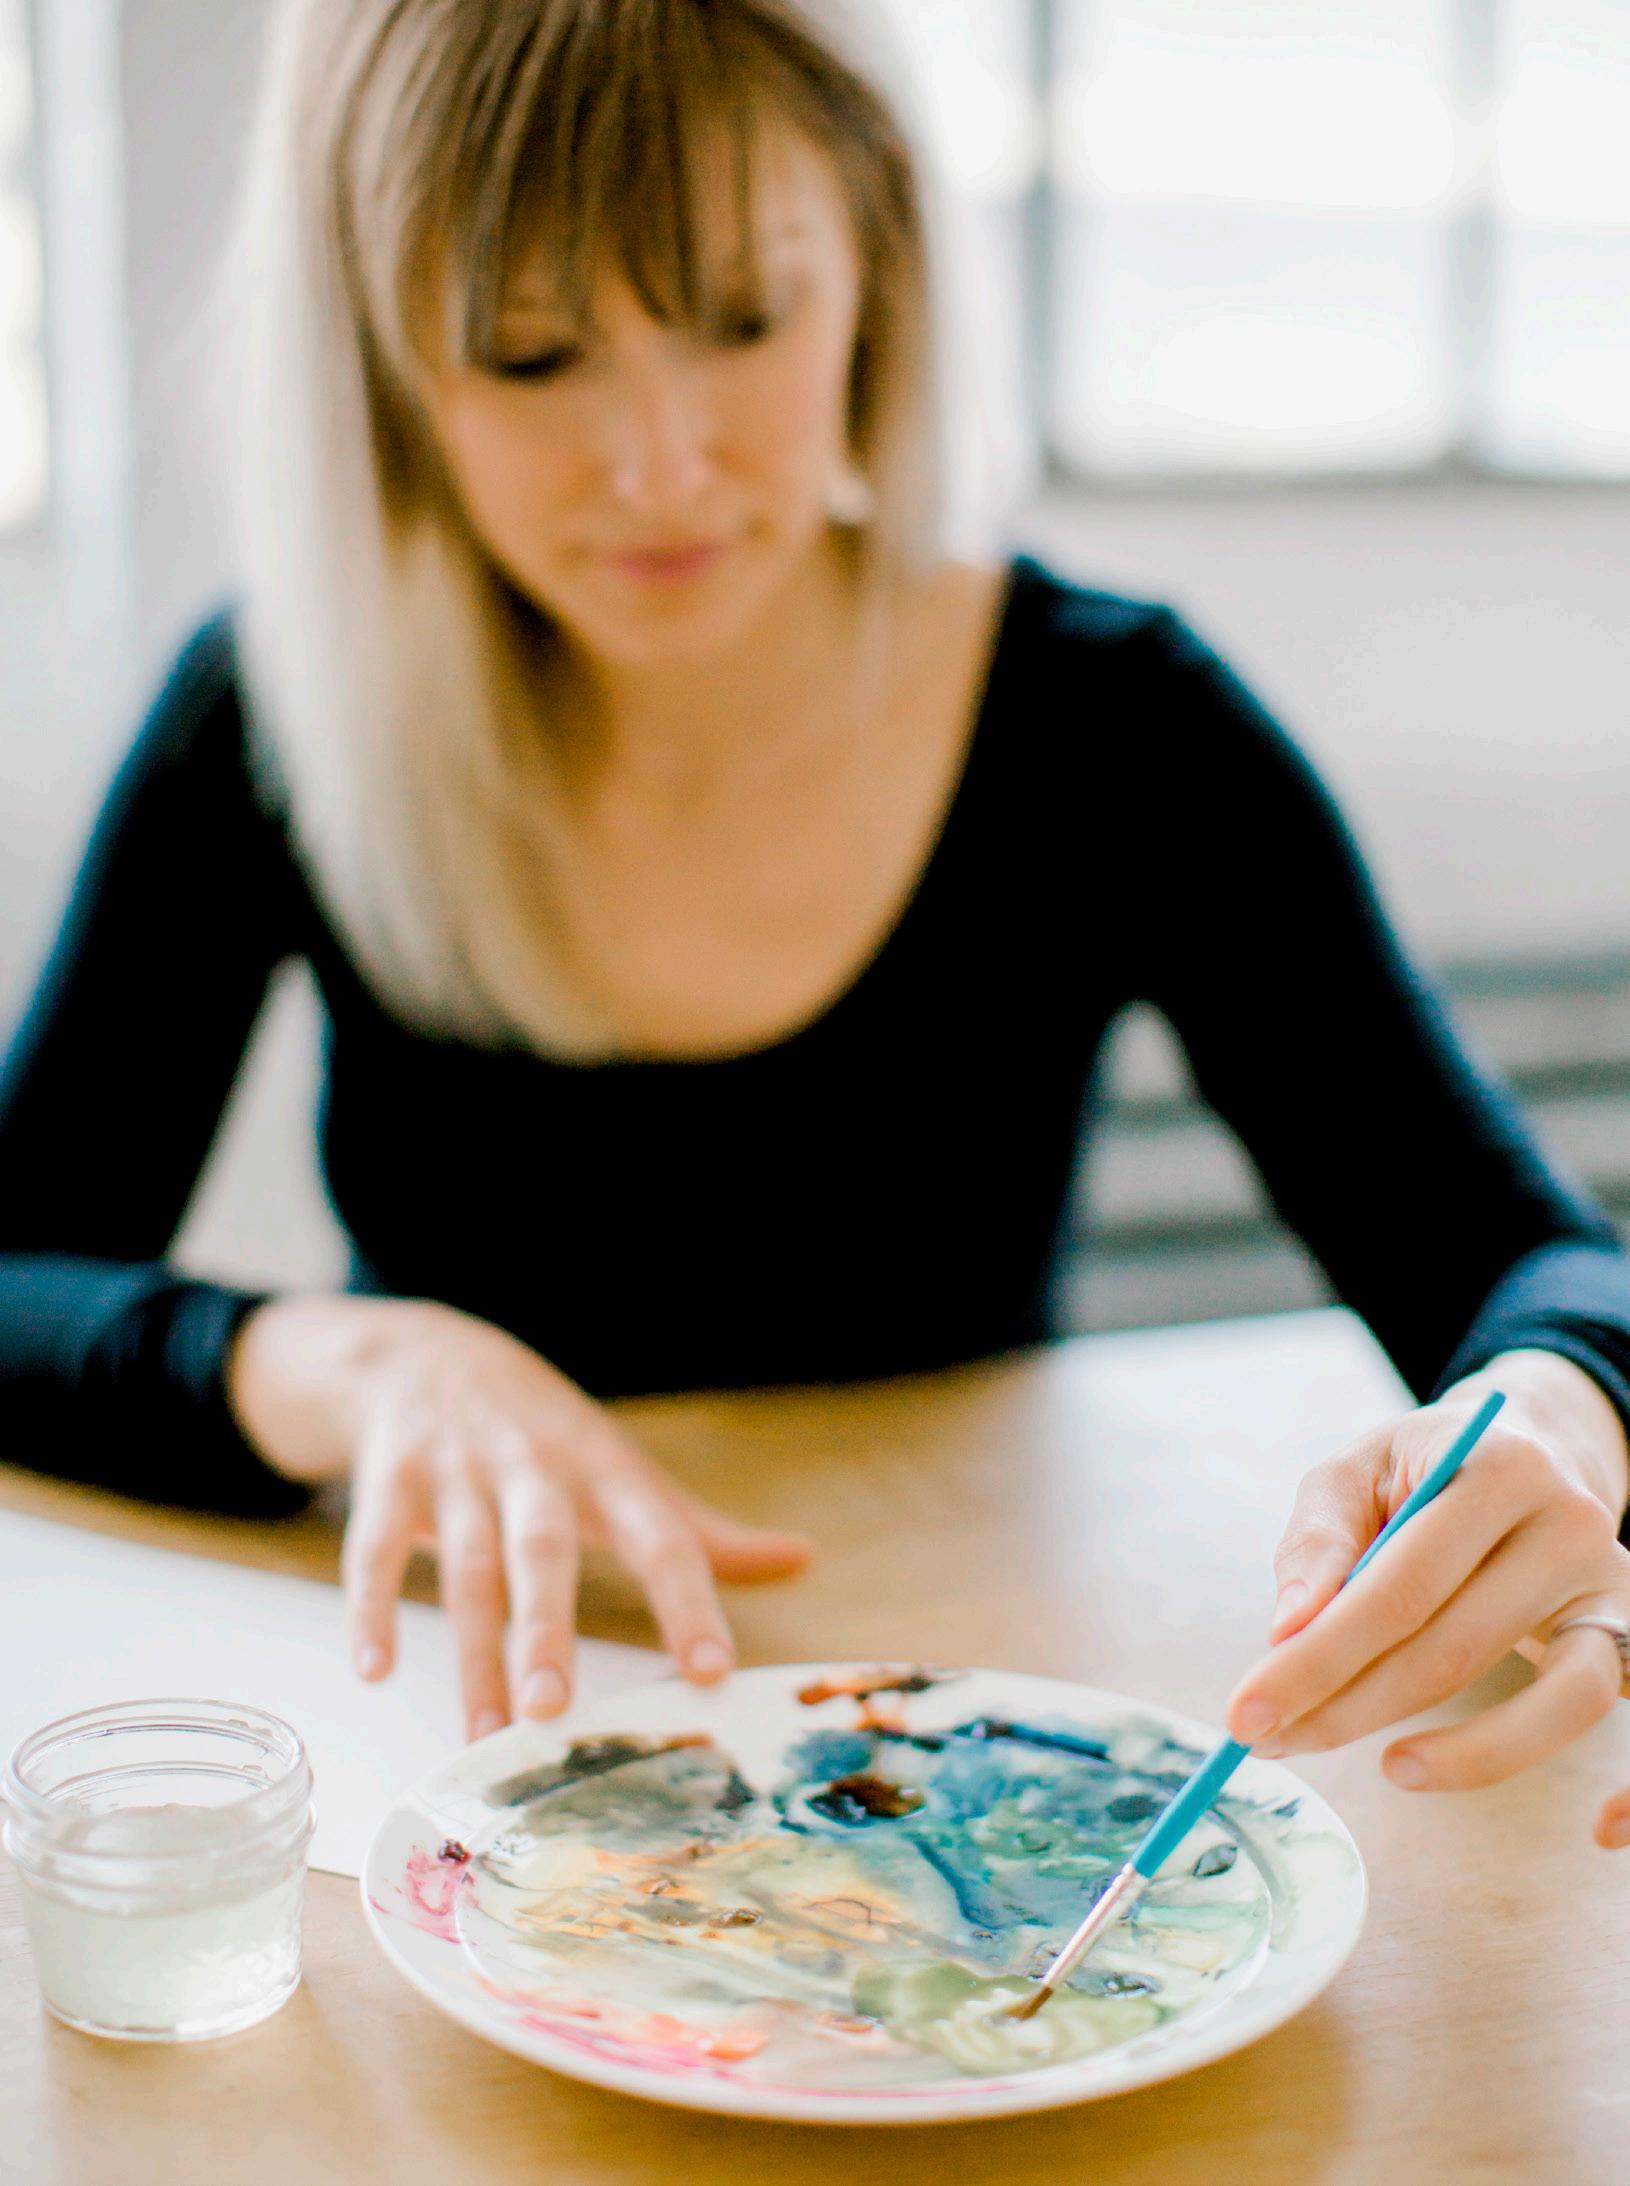
Connection and accessibility are my two main considerations when it comes to teaching people how to paint. I want you to connect with yourself and your community, using art as a way of showing your love. By making cards or painting lovely pieces, you can give gifts from your heart and your hands. To be able to do this, all you need are some basic tools. No, you really don’t need a twenty-dollar paintbrush—you can do it with a three-dollar paintbrush! Painting palettes? Meh. If you don’t have one at home already, use a dinner plate. You just need a few key tools, and you’re off. I want you to enjoy the process and not fuss about the other stuff. I want you to see how much beauty you can create with minimum expense. I want you to feel the satisfaction of mixing some gorgeous colors with student-grade paints and brushes on a leftover dinner plate. I want you to experience the simple joys of painting.
STOCKING UP
In this spirit, I’ve broken out the tools you need into two lists. First is a list of Essentials, followed by a list of Nice-to-Have items. The second list features some extra materials that I enjoy using, but they aren’t necessary—especially if you’re just beginning! Please know that the materials included here are based on my own trial-and-error process. The Nice-to-Have list is always evolving, and I’m sure you will discover a few items to add to your own. That’s one of the best things about art: there is always something new to discover!
Review these lists and take stock of your current supplies. If you are missing any of the Essentials, go ahead and purchase them. That way, once you’re ready to dive into the lessons, you’ll have everything ready and waiting for you! If you’re headed to the art supply store, you may want to read ahead to Lesson 2 (page 56) where we begin to mix some fantastic colors, so you can jot down some of the paint colors you’d like to purchase. If not, don’t worry—you’ll only need two colors of paint up until Lesson 2.
Once you’ve stocked up on the Essentials (and maybe a few Nice to Haves), you are ready to get started. But since paint, brushes, and paper are so crucial to the watercolor process, I go into more depth for each. Having a foundational understanding of these key materials will set you up for success as you continue to navigate your watercolor journey. For instance, knowing how different paper textures will affect the finished look of your work, or how to properly clean your brushes, will make a big difference in the quality of your practice over time.
PAINT WATER
12 T HE A RTIST ' S D ESK
BRUSHES PALETTE
ESSENTIAL
Student-Grade Watercolor Paint Set (Reeves tube paint set of 24)
Student-Grade Round Brushes (Princeton, sizes 1 and 4)
Student-Grade Watercolor Paper (Strathmore, minimum 140-lb. weight)
Painting Palette (or a large white dinner plate)
Micron Pens (sizes 01 and 02)
Colored Pencils (blush/light pink and gray)
HB pencil (any #2 graphite pencil works as well!)
Pencil Sharpener
Artgum Eraser (Prismacolor)
Water (I use Mason jars filled with tap water; a clear jar works best, so you can see when the water needs changing.)
Paper Towels (for blotting)
Scrap Paper (for testing strokes and marks)
NICE TO HAVE
Gouache Paint Set (Reeves tube paint set of 12, 18, or 24)
Individual Gouache Tubes (specifically Winsor & Newton Flesh and Oxide of Chromium)
Dr. Ph. Martin’s Bleedproof White (for gouache)
Micron Pen Set with Multiple Sizes (ideally 005, 01, 02, 03, 05, 08)
Round Brushes in Multiple Sizes (specifically 20/0, 10/0, 5/0, 0, 1, 3, 4, 5, 6)
Arches or Hahnemühle Cold Press Paper (140 lb. weight)
Set of Colored Pencils
Sakura Koi Coloring Brush Colorless Blender (for blending out splatters and mistakes)
Light Box (for tracing)
PREPPING TO PAINT
Let’s start at the beginning and chat about how to prep your supplies to paint. Here are the fundamentals that I use daily. We are going to talk about creating movement and shine on your palette and your paper, and why that magic sauce is what watercolor is all about.
WATER SOURCE
When it comes to your water source, any clear container that’s short in comparison to the length of your brushes works wonderfully. It’s easier to rinse your brushes in a short jar, and you want to be able to see when your water needs changing. I like to use short 6-oz clear Mason jars.
You can maximize your painting time by having two jars of water nearby when you sit down to paint: one for washing your brush clear of light-colored paint, and one for washing out dark-colored paints. It’s also good to have a clean water source nearby in case of accidental spills and splatters. Plus, you can dampen your paper towel to quickly tend to mistakes (see page 99).
When it comes to changing the water, some say that you want your rinse water to remain clean enough that you would let your goldfish swim in it. If I used this barometer, I’m afraid my fishies wouldn’t fare very well. I always start out with lovely, clear room-temperature water, but it muddies up pretty quickly. As you begin to paint and develop your style, you can see if you prefer to follow the goldfish rule for your rinse water, or to simply refill your water when you feel like its muddiness is affecting the coloring of your paint.
FOUNDATIONS OF WATERCOLOR 21
PRIMING YOUR BRUSH
You’ll see instructions to “prime your brush” many times throughout this book. This means getting your brush bristles ready to accept water and paint.
If your brush is new, it may come in a clear cylinder protector for transporting the brush. Feel free to recycle this or save it to use for protecting your brushes on the go. The clear cylinder keeps your brush point intact and protects the sensitive bristles from bending.
Once you’re ready to paint, bring your brush to your water jar, and press the brush side down against the bottom of the jar, first on one side and then the other. Repeating this motion in the jar allows the bristles to relax and soak in water. Swirl your brush in a figure-eight motion a couple of times. This motion fills the bristles with water, making them ready to accept paint.
The secret of watercolor is that you actually don’t use much paint—you use mostly water! Getting familiar with your brush and how to prime it is the beginning of a healthy relationship with watercolor as a medium.
Prime your brush whenever you sit down to begin a painting—it is the first step—and then as often as needed while you paint. This motion of the bristles in the water against the bottom of your jar clears away the excess pigment from the bristles so that when you bring your brush back to your palette, you can pick up a new color without any remnants of the previous pigment. [A]
One of the reasons people love to look at watercolor pieces, or enjoy watching the painting process, is that this medium seems to move with a life of its own. This is all thanks to water! When combined with water, the paint swirls and
moves, independent of its creator’s brush. The only way to achieve this free-flowing dance is by giving the paint enough water with which to move. Streaking and hard lines only appear when there isn’t enough water used on a brush or in a palette in the beginning.
“
The spontaneous and fluid look in watercolor painting only occurs when one mixes the colors like a sauce, then paints without looking back!”
— JOSEPH GYURCSAK
THE BOTTOM OF WATER JAR
A 22 T HE A RTIST ' S D ESK
BRISTLES FLATTENED COMPLETELY TO THE FERRULE
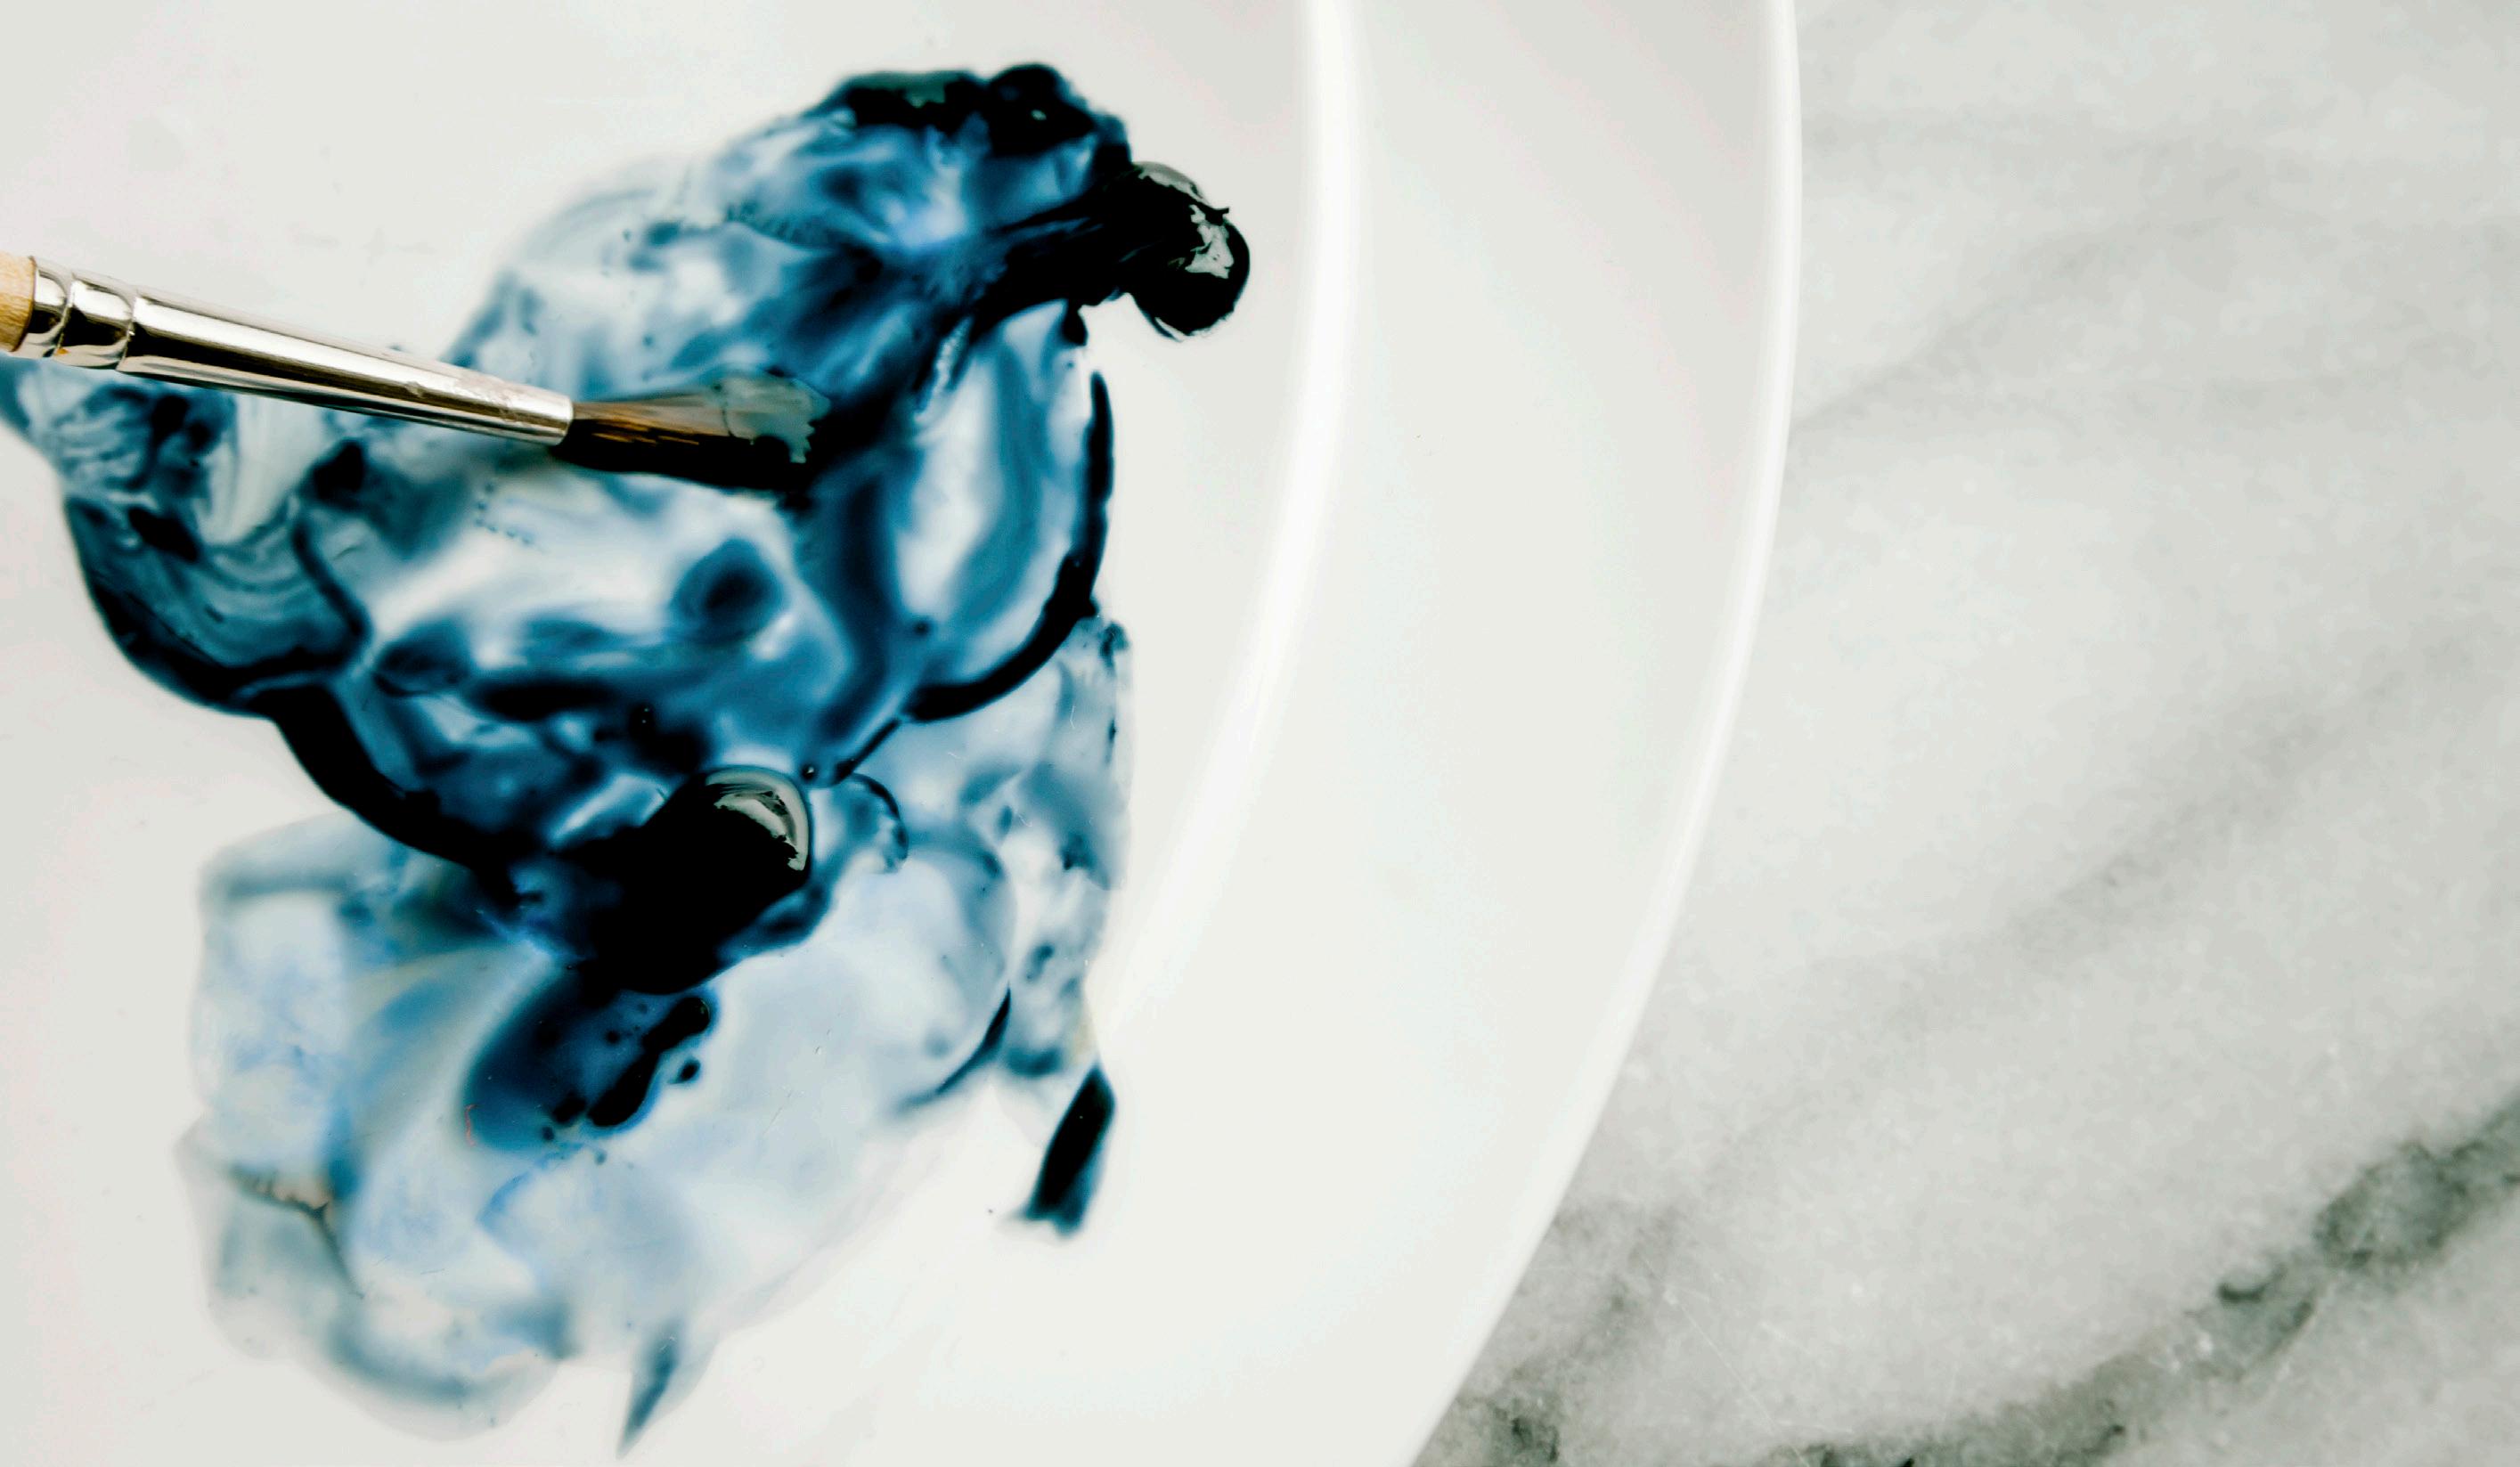
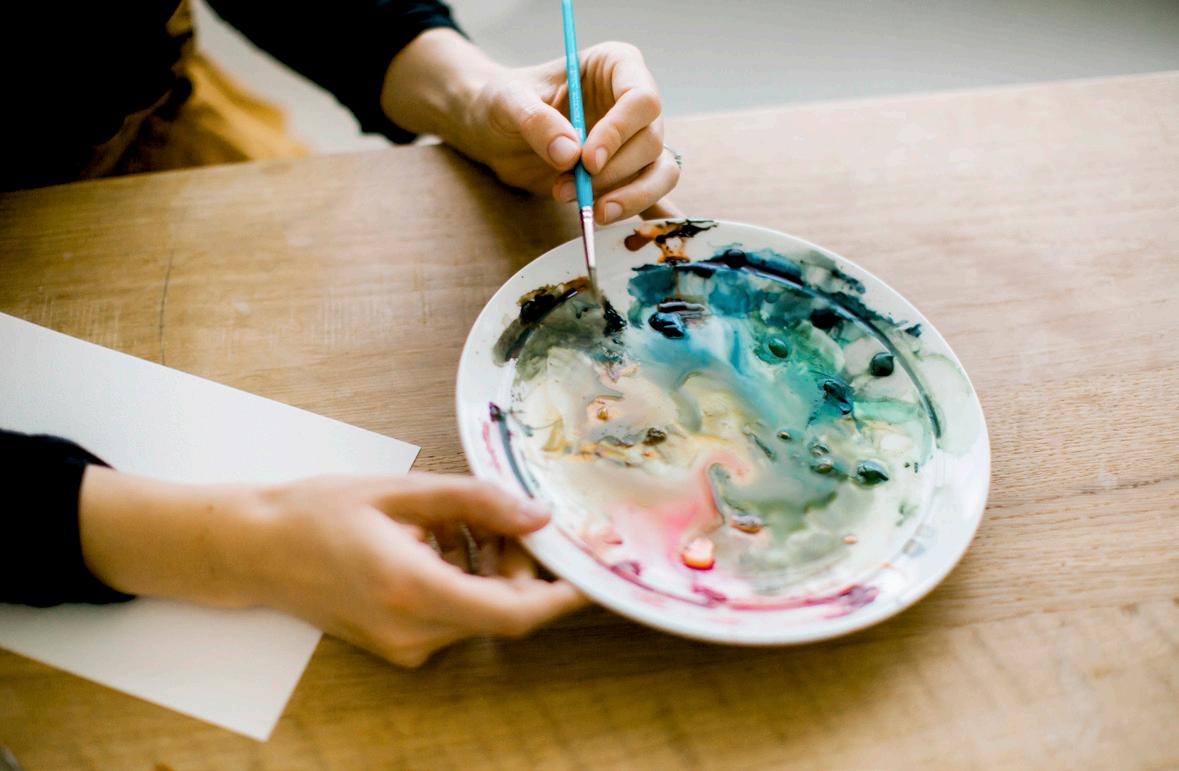
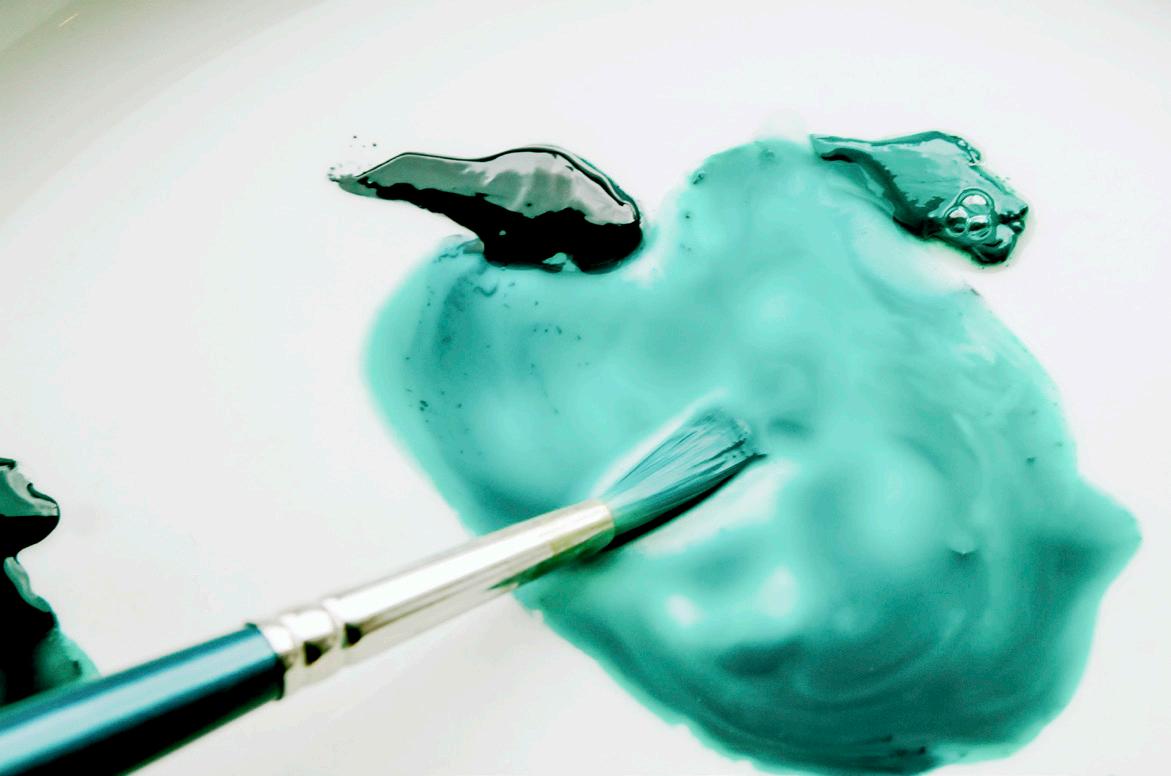
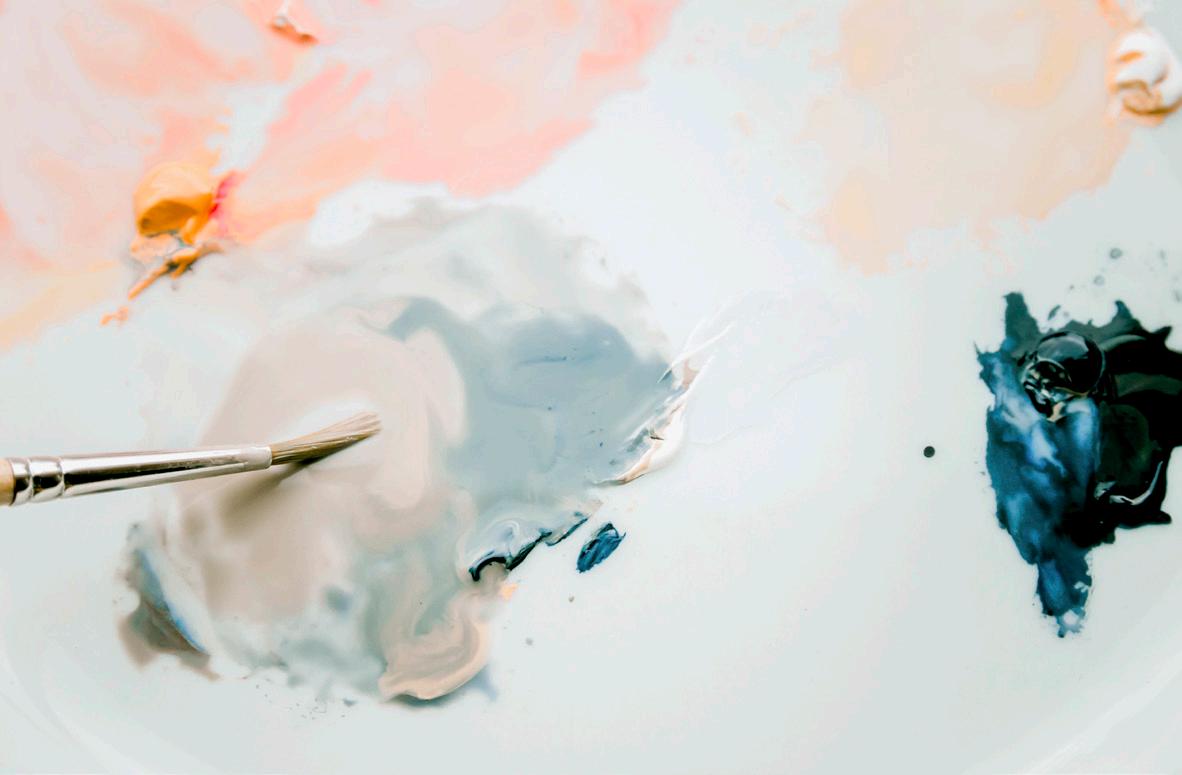
CREATING YOUR PAINT PALETTE
When I sit down to paint, I squeeze small dabs of my tube watercolor paint onto my palette of choice, which is usually a large white dinner plate. Depending on how many colors I want to use, and how much space I have available, I usually like to place the dabs a few inches apart to leave some room to blend colors. I tend to place the pure pigment dabs near the edges of the palette and then mix the colors and water closer to the center of the palette.
I use my brush to bring clear water from my Mason jar to my painting palette to create a mixture of water and paint. This mixture—the ratio of water to paint—is the key to watercolor painting! (More on this in The Magic Sauce, page 24). I enjoy using the slanted edges of my white dinner plate for the paint dabs, as the water runs through, in, and around each of the dabs of pure pigmented paint. The slant of the plate allows the pure pigment to sit slightly above the pools of the paint-water mixtures I create. This way I can easily access the mixtures and, because there are other paint mixtures flowing on the broad mixing area of my plate, new colors and shades are created as I continue to add water and paint. I can also still dab into my pure pigmented paint as needed because it stays in place on the lip of the plate. So convenient! The pure dabs of paint come in handy, in case I want to quickly add more pigment to a paint-water mixture or carry some over to another area of the plate to create a different color mixture.
Some of my favorite color discoveries have happened because of the unintentional blending that happens on my palettes. After I’m done painting for the day, I save my palettes. They dry, and when I return to paint the next day (or hour), I reanimate the same blends just by adding water. This way, all my favorite colors are waiting for me and I can pick up right where I left off.
FOUNDATIONS OF WATERCOLOR 23
THE MAGIC SAUCE: WATER-TO-PAINT RATIOS
Finding the right balance of water and paint is the key to enjoying watercolor and creating lovely pieces, and it starts right on your palette. Before the paint ever touches your paper , it needs to be mixed on your palette and have both movement and shine.
People often ask me: How much water am I supposed to use? How much on my paper? How much on my brush? How much on my palette? Many videos and classes suggest “just a touch more water here” or “maybe a little more water to make that paint really move,” but how do you know if you’ve added enough? This all takes some practice, but I’ll try to keep things really simple to help you use water-to-paint ratios for the best outcome.
In teaching my students, I’ve found that it helps to explain paint consistencies using food analogies. I like to compare the consistencies of paint and water with well-known sauce textures. Throughout the book I refer to these as the “magic sauces,” and they should be easy for you to remember. If you get the hang of them now, you’ll have an easy time mixing your “sauces” for the lessons that follow.
To make your sauce, you’ll use your brush to bring water from your Mason jar to your palette. You can take your brush back to your water source as many times as you need in order to create your sauce so the paint mixtures on your palette begin to have movement.
To see if you’ve added enough water, pick up your palette and tilt it vertically, shifting it this way and that. If you see small raindrops of your paint and water mixture beginning to form, like the picture of my palette on page 23, you’re on the right track. You’re after both movement—the small drops moving on the surface— and shine—the surface of the mixture shining and reflecting the light. Movement and shine! Once you see this, be sure to maintain it on your palette for the entire time you are painting—otherwise, your paint mixtures won’t bring the desired effects to your watercolor paper.
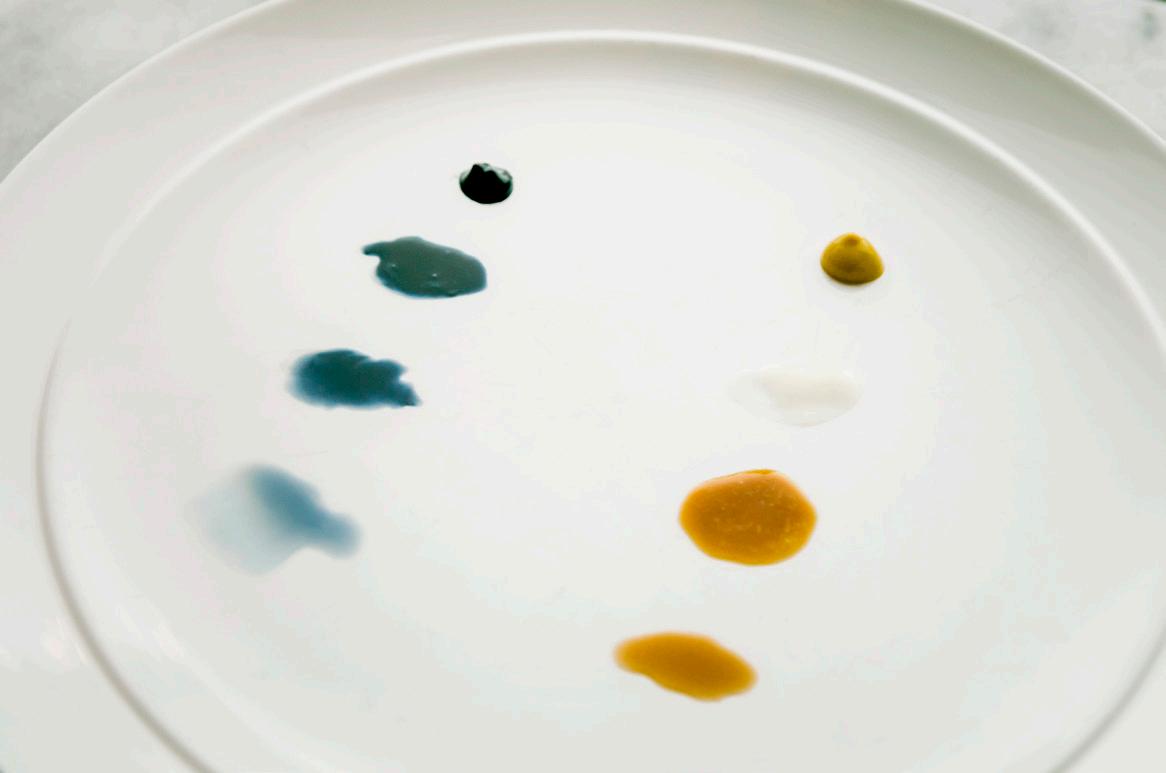
Of course, there is a very wide range of paint-to-water ratios that people use to create their watercolor pieces. To keep things simple, and to share what works best for me, I will break down four go-to water-to-paint ratios—four magic
sauces—that we’ll use throughout the book. Each of these consistencies creates different looking washes. As you’ll see, some are better for painting one thing and some are better for painting another.
Note: If you aren’t familiar with these food sauces in everyday life, you can easily find them at your local market. I suggest building your familiarity with these sauces, as they really are great comparisons as you learn to build your palette and work with water and paint. Above is a picture of Payne’s Gray watercolor paint in the four ratios laid out below, next to their corresponding real-life food sauce consistencies.
CONSISTENCY RATIO CONSISTENCY COMPARISON
Water / Paint Magic Sauce
10w/90p Mustard (with wet tube paint)
50w/50p Heavy Cream
80w/20p Soy Sauce with Wasabi
90w/10p Soy Sauce
To explain how to create a magic sauce, let’s use the 80w/20p “soy sauce with wasabi” consistency as an example.
If your water is your soy sauce, and your dab of tube paint is your dab of spicy wasabi, use your brush to bring water to the dab of concentrated paint and draw out a bit of the pigment into your water. Continue to add water with your brush until you have a mixture of about 80 percent water and 20 percent paint— 80w/20p. The food analogy continues here, as wasabi is incredibly potent, and a little goes a long way—same as a fresh dab of tube paint, which is extremely concentrated. By using your brush to carefully draw just a bit of the pure pigment away from the dab and into your water mixture, you stretch the contents of your paint tube and only use what you need. Keep adding water as needed, diluting and creating your “soy sauce with wasabi” consistency.
This method applies to all four of our sauces, each consistency requiring a different ratio of water to paint—from the most concentrated paint mixture of “mustard” (only 10 percent water and 90 percent paint) to the least concentrated, highly diluted “soy sauce” (90 percent water and only 10 percent paint).
24 T HE A RTIST ' S D ESK
TOOLS
Round watercolor brushes, sizes 4 and 1 (and 0, or smaller, if you have them)
140-lb. watercolor paper
Colored pencils, in blush and gray
Traceable “Layered Wreath” worksheet, beginner or advanced (see page 213)
Light source for tracing (a well-lit window or a light box)
Tape (washi or drafting)
2 Mason jars of water
Paper towel
Scrap paper
PAINT PALETTE
TIPS FOR THIS PROJECT
Keep scrap paper nearby to test your colors as you work.
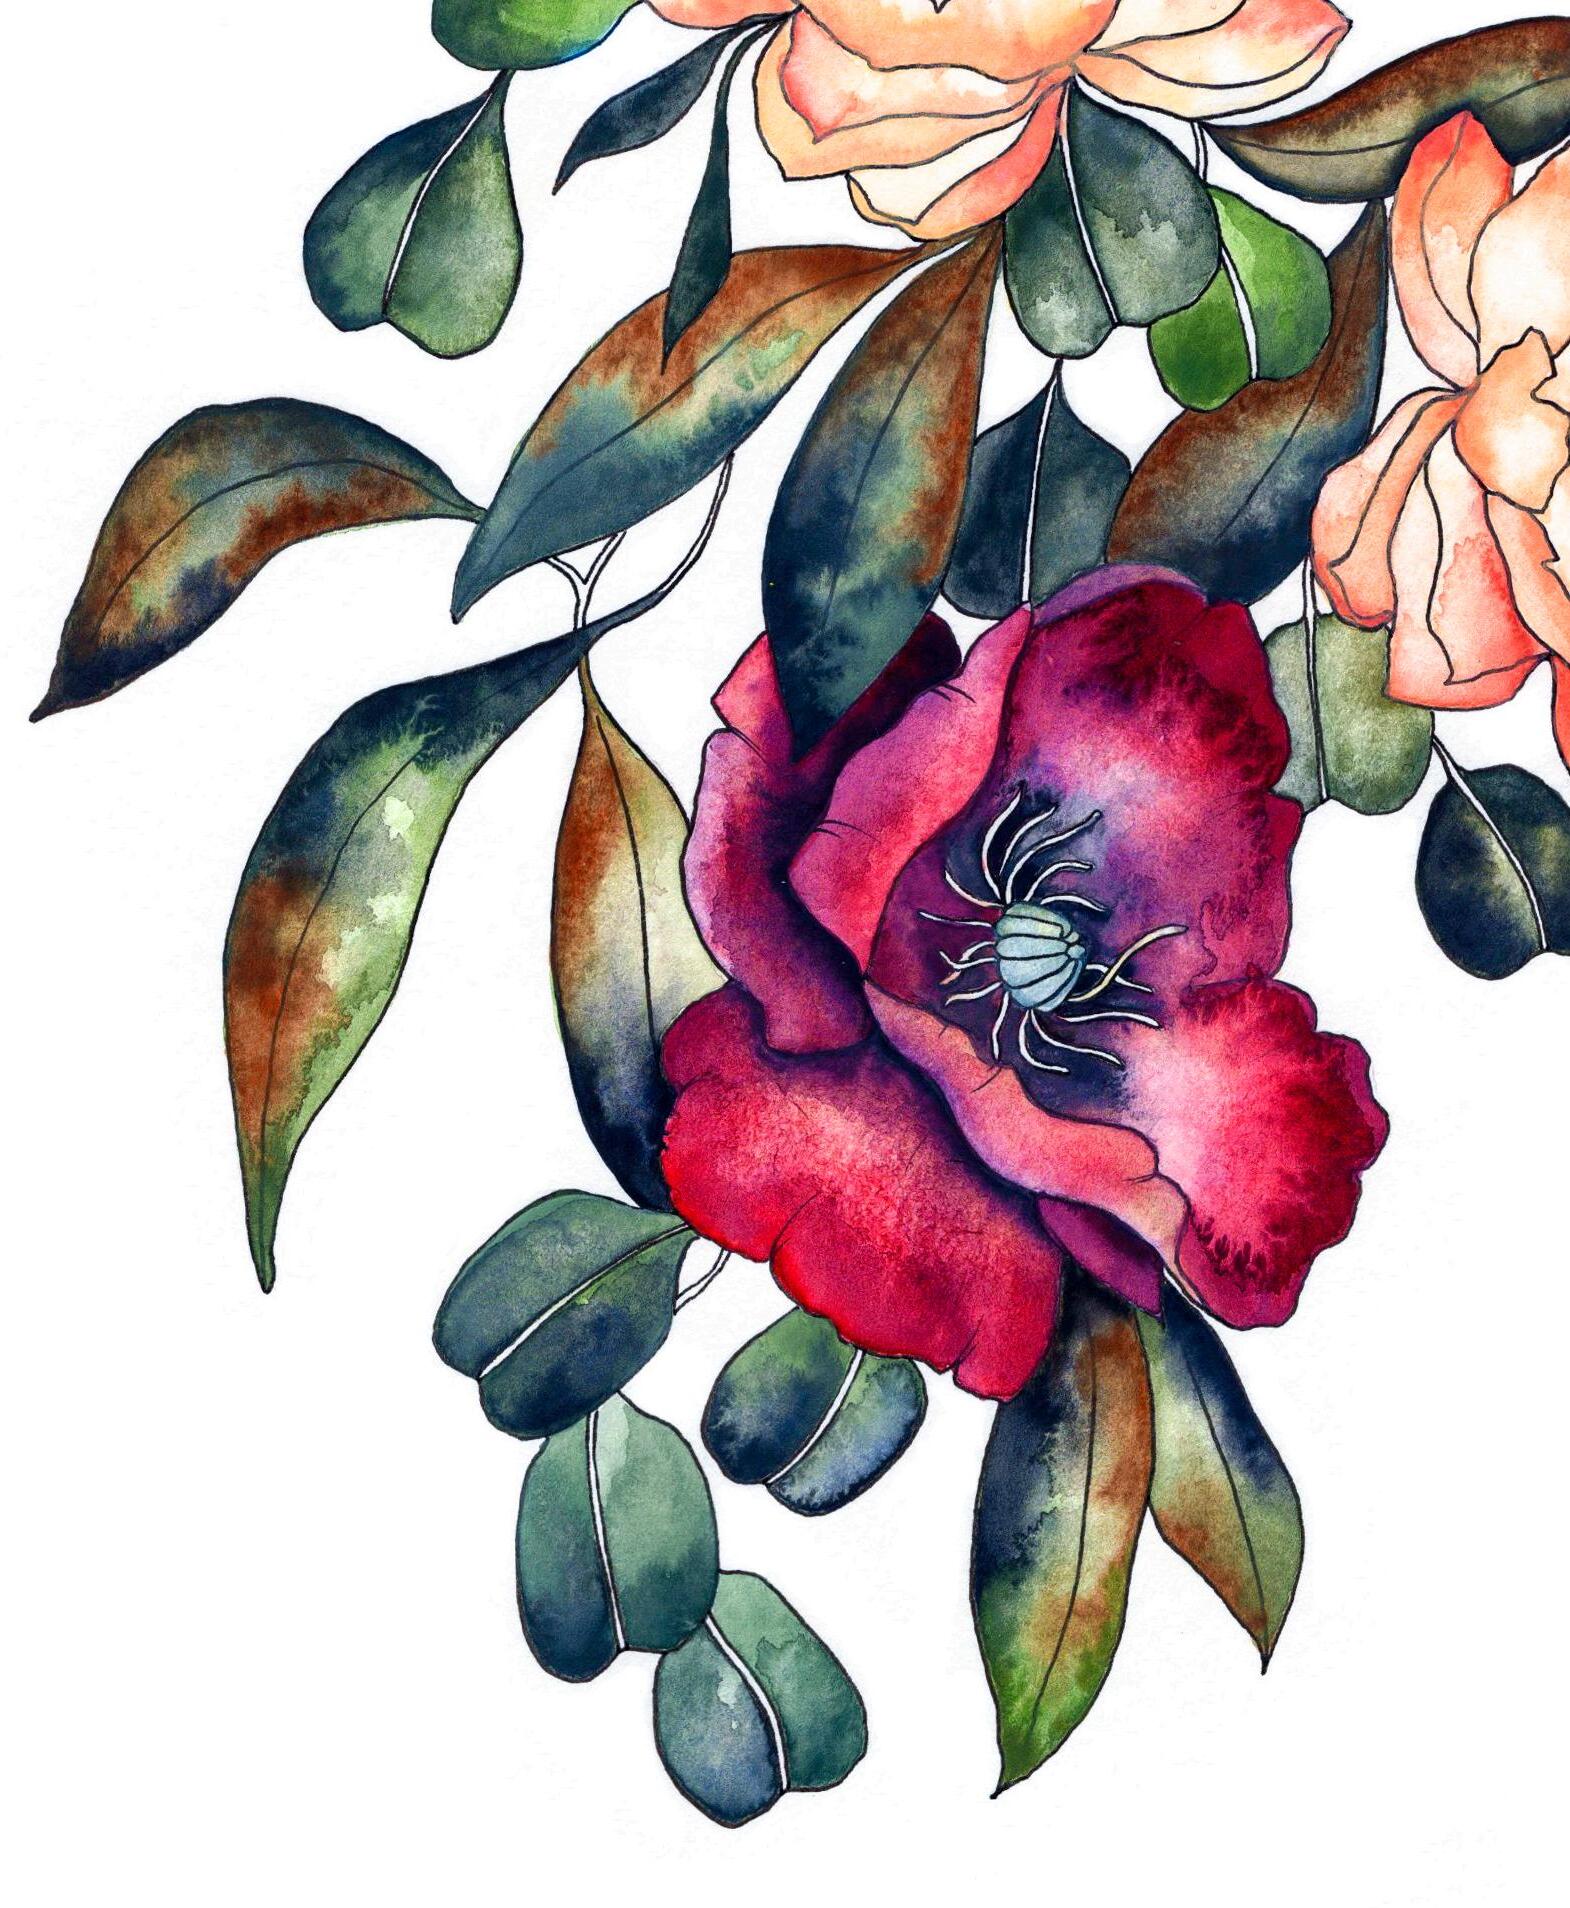
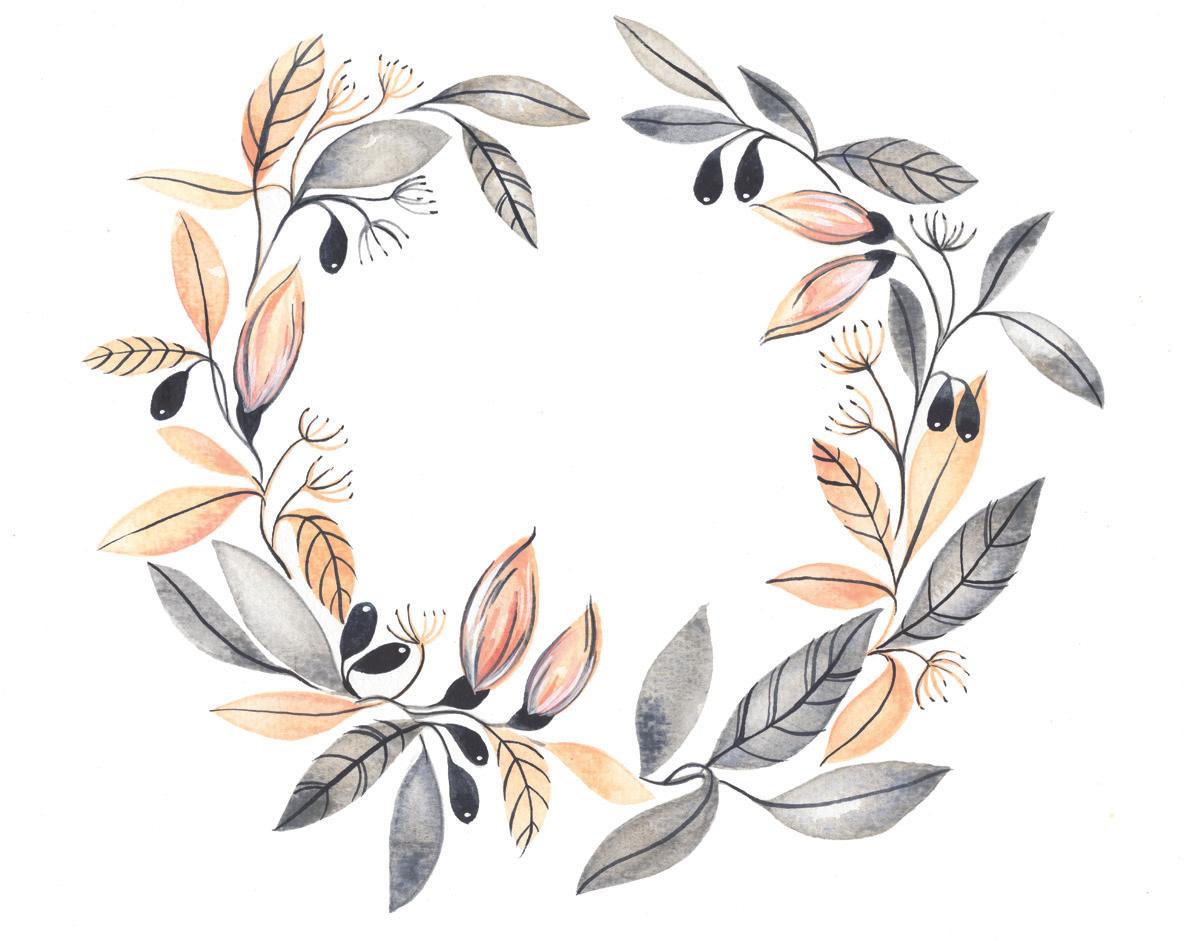
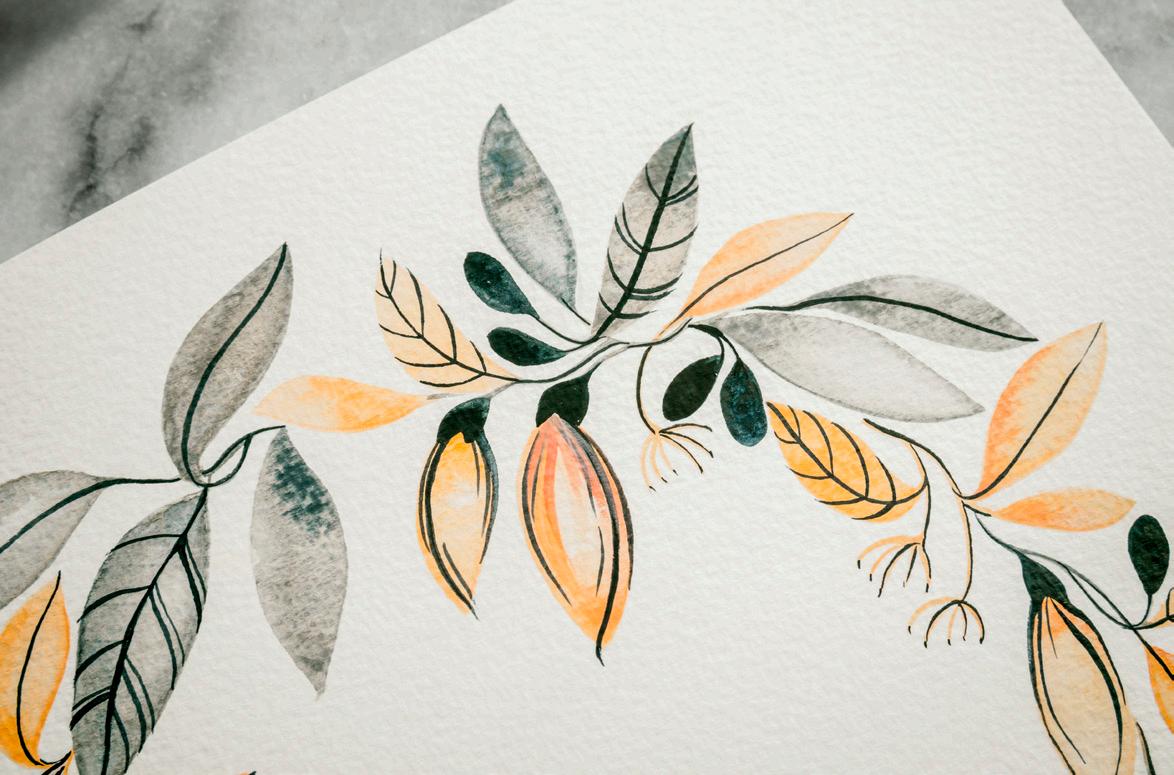
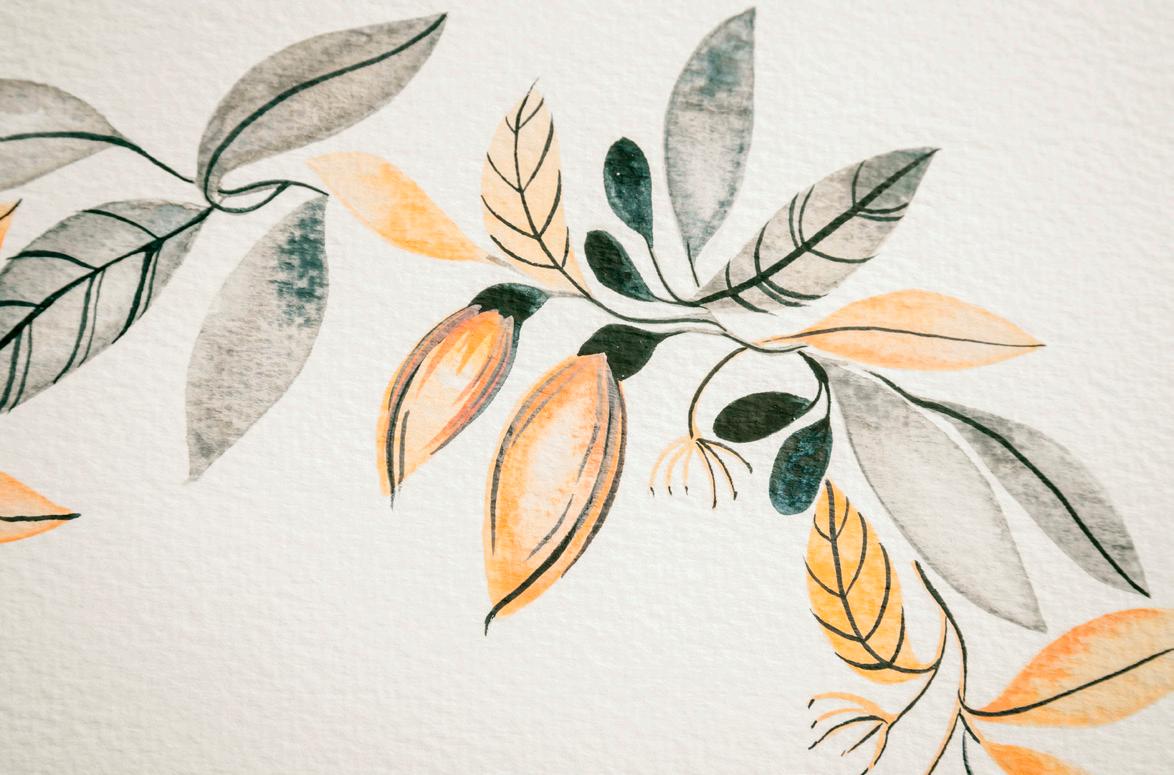
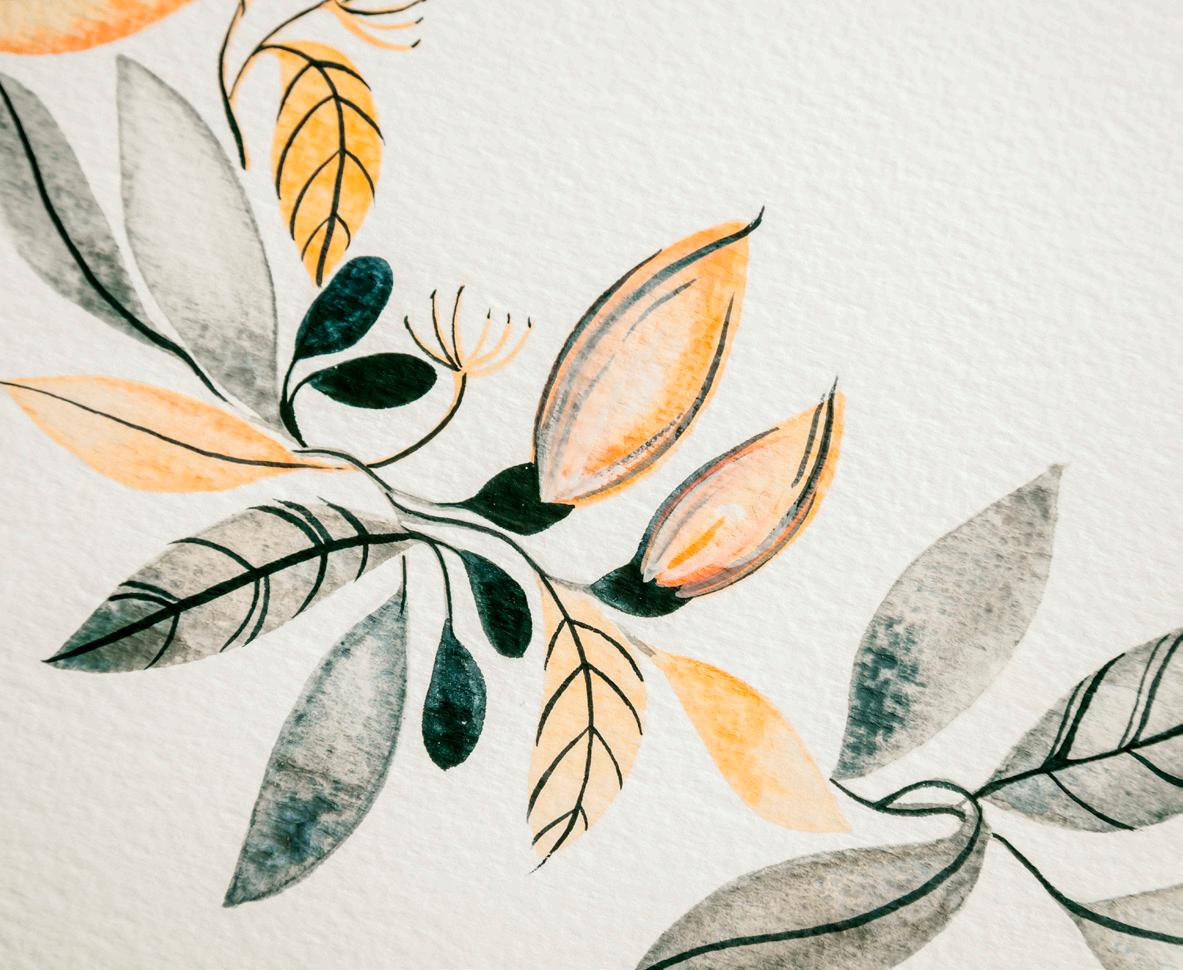
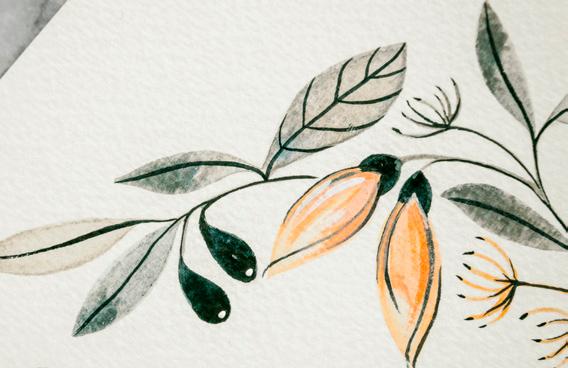
The wreath you painted in Lesson 7 was more of a loose-leaf watercolor style, where you didn’t worry about rough edges or perfectly smooth washes. This lesson encourages a more refined leaf, so you’ll smooth out rough edges and hone the details and coloring of each leaf.
COLOR RECIPES
When we use ink to create a boundary, we bring our paintbrush up to the edge of the ink to fill in the boundary. When we use colored pencils, as in this lesson, the lines are meant to be looser guidelines. I encourage you to paint over them— the coloring within the colored pencil line will dissolve into the paint, instead of forming a hard line.
Remember, all the changes of color gradation and points of light (created when you remove color from your boundary using your paper towel or your brush) need to be made while your wash is still wet.
TECHNIQUES
Fine-line ink work Washes
Wet-in-wet
Point-pressure-point
Blotting, waterdrop and paper towel
AS YOU BEGIN
Tape your papers together to secure your watercolor paper to your tracing sheet. This way, you can move and reorient your paper
BEGINNER
Feel free to trace a simpler version by leaving out the large floral buds.
ADVANCED
This is a wonderful time to design your own wreath. Botanical wreaths like this can be altered for every season, both in the foliage you choose to include and the color palette you select. Take a moment to observe the natural flora in your own corner of the world. Depending on where you live, and how diverse the seasons are, you could find some very stunning inspiration in the leaves and flowers all around you.
while tracing without having to realign the marks every time.
Use a light source, such as a window or a light box, to view your traceable design through your watercolor paper as you trace.
Using your blush colored pencil, lightly trace the dashed lines on your Layered Wreath worksheet onto your watercolor paper. The lighter you trace them, the easier it will be to paint over them.
Then use your gray colored pencil to trace over the solid lines, again tracing very lightly—dark enough to see, but light enough to paint over.
PAYNE’S GRAY
DUSK Chinese White + Peach + Payne’s Gray
CHINESE WHITE OR DR. PH. MARTIN’S BLEEDPROOF WHITE
ROSE Chinese White + Peach + Rose Madder
PEACH
BLUSH Crimson + Yellow Ochre + Peach
LAYERED WATERCOLOR & GOUACHE 161
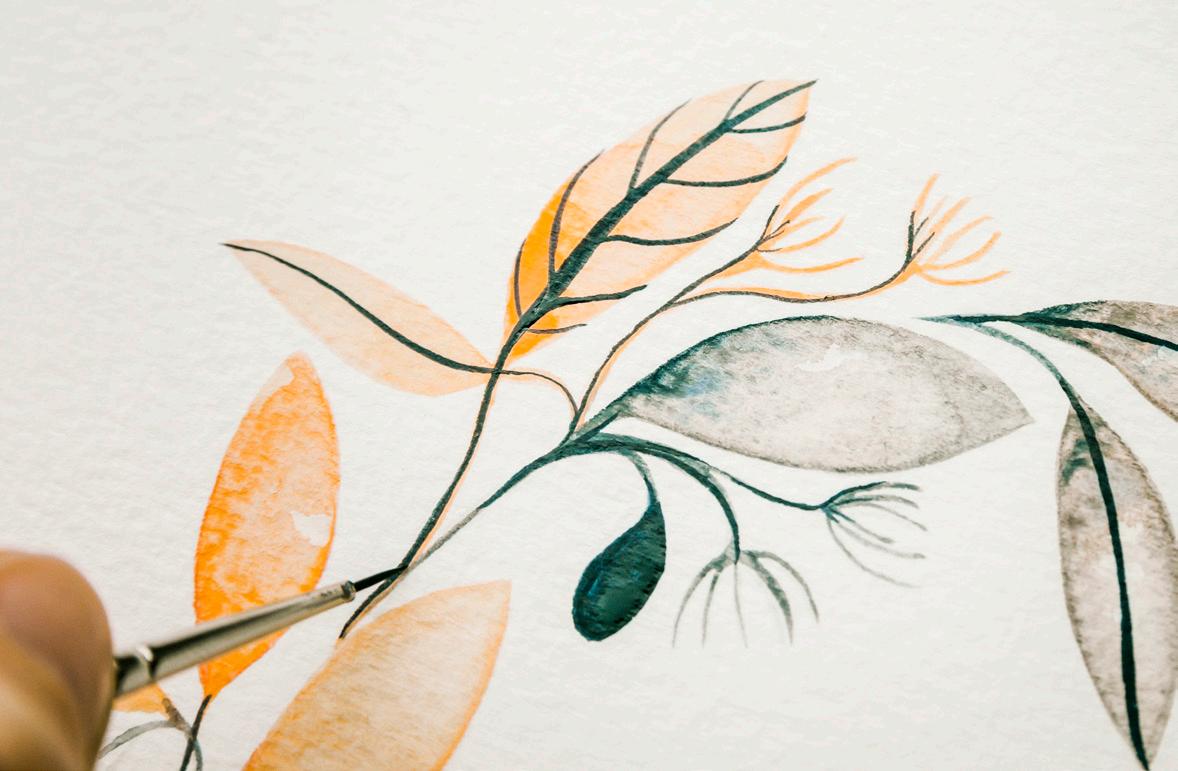
BRUSH: Round 4 PAINT CONSISTENCY: 50w/50p “heavy cream,” moving toward an 80w/20p consistency of “soy sauce with wasabi”
Prime your brush with water and use your brush to bring water from your Mason jar to your palette to create a 50w/50p consistency of your Blush and Rose color recipes.
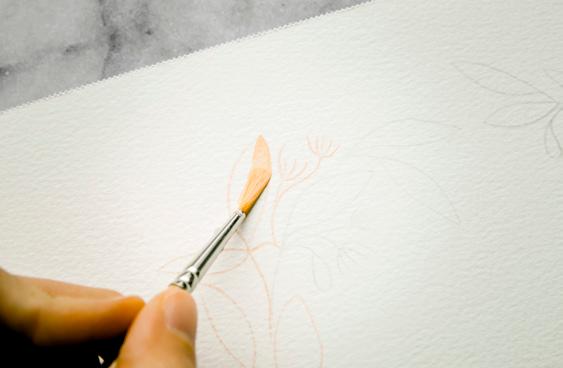
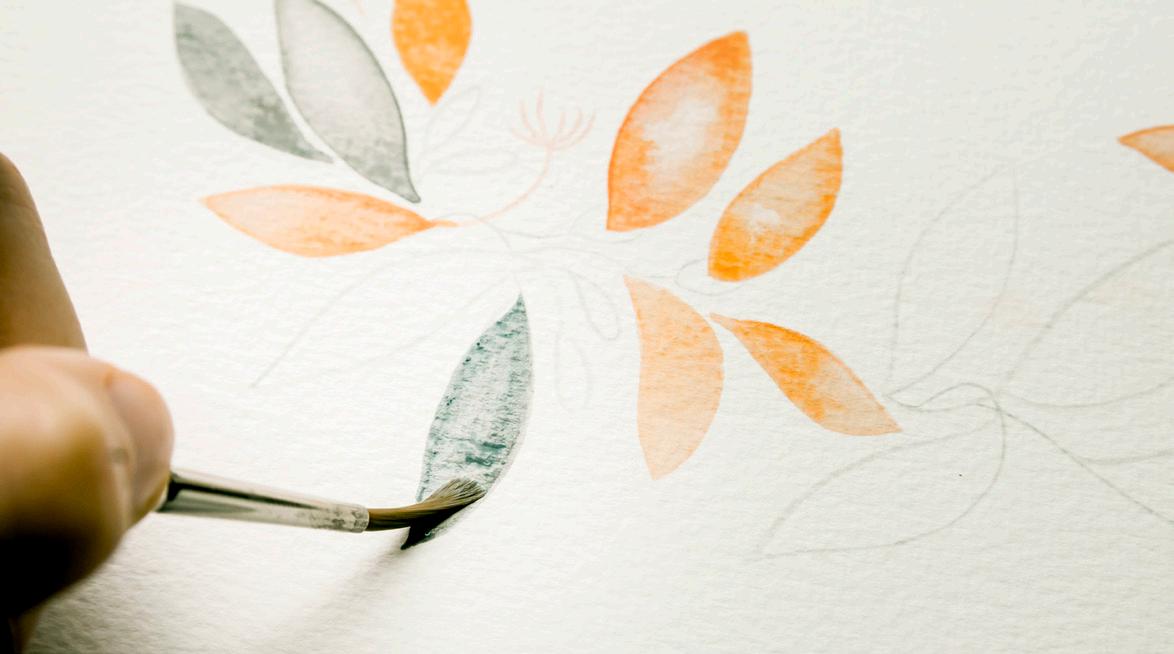
POINT-PRESSURE-POINT BLUSH LEAVES & BUDS
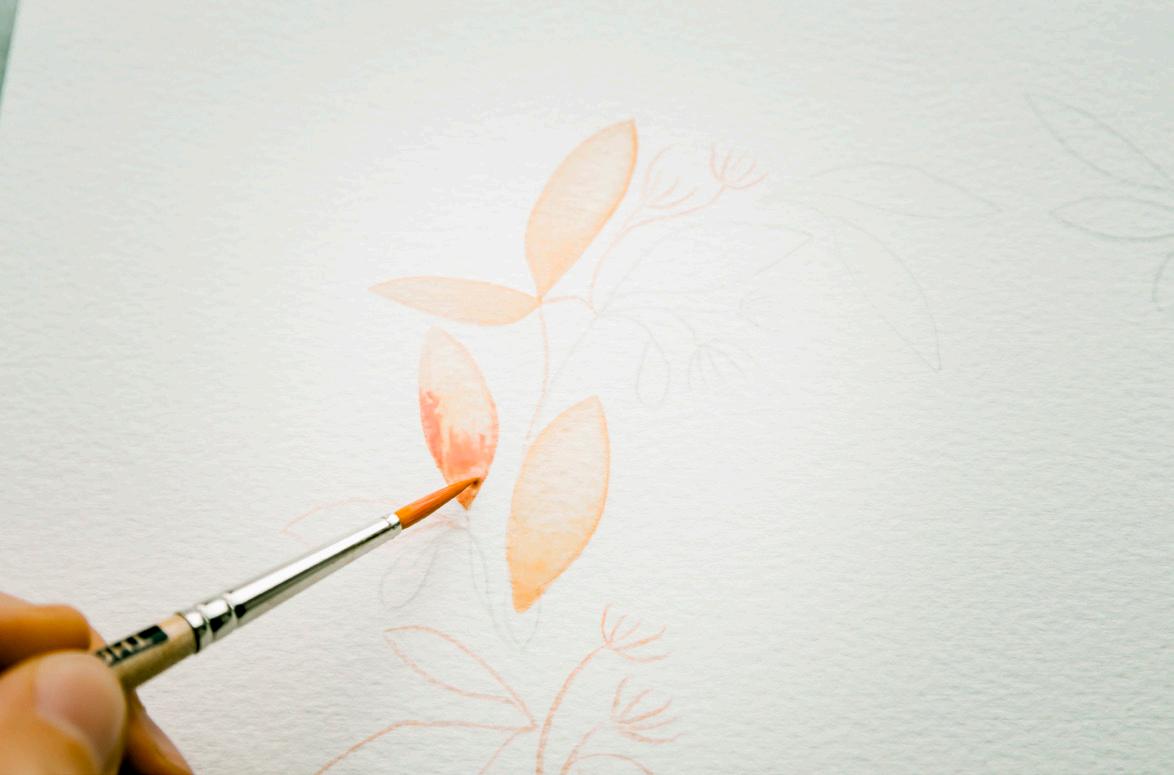
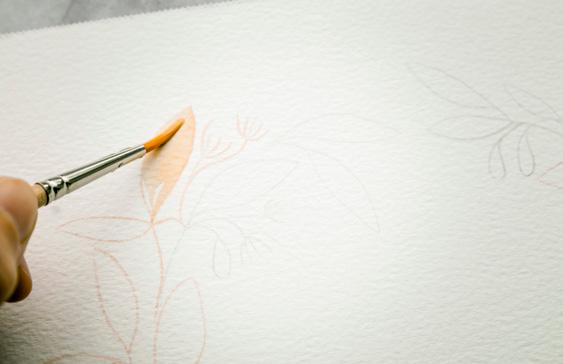
1
Dip your brush in water and fill it with your 50w/50p consistency of Blush and bring it to your watercolor paper. Working from the top left, begin your PPP motion on your Blush shapes. (You will come back to paint the little wisps and stems, so just ignore these for now, as they require a smaller brush.) [A]
2
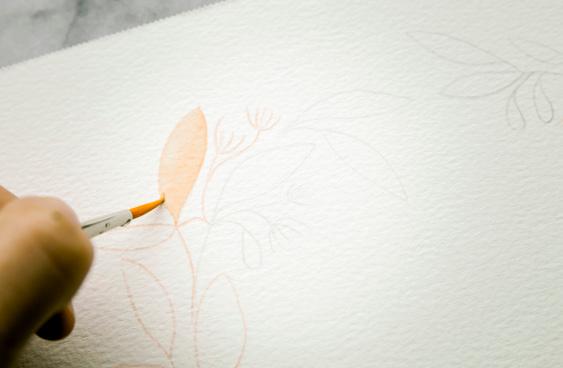
Three or four fluid movements of PPP should cover each Blush leaf and bud. You should be able to make two PPP motions before needing to reload your brush. [B]
3
After you fill in a boundary, dip your brush in your wash water and use the point of your brush to smooth the fine edges of the boundary while it’s still wet. [C]
4 Continue to paint each Blush leaf and bud, following the same steps. [D]
5
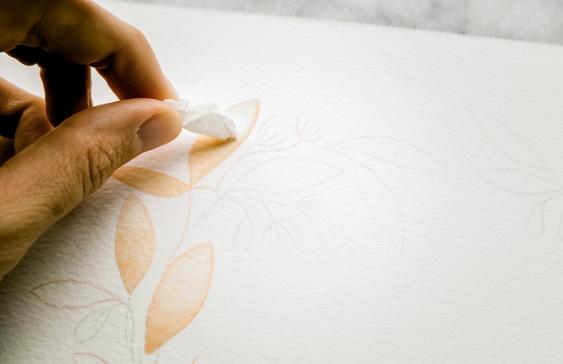
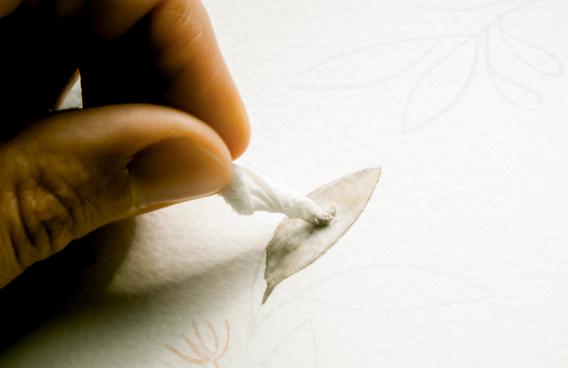
As you work, paint a few, pause, and then make subtle changes to the coloring of each while they are still wet. You can pull color out of the center by dropping in water and then blotting with a paper towel. [E]
6 You can also drop in a bit of the Rose color recipe to achieve a pinker tint, using the wet-in-wet technique. Use your brush to pick up the 50w/50p consistency of Rose and carefully drop it into an edge of a leaf or bud. [F]
7 Depending on how faintly you traced your colored pencil lines, they should be dissolving as you add character to each leaf and bud. If they are not dissolving, don’t worry too much. You can deal with them later.
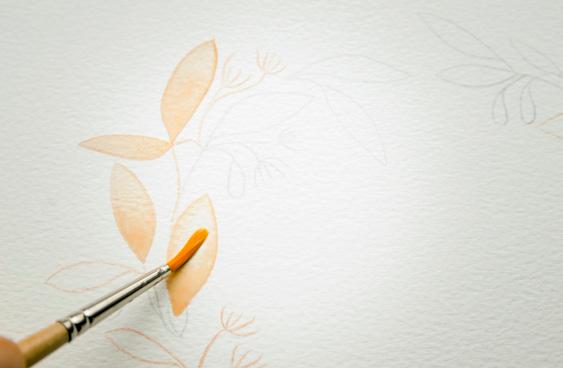
8 Work your way around the wreath, continuing to rotate your paper, painting in all of your blush buds and leaves and adding color interest as you see fit.
A D C B E F
162 LESSON 14: LAYERED WREATH
BRUSH: Round 4 PAINT CONSISTENCY: 50w/50p “heavy cream,” moving toward an 80w/20p consistency “soy sauce with wasabi”
Prime your brush with water and use your brush to bring water from your Mason jar to your palette to create a 50w/50p consistency of your Dusk color recipe and your Payne’s Gray paint.
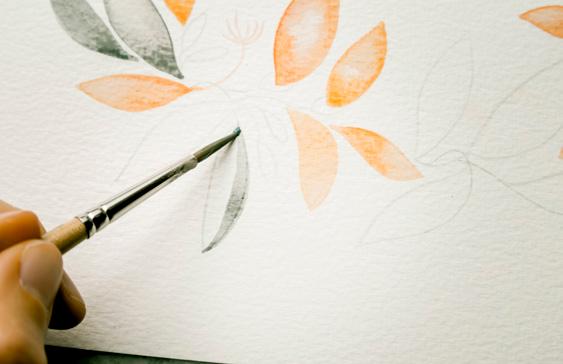
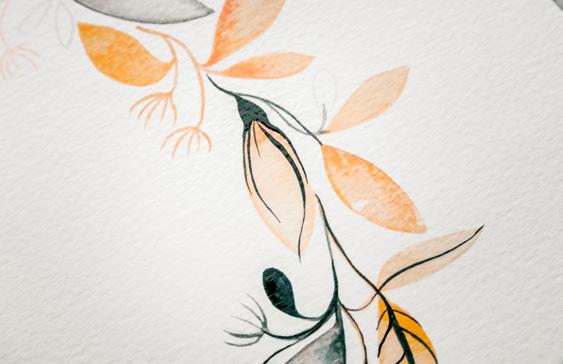
POINT-PRESSURE-POINT DUSK LEAVES
1 Dip your brush in your 50w/50p consistency of Dusk and bring your loaded brush to your watercolor paper. Begin working in the top left, where your wreath is the driest, and start your PPP motion on your Dusk shapes. Ignore the little wisps, berries, and stems for now. [A]
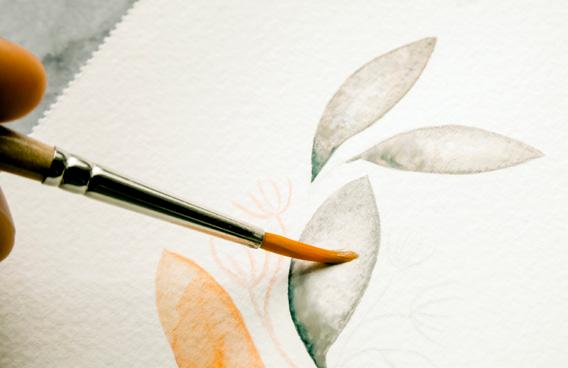
2 Three or four fluid movements of PPP should cover each Dusk leaf. [B, C, D]
3
By dipping your brush into your water jar and using the point of your brush with just the tiniest bit of wetness, ensure the edges are smooth.
4
As you work, paint a few, pause, and then make subtle changes to the coloring of each while they are still wet. You can pull color out of the center by dropping in water and then blotting with a paper towel. [E]

5 You can also drop in a bit of Payne’s Gray using the wet-inwet technique. Use your brush to pick up the 50w/50p consistency of Payne’s Gray and carefully drop it into the corners of a leaf to give it a deeper
tint. You can also use the damp-brush technique to sweep the color away from the center. [F]
6 Work your way around the wreath, continuing to rotate your paper, painting in all of your Dusk leaves.
A B D C E F LAYERED WATERCOLOR & GOUACHE 163
BRUSH: Round 1 (or smaller, if you have it)
PAINT CONSISTENCY: 50w/50p “heavy cream,” moving toward 10w/90p “mustard”
Now it’s time to paint the fine lines of the wisps and the stems and attach your encircling wreath vine to your leaves with small stems. You’ll use your Round 1 (or smaller!) brush for this delicate task. Be aware of wet areas on your piece, as you don’t want to smudge your leaves with your hand as you move around your page. You’ll use your 50w/50p consistency of Dusk and Blush from your palette, as you want very thin lines for the most control.
FINE LINES OF WISPS, STEMS, & VINE
1 Fill up your brush with your Dusk consistency and bring it to your watercolor paper. Begin in the top left again and, with the lightest pressure, gently paint in the first wisp and connect it to the vine with the thinnest of lines. Artistically alternate between Dusk and Blush as you paint in the wisps and connect stems to the vine. [A]
2 Work slowly, rotating your paper as you connect leaves to stems to vine. In some places, the most natural way to paint the vine is by following your pencil-traced circle. [B]
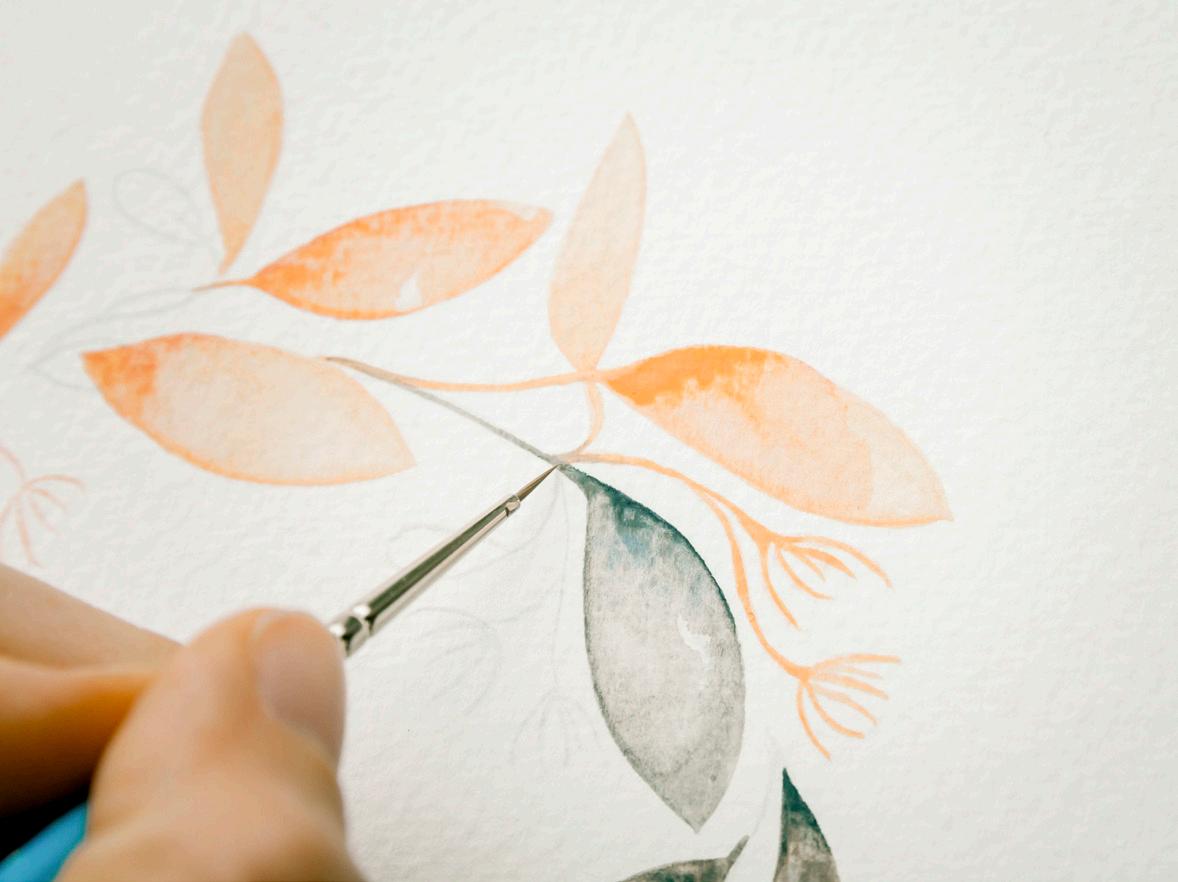
3 In other spots, leaves overlap the center vine. Jump over these and allow your eye to dictate the next connection point.
4 Often, the center circle becomes a wisp, so follow the natural course, delicately and slowly painting the thin tentacles that make up your wisps.
B A 164 LESSON 14: LAYERED WREATH
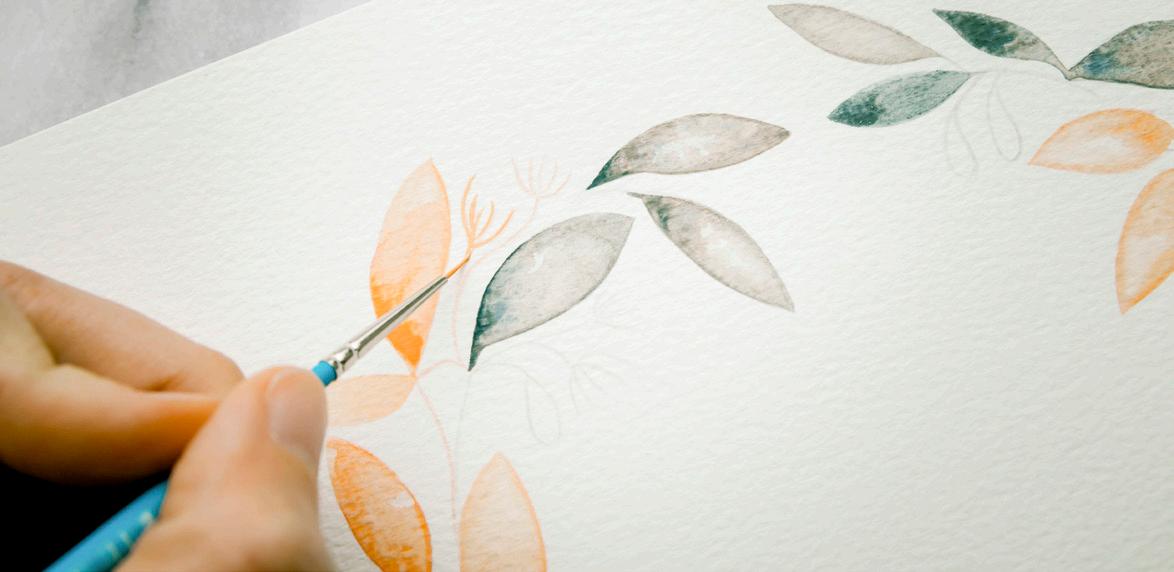
BRUSH: Round 1 (or smaller)
PAINT CONSISTENCY: 10w/90p “mustard”
Now it’s time to add your Payne’s Gray accents to the leaves, berries, and flower buds. A Round 1 brush will do the trick, but if you have a smaller size, like a 0 or a 5/0, use it! Smaller brushes have fewer bristles, and therefore soak up less water, allowing for more control.
WET-ON-DRY LAYERING
1 Prime your brush in water and use your brush to bring water to your palette to create your 10w/90p consistency of Payne’s Gray. You do not need to add much water for this task, as you want very thin lines and more control with your paint.
2 Some leaves can just have a center line, and others can have a center line plus more down the halves. [A]
3
While you’re detailing your leaves, you can go ahead and add the extra tips to your wisps and highlight some of your vine stems.
4
To complete your berries, dip your Round 1 in your Mason jar and pick up your 10w/90p “mustard” consistency of Payne’s Gray. We want these to appear deep and solid in color, so this thicker consistency is your magic sauce.
5 Paint several lines of varying lengths of Payne’s Gray on your buds as well. Notice that these lines flow at a slight curve, which seems to suggest that the bud is swollen in the center, about to open in bloom. The curved sweeping lines help suggest movement and the promise of a new flower! For the best result, turn your paper upside down, and pull your paint down from the stem, through the bud, and lift your brush as the line leaves the edges of the flower. The paintbrush strokes will have a more natural look this way. [B]
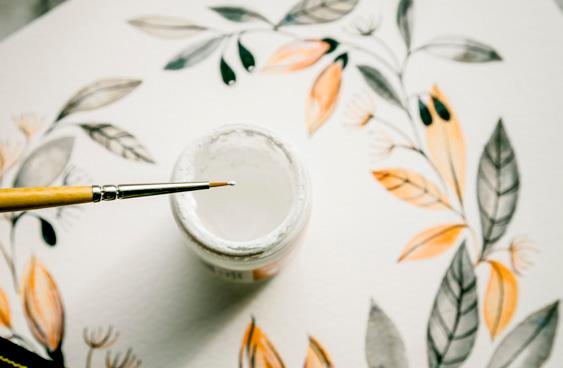
6 Dip your brush in your wash water and bring water to your palette to create a 10w/90p consistency of your Rose, Peach, and White.
7 Using the same upside-down orientation and curved stroke, add both thicker and thin alternating lines of Rose, Peach, and White to give each bloom its own unique look. Use your Dr. Ph. Martin’s Bleedproof White for the bolder white lines or Chinese White for the more blended white look.
continues on next page
A B
LAYERED WATERCOLOR & GOUACHE 165
8
I suggest adding the white accents last, as they provide the most “pop” for your piece. [C–F]
9
Keep in mind that overusing Chinese White can begin to muddy up all of your lines, blending the defined Payne’s Gray lines into your peach tones. If this happens, use the waterdrop blotting technique to
bring clear water to your muddy colors, use your brush to scrub the area lightly, and blot with your paper towel to soak up the water and paint. [G] 10
Then, once the boundary is dry, repaint your wet-on-dry lines as needed.
DETAIL WORK
As you prepare to add wet-on-dry layering as detail lines to your piece, consider what patterns you would like to create on your leaves. Do you prefer those lines to be straight or curved? Angle toward the points of the leaves, or head straight to the edges?
E F G
D C 166 LESSON 14: LAYERED WREATH
