4 minute read
Multi-Pipe Penetrations: The Bane of Roofing
A Checklist Can Help Multiple Trades Coordinate Their Work on Pipe Curbs
Thomas W. Hutchinson, AIA, CSI, Fellow-IIBEC, RRC
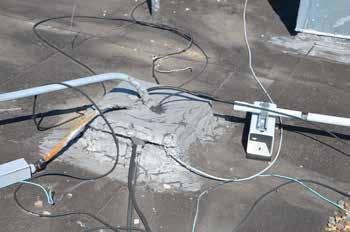
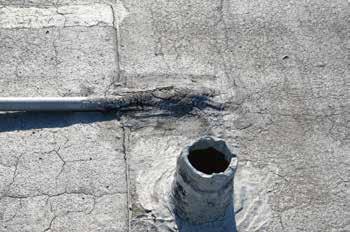
It never ceases to amaze me the way pipe penetrations through the roof are flashed or integrated into a roof cover. It’s as if there is a contest to see if everyone can do it differently – roof cement, membrane pitch pans, pourable sealer, lead, sheet metal covers, pre-molded boots, roof curbs penetrated in every which way and on and on. Many leak within a few months, only to then be caulked, covered in roof cement or duct taped (see photos on page 22). Most of these conditions relate to roofs that have been reroofed. What’s a designer to do?
The Solution
To deal with these conditions, I decided long ago to isolate the pipes from the roofing by having the HVAC piping come up through a prefabricated roof curb with a pipe curb cap and horizontal sleeves out the sides of the copper cap for each pipe – making the pipes fully independent from the roof. As such, the pipes could then be replaced or removed and additional pipes added without affecting the roof membrane and, possibly, the warranty.
I would suggest that when multiple pipes all grouped together penetrate the roof cover, the standard of care for architects, roof consultants and engineers is not a pourable sealer pocket but a pipe curb.
Design items to consider when moving forward with a pipe curb to be replaced on an existing roof include:
■ Purpose: isolation of the pipes from the roofing.
■ How many and what type of penetrations are you dealing with?
■ Disconnection, rerouting and reconnection of the piping.
■ Understand that the work of these details will most likely require coordination with mechanical and electric contractors.
■ Let’s not forget the owner, who may be without air conditioning for several days.
■ Vapor drive from the exterior of the curb toward the interior: How to seal the interior of the curb?
■ What type of deck is there, how open is it to allow the pipes to pass and how can it be closed off?
■ Separation of the pipes placed close together.
■ Waterproofing of the interior of the curb.
■ Ability at some time in the future to gain access to the pipes.
■ Material that will not rust (copper and stainless steel).
The Detail
The proper detail will involve a roof curb and a sheet metal cover, horizontal sleeves out the side of the copper cap that are then sealed with a foam rod, primer and sealant. The height of the curb should be eight inches above the roof surface – remember the tapered insulation. This condition of course requires specific detailing.
Construction involves disconnecting the pipes (and recapturing Freon where it exists). The detail should encompass a vapor retarder, roof curb, insulation for the interior of the curb and a solderable sheet metal hood with horizontal pipe sleeves for the pipe(s) to pass and a removable top. The last steps of the construction process include reconnecting the piping and sealing the pipes to the horizontal sleeves with a foam rod, primer and sealant. A very specific detail should be created to convey what is required. The construction of the pipe curb requires coordination of several trades.
As with other details, the pipe curb detail can involve a complex set of steps. In addition to the contractors having difficulty being able to decipher the steps, our observers did too so we created the following quality assurance checklist.
The Checklist – Pipe Penetration Quality Assurance Compliance
1. Have the existing curbs been removed, pipes disconnected (and any Freon captured) and electrical disconnected?
o Yes o No o Yes o No o Yes o No o Yes o No o Yes o No o Yes o No o Yes o No o Yes o No o Yes o No o Yes o No o Yes o No o Yes o No o Yes o No o Yes o No o Yes o No
2. Has a new insulated roof curb of the correct height been installed and properly secured?
3. Is the vapor retarder attached to the curb with an additional piece of vapor retarder material?
4. Have the gaps between the pipe curb and roof insulation been filled with spray foam insulation?

5. Has the roof deck on the interior of the roof curb been closed to the pipes to allow for the application of spray foam?
6. Has the opening in the roof deck for the pipes to pass been closed off with a sheet metal plate and spray foam been installed to seal the bottom of the curb from air exfiltration and to support the concrete?
7. Has the inside of the curb been filled with a minimum of two inches of concrete?
8. Has the curb been filled with a minimum of 1-1/2 inches of pourable sealer over the hardened concrete base?


9. Has the copper/stainless steel enclosure and sleeve(s) been fabricated with fully soldered joints?
10. Has the copper/stainless steel metal enclosure cap been fabricated with fully soldered joints and have a cross break on top?
11. Have the refrigeration pipes been modified to fit through the horizontal pipe curb sleeves?

12. Have the proper stainless steel screws with EPDM washer fasteners been used to secure the metal cap?
13. Have the pipe penetrations been centered in the horizontal pipe sleeves at the pipe curb cap and shimmed with a foam rod, to be centered in the sleeve?
14. Have the primer, then foam rod, then polyurethane sealant been installed around the pipe to the metal sleeve?
15. Has all sheet metal debris been removed from the roof surface?


