

• We are developing a fully functional Bible study registration system. In this practical session we are going to create a simple HTML webpage that will act as our landing page.

Step 1: Create a “biblestudy” folder

• Create a folder/directory on your PC and rename it to “biblestudy”
• Preferably, you can save it on the Desktop folder

Step 2: Create an “index.html” file
• Open your text editor (Sublime Text/VS Code)
• Create a new file and save it as “index.html”
• Set the document type to html using <!DOCTYPE html>
• Type the following code in the head section
<head>
<meta charset="UTF-8">
<meta name="viewport" content="width=device-width, initial-scale=1.0">
</head>

Step 3: Set the webpage title
• Use the <title> tag within the <head> tag to set the webpage title
• Set the title as “Bible Study Registration | My Organisation”
• Your code should now appear as shown below.
<head>
<meta charset="UTF-8">
<meta name="viewport" content="width=device-width, initial-scale=1.0">
<title>Bible Study Registration | My Organisation</title>
</head>

Step 4: Add a webpage logo

• Use the <img> tag within the <body> tag to set the webpage logo
• Ensure your <img> tag has an “src” attribute and “alt” attributes
• Below is an illustration of that:
<img src="your-logo-url.png" alt="Logo">
Step 5: Add a heading

• To make the heading visible, use the <h1> tag within the <body> tag
• Set the heading to read “Bible Study Registration”
• Below is an illustration of that:
<h1>Bible Study Registration</h1>
Step 6: Add a paragraph
• Add some text below the heading using the <p> tag
• Set the text to read “Nothing can separate us from the unlimited love of God”
• Below is an illustration of that:
<p>“Nothing can separate us from the unlimited love of God”</p>

Step 7: Add a register button
• The register button will redirect us to the registration form.
• To add it, use the <button> tag
• Set the button to “Register Now”
• Here is an illustration of the button: <button>Register Now</button>

Final Step: Browser output
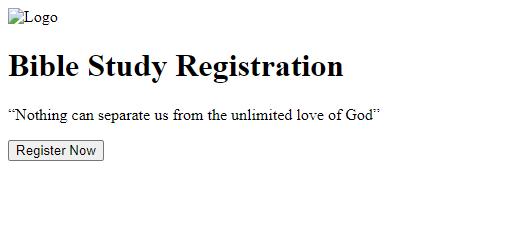
• While within the text editor, right click in the file. On the list of options, choose “Open in Browser”. Your output should as below.


If you enjoyed trying this out, feel free to share it and tag me on social media. Let’s connect using:
How was the learning like?
Twitter: @iDouglasSabwa
LinkedIn: Douglas Sabwa Indumwa
YouTube: Douglas Sabwa Indumwa
