14 minute read
Shop reviews II

from 2005 04 UK
by SoftSecrets

Grow disaster becomes top harvest By Bart B.
NLX on coco
Better and better; it just keeps getting a whole lot better each time, and that’s as it should be. Whether it is down to experience, luck or just plain coincidence, who knows. Do what you like to do and do it well, then you will get good results. What had threatened to be a screwed up grow turned out with the passage of time to be a top harvest. This time it was the supersonic NLX (Northern Lights Cross) that turned out to be a real winner under the lights. This is a story about what an amateur can achieve if he comes through a heat wave having started with too long a pre-growth.
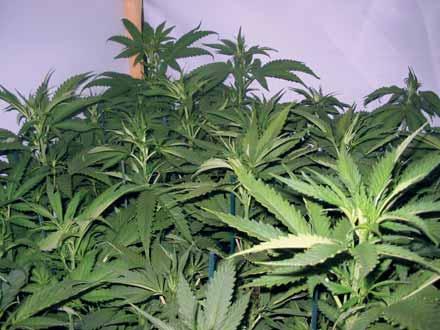
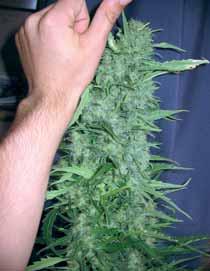
NLX, just before she goes into bloom.
The story begins in the Spring of 2003. The temperature had become nice and warm. Now and then it was actually very hot. After a poor start early in the year the spring sun was beginning to get to work and the temperature barely fell below 20 degrees. This was then an outstandingly good period in which to stick some more clones inside, because you don’t even need to keep them warm.
Many might have problems with the heat, but as long as you provide sufficient ventilation this should not necessarily lead to a failed crop. Hang a few fewer lamps, use a heavier-duty ventilator, or hang water-cooled or air-cooled lamps - these are simple solutions for bringing the temperature in your space down a
few degrees. I personally set my lamps to burn at night, like most people probably, as so long as no heat wave comes along to nudge your night time temperatures above 30 degrees, everything runs pretty smoothly. The ventilation does need to be on continuously though, which will make sure the cool evening air is drawn fully through the grow space.
By the way, I have replaced my old 400 watt lamp with two 600 watt lamps, a question of looking ahead rather than looking back. And the temperature is kept nicely under control, even in a reasonably small grow space. It stays under the 30 degree ceiling and there is sufficient ventilation thanks to a vacuum pump and ventilator working flat out. But that is a situation that cannot be compared with the bigger growers who have 10, 20 or more lamps hung in their spaces. To these people I have only one word to say: airco. This because time and again I hear from growers that if it’s cold you can warm things up but there’s nothing you can do against the heat. But with a small (or large) investment in an airco installation, even with the most roasting hot of Summers you can safely continue to grow in a nice fresh indoor space. This is obviously not something for everybody, but it is an investment that quickly repays itself in bud yield. The technology what’s more never stands still. Also available in the growing scene at the moment is a piece of equipment on sale that can
cool off the inside temperature of the your space before you enter. At the same time, the same piece of kit can keep the air warm in winter, so that your growing space can be continuously kept at an ideal temperature.
With a small (or large) investment in an airco installation even during a scorching hot summer you can grow in nice fresh circumstances indoors.
Reliable clones
I went in search of decent, reliable clones, and boy did I find them. This time around I got hold of some NLX. Just how good they really were only became fully apparent in retrospect. Evidently I have to-date had good luck on the clone market. But many growers have less luck. The quality is not always satisfactory, certainly in the spring and summer months, when it is advisable to take especially good care. Watch out particularly for clones infested with spint or other pests.
I planted 17 NLX clones in four-litre pots filled with coco substrate. I have already mentioned how happy I was with them. For a healthy, vigorous start I added root stimulator and enzymes to the feed water. The pre-growth was started under a 400watt lamp that was switched over to a 600-watter after a few days. Once they had burst into bloom, I added another 600-watt lamp to the set up. Apparently the heat suited them well, despite the fact that everyone complains about the heat given off by a 600-watt lamp. It was not actually that different, but this does come down to the same point I made earlier: ensure good ventilation. Had mine not been powerful enough, then I could still have bought a stronger one. That is why you will frequently hear how important it is to buy a unit with a more powerful suction than you actually need (at the moment). Suppose that you start your first grow with a few plants during the Winter months, and you calculate the capacity of your grow space and the ventilation you will need for it. If you buy your ventilation perfectly tailored to this then you will certainly be fine during the crisp Autumn and Winter months. But what happens when the temperature begins to rise in the Spring and Summer? Then it will become apparent to many that they have bought too feeble a ventilation capacity, and after a few months they will either have to buy another one or stop with growing altogether. One other advantage of buying a larger capacity than you need at the moment is that the ventilation will be fine just turning over at half speed, which will considerably reduce the noise created. The alternative is to have a smaller ventilation capacity and have it run flat out, and that will make much more of a racket. Are you also going to have to spend on hefty noise insulation as a result?
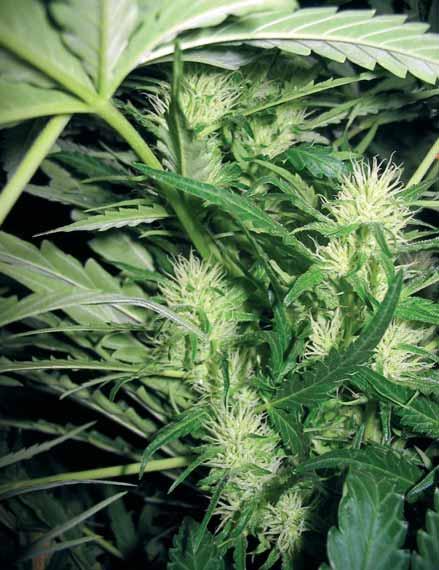
A few weeks in to the bloom. Lovely, elongated buds.
Pre-growth: indoors or outdoors?
Normally I would let the clones go through their pre-growth outside, but because the sun was not yet up to scratch I had no choice but to do this indoors. Nonetheless, I remain a firm supporter of letting everything simply complete its pre-growth outside. But anyway, this time I let the clones have a week and a half of growth. This was a little too long, it later turned out, because the NLX is a very powerful plant and a great grower. That extra half week of growth came about thanks to a problem when a timer burnt out, thanks to which they continued to grow. Fortunately I discovered the problem quite quickly and was able to sort it out.
This incident prompted me to ponder how important it is to always check your lamps regularly and make sure they really are turning on and off at the right time. In the growth period this can not do too much damage, but what if I had been at the flowering stage? Just imagine, you don’t keep a good watch out and after a week you see your plants going back into growth instead of continuing to develop their blooms. This is not a nice thing to witness. So make sure your equipment is in a reasonable state, and don’t spare the pennies when you’re buying your timers. Using cheap gear will sooner or later lead to problems.
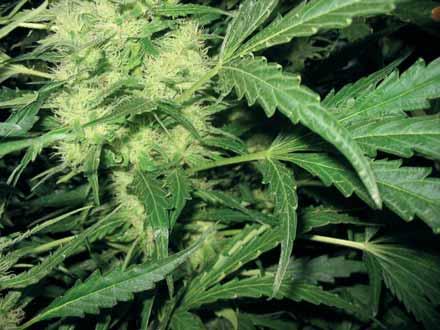
The same buds sometime later. Things are looking better.
The NLX-babes had reached a good 15 to 20 centimetres. The smallest were those growing in soil. I always put a few plants in soil, for one reason just to see the difference when grown in coco. The clones in coco sprang up quite clearly faster. The clones in soil needed a few days more. But no sweat; despite the extra days they took, these clones too achieved a good growth,
Rockets in coco
Bloom was stimulated, and the plants began to develop at a rapid pace. They literally shot up like green rockets; the launch of the space shuttle had nothing on these babies. NLX can without any trouble easily reach three metres in height. It really is a fantastic grower. Unfortunately, I did not know that in advance, otherwise I would certainly have given them less pre-growth. I would also have been better off topping them. But instead I had to
keep raising the lamps and raising them again, until after about two weeks I could not raise them any further. And the growth, sadly, was still not finished. I had not topped them, I guess because I kept thinking ‘well they surely can’t get much bigger’. Once they had reached a height of 1.30 metres, I finally realised that I did in fact need to top them. But they eventually reached a height of 1.60 metres.
The NLX is a slim lady with very short side branches. She is, judging by the leaves, mostly Sativa, which explains the extreme growth. With which Sativa is the NL crossed with? Some people reckon it’s with a Haze or Superskunk, which would explain the strong growth. In any case the NLX grows a dominant cola bud, by which I mean that she expends most of her energy in making one enormously long head bud if you do not top her. Topping at a height of just 30 to 60 centimetres is not unusual. The growth pattern is comparable to an old-fashioned hat stand, with many small, short side branches on it and a single large bump on top. That is how my own NLX looked, 1.40 to 1.60 metre high with side branches of about 15 centimetres. They put out very little leafage. This is a characteristic that makes this lady a pleasure to trim. She’s a sweet-smeller, with elongated, vast Sativa-buds.
They were hand-watered daily with Canna Coco, which can be used during the growth as well as during the bloom. I also gave them a regular dose of Supervit, and once the bloom period had begun I also applied B’Cuzz bloom stimulator on a daily basis. In addition I gave them each week or two weeks a good dose of enzymes to keep the root life optimal, and thereby keep the whole plant growing optimally. The plants slurped up a good 500 ml of feed water each per day. What was a nice advantage with using coco was that it is impossible to give them too much water. Thanks to this attribute it is also a great medium for beginners to let their seeds germinate on. Coco has the advantage of holding plenty of moisture in, but at the same time it remains good
and dry. Strange, but true – even if you have just given the coco litres of water, it still feels bone dry. This is one of the great strengths of using coco. Do this with soil and I can assure you that over the next few days you will not need (or be able to) give any more feed water. By contrast, with coco you will the very next day have once again a nice dry pot in front of you. So then you’ll be able to give another strong feed. With soil you would have to wait another day before it was dry enough for you to be able to give more water. With coco you can feed the very next day, which means you can more easily rectify any deficiencies on coco, plus you can also give much more nutrient – up to twice as much as on soil. This is my experience, at least. Each grow I have undertaken with coco and soil-based plants has given me the same results.
Another advantage of a larger capacity is that you can then run this at half speed, which will make the ventilation noise considerably less. This prompted me to ponder how important it is to always check your lamps regularly and make sure they really are turning on and off at the right time.
Four weeks’ bloom
The NLX had now been blossoming for about four weeks. I have to say that by this stage there were still only very small buds beginning to form on the plants. As things were looking now, I was facing really awful harvest. The buds on my NLX were also coming way too close to the lamps, which were giving off an immense amount of heat. I’m used to growing K2, which in week four already has such huge buds on them they look as if they are practically ready for harvest. In the case of these NLX, this was quite clearly not the case, and that takes a bit of getting used to. I even stopped giving the plants Supervit and B’Cuzz bloom stimulator
in the sixth week of bloom, as I did not want to waste any more of these products, which cost money after all, on plants did not look as if they were going to produce any reasonable yield of buds – at least, so I thought.
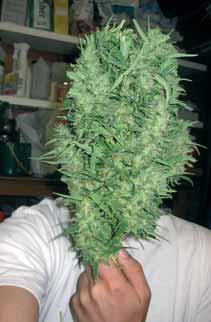
Not very long after this, the NLX astounded me by producing the biggest buds I have ever (personally) seen, let alone grown! Really, I had not even dreamed such buds would appear. What had seemed to be heading for a disastrous grow in fact turned into a top harvest. I give all the credit to NLX, a really top plant. This was the first time that I have grown a variety that developed such a super crown bud. So the growth spurt begins from week six to eight. Then the buds develop and increase in size so quickly that before you even know it, you’re wrestling with enormous buds under your lamps. NLX really lets her best side be seen only in the last two weeks. The coco I used I have had now for more than a year, during which time I have used it three times. There are always nutrient residues left in it, and maybe the coco is all the better for this rather than worse. Who knows? If you ever decide to start a grow on coco yourself it is advisable to start good and early with feeding. In its raw state coco contains no nutrient at all, which is why you need to begin
adding nutrients immediately if you want to get off to a good start with your growth. So don’t dilly-dally, as you can when growing on soil, for a week or so in order to begin giving nutrients. Adding enzymes and root stimulator will also help you get off to a good start in the first few days. And once the clones have really begun to take hold and are showing signs of good growth, then immediately start giving fertiliser to your plants. You can start doing this pretty much from the fourth day or even sooner. When reusing coco, and so are using the same coco for the second time, then you should flush the whole lot well through with enzymes, and then you’re fine to add the second load of clones to it. The coco now contains a great deal of nutrients, which will give you a good growth start, and you will be able to wait a little longer before adding your first fertiliser.
Furthermore, I’d like to remark that so far I have never managed to overfertilise coco. This can partly be explained by the drain off that occurs when you add too much feed water. Any excess simply washes away, taking all damaging salts and whatnot. Coco also has a buffering capability by being able to store considerable amounts of nutrient and then release it when it is needed. Altogether, coco seems to be a particularly user-friendly medium. You really have to try your hardest to screw up using it. I even don’t bother to use a pH meter or EC meter when growing on coco. It works really well without them, and if something works well, why mess with it?
What a cracker. Super harvest
We are now at the end of the eighth, beginning of the ninth week of blooming. The NLX is ripe and ready for harvesting. The most important moment is upon us. I find it hard to believe that if I now look in my little plantation I’m looking at the same one as four weeks ago, when little buds no bigger than a finger were sitting on the plants. Things can change rapidly, the tide can soon turn, this time in my favour. Each time it gets better and better, I have to say. Every new grow undertaken increases your knowledge. Before you know it you’re raising the biggest buds, buds you’ve only seen in your dreams. And let’s not forget: they are your buds! Everyone knows that the sweetest buds are those you’ve raised yourself. Hahaha, indeed! You’ll be walking around with a smile on