12 minute read
KLEMM PROJECT


Vintage fantasy…
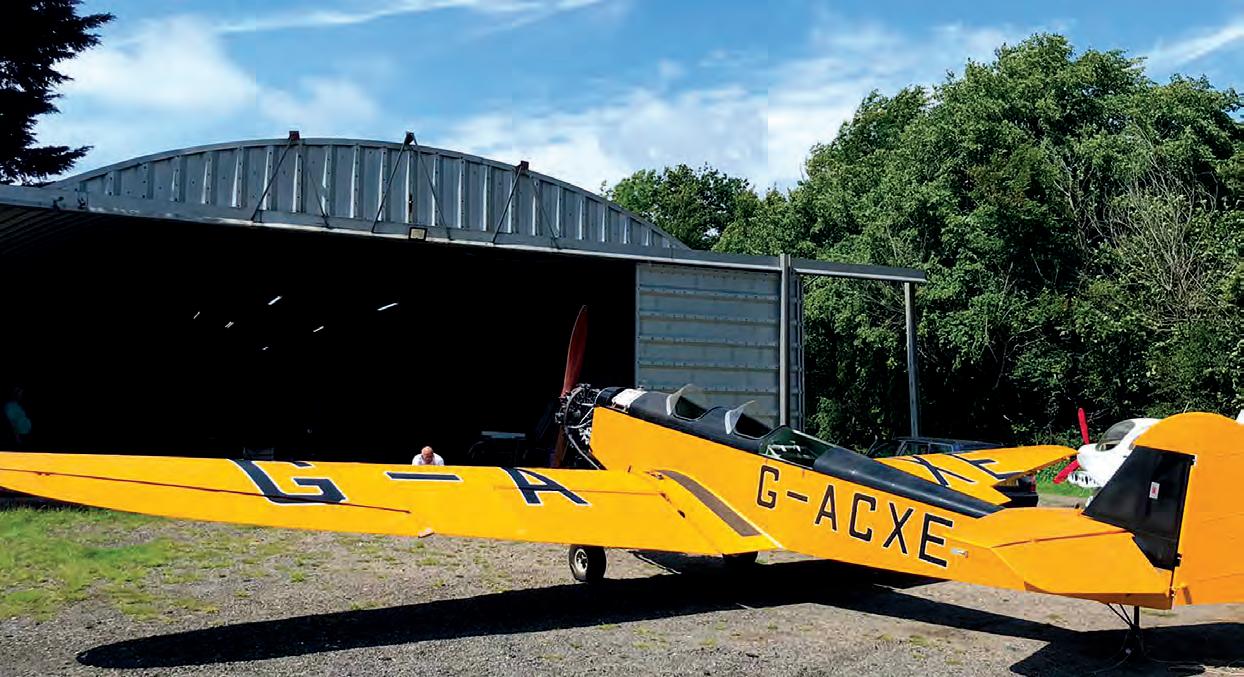
Jim Copeman reports on the progress of British Klemm, G-ACXE, a fascinating vintage machine
Since the previous report in early 2020 much has happened to progress the restoration of our 1934 British Klemm L25C, despite the interruptions of Covid. In fact, I think I wrote the original article as a way to fill time during the early days of the pandemic…
So, what has been done? Well, you may recall from the previous article that we needed a new combustion air inlet duct and an exhaust system for the Pobjoy engine. The inlet duct was designed from various photo evidence of BA Swallows, manufactured, painted and fitted.
Exhaust ring
The exhaust system for this delightful little radial, as you might expect, is pretty involved, but luckily this was one of the few major items we had a pattern for, a rather holey, rusty and very thin example for sure, but it was an original.
Some months before, we’d had the two half round headers prefabricated by a local welder and bends with Above The Klemm nears completion and is seen here less cowling after its first engine runs. tails made at Pipecraft. The time had come to see if we could join the bits together.
Being a seven-cylinder engine, three cylinders per side discharge into the two separate ring headers, with the seventh ducted as an extra into the left header. This means that the headers have asymmetrical internal pressures, so they are coupled to either side of the inlet casting to allow the pressures to equalise. This was handy in the 1920/1930s as the heat from this flow is absorbed into the casting and thus the inlet charge. Pre-WWII, fuel was very different from today and needed help to vaporise, and this heating of the charge helped combustion.
The total exhaust system has come together very well to produce a neat exhaust ring, in keeping with the period and as near to the original as possible, but with the addition of modern springs to hold the joints together to make it reliable in flight. The exhaust system was completed by my partner in the aircraft, Tony Palmer, including the finer details such as the loops for the retention springs, while I was away in Wales helping on my daughter’s farm during lambing.
We then made up two new ignition harnesses and were busy on the engine until we had to stop at the end of March 2020 because of lockdown. During this period the registration letters arrived. All the original lettering on the ‘BK had been brush painted… all rather labour intensive. So, rather than all the masking tape and paint we had decided to go the ready-made route. We produced a digital file based on old photos and our original paintwork and sent them to a local vinyl specialist, and we were very happy with the result.
One of the first jobs when we were able to return to the hangar in June was to have a go at putting the fuselage letters on and, after some practice, it all worked out fine.
Fuel hoses
All of the fuel hoses had been installed about 15 or 16 years ago, so would be out of date, plus they looked to be hydraulic hoses. As we don’t know the future fuel availability, we went with the highest spec pipe available i.e., ethanol proof J30G9. We pulled out the two fuel tanks and disconnected all the hoses and noted the routes and clips etc. We used eBay to source the hose, although the ½inch ID return pipe from the header tank to the main tank had to be bought separately as we couldn’t find that size in the above spec., but it was ethanol proof and only operates at about two psi max.
The hand-painted main tank had some slight surface corrosion in places, so we cleaned it up, sprayed the bare metal with red oxide and then painted the tank with black two-pack to help prolong its life. After repeating the process on the gravity tank, we refitted the various straps and tanks, and installed the new hoses. This involved crawling up inside a cramped knobbly wooden fuselage, with no room to turn back, you go in forwards and out backwards! It proved to be one of many such trips, but at last the tanks were ready for their first drop of fuel.
Undercarriage tweaks
The undercarriage was still finished in hand-painted grey, which looked wrong, so we removed the left leg and repainted it in gloss black, skinned the brake cable with shrink wrap, and rebuilt the leg. This was a useful exercise as the previous owner, John, had rebuilt them and we had no knowledge of what made them tick. The week before, Tony had been checking out the brakes on the Tiger Moth, and these brakes were identical so we knew how they should be assembled.
The right-side leg fairing had been damaged at some time and had been repaired. This repair had filled the dent but the rivets down the back edge were also submerged in filler, and of course, the whole leg was brush painted in grey. So, we removed the fairing and tried knocking out the dents. As it was not possible to get them all out, we de-riveted it, laid it out flat and put it through the English wheel to smooth it out. In the accident, many years previously, the metal had been torn, so Tony had a go at aluminium ‘soldering’ to repair it, using a zinc/aluminium alloy rod, as it melts at a lower temperature than the parent material. We discussed whether to use filler again to disguise the repair, but I was all for leaving it as a bit of history for all to see… so it was only painted.
Mounting the engine
We seem to make significant progress in steps, and two came in quick succession. First, we moved CXE to the hangar and then, in mid-July 2020, we hung the Pobjoy on the firewall. I’m not sure when that had last happened, but Above top The portside cowling and the exhaust ring.
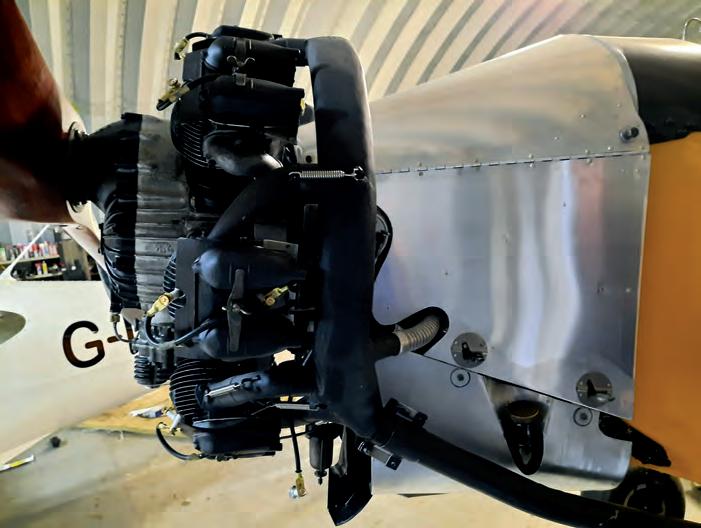
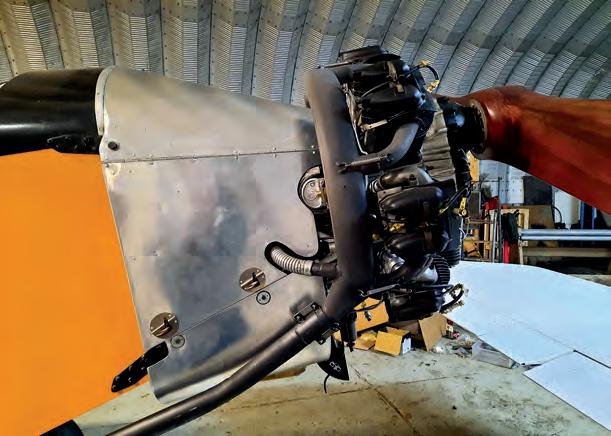
Above bottom
Starboard side view of engine and cowling. uniting the engine and fuselage was certainly a very important milestone.
Engine installed, we had the fun part of dressing it up with the controls, prop, spinner, oil tank, magnetos etc., so we got busy working out all the system hook ups. There are two shafts forward of the firewall which control throttle, mixture, and the advance and retard of the magnetos. Then there are the engine oil lines which go through the carburettor, oil cooler (rebuilt as original by the guy that rebuilds Moth petrol tanks) and oil tank. Plus, there are the three fuel pipes forward of the firewall, all of which now have a fire sleeve over them, and the oil pressure line to the cockpit. All these need wire or pin locking in an increasingly restricted space.
We were making progress but with little evidence. It was a case of much trial fit work, that is, installing the item say, three times, annealing copper washers and gaskets, painting pipes, and finding all the correct hardware, before any final fitting and the wiring of all the bolts etc., and that takes time.
We changed a few things around the oil pump to make it easier to install and maintain in the future, plus as the oil from the lower two cylinders drains to the atmosphere, we
designed and fitted an oil catch pot using period components. We have also designed and made an oil tank breather.
Just as we were getting going again, Covid returned, and apart from a few disjointed days in November it all came to a grinding halt until spring 2021. Consequently, another seven or eight months were lost, which is why these things take so long…
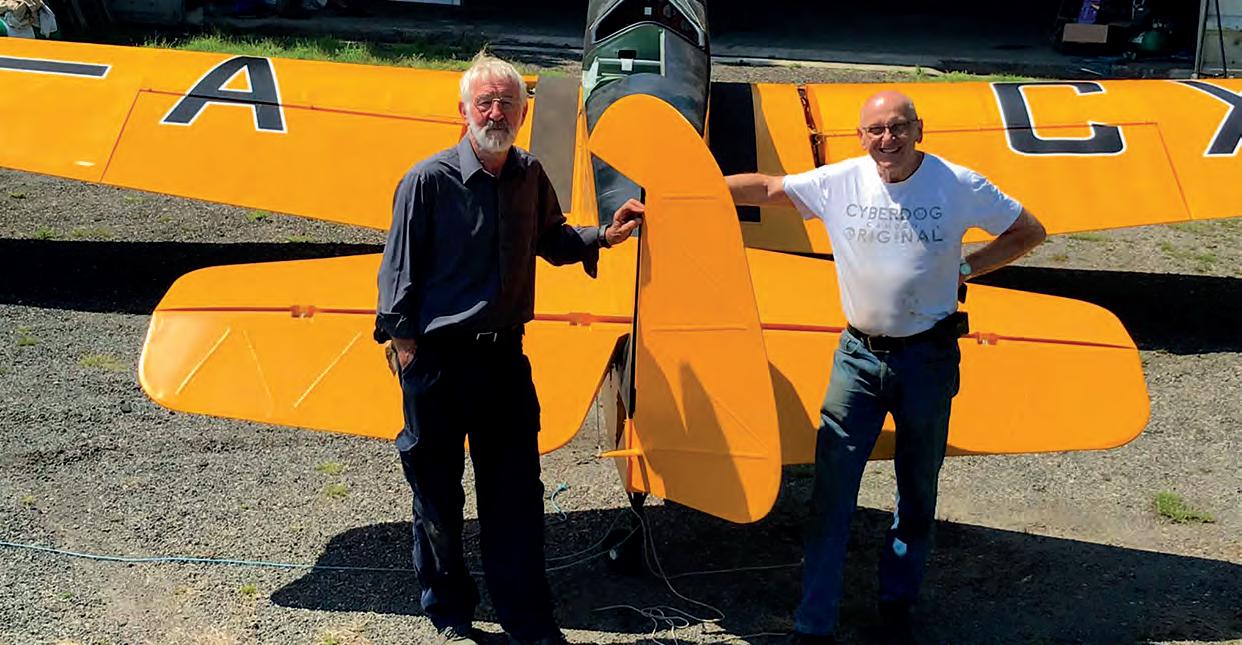
The first few hours back were basically trying to remember where we were with everything. During lockdown we had ordered some exhaust retainer springs so we could at least fit the exhaust system, and that allowed us to start on the engine cowl sides. Again, we had no patterns and no really definite idea of the originals, Above John Copeland (left) and Tony Palmer hope to fly the aircraft in spring 2022.
Below Elegantly folded and ready to hangar. just a few murky old photos. However, both sides needed hinges, cutaways to miss the exhaust and the magnetos, and some form of locking, so that was a start.
We planned the exhaust tail pipes after extensive viewing of lots of pictures of BA Swallow II’s and the old BK Swallow photos, and followed their ideas. The tail pipes came together well, the pipe to manifold joint is a simple slip joint – a foolproof design, easy to disconnect and copied from the DH 82C in the hangar.
The engine cowl was a major exercise as we had no parts to copy and only a very grainy picture as a guide. We had to design from scratch a simple, light, strong enough, single curvature cowl that looked like it was original but also allowed access to all the bits that needed attention in
service. We used ¼ turn cowl fasteners left over from the DH82C project as the start point and then determined where the hinges needed to be. We think it has turned out quite well, but then we are biased…
Engine runs
The 25 May this year was another milestone. The engine installation had progressed so well that before I had to go on another family trip, we thought we’d better attempt to start the Pobjoy. We attached it to the company van and tied down the back, went through the checklist – and it fired on the first pull of the prop. It was the first run of the engine since 1961, and the first time the aeroplane had a working engine since 1939. From 14 unlabelled boxes full of unnamed bits of metal to running at the first attempt, it was an utterly amazing feeling of success.
A video of the engine running is available at https:// youtu.be/uTAi0-b9pm0 but unfortunately it does not show the actual start as there were only two of us – I was doing the swinging with Tony at the controls.
The engine cowlings have also moved on, both sides and the top are done, the right-hand lower panel is complete and we’ve started the left-hand lower one. This is more complicated as it encircles the oil filler cap.
When we ran the engine for the first time, we didn’t get any oil pressure registering on the gauge, so after 10 seconds Tony cut the engine, after all we didn’t want any damage to a virtually new engine. We thought it could be air in the pressure gauge line, so we bled the line and also pumped oil up to the rockers, but still no oil pressure after 10 seconds on run number two.
We then removed the oil line from the scavenge side of the engine and cranked the engine around until oil came out and then reconnected it. We also read the manual, which said that it can take up to a minute for oil pressure to register. We ran the engine again a few days later with Phil Trangmar (our Inspector) and Tony Berryman (test pilot to be) present and ran it for 10 minutes, and had 30psi not long after the start.
We had seen the needle move when hand cranking, so we were confident we had cracked it.
We need to increase oil pressure slightly, reduce the tick over speed and put some gasket goo on the rocker
Engineering charges
LAA Project Registration
Kit Built Aircraft Plans Built Aircraft £300 £50
Issue of a Permit to Test Fly
Non-LAA approved design only £40
Initial Permit issue
Up to 450kg 451-999kg 1,000kg and above Permit Renewal (can now be paid online via LAA Shop) Up to 450kg 451-999kg 1,000kg and above Factory-built gyroplanes (all weights) Note: if the last Renewal wasn’t administered by the LAA an extra fee of £125 applies £450 £550 £650
£155 £200 £230 £250
Modification application
Prototype modification Repeat modification minimum £60 minimum £30
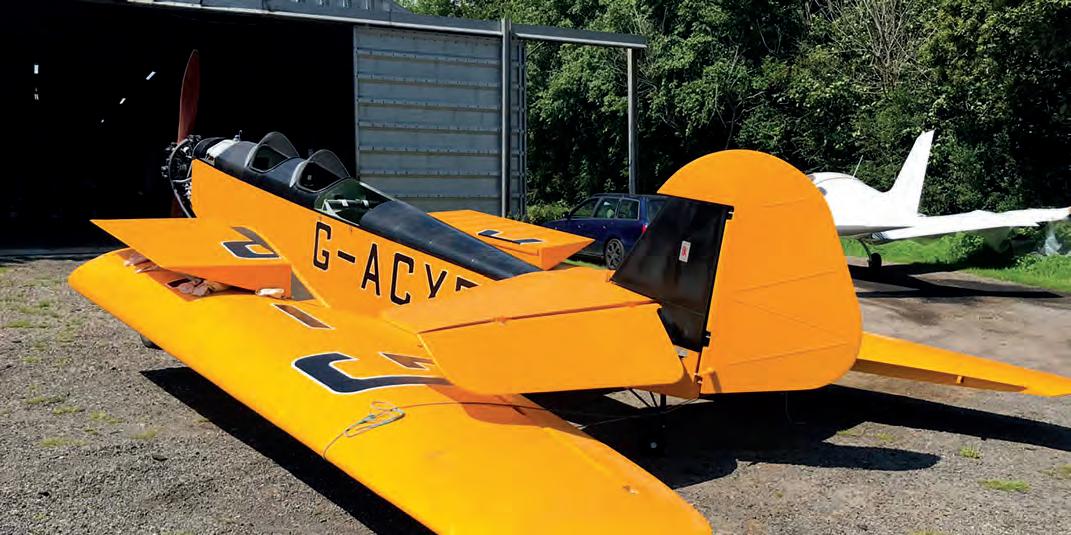
boxes as we have a slight oil leak from them, but otherwise we seem good to go. We brought the wings into the main hangar and fitted the ailerons, the ‘blocks of cheese’ (the inner wing sections that fold up to allow the wings to fold) and applied the registration letters.
The wing registration letters stand nearly 1m tall, are on both top and bottom surfaces on the wings and cover nearly the whole span. Their location on all four surfaces had to be carefully judged to match upper to lower, while avoiding various hatches, seams and gaps to moving sections. Metre high lettering proved a quite interesting task.
The original ‘British Klemm’ badge that previous owner John Wakeford had carefully saved all those years ago was copied and is now back in position on the fin. Having checked and overhauled all accessible parts of the wing folding mechanism, the wings have been reattached and the folding and latching checked, and we have learned the correct procedure.
We’ve taken a long time checking, adjusting and painting all six hatches on the under surface and now they are nicely painted, in place and fitted with lockable catches. A new hatch has been designed for the fuel filler and contents gauge, which is situated on top of the port wing centre section.
So here we are in late 2021 and much nearer to completion, but with still at least three fairly major bits to do. We’ll try a taxying session soon, plus all the form filling, but early 2022 is looking good…
Postscript
It was suggested we try for a National Transport Trust Award and after a chat on the phone, exchanges of emails, changes to wording etc., we submitted our application.
Then came the good news, we’d won a prize of £1,000 towards the restoration. The prize giving was at Fawley Hill, the late Sir Robert McAlpine’s home and railway museum, and was presented by Princess Anne in October 2021.
If you would like to know more about the Transport Trust visit its website at www.nationaltransporttrust.org.uk and read all about the very worthwhile work it does to safeguard the nation’s transport hardware. It makes for interesting reading. ■
Transfer
(from C of A to Permit or CAA Permit to LAA Permit) Up to 450kg 451 to 999kg 1,000kg and above
Four-seat aircraft
£150 £250 £350
Manufacturer’s/agent’s type acceptance fee £2,000 Project registration royalty £50
Category change
Group A to microlight Microlight to Group A £135 £135
Change of G-Registration fee
Issue of Permit documents following G-Reg change £45
Replacement Documents
Lost, stolen etc (fee is per document) £20
Latest SPARS – No 17 April 2018
PLEASE NOTE: When you’re submitting documents using an A4-sized envelope, a First Class stamp is insufficient postage.


