
4 minute read
TESTED Flybox OBLO autopilot


Graham Smith gets his hands on a new autopilot system from Flybox and tackles the install and set up…
FROM €1,278 www.flyboxavionics.it
Autopilots have been around for many years and I have installed plenty of them. Some work very well, while others can be difficult to configure. Just before the pandemic I decided to try out the Flybox Oblo. The Oblo’s most useful trick compared to other units is its WiFi connectivity so a pilot with a tablet using SkyDemon can upload a flight plan into the Oblo using WiFi, and off you go. No need to enter waypoints or altitude. With a tablet on your lap you can drag a waypoint to another location and instantly the autopilot will change course or altitude. I still own my original Sportcruiser from 2006, so I asked the LAA Engineering department if I could fit the Oblo autopilot to that. The answer was instantly ‘yes’.
LAA Engineering paperwork was filled in and submitted, and while I was waiting for the autopilot to turn up I made a new instrument panel so I could mount the control panel and the 80mm Oblo EFIS. Two weeks later the parcel arrived. Everything seemed to be in the box, including a complete wiring harness, servo mounts, servo pushrods and a very comprehensive manual. The only additional items needed were the circuit breakers for the Oblo (1.0 amp) and the servos (7.5 amp). The manual advises that the Oblo must be kept away from airframe wiring and a disengage button must be installed on the instrument panel, which must be reached from both seats with the seatbelts tight.
The first task was to read the manual. Installation location must be well away from any magnetic sources. A hand-held magnetic compass was used to check stable readings around the control panel with the master switch both on and off. No problems so far. The wiring harness was complete with the molex connectors already fitted.
Routing the wiring harness was very simple and positions for the control servos were marked on the fuselage floor behind the pilot seat.
The servo mounts were riveted to the fuselage floor, but it was obvious that the floor needed to be reinforced as the skin was flexing under load. Aluminium angle was added to the floor to resist flexing under load. The aileron servo only needed two pieces of angle but the elevator servo required four pieces of reinforcement. Under load the floor was now not flexing, Obviously, installs on other aircraft types will need to be assessed individually. The pushrods came with spherical bearings which just needed to be cut to length. Adjustment would be needed to prevent the servo arms going past the point where it could jam. The aileron servo was very simple to fit, but the elevator servo required an idler arm which had to be cut to length to stop the elevator from causing a control jam. After the servos were fitted and control rods in place it was time to switch on and enter the settings.
The installation manual warns the aircraft must not fly until the airspeed bar thresholds are set correctly, and magnetic calibration must be performed. The servos have a reliable disengage system so that the output torque is electronically adjusted. The output settings are recommended for each aircraft. The Sportcruiser has a very low elevator setting which must be carefully set. The servos have no residual torque if the autopilot disengages due to turbulence. A visible and audio warning is obvious if the autopilot automatically disengages.

Once the installation is complete, calibration must be performed. With the engine running, the aircraft must complete a 420° clockwise circle on the ground. The screen will let you know when the calibration is completed. The Oblo has three different screens. On start up the artificial horizon will show a lot of information. Turning the knob changes the screen to the HSI (Horizontal Situation Indicator). Turning the knob again will change to an altimeter.


· Data: Attitude Indicator
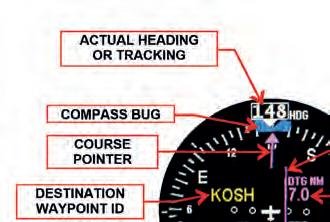
Compass – This is placed in the lower part of the screen. It shows the heading (magnetic compass). It is possible to change the setting to Track by holding the knob for one second.
Turn Rate – Graphical indication of the turn rate. Attitude indicator – With 360 continuous operation in both pitch and roll.
Air Speed – The airspeed is represented with both km/h, Mp/h or knots.
Slip indicator – Graphic indication of lateral indications. Altimeter – It includes a tape and numeric indicator. Vertical speed indicator – Displays the numerical indication.

G-Meter – Indicates vertical acceleration.
· Data: HSI Page
The HSI page (Horizontal Situation Indicator) reduces pilot workload by providing heading/ tracking course reference, course deviation and other navigation aid. The HSI page needs to be connected to a GPS navigation system.
Actual heading or tracking – Can show the heading or tracking.
Compass bug – The compass bug can be freely moved by the pilot by clicking the knob and rotating to select a new heading or track.
Course pointer – The pointer indicates the currently selected course.
Course deviation indicator – The CDI indicates how far you are from the left or the right selected course.
Destination waypoint ID – It shows the name of the destination waypoint.
Distance to go – It shows the distance from your aircraft to the next waypoint.
Time to go – It shows the time needed to reach the next waypoint.
Ground speed – It shows the ground speed. Course – It shows the course to maintain the waypoint. Cross track error – It shows the numerical indication of the deviation from the selected course.
· Data: Drum altimeter page Pressure reference – To change the pressure reference click the knob and then rotate the numerical value.
· Data: Autopilot control system
On/Off – Use the switch to turn off the autopilot control unit.
HDG/TRK (Press) – Press the button to engage/ disengage the autopilot in heading or GPS mode.
HDG/TRK (Rotate) – Rotate the HDG/TRK knob to adjust the heading/tracking bug. Press the knob to toggle the bug to the actual heading.
Alt (Press) – Press the ALT button to engage/ disengage the autopilot in altitude mode. Alt (Rotate) – Rotate the ALT knob to adjust the altimeter bug. Press the knob to toggle the bug to the actual altitude.
Nav – (Press) Press the NAV button to engage/ disengage the autopilot in flight plan or go to navigation.

Next time – test flying Oblo. ■


