6 minute read
NOT-SO-HEAVY METAL

Designing laser-cut metal signs. Not-so-heavy Metal
Metal is typically difficult to work with using traditional sign-making techniques and investing in dedicated metal-cutting equipment can be a serious investment.
Luckily there are resources for sign manufacturers to outsource metal design production quickly and inexpensively. Here’s a step-by-step guide on the best practices for designing metal signage in such cases.
1. Begin with the right file format. For your design to be cut, it will need to be in a vector-based format (.ai, .eps, .dwg, and .dxf file types or alternatively .pdf, .step, or raster).
Keep in mind that your file can be created in almost any vector-based design software that allows exporting to .dxf and .eps. We highly recommend Adobe ® Illustrator ® , AutoDesk ® Fusion 360 ™ , Inkscape, and SolidWorks ® . 2. Design with cutting limitations in mind. As you design, make sure that you don’t have details that may be too small to cut using a laser.
Anything that is smaller than onetimes the material thickness may be too small. For example, if your design is using .060-inch stainless steel, holes and other geometry smaller than .060-inch may not cut reliably.
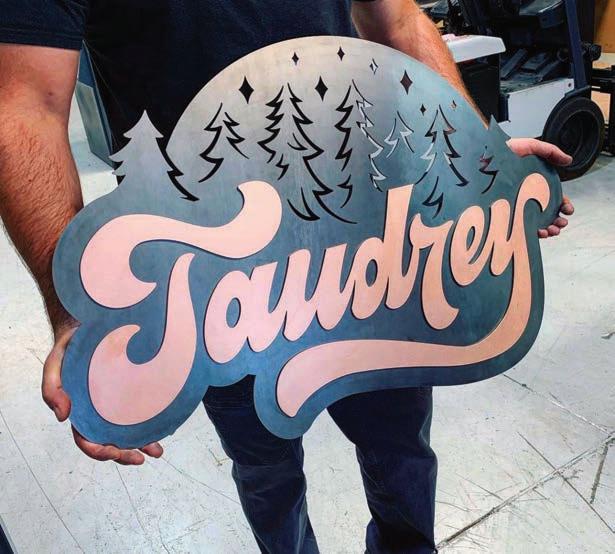
3. Avoid any “orphan” shapes during your design. An orphan shape is a shape that is meant to be part of the metal sign but not connected anywhere else. A common example of a nested shape is the space inside the letter “o.” If the letter “o” is cut unaltered, the small shape inside of the letter will not be in the sign; it isn’t connected to anything else.
To fix this problem, you need to create bridges. Bridges are shapes that are intended to connect nested shapes to the rest of the structure. Basically remember that, because this is being cut on metal, anything that isn’t connected to the bulk of the sign is simply going to fall out. You can modify your design to compensate for this. (Note: One exception to this rule is if you’re planning on mounting the metal parts to a backer or substrate such as wood or acrylic.)

16 Sign Builder Illustrateduilder Illustrated April 2020April 2020 signshop.com All Photos: SendCutSend.com.
Restart Your Business! 2020 is THE year to convert your business with an industry leader!

"Prior to converting to FASTSIGNS,we were never able to achieve the sales goals we wanted. The processes and procedures allow us to obtain larger goals." "Prior to converting to FASTSIGNS,we were never able to achieve the sales goals we wanted. The processes and procedures allow us


- Jeff & Kim Chudoff FASTSIGNS of Maple Shade, NJ (Formerly Arizona Designs)




The FASTSIGNS Conversion Program allows you to convert your existing business, and gain ongoing training and support from our franchise system for only $15,000 down.


FOR MORE INFORMATION ON CONVERTING FASTSIGNS: Visit us at www.fastsigns.com or contact Mark Jameson - mark.jameson@fastsigns.com Text “Restart 2020” to 214-273-1715 to learn more!
4. Make sure lines do not intersect or cross. Intersecting lines will cause issues with the cutting process, as the laser cannot pass over an area that it has already cut.
One way of avoiding intersecting lines is to combine all the elements in your file into a single element (sometimes called “welding” or “uniting”). This will ensure that none of the geometry in your design contains self-intersecting lines.
Likewise make sure that all of your elements are “closed” so there aren’t any breaks in the overall contour. Ideally all lines and shapes should be able to be “filled” as a solid object.
5. Convert any text to outlines. In vector programs, text is handled differently from standard images or shapes.
This makes it easy for you to modify your text on-the-fly, but when it comes to laser cutting, your text needs to be converted into outlines (shapes) before you can cut your metal sign.
With most CAD software solutions (such as Adobe Illustrator), you can select your text, right-click, and select “Convert Text to Outlines.” 6. Prepare your file for cutting. Delete anything from the file that is not intended to be cut. The file provided should be “clean,” with only the exact design itself. Scale the artwork to size. The metal sign will be cut based on the artwork given; if the art is built in Illustrator at twelve inches tall, the sign will be twelve inches tall. Provide artwork at 1:1 scale, using inch-units.
Don’t pre-nest your designs, even if you want to cut multiple units. Just let the third-party know you want more than one copy of your design.
7. Select the correct metal for your application. There are several types of metal and thicknesses available to choose from. Aluminum is a lightweight, strong, and versatile metal, aluminum is affordable and will not rust. Brass is an attractive, brushed, yellow brass that is easy to work with. Cold-rolled Carbon Steel, also commonly known as “mild steel,” is high quality and durable. Copper is a heavy, dense metal with high electrical conductivity; it will develop a patina if left outdoors uncoated. Cor-Ten is a rustic, weathered steel material with unique properties. CorTen develops a protective layer of rust to maintain structural integrity over a long period of time.
Hot Rolled Carbon Steel is a strong, durable metal with a reddish-blue gray finish.
Stainless Steel is a bright, corrosionresistant metal that welds easily and resists elements.

8. Choose your polishing and finishing options. Finished metal signs may have some minor surface scratches and imperfections due to the cutting process. You can choose to polish or brush the material yourself or have the post processing done for you as a part of the manufacturing process. If you are planning on painting or powder coating your design, no post-processing is needed.
Jim Belosic is Application Engineering President at SendCutSend.com. When not manufacturing laser cut parts, he and his children enjoy working on robotics, electric cars, and radio control aircraft.
