
21 minute read
Gold Members Charles Faram & Murphys
New podcasts and videos
March saw the launch of our brand-new video and podcast series for 2021. The series covers everything from hop talk to the latest from brewers, growers and suppliers to the brewing industry.
We’ve already loaded a feature on our own Paul Corbett and Jon Stringer discussing how the business has grown over the past 30 years, including some funny stories of Paul's early days at Faram's. There’s Darren Gamache of Amarillo® fame, regular Brewery Resource Roadshow updates from our supplier partners, focuses on UK and International brewers, and processes in the hop grower’s year. They’re a good watch, but if you haven’t got time for that, stick your headphones on and listen while you work.
Available on YouTube and wherever you download your podcasts from. Just check out our news page for links
www.wellhopped.com
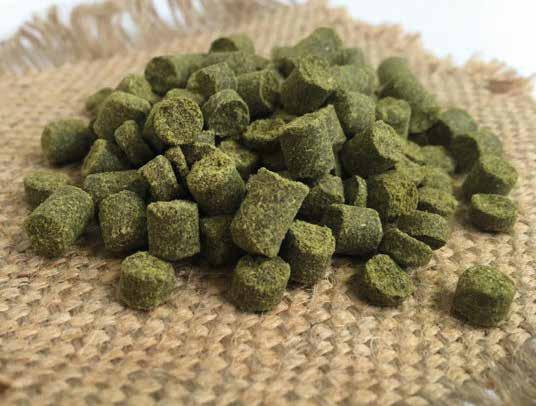
New format T45 Jester® and Olicana®
We have been busy here at Charles Faram. As well as the breeding and selection of new varieties in the Hop Development Programme, we have been looking at new (and sometimes old) methods of delivering even more potency to your brews.
Jester® is our flagship hop and the obvious choice to start the ball rolling with this new format. This was closely followed by sister, Olicana®. Looking at other products on the market we have had a number of trials scheduled over the last year, it was all very exciting. Some may be aware of what Jester® and Olicana® T45s are from our newsletter and others not, so please allow us to enlighten those that haven’t heard of these before.
What are T45 pellets?
Type 45 pellets are by no means a new invention. To explain the difference, we should begin with how Type 90 pellets are made. Whole hops are chopped into a fine powder, homogenised (mixed) to ensure consistency within the batch and then pressed through a die. These pellets will have had some material removed (leaf and stem) and the moisture content may be slightly lower than the whole hops before processing, so the 90 in Type 90 or T90 stands for 90%. Originally processors would expect 90% of the weight of the whole hops returned as pellets.
Lupulin enriched
Today the process is more efficient and the return is higher than that but the name for the process has remained the same. Type 45 pellets differ from Type 90 in that the whole hops are frozen at -20°C, then chopped. When frozen, the lupulin becomes less sticky and it is possible to separate some plant material from the lupulin by sieving. Approximately half of this plant material is discarded and the remainder is then recombined with the lupulin and pressed through a similar die to Type 90. In reality, the amount of plant material used can be varied so these pellets are often standardised to an alpha value, so they may not be 45% of the original weight but more likely 50-80%. These pellets are lupulin enriched pellets.
Cleaner, juicy, less funky
So, what was the goal of this project? There are some obvious advantages to Type 45 pellets. The product weight is reduced so shipping is less costly. When dry hopping in the fermentation or conditioning vessel, beer losses are significantly reduced. There are also some less obvious advantages; potentially a cleaner aroma and flavour profile, and the ability to increase dry hopping rates with more juicy characteristics and less funkiness.
Interested?
When they arrived at Charles Faram UK headquarters in Newland these T45 pellets caused a huge stir in the office. We have been conducting sensory analysis to compare the same beer but made with conventional Jester® T90 pellets. Brewery trials are underway and we’re compiling a variety of comparisons and feedback. We would be delighted for you to try them too! Please get in touch with the Charles Faram team to find out more.
If you are a Faram’s customer and not receiving the newsletter called Faram’s latest updates, resources and news please get in touch.
Check out the Faram website or get in touch with the sales team for an up to date picture of all the products available. Whether its hops, malt, dried yeast, finings, kegs, sensory training kits, bottle tops or closures they are very keen to hear from you.
Keeping it Local & Saving the Planet
We all love the great flavours of hops grown in the USA, Slovenia and New Zealand. What’s not to like? Many will say that the introduction of new varieties from these regions have pushed forward the beer brand considerably over the last few years. Many prefer them to British hops.
So, would it matter at all if we didn’t grow hops here in the UK?
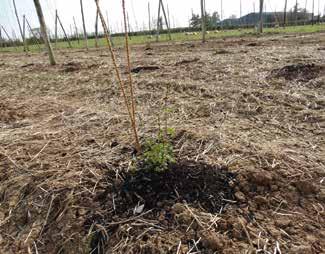
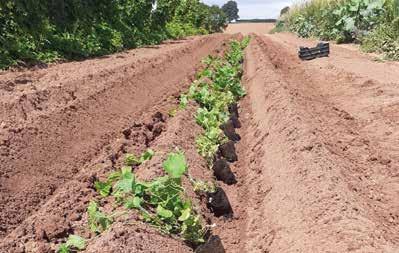
As a brewer in the UK would it matter to you? If we think about it logically there are many reasons to buy locally grown hops. ✔ British hops used in the UK travel fewer miles from farm to brewery so have a lower carbon footprint than most imported hops. Some hops travel for weeks in refrigerated containers, from the USA and New Zealand in particular. ✔ British hops are produced to some of the highest pesticide residue standards in the world: much fewer active ingredients are approved for use in the UK compared to the biggest hop growing areas of Germany or the USA. ✔ Britain’s hop breeding programmes are the envy of the world; our gene bank of disease resistant males and aphid resistant females are much sought after by farmers in other countries. ✔ Britain has some of the most robust food assurance and traceability systems in the world. ✔ By choosing British Hops you support the local economy; everyone from the farmer, to those who work on the farms, to those who service the tractors and the picking machines. ✔ You play your part in protecting our environment as much of Britain’s food is produced in a sustainable way that enhances the countryside. Seems pretty straightforward doesn’t it? I am sure that we all want hops to travel less miles on the way to the brewery, we all want to reduce our carbon footprint, we all want to support the local economy, don’t we? So why do we find that our local hop acres here in the UK are in decline whilst the acreages in the USA, New Zealand and Germany are still rising? Discussing this with brewers it seems very simple; for many, the flavours and aroma in their increasingly successful beers cannot be achieved by using traditional British varieties. Whilst traditional Great British bitters and milds have been at the forefront of beer sales in the UK for many years they are now being surpassed by the Pale Ales, IPA’s and in particular NEIPA’s which require the flavours and aromas that, for some brewers, currently only come from hops from other parts of the world. There is no doubt that if the same sort of flavours were available in hops grown locally then many brewers would prefer to use them. We have to bear in mind that British hop breeding efforts in the past have been 100% focussed on producing Fuggles and Goldings types such as Challenger, Target, Pilgrim, First Gold, Progress, all renowned for having that delightfully delicate traditional British hop character and quality. It takes years to develop new hop varieties. Rest assured that Charles Faram is already well on the way thanks to local plant expert Peter Glendinning. Way back in 2008 we embarked on a partnership project to develop new UK varieties with more intense, fruity characteristics. There were fears that the mild, maritime UK climate may not be able to grow hops with these flavours but the initial findings had been good and we were very keen to find out more.
So here we are 12 years on from those initial forays and the varieties coming off the Charles Faram Hop Development Programme (Jester®, Olicana®, Godiva™, Mystic™ and now Harlequin™) have far more flavour and aroma than we would have ever imagined. What’s even more exciting is that there is more to come. Every year the intensity increases by another 5-10%, so who knows what might be achievable? What is for certain is that we are going to push on with developments as quickly as possible. If we all want sustainability and locally grown produce it has got to be the right thing to do. One of the huge benefits highlighted in the new selections this year is that the growers on some farms are reporting using 20% less fertiliser and pesticide. This is a fantastic side effect that we never envisaged and is a benefit we are thrilled about. To take this even further we are now trialling some of the Charles Faram varieties under organic production to see how far we can go. Having strong, aromatic, disease resistant varieties available is going to reduce our reliance on pesticides and be a mainstay in our programme going forward. We know that some brewers are not going to get all the flavours they need from British varieties just yet but a great way to help push the programme forward would be to try some of the Charles Faram varieties.
Jester® is becoming a firm favourite with brewers with its resinous, blackcurrant and citrus, grapefruit character. If you are looking for more of a tropical character of mango and passion fruit you could try Olicana®. Godiva™ is different with its white grape, tangerine, spice and some say gooseberry aroma. For subtle floral, apricot and lime notes look at Archer®. The latest two varieties are the ones to keep an eye on from future harvests namely Mystic™ and Harlequin™ both of which are getting rave reviews. A beer using Harlequin™ is already winning awards. How about brewing a special or using some Charles Faram British grown hops in a small brew of a core beer to compare flavour? By doing this you help us to finance more research and development which is bound to produce some even more magnificent home-grown local hops in the future. Thank you to the growing number of brewers already using British hops and Charles Faram varieties, your support is very much appreciated. We hope this article inspires you to keep it local whenever you can so we can all do our bit to help in saving the planet!
Paul Corbett
Managing Director Charles Faram & Co Ltd
Follow us @charlesfaram
www.charlesfaram.co.uk 01905 830734

How to Bottle Condition Beer
Key points which can be taken away from this article:
1
2
3
4
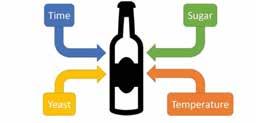
There are many points during the brewing and packaging process where variability can cause inconsistency in the final product. These variables can be explained by looking at methods, equipment, ingredients and yeast handling. Within a small budget, improvements can be made by making the process more consistent, improving storage conditions and refining hygiene techniques. A standard base beer can be transformed in terms of flavour attributes and carbonation by the addition of a different secondary yeast strain.
Unlike filtered or pasteurised small pack products, bottle conditioned beers contain a small amount of yeast which consumes sugars and residual oxygen to give carbonation and flavour development. This can be a great choice for a brewer who wants to produce small pack beers in-house which will have a long shelf life. The secondary fermentation taking place within the bottle is similar to that which takes place in cask-conditioned beers, however, the process requires a higher level of control to keep yeast sediment to a minimum and cannot rely on fining agents once in the bottle. There are various methods to produce bottle conditioned beer, all with their own pros and cons, but it is important to remember that cleanliness should always be a principal consideration throughout every step of the process. The bottle-conditioning of beer can seem like a rather simple procedure, but a lack of process control can lead to variability in batch-to-batch quality. Here we look at the process in detail and the choices you can make along the way.
Primary Fermented Beer
There are different methods for bottle conditioning, but all involve a certain amount of beer clarification, so you may want to consider the use of a bright/racking tank.
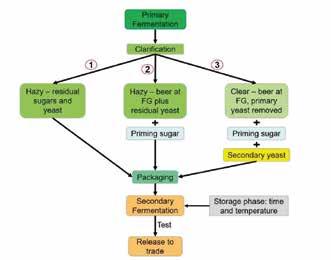
The flowchart shows the basic options when considering the lead up to secondary fermentation in the bottle. Firstly, fermentable sugars need to be available. The sugars required for secondary fermentation can come from two sources: 1. The primary fermentation can be halted before completion via chilling leaving residual fermentable extracts (see flowchart option 1) 2. The primary fermentation can be allowed to ferment out completely and is then primed with fermentable sugar (see flowchart option 2 and 3) The first option can be difficult to control accurately, especially in larger-scale operations. The sugar addition immediately before packaging also has the advantage of making the calculation for secondary fermentation easier. When thinking about sugar dosing calculations, three factors need to be considered; final carbonation level, CO2 already in the beer and if there are any fermentable sugars in the primary fermented beer. To check for residual sugars an attenuation limit test can be conducted. This is simply an aerated sample of the beer which is over pitched with yeast, kept at a temperature of 20-25°C and ideally mixed from time to time. The final gravity of this sample is the theoretical limit achievable in secondary fermentation. Even flat beer contains some CO2, specialised equipment can be used to measure this but as a rough guide, the beer which has been fermented at 20°C will have a concentration of around 0.75 volumes (1.5 g/L) (Note: CO2 solubility increases as the temperature of the liquid decreases). The final carbonation level can depend on the style of beer you are producing. A range of 2.5-4 volumes (5-8 g/L) describes everything from usual beer styles up to some higher carbonated Belgian styles. As well as wanting to get this carbonation level right for the style of beer, you will also want to avoid ‘gushing’ (sudden and uncontrollable foam generation upon opening) or even bursting before opening. Sugar preparations are available in various forms, such as syrups and granulated sugars. However, the addition of the latter is not advised due to the higher chance of introducing beer-spoiling microorganisms into the process. Consider fermentable extracts supplemented with dextrins to increase mouthfeel or sugar syrups with high fermentability to produce ‘drier’ beers.
Flowchart highlighting process options
A note about clearing your beer: the final clarification step can be achieved using filtration and centrifugation, but it can also be achieved to a high standard with flocculant yeast, finings and the use of a bright/racking tank (or casks depending on what you have available).
Secondly, you need to consider the source of your yeast which will perform the secondary fermentation in the bottle. Again, there are many process options to choose from. Flowchart options 1 and 2 indicate some yeast has remained in suspension from the primary fermentation and is transferred to the bottle. It is important to remember that the point of allowing living yeast into the bottles is that as well as converting sugar to ethanol and CO2, they will prevent beer oxidation and increase shelf life. With this in mind, you need to think about the viability and health of the yeast so it can perform as you would wish under stresses such as rising alcohol concentration, nutrient depletion and rising pressure. The strain used in the primary fermentation may not be the best for the job. And if it is, it needs to be at its best/most healthy. After primary fermentation, the yeast has undergone many stressful transitions before entering the stationary phase of its life cycle which can be inferred from gravity measurements remaining the same consecutively at the end of fermentation. In contrast to pitching yeast into freshly prepared and aerated wort, the conditions of the beer in the bottle are austere in nature due to having fewer nutrients, less oxygen, possibly sub-optimum temperatures and the presence of ethanol. At the end of fermentation, yeast can often be inhibited by alcohol (and carbon dioxide) which means issues can especially arise with the use of primary yeast in bottle conditioning. A better option could be to use the Kräusening method where the foamy top of a fermenting beer is mixed with beer that has finished fermenting. However, be aware this will also contain fermentable sugars from the wort and may cause issues with colloidal haze due to the wort not being stabilised but would adhere to German Reinheitsgebot purity laws (depending on the ingredients in the primary fermentation). Alternatively, the beer may be clarified completely, and a defined yeast cell count added at bottling (see flowchart option 3). This step removes unwanted solids whilst also providing an opportunity to use a different yeast strain for secondary fermentation. A dual yeast strain approach is useful as a means of introducing new yeast-derived flavours and there is the option to choose a strain which forms compact sediments and readily adhere to glass. To preserve high viability for as long as possible during secondary fermentation and subsequent preservation of the beer, preference should first be given to freshly propagated yeast (this could also include yeast from the Kräusen which has undergone a washing step), then rehydrated yeast and finally dried. Work by VanLandschoot et al., (2003) found that yeast propagated on a sucrose medium that was poor in nitrogen had the best secondary fermentation characteristics than yeast propagated on wort. And work by Wood et al., (1992) showed that holding yeast in water for a minimum of 3 hours (max. 24) before secondary fermentation also significantly promotes cell attachment to surfaces such as glass. Although very convenient to pitch into bottles directly, dried yeast’s viability can drop considerably as soon as 5 days into secondary fermentation which can lead to a stuck fermentation. Remember, yeast needs to be in good physical condition to perform well!
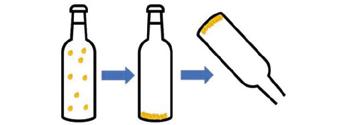
On average, for most beer styles, a newly bottled beer should contain a viable yeast count of around 10,000 – 100,000 cells/ml. Some Belgian styles can contain up to around 3,000,000 cells /ml. When selecting a yeast strain for secondary fermentation, you must consider: • Alcohol tolerance – ale yeasts are fine up to around 8% ABV, above that you may want to consider something like a champagne yeast. • Different strains produce different foam and bubble sizes which are related to
CO2 generation • Flavour and aroma development capabilities • Sugar assimilation profile – could be different to that of your primary fermentation and could change the amount of CO2 produced • Adhesive properties – how well do you want it to settle and stick to the bottom of the bottle • Secondary metabolites - yeast cells produce some important sulphur components such as hydrogen sulphide (H2S) and sulphur dioxide (SO2).
The former component is mostly unwanted, as it is responsible for a “rottenegg” smell, while some SO2 is desirable in beer as it acts as an antioxidant and stabilises the reactive carbonyl components that are responsible for off-flavours in mature beer. • How well it ages – issues can arise off-flavours such as acetaldehyde (apple) when yeast becomes “unhappy”. A decrease in yeast activity during conditioning results in delayed or stuck fermentations which alter flavour profiles.

The spider plot (or radar chart) above quantifies both aroma and taste profiles for bottle conditioned beers which used two different priming sugars, yeast strains and conditioning temperatures. These graphs enable a quick visualization of the differences you can achieve by changing these attributes. For example, yeast strain Y shows the highest score for fruity/estery aromas and yeast strain X shows the highest scores the citrus, cereal/grainy, malty, sweet aromas. Certainly, there are sugar, yeast and temperature combinations that would give even more variation than that presented in the spider plot here, but it is always yeast strain metabolism that is central to the significant differences (i.e. changing yeast strain generates the largest changes).
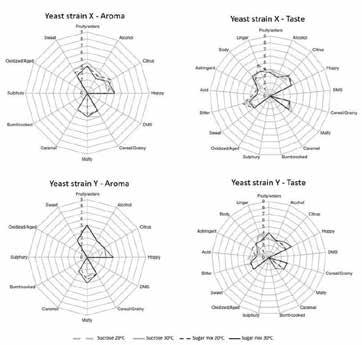
Spider plot analysis of the taste and aroma characteristics of bottle-conditioned beers using different priming solutions, temperatures and yeast strains (based on Marconi et al., 2016).
Conditioning
The conditioning phase is an important step in the process and should not be underestimated. This is the last part of the process which you have control over before the product goes out to trade. The specifics of times and temperatures will be beer style and yeast strain dependant, but the average will be between 2 – 4 weeks at 15 – 25oC to ensure all fermentable sugars are metabolised and the desired carbonation level has been reached (too cold; under carbonated, too hot; negatively impacts yeast). For higher-alcohol style variants much longer storage times (6 months to 2 years) are claimed to be required although this will be more a matter of personal preference. During the conditioning period for a moderate strength beer (4–5% ABV), the CO2 concentration increases to around 3 volumes (6 g/L) and the total yeast count to 2 – 3,000,000 cells/ml. Also, the yeast has what is termed as a “reducing power” because aldehydes are reduced to alcohols which are less flavour active and therefore prolongs shelf-life. Once conditioning is complete, open a bottle to test the aroma and taste profile for yourself. Part and parcel of the bottling conditioning ethos are that it’s meant to differ from its keg/cask/filtered counterparts. Aged flavours do not have to be off-flavours so it could be worth including some descriptors of what the consumer may expect in their beer. This consumer education can also extend to what haze to expect. Does the pour require extra care to avoid the yeast in the bottom of the bottle entering the glass? Or would you like the consumer to mix the last few centimetres of beer in the bottle to rouse the yeast and pour it into the glass? You may want to do this based on beer style.
The yeast in the glass should only add a haze and not form large clumps. Yeast in suspension adds body and a smooth/silkiness to the mouthfeel as well as changing the IBU’s due to bitterness compounds interacting with yeast cell walls. Also, what shape glass would be best for your beer? If you think about classic Belgian style bottle conditioned beers, they’re often associated with large glasses to accommodate the foam which is produced. All these aspects add to the experience for the consumer and can make the pour a more theatrical event and the beer more interesting to drink. This helps to place bottle conditioned beers in the premium section of the market.
Notes on shelf life: Medium strength beers (3.5-5% ABV)
• Around 12 months shelf life • Flavour dips between 12-24 months • >2 years - can acquire a "wine" flavour
Stronger beers (>6% ABV)
• Very complex flavours • May take several months to develop final desired flavour • High ABV can help extend shelf life
Can conditioning
There is the opportunity to take the principles described above and apply them to can conditioning. This can require more investment, be that in a canning line or contract canners. The carbonation levels need to be considered with the utmost care so as not to make the cans bulge under too much pressure. Cans are also filled cold to avoid over foaming which will cause cold stress on the yeast and may extend the lag phase before secondary fermentation or lead to issues with stuck fermentations. Cans do also have the added benefit of being impenetrable to light and the double seam eliminates the ingress of oxygen (unlike some bottle caps over time).
Experimentation
From this article, you will have gathered that variation in small details can result in significant changes. Please do not let that put you off – when making a new bottle (or can) conditioned beer, write down as much information as you can. Too much information is better than too little! When the beers are how you like them, you will have a detailed protocol to follow for next time. Besides, as much as small details can cause you problems, they can also be exploited to your advantage. You could easily create a range of bottle-conditioned beers from a large batch of ‘base beer’ and split subsets with different priming sugars, yeast strains and conditioning temperatures. You may also want to keep a batch in your own store to taste at different time points and sell some vintage bottles (especially if they are higher in ABV).


