7 minute read
Loose Electrical Connections Can Wreak Havoc in Conveyor Ovens


By Daniel Pierre III
Aconveyor oven is not a simple machine. It has high amperage, operates at high temperatures, and has some very fast rotating components. Some oven parts must endure more than one of these things, too. So, placing an oven into production is not a “once and done” task. This article focuses on why vibrations, a sudden in-rush of power and heat/cooling cycles affect threaded studs and cause nuts to loosen, resulting in a burst of energy via an electrical arc (i.e. a mini explosion).
There are two areas in an oven with threaded studs that need constant checking and should be part of a regular maintenance program. When a fastener—usually a nut—loosens on

a stud, it creates a small air pocket where electricity can arc and cause an explosion. Such explosions can affect other nearby components, too. What is important to note is, it is not always the outer nut that loosens. A quick twist with a nut driver is not the correct preventative maintenance action, as detailed later in this article.
Studs on Circuit Breakers Usually there are six studs, and they are all close together, making it hard to reach the inner nut. JN’s internal policy is to make sure that inner nut is tight against the wall of the circuit breaker, and it is a specific line item in our testing checklist. However, once testing is over and test power wires
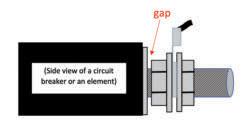
From left to right: a component, a washer or ceramic collar, an inner nut, a washer, a ring terminal, a washer and an outer nut.
This outer nut will not tighten any further, but a gap to the left of the inner nut still exists. are removed, there is no way to tell how much vibration the stud endures while in transit to a customer’s plant. It is expected that a licensed electrician will install an oven, but if not,
it is imperative that these inner nuts are tightly on the stud before connect-
ing power wires to the oven. The next photo shows how the nuts can look and feel tight, but the inner nut is not against the back wall, as evidenced by the washer sitting at an angle.
Inner Nut Issues on the Tip of an Element There are many ways to terminate a heating element, and each supplier seems to have their preferred method. JN likes a ceramic collar, as the material is immune to temperature extremes and high voltage. Ceramics introduces a brittleness factor, but a controlled torque solves this potential issue. Note: If you crack your ceramic collar, it is a sign that you are relying only on torqueing the outer nut, and that is not good for the element or your oven.
It is another line item quality check for JN to ensure the inner nut is properly tightened. So, elements installed in a JN oven will have the inner nut in a safe and tight position. The same cannot be said for replacement elements. While the inner nut is tightened prior to shipment, JN can’t control what happens in shipment or during installation. No matter how carefully one tightens the outer nut, if the inner nut is not hard against the collar (or the end of the element sheath), then after several heat/cool cycles, a gap will probably form and eventually arc and cause an explosion.
How to ensure longevity in tightness in element nuts
Even if all the suggestions in this article are followed, it is important to periodically check the outer nut on your elements as often as once per week. JN consulted four suppliers of heating elements for this information (three are JN suppliers and one who wants to become a JN supplier). This is a blended summary of those discussions.
Torque Matters Across the board, everyone agrees that using just a nut driver to tighten the outer nut is a bad thing. The threaded stud has a torque limit on its attachment to the element itself. It is possible to exceed the torque level and literally break the threaded stud off the element. It is also possible to torque so much that the stud itself breaks in half. Both are permanent damages to the element and are not part of any warranty.
No “One-Handed” Torqueing What is required is neutral torque. While it is possible to tighten the outer nut (assuming the inner nut is already tight) with just a nut driver, it is likely that the element will spin, making you think you’ve tightened the nut. What really happens is the ring terminals rotate and element wire can rip right off the ring terminals*. The important thing is you can rip the element wire off on the far side of the element where you are not looking. [Photo a]
To achieve neutral torque, one needs to use two tools. Use a crescent wrench to hold the inner nut steady, and then use a nut driver to tighten the outer nut. [Photo b] Many people will say that it is difficult to reach the inner nut in this manner, and JN cannot agree more. After exhausting the termination options from element suppliers as well as conducting intensive searches in cyberspace, JN ended up “inventing” a special thick nut for this application. [Photo c] All elements with threaded studs leaving JN after July 1, 2020 (whether on an oven or as a replacement) will have this new nut. Furthermore, we put our crescent wrench through an oven and manually bent one end for easier use in this application, too. [Photo d]. With the thick nut and special wrench, you can properly tighten element fasteners in less than five seconds per element.
*If you do rip off a ring terminal, you should replace it with a stainless, high-temp ring terminal and not a cheap zinc-coated ring terminal from a local supply house.
a
b
c
d
Permanent Attachment of Element Wire to an Element Some element suppliers offer this option, but it is not feasible for JN to procure elements this way for two reasons: We don’t like the quality of element wire they offer, and JN is not able to inspect the element separate from the wire. If we had to reject an incoming element, then the element wire must get tossed, too.
The concept of permanent attachment is a good idea, though. It is estimated that 90 percent of element failures are a result of loosening nuts and not enough checking prior to use of the oven. All JN ovens with a belt width of 12” or wider since the beginning of 2020 have element wire permanently attached to the elements, and the wire path leading to the control panel is accessible to the operator. All future oven builds will have these new elements. The attachment process is with a special butt splice, which also had to be invented by JN (the butt splice is not visible from under the black shrink tubing).
Easy Way to Check for Loose Studs A method JN uses before we test an oven, or before we do any troubleshooting, is to take a thermal image of the power wires and terminals. JN does this when designing a new component to understand the true power needed and the proper size of wire—regardless of what the component OEM recommends for wire sizes. We use the larger wire if there is a discrepancy. A thermal image will light up along the wire if there is a wire size issue, and the terminal will light up if there is a termination issue, including a gap behind a stud. The bright red in this image on the right easily tells us there is looseness at one stud.
In conclusion, vigilant monitoring in the way nuts on studs are checked and maintained will greatly reduce downtime and the need to replace elements before their natural end-of-life. Elements are still considered a ”consumable” and there are other factors that affect the longevity of a circuit breaker or an element. The loosening of fasteners might account for most of the failures, but the next largest factor is putting the wrong power to an oven. Increasingly, JN is seeing ovens wired for 240V being put on 208V power. This can also be fatal to an oven, and will be the topic of our article in the next issue of Springs. n
Daniel Pierre III is the president of JN Machinery in East Dundee, Illinois. He can be reached at daniel@jnmachinery.com.
100% Made in America

STOCK & CUSTOM PRECISION SPRINGS FOR INDUSTRY
• For all applications with ranges from .003”–.750” wire diameter. • Extensive inventory ready to ship with over 1.5 million parts in stock, including die springs. • Custom design work with quick delivery. • Most estimates returned within 24 hours.
www.diamondwire.com 1-800-816-5613
Convenient locations throughout the US –Northeast, Southeast and Southwest.


