


www.easydiy.co.za REDEFINING YOUR SPACE ISSUE 50 • 2023 R40 incl VAT 9772221941042 23050 9772221941042 23050 SPRING 2023 POST-WINTER PAINT PROJECTS TRENDS TO TRANSFORM YOUR SPACE TIKTOK DIY PROJECTS HOW TO PRUNE TREES AND SHRUBS DECLUTTERING ON A BUDGET INSIDE: EXPERT TIPS TO FOLLOW WHEN STOCKPILING WATER / HOW TO CHOOSE THE RIGHT INVERTER AND BATTERIES / MUST-HAVE TOOLS WORKSHOP ■ UPDATE ■ MAINTAIN ■ LIVING HOME IMPROVEMENTS


CONTENTS
Published by:
Picasso Headline, a proud division of Arena Holdings (Pty) Ltd

Hill on Empire, 16 Empire Road (cnr Hillside Road), Parktown, Johannesburg, 2193
Postal Address: PO Box 12500, Mill Street, Cape Town, 8010 easydiy.co.za businessmediamags.co.za


EDITORIAL
Content Manager Raina Julies rainaj@picasso.co.za
Contributors Romaine Cloete, Dominque dHotman, Orlando Luis, Fathima Mathen, Chetan Mistry, Cobus Odendaal
Copy Editor Brenda Bryden
Content Co-ordinator Natasha Maneveldt
ART
Head of Design Studio Jayne Macé-Ferguson
Senior Designer Mfundo Archie Ndzo
Advert Designer Bulelwa Sotashe
Cover Images demaerre/istockphoto.com, CherriesJD/istockphoto.com, fizkes/istockphoto.com, courtesy Italtile,

Supplied
SALES
Project Manager Gavin Payne gavinp@picasso.co.za
+27 21 469 2477 I +27 74 031 9774
PRODUCTION
Production Editor Shamiela Brenner
Advertising Co-ordinator Johan Labuschagne
Subscriptions and Distribution Fatima Dramat fatimad@picasso.co.za
Distribution On the Dot
Printing CTP Printers, Cape Town


MANAGEMENT
Management Accountant Deidre Musha
Business Manager Lodewyk van der Walt
General Manager, Magazines Jocelyne Bayer
8
BITS ‘N’ BOBS
3 Must-have tools for every DIYer.
7 Subscribe to EasyDIY.
8 PAINT TIPS TO REJUVENATE YOUR HOME FOR SPRING


With warmer days just around the corner, spring is a good time to beautify your home.
10 QUIET LUXURY
A classic aesthetic, a timeless style … we highlight some of the trends that will turn your home into a space of quiet luxury
SPRING
29 WORLD-CLASS FLOORING FOR A WORLD-CLASS VENUE
Tackling the stripping of the Franschhoek Cellar’s floors.
DIY 101
30 TIKTOK DIY CREATORS
With the rise of digital platforms, a new generation is finding inspiration and guidance for their DIY endeavours, and TikTok has emerged as a leading source of creativity and inspiration.
15
PROJECTS
15 WATER STORAGE

You can store water for emergencies or to lower utility costs. However, some mistakes could ruin your efforts and even create health hazards. To help avoid such situations, we share some expert tips to follow when stockpiling water.

19 DECLUTTERING ON A BUDGET
Our homes are our sanctuaries and it’s important to love them and be happy in our space. If you’re thinking of selling, your home’s appearance is even more important.
22 A CUT ABOVE THE REST
SPECIAL FOCUS
34 HOW TO CHOOSE THE RIGHT INVERTER AND BATTERIES

Load shedding is unrelenting, and South Africans continue to look for ways to remedy the hours of having no electricity. We share a three-step guide to choosing the right inverter and battery system to fit your power needs.

36 HOW SOLAR POWER CAN INCREASE EQUITY IN YOUR HOME
The demand for solar power continues to grow, installing a solar system can increase the value of your home and your equity.
Copyright: Picasso Headline. No part of this publication may be reproduced in any form without written permission from the publisher. The publisher is not responsible for unsolicited material. EasyDIY is published by Picasso Headline. The opinions expressed are not necessarily those of Picasso Headline. All advertisements/advertorials and promotions have been paid for and therefore do not carry any endorsement by the publisher.
When pruning trees and shrubs, where you cut is as important as how you cut.

25 SPRING TIPS FOR A LUSH SUMMER GARDEN
Give your lawn a little TLC now to make it summer-ready, ensuring it stays lush, green and happy!
CONGRATULATIONS TO OUR WINNERS FROM ISSUE 49 –WINTER 2023
BRIGHTS HARDWARE VOUCHER WINNERS! Simon Motloung, Heilbron
Carlie Ludick, Leeudoringstad
Keenan Leigh, Epping Industrial
EasyDIY SPRING 2023 1
34 3
2023
WORKSHOP ■ UPDATE ■ MAINTAIN ■ LIVING WWW.EASYDIY.CO.ZA

Use tools, NEED TOOLS, GET TOOLS
Home maintenance and DIY projects at every level are made easier when using the right tools and accessories. Here’s a roundup of three great tools to add to your collection
PROFESSIONAL 20V BRUSHLESS 3 AND 4 MODE IMPACT DRIVERS
WX891 20V NITRO CORDLESS DRAIN AUGER

The WX891 packs a lot of power with 560RPM and large torque, making the load-bearing capacity stronger. This means it can meet any of the demands of heavy workloads, such as kitchen, bathroom, bathtubs, utility sinks, shower drains and downspouts. It comes complete with a convenient 7.6m x 7mm cable. This new unit outperforms traditional drain augers. The 7.5m steel flexible shaft can meet various needs, such as “S” and “L” pipes. The drain auger also features a clockwise and counterclockwise button.
FEATURES
Proven Power WORX NITRO™ tools are built for pro-level performance to elevate power, speed and productivity on every task.
• The easy-to-use cordless drain auger clears clogs from drains up to two inches wide, including toilets, sinks, bathtubs and downspouts.
• The WORX Nitro Cordless Drain Auger 20V WX891 has an onboard rear drain port that prevents water build-up in the drain auger’s drum.


• The flexible 25-foot cable extends and retracts automatically, eliminating user fatigue by doing the work for you.
• The same battery powers over 75+ 20V, 40V and 80V lifestyle, garden and power tools in the Power Share™ family.
• Adjustable speed up to 560RPM to tackle even the toughest of jobs.

• 2A charger included, charges 2.0Ah battery in one hour.
GET YOURS TODAY
Brandroid (Pty) Ltd, contact Dean at dean@brandroid.co.za, call 010 824 4420 or 060 985 6257, or Errol at errol@brandroid.co.za or info@worxsa.co.za

The Kress impact drivers are available in three new options – ¼”, ½” and ¾” (inch) – providing more torque, RPM and performance, 10 times longer motor life and 50% more runtime.
The KRESS KUB 61.9, 20V Max Brushless 1/4″ Hex Impact Driver features brushless motor technology and more compact size. It boasts 230Nm of torque with three-speed settings, delivering 3 000RPM and impact rates of up 4 000IPM, making it more than suitable for multiple driving applications, large and small. The compact design makes it perfect for accessing tight spots, and the LED light makes it ideal for use in dark or poorly lit work areas. It also has a convenient belt hook that frees your hands while multitasking and a handy bit clip allows onboard storage of an extra bit while on the job. The aluminium gear housing is designed for durability and prolonged life. The impact rate is 0–1 200/3 300/ 4 000/min with a no-load speed of 0–900/2 400/3 000/min, chuck size: 6.35mm (1/4’’) hex, weighing in at an incredible 1.2 kgs.

TOOLS Bits ‘n’ Bobs EasyDIY SPRING 2023 3
H OW TO USE T H E DRAIN AUGE R
he 1/ ″
KUB33.91 ½” Impact Wrench also features the brushless motor technology and the same features that the compact offers. It is only compatible with Kress 20V 6.0Ah batteries and higher.

A high-power motor with high torque output, the mega force power control system provides continuous high torque. The auto stop –reverse rotation – stops after loosening bolts. It offers a normal LED with a pre-light function for dark work areas, four-mode setting for the right amount of power for the job, and multiple job applications. This KRESS 20V Impact Wrench offers 1300Nm, and the powerful max torque has high tightening capacity.


WORX CORDLESS NITRO PRUNING SHEAR AND LOPPER


This new WORX pruning shear and lopper is a popular garden tool. The new unit is super light and comfortable, allowing you to cut all day without any strain on the hands or arm – the power motor does it all. If you are a homeowner, gardener, running a nursery, or a garden cleaning operator, this unit is a must.
FEATURES
• High-efficiency brushless motor delivers a longer runtime that allows you to cut more than 2 800 pieces continuously on a single charge.


• The pruner features progressive cutting so you can adjust the on/off degree with the trigger as you need and even reach narrow interspaces without damaging other branches.

• The titanium-coated SK5 high-strength blades are sharp, durable and rustproof, providing more than three times longer lifespan than carbon steel SK5 blades.


all the same features and
KRESS KUB35.91, is the flagship model. It is a 3/4” impact wrench, offering all the same features and technology as the ¼” and ½” models, but has better performance and torque (1 700Nm, 1 800RPM, 2 400BPM and 2 100 Nm). All units are compatible with Kress 20V 6.0Ah batteries and higher, and the 20V Max KROSSPACK® Batteries; the KAB21 (4.0Ah), the KAB24 (6.0Ah), and charger KAC21.
GET YOURS TODAY
For more information, contact Greg De Villiers at Positec on 081 030 8944 or email him on Greg.deVilliers@positecgroup.com or Cobus Venter on 083 408 7232 or email him on Cobus.Venter@positecgroup.com
• The machine has a double-switch activation system, which provides extra security.


• Slim and lightweight design for easy one-handed operation.

• Same battery and expendable power. The WORX 20V Nitro Cordless Pruning Shears WG330E.9 is part of the WORX PowerShare battery system. One battery fits all tools, with options of different power packs.

GET


Brandroid (Pty) Ltd, contact Dean at dean@brandroid.co.za, call 010 824 4420 or 060 985 6257 or Errol at errol@brandroid.co.za or info@worxsa.co.za
TOOLS Bits ‘n’ Bobs 4 EasyDIY SPRING 2023
ROM E A B OUT IMPACT D R I VERS AND WR E N C SEH WOH OT U S E THECORDLES S NITROPRUNIN G S H E RA
YOURS TODAY


20SAVE % 1 year of EasyDIY, 4 issues to enjoy for R130 (incl VAT) CALL 0860 52 52 00 Make sure you have your bank details handy when you call. Lines are open Monday to Friday, 8am-4pm TERMS & CONDITIONS ■ Offer valid for SA residents only. ■ Subscription activation is subject to payment confirmation. SUBSCRIBE EMAIL Feedback@arena.africa ONLINE AT https://subs.arena.africa 1 CALL NOW (Call with your credit card details or to arrange a debit order) 0860 52 52 00 SMS 'subs EDIY' to 43331 (standard rates apply) EFT OR DIRECT DEPOSIT Payable to: Arena Holdings - Media Circulation Subs Bank: FNB Branch code: 255-005 Account number: 62793068034 Reference: Your name, surname and cellphone/subscription number Email your proof of payment to: Feedback@arena.africa 5 E ASY WAYS TO SUBSCRIBE 2 3 4 5
Tips to rejuvenate your HOME FOR SPRING
With warmer days just around the corner, spring is a season that often showcases South Africa in all its beauty, and it’s a good time to beautify your home.
 By Dulux
Spring is the perfect season for home projects as temperatures are more moderate, making it comfortable to work outside and providing additional motivation to prepare the house for summer. With sunny skies ahead, your home’s exterior might be the best place to begin getting your home ready for the start of the entertaining season.
POST-WINTER TLC
Now that winter has come and gone, you may notice that the exterior of your home has taken strain from the winter elements and is displaying faded, cracked or peeling paint and rust stains from the trims and gutters. The good news is that a little maintenance and a fresh coat of paint could be all
that is needed to restore your home’s exterior to its former glory.
Preparing the surface before painting is the most important stage of the painting process, it ensures that the paint adheres to the surface, lasts a long time, and the finish looks good.
When painting exterior walls, make sure the wall is dry and not wet. Spring weather is perfect for painting because the temperature is consistent and there is no rain, this allows the paint ample time to dry and results in a smooth and flawless paint finish. Starting with a dry wall will help the paint adhere to the wall and avoid blistering or peeling.
If the wall was painted previously, use Dulux Sugar Soap to wash the dirt, oil and debris off the wall. Rinse off the sugar soap and let the wall dry
before applying preparation paints such as Dulux Undercoat or Dulux Plaster Primer.
THE PAINTING PROCESS
The primer is suitable for use on walls that are bare and not painted, while the undercoat is recommended for use on previously painted surfaces. After applying the relevant preparation paint for your surface, apply topcoat paint, such as Dulux Acrylic PVA – an interior and exterior wall and ceiling paint with exceptional benefits for your wall and an extensive colour collection guaranteed to rejuvenate your home. Dulux Acrylic PVA is green by design – low VOCs, low odour and exceptional coverage and whiteness. It offers great scrubbability and enhanced stain resistance.
PAINTING TIPS Bits ‘n’ Bobs 8 EasyDIY SPRING 2023
MORE: Tips on how to plan your next paint project. Page 14 in our Winter issue.


READ
DON’T FORGET THE TRIMS AND FRAMES
After the wall preparation is taken care of, assess the state of your exterior trims and frames for loose flaky paint, and sand down all rough areas to ensure smooth paint application. The weather should be considered at this stage – avoid painting in direct sunlight, this could cause heavy brush marks while painting, or windy weather, which will blow dirt into the paint. Make sure the surface is clean and dry – paint should not be applied to dirty surfaces. Use Dulux Pre-Paint Brush Cleaner/Degreaser to wash exterior surfaces before applying Dulux Supergrip®, a water-based multisurface primer that provides a good base top coating. The best paint for repainting exterior trims is a water-based paint; it applies easily, dries quickly and cleans easily with soap and water. To complete painting your trims and frame, apply Dulux Pearlglo® water-based, a nondrip mid-sheen enamel for interior and exterior use, suitable for cupboards, doors, frames, skirting and furniture. Dulux Pearlglo’s extensive colour range makes it easy to add your personal touch based on your preferences. It is a non-yellowing, steam- and grease-resistant paint with super tough technology that makes it stain-, knock-, chip- and water-resistant.
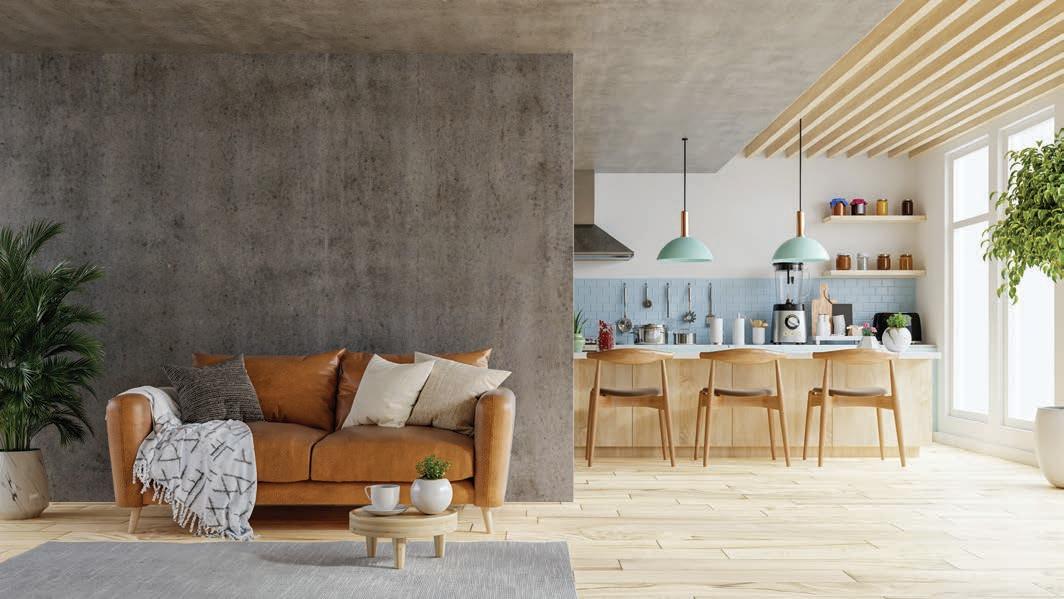
SMALL DECOR CHANGES, BIG IMPACT
As spring symbolises a fresh new beginning, you may also want to switch up your interior decor to match the newly refreshed exterior aesthetics of your home. You can achieve this by simply reshuffling furniture to create a more open and airier feel. You could also add pops of colour throughout the home with scatter cushions, rugs or a vase.
By implementing a few of these tips, you can create a space that embraces warmer days for you and your loved ones to enjoy.
FOLLOW DULUX SOCIAL PAGES FOR MORE COLOUR INSPIRATION AND INFORMATION.


Pinterest:


EasyDIY SPRING 2023 9
IMAGES: DEMAERRE/ISTOCKPHOTO.COM, SUPPLIED INSTAGRAM PINT E REST REA D NOW
pinterest.com/duluxza/ Instagram:
https://www.instagram.com/duluxsa/
QUIET LUXURY
Quiet luxury … It’s an aesthetic we’ve been behind for over half a century. And we’ve been telling the story of timeless style since our doors opened. We watch the trends and pick the looks we know are going to last or keep coming back, such as subways, modern marbles, terrazzo, screed-cement compilations, and, of course, wood looks.
By Italtile


CONTEMPORARY CLASSICS THAT ADD EYE APPEAL TO EVERY LOOK
BEIGE, THE LEAD COLOUR OF THE QUIET LUXURY PALETTE


Our 300 x 1 800 Barkwood tiles, with the silky texture of finely sanded timber, will bring all the warmth of rich, natural wood grain to your flooring,

There are certainly pops of bright colour in our showrooms – patterns, patchworks, mosaics and pure pigments – but you’ll find layers and layers of textural neutrals. “Wow,
but you’ve got a lot of beige tiles”, a competitor once said. Thanks for noticing, we thought quietly to ourselves ... because although “beige” was used there as a stealth bomb, we took it as a huge compliment.
Once used to describe dull interiors and boring people (“She’s lovely, but isn’t she a bit ... I don’t know ... beige?), beige has risen to take its proper place in the colour stakes. Every interior and fashion magazine will concur. Beige is the new grey; from oatmeal, taupe and wheat to cream, mushroom, milk chocolate, caramel and greige, it is unutterably chic. Check out our “new neutrals”: Parsel
Perla, Caph Savona, Pienza Avoria and Quios
Cream – magnificent examples of beige in all its lush moods.

TRENDS Bits ‘n’ Bobs 10 EasyDIY SPRING 2023
C H E CK OUTTHE B A RWOOD COLLE C T I O N LESRAP P E R LA GLOSSGLAZE D WHITEBODIED C E R A CIM ELIT
Our exclusive fireclay Shaker sinks by Shaws of Darwen are beautiful classics that take time to shape, mould, finish and fire. Each one carries the date and signature symbol of the artisan.
SHAWSSINK COLLECTION
Another stunning example of hand-finished craftsmanship is the Palomba collection by Laufen, a fusion of modern sculptural art, technology and artisanship. Italtile’s exclusive pieces from the collection carry the signatures of the designers, Ludovica and Roberto Palomba. High design, craftsmanship, functionality and quality. The pillars of quiet luxury. No conversation about craftsmanship would be complete without mention of Victoria+Albert (V+A) baths and basins. Sanware of the highest quality, handmade from a unique material developed by V+A called Quarrycast, which gives each V+A bath and basin a

smoothness that is warm to the touch. Our exclusive V+A Warndon Bath has that unmistakable silky feel and elegance – a timeless classic that doesn’t have to try too hard to be fabulous.
DECEPTIVE SIMPLICITY

You know you’re in the presence of perfection when a decor piece has minimalist, pared-down design with no need for complicated ostentation. It is in that bare-bones beauty that true designers, artists and architects speak to their audience.
Asked how he achieved his astonishing marble sculpture of David, Michelangelo said: “I created a vision of David in my mind and simply carved away everything that was not David.” (Of course, that simplicity took him three years to achieve.) We’re not saying that our exclusive Laney matt black shower waste is quite in the same class as a Michelangelo, but it’s a sleek and stylish little work of art with hidden details and finishes that quietly get on with completing your luxe look.
EasyDIY SPRING 2023 11 CRAFTSMANSHIP
Vogue Esmeralda Gloss Glazed Ceramic Wall Tile 75 x 300mm.
Victoria & Albert Terrassa Gloss White Freestanding Bath 1702 x 793 x 528mm
TIMELESS
Quiet luxury has a sense of heritage and legacy about it: pieces, such as granny’s pearls that still get compliments when paired with your little black dress, that never date. Unlike fast fashion, which shines for a fleeting moment, quiet luxury is long-lasting. A classic example of timeless style is our Subway tile collection. Called “The Eternal Child’ of the interior world, the metro tile or subway is the comeback kid, returning year after year to the trend lists of the world, each time with a slightly different attitude and personality.
Our Metro Blanco Subway is the ultimate classic bevelled subway, which you can install in a retro brick pattern if you’re a traditionalist or take it up a notch with a horizontal or vertical stack or a herringbone. Then, there’s our gorgeous Vogue Subways, exclusive to Italtile, which are the epitome of a reimagined classic, with their lustrous artisanal-style glaze and unusual colours – Denim, Esmeralda and Greige.
Our Modern Marbles need a spotlight here, too, as arguably the most timeless look of all, next to wood looks. It would be a sin to single out any one range here ... so visit our showroom or website to view the range of marble-look tiles.


TRUE LUXURY IS ABOUT QUALITY, NOT QUANTITY


It is evident in small-batch, artisanal offerings, such as our extraordinary 3D embossed tile range, as well as in Italtile’s carefully curated and limited


selection of wallpaper pattern tiles by Ceramica Sant’Agostino, which has just hit our shelves. This is another example of how timeless patterns, such as florals and botanicals, which have been around for centuries, keep reinventing themselves and returning to delight our senses.

A LAST WORD ON QUIET LUXURY


Vivienne Westwood said: “Buy less. Choose well. Make it last. Quality, not quantity.” And she was right.


Investing in Italtile’s signature LiveGreen style is a mindful, thoughtful, sustainable action. The tiles, taps, baths, bathroom furniture and sanware that we represent with pride have been designed to last for a very long time and will offer many years of gentle joy and quiet delight.


TRENDS Bits ‘n’ Bobs 12 EasyDIY SPRING 2023
IMAGES: COURTESY ITALTILE, MTLAPCEVIC/ISTOCKPHOTO.COM
SA HOME OWNER: Advice on how to work with an interior designer
READ NOW
Sunwood Jardin 08 Matt Glazed Porcelain Wallpaper Tile 600 x 1200mm
Vogue Denim Gloss Glazed Ceramic Wall Tile 75 x 300mm

SAVE AND store
In a water-scarce country, such as South Africa, we mustn’t wait for the taps to run dry. We should save our water, and storing water is a good way to preserve this precious resource, writes
Chetan Mistry, strategy and marketing manager at Xylem Africa
Water is very versatile and can last a long time if stored responsibly.
How you store your water depends on its uses: potable water for drinking or cooking requires much stricter management than nondrinking water for washing or irrigation. Water-borne diseases and parasites are among the most dangerous threats to human health.


It’s not difficult to adopt basic water-management techniques. Everyone should look at some type of water storage, especially rainwater capture and water recycling systems. You can store water for emergencies or to lower utility costs. Yet some mistakes could ruin your efforts and even create health hazards. To help avoid such situations, here are a few tips to follow when stockpiling water.
DECIDE YOUR NEEDS
Do you need water to drink or cook? Do you need to keep your vegetable garden hydrated? Will a lack of water harm certain operations in your business? Water serves many functions, so determine your priorities and stockpile accordingly. Some people can do with a few jugs of drinkable water, while others may need large storage tanks of nonpotable water suited for other jobs. The consensus is that an adult drinks around three litres of water a day, and you can double that to cover cooking needs per person. If you are a business, monitor your water consumption for a month to see where the most demand exists.
WATER STORAGE Projects EasyDIY SPRING 2023 15
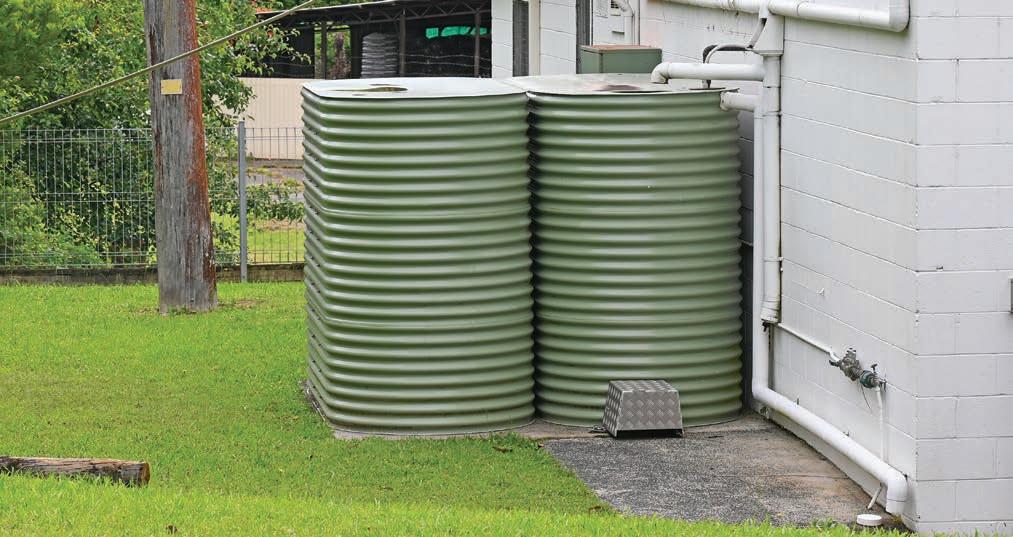
WATER SOURCES
There are different ways to access water. The simplest is stockpiling water from a municipal supply or buying bottled water. Capturing rainwater is a very affordable way to capture large amounts of water, and some people are fortunate to have access to boreholes. You can also recycle water from your premises, such as water used for washing dishes or clothes, reusing it for irrigation, refilling cisterns or outdoor washing. With the appropriate filters, you can make contaminated water drinkable. But avoid water contaminated with chemicals (such as water mixed with nonbiodegradable soap) or bio-matter (such as food waste or faeces).
IMPORTANT TO NOTE
Many of these tips include maintenance, but it’s worth emphasising. Leaving water infrastructure to fend for itself will create disease. There is no starker example than the recent cholera outbreaks resulting from poorly-maintained treatment sites. What applies to towns and cities also applies to individuals: poorly-maintained containers, pipes and filters will encourage bacterial and parasitic growths that are very dangerous to humans – sometimes even without directly consuming the water.
OUTDOOR CONTAINERS
The tricky thing about water is that it supports chemical and biological activities. Water also expands when it heats up or freezes, and it can degrade metals and certain plastics. Your containers have a big influence over how long you can maintain your water stockpiles.
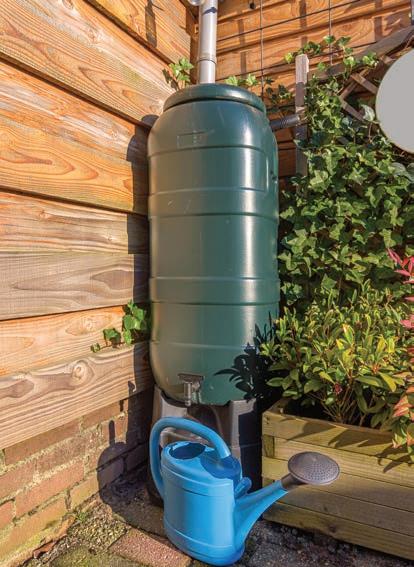
ut r c tai ers sh ul have a e uate pr tecti t st p su li ht from breaking them, causing chemicals to leach into the water. You can use containers made from concrete or metal. However, the most common options use plastics, such as acrylonitrile butadiene styrene (ABS), high-density polyethylene (HDPE) and polycarbonate, treated for sunlight exposure.
PURIFYING WATER
here are i ere t a s t eep ater pure such as usi ilters lamps or chlorine, though they will vary depending on the amount of water and how you plan to use it. You can also purify water by boiling it or adding small amounts of bleach. But note that most techniques only kill biological contaminants. Removing chemical contaminants requires special filters. And again, remember that contaminated water can still appear clean and odourless so err on the side of caution.

WATER STORAGE Projects 16 EasyDIY SPRING 2023
PUMPS AND PIPES
he st ri lar e am u ts ater i ta s u ca c si er a i pumps a pipes r eas access It s ise t ma e this ecisi earl as it ill impact ther ch ices such as a iti al c sts here the ta s ill sta the t pes pumps a ilters a h u a t t c ect the ta s r example a ta s stem that irri ates ur ar e i ers r m e c ecte t ur uil i s plum i
DON’T DRINK POOL
WATER PLEASE!

Many suburban homes already stockpile water in the form of swimming pools. Though pools are not the best way to store water due to evaporation, you can cover them for greater longevity, and it’s simple to add chlorine to fight off contamination. However, maintaining water quality in a pool presents issues because a pool is not designed to store water for multiple uses. Additionally, pool water is often unfit for consumption as it is exposed, so you should filter and treat it before drinking. Also, watch out for over-chlorination, which could make the water dangerous for plants. But generally speaking, your pool is a giant water container.
DID YOU KNOW?
INDOOR CONTAINERS
u s a ttles use i rs sh ul e ept ut su li ht lass is the est me ium t st re small am u ts ater u ca als use c tai ers ma e r m ra e HD plastics calle plastics as the are stampe ith a i si e a three arr tria le v i plastics mar e 1 a as the are te ea a ca cause chemical leachi i t the ater al a s sterilise c tai ers e re use
In theory, you could store water indefinitely. But this requires starting with clean water, keeping it away from light and chemicals, using sterilised containers, and avoiding future contamination. It’s hard to do in practice – especially if the water is for drinking. Consider rotating water stockpiles every six months, and look at decontamination options, such as filters, UV light or controlled quantities of chlorine. Don’t assume that water with no taste or odour is safe: certain diseases (cholera) and chemicals (heavy metals) can linger in water without giving hints of their presence.
Source: Xylem Africa
EasyDIY SPRING 2023 17
IMAGES: ANDERSON PIZA/ISTOCKPHOTO.COM, DRAZEN ZIGIC/ISTOCKPHOTO.COM, PATRICK HERZBERG/ISTOCKPHOTO.COM, D I /I H D /I H /I H D I /I H
Clever and cost-effective ROOM TRANSFORMATION
REDEFINE ANY SPACE ON A BUDGET
Our homes are our sanctuaries, so it’s essential we love them and are happy in our space. If you’re thinking of selling, your home’s appearance is even more important, shares Cobus
Odendaal G
Sotheby’s International Realty in Johannesburg and Randburg.
In these challenging economic times, it’s essential to find creative solutions to transform your living space without straining your finances. While a complete makeover might seem like an expensive endeavour, several innovative and cost-effective strategies – along with a dollop of creativity – can help you revamp your room without breaking the budget.

• REARRANGE AND DECLUTTER.
Before reaching for your wallet, take a moment to reassess your current room layout. Simply rearranging furniture can significantly impact the overall feel of the space. Experiment with different configurations to maximise functionality and create a more open and inviting atmosphere. Additionally, decluttering and organising your belongings can make a room feel more spacious and aesthetically pleasing, all without spending a dime.
DECLUTTERING Projects EasyDIY SPRING 2023 19
• REPAINT OR
WALLPAPER.
One of the most affordable ways to breathe new life into a room is by giving it a fresh coat of paint or changing the colour scheme. Repainting the walls or adding wallpaper can instantly transform the ambience and give the space a fresh look.


Opt for light and neutral tones to create an illusion of a larger space, or experiment with bold and vibrant colours to add personality and flair. By investing in quality paint or wallpaper, you can achieve a dramatic transformation at a fraction of the cost of a full renovation.
•
A statement wall can instantly redefine the look and feel of a room. Instead of repainting or wallpapering the entire room, focus on a single wall as a focal point. Choose a bold and eye-catching colour, or opt for removable wallpaper to create a stunning feature wall. This cost-effective technique can add a dynamic element to your space and make it feel fresh and updated without undertaking a full-scale renovation.
•
SMART STORAGE SOLUTIONS.

Maximise the functionality and aesthetic appeal of your room by incorporating smart storage solutions. Look for budget-friendly options, such as decorative baskets, wallmounted shelves, or floating shelves, to help declutter and organise your space. Utilise under-bed storage boxes or storage ottomans to maximise space in smaller rooms. By keeping your room tidy and well-organised, you create an atmosphere of calm and tranquillity.
•
DIY FURNITURE MAKEOVERS.
Transforming your furniture through do-it-yourself projects can breathe new life into your room, and it won’t cost a fortune. Consider repainting wooden dressers, tables, or chairs to give them a fresh and modern look. Experiment with different colours and finishes to match your desired style. Adding new hardware, such as knobs or handles, can also create a significant impact. With a little creativity and elbow grease, you can completely transform your furniture at a fraction of the cost of buying new pieces.

DECLUTTERING Projects 20 EasyDIY SPRING 2023
STATEMENT WALL.
IMAGES: VANIT JANTHRA/ISTOCKPHOTO.COM, FIZKES/ISTOCKPHOTO.COM, BERNARDBODO/ISTOCKPHOTO.COM, KATARZYNABIALASIEWICZ/ISTOCKPHOTO.COM, KOSTIKOVA/ISTOCKPHOTO.COM, XXXXXX/ISTOCKPHOTO.COM, MONKEYBUSINESSIMAGES/ISTOCKPHOTO.COM, PETEGALLOP/ISTOCKPHOTO.COM, VANIT JANTHRA/ISTOCKPHOTO.COM, VANIT JANTHRA/ISTOCKPHOTO.COM, XXXXXX/ISTOCKPHOTO.COM, PETEGALLOP/ISTOCKPHOTO.COM

• EMBRACE NATURE.
Nature-inspired elements can bring a breath of fresh air into any room. Incorporate plants and flowers to add a vibrant touch and create a calming and inviting atmosphere. Indoor plants not only improve air quality, but also provide a natural aesthetic that can instantly transform a space. Consider low-maintenance plants, such as succulents or spider plants, if you’re new to plant care.


• THRIFT SHOPPING AND UPCYCLING.
Thrift stores, flea markets and online marketplaces offer a treasure trove of unique and affordable items that can transform your room’s appearance. Explore second-hand furniture, vintage accessories and decorative pieces that add character to your space. Consider upcycling or repurposing items to give them a fresh look. For example, repaint old frames and use them as artwork or transform vintage suitcases into stylish storage containers. These budget-friendly options can inject personality and charm into your room.

• TEXTILES AND ACCESSORIES.
Incorporate textiles and accessories strategically to transform the look and feel of your room. Affordable options, such as throws, scatter cushions, pillows, blankets, curtains and rugs, can add texture, colour and style. Mix and match patterns and textures to create visual interest and elevate the overall aesthetic. Look for sales or discounted items to keep within your budget. By updating these smaller elements, you can transform your room without spending a fortune.
• CREATIVE LIGHTING.
Lighting plays a crucial role in setting the mood and atmosphere of a room. Instead of investing in expensive light fixtures, consider creative lighting alternatives that won’t empty your wallet. String lights or fairy lights can add a whimsical touch to any space. Utilise floor or table lamps to create warm and cosy corners. Adding dimmer switches can provide versatility and allow you to adjust the lighting according to your needs. These affordable lighting solutions can transform your room and create a welcoming ambience.

EasyDIY SPRING 2023 21
A CUT ABOVE the rest
When pruning trees and shrubs, where you cut is as important as how you cut.
 By Gardena
Pruning is necessary to maintain the health and attractive look of trees and shrubs. We prune to remove dead or diseased plant limbs, encourage growth and maintain the ideal size and shape of a tree or shrub. Pruning can also be done to remove parts of a plant damaged by frost or storms and promote flowering and fruiting in the coming season.
Where and how you make pruning cuts to achieve a particular result requires careful consideration. Make sure you have the right tools before you start and that they are sharp enough.
Ragged cuts don’t heal well and are vulnerable to infection. Stand back, take a good look at the plant and picture the final shape, size and height.
There are four basic pruning cuts that you can make for different purposes. Follow these helpful principles to achieve the best results.
1. The heading cut
This cut removes the upper portion, or head, of a branch, just above a bud. You aren’t topping the branch, just cutting back to a specific bud. Cut approximately 3cm above the bud at a 45-degree angle.
Plants respond to heading cuts by activating the bud immediately below the cut to generate new heading branches. The new branches will grow more buds, more flowers and more fruit. Because heading cuts stimulate growth, they will make the plant denser, so avoid this cut if that is not desired.
2. The thinning cut
Thinning cuts remove entire branches from within a tree or shrub, usually to expose the interior of the plant. Cut very close to the branch collar, the enlarged ring-like growth area at the base of the branch. Do not cut into the branch collar as it contains the specialised cells that will grow over and heal the cut. Do not leave a stub either as the cells can’t
PRUNING Projects 22 EasyDIY SPRING 2023
grow over the stub to heal the cut. Make the cut right next to the collar so only the raised, textured ring remains. With the branches removed, the tree or shrub will channel energy and nutrients past the cut and concentrate growth along the main lead branches. The interior will also receive more sunlight and air. This allows flowering and fruiting throughout the plant, but may also cause the plant to grow taller and wider.
3.
The releadering cut
This cut removes a portion of a lead branch above a lateral branch, causing the lateral branch to become the new leader. Make this cut approximately 3–6mm above the joint of the lead and lateral branches. Imagine a straight line cutting across the lead branch and meeting the lateral branch to form an imaginary triangle. Angle the blade of your cutting tool so that it points to the tip (where the line meets the lateral branch) of your imaginary triangle. For this cut to be successful, the lateral branch must be at least one-third of the diameter of the lead. If smaller, the lateral will not be strong enough to become the new lead branch.
Releadering cuts immediately reduce the height and width of a tree or shrub
and change the direction in which it grows. This cut also slows growth and can be used to control the size of the plant over a longer period.
4. The jump cut
Jump cuts are made to reduce the weight of heavy branches before making a final cut. This is done to prevent cracking and tearing injuries to the area where the final cut is made on the tree or shrub.
The first cut is made from the underside of the branch approximately
THE RIGHT TOOLS FOR THE CUT
Your choice of tool is not so much determined by the type of cuts, but rather by the type of plant and the thickness of the branches. Gardena stocks a wide range of pruning tools that satisfy all requirements. Follow these guidelines when making your selection:

1. Secateurs: for soft branches with diameters up to 25mm.

2. Loppers: for thicker branches with diameters up to 45mm.
3. Hedge clipper: for hedges or solitary shrubs.
4. SlimCut lopper: for dense undergrowth and hard-to-reach areas.
5. StarCut lopper: for pruning high branches from the ground (maximum height 6m).
6. AccuShears: Battery-operated shears for trimming hedges and lawn edges.
15cm from the point where the final cut is desired (usually the branch collar). Cut halfway through the branch. The second cut is made from the topside of the branch, about 1–2.5cm further out from the first cut. If done correctly, the branch will break away cleanly from the tree or shrub and leave a stump. The third and final cut is made to trim the stump to the desired length or right next to the branch collar (if the whole branch is to be removed).
EasyDIY SPRING 2023 23 IMAGES: L2EGULAS/ISTOCKPHOTO.COM, FEDBUL/ISTOCKPHOTO.COM, CHERRIESJD/ISTOCKPHOTO.COM

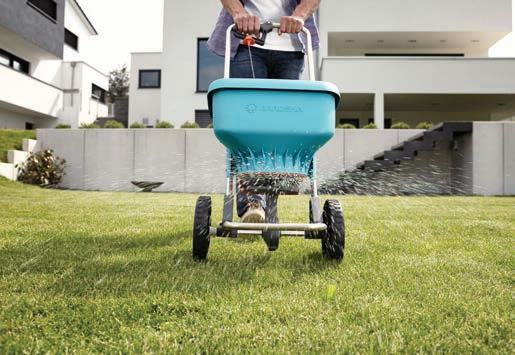
SPRING TIPS for a lush summer lawn
Give your lawn a little TLC now to make it summer-ready, ensuring it stays lush, green and happy! By prepping it now, you’ll boost its resilience against pests, heat and diseases, ensuring a lush, green garden centrepiece.
By Fathima Mathen, marketing manager at GARDENA South Africa
If you dream of a lush lawn during the summer, now’s the time to spring into action – and give it some love. It’s all about ensuring you get that beautiful green carpet that makes your garden shine in summer.

AERATION 101: LET YOUR LAWN BREATHE
Aerating a lawn involves perforating the soil with tiny holes, a process that invites air, water and nutrients to
journey deep into the roots of the grass. But why is this so crucial? Compacted soil is an enemy of root growth and lawn vitality.
Aeration combats this compaction, offering improved circulation and robust root development. The most telling signs that your lawn is yearning for aeration are if water starts to pool after a rainfall or if the soil has an unusually hard feel. Grass that looks patchy or thin can also be a giveaway.
TOP TIPS FOR BEST RESULTS
• Wet the lawn slightly a day before to soften the soil, making it easier to aerate.
• Use a GARDENA Fertiliser spreader, available in 1.8 litre, 12.5 litre and 18 litre.


• Pierce the soil, starting in one corner of your lawn and move systematically to ensure no area is left out.


• Make passes in both vertical and horizontal directions, ensuring maximum coverage.
• Using a rake, remove any soil clumps left on the surface so they can break down and nourish the lawn.
GARDENS Projects EasyDIY SPRING 2023 25
FEED THE GREEN
As your grass prepares for its spring growth phase, it needs nutrients. Feeding the soil assures robust growth and vibrant stems. To best support this phase, feed the soil before summer using the right type of fertiliser for your soil and grass type.
Spring is also the ideal time to start building a compost pile – then you will always have nutrient-rich material on hand for your lawn. You can use a composting bin or build a simple mound – just throw everything to be composted into a heap and let it work its magic.
TOP TIPS FOR BEST RESULTS
• Ensure you spread a mulch layer, using a spreading fork, about six centimetres deep to retain moisture and suppress weeds effectively.


• Avoid piling mulch against the stems of plants – this can lead to rot.
CHOOSING AND CARING FOR YOUR TOOLS
Having the right tools can make all the difference. At GARDENA, we know that gardening is not just a pastime – it’s a passion. We have designed our tools with real gardeners in mind. From our aerators and spreaders to our mulch forks, shovels and hoes, each tool is durable and made to feel right in your hand and help you get the job done correctly. Always remove soil, grass and other debris from your tools after using them. That way they’ll be ready to spring into action when lawn-loving season comes around next year.
TOP TIPS FOR BEST RESULTS
• Before applying fertiliser, calibrate your fertiliser spreaders to ensure an even and appropriate amount of material is released.
• Move at a consistent pace to ensure uniform distribution.
• After spreading, lightly water your lawn to help the fertiliser penetrate the soil.


THE MAGIC OF MULCHING
Spring calls for a fresh round of mulching, which champions the retention of soil moisture, suppression of pesky weeds, and gradual addition of nutrients back into the soil. Choose an organic mulch like wood chips or straw, which can decompose to enrich the soil.
GARDENS Projects 26 EasyDIY SPRING 2023
IMAGES: PONGTEP CHITHAN/ISTOCKPHOTO.COM, SUPPLIED

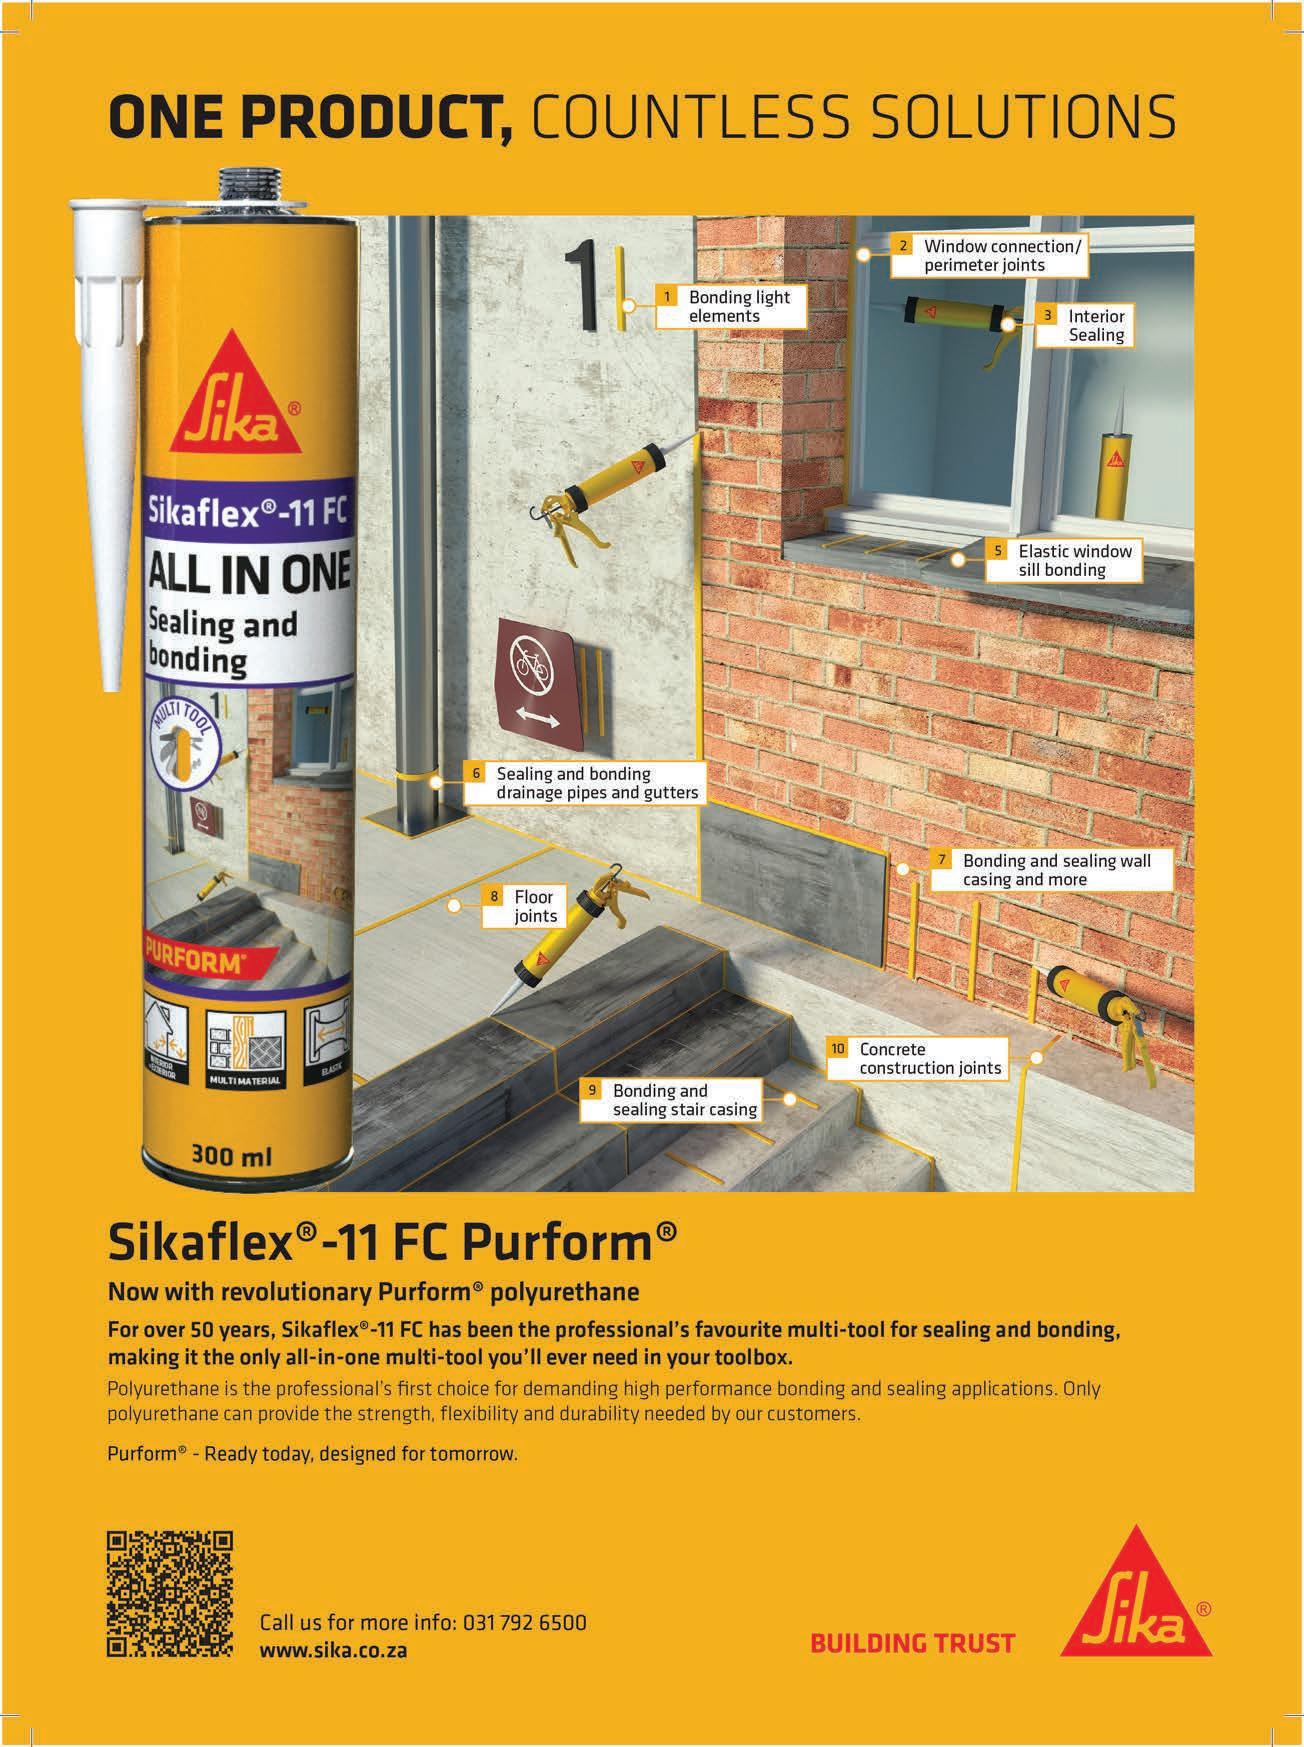
orld-class oorin FOR A WORLD-CLASS VENUE
By Romaine Cloete, marketing manager, Sika South Africa
Nestled in the aptly dubbed “Valley of Dreams”, Franschhoek Cellar is a stunning addition to the region’s breathtaking wine route. Less than a kilometre from the town hall, this unique, elegant venue combines the charm of country life with ultimate luxury and is a must-see for anyone visiting the Western Cape. Even paradise, however, is not without its flaws.
Recently, issues arose around the wine cellar floor, which was deemed unbecoming of the world-class venue. When it came to the complete refurbishment of the wine cellar floor, the instruction was clear: they wanted an elegant, high-quality, granite-grey finish – the perfect finishing touch to the otherwise pristine cellar.


The problem: on initial inspection, it was found that the existing floor was curling, delaminating and riddled with bad joint specifications.
The solution: a complete redo. Specialist applicator Botwei Projects completely stripped the 1 700m of existing cementitious flooring. No easy task, but necessary. In addition, the client wanted an extra 400 m of flooring installed.
PREPPING THE FLOOR
The floor prep starts with the preparation of the existing floors using Sikadur®-52 ZA to seal all existing cracks by means of gravity feed. This is a process by which a bead of sealant is used to create a reservoir around the crack, which is filled with the
PRODUCTS USED
• Sikadur®-52 ZA to seal all existing cracks.
• SikaGrout®-212 to quickly and easily fill all voids and defects.
• SikaQuick®-2500.
• Sikafloor®-20 PurCem®.
• Sika® Primer-3N.
• Sikaflex® PRO-3® polyurethane joint sealant.
low-viscosity resin, allowing it to slowly penetrate the crack and create a robust permanent seal.
SikaGrout®-212 is a high-strength cementitious grout with shrinkage compensation properties and is the go-to product on most projects when repairs to high-strength concrete are required.
Additional repairs were undertaken using SikaQuick®-2500, which, true
to its name, promotes very rapid hardening. This, in turn, allowed for early strength gain.
Sikafloor®-20 PurCem® was trowel applied at 6mm. Sikafloor®-20 PurCem® is a high-strength polyurethane cement hybrid screed with amazing characteristics. The product is odourless, nontainting when used in food processing areas, and thermal shock-resistant when used in industrial freezers. The Sikafloor®-20 PurCem® polyurethane hybrid screed superseded the client’s expectations with its robust yet elegant durable finish.
PRIMING
Sika® Primer-3N and Sikaflex® PRO-3® polyurethane joint sealant were used to prime and seal the joints, respectively.
FLOORING Projects EasyDIY SPRING 2023 29
IMAGES: COURTESY OF SIKA SOUTH AFRICA
TIKTOK DIY creators
inspiration and guidance for their DIY endeavours, and TikTok has emerged as a leading source of creativity and inspiration. From home decor and crafting, TikTok has become a treasure trove of inspiration for DIY enthusiasts.
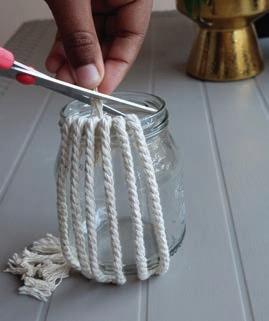
BUDGET-FRIENDLY DECOR VASE
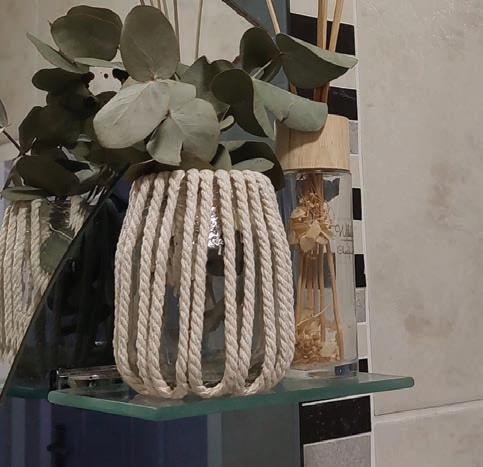
STATS: TikTok handle: diyprincess_nkosazanarul


DID YOU KNOW?
With an astounding 344 billion views, TikTok’s #DIY community has established itself as a valuable source for all your DIY needs.
ABOUT


Nkosazana Mtshazi is a DIY enthusiast originally from eDutywa in the Eastern Cape, but currently based in Johannesburg. On the socials, she showcases budget-friendly house maintenance, home decor, interior design and DIY arts and crafts.

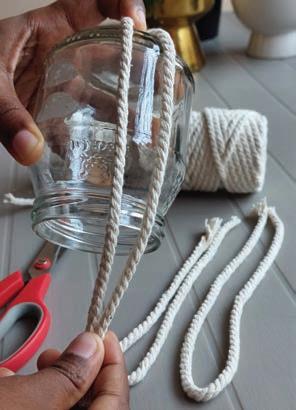
YOU WILL NEED:
• Recycled jar.
• Cotton twine.
• Glue sticks and glue gun (any clear glue can be used).


• Scissors.

30 EasyDIY SPRING 2023 BUDGET-FRIENDLY HOME DECOR DIY 101
ON T I K TOK
WATCH more of Mtshazi’s DIY tutorials here


EasyDIY SPRING 2023 31
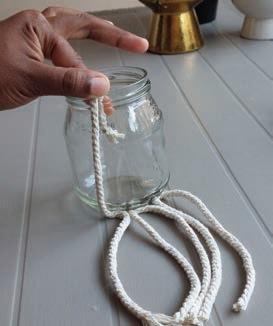
the twine in two strands.
glue inside the jar at the top. Stick the other ends of the twine.
the vase and decorate.
the loose ends to neaten the top of the jar. Measure against the jar and ensure the folded twine reaches the bottom and top of the jar. Cut the twine into equal strands.
glue at the bottom of the jar and stick the twine. HERE’S HOW: 1 4 5 7 2 3 6 8 9 10 DIY FR U IT BOWL R EVAMPING AN E N TIRE ROOM
Fold
Apply
Style
Cut
Apply
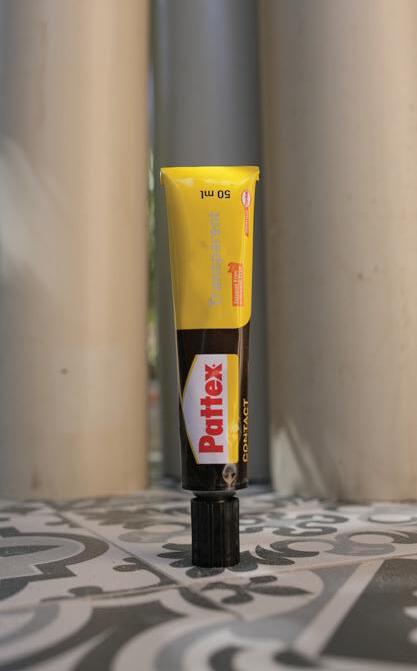
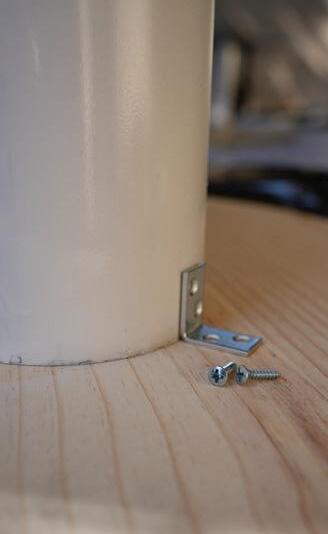
FAUX STONE SIDE TABLE
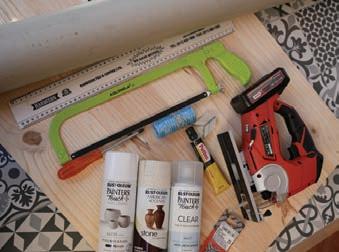
STATS:
TikTok handle: kevinmclennanza

YOU WILL NEED:
• Hand saw.
• Ruler or measuring tape.
• Star screwdriver.
• String.
• Pencil.
• Multipurpose contact glue.
• Jigsaw.
• Small chair angle brackets.
• Self-tapping screws.
• Underground PVC pipe 110mm.
• Pinewood
• Sanding paper – 100–220 grit sandpaper.


ABOUT
Kevin McLennan has an impressive 1.3 million views. His content is a captivating mix of thrilling adventures, exotic travel destinations, exciting shopping hauls and, of course, creative DIY projects. One standout creation is his brilliant DIY laptop stand for those who work from home. This game-changer combines functionality and style to elevate your workspace to new heights. Additionally, he created a load-shedding station rack crafted from a humble kitchen rack.
STEP-BY-STEP
GUIDE
3 1
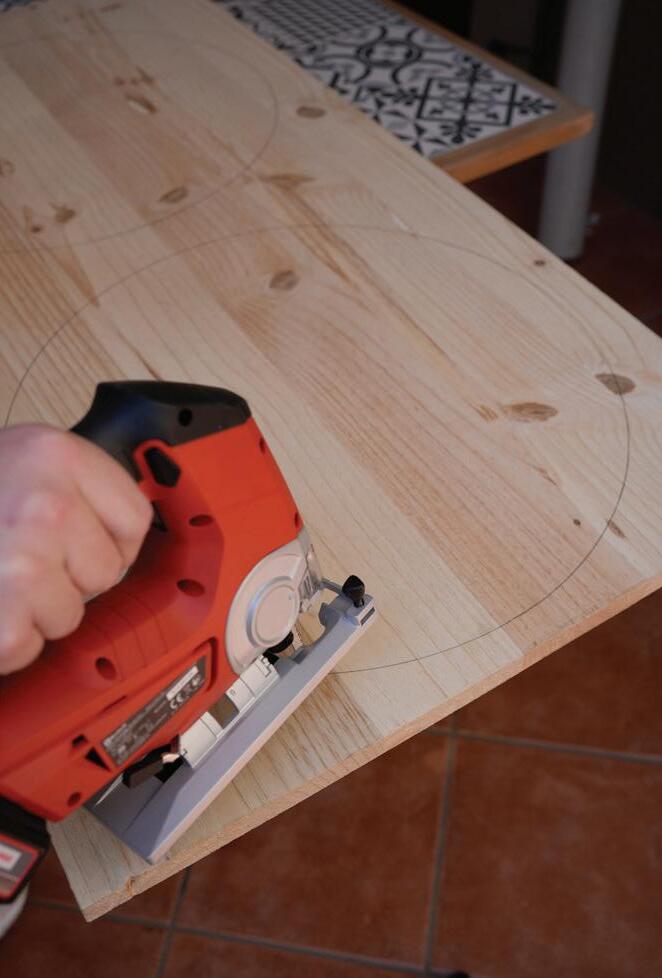
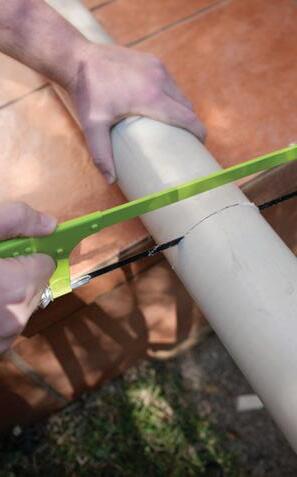
Here you will use your jigsaw to cut the circle. Remember to take your time and wear the necessary protection. If you’re new to this, don’t stress, the stone spray paint we’re using later is very forgiving on cuts that are a little skew.
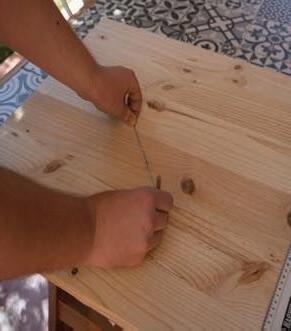
Let’s get ready to cut our tabletop. If you can find a precut piece in-store, that’s already a win! You can begin tracing your circle. Use something around the house that’s already a large circle, like a salad bowl or an existing side table.
If you need to make a circle from scratch – try the pencil and string method!
Tie one end of the string to a short pencil. Place the point of the pencil toward the outer edge of the wood with enough room from the edge to make a full lap. Hold the string onto the wood at the centre. With a taut string, move your pencil around in a circle.
2 4
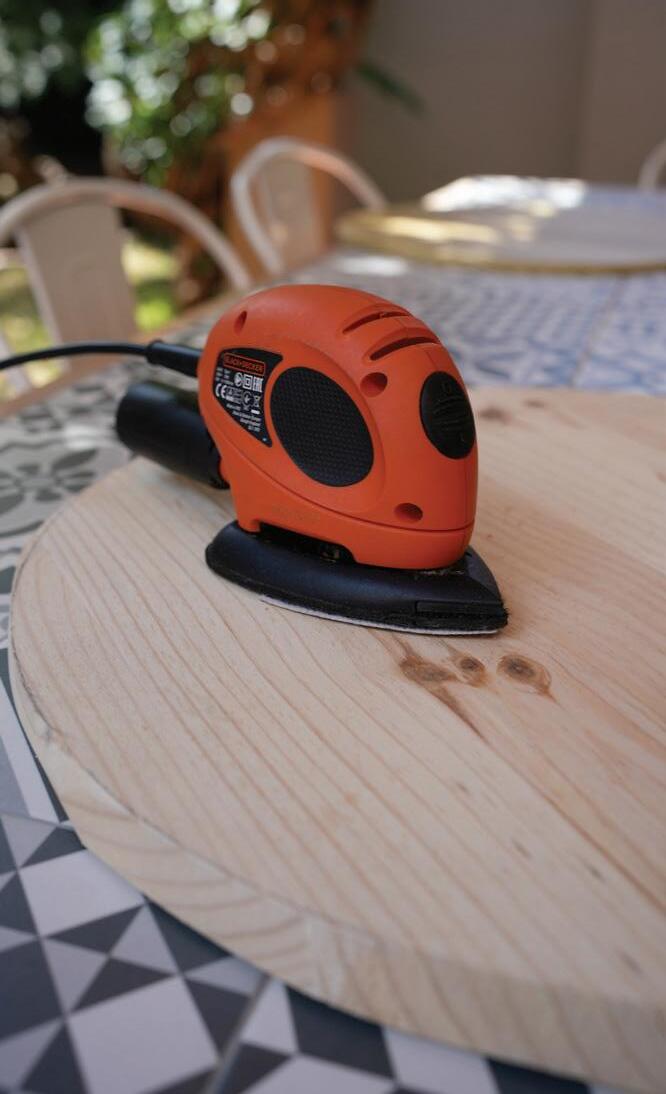
Once your circle is complete, take some time to sand the edges smooth. You can easily do this by hand or with a sander.

32 EasyDIY SPRING 2023 BUDGET-FRIENDLY HOME DECOR DIY 101
Getting your tabletop ready Step 1
Cutting out your circle Step 2
Sanding Step 3
ON T I K TOK
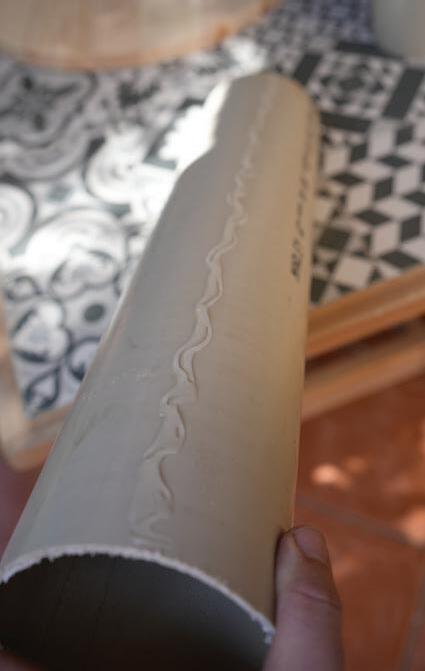
This is the fun part! Decide how long you’d like your legs to be. (I chose 50cm in length) and make these markings. Then cut them out slowly and carefully with a handsaw. I got three legs out of one underground 110mm PVC pipe.
Step 5
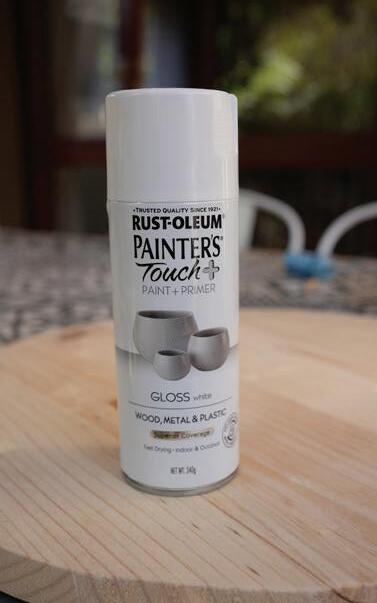
Start by painting your tabletop with spray paint. I used a paint (in plain white) that also had primer. Do this in a well-ventilated area. Apply multiple coats, letting them dry for 30 mins in between each one.
Use the same white spray paint with primer to cover the legs in multiple coats. This may take multiple coats – so be patient and continue each coat between drying times.


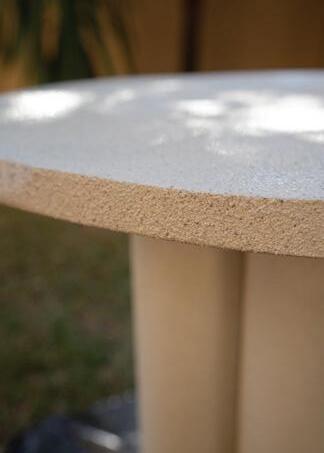
Add a protective coat once everything has dried. This will protect your table from dirt, dust and any potential spills.
16
You now have this super modern side table that you can style any way you’d like.

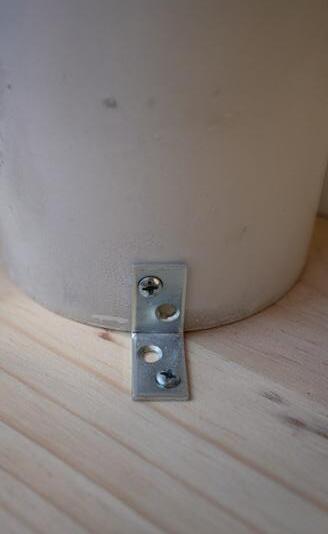
Secure your legs to the tabletop with small chair angle brackets and self-tapping screws. These are a lifesaver because it means you don’t have to use pilot holes or even a drill! I just used a little force with my star screwdriver and they were secured in no time.
5 9 10 11 12 13 15


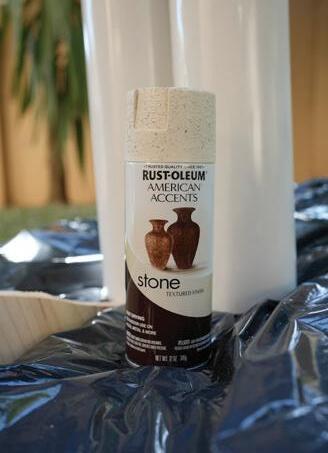
Now it’s time to use the textured finish stone spray paint by Rustoleum. You will only need one or two coats of this, each coat takes four hours to dry. This creates the desirable textured stone finish, which is very popular right now.
EasyDIY SPRING 2023 33
Step
Cutting your PVC pipe
4
Start painting the tabletop Step 6 Step
Paint the legs
7
Attach the legs to the tabletop
Step
8
Use the stone paint to create effect Step 9
Step
Cover in protective coat
10
Style Step 11
Glueing your pipe together
14 6 7 8
N G STATION RAC K
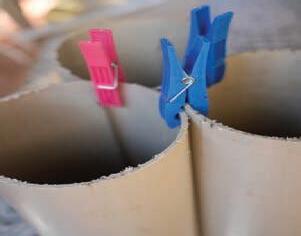
Take your contact glue and join the pipes together. I used clothing pegs to keep the pipes together while I let them dry for around an hour.
LAPTO P STAND LOADSHEDDI
IMAGES: SUPPLIED
WATCH more of McLennan’s DIY tutorials here
How to choose THE RIGHT INVERTER AND INVERTER BATTERIES
Load shedding is unrelenting, and South Africans continue to look for ways to remedy the hours of no electricity. An increasingly popular solution is to invest in an inverter and battery system. Orlando Luis,
your power needs
An inverter is a backup power-generating device that draws power from a battery. The battery is charged through your household electricity supply when available and stores this power to be used by the inverter during load shedding, providing your home with an uninterrupted electricity supply.
The challenge, however, is choosing the right inverter and battery for your needs. There is no one-size-fits-all
TOP TIP
solution as the needs of every household or office are different.
Here is a simple three-step guide to choosing the right inverter and battery system to fit your power needs.

Step 1
IDENTIFY YOUR POWER REQUIREMENTS


Start by making a list of the devices and appliances you want to run during a power outage. Perhaps it is the TV, Wi-Fi, a few lights and maybe the fridge,
It is not recommended to run too many large appliances from an inverter system as they draw a large amount of energy.
for example. Then add up the wattage of all these items to work out your total needs per hour. An average Wi-Fi modem uses 15W, a TV is approximately 150W, a fridge uses 500W and five 10W LED lightbulbs use 50W – this totals about 715W, so a minimum 1 000W inverter would be required.
Step 2
PICK AN INVERTER
The next step is to buy an inverter with a capacity that suits your needs.
The amount of power the inverter is capable of supplying is known as the inverter capacity. The inverter’s rating must be at least 25% greater than the


SOLAR POWER Special focus 34 EasyDIY SPRING 2023
TOP TIP
A battery’s capacity is the electricity it can store, and the inverter capacity is the amount of electricity it can serve at a time. Brights recommends lithium, gel, absorbent glass matt, deep-cycle, and G/P batteries as good choices.
total amount of power you need to run all your devices and appliances at once. The inverter capacity, which is measured in Volt Ampere or Watts, is directly proportional to the number of devices and appliances you are looking to power with it. You can find the value of the inverter’s capacity in the product description when you purchase. There are four main types of inverters to choose from.
1. Off-grid: These have no connection to Eskom, but also no ability to put energy back into the grid.
2. On-grid: These inverters are connected to the Eskom grid and will put excess power back into the Eskom grid when available.
3. Grid-interactive: These inverters do not have to be connected to the Eskom grid, but can be.
4. Hybrid: These inverters combine the characteristics of grid-interactive and on-grid inverters.
On-grid systems do not need storage/ batteries; off-grid systems need sufficient batteries for energy storage; and hybrid systems require a battery storage size that is dependent on your load requirements. In all solutions, focus on meeting your household needs. If you prefer an expensive grid-tied system, ensure you use a qualified company that will apply to the council for approval.
Checking the wiring before you buy
One of the crucial things before picking an inverter is to see if your home wiring is compatible with the inverter you are buying. Consult with your technician to determine if your home is compatible with the inverter you plan to buy.
Step 3
GET THE CORRECT BATTERY
The correct battery is the backbone of an inverter system. Ensure your inverter batteries’ capacity matches the capacity of your inverter.
The battery capacity, which is calculated in Ampere hours, can be found based on the backup time needed for all your appliances. This simple calculation will help you pick the perfect battery for your needs:
Multiply the wattage you need by the time you need it. For example, if you need to run devices and appliances that total 265W (your calculations) multiplied by 4.5 hours (the amount of time you need it), you come out with a total of 1 192.5Wh – this is your energy needs in Watt hours.
If your chosen inverter has, for example, a 5 000W, 48V capacity, you then divide your total energy needs (1 192.5Wh) by the inverter’s capacity (48V), which gives you a minimum battery capacity of 24.84Ah.
RECOMMENDED: Brights always recommends rounding up to the nearest 100 to be safe, so in this instance, a 100Ah battery would be ideal.
Inverter vs UPS
A UPS is better suited for PCs because an inverter takes one microsecond to fall over to the backup power, and this delay in switching may harm the system. Inverters are better for powering appliances such as fans, lights and TVs. An inverter is a great investment to keep your home and office running effectively during power outages. Following this inverter buying guide will help you buy one that satisfies all your power requirements.
GET ADVICE
Brights Hardware stores have on-site experts in all branches, ready to provide advice and guidance on all inverter and battery solutions. Stores are located in Boston, Blackheath, Langebaan, Mitchells Plain, Montague Park, Plattekloof, Stonewood, Brackengate and Sunningdale. An online store shopping experience is available at www.brights.co.za, which offers delivery to anywhere in South Africa. Brights offers same-day delivery in the Western Cape for products purchased online. It also has a tool hire service.
CLICK TO BUY:
In the market for an inverter and battery to stay ahead of the load shedding challenge, why not scan the QR codes to buy the product straight from Brights Hardware stores?


60W 17600MAH UPS
POWER BANK FOR ROUTERS AND FIBRE MODEMS

RECHARGEABLE LED EMERGENCY LANTERN

BUY
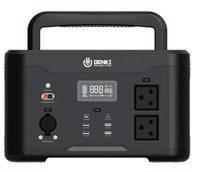
INVERTER LITHIUM 1KW
1166WH NON UPS
GENERATOR
3000W
4-STROKE KEY START
EasyDIY SPRING 2023 35
BUY N OW BUY
NOW
NOW BUY
NOW
IMAGES: VANIT PETMAL/ISTOCKPHOTO.COM, COURTESY OF BRIGHTS HARDWARE STORE
How solar power can INCREASE EQUITY IN YOUR HOME
DOMINQUE dHOTMAN, head of ooba Solar, says South African homeowners who are on the fence about whether or not to invest in solar power should keep in mind that demand for solar power continues to grow
Everyone is seeking energy independence and ways to reduce their household’s energy bill in the long run. Ultimately, solar solutions can increase the value of your home and your equity.

WHAT IS EQUITY?


Simply put, equity is the difference between what your property is worth and what you still owe on it. As you pay off your bond or home loan, your equity grows. Making improvements to your property that increase its value, such as installing solar power, is an effective way to increase equity in your home quickly.
TOP TIP
HOW MUCH VALUE CAN SOLAR ADD TO YOUR HOME?
Depending on the existing value of your property, solar could increase the value of a property by up to 8%.
In addition to bolstering the value of your home, estate agents are reporting that solar power helps sell your home faster – and at a higher price. International reports suggest that homes with solar power can sell up to 20% faster. Locally, dHotman points to the results of a Pam Golding Properties survey, which found that 68.8% of buyers will pay a premium for a home with “green features”, such as solar power. Buyers will favour a property that’s already fitted with a solar power

When installing a solar power system, be sure to maintain it. This boosts your property’s value and makes your home more desirable to buyers. It’s imperative that you select high-quality equipment and work with carefully vetted installers.
READ MORE: Solar 101 – the 10 most FAQ about solar power. Page 16 in our Winter issue.
R INFORMATIO

system as they don’t have to deal with the admin and the installation costs, which can total anywhere between R60 000 and R400 000, depending on one’s requirements. The good news is that numerous financing options are now available, making it easier for homeowners to make the move. In addition, homeowners receive a 25% tax rebate, up to R15 000, on the purchase and installation of solar panels.

YOUR SOLAR INSTALLATION FINANCING OPTIONS

Beyond purchasing solar systems, various financing options are available to help reduce the barriers to entry.

• Financing through your home loan provider: major banks now offer solar power financing solutions linked to your home loan. Each bank has set its own requirements regarding solar quotes, loan limits and accessibility of funds, so it’s important to work with a supplier who can provide independent advice and help you compare. You also need to weigh up the pros and cons of paying off a solar system over 20 years.
• Rent-to-own: solar financing or solar rental companies offer monthly payment plans (including system maintenance and upgrades), at the end of which ownership of the solar installation may transfer to the user. For homeowners who don’t have the funds necessary to purchase and install a system outright, this is an affordable alternative.
SOLAR POWER Special focus 36 EasyDIY SPRING 2023 IMAGES: MAXSHOT/ISTOCKPHOTO.COM
S
N
OLARPOWE