


NEP 2020 based | Technology powered
Accelerate TERM II
COMPUTER SCIENCE GRADE 8


Standing at the forefront of the digital and AI revolution, the importance of coding and computational skills has reached unprecedented heights. In today’s professional landscape, whether it’s in the fields of medicine, space exploration, education, science, or business, no sector remains untouched by this transformative wave. To not just survive but thrive in the 21st century, basic computer literacy is no longer sufficient. Learners must evolve into “digital natives” who can fluently read, write, and communicate in the languages that machines and AI comprehend.
Recognizing this imperative, the National Education Policy of 2020 (NEP 2020) has strongly recommended the integration of coding skills, computational thinking, critical analysis, and problem-solving abilities into the curriculum. Moreover, forward-looking subjects like AI, Data Sciences, Computer Applications, and IT have been introduced as elective subjects from grade 9 onwards. It wouldn’t be surprising if further transformative measures are taken even at the elementary education level.
Uolo has introduced an innovative 360-degree program for a coding-focused computer science curriculum, known as Tekie, spanning grades 1 to 8. Tekie is a significant stride towards STEM education that aims at making learners future ready—enabling them with skills needed in the ever-changing, technology-driven, and dynamic 21st-century world.
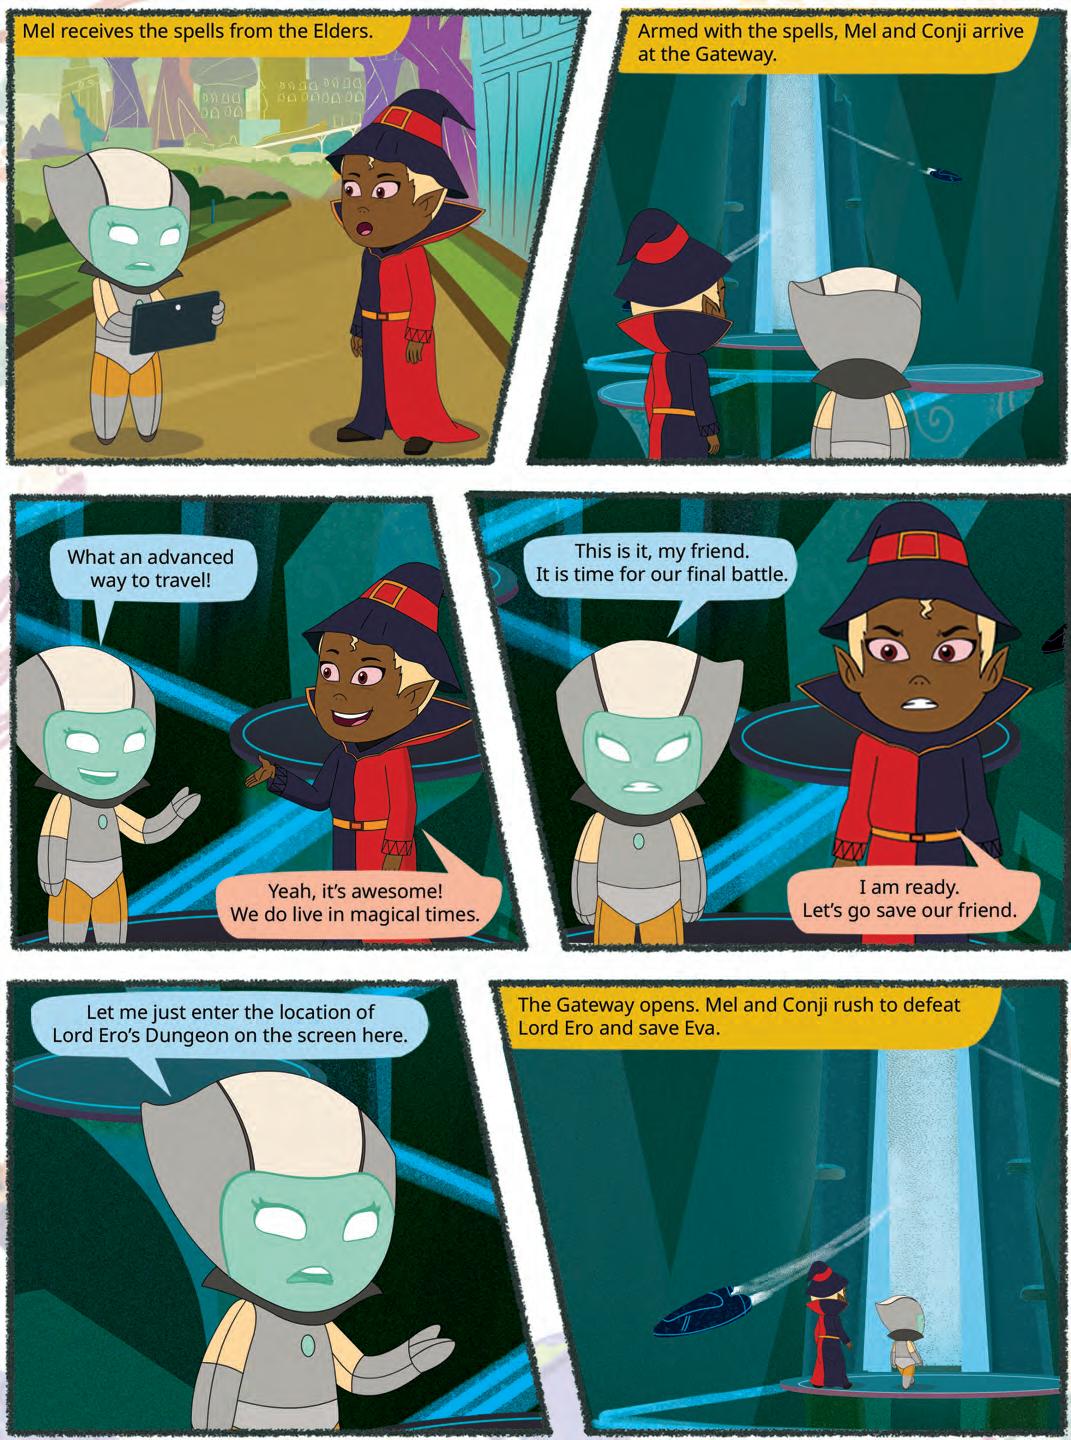
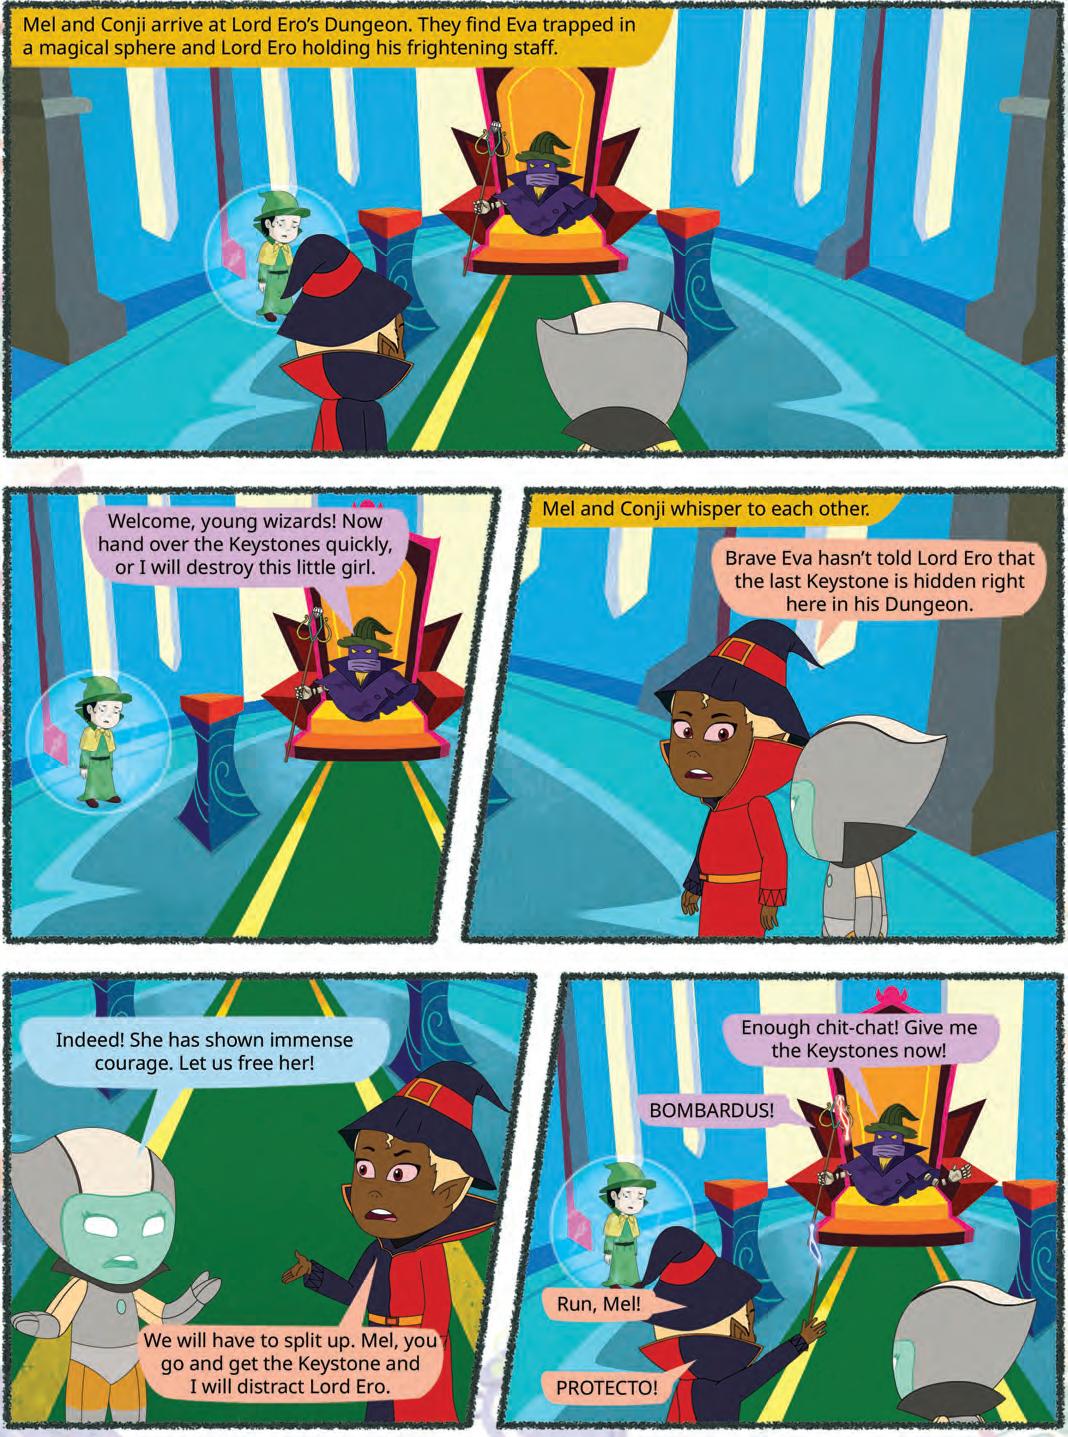
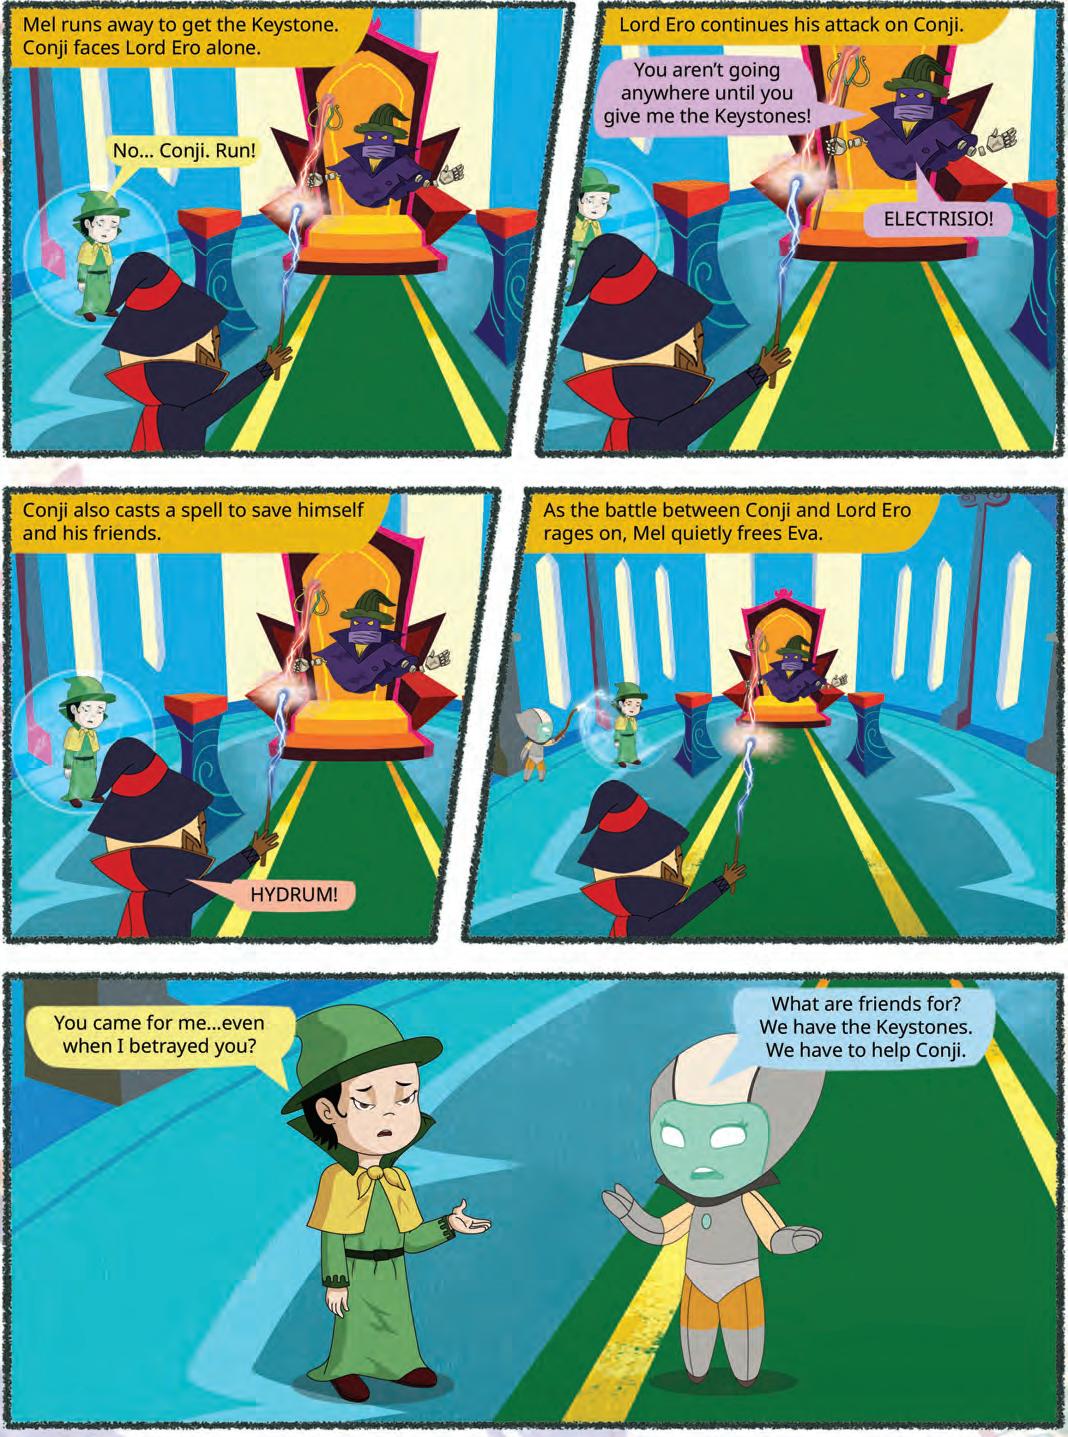
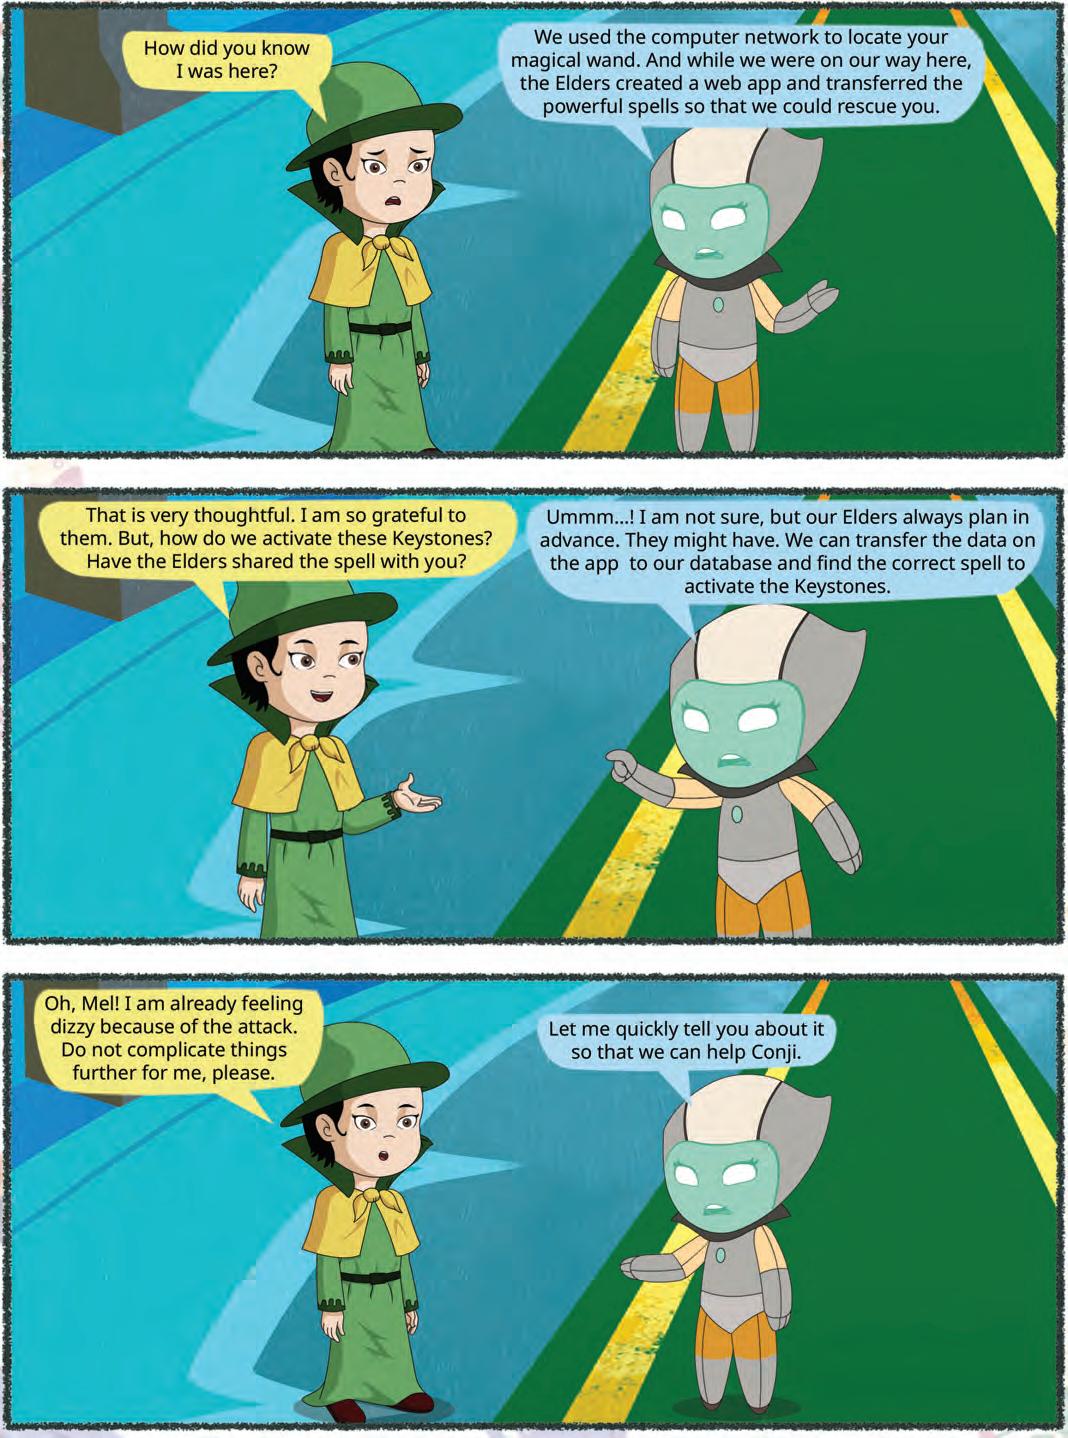
Tekie adopts a captivating and engaging approach to learning, in line with the recommendations of the NEP 2020. The curriculum is ingeniously woven into the thrilling adventures of Mel and Conji, fictional characters from the enchanting land of Avora. The Mel and Conji series epitomizes a modern method of acquiring Computer Science knowledge and honing coding skills and computational thinking.
Tekie is a technology-empowered curriculum that encompasses a few key components:
• Main Content Books: These introduce learners to the theory of computer science and the tools used in the field. Topics in AI are also covered, along with experiential and curiosity-based learning resources.
• Coding Book: Specifically designed to nurture coding skills, this booklet aligns with the experiential and contextual learning approach of the curriculum, fostering critical thinking and problem-solving abilities.
• Animated Learning Videos: The program is powered by high-quality animation-based learning videos that deliver learning in an engaging manner.
• Teacher Manual: This valuable resource supports classroom instruction, ensuring that educators can effectively deliver the curriculum.
Welcome to the captivating realm of Tekie! We hope you relish this educational journey as it equips you with the tools you need to thrive in the exciting and ever-changing world of the 21st century.
Each chapter has been divided into two key sections.
In every grade, students embark on an immersive experience in the “Adventures of Mel and Conji”. Within each chapter, in the initial section (Section A), the story unfolds, enveloping learners in an exciting journey. Through the story, students actively connect with fundamental concepts in the realm of Computer Science.
This section of the chapter focuses on the essential academic content. It provides the learning goals and assists teachers in their classroom instruction.
This section also includes the following academic assets:
HOTS questions to trigger engaging group discussions in the classroom.

Interesting facts related to the application of a concept.

Why do you think apps were invented? How do they make our lives easy?
Did You Know?
The first mobile app store was launched by Apple in July 2008, alongside the release of the iPhone 3G. It was called the “App Store”, and it initially featured 500 apps.
Probing questions to stimulate HOTS at individual level.
What are the most popular apps according to you?
Milestone exercises to practise specific concepts.


QR codes to explore an exciting application of the concept. This element builds curiosity in children and helps them grasp concepts through digital visual aids.


To know more about web apps, scan this code.
This is the chapter summary. It enables learners to glance through all key concepts covered in the chapter.
A pool of questions catering to all topics and skills covered in the chapter.
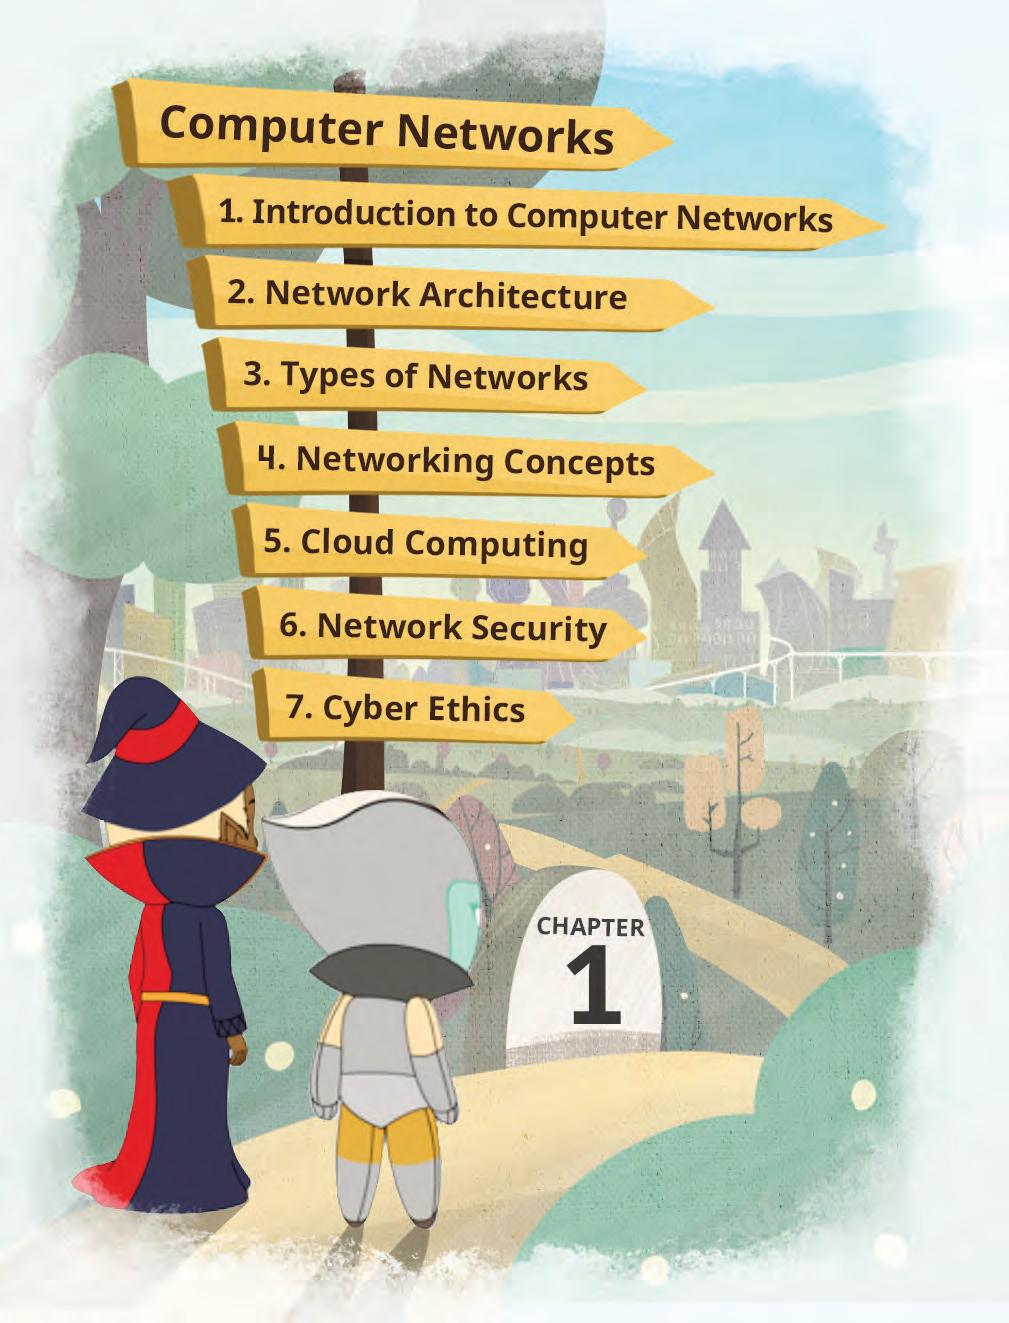
Computer networks are systems of interconnected computers, devices, or nodes that share resources and information with each other. These computers are linked with each other through transmission media, such as cables, telephone lines, radio waves, or infrared light beams.
The network size may vary from small to large depending on the number of computers it connects. A data communication system consists of the following parts:
1. Sender: A sender, also known as a source, is any device or computer that starts communication by creating and sending data, messages, or signals. This can be a computer, smartphone, or any other electronic device which is capable of sending data.
2. Receiver: The receiver is the device or computer that receives the data, messages, or signals sent by the sender. The recipient processes this information and takes appropriate actions based on the data received.
3. Medium: A medium is also called a communication channel or communication media. It is the physical path or method through which data is conveyed from a sender to a receiver. This can include various types of transmission media, which are wired connections such as television cables, telephone cables, and optical fibre, or wireless technologies such as radio waves and infrared signals.
4. Message: The message is the actual information being sent from the sender to the receiver. It could be a text, a picture, a video, or any other type of data. In the context of a letter, it’s the content of the letter itself. On a network, the message is what the sender wants to share with the receiver.
5. Protocols: These are the set of rules and guidelines that ensure seamless and standardised communication between devices on a network. When your computer wants to send a message to another computer, they both need to use the same protocol, just like speaking the same language. These protocols make sure the information travels correctly, gets received properly, and can be understood, creating a reliable way for computers to share data.

Network architecture refers to the design and structure of devices used in computer networks. These devices such as routers, switches, and modems are built with specific components and connections to enable data exchange between computers. These include the central processing unit (CPU), memory for storage, network interfaces for connections, and the operating system for managing tasks.
1. Personal Area Network (PAN): A PAN stands for a personal area network. It includes devices like smartphones, tablets, and accessories which are connected through technologies like Bluetooth. Two smartphones communicating through Bluetooth is an example of a PAN. It can be wired or wireless.
2. Local Area Network (LAN): LAN stands for a local area network. A LAN is a network that connects devices in a limited area, for example, homes, offices, or schools. This network allows devices to share files, printers, and instant accounts. LANs are widely used in homes and small organisations to connect computers and other devices for smooth communication. A school lab is an example of LAN.
3. Campus Area Network (CAN): CAN stands for a campus area network. It connects multiple LANs within a specific area. CAN is a special internet connection that covers a small area, such as a school campus or a big office building. For example, it helps to easily share information between the classrooms of a school.

Buildings
Buildings Buildings Buildings
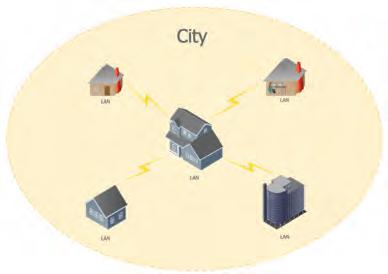
4. Metropolitan Area Network (MAN): A MAN stands for a metropolitan area network. A MAN covers a large area like a city. It connects multiple LANs within that area which enables communication between various locations. MANs are essential for universities or within cities to connect municipal offices for data exchange and communication. Cable TV networks are an example of MAN.
5. Wide Area Network (WAN): A WAN stands for a wide area network. It connects LANs and MANs over long distances that cover cities, nations, or continents. The internet is the most significant WAN that enables global communication.

Discuss the various types of networks and their purposes, coverage areas, and examples of where they are commonly used.
Networking concepts include various networking devices, terminologies, protocols, and topologies. Let us discuss about them in detail.
Networking devices are the hardware devices that are used to connect computers together to share files or printers. These devices perform different tasks at different segments of a computer network.
MODEM: MODEM stands for MOdulator-DEModulator. A modem is a device that connects your computer to the environment which translates the digital data from your computer into signals that can travel over the telephone or cable lines.
Switch: A switch is a device on a network that connects multiple devices (like computers) and directs data only to the device that needs it. A switch improves network efficiency.
Hub: A hub is a central device or place that connects multiple devices on a computer network. It allows various devices, such as computers, printers, or other gadgets, to share information and communicate with each other. It sends data to all connected devices, which can lead to inefficiencies.
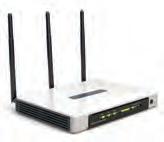
Router: A router is a device used in computer networks that directs data traffic efficiently between different computer networks. This device ensures that the data reaches the correct destination.
Gateway: A gateway connects two different computer networks and allows them to communicate and share information with each other.


Internet: The internet is a global area network that connects millions of computers together across the world. It provides a variety of information and communication facilities. It consists of the interconnected networks that communicate via standardised communication protocols.
Intranet: An intranet is a private network within an organisation that is accessible only to its members. It is used for file sharing, internal communication, and other purposes.
URL: URL stands for Uniform Resource Locator. A URL is a web address used to locate and access specific content or websites on the internet. For example ”www.examplе.com” is a URL.
ISP: ISP stands for internet service provider. An ISP is a company that provides internet access services to individuals and businesses, connecting them to the internet.
IP Address: IP, here, stands for Internet Protocol. An IP address is a unique numerical label assigned to every device (like computers and smartphones) on a network. It is used for identifying and communicating with devices on the internet. For example, an initial IP address is called version 4 (IPv4). It is displayed in a human-readable notation, such as 192.165.16.1.
DNS: DNS stands for Domain Name System. DNS is like the internet’s phone book. It translates humanfriendly domain names (e.g., “google.com”) into IP addresses that computers use to find websites.
Web Page: A web page is a single document displayed in a web browser. It can contain text, images, videos, and links to other pages.
Web Server: A web server is used to store and deliver the contents of a website to clients such as web browsers.
Website: A website is a collection of related web pages that are stored on a web server and can be accessed through the internet. It is the space where individuals, businesses, or organisations can share information, products, services, or entertainment with people from all around the world. To access a website, one has to type the address of the website (URL) in the address bar of a web browser.
Web Portal: A web portal is a special website that gathers lots of useful things at one place. This portal provides easy access to various services, information, and tools.
Link: A link is a connection between two things on the internet, such as web pages, documents, or websites. For example, when you click a hyperlink on a web page, it redirects you to another page or resource. It can be text or an image.
Hyperlink: A hyperlink is a clickable link in a website or document that directs users to another website or resource. A hyperlink makes navigation easy.
Hypertext: Hypertext is a way of organising and connecting information in digital documents, such as web pages. It allows you to click the words or phrases (called hyperlinks) to jump to the related information or various sections within the same document or on other web pages.
Bandwidth: Bandwidth is the capacity of a network connection. It is measured in bits per second (bps) or Bytes per second (Bps). This capacity determines how much data can be transmitted over the network at a given time. More bandwidth means faster data transmission. Bandwidth is measured in Hz (Hertz).
Unscramble the following words.
In computer networks, protocols are a set of rules and conventions that govern how data is transmitted, received, and processed between devices.
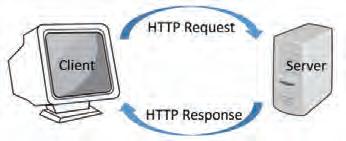
1. HTTP: HTTP stands for Hypertext Transfer Protocol. It is the foundation of data communication on the World Wide Web. It is a request-response protocol used for transmitting information and files on the internet. When you type a website address in your browser and press Enter, your browser uses HTTP to request the web page from the server where the website is stored.
Another form of HTTP is HTTPS, which stands for Hypertext Transfer Protocol Secure. It is used for secure communication over a network.
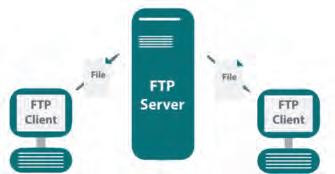
2. FTP: FTP stands for File Transfer Protocol. FTP is a protocol for transmitting files over the internet. It is commonly used by web developers to upload files to a website’s server. FTP allows the user to upload, download, and manage files on a remote server.
3. TCP/IP: TCP/IP stands for Transmission Control Protocol/ Internet Protocol. It is a set of rules and protocols that govern how devices communicate over a network. This protocol provides the fundamental framework for internet communication, allowing computers and devices to share information and resources across the globe.
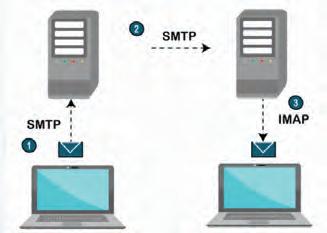
4. IMAP: IMAP stands for Internet Message Access Protocol. It is an email protocol that allows you to access and manage emails stored on a mail server. IMAP enables the user to view, organise, and delete emails on the server while keeping copies of messages on the server.
5. SMTP: SMTP stands for Simple Mail Transfer Protocol. It is used for sending emails. It works by sending outgoing emails from the sender’s email client to the recipient’s email server. SMTP ensures secure delivery of emails to the designated recipient’s mailbox.
Network topologies refer to the arrangement of devices and connections on a computer network. Various topologies define how devices are linked and communicate with each other.
Following are the different types of network topologies:
In a bus topology, all devices share a single communication line. In this type of topology, messages travel along the line and only the intended recipient device processes the message. It is simple and inexpensive but can slow down as more devices are added.
In a star topology, all devices are connected to a central hub or switch. All communication passes through the central hub which makes it efficient and easy to troubleshoot. The disadvantage of the star topology is that if the hub fails, the whole network will be disabled.
In a ring topology, each device is connected to two other devices by forming a circular network. Data travels in one direction through the ring until it reaches the intended recipient. Although it runs smoothly, it can be slow at times; and if one device breaks, the whole network may get affected.


In the mesh topology, every node is directly connected to every other node forming a mesh. The disadvantage of the mesh topology is that the network is costly, due to the large number of cables used and it is difficult to find a faulty node. An example of mesh topology is the internet.
A hybrid topology is a combination of two or more types of topologies. It integrates elements from the bus, star, ring, and mesh topologies. It is often used on large networks to enhance performance and reliability.
Complete the classification diagram.
Network Topologies
Cloud computing is the process of manipulating, configuring, and accessing online applications. We can use various services and resources over the internet by using it. Cloud computing offers an online data storage facility; one can access them through the internet on remote servers. This means that data can be stored, applications can be run, and tasks can be performed online without needing powerful computers. Cloud computing offers convenience, scalability, and accessibility, allowing users to access data and applications from anywhere with an internet connection. Google Drive, Microsoft OneDrive, Dropbox, and Apple iCloud Drive are some of the common examples of cloud computing.
1. On-demand Self-service: Cloud services are available whenever needed. Resources like storage and software can be accessed based on requirements without waiting for any approval or assistance.
2. Broad Network Access: Cloud services can be accessed from any device with an internet connection, whether it’s a computer, smartphone, or tablet.
3. Resource Pooling: Resource pooling involves gathering all computer resources, such as storage, processing power, and networks from various computers, and using them together.
4. Rapid Elasticity: Rapid elasticity allows quick scaling up or down of computing resources in response to demand. This means that resources like storage, processing power, or bandwidth can be increased or decreased rapidly according to needs.
5. Measured Services: In cloud computing, services are billed only for what is used. This ensures precise charges for the services needed, avoiding unnecessary expenses.
1. Cost-efficiency: Money is saved because there’s no need to buy and maintain physical supplies or software. Payment is made only for the services used, making it budget-friendly.
2. Scalability: Resources can easily grow or shrink. If a business expands, the cloud grows accordingly. If less is needed, there’s no obligation to use more capacity.
3. Flexibility: Work can be done from anywhere with an internet connection, whether it’s at home, in a cafe, or while travelling. This accessibility supports remote work.
4. Automatic Updates: Cloud services handle updates and maintenance, ensuring the latest features and security without manual installations.
5. Data Security: Cloud service providers prioritise the safety and protection of data. They use encryption and other measures to secure data, making it more reliable than traditional methods.
6. Collaboration: Cloud platforms make it easier to work together. Multiple people can edit files simultaneously, promoting teamwork and improving productivity.
7. Disaster Recovery: Cloud services automatically back up data. Even if a computer crashes, files remain safe and can be recovered.
Storing and sharing data using cloud computing means saving your files, documents, and information on the internet, rather than on your computer’s hard drive. Cloud computing allows you to access these resources from anywhere using an internet connection. Additionally, you can easily share this data with others which enables collaboration and makes it convenient for remote work or sharing information with colleagues or friends. Such storing and sharing eliminates the need for physical storage devices and offers flexibility and accessibility to your data. The process of storing data from your computer to cloud storage is called uploading and the process of copying files from cloud storage to a system is called downloading.
Network security involves the implementation of strategies, protocols, and tools to protect computer networks, systems, and data from unauthorised access, attacks, and damage. It includes measures like firewalls, antivirus software, encryption, and intrusion detection systems to safeguard sensitive information from cyber threats. Network security ensures that only authorised users can access specific data.
Cyber ethics refers to responsible and ethical behaviour on the internet. These ethics involve being respectful, honest, and considerate in online interactions. This includes avoiding cyberbullying, respecting others’ privacy, and giving credit to original content providers for using their online content. By following cyber ethics, we create a safe and positive online space for all.
1 Computer networks are interconnected devices that share resources and information.
2 Essential components of a network: sender, receiver, medium (communication channel), message and protocol.
3 Network devices include routers, switches, modems, etc.
4 Types of networks are PAN, LAN, CAN, MAN, and WAN.
5 IP address is a unique numerical label assigned to devices on a network for identification and communication.
6 Protocols are rules governing data transmission between devices in a network, including HTTP, FTP, TCP/IP, IMAP, and SMTP.
7 Network topologies refer to the arrangement of devices and connections in a computer network.
8 Cloud computing enables accessing services and resources over the internet, offering scalability, accessibility, and convenience.
9 Network security involves strategies like firewalls and encryption to protect computer networks, systems, and data from unauthorised access and attacks.
10 Cyber ethics refers to responsible online behaviour, including avoiding cyberbullying and respecting others’ privacy, ensuring a positive digital environment.
Hints structure telephone ethical router source capacity
1 A sender, also known as a , is any device or computer that starts communication by creating and sending data, messages, or signals.
2 Network architecture refers to the design and of devices used on computer networks.
3 A modem is a device that connects your computer to the internet and translates digital data into signals that can travel over lines.
4 A is a device used on computer networks that directs data traffic efficiently between various computer networks.
5 Bandwidth is the of a network connection.
6 Cyber ethics refers to responsible and behaviour on the internet.
1 What does LAN stand for in computer networks?
a Large area network
c Long access network
2 Which network type covers a city and connects multiple LANs?
a LAN
c WAN
3 What does URL stand for in the context of the internet?
a Uniform resource locator
c Unified resource link
4 What is the role of a switch in a network?
b Local area network
d Limited area network
b PAN
d MAN
b Universal recording language
d User related link
a Connects devices and directs data only to the intended device
b Connects multiple LANs within a specific area
c Connects two different computer networks
d Sends data to all connected devices in the network
5 Which characteristic of cloud computing allows quick scaling up or down of computing resources?
a On-demand self-service
c Rapid elasticity
b Broad network access
d Measured service
1 I am the physical path or method through which data is conveyed from a sender to a receiver in a network.
2 I translate human-friendly domain names into IP addresses that computers use to find websites on the internet.
3 I connect two different computer networks and allow them to communicate and share information with each other.
4 I am a connection between two things on the internet, such as web pages, documents, or websites.
5 I am a special website that gathers various services, information, and tools in one place for easy access.
6 I am an email protocol that allows users to access and manage emails stored on a mail server.
1 A sender is a device that receives data, messages, or signals sent by the receiver.
2 In a bus topology, all devices are connected to a central hub.
3 Cloud computing services are billed based on the resources you actually use.
4 IMAP is an email protocol that allows you to access and manage emails stored on a mail server.
5 WAN stands for Wide Area Network and covers a limited area like a city or a campus.
1 Mention any two points of difference between PAN and CAN.
2 Define Hypertext and its purpose in digital documents.
3 What do you understand about the term “Cloud Computing”?
4 Name one characteristic of Cloud Computing.
5 What is Cyber Ethics, and why is it important?
6 What does ISP stand for, and what is its role in internet connectivity?
1 Jashan wants to understand the role of protocols in computer networks. Choose one protocol (e.g., HTTP, FTP) and explain it to him.
2 Harpreet is trying to explain computer networks to her younger brother. How would you explain the concept of LAN (Local Area Network) to a younger sibling in simple words?
3 Deepak is at home and needs to share a large presentation file with his classmate who lives in another city. Which type of network would be most suitable for this task, and why?
4 Sakshi is planning to run a cloud-based software business. Explain to her the characteristics of cloud computing, like “on-demand self-service” and “measured service”.
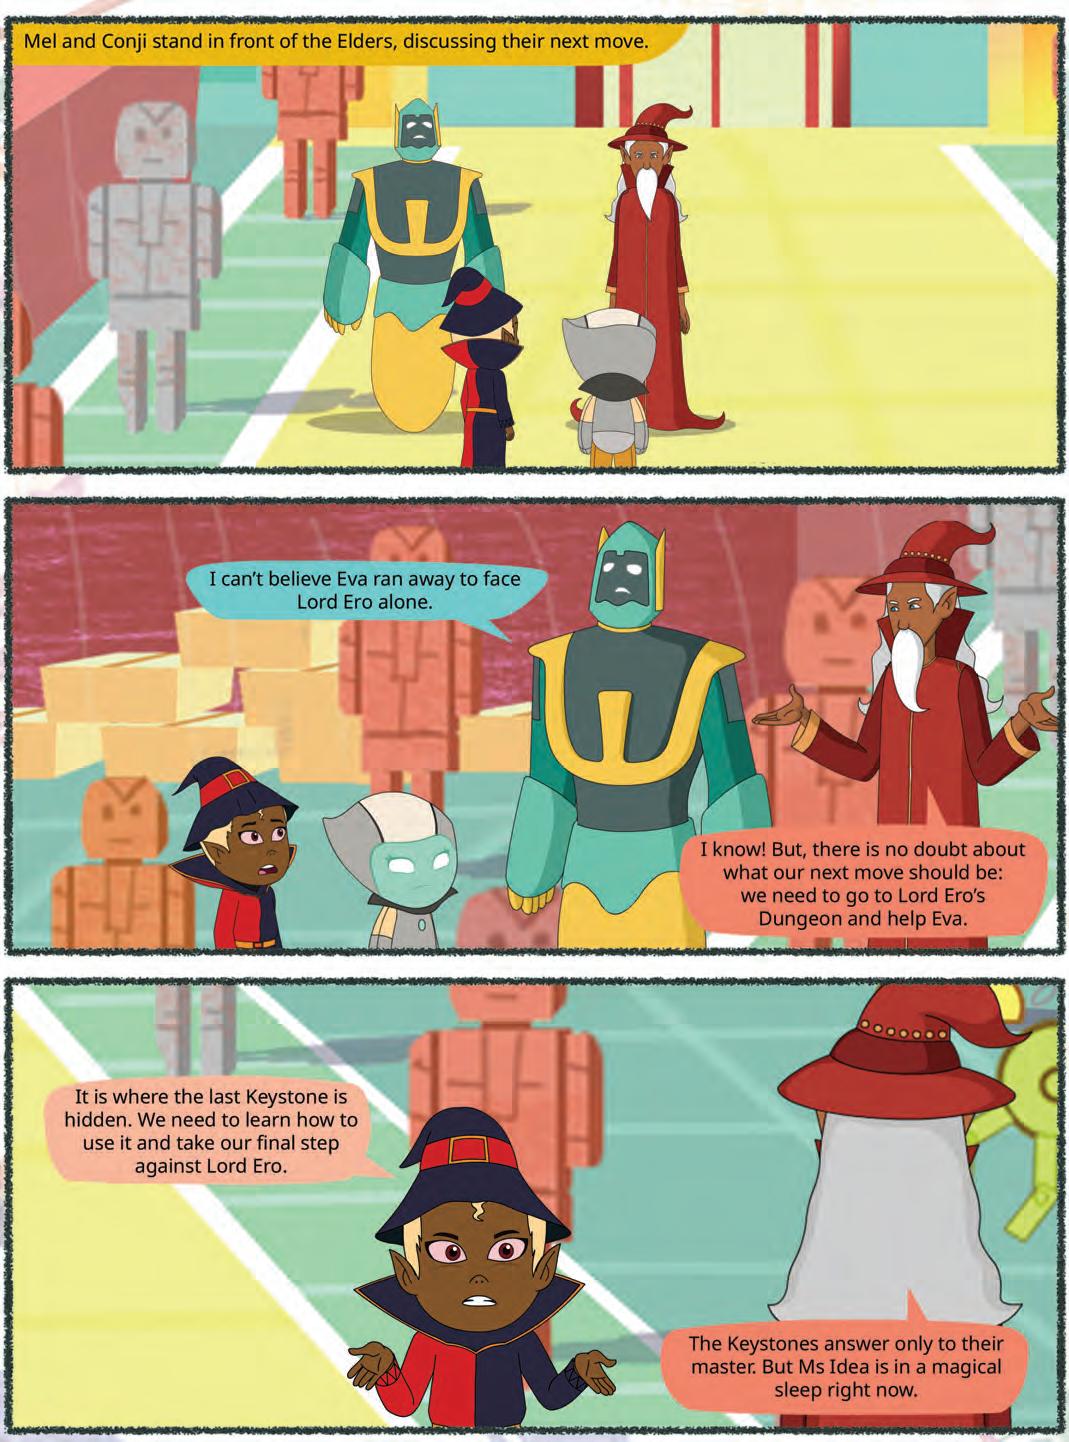
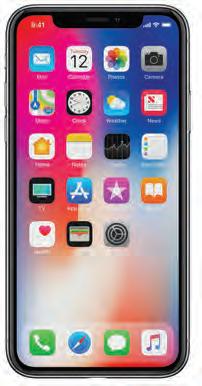
Suppose you are ordering food for dinner tonight. You will fetch your phone, use a food ordering app, and place the order. It is that simple! Your smartphone must have a variety of apps. Do you ever realise how these apps are created and how they work? Well, you will learn about apps in this chapter. Apps or Applications are software programs or mobile applications that can be downloaded and installed on electronic devices like smartphones, tablets, and computers. These apps serve various purposes and can be used for playing games, accessing social media, learning, productivity, communication, and many other activities. You are likely to be familiar with popular apps and may use them regularly for entertainment, education, or communication.
In short, an app refers to a program or software application designed to perform specific tasks or functions on a computer, smartphone, tablet, or other kinds of digital devices.
The first mobile app store was launched by Apple in July 2008, alongside the release of the iPhone 3G. It was called the “App Store”, and it initially featured 500 apps.
1. Social Networking Apps: Social networking apps are apps that help people connect and share with others online. They let you make friends, post updates, and chat. Facebook, Instagram, LinkedIn, Snapchat, and Twitter are some of the commonly used social networking apps.
2. Productivity Apps: Productivity apps are apps that help you get things done and be more organised. Microsoft Word, Google Drive, Snapseed, and YouTube Studio are a few examples of productivity apps.
3. Gaming Apps: Gaming apps are apps where you can play fun games. These apps provide entertainment and challenges, allowing you to explore virtual worlds, solve puzzles, or compete with others. Temple Run, Angry Bird, Sportify, MineCraft, and Fruit Ninja are few examples of gaming apps.
4. Food Delivery and Cooking Apps: Food and cooking apps are apps that help you discover recipes, cook delicious meals, learn about food, and order food. Zomato, Swiggy, DoorDash, Insta Mart, and Zepto are few examples of food delivery and cooking apps.


What are the most popular apps according to you?

Why do you think apps were invented? How do they make our lives easy?
You can access apps from your mobile phone, desktop, or directly from the web. Let us learn all these methods to access the apps.
Desktop apps are like the computer version of the apps you use on your phone, but they are designed to work on your computer and do all sorts of different things, from writing documents to playing games or editing pictures. Desktop apps are like special programs or software applications that you can use on your computer, just like you use games or apps on your smartphone. They are like tools or games that you can open and use while you are on your computer. Desktop apps can be used on a computer or a laptop where they are installed and run locally. Desktop applications do not require an internet connection to run. For example, Microsoft Word is a desktop app that helps you write essays and stories on your computer. There are also games like Minecraft that you can play on your computer. Skype, Microsoft PowerPoint, Paint, Microsoft Excel, and iTunes are a few examples of desktop apps.
A web app is a software application that operates on web servers and is accessed by users through web browsers over the internet.
Web apps, short for web applications, are software applications that run on web servers and are accessed through web browsers over the internet. These applications provide a user interface and functionality similar to traditional desktop applications but are designed to be used within a web browser. As web apps are hosted on web servers, users can access them from anywhere, using various devices, without the need for installation. This ease of accessibility is a significant advantage for both users and developers. Web apps can be accessed from any device with a web browser and an internet connection. They are not

tied to a specific operating system, making them platform-independent. Padlet, YouTube, Gmail, and Google Drive are a few examples of web apps.
Mobile apps are the programs that you install on your phone to make it more fun or helpful for whatever you want to do.


A mobile app is a computer program with a tiny icon that you can download and use on your smartphone or tablet. It is like having a special tool or game that makes your phone do fun or useful things beyond making calls or sending texts. Mobile apps can be games you play, tools that help with homework, maps that show you where to go, or even things like filters that make your photos look cool. Mobile apps can be downloaded from the app stores available on your mobile. An app store can host large numbers of mobile apps. You can check the various features of the app you want to download and compare it with other related mobile apps available on the app store. Instagram, Camera, Telegram, iMusic, and Google Maps are a few examples of mobile apps.


There are two types of apps based on how they are made. They are:
Native apps are specifically designed for a particular type of phone, such as iPhones or Android phones. They are known for their high speed and excellent performance because they are designed exclusively for your phone. Examples of native apps include Camera, Gallery, Clock, Maps, and Settings.
Hybrid apps can work on different types of phones and use web technologies, allowing them to work on multiple platforms and access device features. They are compatible with both iPhones and Android phones and can be downloaded and installed from their respective app stores, such as the Google Play Store for Android phones and App Store for iPhones. Although they may not match the speed and smoothness of native apps, they offer versatility by running on a wide range of smartphones. Examples of hybrid apps include Uber, Zomato, Instagram, Telegram, and X (formerly known as Twitter).
Native apps are built specifically for one type of mobile operating system, such as iOS (for Apple devices) or Android (for Android devices).
They typically offer the best performance and responsiveness because they are optimised for the particular device and its features.
Native apps have complete access to device features, like the camera, GPS, and sensors, allowing them to take full advantage of these capabilities.
They are distributed through platform-specific app stores like the Apple App Store and Google Play Store.
Hybrid apps are developed using web technologies like HTML, CSS, and JavaScript and can run on multiple platforms (iOS, Android, etc.) with some modifications.
Hybrid apps might not feel as fast or quick as regular apps because they use a part that is like a web browser to show things, and that can be a bit slow.
Hybrid apps can access device features to some extent using plugins, but not as exclusively as native apps.
Hybrid apps can be distributed through web browsers as web applications. They can also be distributed through app stores.
Native apps can sometimes be used even without an internet connection! That is because they are installed directly on your device, and many of them store information on your phone. It is like having a little piece of the internet right on your device!
How can we get hybrid apps in our phones? Is it similar to how we get native apps?
There are many apps based on their usage. They are:
Educational apps are software applications designed to facilitate learning and provide educational content on various subjects and skills. These apps are developed to make learning more engaging, interactive, and accessible for users of all ages, from children to adults.
Social networking apps are like virtual platforms where you can meet and talk to your friends and even make new ones. They are special apps on your phone or computer that help you connect with people, share things about your life, and see what your friends are up to.
Entertainment apps are online portals for having fun and enjoyment on your phone or tablet. They are special apps that offer all sorts of things to make you happy and have a great time.
Banking apps are like a virtual bank branch on your phone or tablet. They are the special apps provided by your bank to help you do immediate money transactions without going to the bank in person.
Did you know that the "Like" button on Facebook was originally going to be called the "Awesome" button? Facebook's founder Mark Zuckerberg considered various names for it before settling on "Like". So, every time you click "Like" on a post, you are giving it a little touch of awesomeness!
E-commerce apps are online stores on your phone or tablet. They are special apps that let you shop for all sorts of things without having to go to a physical store.


In your opinion, from the various categories of apps, which ones are most widely used and by whom?
Name five native apps and five hybrid apps. Which one between the two categories do you use the most?
a These apps can help users develop a wide range of skills, including reading, writing, maths, and problem-solving.
b These apps are like virtual platforms where you can meet and talk to your friends.
c These apps provide you with help when you do important financial transactions.
d These apps let you shop for all sorts of things without having to go to a physical store.
e These apps are the portals for fun and enjoyment on your phone or tablet.
MIT App Inventor is a visual development platform that allows users to create mobile applications for Android devices without the need to write traditional codes. It is designed to make app development more accessible to a wide range of people, including those who do not have extensive programming experience. MIT App Inventor provides a visual, drag-and-drop interface for designing the user interface and functionality. Users can assemble components and connect blocks to create the app’s logic.
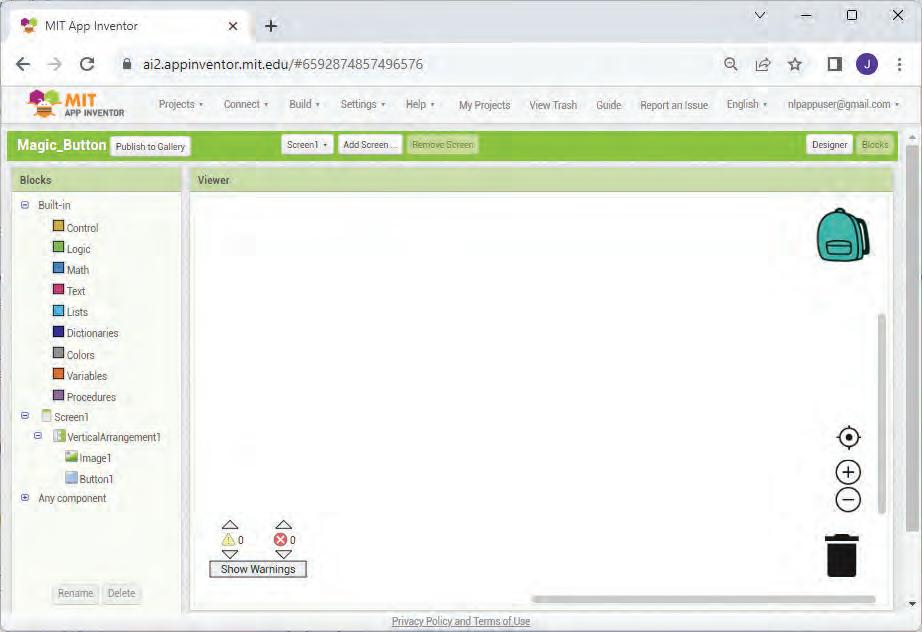
Let us create a simple app using MIT App Inventor.
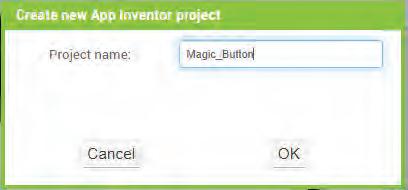
The name of this app will be Magic_Button.
The app will have the following components:
1. A button
2. An image (Download any image from the internet and save it on your computer for later use.)
These two components will be added in the app design. Initially, the image will not be visible. The idea is to display the image only after the user clicks the button. Let us design the app now.
1. Visit the following link to open MIT App Inventor: https://appinventor.mit.edu/
2. The following screen appears:
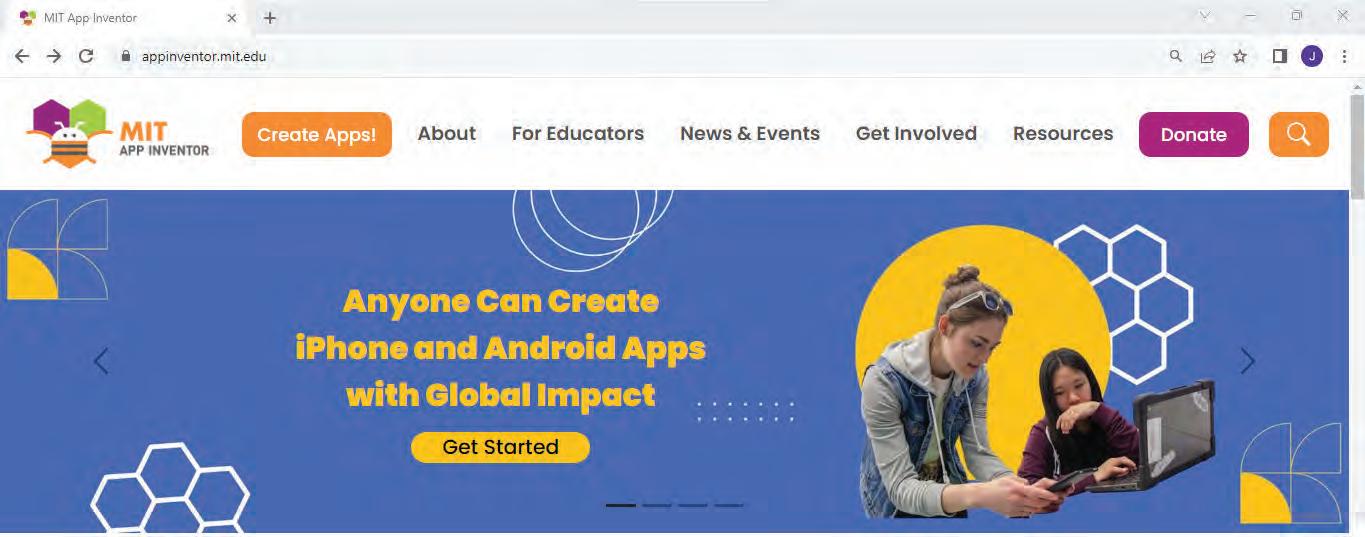
3. Click the Create Apps! button.
4. A sign-in screen appears. You can use your Gmail ID to login, or you can create a new one as well.
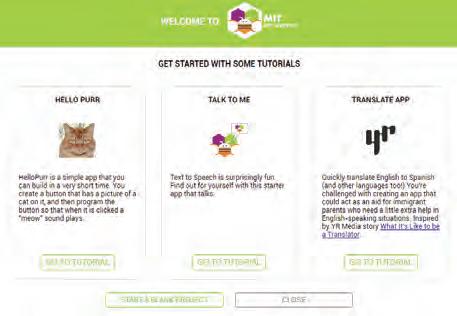
5. After signing in, the Welcome to MIT App Inventor pop-up box appears. Click the Continue button at the bottom of the screen.
6. Another screen appears, from which you can choose to view the tutorials or start a new blank project.
7. Click START A BLANK PROJECT.


Continue Button
8. The Project View window appears.
Click here to start a blank project
9. A dialog box appears, asking you to give a project name to your project.
10. Give an appropriate name to your project, for example, Magic_Button and click OK
11. A new project with the same name will be created.
12. The Project View window will open.
The Project View window is divided into four sections:
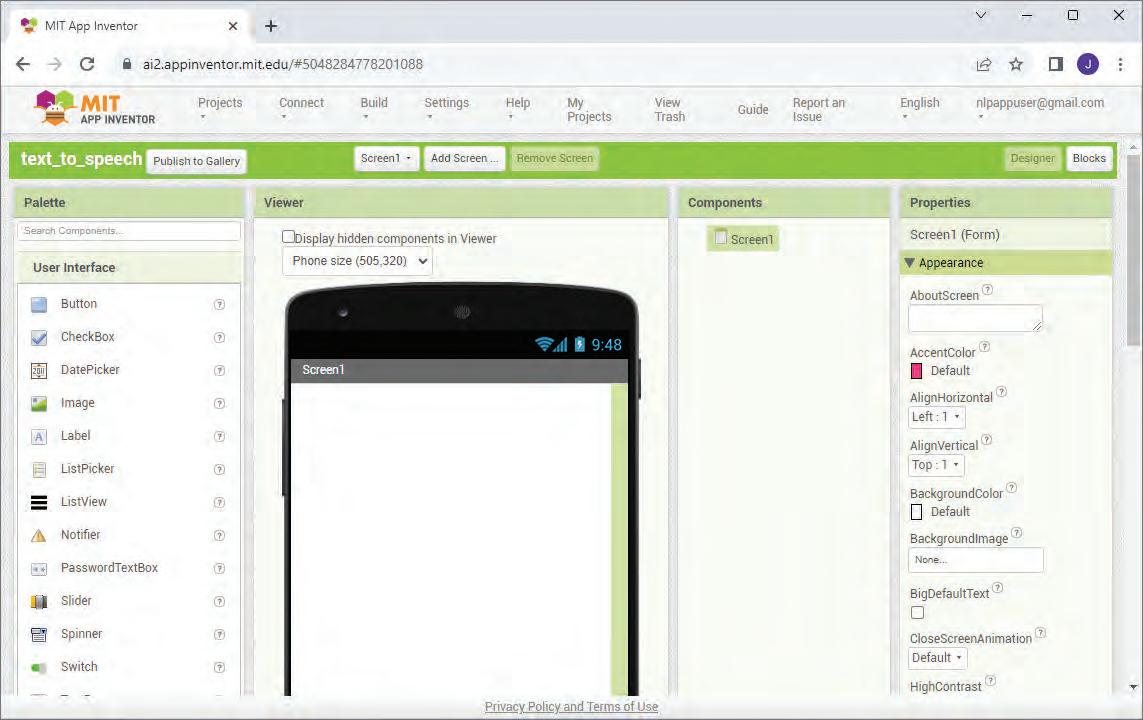
Viewer
Palette: Various components are presented under various categories in the palette.
Viewer: You can select any component from the palette and drag it onto the screen in the Viewer section.
Components: The Components section shows the various components that are placed in the Viewer.
Properties: The Properties section shows the properties of the selected components.
Let us now create the interface of the app.
1. From the Palette section, click the Layout tab.
2. Drag the VerticalArrangement component and place it on the screen in the Viewer section.
3. Now, click the VericleArrangement1 component in the Components section and go to the Properties section.
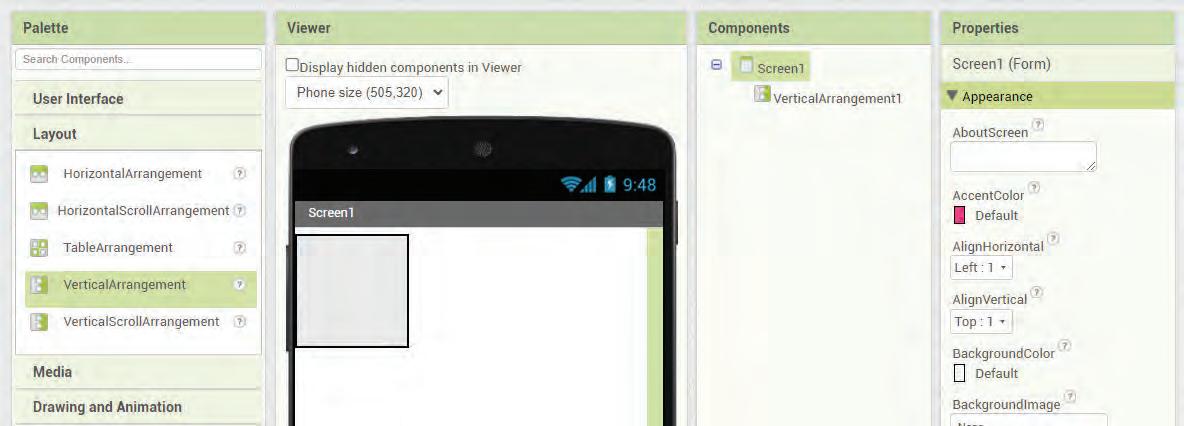
4. Scroll down to the Height property and click it.
5. Select the Fill parent option and click OK.
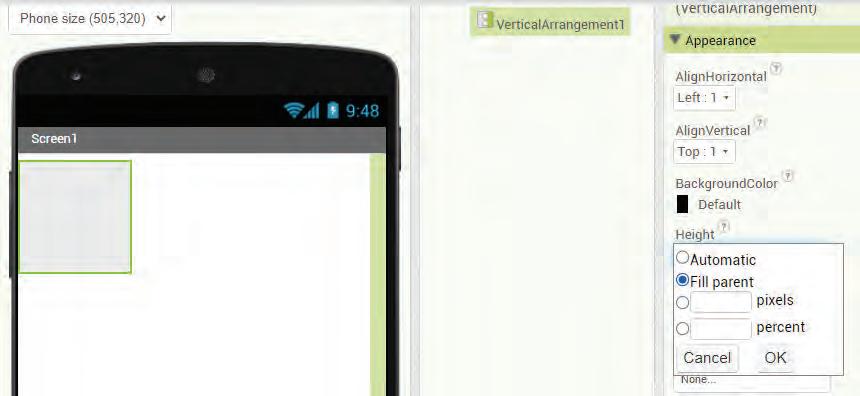
6. Similarly, select the same option for the Width property. The VerticalArrangement component will fill the whole screen.
7. Now, from the User Interface tab, drag the Button component and drop it on the screen.
8. You can also observe that the Button1 component is added under the Components section.
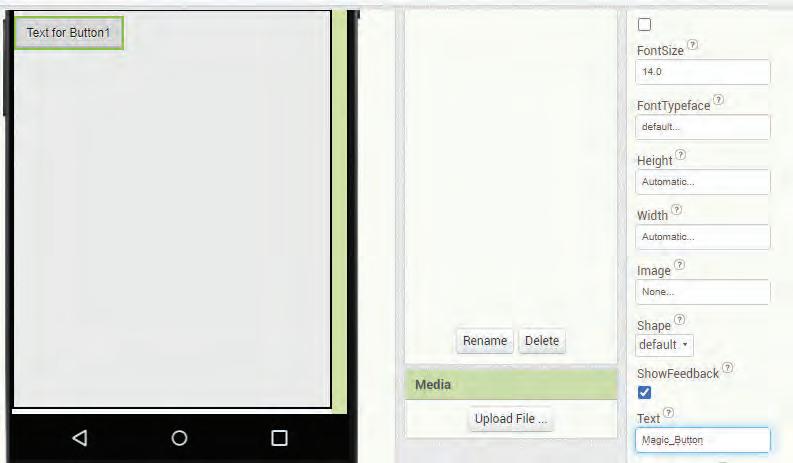
1. Now in the Properties section, scroll down to the Text property of the button. Replace the text “Text for Button1” with “Magic_Button”.
2. From the Palette section, drag the Button component and place it in the Viewer section on Screen1
3. Now, change some more properties of the button in a similar way from the Properties section:
Font Size: 20
Background Colour: Cyan
Text Colour: Blue
Shape: Rounded
Height: 10 percent
Width: Fill parent
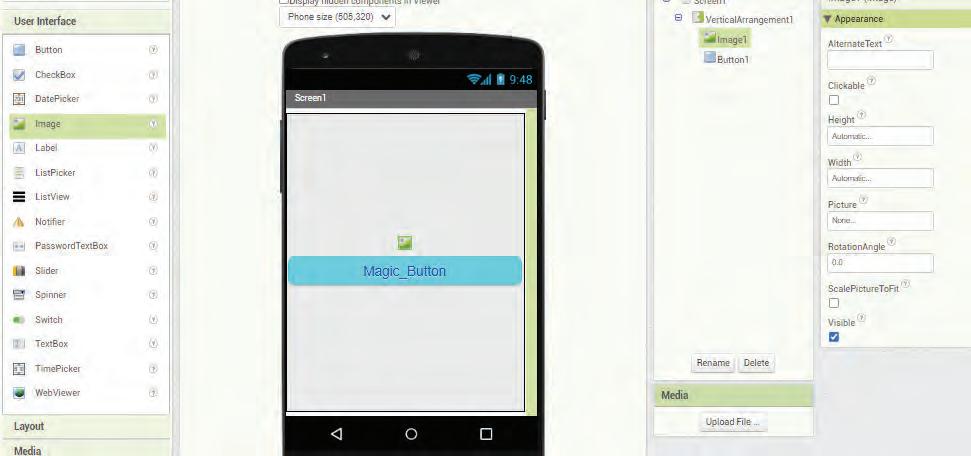
4. Now, drag an Image component from the User Interface section and place it on the screen.
5. From the Components section, select Image1 and click the Picture option in the Properties section. A drop-down will appear. Click the Upload File option.
6. The Upload File dialog box will open. Click the Choose File option.

7. An Open dialog box appears. Select the picture that you have downloaded from the internet and click Open
8. The image will appear on the screen.
You can now set the properties of the image.
Height: Fit to parent
Width: Fit to parent
Visible: Uncheck (to hide the image initially)
After setting all the properties of both objects, the screen will look as shown here:

After that, you have arranged your components on the screen. Let us now create the code for the app.
Coding in MIT App Inventor is very easy and user-friendly. You can create code for your app by using various blocks present in the Blocks Editor.
To create code for your app:
1. Click the Blocks Editor button on the right-hand upper corner of the Project View window.
2. The Blocks Editor will open with the Blocks section on the left and the Viewer section on the right.
3. Click Screen1 > Button1 from the Blocks pane.
4. The blocks related to Button1 will appear.
5. Drag when Button1.Click block from the Blocks drawer and drop it in the Viewer pane.
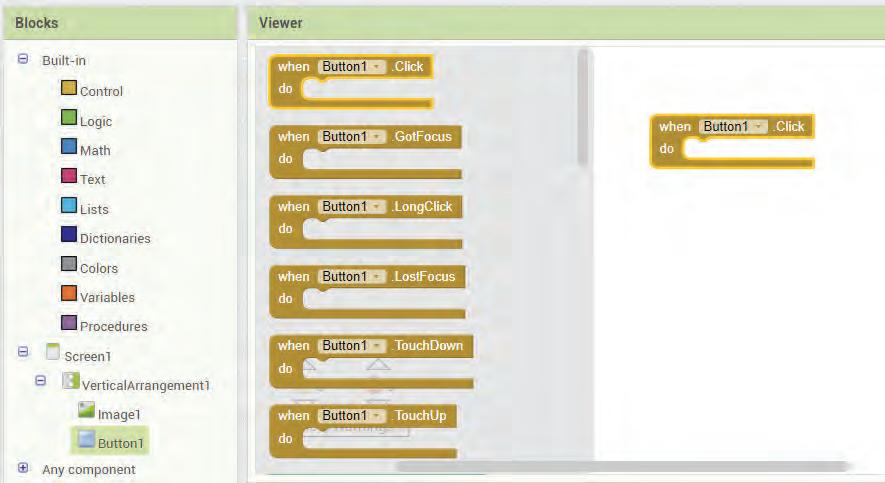
6. Now, click the Image1 component in the Blocks panel. The blocks related to the image are displayed.
7. Drag set Image1.Visible to block and drop it inside the when Button1.Click block.
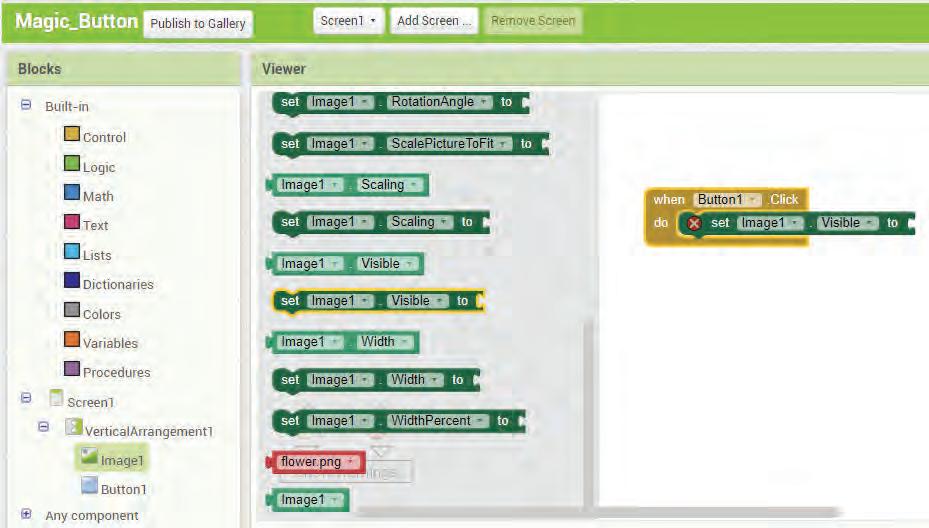
8. Now, from the Built-in > Logic drawer, drag the true block and snap it together with the set Image1. Visible to block.
9. The code for your app is complete.
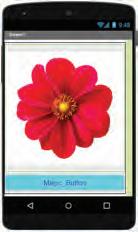
10. Now, when you click the Magic_Button on your mobile app, you will see a picture of a flower.
1. To test your app, you will need a mobile phone.
2. Go to the Google Play Store of your android phone and search MIT AI2 Companion App.
3. Install the app by clicking “Install”.
4. After installation, open the app. You have to provide a six-character code to connect.
5. Now, to get the code, go to your computer where you have created your app.
6. Go to the Connect menu and select the AI Companion option.
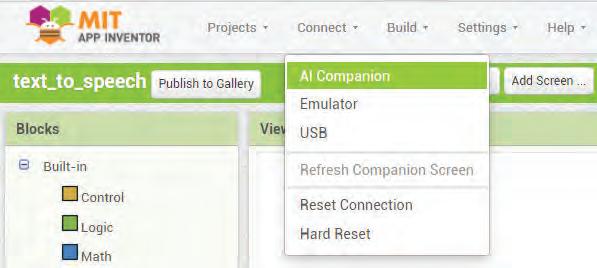
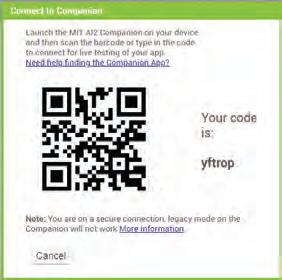
7. A Connect to Companion window will open with a six-character code.
8. You can now fill in this six-character code on the mobile phone app.
9. The app will now open on your mobile.
10. Click the button that you have created, which is the Magic_Button.
11. You will be able to see an image of a flower.
Create an app on MIT App Inventor to show your name when you click a button.
1 Apps or Applications are software programs or mobile applications that can be downloaded and installed on electronic devices like smartphones, tablets, and computers.
2 Social Networking Apps, Productivity Apps, Gaming Apps, Food Delivery and Cooking Apps are different types of apps.
3 You can access apps from your mobile phone, desktop, or directly from the web.
4 Desktop apps are like special programs or software applications that you can use on your computer, just like you use games or apps on your smartphone.
5 Web apps, short for web applications, are software applications that run on web servers and are accessed through web browsers over the internet.
6 A mobile app is a tiny computer program that you can download and used on your smartphone or tablet.
7 Native apps are specifically designed for a particular type of phone, such as iPhones or Android phones.
8 Hybrid apps can work on different types of phones and use web technologies, allowing them to work on multiple platforms and access device features.
9 MIT App Inventor is a visual development platform that allows users to create mobile applications for Android devices without the need to write traditional codes.
A/An is a computer program that you can download and use on your smartphone or tablet. apps are special apps that let you shop for all sorts of things without having to go to a physical store. apps are developed using web technologies like HTML, CSS, and JavaScript and can run on multiple platforms.
In MIT App Inventor, various components are present under various categories in apps are apps that help people connect and share with others online.
Apps are software programs that can be installed on your desktop.
There are two types of apps: hybrid and native.
Web apps do not operate on web servers and are not accessed by users through web browsers.
Native apps provide the best performance as they are optimised for a specific device.
MIT App Inventor is an online platform that makes it easy for people to create their own mobile apps.
1
2
3
4
5
I am like a virtual bank branch on your phone or tablet. I can assist you to design and make the app of your dreams.
I am a computer program that you can download and use on your smartphone.
I can show the properties of the selected components.
I am a type of app that can work on various types of phones, like both iPhones and Android phones.
Ramesh wants to design an app. Which platform can he use?
Tia wants to understand the e-commerce apps and know a few examples. Can you explain it to her?
Umang wants to download a specific app for his iPhone. What type of app will it be?
Geet is using her computer and wants to learn about web apps. Can you help her understand about them?
Meher has installed an app on her phone that was not a preloaded app. What type of app has she downloaded?

A web application is a software application that runs on your web browser. Businesses need to exchange information and deliver services remotely. They use web applications to connect with customers conveniently and securely. Common website features like shopping carts, product item search and filtering, instant messaging, and social media news feeds are all web applications by design.
There are many types of web applications. Here are some of the well-known ones.
Workplace Collaboration Web Applications: The web apps allow team members to access documents, shared calendars, business instant messaging services, and other enterprise tools.
Ecommerce Web Applications: Ecommerce web apps such as ‘Amazon.com’ enable users to browse, search, and pay for products online.
Email Web Applications: Webmail apps are widely used by enterprises and personal users to access their emails. They often include other communication tools such as instant messaging and video meetings.

Online Banking Web Applications: Business and personal users widely use online banking web apps to access their accounts and other financial products such as loans and mortgages.
You can use web applications to create and share technical documentation
Web applications work on client-server architecture. Their code is divided into two components: client-side scripts and server-side scripts. Let us learn more about these.
The client-side script deals with user interface functionalities like buttons and drop-down boxes. When an end user clicks a web app link, the web browser loads the client-side script and renders the graphic elements and text for user interaction. The client-side script is also called the front-end of an application.
For example, a user can read content, watch videos, or fill details on a contact form. Actions such as clicking a Submit button go to the server as a client request.
The server-side means everything that happens on the server. Server-side code is often written in languages such as Python, Java, or JavaScript (Node.js) and is executed on the server. It is called the back-end of an application.
For example, large-scale services like Facebook, Amazon, and Netflix rely on server-side architecture to efficiently handle millions of user requests, process data, and deliver content.
So, let us discuss the front end and the back end to understand their relationship clearly.
1. The front end of a web application is the part that users directly see and interact with.
2. It includes the user interface (UI) elements, design, and presentation layer.
3. In Python web development, popular front-end frameworks like Flask or Django are often used to create the user interface and render dynamic web pages based on user input and data from the back end.
1. The back end of a web application collects data from its front end.
2. It is responsible for handling data storage, retrieval, and the core logic of the application.
3. In the context of MySQL, the back end can involve creating a database schema, establishing a connection to the MySQL server, and performing CRUD (Create, Read, Update, and Delete) operations on the data.
• Customers
• Suppliers
In this chapter, we will explore the process by which web applications send and receive information. Let us now create a web application using the front end and back end. For this, the following are required:
MySQL server provides a database management system (DBMS) with querying and connectivity capabilities, as well as the ability to have excellent data structure and integration with various platforms. This DBMS can handle large databases reliably and quickly in high-demand production environments. MySQL server also has features such as connectivity, speed, and security that make it suitable for accessing databases.
Let us understand it through an example. Imagine that you are the owner of an online store that sells various products. To efficiently manage your business, you use MySQL as your database system. Here’s how MySQL is applied in this scenario:
1. Database Creation: In MySQL, you create a database named ‘OnlineStore’ to store all your business data.
2. Tables: In the OnlineStore database, you create tables to represent various aspects of your business. For example:
Products table, to store product details such as name, price, and availability
Customer table, to store customer information
Orders table, to track customer orders
3. Data Insertion: Insert data in these tables. For instance, add product listings, customer profiles, and order records.
4. Querying: MySQL allows you to perform queries to retrieve specific information. You can:
Retrieve a list of all products in stock.
Find out which customers have made the most orders.
Calculate the total revenue for a specific period.
5. Updating and Managing Data: You can easily update product prices, customer details, and order statuses as your business evolves.
6. Security: MySQL provides user authentication and authorisation features, ensuring that only authorised personnel can access and modify data.
7. Scalability: As your online store grows, MySQL allows you to scale your database infrastructure to handle increased traffic and data.
In this real-life example, MySQL serves as the backbone of your online business, helping you store, manage, and retrieve data effectively, which is crucial for running a successful e-commerce operation.
1
Create a table Student in the School database. Each row should represent a student, and each column should represent a piece of information (name, age, grade, and favourite subject).
2 Python
Insert the student information in the database.
Python is a programming language that helps easily communicate with databases. Python is commonly used to build both the front end and back end of web applications.
The front end focuses on the user interface and presentation, whereas the back end handles data management, including interactions with the MySQL server for data storage and retrieval.
The relationship between Python and the MySQL server is like a conversation between two friends:
1. Python as the Speaker: Python is like a friend who wants to communicate and share information.
2. MySQL Server as the Listener: The MySQL Server is like a friend who listens carefully and stores information. The My SQL specialises in efficiently storing and managing data.
Here is How Their Conversation Works:
1. Python speaks to the MySQL Server by sending messages (commands) in a language that both understand.
2. The MySQL server listens, processes Python’s requests, and stores data securely, like a note-taker who jots down important information.
3. When Python needs information (data), it asks the MySQL Server, and the MySQL Server responds with the requested data.
4. They continue this friendly exchange, allowing Python to access, manage, and update data stored on the MySQL Server, just like friends sharing and updating their notes.
Let us create a small web application using HTML. You need a database, which we will create using MySQL.
Think and Tell
Who invented Python, and what was the motivation behind its creation?
Then, a Python script will be used to connect the HTML form to the database. The idea of the project is as follows:
1. An HTML form is created.
2. The HTML form collects the information.
3. The Python script ‘app1.py’ uses Flask to handle form submissions.
4. Using SQL queries, form data is inserted into the MySQL database.
5. The Python script uses the mysql.connector library to connect the form to a MySQL database.
6. When the form is submitted, the data is inserted into a table.
To connect an HTML form to a MySQL database using Python:
Step 1: Install Flask and MySQL Connector.
Ensure that you install Flask and the MySQL Connector Python library by executing the following commands on the prompt:
pip install Flask
pip install Flask mysql-connector-python
Step 2: Create MySQL Database and Table.
We need to create the MySQL database webapp and then the item table to store user information.
To create and use the webapp database:
mysql> create database webapp;
mysql> use webapp;
To create the item table:
mysql> create table item (id int not null primary key, name varchar(15));
Step 3: Insert Values in the Table.
mysql> insert into item values (1001, ‘Item 1’);
Step 4: View Records from the Table.
mysql> select * from item;
Step 5: Create a Python Script to Handle form Submission.
To write the Python code, you need to install the necessary Python packages, including a MySQL connector library such as mysql-connector-python or pymysql.
Code
# import all libraries here from flask import Flask, render_template, request, redirect, url_for, session from flask_mysqldb import MySQL import MySQLdb.cursors
# MySQL Configuration db = mysql.connector.connect( host=”localhost”, user=”root”, password=””, database=”webapp”
)
cursor = db.cursor()
cursor.execute(“SELECT id, name FROM item”) items = cursor.fetchall()
cursor.close()
item_name = request.form[‘item_name’]
cursor = db.cursor()
cursor.execute(“INSERT INTO item (name) VALUES (%s)”, (item_name,)) db.commit()
cursor.close()
Step 6: Create the HTML Form ‘index.html’.
HTML is a programming language used to define the structure and content of web pages. To create a form with the fields that you will use to collect data, create the ‘index.html’ file in the ‘templates1’ directory.
<!DOCTYPE html>
<html>
<head>
<title>Simple Web App</title>
</head>
<body>
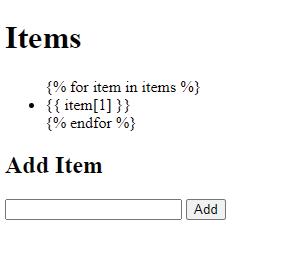
<h1>Items</h1>
<ul>
{% for item in items %}
<li>{{ item[1] }}</li> {% endfor %}
</ul>
<h2>Add Item</h2>
<form method=”POST” action=”/add”>
<input type=”text” name=”item_name” required>
<button type=”submit”>Add</button>
</form>
</body>
</html>

The first web application was created by Tim Berners-Lee in 1991. Tim Berners-Lee, a British computer scientist, developed the World Wide Web (WWW) while working at CERN, the European Organisation for Nuclear Research.
Step 7: Run the Application.
1. Run the Python script.
2. Extract the data submitted through the form, using the request object (Flask or Django) or the CGI library.
3. Access the HTML form from your web browser by navigating to http://localhost:5000/. You can type the information and submit it to store it in the MySQL database.
Step 8: Close the Database Connection.
>>> mysql.connection.commit()
Step 9: Run the HTML Web Application.
1. Open the HTML file in the web browser.
2. Type the name of the item in the text box on the form.
3. Click Add.
4. Check the table using the Select * from item query in MySQL.
5. You can observe the newly added item in your table.
Use HTML to create a form related to library information. Type the name of your favourite book in the form and save the entry in the library database.
A web application is a software application that runs on your web browser. There are many web applications available, such as ecommerce, online banking, email, workplace collaboration, etc. Web applications work on the client-server architecture. Their code is divided into two components: clientside scripts and server-side scripts.
The client-side script deals with user interface functionalities like buttons and drop-down boxes.
Server-side code is often written in languages such as Python, Java, or JavaScript (Node.js) and is executed on the server.
5 6
MySQL server provides a database management system (DBMS) with querying and connectivity capabilities.
Python is a programming language that helps easily communicate with databases.
Hints server-side web application MySQL client-side HTML
1 A is a software application that runs on your web browser.
2 is used to collect information.
3 The script deals with user interface functionalities like buttons and drop-down boxes.
4 code is often written in languages such as Python, Java, or JavaScript.
5 can handle large databases reliably and quickly in high-demand production environments.
1 Business and personal users widely use online web apps to access their accounts.
a Banking
c Business
2 On which architecture do the web apps work?
a Server-side
c Client-side
b Fitness
d Shopping
b Client-server
d None of these
3 Server-side architecture of a web application is also known as its
a Server-end
c Back-end
b Client-end
d Front-end
4 Which server has features such as connectivity, speed, and security that make it suitable for accessing databases?
a YourSQL
c MySQL
b Free-SQL
d MyServer
5 Which programming language is commonly used to build both the front end and back end of web applications?
a Fortran
c D Language
b C Language
d Python
1 I am a type of web app that enables users to browse, search, and pay for products online.
2 I am a server that provides a database management system (DBMS) with querying and connectivity capabilities.
3 I am a management system that can handle large databases reliably and quickly in high-demand production environments.
4 I am a component of the web app that includes the user interface (UI) elements, design, and presentation layer.
5 I am a type of database management system that stores data in a structured format using tables. I am known for my reliability and ease of use.
1 Python is a programming language commonly used for web development.
2 MySQL is a type of database management system used to store data for web applications.
3 HTML is a language that is used to define the structure and content of web pages.
4 In web development, CSS is primarily used for database management.
5 MySQL has the ability to have excellent data structure and integration with various platforms.
1 What is a web application?
2 Differentiate between front-end and back-end applications.
3 What are some common web applications?
4 How do web applications work?
5 How does the choice of database technology impact on the performance and scalability of a modern web applications?
1 Create a simple HTML form that collects a user’s name and email address. Implement validation to ensure that both fields are filled before submission.
2 Design an HTML form for the registration page of a website. Include fields for user name, password, email, and a drop-down menu for selecting the user’s country. Ensure that the password input is masked for security.
3 Develop an HTML form that allows users to upload an image file. Implement a file type validation to accept only image files (e.g., .jpg, .png). Upon submission, display the uploaded image on the same page.
4 Build an HTML form with a check box group for selecting multiple programming languages. When the user selects languages and submits the form, display a message listing the chosen languages.
5 Create a contact form with fields for name, email, subject, and a text area for the message. On submission, validate that the email is in the correct format and that the message is not empty. If the validation passes, send form data to a server using an appropriate HTTP method (e.g., POST).
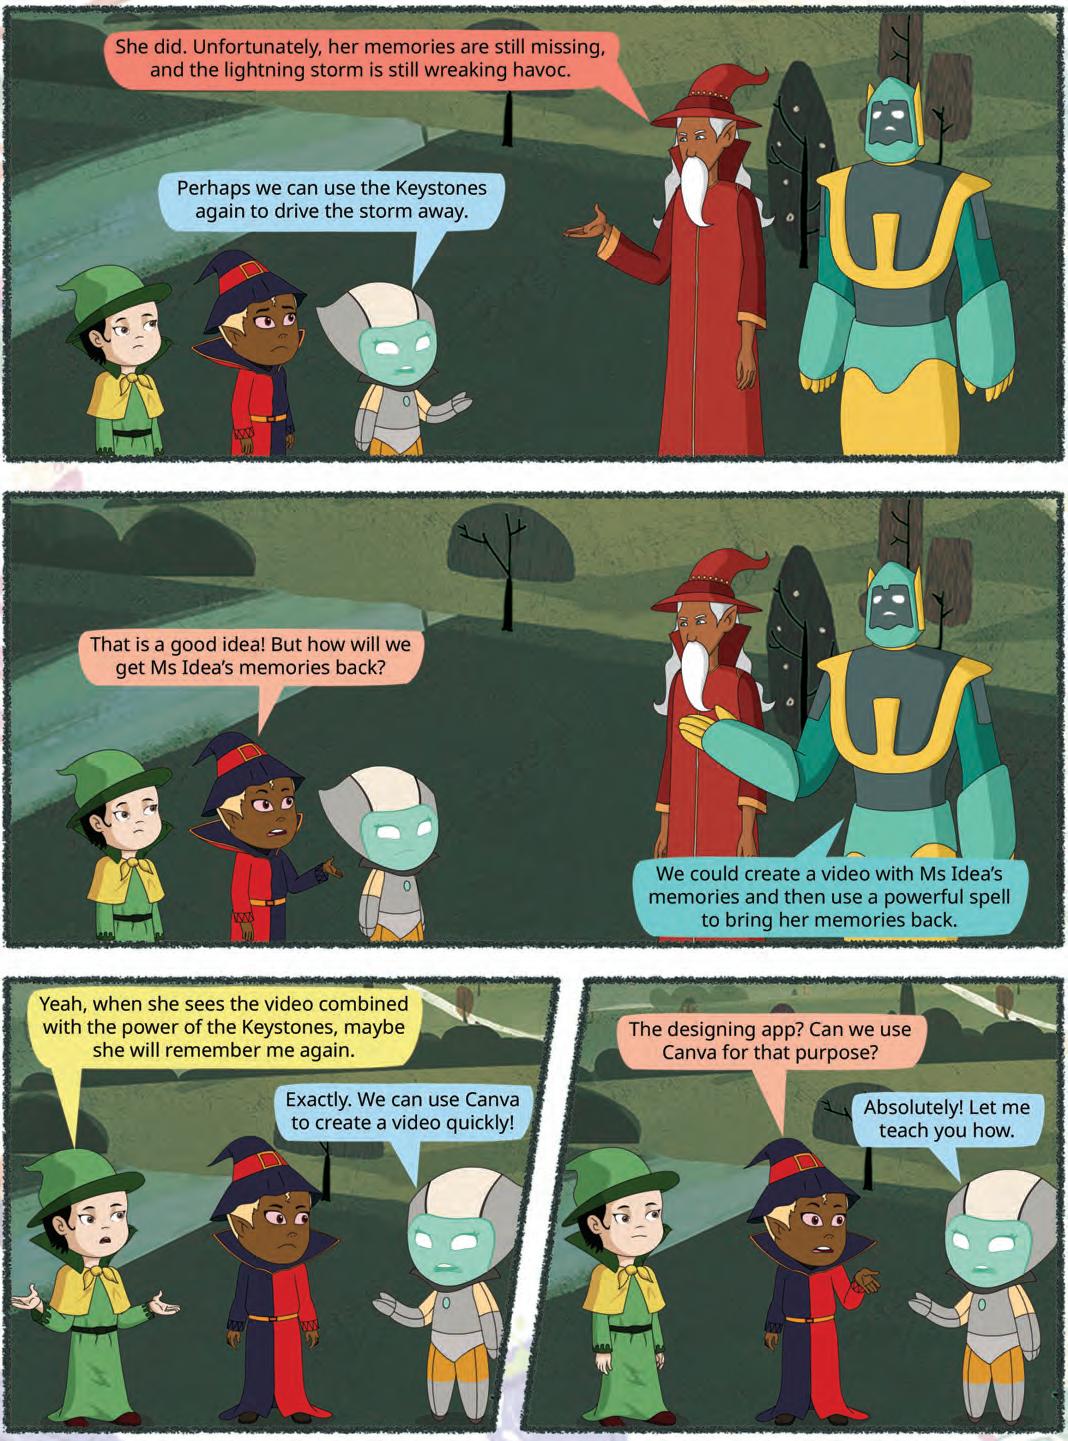
Welcome to the exciting world of video creation with Canva! In this chapter, you will discover how we can make videos with the help of Canva, which is an amazing tool for creating videos. Let us start a video project from scratch.
Steps to Create a Blank Video in Canva:
1. Log in to www.canva.com and create an account if you do not have one.
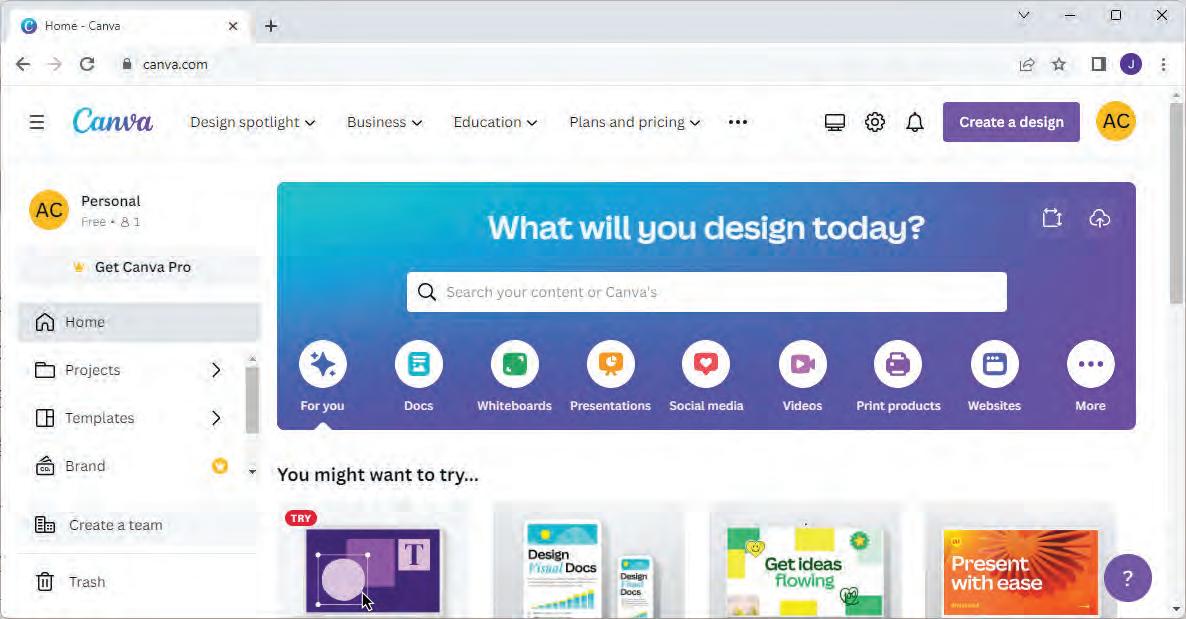
2. Click on the Create a design button on the home page.
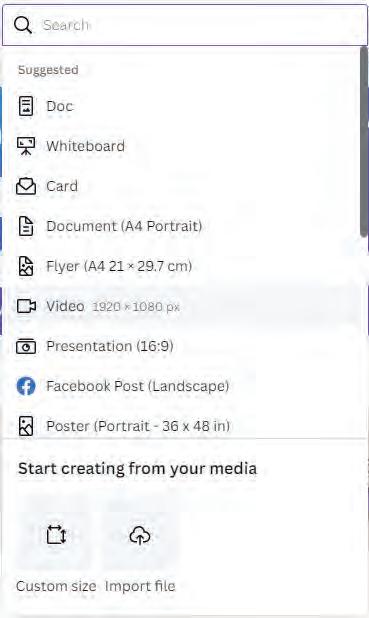
3. A drop-down list of options will appear.
4. Click on the Video option.
5. A blank video will be created, and the following window will appear:
You can also click on the Video icon on the home page and select from the various options.

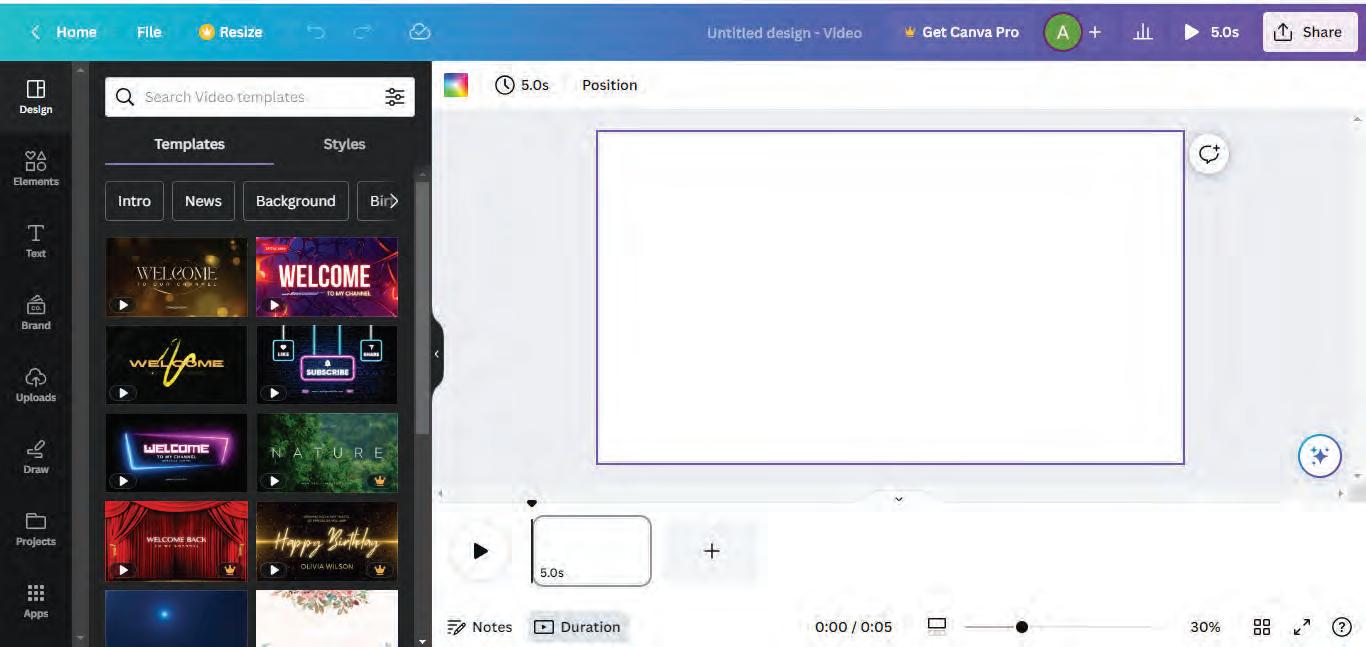
1. Canvas: The canvas is your workspace, where you build and design your video. It’s where you add and arrange all the elements of your video project, including text, images, videos, and audio.
2. Timeline: The timeline is a critical component that allows you to control the timing of your video. You can arrange elements on the timeline to determine when they appear and for how long. It helps you arrange objects like text, images, and videos in the desired sequence.
3. Zoom Controls: Canva offers zoom controls that allow you to zoom in and out of your canvas. This feature helps you focus on specific details while working on your video.
4. Grid View: Grid view provides an overview of all the pages in your video project, helping you visualise the structure and flow of your video. It is a useful tool for organising your content effectively.
5. Preview: The Preview option allows you to see how your video will appear to your audience. It is a valuable tool for reviewing your video before finalising it, ensuring that everything looks and sounds just right.
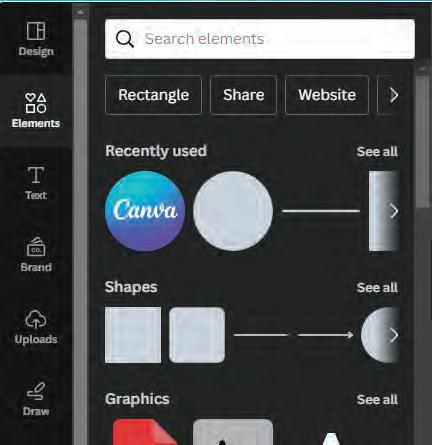
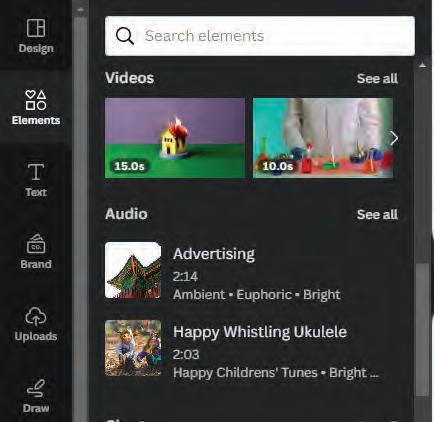
6. Elements: The Elements option offers a wide range of design elements, including photos, videos, stickers, shapes, and icons. You can search for and browse elements to enhance the visual appeal of your video project.
7. Text Tool: Canva’s Text tool enables you to add text to your video. You can choose from various fonts, colours, sizes, and styles to customise your text elements. This is essential for creating titles, captions, and on-screen messages.
8. Uploads: This feature allows you to upload your own media files, such as images, videos, and audio clips, to incorporate them into your video project. It is a way to personalise your content and add unique elements.
9. Draw: You can draw any shape in your video by using the tools present under this drawer.
10. Projects: You can view all your projects that you have created up to now under this option. You can select any one of them to work upon.
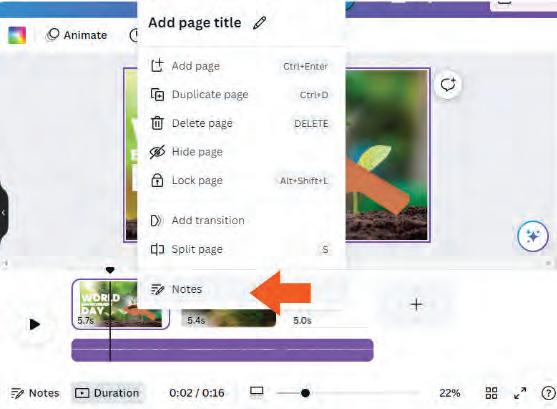
11. Notes: You can add notes to your project to keep track of ideas, reminders, or specific instructions. Notes are useful for collaborating with others on your video project.
12. Canva Assistant: This is a very interesting artificial intelligence tool that helps you with your queries during the project. You can ask any query by clicking on the Canva Assistant button.
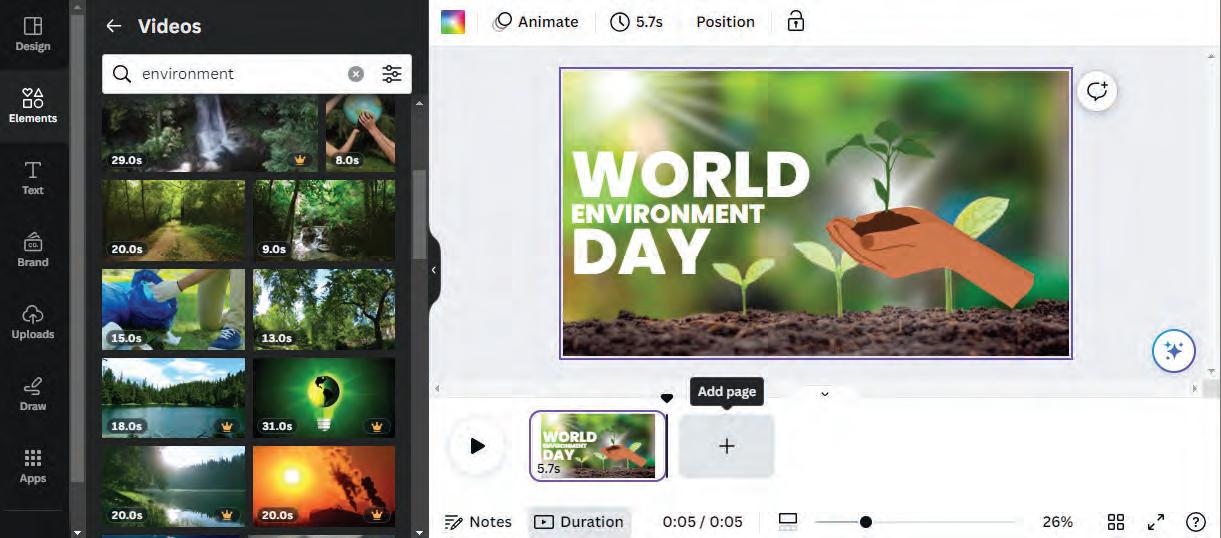
Adding background is the initial step in creating any video. This step creates a base for all elements inside the video.
1. Click on the Elements option on the side bar.
Type
displayed at the top and press Enter. The backgrounds related to environment are displayed.
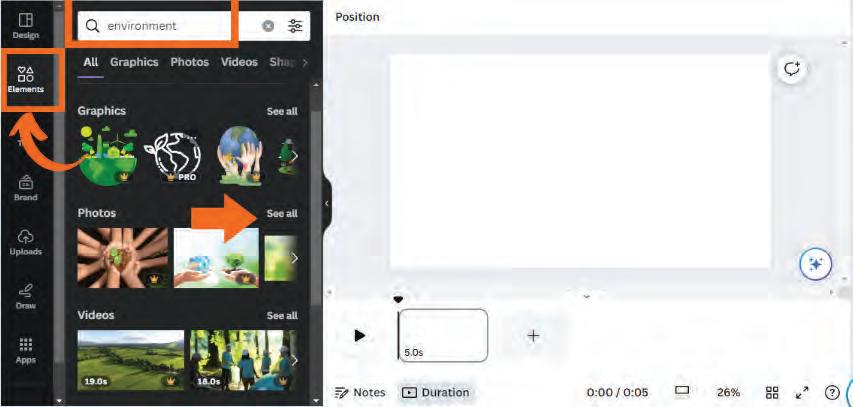
3. Click on the background to add it to your blank video.
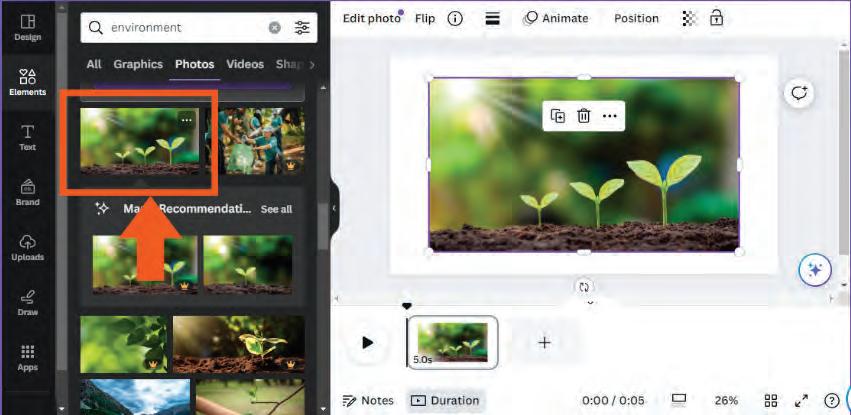
4. Adjust the size of the image as you want it to be.
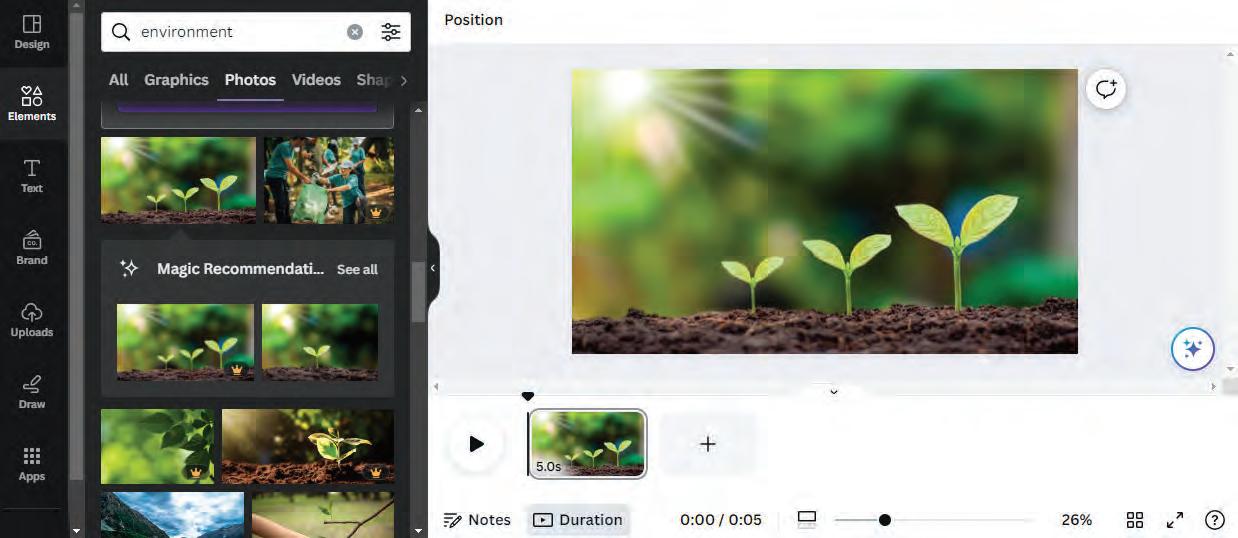
5. The background will be added to your video.
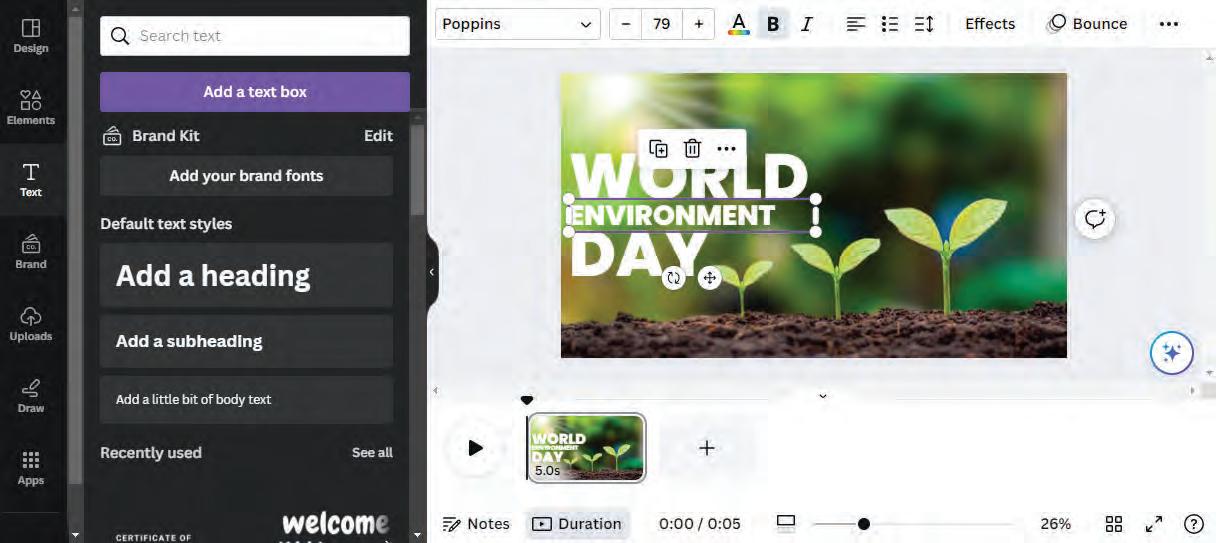
Adding text in Canva is like writing words on your video to explain or highlight something. Steps to Add Text in the Video:
1. Click Text: On the left side bar, click Text.
2. Choose a Text Style: Pick a text style you like by clicking on it.
3. Add Text: Click on the text box that appears in the video and start typing according to your video project.
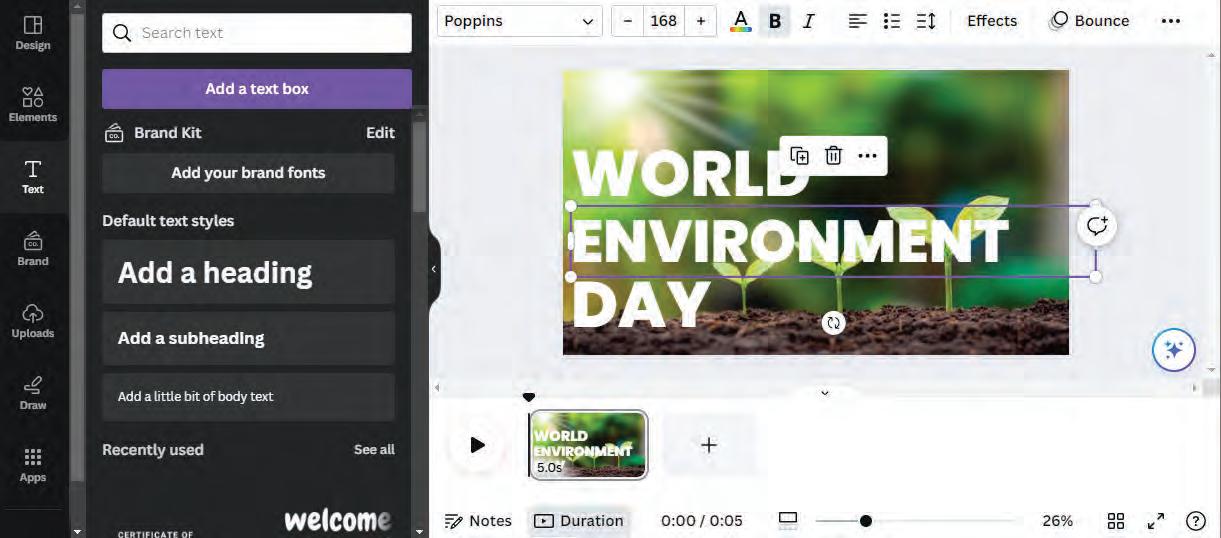
4. Edit Text: You can change the font, size, colour, and more by clicking on the text box.
You can add more pictures in your video as you want to make it interesting and informative.
1. Click Elements: On the left hand side panel, click Elements
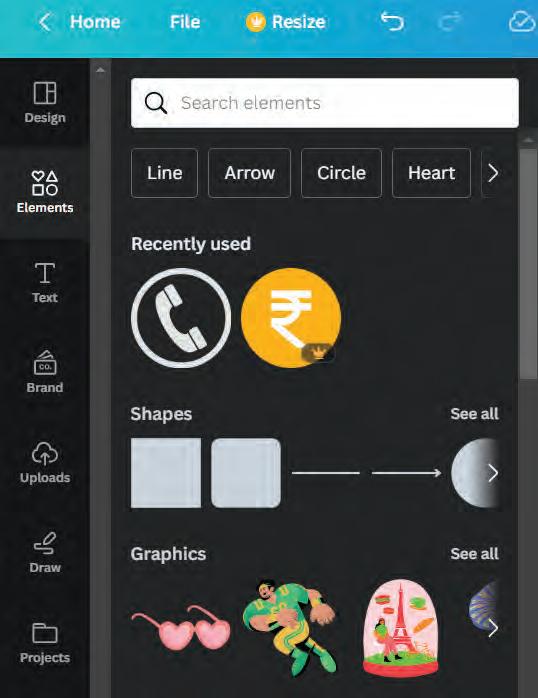
2. Choose Graphics: Under Elements, scroll down and then select Graphics to find graphics for your video project.

3. Search and Select the Graphic: Search for the graphic that you want in your video and click on it to add it to the video.
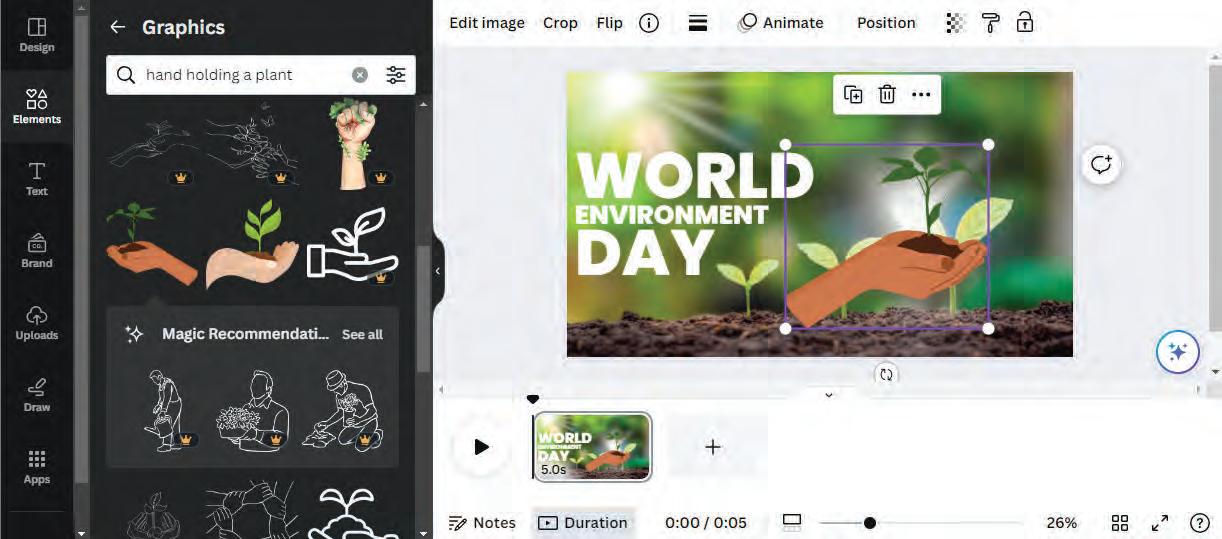
4. Move and Resize: Drag the photo to where you want it and adjust the size, as needed.

5. Customise: If you want, you can make the photo look different by cropping, changing colours, or adding filters.
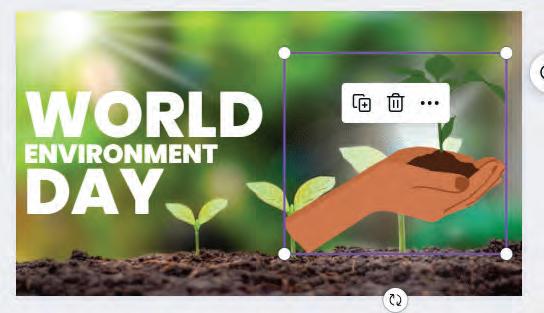
For instance, this is the video after dragging and resizing. You can change it according to your needs.
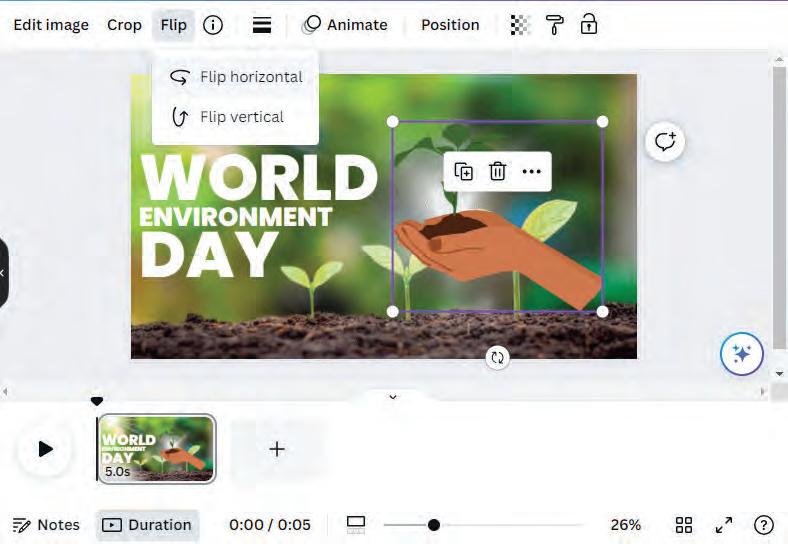
You can also flip the added picture horizontally as well as vertically, as shown above.
6. Add More Photos: Repeat these steps to add more photos to your video.
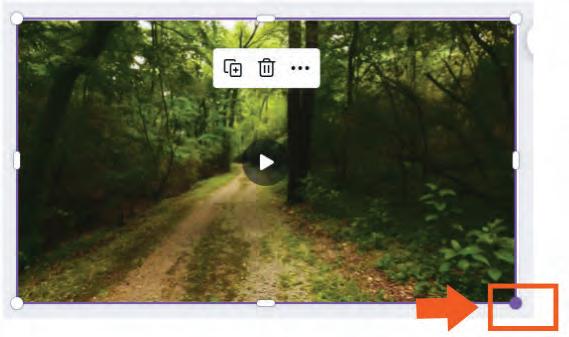
Adding videos in Canva is similar to including moving clips in your video project to make it more vibrant and engaging.
Steps to add videos to your video project in Canva:
1. Click Elements: On the left, click Elements.
2. Choose Videos: Under Elements, select Videos
3. Select a Video: Click on a video you like, and it will appear in your project.

4. Add Page: You can also add a new page and then add the video on that page.
5. Select a Video: Now, you can select any video according to your video project.

6. Resize It: You can resize it from the ends of the video to fit it according to the dimensions.
Write T for True and F for False.
1 You cannot add a new page into your Canva video.
2 You can make the photo look different by cropping, changing colours, or adding filters.
3 Canva Assistant is artifical intelligence enabled.
Adding audio in Canva means putting sound, like music or talking, into your video to make it more exciting.
1. Click Elements: On the left, click Elements.
2. Choose Audio: Under Elements, select Audio
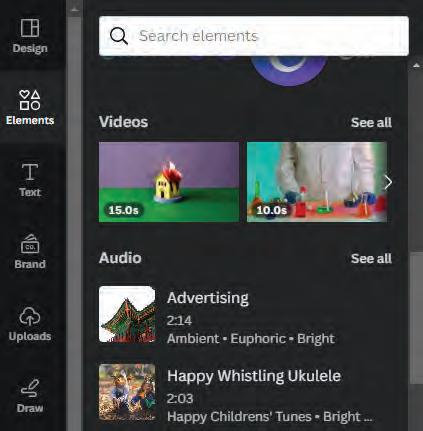
3. Select an Audio: Click on an audio you like, and it will be added to your project.
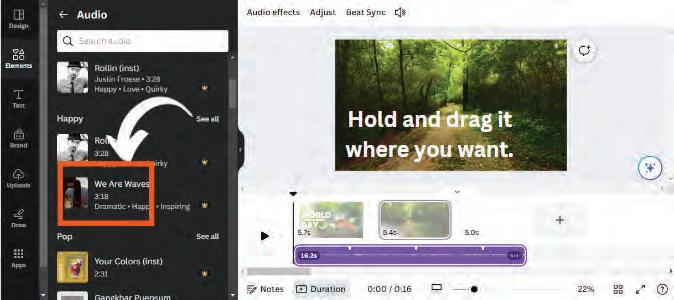
4. Position the Audio: Drag the audio to where you want it in your video.
5. Adjust Volume: You can make the audio louder or quieter if needed.
6. Preview Your Video: Click on the video to hear how it sounds in your project.
Adding and moving pages in Canva is like organising your video project into various parts and deciding where each part goes. Here’s how to do it:
Steps to Add and Move Pages in Canva:
1. Find Pages: In your video timeline (the part at the bottom of your project), hold the cursor in the gap between two pages for a moment, and the Add page option will be visible to you.
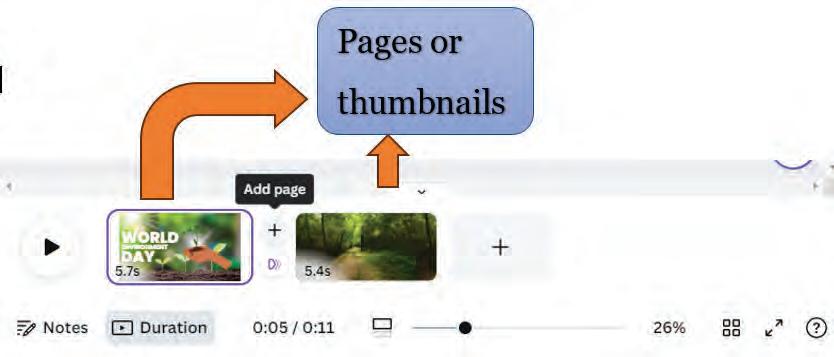
2. Add Page: Click Add page to create a new page in your video project. It’s like adding a new scene.
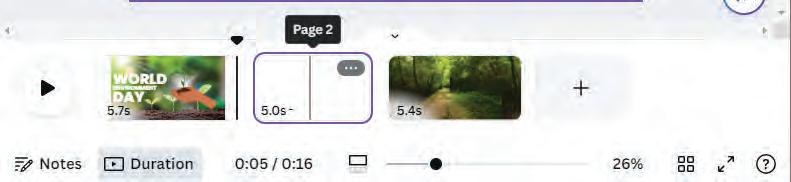
3. Arrange Pages: You can click and drag the pages to change their order. Move them up or down to change how your video is intended to flow.
4. Edit Each Page: Click on a page to edit what’s on it, like text, images, or videos.
What are the different types of audio effects you can use in Canva?
Splitting audio in a video project in Canva is like cutting a sound into smaller parts to use them at different times. Here’s how you can do it: Steps to Split Audio in Canva:
1. Click on the Audio: Find the audio you want to split on your video’s timeline (the part at the bottom of your project) and then right-click on it. You will find a Split audio option.
2. Click Split Audio: Click on the Split audio option, and your audio will split into two parts at that point.
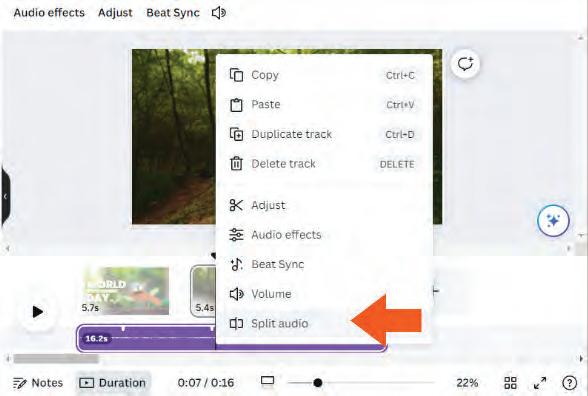
3. Drag and Adjust: You can now drag and adjust the two audio pieces separately on the timeline.
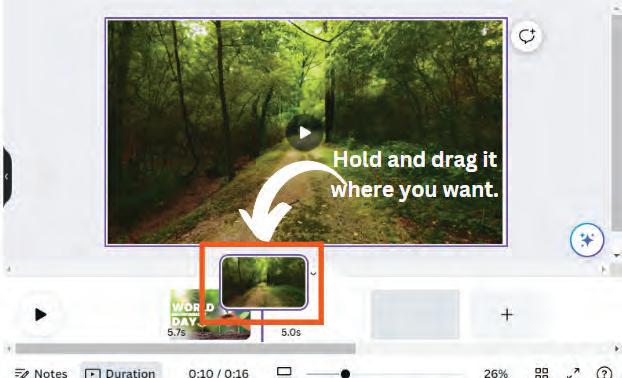
Arranging objects in the timeline of a video project in Canva is like organising the order of things in your video. Here is how you can do it.
Steps to Arrange Objects in the Timeline in Canva:
1. Access the Timeline: Look for the timeline at the bottom of your video project. It shows all the elements in your video.
2. Select an Object: Click on an object, like text, an image, or video, in the timeline that you want to move.
3. Drag and Drop: Click and drag the selected object to a new position in the timeline. This changes when it appears in your video.
4. Arrange All Objects: Repeat steps 3 and 4 for each object until they are in the order you want.
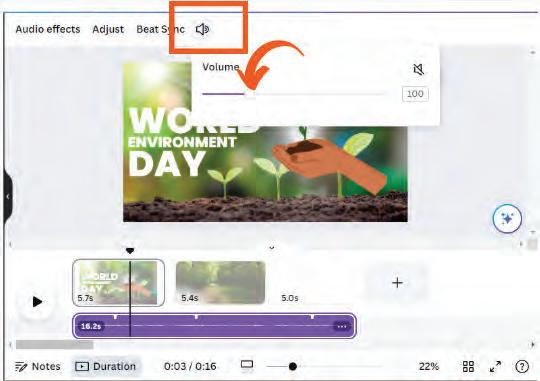
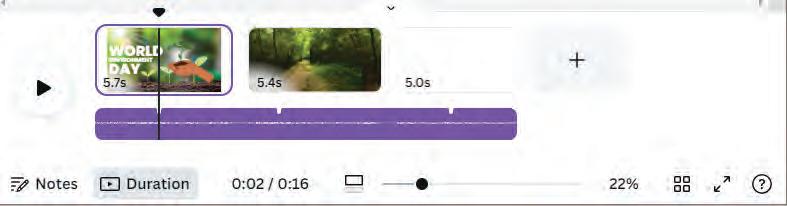
Setting audio effects and volume in a video project in Canva is like making the sound in your video more interesting and easier to hear. Here’s how you can do it:
Steps to Set Audio Volume and Effects in Canva:
1. Access the Audio: Find the audio you want to adjust on the timeline (the part at the bottom of your project).
2. Select the Audio: Click on the audio to select it.
3. Adjust Volume: Right-click on the audio and you can see the Volume option. Click on it and move the slider to make the audio louder or softer.
4. Apply Effects: If you want to add effects like making it sound like an echo or changing the pitch, find the audio effects options and apply them as needed.
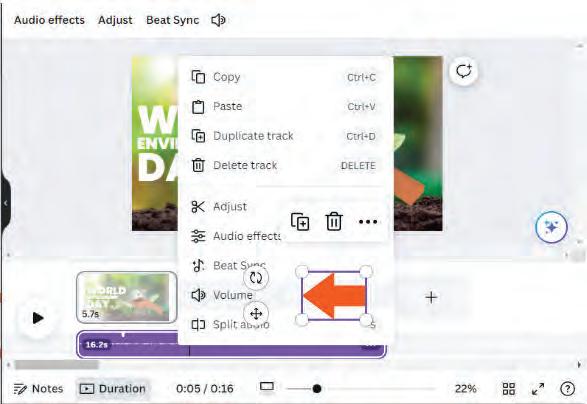

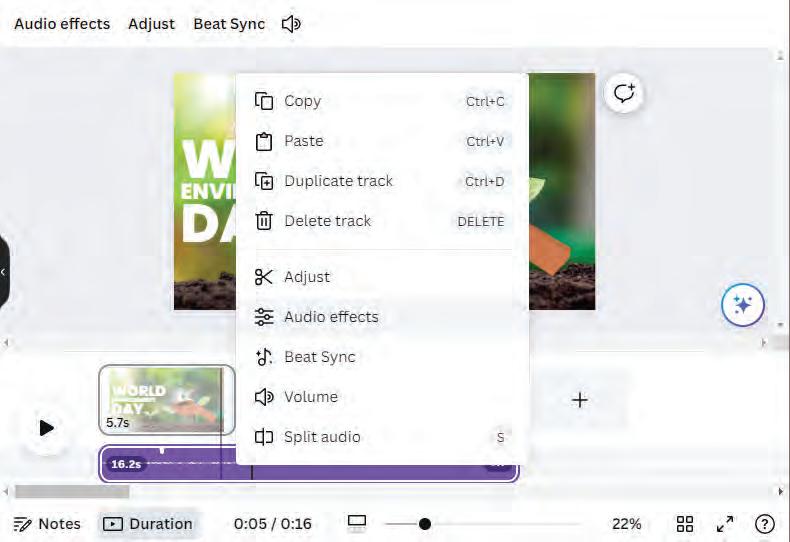
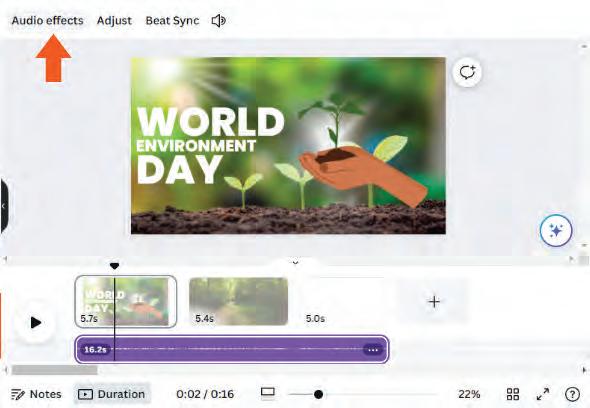
Either you can right-click on the audio to find the “audio effects” or you can just click on the audio and you will find Audio effects option on the top of your canvas.
5. Preview: Click the audio to hear how it sounds with the changes you made.
Adding notes in a video project in Canva is like leaving reminders or comments for yourself or others while working on your project. Here’s how you can do it.
Steps to Add Notes in Canva:
1. Find Notes: Either you can select the page in the video timeline and right-click on it where you want your notes to be.
or
You can just click on the timeline where you want the notes, and you can see a Notes option at the bottom of the video timeline.
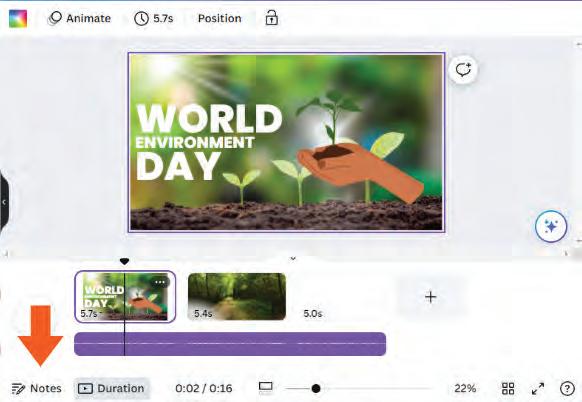
2. Add a Note: Click on Notes.
3. Write Your Note: A box will appear where you can type your note. Write down any ideas, reminders, or comments you may have.
4. View Your Notes: You can usually see your notes in the Notes section whenever you need to refer to them.

How can adding notes in Canva assist in collaboration with others when working on a video project?
Zooming in and out of pages and thumbnails in a video project in Canva is like getting a closer or wider view of your work to see details or the big picture.
Steps to Zoom In and Out Pages and Thumbnails in Canva:
1. Look for Zoom Controls: You can find zoom controls below the video timeline.
2. Zoom In and Out Pages: You can drag right or left to zoom in and zoom out the pages.
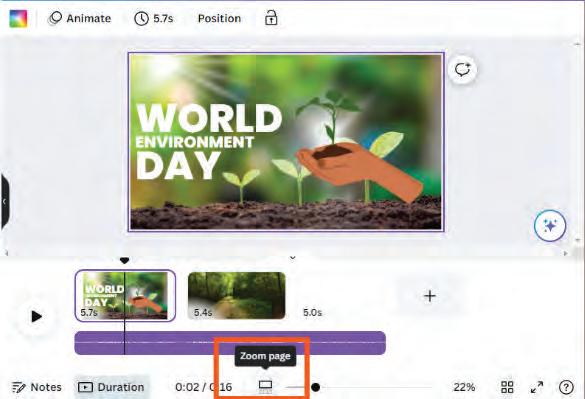
3. Zoom In and Out Thumbnails: To change the Zoom controls of the page to Thumbnails, you have to click on the icon you find below the video timeline and before the zoom control slide bar. After clicking, it will be changed to a different icon . Now you can zoom the thumbnails. You can drag right or left to zoom in and zoom out in the thumbnails.
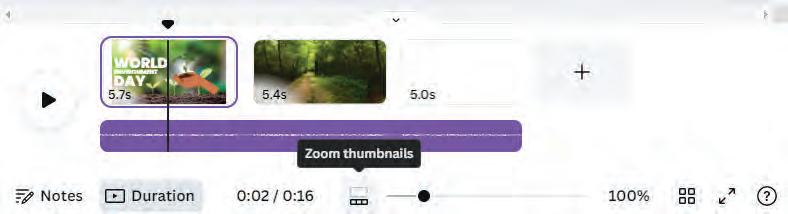
4. Adjust as Needed: You can adjust them as you want to see the wider or closer look of your work.
Grid view and preview in a video project in Canva to help you see your work differently and check how it will appear to others.
Grid View:
Grid view is like looking at all the pages of your video project at once, like a grid of small pictures. This view helps you organise and see the structure of your project.
1. In your video project, look for an option that says “Grid View” or an icon that looks like a grid of squares. You will find it below the video timeline.
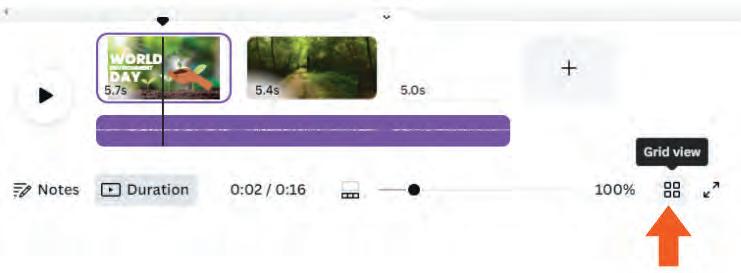
2. Click it to switch to grid view.
Preview:
Preview lets you watch your video to see what it will look like and sound to your audience before you finish it.
Steps to Preview Your Video:
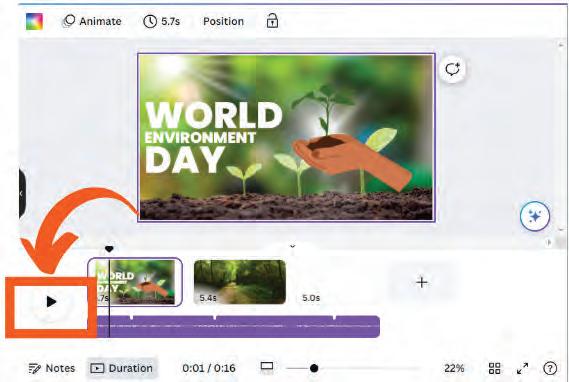
1. In your video project, find a button or option that says Preview or Play. You will find it below the video timeline bar.
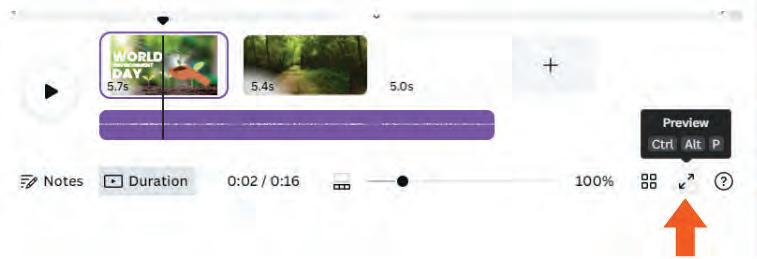
2. Click it to watch your video.
Using the grid view helps you organise your project, whereas preview helps you check how your video will turn out. Both are important for creating a great video in Canva!
Downloading and sharing a video in Canva means saving your video project to your computer or sharing it with others. Here’s how to do it:
Steps to Download and Share a Video in Canva:
1. Click Share Option: Click the Share option in the top right corner of the canvas.
2. Click Download: When you click on the Share option, you will find the Download option.
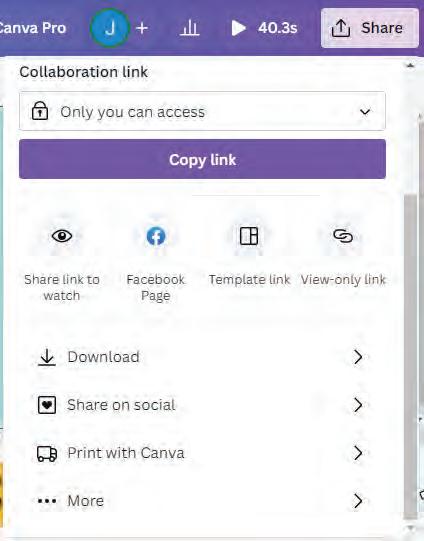
3. Choose File Type: Click on it and choose the format you want, like MP4 or MOV.
4. Select Quality: Pick the quality you prefer, such as HD or standard.

5. Click Download: Finally, click the Download button to save your video to your computer.

6. Click Share: Find a button or option that says Share. It is located at the top right corner of the canvas.
7. Choose Share Settings: Set the sharing options, like who can see your video and if they can edit it.
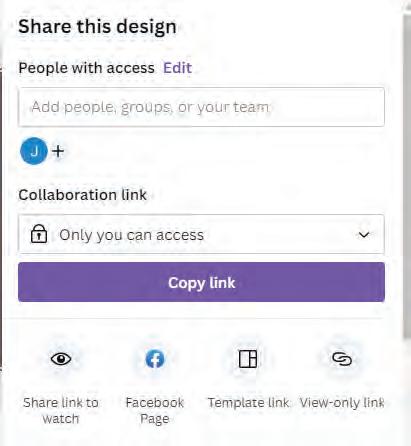
8. Copy Link: Click to get a shareable link or choose how you want to share it, like through email or social media.
Downloading lets you save your video, whereas sharing helps you show it to others or collaborate on it. It’s a great way to get your video out there!
Think about the Canva feature you like the most (for example, adding photos, splitting audio, or using text). Tell your friends why you find it interesting.
Write the names of the following icons of Canva:
You can create, modify, and share interesting videos using Canva.
Key components of Canva’s video editor include the canvas, timeline, text, elements, uploads, and audio controls.
You can add text in your video to express your thoughts along with the video.
You can add pictures in your video in Canva to enhance the presentation of the video.
Adding videos in Canva brings motion to your project, with options to resize and preview.
You can insert audio in Canva for background music, sound effects, or voiceovers, with volume control.
You can organise your project by adding and moving pages, changing their order as needed.
You can split audio in Canva to cut and arrange sound clips for precise timing.
You can arrange objects in the timeline to control the order of text, images, and videos.
You can adjust audio effects and volume, add notes, and use zoom controls for detailed work.
A. Fill in the Blanks.
Hints styles audio sequence pages preview
1 The key components of the Canva video editor include the canvas, timeline, text tool, elements, uploads, and controls.
2 To add text to your video in Canva, you can choose from various fonts, colours, sizes, and
3 When adding videos to your project, you can position, resize, and them as needed.
4 The timeline in Canva helps you arrange objects like text, images, and videos in the desired .
5 The grid view in Canva provides an overview of all the in your project.
1 What is the purpose of adding photos in Canva?
a Creating audio effect
c Adding text
2 What can you add using the text tool in Canva?
a Images
c Audio
b Enhancing visuals
d Adding pages
b Videos
d Text
3 What is the purpose of “Grid View” in the Canva video editor?
a To add text to the video
c To see an overview of all the pages in the video project
b To arrange elements on the timeline
d To apply audio effects
4 Which component of the Video Editor in Canva allows you to control the timing of your video?
a Canvas
c Text Tool
b Timeline
d Grid View
5 What can you add to your video in Canva to create background music or voiceovers?
a Elements
c Audio
1 I help you get a closer or wider view of your work in Canva, allowing you to focus on specific details or see the big picture.
2 I enable you to upload your own media files, such as images, videos, and audio clips, to personalise your video project.
3 I am the workspace in Canva where you create and design your video project from scratch.
4 I am a feature in Canva that allows you to leave reminders or comments for yourself or collaborators during your video project.
5 I am the feature in Canva that allows you to watch your video to see what it will look like and sound to your audience.
D. Write T for True and F for False.
1 This icon is for grid view.
2 You cannot download your video project in Canva.
b Text
d Canvas
3 Adding and moving pages in Canva has no impact on organising your video project or changing the order of elements.
4 Splitting audio in a video project in Canva is like cutting a sound into smaller parts to use them at various times.
5 You cannot add more than one video to your video project in Canva.
1 What is the use of the Draw tab in Canva?
2 What do you mean by downloading a video in Canva?
3 What is Canva Assistant?
4 How can you share your video?
5 How can you adjust the audio volume in Canva’s video editor?
1 Rahul wants to add text to his Canva video. How can he customise the text elements to create engaging titles and captions?
2 Neha is enhancing her Canva video by adding photos. What are the steps she should follow to resize the video clips effectively?
3 Vikram is arranging objects in the timeline to control their appearance. Why is the timeline useful for this, and how can he rearrange objects?
4 Kavita wants to make her Canva video more exciting with background music. How can she add effects, like making it sound like an echo or changing the pitch?
5 Arjun is including videos in his Canva project to make it dynamic. How can he position and resize the video clips effectively?
Have you ever talked to your phone or a smart speaker to get information or set reminders? Or when you watch a video on YouTube or a show on Netflix, have you noticed how they recommend other videos or shows you might like? Yes! There is a technology behind all of this called Artificial Intelligence.
AI is all around us, making our lives more convenient and efficient. It is a rapidly growing field with endless possibilities, from voice assistants in our smartphones to self-driving cars and even in healthcare. A robot is capable of recognising voices, playing games, and even doing household chores. Let us learn more about artificial intelligence in this chapter.
Artificial intelligence is the process of giving a computer the capability to think, learn, and make decisions, just like humans do.
Did You Know?
John McCarthy is recognised as the creator of Artificial Intelligence. He was an American computer scientist who coined the term “Artificial Intelligence” in 1956.
From enterprise to home, AI technology has not only helped people but also opened the door to the entire human being by bringing new business opportunities for small as well as large companies. For example, Uber became a billion-dollar company just by using the technology through which riders are connected to the taxis.
Let us discuss more about the usage of AI in our daily lives.
Chatbots: AI-powered chatbots in education can assist both students and teachers with various tasks, such as preparing study material, doing school work, and answering questions. They also help in the customer service industry.
Recommendation Systems: AI can suggest books, movies, or music based on users’ tastes. It learns from their preferences.
Voice Assistants: AI is used in voice assistants like Siri or Alexa to recognise and carry out spoken orders. They can play music, answer queries, store schedules, and set alarms.
Image Recognition: AI can identify objects in pictures. For example, it can help to sort photos or even recognise animals and plants on the basis of their facial features. This technique is also used in object recognition.
Language Translation: AI has the ability to translate languages, making it simpler to communicate with individuals throughout the world.
Game Development: AI can be used in game development to generate non-player characters who act intelligently, increasing the difficulty level of the game.
Medical Diagnosis: AI helps doctors analyse medical
images like X-rays and MRIs to detect diseases.
Autonomous Vehicles: Self-driving cars use AI to navigate and make decisions, like avoiding obstacles.
Predicting Weather: AI analyses data to improve the accuracy of weather forecasts.
Agriculture: Artificial Intelligence, or AI, assists farmers in optimising their crop production by making use of drones. AI ensures efficient water usage for plants and aids in the early detection and control of pests, resulting in increased food production and environmental benefits.


These are just a few examples of how AI is applied in our daily lives. Recently, India landed successfully on the Moon by using this amazing technology.
Match the following.
Healthcare
Customer service
Transportation
Agriculture


Virtual Reality (VR) and Augmented Reality (AR): Artificial intelligence improves virtual reality (VR) and augmented reality (AR) experiences by allowing virtual objects to interact with the real environment.
How has artificial intelligence helped India in the Chandrayan-3 mission?
Using drones to monitor crop health
Self-driving cars and traffic management
Helping doctors diagnose diseases
Chatbots answering questions on website
Artificial intelligence is used in a variety of applications, either at home, in offices, or elsewhere. A general question might come to your mind: can one type of AI be able to handle this wide range of applications? Certainly not. Based on its functionality and capability, AI is divided into various categories:
Narrow AI
General AI
Super AI
Imagine you have a robot vacuum cleaner at home. This cleaner cleans your house with utmost accuracy. It even cleans up in your absence. It can move around the house with the help of its sensors and avoid any types of obstacles. But apart from cleaning, it does not know how to do anything else. It cannot make you a sandwich, it cannot drive a car, and it cannot even tell you a joke. This is an example of a weak AI.
Narrow AI, also known as Weak AI, is good at doing one specific task, but it does not understand or think like humans do.
Voice assistants such as Alexa, Apple Siri, and Google Assistant are all examples of narrow artificial intelligence because they only do a small set of predefined tasks.
Narrow AI includes playing chess, getting suggestions for goods on an e-commerce site, speech recognition, and image identification.
General AI, also known as Artificial General Intelligence or AGI, is like a super-smart computer that can learn, understand, and do many tasks just like human beings.
This kind of machine intelligence is not limited to a single task, like a voice assistant or a robot vacuum cleaner; but it can do all sorts of things, from solving problems to talking and learning new things on its own. It is like having a robot friend that can do almost anything you teach it to do!
The worldwide researchers are now focused on developing machines with General AI. A self-driving car is an example of general AI.


Super AI (Super Artificial Intelligence) is like a super-smart computer program that can think, learn, and solve really complicated problems all on its own.
It is far more intelligent than typical computer programs and is even capable of understanding and performing tasks that only humans can do, including making decisions, having conversations, and other activities. Super AI is like a super-brain for computers!
Super AI is still an imaginary concept of Artificial Intelligence. It is still a hard effort to develop such systems in the real world.
Narrow AI is highly specialised and cannot perform tasks outside its designed scope.
Achieving AGI would mean creating machines with human-like cognitive abilities.
The various domains of AI that are working as driving forces for this wide range of applications are used to solve problems, automate tasks, and make predictions. Some key domains of AI are:
Computer Vision: With computer vision, computers have the ability to interpret and understand visual information from the world, including images and videos. It is mostly used in facial recognition, object detection, and autonomous vehicles.
Machine Learning (ML): Using machine learning, AI-enabled models are created that make computers learn from data, make predictions, and improve their performance over time. It includes subdomains like supervised learning, unsupervised learning, and reinforcement learning.
Natural Language Processing (NLP): The superpower of AI is research NLP, or the ability to understand and communicate with humans in their own languages. It is similar to teaching your robot friend to understand your speech in Spanish, English, or another language. Google Assistant is an app found on smartphones and other devices, and this app is capable of having conversations with people and responding to their questions in a helpful manner.
Let us use this concept of NLP to design an app that translates the text written in one language to another.
Can art be produced by AI? Some AI programs can come up with music, artwork, and even poetry!
In the previous class, you created an app using MIT App Inventor that is capable of recognising text and converting it into speech. Let us now create another app that can translate the text written in one language to another.
Before starting, let us learn what MIT App Inventor is.
MIT App Inventor is an online platform for creating apps for mobile phones and tablets. It is a very user-friendly platform to learn app creation and coding. This platform focuses on making everyone, especially young children, create their own apps. No coding skill is required to build your own app using MIT App Inventor. Apps are software programs that can be downloaded and installed on electronic devices.
MIT app inventor can be accessed from the link: https://appinventor.mit.edu/
Here, you will learn the easy steps to design a guide app that will convert text to speech and translate languages from English to Spanish.
Step 1: Set Up MIT App Inventor
1. Go to the MIT App Inventor website (https://appinventor.mit.edu/).
2. Log in with your Google account. If you do not have one, ask your teacher or parents to help you create one.
3. Click Start new project and assign your project a fun name, like “ToggleTutorial”.
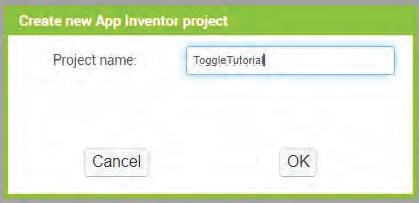
Step 2: Design Your App
1. You will see a screen where you can design your app. This is like drawing a picture.
2. From the left-hand side, drag the following things on the screen:
Text Box
Label
Translate Button
Translator
Text to Speech
3. Arrange these on the screen the way you like. Give them names or change their colours, if you want.
1. Click on the Palette tab on the left side.
2. Find Translate in the list of components under Media and drag it onto your screen.

Now, let the app translate English to Spanish and speak it when you press the button!
1. Click on the Blocks button to switch to the Blocks Editor window.
2. You will see various blocks that you can use in your app on the left-hand side of your screen.
3. Click on the TextToSpeech button on the left-hand side of the screen.
4. Find the block when TextToSpeech1.BeforeSpeaking and drag it onto the screen.
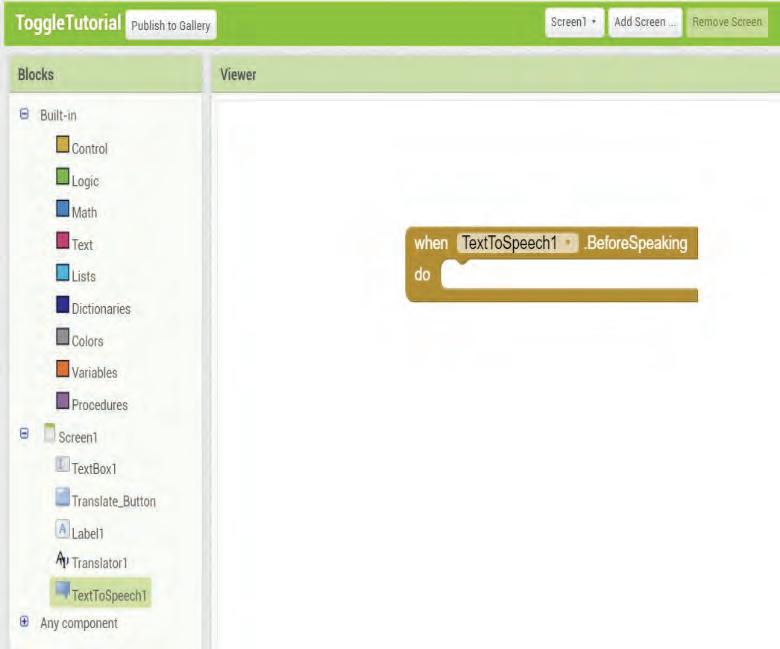
5. Next, click on the Translator option and drag out the label call Translator1.Request Translation language To Translate To Text To Translate.
6. Drag this component and place it in front of the do label of the when Translate block.
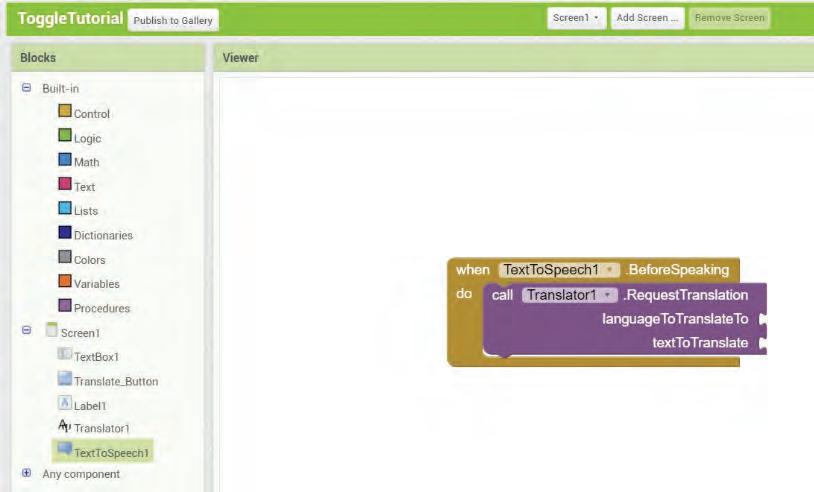
7. Click on Text in the Blocks palette and find an empty component to write the code “en-es”, which are the codes for English-Spanish.
8. Next, click on TextBox1 and drag the TextBox1.Text.
Now, we must add the translation codes:
1. Click on Translator and select when Translator1.GotTranslation.
2. From the Label1 button, drag out set Label.Text to block.
3. When you hover your mouse over the Translator1 button, you will be able to see get translation block. Drag and connect it to the set Label1.Text to block.
Now, let us create the code that will translate and recite our text:
1. Click on the Translate_Button and select the when Translate_Button.Click
2. Click the TextToSpeech button and drag out the call TextToSpeech1.Speak and place it in front of the label do.
3. Select a blank component from Text and place it in front of the message label.
4. Drag another call TextToSpeech1.Speak block and place it under the previous call TextToSpeech1. Speak block. Now, select the Label1.Text component from under the Label option and place it in front of the message label.
To test your app, on a mobile phone:
1. Go to the Google Play Store on your Android phone and download the MIT AI2 Companion App
2. Install the app by clicking on Install
3. After installation, open the app. You have to provide a six-character code to connect.
4. Now, to get the code, go to your computer where you have created your app.
5. Go to the Connect menu and then select the AI Companion option.
6. A Connect to Companion window will open with a six-character code.
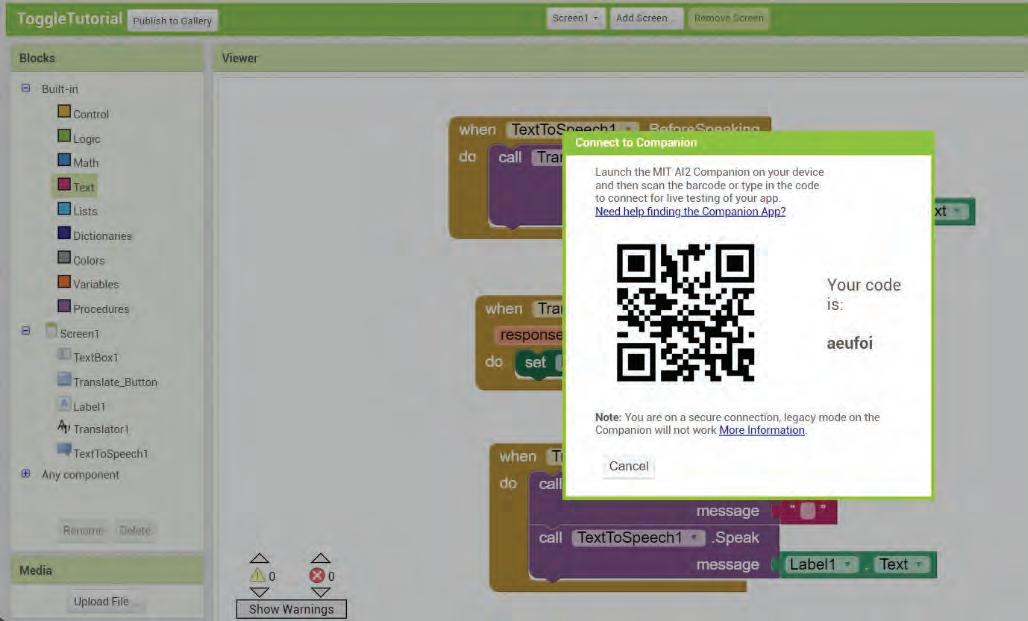
7. You can now fill this six-character code in the mobile phone app.
8. The app will now open on your mobile.
9. Click on the button that you have created.
10. Your app is now ready. You have created a simple translation app to convert Text-to-Speech and do language translation from English to Spanish using MIT App Inventor. ype something in English in your app, click the button, and see and listen to it in Spanish!
Problems or causes that affect your education, and how you can use the technology or build an app to solve it.
To know how Text Sentiment Analysis is done by using AI, scan this QR code.


Artificial intelligence is the process of giving a computer the capability to think, learn, and make decisions, just like humans do.
AI is used in voice assistants like Siri or Alexa to recognise and carry out spoken orders.
YouTube and Netflix recommend other videos or shows you might like based on your past preferences.
Weak AI, also known as Narrow AI, is good at doing one specific task, but it does not understand or think like humans do.
General AI, also known as Artificial General Intelligence or AGI, is like a super-smart computer that can learn, understand, and do many different tasks just like human beings.
Super Artificial Intelligence (Super AI) is like a super-smart computer program that can think, learn, and solve really complicated problems all on its own.
The three domains of AI are machine learning, computer vision, and natural language processing. MIT App Inventor is an online platform for creating apps for mobile phones and tablets.
A. Fill in the Blanks.
Hints assistants chatbots weak strong recommendation
AI-powered in education can assist both students and teachers with various tasks. systems learn from your preferences.
Voice can play music, answer queries, store schedules, and set alarms.
4
5
A AI is good at doing one specific task.
A AI is still an imaginary concept of artificial intelligence.
B. Tick () the Correct Option.
1
Voice assistants such as Alexa and Siri are examples of narrow artificial intelligence because:
a They can perform any task that you ask them to do.
c They can think on their own.
2
Which of the following does not represent an application of AI?
a A chatbot
c Microwaves
What is the primary purpose of a recommendation system in AI?
a To send spam emails
c To play video games
b They only do a small set of pre-defined tasks.
d They have narrow thinking.
b Autonomous vehicles
d Voice assistants
b To suggest products or content based on user preferences
d To control traffic lights
Which domain of AI focuses on creating machines that can think and reason like humans?
a Machine Learning
c Robotics
A self-driving car is an example of AI.
a Weak
c Narrow
I am a type of AI that allows computers to understand and translate a human language.
I am an application of AI that can help sort photos or even recognise animals and plants on the basis of their facial features.
I am in the domain of AI, using which AI-enabled models are created to make computers learn from data.
b Natural Language Processing
d Cognitive Computing
b Strong
d General
I am a type of AI that will make machines think on their own and make decisions in really complicated situations.
I am an intelligent flying machine that helps farmers in agriculture.
D. Write T for True and F for False.
AI machines cannot think on their own.
Artificial intelligence analyses data to improve the accuracy of weather forecasts.
Any language can be easily understood and spoken by AI.
AI has improved AR and VR experiences by allowing virtual objects to interact with the real environment.
AI machines can perform only one type of specific task.
What is artificial intelligence? Write its two applications.
What is the difference between weak AI and strong AI?
What is general AI? Give one example.
What is MIT app inventor?
Is it possible to have strong AI machines? Why/Why not?
Can you give a real-world example of AI in action? 1
Sahil does not know how AI is used in everyday life. Can you tell him?
Diya wants to know about an exciting future possibility for Strong AI. Discuss with her how strong AI machines will help mankind.
Rohan has a robot pet dog. Is it an example of a strong AI or a weak AI?
Lovey wants to open her restaurant for which she needs to create an app that can understand the language of foreign customers as well. Which platform can she use to create this app?
To get input from a user, we have to use the Scanner class. The Scanner class can be imported from the java.util package, as shown below.

To use any of the Scanner class methods, we must first create an object of the class. Below is an example of how to create and use an object of the Scanner class to call a method from the class.
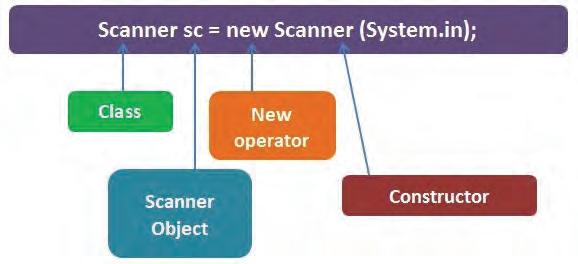
You can choose a name for the object. When the object is created, you can use any method from the Scanner class for the input data type. The table below shows the methods used to read various input values.
Method
nextBoolean()
nextByte()
nextDouble()
nextFloat()
nextInt()
nextLine()
nextLong()
nextShort()
Description
Reads a boolean value from the user.
Reads a byte value from the user.
Reads a double value from the user.
Reads a float value from the user.
Reads an int value from the user.
Reads a string value from the user.
Reads a long value from the user.
Reads a short value from the user.
Example 2.1
Program to read your name as input and print it.
Main.java
import java.util.Scanner;
class Main{
public static void main(String[] args){
Scanner myObj = new Scanner(System.in);
String Name;
System.out.println(“Enter your name “);
Name = myObj.nextLine();
System.out.println(“Username is: “ + Name);
Example 2.2
Program to read the name, age, and salary of an employee and print it.
Main.java
import java.util.Scanner;
class Main{
public static void main(String[] args){
Scanner myObj = new Scanner(System.in);
System.out.println(“Enter name, age and salary:”);
String name = myObj.nextLine();
int age = myObj.nextInt();
double salary = myObj.nextDouble();
System.out.println(“Name: “ + name);
System.out.println(“Age: “ + age);
System.out.println(“Salary: “ + salary);
Output
Enter your name
Amita
Username is: Amita
Output
Enter name, age and salary:
Amita
36 85000
Name: Amita
Age: 36
Salary: 85000.0
Consider a real-life scenario where you are cycling and suddenly a puppy runs in front of you. What would you do? You will surely stop cycling. However, you would have kept going if the puppy hadn’t crossed you. This is how we make decisions in real life.
The decision statement in Java allows you to make a decision based on the outcome of a condition.
Generally, a Java program runs the code in sequence. But we can control the order in which the program executes and run specific code based on the outcome of a condition. This is accomplished through the use of control flow statements, such as the if-else statement.
Control flow statements allow us to specify a set of instructions that should be executed only if certain conditions are met.
Start
Think and Tell Code
In this chapter, we will learn the following control flow statements for decision-making in Java:
• If statement
• If-else statements
• Nested-if statements
• If-else-if statements
If Statement
The if statement is used to execute a statement or a block of statements only when the given condition becomes true.
One can vote if he or she is 18 or older. Right!
Chapter 6 • Conditional Statements in Java 97
Syntax:
if (condition)
//Task to be performed if the condition becomes true.
keyword condition opening braces closing braces
if (Age>= 18) { }
System.out.println(”Eligible to Vote!”);
If Age>=18
True
Eligible to Vote
Statement(s) that will execute only when the condition is true
If the condition becomes true, only then the statements inside the block will be executed; otherwise, the control goes to the next statement after the closing braces.
Example 2.3
A program to check which of the two variables, x or y, has the greater value.
Main.java Output
class Main{ public static void main(String[] args){ int x = 20; int y = 18; if(x > y) {
System.out.println(“x is greater than y”);
x is greater than y
Java also provides a shorthand version of the “if-else” statement known as the ternary conditional operator (?:). It allows you to write a simple if-else statement in a single line.
Example 2.4
A program to check whether the number is even.
Main.java Output
class Main{
public static void main(String[] args){
int number = 100; if(number % 2 == 0) { System.out.println(“The number is even”); }
The number is even
The if-else statement has two sets of code to be executed, whether the given condition is true or false. Let us consider the example of eligibility to vote again to understand how if-else works. Take a look at the flowchart below. If the condition is met, the person is eligible to vote; otherwise, the person is not eligible to vote.
False
True
Syntax:
if (condition)
{
//Task to be performed if the condition becomes true. } else{
//Task to be performed if the condition becomes false. }
keyword
condition
Statement(s) to be executed when the condition is true
if (Age>= 18) {
System.out.println(”Eligible to Vote!”);
} else { }
System.out.println(”Not eligible to Vote!”);
Statement(s) to be executed when the condition is false
If the condition becomes true, then the statements inside the if block will be executed; otherwise, the statements inside the else block will be executed.
Example 2.5
A program to print “Good day” if the time is before 18 else print “Good evening”.
Main.java Output
class Main{
public static void main(String[] args){ int time = 20; if(time < 18) {
System.out.println(“Good day.”); } else{
System.out.println(“Good evening.”); }
Example 2.6
A program to check whether a number is even or odd.
Good evening.
Main.java Output
class Main{
public static void main(String[] args){ int number = 99;
if(number%2 == 0) {
System.out.println(“The number is even”);
The number is odd
} else{
System.out.println(“The number is odd”);
“Nest” means within. In Java, an “if statement” is referred to as being “nested” if it is stated inside another “if statement” or an “if-else statement”.
In fact, there is no limit to how deep a nest can go. Nested if statements are common in Java programming.
Syntax:
if (condition1)
{ if (condition2)
{
//Task to be performed if condition1 and condition2 becomes true. else
{
//Task to be performed if condition1 is true but condition2 is false.
} } else{
if(condition 3) {
//Task to be performed if condition1 becomes false but condition 3 is true.
}
else {
//Task to be performed if condition1 and condition 3 is false.
Nested if block
if (a>c) {
if (a>c)
{
System.out.printIn(“a is the largest number”); else{ if (a>c)
} else
{
System.out.println(“c is the largest number”);
{ if (b>c)
{
System.out.println(“b is the largest number”);
} else
{
System.out.println(“c is the largest number”);
if block
Outer else block
Assume that a = 30, b = 12, and c = -15. First, the outer if condition is examined. The control goes to the nested if block as the outer if condition is true. Now that the nested-if condition has been checked and found to be true as well, the output is “The largest number is: 30”.
Example 2.7
A program to check the largest of three numbers.
Main.java Output import java.util.Scanner; class Main { public static void main(String[] args)
{
Scanner myObj = new Scanner (System.in);
Enter the values for a, b, and c: 10 20
30
The largest number is: 30
Main.java Output
System.out.printIn(“Enter the values for a, b, and c”);
int a = myObj.nextInt();
int b = myObj.nextInt(); int c = myObj.nextInt(); if(a>b)
{ if(a>c)
{
System.out.printIn(“The largest number is:” + a);
} else
{
System.out.println(“The largest number is:” + c);
}} else
{ if (b>c)
{
System.out.println(“The largest number is:” + b);
} else
{
System.out.println(“The largest number is:” + c); }
Example 2.8
A program to check the values of a and b.
Main.java Output public class Main{ public static void main(string[]args)
{
int a=10; int b=20; if(a==10)
{ if(b==20)
{
System.out.println(“a is 10 and b is 20”); }
a is 10 and b is 20
System.out.println(“a is 10 and b is not 20”);
An addition to the if-else statement is the if-else-if ladder statement. It is used in situations where multiple cases need to be checked. If one of the conditions in an if-else-if ladder statement is true, the statements defined in the if block will be executed. If some other condition is true, the statements defined in the else-if block will be executed. Eventually, the statements defined in the else block will be executed if none of the conditions are true. Several else-if blocks are possible. If none of the conditions match, the default statement is executed. Let’s look at the example below to understand better.
time < 10
Syntax:
if (condition1)
//Task to be performed if condition1 becomes true.
} else if (condition2)
//Task to be performed if condition1 becomes false and condition2 becomes true.
} else{
//Task to be performed if condition1 and condition2 both become false.
if (time<10)
System.out.println(”Good morning.”);
}
else if (time<18)
System.out.println(”Good day .”);
} else
System.out.println(”Good evening.”);
if-else-if ladder
Example 2.9
A program to print “Good Morning”, “Good Day”, and “Good Evening”, depending on the time.
Main.java Output
class Main{ public static void main(String[] args){
int time = 22;
if(time < 10) {
System.out.println(“Good morning.”);
} else if (time < 18){
System.out.println(“Good day.”);
}else {
System.out.println(“Good evening.”);
Example 2.10
Good evening.
Main.java Output
class Main{ public static void main(String[] args){ int i = 30;
i is greater than or equal to 30 Statement(s) after if-else-if ladder
if(i < 10) {
System.out.println(“i is less than 10”);
} else if (i < 20){
System.out.println(“i is less than 20”);
} else if (i < 30){
System.out.println(“i is less than 30”);
} else {
System.out.println(“i is greater than or equal to 30”);
} System.out.println(“Statement(s) after if-else-if ladder”);
A Fill in the Blanks.
Hints nextLine() object nested else Scanner
1 To get input from a user, we have to use the class.
2 method reads a string value from the user.
3 A ‘if ’ statement is referred to as being if it is stated inside another ‘if’ statement.
4 In the if-else-if ladder statements, if none of the conditions is true, then the statements defined in the block will be executed.
5 To use any of the Scanner class methods, we must first create a/an of the class.
B Write T for True and F for False.
1 Several else-if blocks are possible in Java.
2 If-else statements is an example of control flow statements.
3 In the if-else statement, if the condition is true, then the statements inside the else block are executed.
4 The Scanner class can be imported from the java.util package.
5 The nextBoolean() method reads a boolean value from the user.
C Answer the Following.
1 What do you mean by nested-if statements?
2 Name the types of control flow statements that can be used in Java.
3 Differentiate between the if and if…else statements.
4 What are if-else-if ladder statements?
5 Describe the following methods used in Java.
a nextLong():
b nextFloat():
c nextInt():
D Apply Your Learning.
1 Write a program to check whether a student has passed the exam or not.
2 Write a program to assign a number within 1, 2, and 3 to a variable and print it in words, as per the integer assigned.
3 Write a program to check whether 2024 will be a leap year or not.
4 Write a program to input a number and check whether a number is greater than 10, using the if statement.
5 Write a program that prompts a user for the lengths of the three sides of a triangle and determines whether the triangle is scalene, isosceles, or equilateral.
6 Write a program in Java to determine if a number is divisible by 15.
This book embodies the principles outlined in the National Education Policy (NEP) 2020. It unveils the world of computer science through a unique and captivating pedagogical approach—seamlessly integrating curriculum content into the mesmerizing adventures of Mel and Conji, fictional figures hailing from the enchanting world of Avora. Our aim is to prepare learners for the dynamic and technology-driven landscape of the 21st century, equipping them with the essential skills they need to thrive in an ever-evolving world.

• Explore More: QR codes to explore an exciting application of the concept. This element builds curiosity in children and helps them grasp concepts through digital visual aids.
• Discuss: Questions to trigger engaging group discussions in the classroom.
• Think and Tell: Probing questions to stimulate thinking at an individual level.
• Did You Know? Interesting facts related to the application of a concept.
• Points to Remember: Chapter end summary.
• Do It Yourself: Milestone exercises to practice specific concepts.
• Chapter Checkup: A pool of questions catering to all topics and skills covered in the chapter.
Uolo partners with K-12 schools to bring technology-based learning programs. We believe pedagogy and technology must come together to deliver scalable learning experiences that generate measurable outcomes. Uolo is trusted by over 10,000 schools across India, South East Asia, and the Middle East.
hello@uolo.com