


Academic Authors: Neha Verma, Ayushi Jain, Anuj Gupta, Simran Singh
Creative Directors: Bhavna Tripathi, Mangal Singh Rana, Satish
Book Production: Rakesh Kumar Singh, Sanjay Kumar Goel
Project Lead: Jatinder Kaur
VP, Learning: Abhishek Bhatnagar
All products and brand names used in this book are trademarks, registered trademarks or trade names of their respective owners.
© Uolo EdTech Private Limited
First impression 2024
Second impression 2025
This book is sold subject to the condition that it shall not by way of trade or otherwise, be lent, resold, hired out, or otherwise circulated without the publisher’s prior written consent in any form of binding or cover other than that in which it is published and without a similar condition including this condition being imposed on the subsequent purchaser and without limiting the rights under copyright reserved above, no part of this publication may be reproduced, stored in or introduced into a retrieval system, or transmitted in any form or by any means, electronic, mechanical, photocopying, recording or otherwise, without the prior written permission of both the copyright owner and the above-mentioned publisher of this book.
Book Title: Tekie Robotics 3
ISBN: 978-81-983027-1-7
Published by Uolo EdTech Private Limited
Corporate Office Address:
85, Sector 44, Gurugram, Haryana 122003
CIN: U74999DL2017PTC322986
Illustrations and images: www.shutterstock.com, www.stock.adobe.com and www.freepik.com
All suggested use of the internet should be under adult supervision.
Robotics is the study and creation of robots. Robots are machines that can perform various tasks. They are built using parts like metal, wires, and circuits, and programmed with special instructions to tell them what to do.
Some robots look like humans, while others are designed to work in specific places, like factories, hospitals, or even outer space! For example, a robot might assemble cars in a factory or explore the surface of Mars where humans cannot go easily.
Robots can sense their surroundings using sensors. These sensors act like the robot’s eyes, ears, and hands, helping it understand distance, temperature, or touch. Once the robot knows its surroundings, it can make decisions based on its programming.
The field of robotics combines science, technology, engineering, and mathematics (STEM) to solve problems and create amazing inventions. It is an exciting way to bring creativity and technology together!
Robots are made up of different parts that work together to help them move, sense, and do tasks. These parts are grouped into three main types: mechanical, electronic, and coding interface. Let us learn about them.
Mechanical parts are like the bones and muscles of a robot. They include wheels, gears, motors, and arms. These parts help the robot move, pick up things, or spin. For example, wheels let a robot roll around, and motors make robots move by turning wheels, spinning gears, or lifting arms.
The electronic parts are like the robot’s brain and nerves. They include circuits, sensors, and batteries. These parts help the robot think and sense its surroundings. Sensors act like eyes, ears, or even a nose for the robot, allowing it to detect light, sound, or obstacles. The battery gives the robot the power it needs to work.
Coding is how we talk to robots and tell them what to do. Coding means writing instructions for them to follow. The coding interface is the program or app used to give these instructions. Once coded, the robot can move in a specific direction, stop when it sees something, or even dance.
By combining these three parts—mechanical, electronic, and coding—robots come to life and do amazing things.


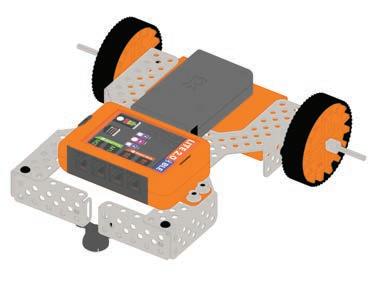
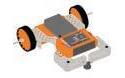
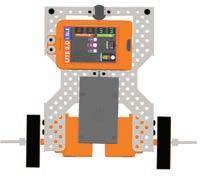
ABot is a robotics kit that enhances STEM education and problem-solving skills while sparking curiosity and creativity in young innovators. Let’s explore its components.


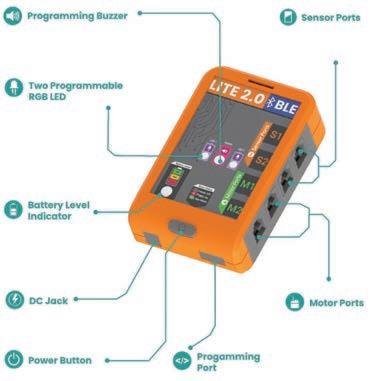
Following are the components of the Brain:
Component
Programming Buzzer
Two Programmable RGB LEDs
Sensor Ports
Battery Level Indicator
DC Jack
Power Button
Programming Port
Motor Ports
Description
The programming of tones and time gives you many different sounds to play with.
You can program the intensity of red, green, and blue colours produced by the LEDs and make many colours.
These ports help you connect sensors to the Brain.
An indicator will show you the energy level of your bot, whether it is feeling low or full of energy.
Connect the 9V Battery to this port.
This button helps you to turn the Brain ON and OFF.
Connect your Programming wire to this port.
These ports help you connect motors to the Brain.

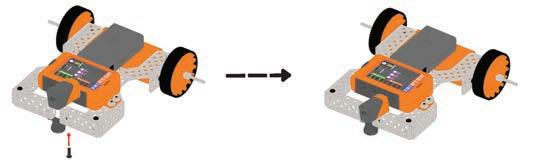
Identify the rotation direction of motors by looking at it with the Axle facing you. The robots move in different directions by the combination of the rotation from each wheel. For example:
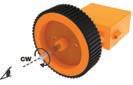
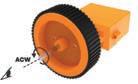
Rotation Anti-Clockwise Rotation
Let’s understand some basics of building the robots:
Tightening Screws:


Tighten (Rotate Clockwise) Loosen (Rotate Anti-Clockwise)
Tightening Axle Lock:


Tighten (Rotate Clockwise) Loosen (Rotate Anti-Clockwise)
Tightening Axle Lock:


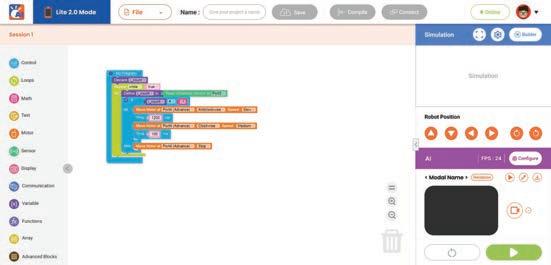
The coding interface serves as the central hub for your kit, acting as an Integrated Development Environment (IDE) that enables you to write code for all of your experiments. This code is then transferred to the hardware. The coding interface consists of the following components:
1. Workspace Area: This is the area where you drag blocks for the code you want to write.
2. Blocks Panel: The blocks from the Blocks Panel help make your code.
3. Control Buttons: The Control Buttons consist of Save, Compile, and Connect buttons.
• Save Button: The Save button helps save your code.
• Compile Button: The Compile button helps compile your code.
• Connect: The Connect button helps burn your code to the hardware.
4. Arena: This is where you can see the output.
5. Buttons: The buttons help move the bot towards the front, back, left, or right. The buttons also help rotate the bot clockwise and anticlockwise in the virtual arena.
6. Play Button: The Play button runs the code.
7. Reset Button: The Reset button resets the arena.
Burning means loading your code into the hardware. This process, mainly, has the phases as shown:
1. Once you have completed your experiment, connect the bot to a PC/Laptop using a USB cable or Bluetooth.
2. Save and compile your code by clicking the Save and Compile buttons, respectively.
3. Now, click on Connect.
4. Click on the USB Connect option or the BLE Connect (Bluetooth) option.
5. Click on the Connect Device button, and a small window will appear. Thereafter, select your connected device, and then click on Connect.
6. Now click on Burn to write your program into the bot.
7. You have successfully written your code into the hardware. Now you can experiment on the bot.
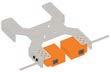
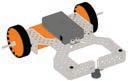
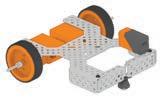
1 Insert the axle lock and the 3.5” axles into the high-speed motors, as shown.
2 After attaching the axles to both motors, screw them to the chassis using the 6mm bolts, as shown.


3 Repeat the previous step to attach the second high-speed motor to the other side of the chassis.
4 Add a filler to the axle, then add the wheel and lastly add another axle lock. Do this for both axles.
5
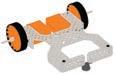
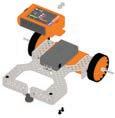
Screw the Caster wheel to both U-Beams using 2 K-nuts and 6mm bolts, as shown below


6
Attach the previous assembly to the chassis as shown, with 12mm bolts.

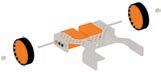
7 Screw the Battery to the chassis using 6mm bolts as shown.
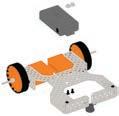
8 Now, connect the Brain to the chassis in front of the battery as shown.
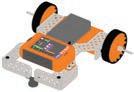
9 Connect the left motor to the "M1" port and connect the right motor to the "M2" port of the Brain using the connecting cables, as shown.
Welcome to the exciting world of robotics! Drive your RC Car in a virtual world using keyboard controls. This helps you get comfortable with technology and learn basic robot movements.
1. To play the game, click on the game screen and then use A, D, W, S keys to move the bot left, right, forward, and backward, respectively.
2. Now, complete the following five tasks:
a. Move the bot forward to throw garbage in the dustbin.
b. Move the bot right to throw garbage in the dustbin.
c. Move the bot left to throw garbage in the dustbin.
d. Move the bot backwards to throw garbage in the dustbin.
e. Use all movements to collect multiple items.
Scan QR code to view output
Let's learn how to control a robot by making it move forward, backwards, left, and right using motors. This helps in understanding the basics of how robots work.
The delay function is used to suspend the execution of a program for a particular time. Let us understand this concept by looking at the process of cooking a dish in the microwave.
Put the dish in the microwave.
Set the timer of the microwave.
Wait for the buzzer to beep. Is the buzzer beeping? Yes No
Start Stop
Take the dish out.
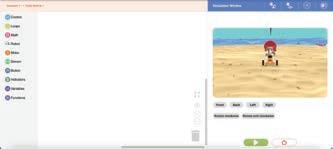
1. Click on the Control category from the Blocks panel.
2. Drag the My Program block to the workspace area to begin your program. The execution of all the blocks present inside this occurs step by step.

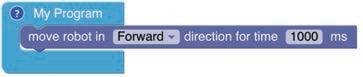
3. Now, drag and drop the move robot in the block from the Robot category. This block is set to Forward direction by default. The time duration in the block indicates how long the robot should move.
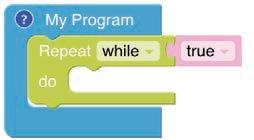
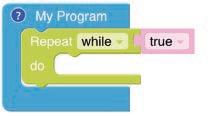
4. To move the robot forward for infinite time, use the Repeat while block from the Loops category, as shown below.

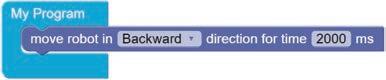
5. To turn the bot backwards, select the Backwards option from the drop-down.
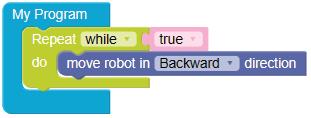
6. To move the robot backwards for infinite time, use the Repeat while block from Loops category, as shown below.
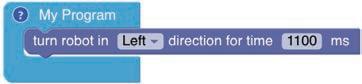
7. To turn the bot to the left, use the block shown below. The time duration will restrict the bot movement to 90° degrees. If you change the time value, the movement degree will change accordingly.
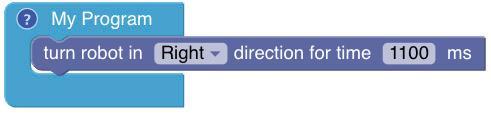
8. To turn the bot to the right, use the block shown below. The time duration will restrict the bot movement to 90° degrees. If you change the time value, the movement degree will change accordingly.
QR code to view output
A. Tick () the Correct Option.
1 Where do you need to keep your code blocks to begin your program?
a Control category b Workspace
c Arena d Output area
2 What is the default value of the “Repeat while” block?
a True b False
c Can’t say d None of these
3 What is the default value of the “move robot in…direction” block?
a Left b Right
c Forward d Backward
B. Answer the Following.
1 What is the concept of delay?
2 For what purpose are the blocks in the Robot category used?
C. Apply Your Learning.
1 In which real-life application can you see the usage of the bot movement?
2 What will happen if the “Repeat while” block is not used in the code?
Objective
Make your robot move to create shapes like squares and rectangles to practice its movements.
Background
This experiment is based on the concept of time delay as discussed in the previous experiment.
Let’s Build
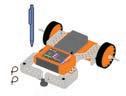
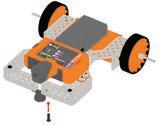
Attach a pen to the RC bot as shown here, using zip-ties.
Let’s Code
1. Click on the Control category from the Blocks panel.
2. Drag the My Program block to the workspace area to begin your program. The execution of all the blocks present inside this occurs step by step.
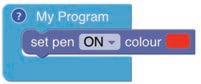
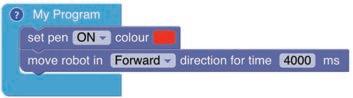
3. Drag the set pen block from the Robot category and drop it inside the My Program block.
4. This block is set to ON by default. Select any colour of your choice from the colour box.
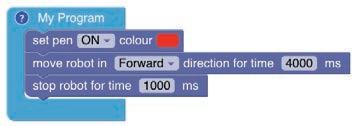
5. To make a square shape, move the bot forward by dragging and dropping the move robot in block from the Robot category. Type "4000" in the value box of the block.
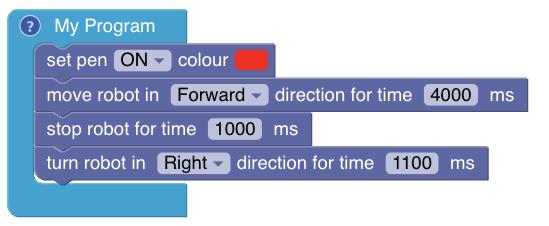
6. Now, stop the bot for 1000 ms by dragging and dropping the stop robot for time block. This block is set to "1000" ms by default.
7. Now, drag and drop the turn robot in block. Select the "Right" option from the drop-down to make it turn right.
8. Post taking a right, stop the bot for "1000" ms.
9. Now, move the bot forward for "4000" ms and then stop.
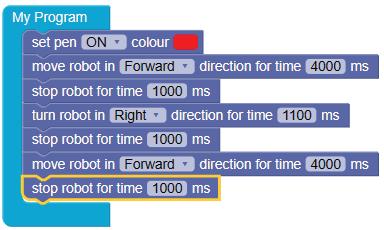
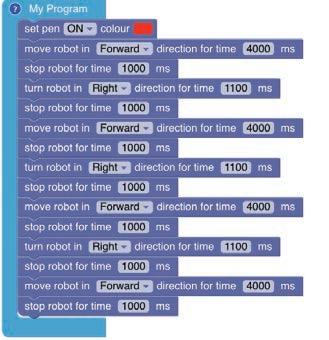
10. Repeat the above steps 7 to 9 until you create all four sides of the square shape. The final code should look like this:
Scan QR code to view output
A. Tick () the Correct Option.
1 What is the default value of the set pen block?
a ON b OFF
c 0 d 1
2 What value should be given in the “turn robot in…direction” block to make it take a right turn?
a 90° b 180°
c Right d Left
3 What is the purpose of the “stop robot for time” block?
a To stop the robot forever
b To stop the robot for a specified time
c To turn the robot to the left
d To turn the robot to the right
B. Answer the Following.
1 How many times does the robot need to turn to make a square?
2 Is there a shorter way to avoid repeating the same type of multiple steps in the code?
C. Apply Your Learning.
1 Can you rewrite the code using the “Repeat while” block?
2 What would be the real-life application of this code?
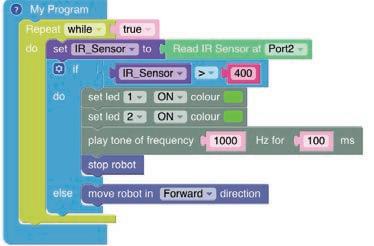
To create a bot that intelligently pauses when it detects obstacles using the IR sensors, providing a gateway to explore and learn about the principles of sensor technology and autonomous decision making.
1. Variables
• Variables are used to store information to be referenced and manipulated in a computer program.
• Variables in coding are not just static values; they also provide a way of labelling data with a descriptive name, so our programs can be understood more clearly. This data can then be used throughout your program.


Here, i_count is the name of a variable.
2. Conditionals
• Human beings (and other animals) make decisions all the time that affect their lives, for eg:
a. "Should I eat one cookie or two?"
b. "Should I play cricket or badminton?"
• Similarly, to make decisions and carry out actions accordingly, in our code, we use conditionals.
3.
• Conditional blocks have conditions, and the program’s flow is based on whether the condition is true or false.
• To apply conditions in code, use the if block. The if block has else if and else blocks.
• If the condition given in the if block is true, then the set of code is executed; otherwise, the code given in else if or else block is executed.
• An infrared (IR) sensor is an electronic device that measures and detects infrared radiation in its surrounding environment. Everything around us, including our bodies and objects, gives off heat in the form of infrared radiation. Warmer objects emit more infrared radiation than cooler ones.
• In the IR sensor, the sensor state is high when a reflective object is in front of it. Black or dark-coloured objects do not reflect the IR rays.

The IR sensor is used in ADAS (Advanced Driver Assistance System) and Emergency Breaking Systems.


IR sensors work in touchless taps and soap dispensers. They detect hand movements to control water flow and soap dispensing without physical contact.
• Connect the IR sensor to Port S1 of the Brain.


• Attach the IR sensor to the front on holes 1 and 2 in row 2 of the chassis.

1. Click on the Control category from the Blocks panel.
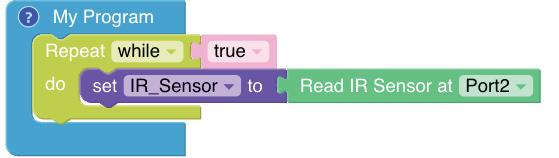
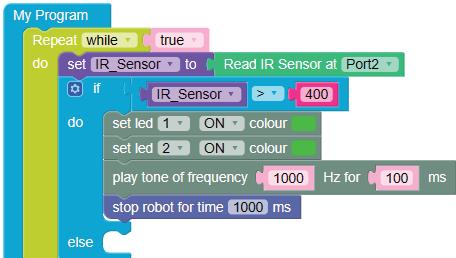
2. Drag the My Program block to the workspace area to begin your program. The execution of all the blocks present inside this occurs step by step.
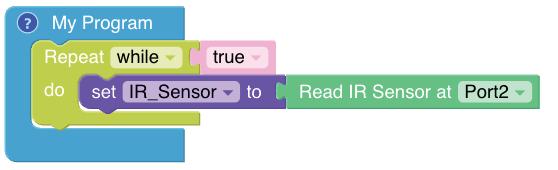
3. Drag the Repeat while block from the Loops category and drop it inside the My Program block to begin the infinite loop. This block is set to true by default.
4. Click on the Variables category, and then click on the Create variable button. A pop-up box appears, asking you to enter a New variable name to store the data of the IR sensor value received from the sensor.
• Enter a suitable variable name such as IR_Sensor.
• Click on the OK button.
5. Drag the set to block from the Variables category and drop it inside the Repeat while block.
6. Then drag the Read IR Sensor at block from the Sensor category and attach this block with the set to block. Select Port 2 from the drop-down of the Read IR Sensor at block.
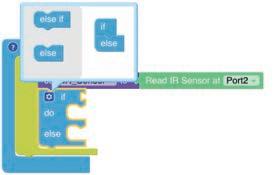
7. Drag the if block from the Control category and drop it below the set to block.
8. Click on the settings icon of the if block. A pop-up box appears.
9. Drag the else block and drop it below the if block in the pop-up box.
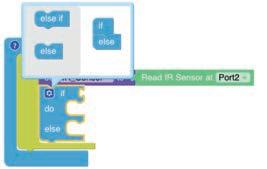
10. Click on the settings icon again to close the pop-up box.
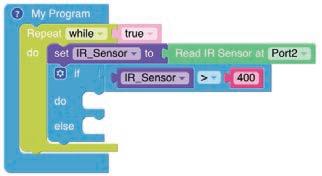
11. Drag the equal operator block from the Control category and attach it to the right of the if else block.
12. Select the ">" option from the drop-down of the equal operator block.
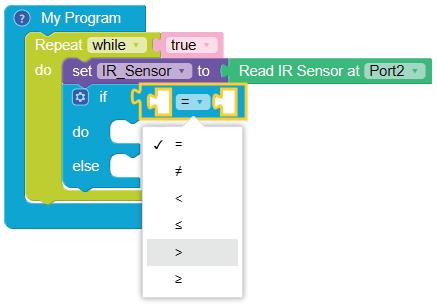
13. Drag the IR_Sensor block from the Variables category and drop it in the left part of the greater than operator block.
14. Now, drag the number block from the Math category and drop it in the right part of the greater than operator block. Type "400" in the text part of the number block. Now, if the value of the IR_Sensor variable is greater than 400, i.e., the IR Sensor senses the object, then the blocks under the if block will be executed, else the blocks under the else block will be executed.

15. Drag two set led blocks from the Indicators category and drop them inside the do condition block.
16. Select "2" from the drop-down for the second set led block.
17. Also set the colour of LED 1 and LED 2 to green.
18. Drag the play tone of frequency block from the Indicators category and drop it below the second set led block. This block is used to play the buzzer.
19. Now, drag and drop the stop robot block from the Robot category. This will instruct the bot to stop when there is an object in front.
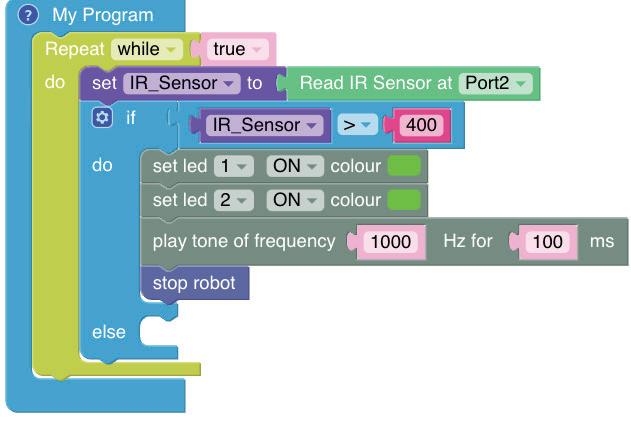
20. For the else condition, drag and drop the move robot in block from the Robot category. This block is set to Forward direction by default. This is to instruct the bot to move forward as long as no object is detected ahead.
Scan QR code to view output
A. Tick () the Correct Option.
1 Which blocks are used to make decisions in coding?
a Sequential blocks b Repeat blocks
c Conditional blocks d None of these
2 Variables in coding are used to .
a store values
b make decisions
c repeat actions d control the flow of execution
3 In the IR sensor, the sensor state is when a reflective object is in front of it.
a missing
c low
B. Answer the Following.
1 Define a variable.
b found
d high
2 What is the purpose of the conditional statements in coding?
C. Apply Your Learning.
1 Why do the black objects not reflect the infrared rays?
2 Name one application of the object detection experiment in real life.
To create an object detection bot and teach it how to move around by itself. This will help the bot avoid obstacles and choose a path on its own in real time.
The concept of object avoider is mostly used in the automatic vacuum cleaners.
• Attach the IR sensor to the front on holes 1 and 2 in row 2 of the chassis.
• Connect the IR sensor to Port S2 of the Brain.
1. Click on the Control category from the Blocks panel.
2. Drag the My Program block to the workspace area to begin your program. The execution of all the blocks present inside this occurs step by step.
3. Drag the Repeat while block from the Loops category and drop inside the My Program block to begin the infinite loop. This block is set to true by default.
• Click on the Variables category, and then click on the Create variable button. A pop-up box appears. This will create a variable to store the data of the IR sensor value received from the sensor.
⸰ Enter a suitable variable name such as IR_Sensor.
⸰ Click on the OK button.
• Drag the set to block from the Variables category and drop it inside the Repeat while block.
• Then drag the Read IR Sensor at block from the Sensor category and attach this block to the set to block.
• Select the "Port 2" option from the drop-down menu of the Read IR Sensor at block.
4. Drag the if block from the Control category and drop it below the set to block.
5. Click on the settings icon of the if block. A pop-up box appears.
6. Drag the else block and drop it below the if block in the pop-up box.
• Click on the settings icon again to close the pop-up box.
• Drag the equal operator block from the Control category and attach it to the right of the if else block.
• Select the ">" option from the drop-down of the equal operator block.

• Drag the IR_Sensor block from the Variables category and drop it in the left part of the greater than operator block.
• Now, drag the number block from the Math category and drop it in the right part of the greater than operator block. Type "400" for the text part of the number block.
• If the value of the IR_Sensor variable is greater than 400, i.e., the IR Sensor senses the object, then blocks under the if block will be executed, else the blocks under the else block will be executed.
7. Drag two set led blocks from the Indicators category and drop them inside the do condition block. Select "2" from the drop-down for the second set led block.
8. Also set the colour of LED 1 and LED 2 to green.
9. Drag the play tone of frequency block from the Indicators category and drop it below the second set led block. This block is used to play the buzzer.
10. Now, drag and drop the stop robot for time block from the Robot category to instruct the bot to stop for "1000" ms when there is an object in front.
• Now, drag and drop the move robot in block from the Robot category. Select the Backward direction from the drop-down. Type "1000" in the value box of the block to instruct the bot to move backwards for 1000 ms.
• Now, instruct the bot to stop again for "1000" ms.
• Drag and drop the turn robot in block to turn the bot in the left direction for "1100" ms.
• Now, stop the bot again.
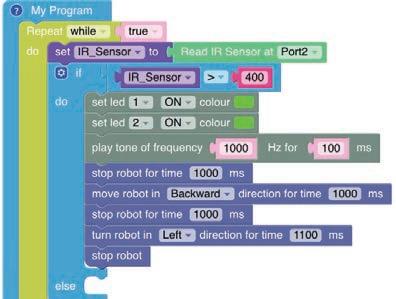
• In the else condition, drag and drop the move robot in block to instruct the bot to move forward until there’s no object in front.

A. Tick () the Correct Option.
1 Which category of blocks is used to create variables in your code?
a Control b Display
c Robot d Variables
2 How can you add an “else” block to an “if” block in your code?
a Using the Settings icon
c Using the Variables category
b Using the Control category
d Using the Robot category
3 How many options are there in the drop-down menu of the equal operator block?
a 4 b 5
c 6 d 7
B. Answer the Following.
1 What is the purpose of the “equal operator” block?
2 What role does the “play tone of frequency” block play in your code?
C. Apply Your Learning.
1 What will happen in your code if you do not add the time delay?
2 Why do you use the “else” block in your code?
Students will use both IR and touch sensors to program their robots. The robots will stop when they see an object with the IR sensor and turn right when the touch sensor is activated. This will help students learn about how sensors work together and how to control robots.
1. IR Sensor
• An infrared (IR) sensor is an electronic device that measures and detects infrared radiation in its surrounding environment. Everything around us, including our bodies and objects, gives off heat in the form of infrared radiation. Warmer objects emit more infrared radiation than cooler ones.
• In the IR Sensor, the sensor state is high when a reflective object is in front of it. Black or darkcoloured objects do not reflect IR rays.
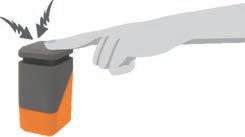
2. Touch Sensor
• The touch sensor works like a push button or a limit switch. It simply gets triggered when it is touched or pressed.
• In a touch sensor, the sensor state is high when the sensor is pushed with any object.
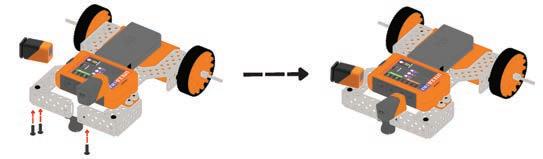
• Attach the IR sensor to the front on holes 1 and 2 in row 2 of the chassis using 6mm bolts.
• Connect the IR sensor to Port S1 of the Brain.
• Attach the touch sensor to the side using 6mm bolts and connect it to Port "S2" of the Brain.
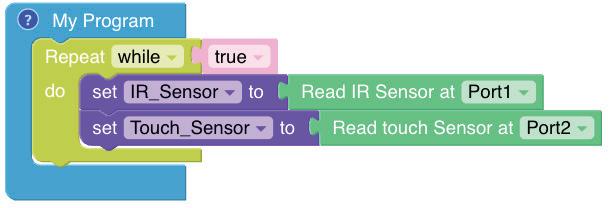
1. Click on the Control category from the Blocks panel.
2. Drag the My Program block to the workspace area to begin your program. The execution of all the blocks inside this occurs step by step.
3. Drag the Repeat while block from the Loops category and drop it inside the My Program block to begin the infinite loop. By default, the loop value is set to true.
4. Click on the Variables category.
5. Click on the Create Variable button. A pop-up box appears.
• Enter a suitable variable name such as IR_Sensor.
• Click on the OK button. This will create the IR_Sensor variable to store the data of the IR sensor value received from the sensor.
• Similarly, create one more variable named Touch_Sensor to store the data of the touch sensor value received from the sensor.
6. Drag the set IR_Sensor to block from the Variables category and drop it under the Repeat while block.
7. Then, drag the Read IR Sensor at block from the Sensor category and attach it to the set IR_Sensor to block. This block is set to Port1 by default.
8. Similarly, drag the set Touch_Sensor to block from the Variables category and drop it below the set IR_Sensor to block.
9. Drag the Read Touch Sensor at block from the Sensor category and attach it to the set Touch_Sensor to block. Set the value to "Port2".
10. Drag the if block from the Control category and drop it below the set Touch_ Sensor to block.
11. Click on the settings icon of the if block. A pop-up box appears.
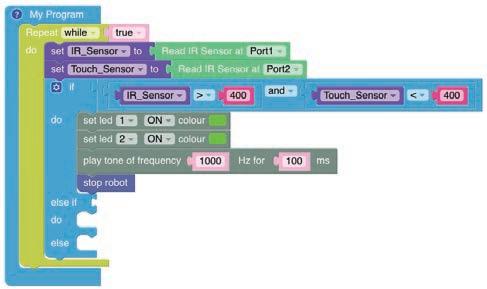
12. Drag the else if and else blocks and place them below the if block in the pop-up box (refer to the image below).
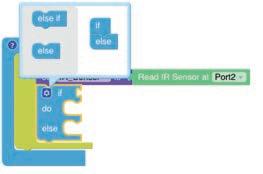
13. Again, click on the settings icon to hide the pop-up box.

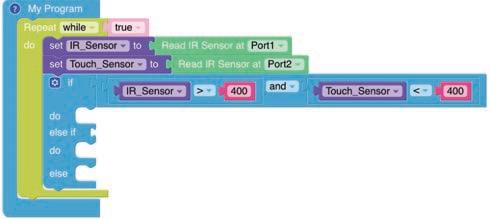
14. Drag block from the Control category and drop it to the right of the if block.

15. Now, drag two blocks from the Control category. Drop this one block to the left of the block and drop the second block to the right of the block.
16. Select the ">" operator from the drop-down list of the block to the left and select the "<" operator from the drop-down list of the block to the right.
17. Drag and drop the IR_Sensor block from the Variables category and place it in the left value box of the block.

18. Drag and drop the block from the Math category inside the right value box of the block. Type "400" in place of 0.
19. Similarly, drag and drop the Touch_Sensor variable block to the left of the and block to its right. Type "400" in place of 0.
20. If the value of the IR_Sensor variable is greater than 400, i.e., the IR Sensor senses the object and Touch_Sensor variable value is less than 400, i.e., the touch Sensor does not detect any touch, blocks under this if block will be executed.
21. Drag and drop the set led block from the Indicators category. Set the LED colour to green. This block is set to ON by default.
22. Drag and drop another set led block. Select "2" from its drop-down. Set the LED colour to green.
23. Drag and drop the play tone of frequency block from the Indicators category to play a buzzer.
24. Now, set the bot to stop when there is an object in front. For this, drag and drop the stop robot block from the Robot category.
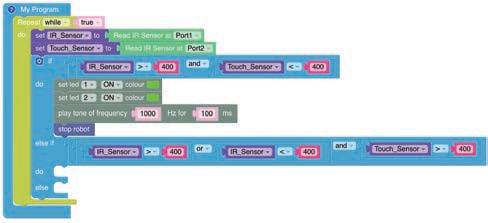
25. Similar to the condition defined for the if block, define the condition for the else if block using the operator block from the Control category. Insert another block to its left and select the or option from the drop-down of the inserted block.
26. If the value of the IR_Sensor is either greater or less than 400, i.e., the IR sensor gets triggered or not, but the value of the Touch_Sensor > 400, i.e., detecting any touch, blocks under this else if block will be executed.
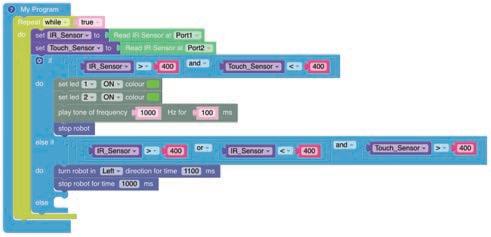
27. Now, drag the turn robot in block from the Robot category and drop it in the do condition of the else if block.
28. Now, drag and drop the stop robot for time block from the Robot category.
29. This will instruct the bot to move left for "1100" ms and then stop for "1000" ms when the touch sensor is pressed.
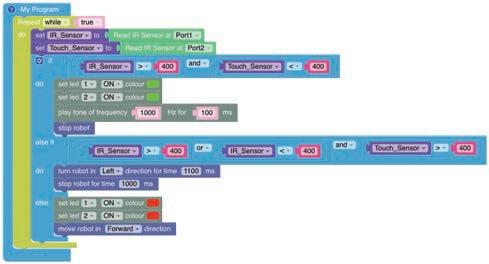
30. For the else part, set LED 1, and LED 2 to RED light.
31. Now, drag and drop the move robot in block to set the bot to move forward as long as no object is detected ahead.
A. Tick () the Correct Option.
1 When does a touch sensor get triggered?
a When it is pressed or touched
c When an object moves farther away
b When an object moves closer
d When an object emits heat radiation
2 From which category of blocks do you get the number block?
a Variables
c Math
b Control
d Text
3 What will happen if the value of the IR sensor is less than 400?
a The sensor will detect the object near it
b The sensor will not detect the object near it
c The sensor will start making buzzing sound
d The sensor will start making buzzing sound
B. Answer the Following.
1 Which block will be used to stop the robot if there is an object in front of it?
2 What is the purpose of the “and” operator block?
C. Apply Your Learning.
1 Where can you see the usage of the touch sensor in real life?
2 What will happen if the value of the IR sensor is greater than 400?
This book introduces learners to the captivating realm of robotics, with a learner-friendly, motivating, and hands-on approach. It combines theoretical understanding with practice, through insightful examples of real-world applications, while promoting creativity and coding skills. Emphasising a project-based learning methodology, the book provides a series of projects, each with detailed instructions. These instructions can be effortlessly executed using the accompanying robotics hardware kit. The assembly and programming of the robotics systems are done through block-based coding, and simulation environments; accelerating the experiential learning journey of the learners.
• Hands-on Experiments: Engaging experiments that allow students to build and test-run robots themselves.
• Detailed Coding Practice: Step-by-step coding instructions to program robots, making it easy for beginners to learn.
• Things Around Us: Each experiment connects robotics to real-world scenarios, showing how technology solves everyday problems.
• Comprehensive Background: Clear explanations of the concepts and the technology behind each experiment, helping students understand the "why" and the "how."
• Interactive Exercises: Exercises at the end of each experiment to reinforce learning and to challenge students to think critically.
Uolo partners with K-12 schools to provide technology-enabled learning programs. We believe that pedagogy and technology must come together to deliver scalable learning experiences that generate measurable outcomes. Uolo is trusted by over 15,000+ schools across India, Southeast Asia, and the Middle East.
In partnership with Avishkaar
ISBN 978-81-983027-1-7
