

COMPUTER SCIENCE Hexa
One Byte at a Time

COMPUTER SCIENCE Hexa

Acknowledgements
Academic Authors: Jatinder Kaur, Ayushi Jain, Anuj Gupta, Simran Singh
Creative Directors: Bhavna Tripathi, Mangal Singh Rana, Satish
Book Production: Rakesh Kumar Singh, Sakshi Gupta
Project Lead: Jatinder Kaur
VP, Learning: Abhishek Bhatnagar
All products and brand names used in this book are trademarks, registered trademarks or trade names of their respective owners.
© Uolo EdTech Private Limited
First published 2025
This book is sold subject to the condition that it shall not by way of trade or otherwise, be lent, resold, hired out, or otherwise circulated without the publisher’s prior written consent in any form of binding or cover other than that in which it is published and without a similar condition including this condition being imposed on the subsequent purchaser and without limiting the rights under copyright reserved above, no part of this publication may be reproduced, stored in or introduced into a retrieval system, or transmitted in any form or by any means, electronic, mechanical, photocopying, recording or otherwise, without the prior written permission of both the copyright owner and the above-mentioned publisher of this book.
Book Title: Hexa Computer Science 7
ISBN: 978-81-979297-2-4
Published by Uolo EdTech Private Limited
Corporate Office Address:
85, Sector 44, Gurugram, Haryana 122003
CIN: U74999DL2017PTC322986
Illustrations and images: www.shutterstock.com, www.stock.adobe.com and www.freepik.com
All suggested use of the internet should be under adult supervision.
Preface
In today’s rapidly evolving digital landscape, computer science has become an essential field of study, shaping the world around us in countless ways. From the smartphones in our pockets to the vast networks that connect people across the globe, computer science drives innovation and progress in nearly every aspect of modern life. In today’s fast-paced digital world, understanding the basics of computer science is as important as learning to read, write, or solve maths problems.
Recognising this imperative, the National Education Policy (NEP) 2020 has strongly recommended the integration of coding skills, computational thinking, critical analysis, and problem-solving abilities into the curriculum.
Inspired by these insights, Uolo has introduced a comprehensive program, Hexa, for grades 1 to 8, to empower young minds with the knowledge and skills they need to thrive in the digital age. From the basics of how computers function to the tools that shape our digital landscape, this series opens the door to a world of endless possibilities. This series will build a strong foundation, helping shape the next generation of digital citizens and innovators. It aims to demystify the world of computer science, making it accessible and engaging for young learners, while preparing them for future academic and professional pursuits in the field.
We believe that learning computer science should be an engaging and accessible experience for all children. This series takes a project-based approach, allowing students to learn by way of concurrently applying acquired knowledge and skills. As they progress through the course, they will build strong foundations in computational thinking, coding basics, and digital literacy. Our program focuses on three key areas:
1. Computer Science Fundamentals: Core concepts are introduced step by step, ensuring a solid grasp of how computers function, and how information is processed and stored.
2. Latest Computer Tools: Various computer tools relevant to today’s world are included, equipping students with the confidence to thrive in the digital age.
3. Introduction to Coding: The series offers an introductory look into coding, preparing students for more advanced learning in the future.
To broaden the learning process, we have included informational annexures on Artificial Intelligence (AI) and its related fields, offering students an early insight into the groundbreaking technologies that are shaping our world. These sections aim to inspire curiosity and encourage a deeper exploration of computer science.
Our mission is to make computer science approachable and exciting for young learners. By providing early exposure, we aim not only to teach about computers but also to cultivate skills that will benefit students in their future endeavours.
We invite you to embark on this exciting journey with us through the world of computer science. Let us empower the next generation with the skills and the knowledge they need to thrive in a digital world.
The NEP Tags
The National Education Policy (NEP) 2020 outlines essential skills, values, dispositions, and learning approaches necessary for students to thrive in the 21st century. This textbook identifies and incorporates these elements throughout its content, activities, and exercises. Referred to as “NEP Tags”, they are defined as follows:


INTEGRATED


Art Integration
Bringing creativity and fun into learning by combining music, drama, and art with other subjects CRITICAL

Sports Integration
Using games and sports in daily life to enrich computer-related activities
Holistic & Integrated Learning
Cross-curricular linkages to make the learning experience more holistic, joyful and meaningful
Critical Thinking
Coding opportunities to apply higher-order skills like algorithmic and computational thinking, and problem-solving

SDG
Hands-on Activity
Step-by-step activities to enable learners put theoretical knowledge into practice
Sustainable Development Goals
Applied computer science activities related to real-world issues and sustainable development

SEL Social Emotional Learning
Developing the skills to understand and manage emotions, build positive relationships with others and make responsible choices

GAMES
1


ISP
Chapter at a Glance Walkthrough of
An Internet Service Provider, or ISP, is a company that provides you access to the internet, often for a fees. Some examples of ISPs are BSNL, Airtel, Jio, and Excitel.
To draw a circle, press and hold down Did You Know?

Communication Media
Communication media helps us connect to the internet. Let us see some of their types.
1. DSL
DSL stands for Digital Subscriber Line. It is a type of communication media that uses your telephone line to transmit data.
Project-based Learning: A project-based learning approach employed to foster an engaging and interactive learning experience
2. Cable


Cable is a type of communication media that uses the existing cable television wires to connect your computer to the internet.
3. Fibre
NEP Tags: To show alignment with NEP skills and values
2
Fibre optic cable is a type of communication media that uses light rays to connect your computer to the internet. Fibre optic cables are much faster than copper or cable wires. In fibre cables, the data travels in the form of light. Nothing in the universe travels faster than light. So, the internet through fibre optic cables is often the fastest type of internet connection available.

Chapter Checkup
Discuss: A multi-faceted probing question, related to the concept, that arouses curiosity
Discuss!
Find out which type of internet connection your house or school has.


it, go to the main drawing area.
Now think of the fan speed knob, or regulator, on the switchboard. It changes the speed at which the fan spins, instead of just switching it on or off. We can have the fan spin at the fastest speed, reduce it to a slower speed, then much slower, and finally switch it off. We can do more things with the regulator than the switch. That is how analog signal works.
e I hold all the blocks for a block category.
A Fill in the blanks.
Did You Know: Interesting facts related to the topic
3
Did You Know?
India has the second-largest internet user base in the world, with over 70 crore users.
Think and Tell
Can you think of more examples of analog and digital signals?
Hints menu bar untitled backdrop blocks create
ISP
1 In Scratch, we use colourful to create our own games, stories, and drawing.
Do It Yourself: Short exercises between the chapter to pause and assess comprehension
An Internet Service Provider, or ISP, is a company that provides you access to the internet, often for a fees. Some examples of ISPs are BSNL, Airtel, Jio, and Excitel.

Communication Media
2 To create a project in Scratch, you need to click .
4. Hold the left mouse button, move the pointer and then release the button. You will see that a triangle has been drawn. In the same way, we can draw many shapes in Paint.
3 By default, the name of the Scratch project is
Communication media helps us connect to the internet. Let us see some of their types.
1. DSL
Think and Tell: Analysis, reflection, and text-to-self connection based prompts for discussion in class
DSL stands for Digital Subscriber Line. It is a type of communication media that uses your telephone line to transmit data.
4 The purple bar at the top of the Scratch editor is called the .

2. Cable
5 The background of the stage is called the
Artificial Intelligence
F Apply your learning.
Annexures: To offer a basic understanding of specific domains of Artificial Intelligence
Chapter Checkup
Cable is a type of communication media that uses the existing cable television wires to connect your computer to the internet.
Artificial
e I hold all the blocks for a block category.
3. Fibre
A Fill in the blanks.
Hints menu bar untitled backdrop blocks create
Artificial Intelligence
Chapter Checkup: Chapter-end practice exercises aligned to different levels of Bloom’s Taxonomy
Artificial Intelligence, or AI, helps computers think. It can learn like people do.It learns new things all the time. AI is very smart. It will keep changing and getting better.
AI
Apply Your Learning: Intellectually stimulating questions designed for higher order thinking and analysis
Intelligence AI
in
Test Papers: Designed to evaluate understanding of core concepts and application of skills
A. Fill in the blanks.
1 In Scratch, we use colourful to create our own games, stories, and drawing.
Chapter Checkup
Fibre optic cable is a type of communication media that uses light rays to connect your computer to the internet. Fibre optic cables are much faster than copper or cable wires. In fibre cables, the data travels in the form of light. Nothing in the universe travels faster than light. So, the internet through fibre optic cables is often the fastest type of internet connection available.
1 Nia is making a Scratch project where she needs to move the dog from left to right. Which block should she use?
2 To create a project in Scratch, you need to click
e I hold all the blocks for a block category. A Fill in the blanks.
3 By default, the name of the Scratch project is
4 The purple bar at the top of the Scratch editor is called the
Hints menu bar untitled backdrop blocks create
Find out which type of internet connection your house or school has.
5 The background of the stage is called the F Apply your learning.
with
Chapter 4 • Browsing the Internet
1 In Scratch, we use colourful to create our own games, stories, and drawing.
2 To create a project in Scratch, you need to click

1 Nia is making a Scratch project where she needs to move the dog from left to right. Which block should she use?
3 By default, the name of the Scratch project is
4 The purple bar at the top of the Scratch editor is called the
5 The background of the stage is called the F Apply your learning.
Test Paper (Based on Chapters 1 to 4)
1 Nia is making a Scratch project where she needs to move the dog from left to right. Which block should she use?
Test Paper (Based on Chapters 1 to 4)

1 In Scratch, the blocks you put together in the script area are called a
A. Fill in the blanks.

1 In Scratch, the blocks you put together in the script area are called a
2 The is the background of the stage.
2 The is the background of the stage.
• Number Systems
• Converting Numbers from One System to Another
• Binary Addition and Subtraction
• What are Cybercrimes? • How to Protect Yourself?
• Problem-Solving
• Concepts of Computational Thinking 4 Calculations Using Spreadsheets ����
• Understanding Spreadsheets
• Creating a Spreadsheet
• Elements of a Spreadsheet
• Cell Naming
• Applying Formulas and Functions 5 Visualising Data Using Spreadsheets
• Sorting
• Grouping of Data
• Filtering Data
• Charts
• Sheet Tabs
• Database
• Database Management System (DBMS)
• MySQL
• Data Types in SQL
• Types of SQL Commands
• SQL Queries
Designing with Canva • Concept of Layers
• Programming Languages
• Introduction to Python
• Data Types and Variables
• Simple Calculator
• Dynamic Typing
• Typecasting
• Arithmetic Operators
• Control Statements
• Conditional Statements
• Types of Conditional Statements
• Logical Operators
• Loops • Jump Statements
• Web Development • HTML • Basic Structure of an HTML Document • Basic HTML Terminologies
CSS
Introduction to Number Systems 1
Number Systems
We have learnt about measuring quantities in Science and Maths. We measure length in centimetres, metres, and kilometres. Similarly, we use grams and kilograms to measure weight.
But what do we use to measure and express these quantities? We use numbers.
But what are numbers made of? They are made of digits—0, 1, 2, 3, 4, 5, 6, 7, 8, and 9. These ten digits together form our Number System.
A Number System is a way of representing and expressing numbers using a set of symbols or digits. Different number systems can use different symbols and rules to represent a number in that number system.
The base of a number system is the total number of digits the system uses.
The number system that we use is the decimal system, also known as the base-10 system. The numbers are expressed using ten different digits: 0, 1, 2, 3, 4, 5, 6, 7, 8, and 9.

A question arises here: why do we need to learn about different number systems?
The answer is that the different number systems help us understand computers better as computers do not work on the decimal number system. We will later see which other number systems they work on.
Furthermore, learning about different number systems helps us to represent data in different number systems. They also help us to convert data represented in one number system to another number system.
Types of Number Systems
There are four types of number systems that computers understand. Let us learn more about each one.
Decimal Number System
The Decimal Number System is the number system that we use every day.
The Decimal Number System is a base 10 number system that has combinations of the following 10 digits: 0, 1, 2, 3, 4, 5, 6, 7, 8, and 9.
When we deal with a decimal system, we write the base of the number system as the subscript of the number.
is 10.
Digits used: 0, 1, 2, 3, 4, 5, 6, 7, 8, and 9.
For example, if we want to write 70, 128, and 349 in a number system notation, we will write: (70)10, (128)10, and (349)10
Binary Number System
The Binary Number System is a base 2 number system that uses only two digits—0 and 1. A binary number is called a Binary digit or a bit. We express binary numbers as (101)2, (1001)2, (101011)2, and so on.
Base is 2.
Digits used: 0 and 1.
The Binary System forms the basis of data storage in computers. In fact, a bit is the fundamental unit of data storage. Different digital devices like calculators, TVs, cell phones, burglar alarms, and watches use this system. But how do these devices understand a bit?
Imagine you have a flashlight. It only has two buttons: one to switch it on and the other to switch it off. The state of an “on” flashlight is 1 and the state of an “off” flashlight is 0.
If we want to store this information:
The first flashlight is on and second one is off It can be depicted as “10”. This is how these digital devices store information using the Binary Number System.
Explore More!

Computers store data in binary form using electronic switches that can either be on (representing 1) or off (representing 0). This binary storage is the basis of all digital memory.
Did You Know?
Acharya Pingala, a Vedic Scholar, was the inventor of the Binary Number System.
Each number in the decimal number system can be represented in the binary number system as well. This table shows the decimal numbers 0 through 15 in their binary forms:
Octal Number System
The Octal Number System has a base of 8 and has eight digits: 0, 1, 2, 3, 4, 5, 6, and 7. We express numbers in the octal number system as (40)8, (214)8, (376)8, etc.
The Octal Number System is widely used in computer applications in the aircraft sector. The octal numbers are used in the form of codes.
Base is 8.
Digits used: 0, 1, 2, 3, 4, 5, 6, and 7.
Just like in the binary number system, all decimal numbers can be represented in the octal number system as well. This table shows the decimal numbers 0 through 15 and their octal forms:
Hexadecimal Number System
The Hexadecimal Number System has a base of 16 and has digits from 0 to 9 and letters of the alphabet A to F, where A is 10, B is 11, and so on up to F as 15. We express numbers in this system as (CD)16, (129A)16, (A56)16, etc.
Base is 16.
Digits used: 0, 1, 2, 3, 4, 5, 6, 7, 8, and 9.
Letters used: A, B, C, D, E, and F.
Imagine that you have a special way of counting on your fingers. Instead of just using your regular 10 fingers, you have 16 different symbols to count with. The first 10 symbols are just like your regular fingers, and they are represented by the numbers 0 to 9.
But this is where it gets interesting: after you’ve counted up to 9 on your regular fingers, you don’t stop. Instead, you start using your special symbols, represented by the letters A, B, C, D, E, and F. These symbols represent the numbers 10, 11, 12, 13, 14, and 15, respectively.
So, when you count with your fingers in hexadecimal, it goes like this: 0, 1, 2, 3, 4, 5, 6, 7, 8, 9, A (which represents 10), B (which represents 11), C (which represents 12), D (which represents 13), E (which represents 14), F (which represents 15).
The Hexadecimal Number System is commonly used in computer programming and in microprocessors. It is used to describe locations in the computer memory.
Octal Number System
Hexadecimal Number System
This table shows the decimal numbers 0 through 15 and their hexadecimal forms.
Think and Tell
Is the value of 0 and 1 the same in different number systems?
Do It Yourself 1A
Identify the systems that these numbers belong to.
Converting Numbers from One System to Another
A number in one particular number system can be converted into another with some specific rules. Let us learn how to do it.
Decimal to Binary, Octal, and Hexadecimal
Let us learn to convert a decimal number to its binary, octal, and hexadecimal form using the given example.
Conversion of Decimal Number to Binary Number
We will convert (35)10 to its binary form.
Step 1: Divide the number repeatedly by two and note down the remainders. See below:
Step 2: Write the remainders in reverse order.
The final number with only the 0 and 1 digits is the required number. So, (35)10 (100011)2
Or, we can also represent the above method in a different way. Remainders 110001
Step 1: Create a table and place the number to be converted in the first row.
Step 2: Write the base of the system, as shown. Here, we want to convert 35 into binary. So, we write 2.
Step 3: Now, divide the number by the base of the target system and write the quotient in the next row. Write the remainder in the cell next to it.
Step 4: Repeat the process till you get a 0 as quotient.
Step 5: Take the remainder from bottom to top. That is the desired binary number. So, we again get (100011)2.
Conversion of Decimal Number to Octal Number
We will take the same step-by-step approach. This time, we will use 8 as divisor instead of 2. Let us write (435)10 in its octal form. We follow the same approach. So, (435)10 in octal is (663)8.
Conversion of Decimal Number to Hexadecimal Number
We will repeat the same process. This time the divisor will be 16, because the base for hexadecimal is 16. We will try to write (846)10 in the hexadecimal form. So, (846)10 in hexadecimal is (34E)16.
Convert (442)10 into binary, octal and hexadecimal form.
Any Other Base into Decimal
To convert a number in a given base to a decimal.
Conversion of Binary Number to Decimal Number
Let us use (101011)2 to understand the step-by-step approach.
Step 1: Write the number in a row and note the position of the digits from right to left, as shown:
Step 2: Now make a third row and write the values of base to the power of the position.
25 = 3224 = 1623 = 822 =
Step 3: Make a fourth row and write the products of the digits in each place with the base power number.
Step 4: Find the sum of the numbers found in each place. In this case we get:
32 + 0 + 8 + 0 + 2 + 1 = 43.
So, we get (43)10.
Conversion of Octal Number to Decimal Number
What is the decimal equivalent of (1705)8?
We repeat the same process:
We get, 512 + 448 + 0 + 5 = 965.
So, (1705)8 is (965)10 in decimal.
Conversion of Hexadecimal Number to Decimal Number
What is the decimal equivalent of (1AC7)16?
We repeat the same process:
We get, 4096 + 2560 + 192 + 7 = 6855.
So, (1AC7)16 is (6855)10 in decimal.
Do It Yourself 1C
Convert the following numbers into the decimal form.
Binary to Octal and Hexadecimal
There is a standard method to convert a binary number into its octal or hexadecimal form.
Conversion of Binary Number to Octal Number
We will convert (1110101)2 into its octal form.
Step 1: We will group the digits of the binary number. We will form groups of 3, because: Base of octal = 8.
Base of binary = 2 and 23 = 8.
So, we form groups of 3 starting from the right. If 1 or 2 digits are left, we put them in a new group. See below:
Step 2: Now, treat each group as a separate binary number and convert into the decimal form. So, we get: Binary Number 1110101
Step 3: We join the decimal numbers formed from the grouped digits. The number formed is the desired number.
So, (1110101)2 = (165)8
Think and Tell
Why are we forming groups of 4?
Conversion of Binary Number to Hexadecimal Number
This time, we form groups of 4 starting from the right.
Binary Number
Decimal number from grouped digits 110 (= A in hexadecimal)11 (= B in hexadecimal)
We get (1AB)16.
So, (110101011)2 = (1AB)16.
Do It Yourself 1D
Convert (1001001001)2 into its octal and hexadecimal form.
Hexadecimal and Octal into Binary
The method to convert hexadecimal and octal numbers into their binary form is also very similar. We will also use the concept of groups of digits that we learnt in the previous section.
Conversion of Hexadecimal Number to Binary Number
Let us use the hexadecimal number (1A7)16 to go through the process.
Step 1: We take each digit of the number separately.
Step 2: We then convert each digit into its binary form.
Step 3: Write each derived binary number in groups of 4.
Again, we are writing digits in groups of 4 because:
Base of hexadecimal = 16.
Base of binary = 2 and 24 = 16.
So, we get:
of 4
Step 4: We now join the different 4-digit binary numbers derived. These final numbers is the desired binary number.
We get 000110100111.
So, (1A7)16 in the binary form is (000110100111)2 or simply (110100111)2.
We follow the same steps while converting an octal number into its binary form. We need to make the group of three instead of four in case of octal numbers.
Do It Yourself 1E
Convert the following numbers into binary form.
a (174)8
b (B12)16
Hexadecimal and Octal Conversions
Converting hexadecimal numbers into octal numbers, and vice versa, has to be done via other number systems.
Let us say we want to convert (721)8 into its hexadecimal form.
We first find its decimal form. The decimal form of (721)8 is (465)10.
Now, convert this decimal form into the hexadecimal form. The hexadecimal form of (465)10 is (1D1)16
So, the hexadecimal form of (721)8 is (1D1)16
We follow the same steps while converting a hexadecimal number into its octal form.
Do It Yourself 1F
Convert the following:
a (764)8 into its hexadecimal form.
Binary Addition
b (2B1)16 into its octal form.
Binary addition is similar to the addition of decimal numbers.
When we add (0)2 and (0)2, we get 0. So, (0)2 + (0)2 = (0)2
When we add (0)2 and (1)2, we get (1)2. So, (0)2 + (1)2 = (1)2
But what happens when we add (1)2 and (1)2? (1)2 is basically 1 in decimal as well. So, (1)2 + (1)2 = (2)10 = (10)2.
So, a new place is created and 1 is carried over.
We can summarise the rules of binary addition as follows:
If we are adding x and y:
Think and Tell
In a binary system, only 1 can be carried over. In the decimal system, what numbers can be carried over?
So now, we can add bigger binary numbers by this method. For example, let us add (101101)2 and (10110)2
So, the sum of (101101)2 and (10110)2 is (1000011)2.
Binary Subtraction
Following from the previous section, the rules of binary subtraction are as follows:
For example, let us subtract (11010)2 and (1100)2
So, the subtraction of (11010)2 and (1100)2 is 01110.
Do It Yourself 1G
A. Fill in the blanks.
+ (1010101)2
The Binary Number System uses two digits: and .
The Binary digit is also known as a .
The Decimal Number System is a base number system.
In Octal and Hexadecimal Number Systems, we have and digits, respectively.
When converting binary numbers to their octal form, we put digits together in groups of .
B. Tick () the correct option.
Which number system uses only two digits, 0 and 1?
a Decimal b Binary c Octal d Hexadecimal
The Decimal Number System is also known as the system.
a Base 2 b Base 8 c Base 10 d Base 16
What does “A” represent in the Hexadecimal Number System?
a 7 b 9 c 10 d 12
Which number system is used by digital devices like computers and calculators?
a Binary b Decimal c Octal d Hexadecimal
When converting a binary number into a hexadecimal number, we will form groups of how many digits?
I am common to all number systems. My value is also the same in all the number systems. 1 2 3 4 5 C. Who am I?
I only understand two digits, 0 and 1. Computers use me to store and process information.
I am used in counting and doing calculations every day. I have 10 digits, starting from 0 to 9.
I am a number system that uses base 8.
I am unique as I let you use letters of the alphabet as my digits too. Programmers love using me.
D. Write T for True and F for False.
The Decimal Number System is based on the digits 0 to 10.
In the Hexadecimal Number System, the letter “D” represents the digit 10.
The Binary Number System is the foundation of how computers understand and process information. Computers can only perform addition, not subtraction.
(D716240234)16 is an octal number.
E. Answer the following questions.
What is a number system?
What is the base of a number system? Why is it important?
What does the term “hexadecimal” mean in the context of number systems?
Why do we need to convert a decimal number into binary?
F. Apply your learning.
Convert the following decimal numbers into their octal, hexadecimal, and binary forms.
Convert the following binary numbers into their decimal, octal, and hexadecimal forms. a (11)2 b (110)2 c (100011)2 d (111010)2 e (10001001)2
Convert the following numbers into their decimal and binary forms.
Add the following binary numbers. a (101)2 and (110)2 b (10101)2 and (1010)2 c (1110101)2 and (110110)2
Subtract the first binary number from the second binary number. a (11)2 and (110)2 b (1010)2 and (10101)2 c (110110)2 and (1110101)2
Cybersecurity 2
What are Cybercrimes?
When we talk about technology, the first thing which comes to our minds is the internet. The internet has brought the world closer. It has changed our lives. But nothing is perfect because just like in the real world, the world of the internet also has its share of crime, called cybercrime.
The word cyber means internet-related, and crime is something that is illegal. Therefore, cybercrime means crimes that happen on the internet.


Cybercrime is considered a serious offence as it can harm many users of the internet across the world. It is a wrong and harmful action done through digital devices.
Some examples of cybercrime are:
• using the internet to steal another user ’s personal information;
• breaking into, or hacking, websites and accounts;
• infecting other computers by creating or sending viruses; and
• bullying others on social media platforms.
Awareness of the different kinds of cybercrime helps us avoid them.
Categories of Cybercrime
Cybercrime can be classified into different categories based on the nature of the criminal activity.
Cybercrimes Against Individuals
These crimes include the theft of personal information, such as credit card numbers, Aadhaar card numbers, and passwords. Here are a few kinds of cybercrimes committed against individuals.
Awareness about the different kinds of cybercrime helps us avoid them.
1. Phishing: It is the attempt to trick a user to get his or her personal information. This is generally done through fake emails. The stolen information can be used for:

a. Email spoofing, or identity theft: where the criminal will pretend to be someone else on the internet to fool and steal more information from other users.
b. Scamming: where the criminal will send believable-looking emails or advertisements to steal banking information and money from the users.
2. Cyberbullying: Targeting a user on social media and emotionally harming him or her by:
a. creating fake accounts of that user; or
b. spreading lies, incorrect information or rumours about that user; or
c. shaming or abusing that user for his or her views.
d. extortion, or forceful taking of money by blackmailing or harassing a user, sometimes after stealing his or her personal information.
3. Cyberstalking: Using the internet to follow another user’s location, monitoring his or her actions, and harming that person’s privacy.
Cybercrimes Against Businesses
Did You Know?
When a website’s URL starts with ‘https://’ instead of just ‘http://’, it is more secure.
These crimes involve the theft of intellectual property, such as trade secrets, sensitive information, and ownership of an invention or idea.
These crimes can be of the following types:
1. Corporate Espionage: Espionage means to spy or secretly monitor a person, company, or a government without their knowledge. Corporate means relating to offices or businesses. Therefore, corporate espionage is the illegal spying on a business or office to steal their information. This can be done through hacking, or gaining access to a person or organisation’s computer or computer network in order to spread viruses or steal information.
2. Denial of Services: Purposely flooding the office or business’s computer or network with so much data transfer, or traffic, that it becomes slow, creates network downtime or stops working altogether.
Network downtime is the inability of a network to function as a result of a specific system or an application failure. This disturbs the normal functioning of an office or a business, thereby disrupting work.
Cybercrimes Against Governments


1. Ransomware Attack: In these, hackers encrypt government systems and demand a price to provide the decryption, possibly causing huge disturbance in government operations.
Did You Know?
In 1961, MIT Professor Fernando Corbato invented the first digital password for secure access to a giant time-sharing computer.


These crimes involve the theft of sensitive data of a country’s government such as information about their military, policing, economy, tax, and citizens. They can also involve cyberwarfare, which is the use of cyber attacks to disrupt or disable government systems.


2. Insider Attack: An insider attack is a cybersecurity threat that comes from employees or contractors within government offices who may intentionally or unintentionally leak important information and use that information to commit cybercrimes.
Think and Tell
If a hacker locks your friends files in his computer and demands money to unlock them, what kind of cyber threat is that?
Cybercrimes Against Society
The internet can also be used to create a negative impact on the general public or various social groups. These crimes often exploit the interconnected nature of the digital world to cause harm, spread fear, or disrupt the functioning of society.
1. Cyberterrorism is the use of computers and the internet to attack or frighten large numbers of people.
2. Spreading Fake News is the spreading of false or misleading information presented as actual news with the intent to manipulate public opinion, leading to confusion and discord in society. It can be shared on social media, websites, messaging apps, and even traditional media outlets.
Think and Tell
Share some
I got an email which has a message that my account will expire soon…
I have to fill in this form. They are asking for my bank account number and address. Type

I got low grades in Mathematics. One of my classmates is calling me loser on social media.
He has even tagged me in one of the posts, calling me bad names.
Column A
Cybercrime
Corporate Espionage
Ransomware attack
Phishing
Column B
Tricking a user to steal his personal information.
Stealing government information and demanding money for its return.
The act of breaking the law using the internet.
Illegally spying in a business.
How to Protect Yourself?
Just as you lock your doors and windows to keep thieves out of your house, cybersecurity serves as a lock for your computer and the internet.
Cybersecurity functions like a digital shield, ensuring that your computer and personal information remain safe and secure from threats on the internet. It is all about safeguarding your online activities from harmful users and hackers.
Cybersecurity is the practice of protecting computers, systems, and networks from digital attacks.
How to Implement Cybersecurity
Here are a few ways that can help you protect your computer better.
Strong Password
A password is a secret code that only you know and that can keep your online accounts safe from hackers. A strong password guards your computer and information like a fortress can guard a city.
To create a strong password, use the following tips:
1. Have at least 12 characters in your password.
2. Use a combination of symbols, numbers, and capital and small letters.
3. Avoid passwords that can be easily guessed, like your nickname, your phone number, or your date of birth.
4. Change your password frequently.
Multi-Factor Authentication (MFA)
Multi-Factor Authentication (MFA) is a security process that requires users to provide two or more forms of verification to gain access to a system or an account. This adds an extra layer of protection beyond just a username and a password.


Avoid Suspicious Links and Emails
You must have seen some emails or links saying things like “Your account will be deleted” or “You won a prize; click here now!”. Take a deep breath and don’t rush to click on it. Never click on these types of links or emails. Simply delete it instead and inform your parents or your teachers about it.
Install and Maintain Antivirus Software
To keep your personal information on your computer, you can install antivirus software which saves your computer from viruses before they can harm your computer. Some popular antivirus software are McAfee, Quick Heal and Norton.
Use Secure Networks and Browsers
Always be cautious of the website you are visiting. Securing your browser by changing its setting to filter out harmful links and sites can make your net surfing enjoyable and safe.
Our computers also have a firewall. A firewall is a network security device that monitors and controls incoming and outgoing data in the network. The main function of a firewall is to filter and block harmful content when you are using the internet.
Explore More!
Hacking is not always bad. Ethical hacking helps to keep the online world safe. Know more about it here!
Read the paragraph and answer the following questions.
As time goes by, families sometimes move to different cities. We can stay in touch with them even if they are far away using the internet. We can also make new friends online, but we need to be careful. Not everyone online is who they say they are. Since we cannot see them in real life, it is best not to share personal things like our name, where we live, or our phone number with them. Some people might want to make us uncomfortable or trick us, so it is important to let the elders we trust know if something feels strange.
We should never share passwords of our online accounts with anyone. A strong password has a mix of letters, numbers, and special characters. Also, it is a good idea to have different passwords for different things. If one gets compromised, the others will still be safe. By being cautious and using the internet responsibly, we can have fun and stay safe at the same time.
What’s an important thing to remember when making new friends online? Why?
Why is it risky to share personal information like your name, address, or phone number with people you meet on the Internet?
If something feels strange while you are using the internet, what should you do?
Why is it a bad idea to share your online account passwords with anyone, even your friends?
Imagine you met someone online who was really nice, but he started asking for your personal information. What should you do in that situation?
Chapter Checkup
A. Fill in the blanks.
Cybercrime is a wrong or harmful action done through Cybercrimes against individuals can involve the theft of personal information like is where the criminal pretend to be someone else to fool the user. involves using digital platforms to harm others through aggressive and hurtful messages.
Installing and
B. Tick () the correct option.
What should you do if you encounter cyberbullying?
a Ignore it and don’t tell anyone
c Report it to a trusted adult and seek help
What is the goal of cyberterrorism?
a To bring peace and harmony to society
c To cause direct physical harm or casualties.
How can you protect your online accounts?
a Use weak and simple passwords
c Create strong passwords and enable MFA
What can antivirus software do for your computer?
a Provide entertainment and games
c Increase computer speed and performance
What is the purpose of MFA in cybersecurity?
a To block access to all websites
c To slow down internet connection speed
on your computer can help protect it from viruses.
b Stand up to the bully and respond with hurtful messages
d Get worried and panic
b To create fear, panic, and disturbance using technology and the internet
d To improve cybersecurity
b Avoid using Multi Factor Authentication (MFA)
d Share your passwords only with your close friends
b Protect against viruses and malware
d Help to play games easily
b To help hackers steal your data
d To make your computer more secure by adding layers of security
C. Who am I?
I am a cybersecurity threat that comes from someone within the organisation who has authorised access to its resources and can carry out harmful actions.
I am a cybercrime aimed at tricking people into giving away personal information or money.
I am a network security device that monitors and controls incoming and outgoing data in the network.
I am a strong code that only you know and can keep your online accounts safe from hackers.
I am a cybercrime that hackers use to encrypt organisational systems and demand a price to provide the decryption.
D. Write T for True and F for False.
Multi Factor Authentication (MFA) adds extra security to online accounts.
It is safe to click on any links or download files from unknown sources.
Email spoofing is a safe and harmless activity.
Ransom attacks involve stealing sensitive government data.
E. Answer the following questions.
What do you mean by corporate espionage? What is cybersecurity and how can you implement it? What
Pranav receives an email from a bank asking him to verify his account details urgently. The email looks official, but something seems suspicious. What do you think: is this an attempted cybersecurity breach, and if it is then what type of security breach is it?
Raman is at a coffee shop with free Wi-Fi and wants to check his social media accounts. What do you think, should he connect with the coffee shop’s Wi-Fi and start working on his project or should he not connect with the Wi-Fi? If your answer is no, explain why.
Geeta has created a new online account and needs to set up a password. What are the essential elements of a strong password?
Malin comes across a website that promotes illegal activities and harmful content. Should he open that website on his system?
Ritu receives an email claiming that she has won a big prize and needs to click on a link to claim it. The email looks convincing, but something feels off. What should she do?
Computational Thinking 3
Problem-Solving
A problem is a challenge or a task that needs to be solved.
Puzzles are problems that challenge our thinking skills.
There are many types of puzzles that we solve, such as jigsaw puzzles, Sudoku, riddles, maths puzzles, and more.
Let us solve this maths puzzle. You need to identify the hidden pattern and enter the correct number at the place of the question mark.
Let us try to solve it.
Step 1: Let us first break the problem into smaller parts and notice the hidden pattern by looking at the first row of the grid. You can observe that by adding the first two numbers of the row and multiplying their sum by 2 will give you a number given the third and the fourth cells of the row.
(3 + 2) × 2 = 10
Step 2: Similarly, look at the other two rows:
(1 + 9) × 2 = 20 (7 + 5) × 2 = 24
Step 3: By following the same pattern, you can find the number to be given at the place of the question mark.
(0 + 8) × 2 = 16
So, the correct answer for the above puzzle is number 6.
The process of breaking down a problem into smaller parts and recognising a pattern to efficiently solve it is called Computational Thinking.
Computational thinking is not only limited to the field of mathematics or computers, it can be applied in various fields such as engineering, medicine, social sciences, agriculture, and other.
Concepts of Computational Thinking
Computation means performing mathematical or logical calculations to solve a problem or process data. When we apply this concept to solve a particular problem, we must investigate the other aspects of problem solving, which also involves breaking down complex problems, applying logic, and designing algorithms to solve them. This is the approach that we follow for computational thinking.
In the previous section, while solving the maths puzzle, you must have followed certain steps, like dividing the problem into sub-problems, then applying a method to solve the sub-problem, and then finally combining all the solutions together to provide the solution to the main problem. These are the core concepts of computational thinking. Let us learn about them one by one. The following are the core concepts of computational thinking.
Decomposition: Break a problem into smaller, easier parts.
Pattern recognition: Identify links or repeated parts in a situation.
Abstraction: Focus on the important details while ignoring useless information.
Algorithmic design: Create a step-by-step plan to solve the problem. Let us learn about these concepts one by one.
Decomposition
Decomposition means breaking down a big, difficult task into smaller, easier ones.
Suppose you are organising a school fair. This task looks like a very big task. But by breaking it down into smaller tasks, it becomes more manageable.
Now, let us break down this problem into smaller subproblems:
1. Planning the layout of stalls
2. Arranging food vendors
3. Organising games and activities
4. Setting up ticket booths
5. Coordinating volunteers
Each smaller task can then be assigned to different teams or handled step-by-step, making the overall task less overwhelming.
In a similar manner, on computers, large programs are also divided into smaller, easier tasks to reach the solution.
Applying Decomposition
Now, let us learn how to apply decomposition to solving issues:
Step 1: Identify the big problem
First, determine the main problem you wish to solve.
Step 2: Break it down
Next, split the major problem into smaller, more manageable sub-problems. These sub-problems should be simpler and easier to address on their own.
Step 3: Solve each sub-problem
Tackle each sub-problem one by one. Write methods or step-by-step tips to solve them.
Organising School Fair
Planning the layout of stalls
Arranging food vendors
Organising games and activities
Setting up ticket booths
Coordinating volunteers
Arranging Coupons
Snacks vendor
Ice-cream corner
Printing of coupons
Distribution of coupons
Step 4: Combine solutions
Once you have solved all the sub-problems, merge their solutions together to solve the original, huge problem at hand.
Step 5: Test and refine
Test your answer to make sure it works as planned. If you find any challenges, go back and change your techniques.
Decomposition in Daily-life Situations
Let us look at some everyday examples of decomposition:
Example 1: Making a sandwich
Big Problem: Make a delicious sandwich.
Decomposition:
- Chop vegetables.
- Prepare the sauce for sandwich filling.
Put it all together to make a delicious sandwich.
Example 2: Solving a math problem
Big Problem: Solve a complex math equation.
Decomposition:
- Break it into smaller equations or steps.
- Solve each small equation.
- Combine the solutions to get the final answer.
Advantages of Decomposition
Decomposition is a basic skill in computer science and problem-solving. Here are some of its advantages:
1. Simplicity: By breaking a big problem into smaller parts, it becomes easier to understand and solve.
2. Collaboration: Decomposition makes collaboration more feasible. Various individuals may work on various portions of an issue, and when you bring all the solutions together, you solve the complete problem.
3. Reusability: Once you have solved a significant piece of an issue, you may apply that answer again and again in other situations. This saves time and work.
4. Efficiency: Smaller hurdles are typically simpler and faster to handle than major ones.
Pattern Recognition
Look at the adjoining picture. Can you find the next image in this given pattern? You must have solved this puzzle by identifying a pattern in the shapes.
Pattern recognition is the process of identifying patterns in data or information.
Let us again consider our Organising a School Fair problem.
You can talk to your seniors and teachers who have organised the school fair in the past, to get the idea about the type of activities and food items children prefer in the school fair. Following the same pattern, you can include such activities and food items in your list.
In computer science, it is about discovering links or patterns in data. Computers use mathematical formulas to find patterns in data. Let us look at some examples of pattern recognition.
Pattern Recognition in Daily-life Situations
Here are a few examples of pattern recognition in different contexts:
1. Speech recognition: Software that identifies speaking patterns by listening to spoken language and turns it into text are examples of speech recognition. For instance, voice assistants like Alexa, Siri, and Google Assistant detect speaking patterns to understand and carry out your requests.
2. Handwriting recognition: There are software applications that study handwriting patterns and turn scribbled characters into digital text. This is a common method for digitising handwritten notes or signing digital documents.
3. Image recognition: Many applications and software are there for image recognition to find patterns and items in pictures and videos. This is applied in several ways, like face recognition in smartphones, recognising objects in self-driving cars, or even in medical imaging for spotting diseases.
4. Natural language processing (NLP): To find trends in written or spoken material, NLP methods are applied. For instance, sentiment analysis examines the text’s emotional tone, while robots apply pattern recognition to grasp and respond to human contacts.
5. Credit card fraud detection: To find abnormal credit card buying trends, banks and credit card companies apply pattern recognition software. The system may flag a transaction as a likely scam if quick and bulk purchases are made with it somewhere else.
Abstraction
Now, you have solved some problems by decomposing them into small parts. Think of a huge, complex problem with hundreds of small sub-parts. To solve it step-by-step would be impossible. However, at times, if you look at the larger picture and ignore the minute unnecessary detailing, then your bigger problem may seem easy to solve. For example, while driving a car, you will be concerned only with the performance and the comfort provided by the car instead of its inner details like engine type, etc.
This is called abstraction.
Abstraction refers to disregarding the minute details of a problem and focusing on its major issues.
Abstractions in Daily-life Situations
Abstraction is applied in our daily-life situations without us ever knowing about it. Let us look at a few common examples:
1. Maps: Maps are simple images of real-world places. It is not possible to show each and every place and landmark on the map. For teaching, they show roads, towns, and essential information rather than every tree and building.
2. Recipes: By splitting the cooking process into steps, we may make it easy to follow a process. We focus on which materials to use and how to mix them, rather than having to focus on the chemistry processes working behind them.
3. Language: Language is a great example of abstraction. Language and words make it easier for us to express difficult ideas and feelings without going into the details of the formation of words and sentences.
Advantages of Abstraction
The following are the advantages of abstraction:
1. Simplification: Abstraction simplifies difficult problems, making them more understandable and doable.
2. Reusability: Abstracted components can be reused in different situations, saving time and effort.
3. Modularity: Abstraction supports modular design, where each part of a system can be built and tested separately.
4. Scalability: As problems become more complicated, abstraction helps us grow our answers successfully.
Algorithmic Design
Let us think about baking a cake. We can divide the entire process into the following steps:
Collect the ingredients.
Mix them in proper proportions.
Switch on the oven.
Bake for the suggested period of time.
This step-by-step procedure for baking a cake is called an algorithm.
Algorithms can be defined as step-by-step instructions to be followed for a machine to carry out a particular task.
Algorithmic design is the process of designing and analysing algorithms to solve computational problems. It involves creating a step-by-step set of instructions or a well-defined sequence of operations that can be followed to solve a specific problem or perform a task. These algorithms can be implemented in various programming languages and executed by a computer. Algorithms may have multiple solutions to a problem and can be adapted or modified according to the situation.
Discuss!
Can we solve all problems by creating algorithms for them?
Algorithmic design in Daily-life Situations
Now, let us explore some real-life examples of algorithmic design that impact our daily lives:
1. GPS navigation: When you use a GPS device or a smartphone app to find directions, it estimates the best way for you to reach your location. This includes complicated computations and programs that consider things like traffic, road limits, and your chosen mode of transportation.
2. Online shopping: When you shop online, websites offer product recommendations based on your previous purchases and viewing habits. They study your preferences using recommendation algorithms to offer things you might like, making your buying experience more customised.
3. Social media feeds: Social media sites like Facebook and Instagram use algorithms to decide which posts to show you. They consider things like your connections, hobbies, and the reach of the content to create a customised page for you.
4. Search engines: When you search the internet using a search engine like Google, it uses algorithms to scan billions of web pages and show you the most appropriate results. This needs fast processing and organising methods to give quick and accurate results.
Rules for Writing an Algorithm
Follow the rules while writing an algorithm:
An algorithm must start with a Start step.
It must end with a Stop step.
The language should be simple.
There should be proper sequence marking for all the steps of a problem.
If there are some steps that need to be repeated, then this should be marked properly in an algorithm.
Designing an Algorithm
Let us design an algorithm for grocery shopping:
1. Start
2. Make a shopping list
3. Go to the grocery store
4. Collect the items that you want to buy
5. Pay the amount
6. Get the items packed
7. Return home
8. Stop
Let us look at another example:
1. Start
2. Input two numbers, num1 and num2
3. Take another variable sum
4. Initialise the sum to 0
5. Perform the calculation, sum=num1+num2
6. Display the result
7. Stop
Design the algorithms for the following problems:
a Getting ready for school.
b Making a cup of tea.
c Convert a temperature in Celsius to Fahrenheit.
[Hint: °F = (°C × 9 5 ) + 32]
Explore More!
To learn more about algorithms, scan the QR code.
Rina was riding her bicycle to school when her bicycle tyre got punctured. She fell off the cycle, but she didn’t get hurt. However, her pen fell out of her bag.
Match the following:
Concept Name
Decomposition
Example
She had a flat tyre before, and she knows a shop close by where she can get it repaired.
I should take the bicycle to the nearby mechanic.
Pattern Recognition
1. Punctured tyre.
2. Lost pen.
Abstraction To get the tyre fixed:
1. Go to the tyre shop.
2. Ask the mechanic to fix the tyre.
3. Pay the mechanic and get your bicycle back.
Out of the two problems, she decided to focus on getting the tyre fixed because she needed to reach school on time.
Algorithmic Design
She identified the subproblems:
1. Punctured tyre.
2. Lost Pen.
Chapter Checkup
A. Fill in the blanks.
Hints simple sub-problems pattern algorithm decomposition
1 In computational thinking, we break down a complex problem into smaller to make it easier to solve.
2 means breaking down a big, difficult task into smaller, easier ones.
3 An is a set of step-by-step instructions that a computer can follow to solve a specific problem.
4 When writing an algorithm, it is important to use language to ensure that the computer understands the instructions.
5 Computers use mathematical formulas to find a in data.
B. Tick () the correct option.
1 What is an algorithm?
a A type of computer hardware
c A computer program
2 Which of the following is NOT an example of an algorithm?
a A recipe for baking a cake
c Steps to tie your shoelaces
b A step-by-step procedure to solve a problem
d A mathematical equation
b Instructions for assembling a piece of furniture
d A list of your favourite movies
3 In computational thinking, what does “decomposition” mean?
a Breaking down a problem into smaller, manageable parts
c Combining two problems into one
4 Which of the following is an example of abstraction?
a Following a map
c Using a recipe to make dinner
5 Handwriting recognition is an example of
a Abstraction
c Decomposition
C. Match the following.
Column A
Algorithm
b Making something more complex
d Ignoring unnecessary details
b Watching a TV serial
d Playing games
b Pattern recognition
d Algorithm design
Column B
Includes moving away from the detailed details and focusing on the important aspects of a problem
Computation By breaking a big problem into smaller parts
Decomposition
Abstraction
D. Write T for True and F for False.
The process of solving a problem using a computer
A step-by-step procedure for solving a problem
1 An algorithm is a step-by-step set of instructions for solving a specific problem.
2 Computation refers to the process of performing calculations and solving problems using computers.
3 Algorithms can be used to solve real-life problems, such as finding the shortest path between two locations on a map.
4 Pattern recognition involves breaking down complex problems into smaller, manageable steps that can be solved systematically.
5 Algorithms always have a single, fixed solution to a problem and cannot be adapted or modified.
E. Answer the following questions.
1 What is an algorithm? Provide a simple example of an algorithm.
2 Define abstraction. Give an example.
3 Why is it important to break down complex problems into smaller, manageable steps when solving them?
4 Can you name three common tasks in your daily life that can be simplified or improved by applying the concepts of computational thinking?
5 What is pattern recognition?
F. Apply your learning.
1 Anamika’s father has been financially duped by some criminals. Which step of computational thinking would be helpful for him to find out about this fraud?
2 Arun wants to prepare for a competition. How can the decomposition steps of computational thinking be helpful for him to prepare?
3 Lovey has applied a face lock in her mobile phone. Which example of pattern matching is this?
4 Tarun uses Alexa at his home for managing devices. His mother gives instructions to Alexa to perform various tasks. What types of patterns does Alexa recognise here?
5 Pari is trying to write an algorithm to solve a mathematical problem, but she does not know the rules of writing an algorithm. Suggest some rules to her to design the algorithm.
Calculations Using Spreadsheets 4
Understanding Spreadsheets
Do you help your parents to plan the household budget? Suppose your mother wants you to learn budget planning. So you decide to assist her in maintaining the monthly budget. Which application do you think is the most suitable for this task?
Yes, you can use a spreadsheet.


A spreadsheet is a tool that helps you organise data in rows and columns and do calculations. Spreadsheets also allow you to analyse and visualise data. There are many spreadsheet software options available, such as Microsoft Excel and Google Sheets. While Excel is a licenced software, you can use Google Sheets without purchasing any licence. Google Sheets lets you create spreadsheets online and collaborate with others.
Creating a Spreadsheet
Let us create a spreadsheet to plan the monthly budget. To do this, follow the given steps:


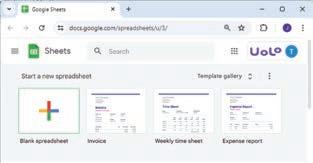
1. Open the Google Chrome browser and visit the link: https://docs.google.com/spreadsheets/
2. The home page appears, as shown below. Click on the plus ‘+’ sign to open a blank spreadsheet.
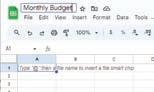
3. In your new spreadsheet, go to the Rename textbox given at the top left corner of the sheet and rename the file as, “Monthly Budget”.
Elements of a Spreadsheet
A spreadsheet consists of a grid-like structure. The various components of a spreadsheet are discussed as follows:
Column/Field
Row: The horizontal set of boxes is called a row or record.
Column: The vertical set of boxes is called a column or field.
Cell: The intersection of a row and a column is called a cell.
Row/Record Cell

Cell Naming
A cell is a rectangular block in a spreadsheet that can hold data.
Data can be numbers, strings, or symbols.
To refer to a cell, we use cell names. A cell name is a combination of letters and numbers. Letters represent the column, and numbers represent the row.
For example, look at the adjoining image. The first cell will be called A1, where A stands for the column and 1 stands for the row.
Now, let us start entering the data in the sheet. Follow these steps:
1. Select a cell where you want to add data using the mouse or the arrow keys.
2. Type in numbers, text, or any other information you want, to add data.
3. Press the Tab key to move to the next cell in a row.
4. Press the Enter key to move to the next cell in a column.
Now, type the data as shown in the given image.
Applying Formulas
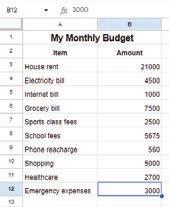
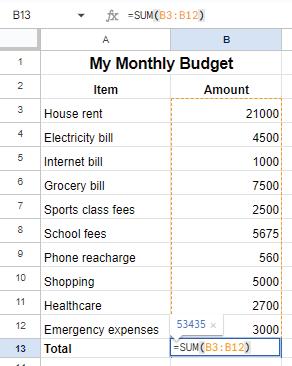
In Google Sheets, a formula is an expression used to perform calculations and obtain results within the cells of the spreadsheet. Formulas always begin with an equal sign (=) followed by the mathematical expression. Now that you have added the details of your expenses, let us apply a formula to find the total expense.
Follow the given steps to do so:
1. Select the cell where you want the total to appear, for example, cell B13.
Row 1
Column A
Cell name A1
2. Type the equals sign ‘=’.
3. Now, click on the cell B3, type a plus ‘+’ symbol, and click on cell B4.
4. Repeat this process up to cell B12 and then press the Enter key. The sum of cells B3 to B12 will appear in cell B13.
To know how you can also insert images in the cell, scan this QR code.
Do It Yourself 4A
Match the highlighted cells with their correct cell names.


Write the formula to calculate the total of cells A1, B1, C1, and D1 in cell E1.

Functions
You have learnt in the previous section how to calculate the total amount using formulas. However, you could have simplified your formula by using functions.
Functions allow you to calculate more efficiently using cell ranges instead of typing out the name of each cell
A cell range is a group of cells selected together. You can use cell ranges in the functions instead of selecting individual cells.
Functions are like built-in formulae in Google Sheets. They perform calculations, handle data, and analyse information.
When we want to use a function on a range of cells, we type the range instead of typing the name of each cell. To type a cell range, first we type the name of the first cell, then a colon (:), and then the name of the last cell. For example, A1:A4.
To use a function, first type the ‘=’ sign, then the function name, followed by cell names or cell ranges inside the brackets. For example, =SUM(A1:A4)
Let us try functions in place of formula to find the total monthly expense.
Using the SUM Function
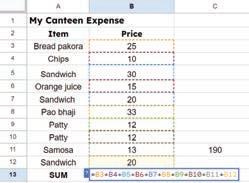
The SUM function is used to add the values given in a specific cell range. To use the SUM function, follow the given steps:
1. Click on the cell where you want the sum to appear, for example, cell B13.
2. Type an equal to symbol ‘=’ and then the function name SUM
3. Type the opening parentheses ‘(‘ after the function name.
4. Inside the brackets, add the cell range for which you want to calculate the total. For example, B3:B12.
5. Press Enter to complete. You can see the result in the cell B13.

A group of friends went on a trip. Their individual expenses are given in the table below. Calculate the total expense of the trip in the cell B10.

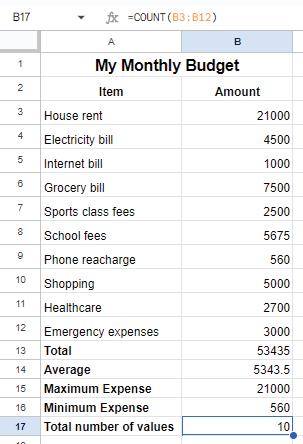
Average Function
The Average function calculates the average of a range of numbers. To find the average monthly expense, you can use the average function as shown here:
=AVERAGE(B3:B12)
This function calculates the average of all the values from cell B3 to B12.

Max and Min Functions
The Max function finds the maximum value in a range of numbers. To find the highest monthly expense, use the Max function as given here:
=MAX(B3:B12)
This function returns the highest value from cell B3 to B12.
You can use the Min function in a similar way to find the minimum value in a range of numbers. To find the lowest monthly expense, use the Min function as given below:
=MIN(B3:B12)
This function returns the lowest value from cell B3 to B12.

Count Function
The Count function counts the number of cells that contain numbers. To find the number of cells that contain numbers in a given range, use the Count function as given here:
=COUNT(B3:B12)
This function counts the number of cells with numeric values from B3 to B12.
More Functions Used in Google Sheets
Let us learn about some more functions used in Google Sheets.
More Mathematical Functions
Apart from the functions used in the previous section, there are many functions that you can use to perform mathematical calculations.
Let us learn more about these functions.
MOD Function
This function returns remainder when the dividend is divided by the divisor.
Syntax: =MOD(Dividend, Divisor)
Example: =MOD(100, 5)
Result: 20
SQRT Function
This function returns the square root of a number.
Syntax: =SQRT(Value)
Example: =SQRT(100)
Result: 10
INT Function
This function rounds a given number down to the nearest integer.
Syntax: =INT(Value)
Example: =INT(5343.5)
Result: 5343
POWER Function
This function is used to raise a number to a specified power.
Syntax: =POWER(Value)
Example: =POWER(10, 3)
Result: 1000
ABS Function
This function returns the absolute or non-negative value of a given number.
Syntax: =ABS(Value)
Example: =ABS (-243)
Result: 243
Text Functions
Apart from the mathematical functions, there are several text functions that can be used in Google Sheets. Let us learn about some commonly used text functions.
CONCATENATE Function
The CONCATENATE function is used to join multiple text strings into a single string. This function is useful for combining data from different cells into one cell.
Syntax: =CONCATENATE(“text_string1”, “text_string2”)
Example: =CONCATENATE(“Hello”, “World”)
Result: HelloWorld
LEN Function
This function counts the number of characters in a cell, including letters, numbers, spaces, and punctuation.
Syntax: =LEN(“text_string”)
Example: =LEN(“Hello”)
Result: 5
UPPER Function
This function converts all the text in a cell to uppercase letters.
Syntax: =UPPER(text)
Example: =UPPER(“Hello”)
Result: HELLO
LOWER Function
This function converts all the text in a cell to lowercase letters.
Syntax: =LOWER(text)
Example: =LOWER(“Hello”)
Result: hello
Think and Tell
You are tracking the number of hours you study, for different subjects, in a Google Sheet. Which function would you use to find the subject that you have studied the longest?
Date and Time Functions
In order to work with dates and time, Google Sheets provides two important functions. Let us see how these functions work.
TODAY Function
This function returns the current system date.
Syntax: =TODAY()
Example: = TODAY()
Result: 01/08/2024
NOW Function
This function returns the current system date along with time.
Syntax: =NOW()
Example: = NOW()
Result: 01/08/2024 10:30
Do It Yourself 4C
Label the parts of the given function. a
What will be the output of the following functions?
a MAX(12, 34, 87, 32, 52, 43)
b CONCATENATE(“My “, “ “, “Rules “)
c ABS(-23)
d POWER(20, 2)
Chapter Checkup
A. Fill in the blanks.
Hints
1 A is a rectangular block in a spreadsheet that can hold data.
2 To refer to a cell in a spreadsheet, we use a combination of letters and
3 The function finds the maximum value in a range of numbers.
4 The function is used to find the average of a range of numbers.
5 The function returns the current date and time.
B. Tick () the correct option.
1 Which function is used to find the minimum value in a range of numbers?
a MAX
c AVERAGE
2 How do you create a cell range for cells A1 to A4?
a A1,A4
b MIN
d COUNT
b A1:A4
c A1-A4 d A1 to A4
3 Which function would you use to join text strings together?
a UPPER
c LEN
b CONCATENATE
d SUM
4 To get the current system date in a cell, which function would you use?
a NOW()
c DATE()
5 The function =SQRT(16) returns:
a 4
b TODAY()
d TIME()
b 8
c 16 d 2
C. Who am I?
1 I return the highest value from a set of numbers.
2 I count the number of cells that contain numeric values in a range.
3 I add all values in a specified cell range together.
4 I convert all text in a cell to lowercase letters.
5 I provide the current date and time.
D. Write T for True and F for False.
1 Google Sheets is a licensed software like Microsoft Excel.
2 The COUNT function counts the number of cells that contain text.
3 The SUM function adds up all the values in a specified cell range.
4 The MOD function returns the remainder when one number is divided by another.
5 The LOWER function converts all the text in a cell to uppercase letters. E. Answer the following questions.
1 What is the purpose of the LEN function in Google Sheets?
2 How do you move to the next cell in a row after entering data?
3 What is a cell range in Google Sheets?
4 Which function calculates the square root of a number?
5 Describe the process to find the total expense using the SUM function. F. Apply your learning.
1 You have a list of your monthly grocery expenses in cells C3 to C10. Create a formula to calculate the total amount spent using the SUM function.
2 Sunny recorded the daily high temperatures for a week in cells D5 to D15. How can he find out the average temperature for that week?
3 Smriti has entered a value in a cell, E2, with the name “john smith.” Which function can she use to convert this name to uppercase?
4 Raima wants to find out how many apples are left after each person takes 3 apples from a total of 20 apples. Which function can she use?
5 Seema needs to add the current date to a report. Which function will be useful for her?
Visualising Data Using Spreadsheets 5
You have created a Google spreadsheet in the previous chapter for your monthly budget. However, analysing and drawing conclusions from the numbers in the sheet can be challenging. What if you could ‘see’ the data visually to help analyse and interpret the results? Yes, that is possible in Google Spreadsheets. You can organise your data, group sheets, filter information, and create charts based on the data in your spreadsheet. In this chapter, we will explore these concepts in detail.
Sorting
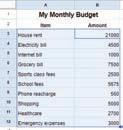
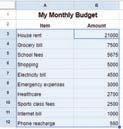
Sorting means to arrange data in a particular sequence based on specific criteria. It allows us to reorganise data in rows or columns, making it simpler to locate, analyse, and understand. Let us again consider the example of the monthly budget sheet. Suppose you want to find out which item is the most expensive. Then, you can sort the data of the sheet in descending order. To do so, follow the steps:
1. Choose the range of cells that contains the data you want to sort.
2. Go to the Data menu.
3. Select Sort range > Advanced range sorting options from the menu.
4. A dialog box appears. In the Sort by drop-down, select Column B and then check Z to A checkbox to arrange data in column B in the descending order.

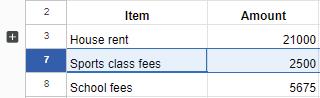
Grouping of Data
Suppose you are interested in finding out how many entries for bills are there in the monthly budget sheet. This way, you can display each bill entry just once, without repeating it multiple times. This is done with the help of grouping of data.
In Google Spreadsheets, grouping means putting similar things together. Grouping keeps things tidy and helps you find what you need faster.
Follow the steps to group data in the monthly budget sheet:
1. Select the rows that you want to group. Then, go to the View menu.
2. Select the Group option > Group rows 4-6.

3. Use the plus ‘+’ button to show the group and the minus ‘−’ button to hide the group.

Filtering Data
Suppose you want to see only those items that cost more than ₹5000. To resolve this, we use the Filters. Filters are a useful feature used in Google sheets that enable you to display data according to specific criteria. Filters can help narrow down the options to what we want and hide the rest. Filtering allows us to focus on specific parts of our data that meet certain conditions.
By using filters in spreadsheets, you can easily find specific data, answer specific questions, and understand information in a better way. Let us try to filter data to find items that cost more than ₹5000 in the monthly budget sheet.
1. Select the range to which you want to apply the filter.
2. Go to the Data menu and choose Create a filter option.


3. Click on the Filter symbol and select Filter by condition and choose your rule.
4. Here, we must select the Greater than condition and put 5000 in the Value or formula box.

5. After selecting the required rule, click OK.
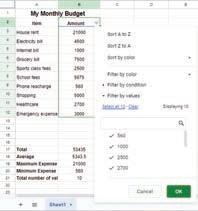
6. The spreadsheet hides unmatched rows, showing only the data that fits the selected criteria.

Do It Yourself 5A
You have a list of animals in a spreadsheet, and you want to see only the ones that are mammals. What should you use?
a Sorting
b Filtering
c Formatting
d Deleting
Write T for True and F for False.
Discuss!
How is filtering different from grouping?
List of Animals
Animals Class
Lion Mammals
Crocodile Reptiles
Shark Fish
Tortoise Reptiles
Giraffe Mammals
Elephant Mammals
Kangaroo Mammals
a You have created a list of cars and their speeds in a Google Sheet. You can use the sorting feature to put them in order from the highest to the lowest speed to view the fastest car at the top.
b Grouping data is only useful when working with numbers, and it does not apply to other types of information.
Charts
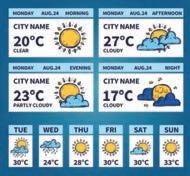
Charts help us look at data in the form of pictures. This helps us to understand the data in a better way.
Charts are common in everyday life, such as weather forecasts on TV. These charts use colourful images and symbols to display daily temperatures or chances of rain. Just like looking at the weather without too many numbers, charts help us see information in pictures, making it easier for our eyes and brains to quickly understand.
In Google Sheets, there are various types of charts available to visually represent data. Let us explore some common types of charts:
Column Chart: It uses vertical bars for comparing data or showing quantities. Each bar represents a category, and its height shows the value or amount.
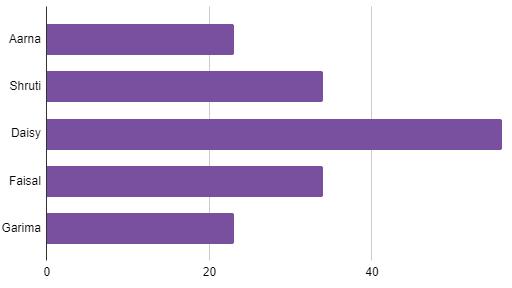
Bar Chart: It is similar to a column chart but with horizontal bars. Each bar represents a category, and its length shows the value or amount.
Pie Chart: It displays parts of a whole as slices of a pizza. Each slice represents a category, and its size shows the proportion or percentage.
Line Chart: A line chart uses lines to show how something changes over time by connecting dots. This helps us spot trends, such as temperature changes throughout a year or the progression of a plant’s growth.
Aama Shruti Daisy Faisal Garima
Creating a Chart
Follow the given steps to create a chart:
1. Choose the cells that contain the data you want to present in the chart.
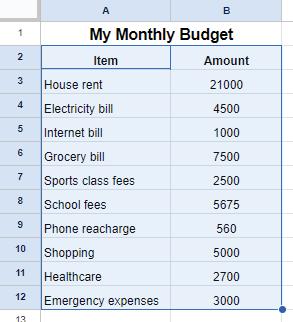
2. Go to the Insert tab and select the Chart option.
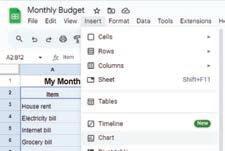
3. A chart will appear along with a Chart editor menu on the right-hand side of the page.
4. Select the appropriate type of chart from the Chart editor menu. In this example, we are creating a column chart.
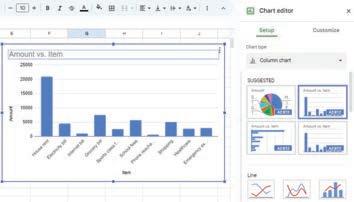
5. Once you have selected a chart type, you can customise it from the Customize tab in the Chart editor menu. As you can see in the image, the background is changed to light yellow, and the 3D version of the chart is enabled.
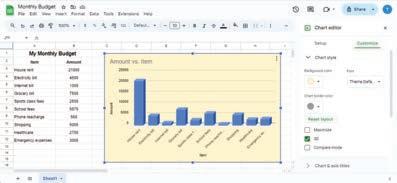
Sheet Tabs
So far, you have been working on the monthly budget sheet. If you want to track your subject marks throughout the year, you do not need to create a new spreadsheet. Instead, you can keep adding new sheets in the same spreadsheet.
Explore More!
Scan this QR code to know about plenty of different types of charts in Google Spreadsheets.
To add a new sheet tab in Google Sheets, follow the given steps:
1. Click on the plus ‘+’ symbol at the bottom left corner of the Google sheet.
2. A new sheet tab will appear, ready for you to work on.

Colouring Sheet Tabs
Colouring sheet tabs in a Google Spreadsheet means giving different colours to the names of the sheets. Let us colour-code the sheet tabs to organise the spreadsheet, making it easier to find the information you need.
The steps for colouring sheet tabs are:
1. Right-click on the tab you want to colour.
2. Click on the Change color option.
3. A palette of colours will be displayed. Select the colour you like by clicking on it. The sheet tab will be coloured.

Do It Yourself 5B
Tick () the correct answer.
1 Why do we use charts in Google Sheets?
a To make the data look fancy
b To make the numbers bigger

c To help understand and analyse data more easily
d To hide the data from others
2 Which type of chart looks like a pizza divided into slices?
Chapter Checkup
A bar chart is like a graph made up of colourful rectangular bars, where each bar represents a category, and its shows the value or amount. data helps to organise data in rows or columns based on specific criteria.
Charts are representation of data. data means putting similar things together to keep the data tidy.
B. Tick (
) the correct option.
Which type of chart would you use to display the progression of a plant’s growth?
a Column chart
c Pie chart
Grouping in spreadsheets refers to:
a Colouring sheet tabs
c Combining related rows or columns together
What do charts do in spreadsheets?
a Perform calculations
c Sort data alphabetically
b Bar chart
d Line chart
b Arranging data in a specific order
d Creating formulae to perform calculations
b Show data visually and help understand it
d Change the font style of the spreadsheet
What symbol is used to show a grouped set of rows in Google Sheets?
a ‘*’ b ‘-’
c ‘+’
What feature in Google Sheets helps you display only items that meet certain conditions?
a Sorting
b Grouping c
Who am I?
I am a symbol used to add sheet tabs in Google Sheets. 1 2 3
I help you to reorganise data to make it simpler to locate and understand.
I put similar items together to keep things tidy in a spreadsheet.
I am a type of chart that uses colourful and rectangular vertical bars to compare quantities or values.
I am a process in spreadsheets that enable you to display data according to a specific criteria.
D. Write T for True or F for False.
Pie charts are suitable for comparing quantities or values, while line graphs are used to show changes over time.
Filtering data in spreadsheets permanently removes hidden rows or columns from the dataset.
Sorting in spreadsheets refers to arranging data in a specific order based on certain criteria, making it easier to locate and analyse.
E. Answer the following questions.
How does grouping data help in organising a spreadsheet?
What is a line chart used for?
Describe the steps to apply a filter in Google Sheets.
How can you add a new sheet tab in Google Sheets? What type of chart would be appropriate to display the names of different sports and the number of students who like each sport?
F. Apply your learning.

Ravi is a sales person in an organisation. He maintains the sales data in a Google spreadsheet. Which feature of spreadsheets should he use to display only those items that have sold more than 50 units.
Suppose you are creating a mathematics project based on distances of different places from your school. You are recording the data in a spreadsheet. Now, you want to create a similar type of project for science subject where you have to record the distance of different planets from the Sun.
How will you add a new sheet in the same spreadsheet?
Akhil
Introduction to Database 6
Database
We are in an age where we are surrounded by a huge amount of data. Data helps us maintain and improve systems. Think about your school. Your school needs to maintain data about all the students, like their names, ages, grades, library card numbers, parent’s names and many other details so that the school can run without any problems. Similarly, data helps shopkeepers to keep track of their sales. Large businesses benefit from data by being able to understand their customers and create products that will be helpful to them. Additionally, it aids scientists in their many scientific endeavours.
However, storing and maintaining this data on the computer becomes a challenge if we do not have a structured system.
It leads to various problems like having the same information in different places, information not getting updated everywhere, and security and privacy issues.
To resolve these problems, we use databases.
A database is a collection of information or data, stored electronically in a computer system. Most databases store data in the form of tables. A database can contain multiple tables to store related data.
For example, your school’s database might contain separate tables containing students’ data, teachers’ data, library data, and so on.

The column headers in the table are known as attributes and the rows are known as records. We use DBMS (Database Management System) to organise and manage the databases. It acts as an interface between the database and user applications. We will learn more about DBMS later in this chapter.
Did You Know?
The first DBMS was developed in the early 1960s by Charles Bachman.
Importance of Database
In this digital age, computers are used everywhere to store large amounts of data to keep track of personal and professional needs whether it is a local grocery shop or the stock market. Today, we all rely on some form of database to store information.
Let us learn more about the importance of database:
Organised Information: Databases help to keep information organised and make it easier to find. Most databases store related data using multiple tables. This information is recorded in rows and columns, making it easy to access.
Quick Access: Without a database, you would need to manually search through various files and documents to find data. Databases make it simple to add, delete, or modify data because they store data in rows and columns, allowing quick access to specific information.
Centralisation: Centralising information also structures data and prevents duplication. It saves space and allows you to work better and faster, ultimately increasing your overall productivity.
Large Volumes of Data: Databases can store and organise a huge amount of data easily. That makes it easy to quickly find the specific information as needed.
Data Security: Your data is secure when it is kept in the database. Only authorised persons can access the information which prevents unauthorised access to data.
Ensures Data Integrity: Data integrity is a process that makes sure the data is correct, whole, and the same as long as it exists in the database.
The database ensures data integrity by providing accurate information, even if multiple users are working in the system at the same time. This means you will always get the right information, even when there are multiple users.
For example, Book Id, Book Name, Genre, Price, and Publisher would be the same throughout, and anyone can access it. Data integrity helps to set rules on how this data can be accessed, used, and modified.


Reduction of Data Redundancy: Data redundancy occurs when we have multiple copies of the same data. Databases help us reduce data redundancy by making sure you do not have copies of the same data spread all over the place. This is important because it can get tricky to update data everywhere it is stored.
Explore More!
Big Data is a huge collection of information. Companies use it to recommend movies and songs you might enjoy. Scan the QR code to know more about it.
Database Management System (DBMS)
A DBMS (Database Management System) is a software that helps us to store, retrieve, and manage data in a database.
To retrieve data means to obtain the data from the database.
DBMS provides an interface between an end-user and a database, which allows users to create, read, update, and delete data in the database. It also provides protection and security to the database. In case of multiple users, it can restrict access to different databases for unauthorised users.
Imagine you have a big collection of books and you need someone to keep them neat and tidy for you. That’s what a DBMS does for databases.
It helps organise the data, makes it easy to search for specific things, and ensures that everything is safe and secure. So, whenever we want to find something in our database, the DBMS helps us quickly locate the exact information we need.
Components of DBMS
Database Management System consists of six main components. These are:
1. Hardware
2. Software
3. Data
4. Procedures
5. Database Access Language
6. People
Discuss!
What is the difference between a database and a DBMS?
1. Hardware: The hardware of computers consists of physical components such as a keyboard, mouse, monitor, and processor. Hardware is used to capture the data and present the output to the user.
When we try to run any database software like MySQL, we can type any command with the help of our keyboard. Storage devices, such as the hard disk, RAM, and ROM, are also the part of our computer system.
2. Software: Software is a set of programs that help hardware do its job.
It is made up of procedures and programs that can understand the language used to talk to databases.
This software then turns those instructions into real commands for the database and makes things happen.
Some examples of DBMS software are MySQL, Oracle, SQL Server, dBase, FileMaker, and Microsoft Access.
Did You Know?

Smarthome gadgets, like those controlling lights and music, rely on databases to deliver great experiences.
3. People: People interacting with the computers are also referred to as the “live-ware” of the computer system.
They form the most crucial part of the computer system.
These individuals control and manage databases, performing various operations within the Database Management System (DBMS). This group comprises the database administrator, software developer, and end-users.
4. Procedures: A procedure is a form of general instructions or guidelines for using a DBMS. These instructions include how to set up the database, install it, log in and out, manage it, create a backup, and generate reports from the database.
5. Data: These are the actual pieces of information, like numbers or text, that are input into a computer system.
Data refers to the collection of raw facts stored in a database.
Data is the fundamental building block for creating useful information. It is a crucial part of a DBMS. The database contains both the actual data and metadata, which is information about the data.

For example, when you want to store data in a database, you need to identify the attributes to organise that data, such as the data’s size, name, and other related details. These specific pieces of information about the data to be stored are known as metadata
6. Database Access Language: Database Access Language is a language that allows users to give commands to a database to operate the data stored. You can use this language to ask the database to do many things, such as getting data, modifying it, or removing it.
The most widely used Database Access Language is SQL. SQL stands for Structured Query Language
Do It Yourself 6A
Match the Columns.
Column A
Database
Data Integrity
Database Management System
Data Redundancy
Column B
Occurrence of duplicate copies of similar data
A special computer program for managing databases
A collection of organised data
A process that makes sure data is accurate, complete, and consistent over the data’s lifecycle
MySQL
MySQL is a database management system that allows us to create our own databases. It allows us to create, update, and retrieve data using SQL. It is open-source, which means it is free to use. It is popular for its speed, reliability, and scalability.
SQL (Structured Query Language)
SQL (Structured Query Language) is a language that lets us access and manipulate databases. It allows us to perform operations on the data stored in the database, such as updating, inserting, deleting, and modifying data, etc.
SQL works on structured data. As a database holds data in a structured way, it is easy to retrieve information from the database using SQL.
Did You Know?
SQL is not a database management system, but a query language.
With SQL, we can state our query using commands and ask the database to find specific data, like “Which book has the maximum price?” or “How many books do I have in my collection?”. The database then understands our questions and gives us the right answers. SQL is simple but a powerful language to deal with databases. Before we learn more about SQL and create our database, let us learn about keys.
Keys in SQL
Keys are used to uniquely identify any row of data from the table. We know a database can have multiple tables. Keys are also used to establish and identify relationships between tables. We will learn about four kinds of keys in this chapter.
1. Primary Key: The primary key is the attribute or set of attributes in a table that uniquely identifies a row in that table. There should be only one primary key in a table. The value of the primary key in each row should be unique, there should be no repetition.
Let us observe the Students table. Student_ID is the primary key. Student_ID uniquely identifies each row in the table. In tables, the underlined attribute is the primary key.
Primary Key
STU001Riya Das 7 A 23 LIB007
STU002Ronita Shah5 B 31 LIB010
STU003Anuj Bhatnagar3 A 24 LIB100
STU004Ritu Gupta7 A 13 LIB101
STU005Priya Sen4 B 11 LIB112
STU006Satish Pandey2 A 13 LIB015
2. Candidate Key: There might be multiple attributes that can uniquely identify a row in a table. In our example, both Student_ID and Library_ID can uniquely identify a row in the table. But we had chosen Student_ID as the primary key.
Candidate key is the attribute that uniquely identifies a row in the table, but is not considered as the primary key. In our example, Library_ID is the candidate key.
3. Composite key: A primary key can consist of more than one attribute. In the Students table, Grade, Section, and Roll_Number when combined together can identify a row uniquely. Hence, it can be a primary key. When a primary key consists of more than one attribute, it is called a composite key.
4. Foreign key: We have previously learnt that a database can have multiple tables. Foreign keys help us to establish a relationship between these tables. Consider the following tables: Students table: Foreign key for Students table
STU001Riya Das 7A23 LIB007H001
STU002Ronita Shah5B31
LIB010H001
STU003Anuj Bhatnagar3A24 LIB100H003
STU004Ritu Gupta7A13
STU005Priya Sen4B11
STU006Satish Pandey2A13
LIB101H002
LIB112H001
LIB015H003
House table:
Primary key for House table
House_ID House_name
H001 Red house
H002 Yellow house
H003 Green house
Both the tables have the attribute named House_ID. House_ID is the primary key in the House table but it is not a primary key in Students table. House_ID is considered as a foreign key in the Students table.
Let us learn the basic concepts of SQL and then create queries.
Data Types in SQL
In SQL, data types define the type of data that can be stored in a column of a table. The following are the most common data types of SQL:
Numeric Data Type
Numeric data types are used to store a numeric value in a field column. It may be decimal, integer or real value.
Syntax: NUMBER(n, d)
where n specifies the number of digits and d specifies the number of digits to right of the decimal point.
Example: age NUMBER(2), salary NUMBER(6, 3)
Text Data Type
Text data types are used to store a string value in a field column. It can be a single character or a set of characters.
CHAR: This data type is used to store fixed-length character strings. If the string is shorter than the specified length, it is padded with spaces.
Syntax: CHAR(size) where size represents the maximum (255 Characters) number of characters in a column.
Example: name CHAR(15)
VARCHAR/VARCHAR2: It is used to store variable length alphanumeric data.
Syntax: VARCHAR(size) / VARCHAR2(size) where size represents the maximum (2000 Characters) number of characters in a column.
Example: address VARCHAR2(50)
Date and Time Data Types
Date and time data types are used to store date and time values.
DATE: It is used to store date in columns. SQL supports the various date formats other than the standard DD-MON-YY.
Example: dob DATE
TIME: It is used to store time in columns. SQL supports the various time formats other than the standard hh-mm-ss.
Example: joining_time TIME
Types of SQL Commands
Did You Know?
Every DATE and TIME can be added, subtracted, or compared as it can be done with other data types.
SQL (Structured Query Language) is used for managing and manipulating databases. SQL commands are broadly categorised into two main types:
• Data Definition Language (DDL)
• Data Manipulation Language (DML)
Data Definition Language (DDL)
DDL commands are used to define and modify the structure of database objects, such as tables, indexes, and views. These commands deal with the schema and structure of the database.
The following are the main DDL commands:
1. CREATE: Used to create new database objects like tables, views, and indexes.
2. ALTER: Used to modify the structure of an existing database object.
3. DROP: Used to delete an existing database object.
Data Manipulation Language (DML)
DML commands are used to manipulate data stored in the database. These commands deal with the actual data in the database.
The following are the main DML Commands:
1. SELECT: Used to retrieve data from the database.
2. INSERT: Used to add new rows of data to a table.
3. UPDATE: Used to modify existing data in a table.
4. DELETE: Used to remove rows from a table.
SQL Queries
Let us now learn how to use the SQL queries to create tables and work upon them.
Create Table Command
The Create Table command is used for creating tables. Syntax:
Create Table table_name ( column_name_1 data_type_1, column_name_2 data_type_2,
column_name_n data_type_n );
Here is an example of creating a table Students using various data types: CREATE TABLE Students ( Student_ID VARCHAR(6), Student_Name VARCHAR(50), Grade INT, Section CHAR(1), Roll_Number INT, Library_ID VARCHAR(7), House_ID VARCHAR(4), Enrollment_Date DATE
); This query will create a table with the following structure:
Student_ID Student_Name Grade Section Roll_Number Library_ID House_ID Enrollment_Date
Create Table Command with Primary Key
The Create Table command is used to create a new table in a database. When defining a table, you can set a primary key to ensure each record is unique.
Syntax:
Create Table table_name ( column_name_1 data_type_1 PRIMARY KEY, column_name_2 data_type_2,
column_name_n data_type_n );
Example:
CREATE TABLE Students (
Student_ID VARCHAR(6) PRIMARY KEY, Student_Name VARCHAR(50), Grade INT, Section CHAR(1), Roll_Number INT, Library_ID VARCHAR(7), House_ID VARCHAR(4), Enrollment_Date DATE );
In the above created Students table, the Student_ID field is the primary key and will contain only the unique values in it.
Insert Command
Now, we have created a table. Let us insert the values in the created table, Students.
Syntax:
INSERT INTO table_name (column1, column2, ...) VALUES (value1, value2, ...);
Example:
INSERT INTO Students (Student_ID, Student_Name, Grade, Section, Roll_Number, Library_ID, House_ID, Enrollment Date) VALUES (‘STU001’, ‘Riya Das’, 7, ‘A’, 23, ‘LIB007’, ‘H001’, ‘24-07-2024’);
This command will insert the values in the Students table.
Select Command
The SELECT statement is used to query the database and retrieve specific data.
Syntax
SELECT column1, column2, ...
FROM table_name
WHERE condition;
Examples
Let us select all columns for all students from the Students table:
SELECT * FROM Students;
To select specific columns, such as Student_Name and Grade, we use:
SELECT Student_Name, Grade FROM Students;
To filter the results and retrieve only students from Grade 7:
SELECT * FROM Students
WHERE Grade = 7;
Explore More!
There are other Database Management Systems besides MySQL like Microsoft SQL Server and MongoDB. Scan this QR code to know more about them.
Do It Yourself 6B
To create a table, we use command to define its structure.
To show data from a table, we use command.
Identify and write down the field names with their data types if you have to create a table named
4 Identify the given commands as DDL or DML and write their type in the blank space.
a select
b update
c alter d insert
5 Look at the structure of the given table. Which field according to you should be a primary key?
Table name: Library_Inventory
Book_ID Title Author Year Publisher ISBN
Chapter Checkup
A. Fill in the blanks.
Hints Insert DBMS Primary Database Attribute
A is a collection of information stored electronically in a computer system.
The is the software that helps us store, retrieve, and manage data in a database.
In a table, the column headers are known as
A key uniquely identifies each row in a table.
The SQL command used to insert values in the created table is
B. Tick () the correct option.
Which of the following is a numeric data type in SQL?
a
What does DML stand for?
a Data Modification Language
b Data Management Language
c Data Manipulation Language d Data Mining Language
What is the purpose of the primary key in a table?
a To store text data
c To perform calculations
b To uniquely identify each row
d To store date values
key help us to establish a relationship between different tables.
a Primary b Composite c
C. Who am I?
I am the software that acts as an interface between the database and user applications.
I ensure that the data in a database is correct, whole, and consistent.
I am a language used to manage and manipulate databases.
I am a command used to create a new table in a database.
I am a type of SQL command used to define and modify the structure of database objects.
D. Write T for True and F for False.
Databases are used to keep information organised and make it easier to find.
A primary key can have duplicate values.
SQL stands for Structured Query Language.
The SELECT command is used to insert data into a table.
A DBMS provides protection and security to the database.
E. Answer the following questions.
What is a database, and why is it important?
Explain the role of a Database Management System (DBMS).
What are the different components of a DBMS? What
F. Apply your learning.
Create a table named ‘Teachers’ with columns for Teacher_ID, Teacher_Name, Subject, and Contact_Number. Make Teacher_ID the primary key.
Insert a new row into the “Teachers” table with the following values: Teacher_ID: ‘T001’, Teacher_Name: ‘John Doe’, Subject: ‘Math’, Contact_Number: ‘1234567890’.
Vijay has started his own movie theatre. He wants to keep a record of the movies he plays in his theatre. Write SQL commands to create a database and table for the same.
Rahul is a video game player. He wants to create a leadership board with each player’s name, score, and level achieved. Write the SQL commands to create a leadership board table and add records in it.
Describe a real-world scenario where you would use a composite key in a database table.
Creating Animations with Canva 7
Designing with Canva
Canva is a free graphic design platform used to create graphics and presentations. The word ‘graphics’ refers to visual art or images. Using graphics and text, we can easily convey ideas and information to a reader.
Canva is used for making various types of visuals that can be used in posters, on social media, presentations, flyers, infographics, and many more.
Getting Started with Canva
To get started with Canva, follow the steps:
1. Open a web browser.
2. Type www.canva.com in the address bar. The home page of the website opens.

3. Create a new account by clicking on the Sign up button. Or, log in to Canva by using your existing mail address by clicking on the Log in button.
To log in to an existing account To create a new account

After you log in, the first screen will look like the image given here. You can see a variety of design templates and tools that you can choose from.
Let us create a card on the topic, ‘Digital India.’
Creating a Card
Follow the given steps to create a card:
1. Click the Create a design button in the top left-hand corner of the screen. The Create a design window will appear.
2. Type ‘card’ in the search bar. The options related to card appear.
3. Select the size of the card that suits your requirement.

4. A new window opens where you can design the card.

Setting a Background
To set the background image for your card, follow the steps:
1. Scroll down the left-hand sidebar and then select the Apps option. The Apps panel will appear.
2. Choose the Background option from the list. Various background options will appear. Choose a suitable background from the list.


Adding Elements
Elements in Canva are colourful images, stickers, icons, and shapes that you can easily add to your designs to make them interesting.
Let us follow these steps to add some elements on the card:
1. Click the Elements option on the sidebar. A drawer menu appears.
2. Browse the various elements displayed in the menu
3. You can also type a keyword in the Search elements box and press Enter.
4. The elements related to the keyword will appear.
5. Select an element to add. The selected element appears in the design area.
6. You can select the added element by clicking on it and move it anywhere on the card. You can also rotate the element by clicking on the Rotate button.

Adding Text
Other than elements, you can also add text to your design. Follow the given steps to add text to your project:
1. Click the Text option on the sidebar. A drawer menu appears.
2. Select the Add a text box button.
3. A text box with default settings appears in the design area.
4. You can select the font style and font size from the text options displayed in the options bar above the design area. Now, type the desired text in the text box.

Font style Font size
In a similar manner, add more elements and text to your design.
Concept of Layers

A layer can be considered as a transparent sheet. Suppose you need to create a drawing with various elements. There are multiple transparent sheets with one element drawn on each sheet. Now, put these sheets on top of each other. You can observe a complete drawing with multiple elements.
When you add new elements to Canva, they get placed on top of each other, creating layers of elements.
Positioning Elements

After all the elements are placed in the design area, you can position them as required. Let us explore the various ways to position an element or a layer.
1. Click on an element.
2. Click on Position in the Options bar.
3. A sidebar opens on the right-hand side, consisting of two tabs, Arrange and Layers.

Let us learn about the various options in the Arrange and Layers tabs.
a. Arrange Tab
In the Arrange tab, the general settings for arranging various elements appear. This panel is further divided into various sections.
Layers Arrangement Section
The first section helps us with the arrangement of layers.
Forward—moves the selected layer a layer above.
To front—moves the selected layer to the top of the stack.
Backward—moves the selected layer a layer below.
To back—moves the selected layer to the bottom of the stack.
Align to Page Section
This section helps you to align the elements on your page.
For vertical alignment, use the options Top, Middle, and Bottom
For horizontal alignment, use the options Left, Centre, and Right.
Let us align the text ‘Digital India’ to the top of our design:
1. Select the text to be aligned.
2. Then, select the top option, to position the element vertically on the top of the design page.

Advanced Section
The Advanced section lets you move, turn, or resize elements in your design, using exact values.
Width and Height
Width refers to how wide an object is, and height refers to how tall an object is.
In Canva, you can type the values to specify the exact object size.
You can change the values of width and height by typing the required values in the Width and Height fields. Here, px stands for pixels.
Rotate
The Rotate option in Canva allows you to turn the element around at the required angle. You can use this feature to show elements from various angles.
Follow the given steps to rotate an element:
1. Select the element to be rotated.
2. Change the value of the Rotate field to the required angle.
Alternatively, you can also rotate elements with the help of the Rotate icon.

Hold the Rotate icon and move it to change the angle of the element.

b. Layers Tab
You can use the Layers tab to view the list of the layers in your project. By dragging the layers using a mouse, you can arrange the layers from this tab as well.
Using the All Tab
Go to the Layers tab and select the All tab under it.

Using the Overlapping Tab
Top Layer
Different layers in the design
Bottom Layer
If there are multiple layers in a project, it becomes difficult to select the exact layer on which you want to work. In such a case, the Overlapping tab is helpful.
1. Go to the Layers tab and select the Overlapping tab under it.
2. This tab shows only the layers that overlap with a selected layer. Select the layer you are looking for and make the required changes.

Think and Tell
Imagine you are creating graphics in Microsoft Paint. You have added a few shapes and text overlapping each other. Later, you realise that the text is hiding behind the shapes. Is it possible to correct it without re-creating it in Paint? If you create the same project in Canva, how would it be helpful?
Duplicating a Layer
Duplicating a layer means creating a copy of it. This can save a lot of time when you want to use the same element multiple times in a project. What if you want to add two mobiles? You will simply duplicate the layers.
Follow the given steps to duplicate a layer:
1. In the Layers tab, right-click the layer that you want to duplicate. A drop-down menu appears.
2. Select the Duplicate option.
3. The selected layer is duplicated.


Deleting a Layer
Deleting layers that are not needed helps maintain an organised design. To delete an element from your design, delete its corresponding layer.
Follow the given steps to delete a layer:
1. In the Layers tab, right-click the layer you want to delete.
2. Select the Delete option.
3. The selected layer is deleted.


Did You Know?
As of 2023, 80 crore designs were created using Canva since its launch.
Create a similar design in Canva and guess the alignment of the text ‘Happy Birthday’ in the following designs.


a The Middle and Center alignment options serve the same purpose.
b The To Front option is different from the Forward option.
c The To Back option places an element immediately behind the other element.
d You can change the order in which the elements are layered.
Tick () the correct option.
The Align to Page feature helps you to:
a Make elements invisible.
c Align the elements on page.
Animations
Have you ever seen a flipbook?
b Create complex designs.
d Change the colour of the element.
It is a small book with a series of images at various positions on separate pages. When you quickly flip through such a book, it creates the illusion of movement of the objects drawn on the pages.
The cartoon movies that you watch are created in a similar fashion. Many images are drawn and flipped through at a fast pace so that the characters seem to be moving. This is what we call animation
Animation is a method in which figures or objects are manipulated to appear as moving images
Did You Know?

“Snow White and the Seven Dwarfs”, released in 1937, is Disney’s first full-length animated movie!
Creating Animations
After creating a design in Canva, you can make it look interactive by adding animations. Canva has many useful tools using which you can create interesting animations. Let us learn how to use them.
Adding Page Animation
Page animations decide how your page will enter the screen. Follow the given steps to add page animation:
1. Select the page. (Make sure you select only the background, not the other elements.)
2. Click the Animate option on the top bar. A sidebar with the tab Page Animations opens showing a list of animations.

3. Place the mouse cursor over the effects to see what they look like on your page.
4. Click the Play button, at the top right-hand side of your screen to observe the effect of the animation.

Adding Element Animation
You can animate specific texts and elements present on a page in the same way as you can animate the entire page.
Follow the given steps to add element animation:
1. Click the text/element you want to animate.
2. Select the Element Animation tab from the sidebar and apply the desired animation effect to your element.

Applying Transparency
Applying transparency means making the elements look see-through. In Canva, all elements are fully visible by default. This means that Transparency is set to 100.
To apply transparency:
1. Select an element from your design, for example, the mobile.

2. Click the Transparency icon from the options bar above the design area. The Transparency slider appears.
3. Move the slider to the left to decrease the transparency of the element and to the right to increase it.
4. Observe the effect on the element’s transparency.
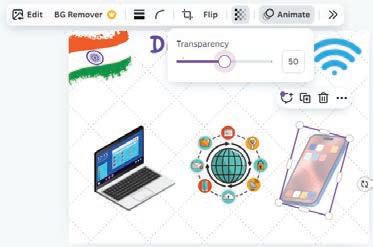
Using the Copy Style Option
Suppose you like the style of an element or a page, such as font, colour, effects, or transparency. You can apply the same styles to other elements or pages as well.
To copy and apply a style, follow the given steps:
1. Let’s say, you like the mobile for its transparency and want to copy the same to another element.
2. Right-click the mobile. A context menu appears.
3. Click the Copy style option. The style is copied.
4. Click the element where you want to apply the copied style. For example, click the image of the laptop.

The laptop becomes transparent with the same transparency value, just like the mobile.

Locking Objects
Locking an object makes sure that the object remains on its place while you work on the other parts of the design. You can either lock an individual element or the entire page.
To lock the entire page:
1. Select the thumbnail of the page from the bottom and click on the More option (three dots).
2. A context menu will appear. Select the Lock page option to lock the page.
Discuss!
How can the Lock feature be helpful when you are creating a project?
To lock the specific elements, right-click the element and select the Lock option from the context menu. The element is locked. Note that another Lock symbol appears near the locked element.
To unlock the element, click the Lock symbol again.


Explore More!
Wonder how animation works practically? Scan this QR code.
Do It Yourself 7B
Fill in the blanks.
a Page Animation decides how the will enter the screen.
b To see how your animation looks on an element, you use the button.
c The feature is used to copy the style of an element to another.
Match the following:
When you want to make sure that the object remains on its place.
When you want to make the elements look see-through
When you want to have the same style as the current element
Chapter Checkup
A. Fill in the blanks.


Canva is a popular online tool used for creating various types of
To create a design in Canva, you need to click the button. Elements in Canva include graphics, stickers, icons, and
The option in Canva allows you to control the arrangement of various elements in your design. means making the elements look see-through.
In Canva, all elements are fully visible by default. This means that the Transparency setting is at what value?
a 0
c 100
b 50
d 75
Which tab helps you set the background image for your card in Canva?
a Text
c Draw
What does adjusting transparency in Canva do?
a Changes the font size of the element
c Makes a layer see-through
How does the Copy Style feature in Canva help your design?
a It changes the animation effects.
c It duplicates the entire design.
C. Who am I?
I make layers see-through, creating visual effects and overlays.
I can save a lot of time when you want to use the same element multiple times in a project.
I prevent unwanted changes in the project.
b Apps
d Background
b Rotates the element
d Duplicates the element
b It applies the same style from one element to another.
d It adds comments to the design.
I help you position the element at the top, middle, or centre of the design area.
I am used to turn elements around by a desired angle.
D. Write T for True and F for False.
Canva is difficult to use and requires professional design skills.
The Layers tab in Canva helps order the elements like a stack.
Locking objects in Canva prevents any changes to that element.
The element will not be visible if the transparency value is 100.
The Forward option brings the layer to the top of the stack.
E. Answer the following questions.
What is the purpose of the Position option in Canva? 1
F. Apply your learning.
Aleena is making a poster for Diwali. She placed various elements in her design. Which Canva feature can she use to put the elements exactly in the centre?
Archita made a crossword puzzle for her classmates, using Canva. However, she made some adjustments to the project, causing the crossword to become nearly invisible. What do you think she must have done?
Maya is creating a design with lots of elements. She wants some objects to be in front while others hide behind them. Which Canva feature can she use to control the layers and make her design look like a playful scene?
Imagine you are a young chef who wants to share your favourite recipes. You have designed a digital recipe card using Canva. You have created multiple layers of elements in the recipe card. The text of the recipe card is hidden behind the images. What might be the problem?
Rani created a card for her friend’s birthday. She was showing it to her younger brother Anuj. Anuj was very curious and deleted the text in the card by mistake. How could have Rani prevented this mistake?
8 Basics of Python
Programming Languages
Have you ever wondered how the computer games you play or the websites you explore actually work? Well, to design these, we need programming languages. As a computer is an electronic device, it does not understand the language that we speak. To communicate with the computer, we need to create programs in its language, which is known as a programming language.
A computer program is basically a set of instructions given to a computer to perform a task. We need a programming language to write these programs.
Types of Programming Languages
Programming languages are classified into two main categories:
Low-level Languages
Low-level languages (LLLs) are machine-friendly languages that are understandable for the machines and harder for humans to understand. They are used to control the hardware of the computer.
Machine language and assembly language are examples of low-level languages. These languages communicate with the computer directly, so no language translation is required. The instructions in the machine language are written using 0s and 1s, which are known as binary digits. On the other hand, symbolic names, also known as mnemonics, are used in assembly language for writing programs.
High-level Languages
High-level languages (HLLs) are user-friendly and easier to use than low-level languages. They are used for various tasks like making games, websites, and analysing data.
HLLs make programming simpler because they use words that are human readable like English language words, instead of the hard-toremember 0s and 1s of machine language.
But, before a computer can run an high-level language program, it needs to be translated into low-level language program.


Some common examples of high-level languages are C, C++, Java, and Python. In this book, we will learn Python, which is a very popular programming language these days.
Introduction to Python
Python is a high-level programming language that is easy to learn and simple to use. It comes with a lot of pre-installed features. This makes it simple to start programming without having to learn a lot of complicated material. It was created by Guido van Rossum and first released in 1991.
Features of Python
Here are some of the features of Python:
1 Easy to read: Python code is easy to read, just like English.
2 Quick to learn: Python has few keywords, a simple structure, and a clearly defined syntax. This makes it easier to learn and understand, even for beginners.
3 Easy to maintain: Python source code is easy to maintain and update.
4 Interactive execution mode: Python offers script and interactive modes for running programs. The code can be interactively tested and debugged in the interactive mode.
A three-step loop process defines how Python is run in the interactive window:
• The Python interpreter first reads the code entered at the prompt.
• Then it evaluates the code.
• Finally, it prints the outcome and awaits new input.
Did You Know?
5 Dynamic typing: Python defines data type dynamically for the objects according to the value assigned. It also supports dynamic data type checking.
6 Portable: Python is a portable language because it can be used on a variety of hardware platforms.
7 Large database support: Python provides interfaces to all major commercial databases.
8 GUI application creation: Python also supports the creation of Graphical User Interface (GUI) applications.
9 Scalable: Python provides better structure and support for larger programs than shell scripting. This makes it scalable.
Syntax
Like any language, programming languages have their own sets of rules for writing programs. These rules, called syntax rules, tell us how to write programs in that language.
Python is not different; it has its own rules that we must follow when writing code.
If we don’t follow the naming conventions or any syntax of a language, we may get syntax errors when executing our code.
Python is named after a famous British comedy group called Monty Python.
Syntax errors are mistakes that happen when we don’t write our code correctly, such as using incorrect function names or missing quotes and brackets.
Built-in Functions
In Python, there are numerous built-in functions readily available. A function is a block of code used to perform a specific task. Built-in functions are functions predefined in the Python programming language. These functions can be used without the need to define them yourself.
One of the built-in functions is the print() function.
The print() Function
The print() function displays a value or information in the output.
Syntax: print(“value“)
print("Hello kitty!") Hello kitty!
print(25) 25
But how does a Python code get executed?
Execution of a Python Code
The Python interpreter reads and executes the code line by line. If there are any results (output) for a particular line, it displays them. During execution, the interpreter compiles the code into bytecode, an intermediate language that the Python virtual machine understands. This bytecode is then executed directly, without needing a separate conversion to machine code. If errors occurs during execution, the process stops.

Interpreter
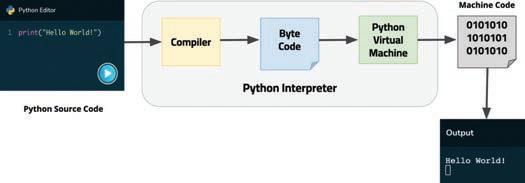
Data Types
In Python, every value has a data type. Data types define the type of data that a variable can store. There are two categories of data types in Python: Immutable and Mutable.
• Immutable data types are those whose values cannot be changed once declared.
• Mutable data types are those whose values can be changed at any time.


4, 7, 10.5


7, 10

(True, False)


Tuples (4,3.5, ‘b’)


Lists [4, ‘b’, 6.5]

Dictionaries {1: ‘a’, 2: ‘b’}

Sets {2, 5, 7}

Look at the table. It shows the different data types and their descriptions.
Name Type
Integer int
Floating point float
String str
List list
Dictionary dict
Tuple tuple
Set set
Boolean bool
Variables
Description
Whole numbers, like 15, 200, and 275.
Numbers with a decimal point, like 4.3, 7.6, and 340.0.
Ordered sequences of characters, like "Python", "hello", "1495", and "SV".
Ordered sequences of objects, like ["hello123", 40, 107.5].
Unordered key-value pairs, like {"key": "value", "language": "Python"}.
Ordered immutable sequences of objects, like (50, "python", 208.7).
Unordered collections of unique objects, like {"apple", "bird"}.
Logical value indicating True or False.
A variable is a reference name given to a location in the computer’s memory. It allows you to store a value in that location and refer to it as needed. Variables can be used to store numbers, strings, lists, and other data types. They are just like a label that can be changed.
5 num

Imagine a memory location as a box and a variable name as a label for that box. You can store a number in the box and label it as “num”. Whenever you need to use the number, you can easily find it by the label on the box. You can even remove the label and put it on another box, or you can replace the number in the box as needed.
Creating a Variable

In Python, unlike some other programming languages, variable declaration and initialisation occur in a single step. You can simply assign a value to a variable’s name, and it will be automatically created.
Syntax: variable_name = value
Assignment operator (=) is used to assign a value to a variable.
word = "Hi"
number = 5
print(word, number)
5
We can also initialise multiple variables in one line.
Syntax: var1, var2 = value1, value2
word, number = "Hi", 5
print(word, number)
Rules of Naming a Variable
5
There are certain rules we need to follow while naming a variable.
Some rules are:
1 Instead of using spaces, you should use the underscore (_) symbol when naming variables.
2 A variable name must start with a letter or the underscore character.
greeting_message = "Good Evening!" _number_ = 205
print(greeting_message)
print(_number_)
Code Output
greeting%message = "Good day!"
print(greeting%message)
SyntaxError: cannot assign to expression here
3 Python is a case-sensitive language, so the variable names are also case-sensitive. Example: num, Num, and NUM are three different variables.
num = 25
Num = 30
print(Num)
print(NUM)
4 A variable name can have numbers within it but cannot begin with a number.
num_1 = 430 _num2 = 250
print(num_1)
print(_num2)
1num = 100
print(1num)
SyntaxError: invalid syntax
Variable Naming Styles in Python
As we have case styles for words in English, we have some case styles for naming variables. Below are the case styles you can follow to name variables in Python:
Camel Case
• The first letter of the variable is lowercase.
• Each subsequent word’s first letter is capitalised.
• No spaces or underscores.
• Often used for variable and function names.
Example: “Nameofthecompany” can be written as “nameOfTheCompany”.
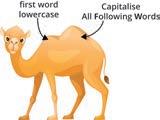
As this represents the camel’s hump we call it Camel-Case.
Code
camelCaseExample = "Hello Camel" print(camelCaseExample)
Snake Case
• All letters are lowercase.
• Words are separated by underscores (_).
• Often used for variable and function names.
Example: "name of the company" in snake-case is written as "name_of_ the_company".
Code Output
snake_case_example = "Hello Python" print(snake_case_example)
Creating a Variable with User Input
In Python, we can even create a variable with user input. To do so, we use a built-in function named input().
The input() Function
The input() function in Python is used to allow input from the user. It is a built-in function.
Syntax: name = input(“<message to be displayed>“) Code
user_input = input("Enter your favourite colour: ") Enter your favourite colour: blue
Solved Examples
Example 1.1
The side of a square is 80. Use camel case to name a variable for area of the square. Calculate the area. Print the result.
Answer:
side = 80
areaOfSquare = side * side print("The area is: ", areaOfSquare)
Example 1.2
The area is: 6400
Given is the average temperatures of different places. Store them in different variables. The temperature has increased by 0.5 in the afternoon. Display the updated temperature of all the places.
Hello Camel
Hello Python
Place
Average Temperatures of Places
Zo Hills
Met Town Bay Area Temperature 20 25 26
Answer:
Zo_Hills=20
Met_Town=25
Bay_Area=26
print("Place","Updated Temperature")
print("Zo Hills", Zo_Hills+0.5)
print("Met Town",Met_Town+0.5)
print("Bay Area",Bay_Area+0.5)
Simple Calculator
Let’s build a simple calculator project while learning the concepts in the chapter. We will be building this project by dividing it into various sub-tasks.
Task 1: Take two numbers and an operator as input from the user.
Let’s create three variables and use the input() function to allow input from the user.
Code
num1 = input("Enter first number: ")
operator = input("Enter operator (+, -, *, /): ")
num2 = input("Enter second number: ")
Now, before we execute the project, do you remember what Dynamic Typing is?
Dynamic Typing
Dynamic typing is a feature of Python where the data type of a variable is not determined until runtime. This means that you can assign a variable to a value of any type, and the variable will automatically take on that type.
The type() Function
In Python, we use the type() function to check the dynamic data type assigned to a variable. It is a built-in function that returns the type of an object. The object can be a variable, a value, or an expression.
Syntax: type(object_name)
Simple Calculator
Task 2: Check the data type of user input. Code
num1 = input("Enter first number: ")
operator = input("Enter operator (+, -, *, /): ")
num2 = input("Enter second number: ")
print(type(num1))
print(type(num2))
print(type(operator))
Enter first number: 4
Enter operator (+, -, *, /): +
Enter second number: 6
<class ‘str’>
<class ‘str’>
<class ‘str’>
The input() function always returns a string value, even if it takes a number, operator, or any other value as input. Since we have created variables with user input, all three variables are of string type.
Do It Yourself 8A
1 Use camel case and snake case to name a variable to represent the scores of a match. Camel case: Snake case:
2 What will be the output of the given code?
a = 7
print(type(a))
b = 3.0
print(type(b))
c = a + b
print(c)
print(type(c))
Typecasting
Typecasting is conversion of the data type of a value into another data type.
We can typecast a data type using typecasting functions: 1 int() 2 float() 3 string() 4 bool()
The int() Function
The int() function is used to typecast the value of a variable into an integer.
It converts the following data type into an integer:
1 Float by removing the decimal point and everything after it.
2 String only if string represents a number.
3 Boolean by converting True to 1 and False to 0.
Syntax: int(variable_name) Code
str_to_int = int("8")
bool_to_int = int(True)
print(str_to_int, type(str_to_int))
print(bool_to_int, type(bool_to_int))
number=int("Hello")
The float() Function
Did You Know?
If you try to convert a string type variable to int type, you will get an error.
ValueError: invalid literal for int() with base 10: ‘Hello’
The float() function is used to typecast the value of a variable into float.
It converts the following data type into float:
1 Integer by adding a decimal followed by a zero.
2 String only if the string represents a float or an integer.
Syntax: float(variable_name)
a=float(10)
b=float("10.2")
ValueError: could not convert string to float: ‘Hello’
The str() Function
The str() function is used to typecast the value of a variable into a string. It converts all the data types including float, integer, and boolean into a string.
Syntax: str(variable_name)
Code
num_1 = str(5)
num_2 = str(7.2)
print(num_1 , type(num_1))
print(num_2, type(num_2))
The bool() Function
5 <class ‘str’>
7.2 <class ‘str’>
Output
The bool() function is used to typecast the value of a variable into boolean. It converts the following data type into boolean:
1 Integer and prints False if the value of the variable is 0, otherwise prints True
2 String and prints False if the string is empty, otherwise prints True.
Syntax: bool(variable_name)
a=bool(0)
b=bool(1)
c=bool("")
d=bool("Python")
print(a,b,c,d)
Simple Calculator
Task 3: Typecast the numbers that the user inputs into floats.
Code
num1 = float(input("Enter first number: "))
num2 = float(input("Enter second number: "))
Next, we need to learn about operators we can use for various mathematical operations on numbers that the user inputs.
Arithmetic Operators
Arithmetic operators are the operators used with the integer or float values to perform mathematical operations on them.
There are 7 arithmetic operators in Python:
Example 1.3
Write a program to get the right answers to the questions given below.
a = 23 b = 13
a. Addition of a and b.
b. Multiplication of a and b.
c. Division of a and b.
d. Base a to the power b.
e. Modulus of a%b
Answer:
a,b=23,13
Think and Tell
Can we multiply a string by a float value in Python?
Code Output
Addition of a and b is: 36
print("Addition of a and b is:",a+b)
print("Multiplication of a and b is:",a*b)
print("a divided by b is:",a/b)
print("Base a to the power b is:",a**b)
print("Remainder, when a is divided by b, is:",a%b)
PEDMAS rule
Python follows the PEDMAS rule, which stands for:
1 Parentheses (P)
3 Division (D)
5 Addition (A)
Multiplication of a and b is: 299
a divided by b is: 1.7692307692307692
Base a to the power b is: 504036361936467383
Remainder, when a is divided by b, is: 10
2 Exponents (E)
4 Multiplication (M)
6 Subtraction (S)
This rule tells us the order in which operations are performed in an expression.
Operations within parentheses are performed first, followed by exponents, multiplication and division from left to right, and finally addition and subtraction from left to right.
Example:
9 + 7 * (8 - 4) / 2 - 3**2 (First, the brackets are solved.)
= 9 + 7 * 4 / 2 - 3**2 (Then, the exponent is solved.)
= 9 + 7 * 4 / 2 - 9 (Then, multiplication is solved.)
= 9 + 28 / 2 - 9 (Then, division is solved.)
= 9 + 14 - 9 (Then, addition is solved.)
= 23 - 9 (Finally, subtraction is solved.)
= 14
Simple Calculator
Task 4: Apply all four basic arithmetic operations ( +, - , *, / ) to the numbers the user inputs.
Code
num1 = float(input("Enter first number: "))
num2 = float(input("Enter second number: "))
add = num1+num2
sub = num1-num2 mul = num1*num2 div = num1/num2
print("Addition: ", add)
print("Subtraction: ", sub)
print("Multiplication: ", mul)
print("Division: ", div)
Do It Yourself 8B
1 Write the output of the following expressions:
Output
Enter first number: 6
Enter second number: 8
Addition: 14.0
Subtraction: -2.0
Multiplication: 48.0
Division: 0.75
2 Write the output of the following code: value = True + False + True print(value)
Chapter Checkup
A Fill in the blanks.
1 A allows you to store a value on that location and refer to it as needed.
2 A variable name must start with a or the character.
3 are mistakes in following rules to write the code.
4 means we can assign a variable to a value of any type, and the variable will automatically take on that type.
5 functions are the predefined functions in the Python programming language.
B Tick () the correct option.
1 Python is a language because it can be used on a variety of hardware platforms.
a Usable b Scalable c Portable d Changeable
2 Which of the following data types in Python is mutable?
a String b Integer c List d Tuple
3 Which operator is used to assign a value to a variable?
a Logical b Assignment c Arithmetic d Comparison
4 Which of the following is a valid variable name?
a Hello_Name b %Name-Hello c Hello%Name d Hello-Name
5 The function in Python is used to allow input from the user.
a print() b input() c type() d int()
C Who am I?
1 I am a type of data that can be changed after being created.
2 I am a variable naming style where words are separated by underscores.
3 I am the process of converting one data type into another.
4 I am an acronym that represents the order of operations in mathematical expressions in Python.
5 I am the function used for converting a value into a floating-point number.
D Write T for True and F for False.
1 The exponentiation operator has the highest precedence in any expression.
2 Arithmetic operators can perform operations on the integer type of data only.
3 Variable names in Python are case-sensitive.
4 Dynamic typing is a feature of Python where the data type of a variable is determined at compile time.
5 The type() function returns the data type of a variable.
E Answer the following questions.
1 What are the two main categories of data types in Python?
2 Write the output of the following code in the given space.
x = 5.7
y = int(x) print(y)
3 What is the difference between mutable and immutable data types in Python?
4 What is the full form of PEDMAS?
5 In Python, what does the input() function return after reading user input from the console?
F Apply your learning.
1 Write a Python program that takes two numbers as input from the user and displays their average.
2 Write a program to keep track of a user’s expenses. Choose appropriate variable names to store the user’s name, total expenses, and the category of expenses (e.g., “Food,” “Transportation”).
Display a message like “Jia spent `50 on Food.”
3 Write a Python program to calculate the area of a circle.
4 Write a program to find the total expenditure on the stationery you purchased from a shop:
5 Write a program to take a temperature in Fahrenheit as input from a user and convert it to Celsius. Then print the result.
9 Control Statements in Python
Control Statements
Control statements in Python are used to control the flow of execution of the program. They allow you to make decisions, repeat code, and skip code.
There are three main types of control statements in Python:
• Conditional Statements
• Loops
• Jump Statements
Let us learn about these statements in detail.
Conditional Statements
Suppose you are going on a 3-day, 2-night class trip to Shimla during your summer holiday. What type of clothes will you pack?
You will check the weather in Shimla and pack your clothes accordingly. Since you are visiting Shimla during the summer, you should pack light woollen clothes, as it will be pleasant during the day and a little cold at night.
Similarly, we often find ourselves in situations where we need to make some decisions according to the given conditions. This skill we have is called decision-making ability
However, computers are machines. They cannot make decisions on their own. We need to make programs for them so that they can give the appropriate results according to the given condition. This can be achieved with the help of conditional statements in Python.
Conditional statements allow us to instruct the computer to check for a specific situation and make it do something if that situation occurs.
A condition is set to establish criteria that require some form of comparison to be performed. Therefore, to define a condition, one must also understand the comparison operators.
Comparison Operators
Comparison operators are the symbols or expressions that allow us to compare two values or variables. They compare the value on the left-hand side with the value on the right-hand side and return either ‘True’ or ‘False’ as the result of the comparison.
These operators are also known as Relational Operators
Below are the six comparison operators in Python.
== Equal to Returns True if both operands are equal
!= Not Equal to Returns True if operands are not equal
> Greater than Returns True if the left operand is greater than the right
< Less than Returns True if the left operand is less than the right
>= Greater than or equal to Returns True if the left operand is greater than or equal to the right
<= Less than or equal to Returns True if the left operand is less than or equal to the right
Let us look at the following example to understand the usage of comparison operators.
Johnny needs to determine whether the number of balls in box A is equal to, less than, or greater than the number of balls in box B. Box A contains 453 balls, and box B contains 454 balls. Using comparison operators, print whether the situations are ‘True’ or ‘False’.
Answer: Code
box_A=453
box_B=454
cond1=box_A==box_B
print("Are balls in box A equal to box B? ", cond1)
cond2=box_A<box_B
print("Are balls in box A less than box B? ", cond2)
cond3=box_A>box_B
print("Are balls in box A more than box B?", cond3)
Do It Yourself 9A
What is the difference between the greater than operator (>) and the greater than or equal to operator (>=)? Think and
Are balls in box A equal to box B? False
Are balls in box A less than box B? True
Are balls in box A more than box B? False
Joe always likes to help his parents with the household chores. His mother has given him ` 350 to buy some groceries from a nearby shop. He plans to purchase tomatoes for ` 50, onions for ` 60, and a jar of peanut butter for ` 100.
1 Using comparison operators, print ‘True’ or ‘False’ to help him determine whether the money his mother gave him will be enough to buy the planned items or not.
2 Joe intends to buy 2 more jars of peanut butter with the remaining money. Assist him in deciding if he has enough money to do so.
Indentation and Code Blocks
Indentation refers to a fixed number of spaces (or sometimes tabs) added at the beginning of each line of code. These spaces create a visual hierarchy in your program, just like paragraphs in a story or chapters in a book. Indentation helps Python understand which lines of code belong together and should be executed as a single unit.
Interpreter view of Code
Code block 1 begins
Statement 1
Code block 2 begins
Statement 2
Statement 3
Code block 2 ends
Code block 1 ends
Types of Conditional Statements
Discuss!
In Python, we have three types of conditional statements that allow us to make decisions in our programs. These include:
• if Statement
• if… else Statement
• if… elif… else Ladder
The if Statement
Syntax: if condition1:
# Statement to execute if condition1 is true
The colon (:) sign is used after the condition with the if statement. The statements inside the if statement should be properly indented.
Code
age = 21 if age >= 18: print("Eligible to vote.")
The if… else Statement
Output
Eligible to vote.
The ‘if’ statement is used to check a specific condition. If the condition following the ‘if’ keyword evaluates to True, the code block after the ‘if’ condition will be executed; otherwise, the code block will be skipped. Flowchart
The ‘if… else’ statement checks a condition, allowing us to instruct the computer on what to do in both cases, whether the statement is true or false.
If the condition following the ‘if’ keyword evaluates to True, the code block after the if condition will be executed; otherwise, the code block after the ‘else’ keyword will be executed.
What happens if you don’t indent your code properly? Chapter 9 • Control Statements in Python
Syntax: if condition_1:
#Statements to execute if condition_1 is True else:
#Statements to execute if condition_1 is False
age = 21 if age >= 18:
print("Eligible to vote.") else: print("Too young to vote!") Eligible to vote.
The elif Statement
Sometimes, we need to evaluate multiple conditions. In such cases, we use the ‘elif’ statement, which stands for ‘else if’. It allows us to check multiple conditions in sequence, and Python checks each condition until one of them is True.
Syntax: if condition_1:
Statement_1 if condition1 is True elif condition_2:
Statement_2 if condition2 is True .. else:
Final_Statement if no condition is True
x = 10 if x > 0:
print("x is positive") elif x == 0:
print("x is zero") else:
print("x is negative") x is positive
If condition_1 becomes True, Statement_1 will be executed, otherwise, the interpreter moves on to condition_2 and if it becomes true then it will execute Statement_2.
This process continues until a True condition is found, otherwise the Final_Statement inside ‘else’ statement will be executed if none of the conditions are True.
Let us update the project we created in the previous chapter using comparison operators and conditionals.
Simple Calculator
Code
num1 = float(input("Enter first number: "))
operator = input("Enter operator (+, -, *, /): ")
num2 = float(input("Enter second number: ")) if operator == "+":
result = num1 + num2 elif operator == "-":
result = num1 - num2 elif operator == "*":
result = num1 * num2 elif operator == "/": if num2 == 0:
result = "Division by zero is not allowed." else:
result = num1 / num2 else:
result = "Invalid operator." print("Result:",result)
Do It Yourself 9B
Output
Enter first number: 6
Enter operator (+, -, *, /): /
Enter second number: 8
Result: 0.75
1 Write a program to check if a number is greater than 100 or not.
2 Write a program to print the largest number among three inputs.
Logical Operators
Logical operators allow us to combine multiple conditions in one. There are three important logical operators in Python: ‘and’, ‘or’ and ‘not.’
The and Operator
The ‘and’ operator allows us to combine two conditional statements and returns True only if both statements are true.
In all other cases, it returns False. If Statement 1 is True and Statement 2 is True, then the result is True. If either Statement 1 or Statement 2 (or both) is False, then the result is False.
Syntax: Statement 1 and Statement 2
Following is the truth table for the and operator:
print(3<7 and 8==8)
print(6>2 and 9==8)
The or Operator
The ‘or’ operator allows us to combine two conditional statements and returns True if either of the statements is true.
It returns False only if both statements are false. If Statement 1 is True or Statement 2 is True (or both), then the result is True. If both Statement 1 and Statement 2 are False, then the result is False.
Syntax: Statement 1 or Statement 2
Following is the truth table for the or operator:
print(4+5>8 or 9!=7)
print(6>7 or 8==9.0)
Multiple and/or Operators
What is the difference between the ‘and’ and the ‘or’ operator?
In Python, we have the flexibility to create complex conditional statements by using multiple ‘and’ and ‘or’ operators. When dealing with multiple conditional statements involving both ‘and’ and ‘or’, it is important to know that ‘and’ takes precedence over ‘or’.
This means that conditions with ‘and’ are evaluated first, followed by the conditions with ‘or’.
Statement 1 or Statement 2 and Statement 3
#First we solve the ‘and’ operator, and then the ‘or’
Code
print(2>3 or 3==3 and 1>0) True
Let us look at how we got the output for the given code:
2 > 3 or 3 == 3 and 1 > 0
False or True and True #Solve and first
False or True #Solve or True
Solved Example
Write a program to help David pick students for his project.
He has two rules:
1 Students must have at least 60% in their school grades.
2 They need a score of at least 7 in their analytical tests.
Output
Run the program to check if Ray and Joe meet David’s conditions.
Ray has 65% in school and 8.5 in tests.
Joe has 55% in school and 8 in tests.
Answer:
Code
ray_academics=65
ray_analytical=8.5
print("Ray’s scores:")
print("Academics:", ray_academics)
print("Analytical test:", ray_analytical)
ray_condition = ray_academics>=60 and ray_analytical>=7
print("Does Ray meet David’s criteria?-", ray_condition)
joe_academics=55
joe_analytical=8
print("Joe’s scores:")
print("Academics:", joe_academics)
print("Analytical test:", joe_analytical)
joe_condition = joe_academics>=60 and joe_analytical>=7
print("Does Joe meet David’s criteria?-", joe_condition)
Output
Ray’s scores:
Academics: 65%
Analytical test: 8.5
Does Ray meet David’s criteria?- True Joe’s scores: Academics: 55%
Analytical test: 8
Does Joe meet David’s criteria?- False
The not Operator
The not operator reverses the result of the condition. True will be reversed to False, and vice versa. For example, not (True) will return False.
Loops
When we write computer programs, there are times when we need to execute the same piece of code again and again. In that case, we have to write the same code again and again. This is not an efficient way of programming. This can be improved by using ‘loops’.
Loops allow us to execute a set of instructions as long as a certain condition is True. Once that condition becomes False, the loop stops. This process is also known as iteration.
Python provides mainly two types of loops, the while loop and the for loop.
The for Loop
A ‘for’ loop is a way of telling a computer to do something over and over again. It can be used to repeat a block of code a certain number of times, or to go through a list of things one by one.
A ‘for’ loop is also known as a counting loop. We use a variable to create the ‘for’ loop called the loop variable.
Syntax: for variable in sequence:
# Statements to be executed
Flowchart
If no more item to iterate for item in sequence:
item in sequence?
Next item from sequence
Code to be executed
There are two ways to create a ‘for’ loop:
1 Using the range() function.
2 Using the in operator.
Using range() Function
The range() function in Python returns a sequence of numbers, starting from 0 by default, and increments by 1 by default, and stops before a specified number.
The range() function can be used in a ‘for’ loop to iterate over a sequence of numbers.
Syntax:
for loop_variable in range(start, stop, step):
<statements>
#the loop runs from start to stop-1 where:
start is the starting number (optional, default is 0)
stop is the ending number (not inclusive) step is the increment (optional, default is 1)
for num in range(0, 5):
Here, the ‘for’ loop starts at 0 and counts up to 4, increasing by 1 each time. Note that if the increment is by 1, there is no need to specify it.
Using the ‘in’ Operator
The ‘in’ operator is a membership operator that checks if an item is a member of a sequence or not. It can be used in a ‘for’ loop to iterate over the items of a string, list, tuple, or dictionary.
Syntax: for loop_variable in string_variable: <statements>
word = ‘bumfuzzle’ for letter in word: print(letter)
Here, the loop iterates over the letters of the string word, starting with the first letter ‘b’ and ending with the last letter ‘e’
The while Loop
The ‘while’ loop repeats a set of instructions as long as a condition is True. It is also known as a conditional loop. It verifies the condition before executing the loop. Chapter 9 • Control Statements in Python
Flowchart
Statement 1
Statement 2
Here, the ‘while’ loop starts with the value of i being 1. As long as i is less than 6, the loop will continue. In each iteration of the loop, the value of i is printed and then incremented by 1. The loop will stop when i is equal to 6
The
for versus while Loop
The ‘for’ loop and the ‘while’ loop are both control flow statements in Python that are used to repeat a block of code. However, they have different usage scenarios.
The ‘for’ loop is used to iterate over a sequence of items, such as a list, tuple, or string, when the number of times you want to iterate is known.
The ‘while’ loop is used to repeat a block of code when the number of times you want to iterate is not known or when the number of iterations depends on the results of the loop.
Jump Statements
Loops run the same set of code for a defined number of times or until the test condition becomes False. However, sometimes we might wish to stop the loop even before the test condition becomes False or skip an iteration.
This is where we need Jump statements.
Jump statements allow you to skip code or terminate a loop. We have two jump statements in Python:
• break statement
• continue statement
The break Statement
The ‘break’ statement is used to terminate the loop.
Syntax: while expression: if condition: break
#breaks out of the loop #executes statement outside the loop
Code Output
word = input(‘Enter a word: ‘) for letter in word: if letter in ‘aeiou’: print(‘Vowel found!’) break
Enter a word: apple Vowel found!
Here, the loop checks for all the letters in the word entered by a user for vowels. If the letter is a vowel, the ‘break’ statement will run, and the loop will terminate. Otherwise, the loop will continue to run until it reaches the end of the word.
The continue Statement
The ‘continue’ statement skips the current iteration of the loop and continues with the next iteration.
Syntax: while expression:
Statement_1
if condition: continue
#skips next set of statements and starts with next loop iteration
Statement_2
Code Output
for num in range(1, 11): if num == 4 or num== 6 or num==8: #when num = 5, it is False
Here, the loop starts counting from 1 and increments the value of num by 1 in each iteration. When the value of num is equal to 4, 6, or 8, the ‘continue’ statement is executed, which skips the printing of the number and goes to the next iteration of the loop.
Infinite Loop
In a program, if a loop is executed over and over again without stopping, it is called an ‘infinite’ loop. This can happen if the condition that controls the loop is always true, or if the loop is never terminated by a ‘break’ statement.
Code
while True: print("This is an infinite loop!")
Here, the loop will print the message “This is an infinite loop!” repeatedly, until the program is terminated by the user. An ‘infinite’ loop can lead to the program becoming unresponsive.
Infinite loops can be useful when you want to create a program that runs continuously, such as a server or a chatbot. Did You Know?
How to Prevent an Infinite Loop?
To prevent an ‘infinite’ loop, it is important to carefully consider the condition that controls the loop. Make sure that the condition is only true under the circumstances you want. You should also use ‘break’ statements to terminate loops when you no longer need them to run.
Code
counter = 0
while counter < 5: # This loop will run 5 times.
print("Loop iteration:", counter)
counter += 1
Output
Loop iteration: 0
Loop iteration: 1
Loop iteration: 2
Loop iteration: 3
Loop iteration: 4
Here, the loop will run five times because the counter variable starts at 0 and increments by 1 each time the loop runs. The loop will continue as long as the counter is less than or equal to 5. Once the counter reaches 5, the condition is no longer true, and the loop exits.
Do It Yourself 9C
1 Write a program to generate and display the first 10 numbers of the Fibonacci sequence.
The Fibonacci sequence is a series of numbers where each number is the sum of the two preceding numbers. If the sequence starts with 0 and 1, and the first 10 numbers will be:
0, 1, 1, 2, 3, 5, 8, 13, 21, 34, 55
2 Write a program to calculate the sum of the digits of a given number. Take the number from the user as input. For example, if the input number is 4453, the sum of the digits will be 4 + 4 + 5 + 3 = 16
Coding Challenge
FizzBuzz
Write a program that prints the numbers from 1 to 100. However, for multiples of 3, the program should print “Fizz” instead of the number. For multiples of 5, the program should print “Buzz” instead of the number. For numbers that are multiples of both 3 and 5, the program should print “FizzBuzz” instead of the number.
Chapter Checkup
A Fill in the blanks.
1 In programming, statements are used to execute different blocks of code based on specific conditions.
2 operators are used to compare two values or expressions and return a Boolean result.
3 The operator checks if two values are equal.
4 A statement is used to specify a code block that executes when none of the preceding conditions in the ‘if’ and ‘elif’ statements are True.
5 In a program, if a loop is executed over and over again without stopping, it is called an loop.
B Tick () the correct option.
1 What is the output of the given code? x = 5 if x > 10:
print("x is greater than 10") elif x == 10:
print("x is equal to 10") else:
print("x is less than 10")
a x is greater than 10
b x is equal to 10
c x is less than 10 d An error occurs
2 What is the output of the given code? i = 1 while i <= 5: print(i) i += 1
of the above
3 What is the output of the given code? for i in range(1, 6): if i == 3: continue print(i)
a 1 2 3 4 5
c 1 2 4
4 What is the output of the given code? while True: print("Infinite Loop") break
a Infinite Loop
c An error occurs
C Who am I?
b 1 2 4 5
d None of the above
b No output
d Loop runs infinitely
1 I am a type of operator that allows you to compare two values or variables.
2 There is no effect of indentation on the statements inside the if statement.
3 I am a type of statement that allows you to skip code or terminate a loop.
4 I can combine two conditions together to test.
5 I repeat a block of code as long as a certain condition is true.
D Write T for True and F for False.
1 The ‘for ’ loop is used to iterate over a sequence of elements.
2 The logical operator ‘and’ returns True if at least one of the conditions it combines is True.
3 The ‘continue’ statement in Python skips the current iteration of a loop and continues with the next iteration.
4 An infinite loop is formed if the condition that controls the loop is always true.
E Answer the following questions.
1 What is the purpose of the ‘elif’ statement in Python’s conditional statements? Give an example.
2 Define the ‘and’ and ‘or’ logical operators and give an example of how they can be used in a conditional statement.
3 How does a ‘for’ loop differ from a ‘while’ loop in Python? Provide an example of when you might use a ‘for’ loop.
4 Write the syntax of the while loop.
F Apply your learning.
1 Write a program to display a multiplication table for a number the user inputs. Ask the user for the number of terms to display and print the result.
2 Write a program check if a number is prime or not.
3 Create a program that calculates the factorial of a positive integer entered by the user using a loop. A factorial of a number ‘n’ is the product of all positive integers from 1 to ‘n’.
4 Write a program to implement a word guessing game where players guess one letter at a time until they solve the word or run out of attempts.

5 Ben, the school’s football team captain, wants to find players who are tall and strong for the defenders, and short and nippy for the attackers. He needs defenders to be over 6 foot tall and weighing over 68 kilos. For attackers, he wants players under 5 foot tall and weighing less than 57 kilos. Write a program to help Ben find the right players.
10 Introduction to Web Development
Web Development
Do you explore the internet for various tasks, like searching for information, doing online shopping, playing online games, and so on? Which websites do you visit often, and how do you think these websites are created?
Let us understand this with the help of an example.
Imagine you are creating a flyer for a school event. The flyer needs a title, some text to describe the event, and maybe a picture. You also need to decide where to place the title, text, and picture on the flyer. After that, you may think of giving some style to these objects as well.
This is similar to designing a web page. The process of creating web pages and then linking them together to form a website is called web development.
Web development involves multiple tasks, such as:
• Designing the layout and appearance of the website
• Writing the code that makes the website work
• Adding content to the website, such as text, images, and videos
There are two main types of programming languages used in web development:
HTML (HyperText Markup Language): HTML is the markup language used for creating websites. It is also used to structure the content of a website. For example, HTML tags can be used to tell the computer whether a piece of text is a heading, a paragraph, or a list.
CSS (Cascading Style Sheets): CSS is used to style the content of a website. For example, CSS can be used to change the font size, colour, and alignment of text.
HTML
HTML stands for ‘HyperText Markup Language’. It is used to develop web applications. It tells a web browser how to display content on a website.
In HTML, ‘Hypertext’ means the text that is more than static text. It can be interactive and linked to other pages or resources.
Markup are the tags we use in HTML to structure and format the text on a web page. These tags are the instructions that tell the browser how and where to display the content on a page.
Did You Know?
The first website, CERN, was created in 1989 and is still alive today.
Features of HTML
Some common features of HTML are:
1 Easy to learn: HTML is an easy language to learn, even for beginners. It is made up of tags that tell the browser what to do.
2 Platform independent: HTML is platform independent, which means that it can be used to create web pages that can be viewed on any device, regardless of the operating system or web browser.
3 Media support: HTML can be used to display images, videos, and audio on web pages.
HTML is a markup language. It defines the structure and content of a web page but does not involve complex calculations or logic like programming languages such as Python and Java. Did You Know?
4 Hypertext: HTML supports hypertext, which means that text on a web page can be linked to other web pages or resources.
5 Semantic structure: HTML5 introduced many new semantic elements, which can be used to improve the accessibility of web pages.
6 Case insensitive: HTML elements and attribute names are generally case-insensitive.
Basic Structure of an HTML Document
An HTML document is structured into two main parts: the head and the body. The head contains information about the document, such as the title.
The body contains the content of the web page, such as text, images, and videos. The body is displayed in the browser window.
The basic structure of an HTML document looks like this:
1 The <!DOCTYPE html> declaration is part of HTML5 and is used to indicate that you are using the HTML5 standard.
2 The <html> and </html> tags enclose the entire document.
3 The <head> and </head> tags enclose the head section of the document.
4 The <title> and </title> tags enclose the title of the document.
5 The <body> and </body> tags enclose the body section of the document.
Web Browser
A web browser is a software application that allows you to access and view web pages.
There are many web browsers available, such as Google Chrome, Mozilla Firefox, Microsoft Edge, and Apple Safari. All web browsers work in a similar way, but they may have different features and user interfaces.
HTML Document Basic Structure
<!DOCTYPE html> <html> <head>
<title> Document Title</title> </head> <body>
<!-- Content goes here --> </body> </html>
They allow us to browse websites, watch videos, listen to music, and play games.
Some of the basic components of a web browser are as follows:
• Address bar: The address bar is where you type the URL of the website you want to visit.
• Navigation buttons: The navigation buttons allow you to move forward, back, and refresh the current web page.
• Tabs: Tabs allow you to have multiple web pages open at the same time.
Tabs Address bar

Navigation buttons Bookmarks icon
• Bookmarks: Bookmarks allow you to save the URLs of your favourite websites so that you can easily access them later.
• History: The history feature allows you to view a list of the websites you have recently visited.
Basic HTML Terminologies
Tags
A tag tells the browser how to display the content that follows it. Tags are enclosed in angle brackets (< and >).
For example, <h1> is the opening tag for heading and </h1> is the closing tag for heading.
To create an HTML document, we have the following tags:
Tag Purpose Syntax
<!----> Used to insert comments in the HTML code. <!--comment–-> <p> It is used as the paragraph tag that is used to add a paragraph. <p>content</p>
Heading tags HTML heading tags are used to add headings and sub-headings to the content you want to display on a web page. HTML has six levels of heading from <h1> to <h6>.
<div> This tag is used in HTML to make divisions of content in the web page such as text, images, and header.
<br> Inserts a single line break
<h1>Most important heading</h1> <h2>content</h2> <h3>content</h3> <h4>content</h4> <h5>content</h5> <h6>Least important heading</h6>
<div>content</div>
Should be added where the line break is needed.
<b> Converts the text into bold <b>text</b>
<i> Converts the text into italics <i>text</i>
<u> Underlines the text <u>text</u>
Tag Purpose Syntax
<hr> Inserts a horizontal line. <hr> <em> Emphasises text and displays it in italics. <em>text</em> <strong> Represents strongly emphasised text and displays it in bold. <strong>text</strong>
<sub> Represents text as a subscript. <sub>text</sub> <sup> Represents text as a superscript. <sup>text</sup> <section> Defines the grouping of content in a document. <section>text</section>
<article> Represents a self-contained composition. <article>text</article>
Elements
An element is a combination of a tag and its content. For example, the <h1> element is a heading element. There are mainly two types of HTML elements:
1 Container elements: Container elements are HTML elements that can contain other elements or text within them. They have both an opening tag and a closing tag to enclose their content.
Opening Tag Content
<h1> This is my first HTML document. </h1> Element Closing Tag
Examples: <html></html>, <head></head>, <body></body>.
2 Empty elements: Empty elements, also known as void elements or self-closing elements, do not contain any content between opening and closing tags. They are self-contained and do not require a closing tag. Examples: <br>, <hr>, <img>.
Attribute
It is used to define the characteristic of an HTML element. An attribute is always placed in the opening tag of an element and generally provides additional styling (an attribute) to the element.

Project: Saving Endangered Species
<h1> <font color= ''red''> This is my first HTML document. </font> </h1>
Attribute
Let us build a simple web page project on the topic “Saving Endangered Species” while learning the concepts in the chapter.
We will be building this project by dividing it into several tasks.
Task 1: Create a web page and name it ‘Saving Endangered Species’. Add the heading ‘Saving Endangered Species’ and then add an introduction for it.
<!DOCTYPE html>
<html>
<head>
<title>Saving Endangered Species</title>
</head>
<body>
<h1>Saving Endangered Species</h1>
<div>
<p>From majestic animals to tiny insects, every creature plays a vital role in the ecosystem. Thus, protecting these creatures helps preserve biodiversity, which is essential for ecosystem flexibility. <br><br>It is also crucial for maintaining the <i><b> balance in nature. </b></i> <br><br> Conservation efforts, such as <u>habitat preservation,</u><u> anti-poaching measures,</u> and <u>breeding programs </u>are vital for protecting endangered species. <br> <br>By saving them, we will ensure that future generations benefit from a rich and diverse ecosystem.</p>
</div>
</body>
</html>
Output
Saving Endangered Species
From majestic animals to tiny insects, every creature plays a vital role in the ecosystem. Thus, protecting these creatures helps preserve biodiversity, which is essential for ecosystem flexibility.
It is also crucial for maintaining the balance in nature.
Conservation efforts, such as habitat preservation, anti-poaching measures, and breeding programs are vital for protecting endangered species.
By saving them, we will ensure that future generations benefit from a rich and diverse ecosystem.
Do It Yourself 10A
1 Match the following terms with their descriptions.
Column A Column B
<h1> Is a language for structuring web content.
<!-- --> Converts the text into bold.
<div> Is used for inserting comments in HTML code.
HTML Is used to create a division within a web page.
<b> Defines the main heading of a web page.
2 Identify the error in the following element examples:
a <titl>My Web Page</title>
b <h1>Welcome to My Page<h1>
c <p>This is a paragraph</h>
d Plants give us O<sub> 2 </sup>.
CSS
CSS stands for Cascading Style Sheets. It is a language used to style HTML elements. CSS can be used to change the appearance of HTML elements, such as their font, colour, and size.
Features of CSS
Some key features of CSS include:
1 Selectivity: CSS can be used to select specific HTML elements to style such as changing colours, styling fonts, spacing elements, and resizing them.
2 Consistency: You can use the same styles for many pages on a website to make them look similar.
3 Cascading: CSS styles are applied in cascading order. This means that the most specific style will be applied to an element, even if there are other styles that are more general.
4 Responsive design: CSS can be used to create responsive web pages that work on all devices, from desktop computers to smartphones.
5 Animations and transitions: CSS can be used to add animations and transitions to web pages, which can make them more visually appealing and engaging.
Adding Style to an HTML Document
There are three ways to add style to an HTML document:
1 Inline CSS: Inline CSS is used to style a single HTML element. To add inline CSS, you use the style attribute. For example, the following code will make the <h1> element red and 20 pixels in size:
Code Output
<h1 style="color: red; font-size: 20px;">This is a heading</h1> This is a heading.
2 Internal CSS: Internal CSS is used to style all the elements on a single HTML page. To add internal CSS, you use the <style> tag. The <style> tag should be placed in the <head> section of your HTML document. For example, the following code will make all <h1> elements on the page red and 20 pixels in size:
Code Output
<html> <head> <style> h1 { color: red; font-size: 20px; }
</style> </head> <body>
<h1>This is a heading</h1>
<h1>This is another heading</h1> </body> </html>
This is a heading.
3 External CSS: External CSS is used to style all the elements on all of the pages of a website. To add external CSS, you use the <link> tag. The <link> tag should be placed in the <head> section of your HTML document. For example, the following code will link to an external CSS file called style.css:
Code Output
<html> <head> <link rel="stylesheet" href="style.css">
</head> <body>
<h1>This is a heading</h1> </body> </html>
This is a heading.
The rel attribute specifies that the linked file is a CSS stylesheet and the href attribute specifies the path of the stylesheet file. The style.css file would contain the following CSS:
Code
h1 { color: red; font-size: 20px; }
If you only need to style a single element, then use inline CSS.
Think and Tell
If you need to style all the elements on a single page, then use internal CSS.
If you need to style all the elements on all the pages in a website, then use external CSS.
CSS Classes
CSS classes are a way to group similar HTML elements together so that you can style them all at once. This can save you a lot of time and effort, especially if you have a lot of similar elements on your page.
To create a CSS class, you add the class attribute to an HTML element and assign it a unique name.
Which method of CSS will you use to style a web page?
For example, the following code would create a CSS class called my-class: <p class="my-class">This is a paragraph</p>
Once you have created a CSS class, you can style it using the . (dot) character and the class name. For example, the following CSS code will make all paragraphs with the my-class text red and 20 pixels in size: .my-class { color: red; font-size: 20px; }
Selectors and Properties
Selectors are used to select the HTML elements that you want to style, and properties are used to define the styles that you want to apply to those elements.
Some of the most common selectors in HTML include:
1 Element selectors: Select elements by their tag name, such as h1, p, or img.
2 Class selectors: Select elements by their CSS class.
3 ID selectors: Select elements by their ID.
4 Combination selectors: Combine multiple selectors to target specific elements.
There are many CSS properties, including:
CSS Property Purpose Syntax
color Sets the colour of the text.
font-family Sets the font family of the text.
font-size Sets the size of the text.
font-weight Sets the weight or thickness of the text.
color:blue
font-family:cambria
font-size:x-small
Note: x-small, small, medium, large, x-large, xx-large can also be used as values.
font-weight: bold
Note: lighter, or any number can also be used
text-decoration Formats the text.
text-align Aligns the text.
text-decoration: underline
Note: line-through, overline can be used.
text-align: left
Note: right, center, justify can be used.
background-color Sets the background colour of the element. background-color:red background-image Sets background images for an element, you can set one or more images. background-image:url("https://example. com/image.png")
border To set the border around the element.
border: solid
border-color Sets the colour of the border of an element. border-color:blue
CSS Property Purpose Syntax
border-radius Round the corners of the outer border edges of an element.
padding To set the space around the content of the element.
border-radius:30px
padding:40px
Note: Any number can be added according to the use.
margin To set the space around the element itself. margin:20px
Note: Any number can be added according to the use.
Shorthand Properties
You can also use multiple attributes of a property in one declaration. For example, you can use the background property to set the background colour, image, size, and position of a div element all at once.
Here is an example: div { background: blue url(‘image.jpg’) no-repeat center/cover; }
In this example:
• blue sets the background colour to blue.
• url(‘image.jpg’) sets the background image to the image named image.jpg.
• no-repeat prevents the image from repeating.
Discuss!
What are the benefits of having classes in an HTML document?
Think and Tell
How are selectors and properties different?
• center/cover positions and sizes the image so that it covers the entire div element.
You can apply the background property to any HTML element, not just to div elements. For example, you can apply it to the <body> element to set the background of your entire web page.
Project: Saving Endangered Species
Task 2: Use internal CSS to make the project colourful and attractive.
1 Inside the head element, create a style element and:
a Add a style for body element.
b Create a content class for styling internal content.
Code <html> <head> <title>Saving Endangered Species</title> <style> body { background-color: peachpuff;
color: black; text-align: center; } .content{ color: darkred; text-align: left; } </style> </head>
2 Update the body element by applying the content style in content div. Code
<body> <h1>Saving Endangered Species</h1>
<div class=content>
<p>From majestic animals to tiny insects, every creature plays a vital role in the ecosystem. Thus, protecting these creatures helps preserve biodiversity, which is essential for ecosystem flexibility. <br><br>It is also crucial for maintaining the <i><b> balance in nature. </b></i> <br><br> Conservation efforts, such as <u>habitat preservation,</u><u> anti-poaching measures,</u> and <u>breeding programs </u>are vital for protecting endangered species. <br> <br>By saving them, we will ensure that future generations benefit from a rich and diverse ecosystem. </p> </div> </body> </html>
Output
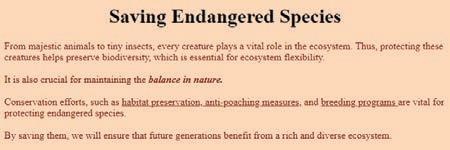
Coding Challenge
1 Create a web page with the following content:
a. A title: My Dream Vacation
b. A paragraph describing my dream vacation
c. Set the font and background colour.
Do It Yourself 10B
1 Fill in the blanks.
a If you want to style all elements on a single HTML page, you can use CSS.
b CSS classes are used to group HTML elements together.
c The shorthand for setting multiple background-related properties in one declaration is the property.
d To set the background colour of an element, you can use the property.
e External stylesheets are linked to HTML documents using the element.
2 Write T for true and F for false.
a Internal CSS is added to the <body> section of an HTML document.
b You can create a CSS class by adding the class attribute to an HTML element.
c The no-repeat property of CSS prevents the image from repeating.
d External stylesheets are included directly within an HTML document, using the <style> element.
e CSS can be used to change the colour and size of HTML elements.
Chapter Checkup
A Fill in the blanks.
1 Web development involves designing, building, and maintaining
2 The basic structure of an HTML document consists of the and the .
3 HTML tags are enclosed in brackets.
4 You can apply CSS using three main methods: inline styles, internal stylesheets, and stylesheets.
B Tick () the correct option.
1 Which type of CSS would you suggest to style a single HTML element?
a Internal CSS
c Inline CSS
2 Which HTML tag is used to create a single line break?
b External CSS
d Outline CSS
a <newline> b <line-break>
c <b> d <br>
3 Which of the following is an example of a CSS class?
a .my-class
c <class="my-class">
b my-class
d my.class
4 Which of the following HTML elements is used to create a link to the stylesheets?
a <p>
c <h1>
b <img>
d <link>
5 Which of the following CSS properties is used to set the colour of the border of an element?
a border-color b color
c bordercolor d border
C Who am I?
1 I define the characteristics of an HTML element and am placed in the opening tag.
2 I make divisions of content on a web page, like sections of text, images, headers, and more.
3 I am a CSS property to set the space around the element itself.
4 I convert text into an italic format in HTML.
5 I am a CSS property used to set the background of an element.
D Write T for True or F for False.
1 A web browser is a software application that allows you to access and view web pages.
2 CSS-created web pages don’t work on all devices.
3 You can use the . (dot) character and the class name to style a CSS class.
4 Element selectors select elements by their tag name, such as h1, p, or img.
5 Class Selectors select elements using their ID
E Answer the following questions.
1 What is web development? Name two programming languages used to develop and style web pages.
2 What is the basic structure of an HTML document?
3 What is CSS, and what are some of its features?
4 What are CSS classes? Give an example.
5 What are selectors and properties in CSS? Provide examples of each.
F Apply your learning.
1 In CSS, how would you make all paragraphs with the class “my-class” blue in colour and 30 pixels in size?
2 When you use the HTML tag <div>, what purpose does it serve?
3 You have a paragraph of text that you want to make bold. How would you do this using HTML tags?
4 Create a CSS class named “highlight” that changes the text colour to yellow and applies the ‘back.png’ images as background of the web page.
11 Images and Hyperlinks in HTML
Just like pictures make a book more interesting, images make websites more exciting and interesting. Images are used for many purposes, such as providing visual support to written content, conveying feelings, telling stories, providing clarity of purpose, and making the content easy to remember.
CONSER VATION Wildlife
Climate change is making the protection of endangered species increasingly challenging. The best way to protect endangered species is to prevent their decline and deterioration
LEARN MORE
Let us learn to add and style images.
Adding Images
In an HTML document, you can add images using the following methods:
1 Using the <img> element: The most common way to add images is by using the <img> element. You need to specify the source (URL) of the image, using the 'src' attribute.
Here is an example:
<img src="image.jpg" alt="A beautiful landscape">
In this example, ‘image.jpg’ is the source file for the image, and “A beautiful landscape” is the alternative text (alt text) that appears if the image cannot be displayed.
2 Using background images: You can set background images for HTML elements (like <div> or the entire <body>), using CSS.
Note the following points while adding images in a web page:
1 You can acquire the image to be inserted into the web page from any resource. It can be a file downloaded and saved on your computer, or you can provide a direct link to an online resource.
2 If the image is on your computer, both the image and your web page should be saved in the same folder or location. In this case, you can reference the image file like this:
<img src="image.jpg">
3 If the image and the HTML file are in different folders, then you should give the full path or relative path to the image in the code. The corrected example should look like this:
<img src="C:\images\image.jpg"> or using a relative path like: <img src="../images/image.jpg">.
4 You can provide the URL of the image directly if it is hosted on the internet: <img src="https://www.example.com/image.jpg">.
5 In case you are using the Tekie platform for developing your project, then you will get the required resources for the respective projects on the platform.
Here is an example of setting a background image for a <div> element: <style> .my-div { background-image: url(‘background.jpg’); background-size: cover; /* Adjust the size as needed */ } </style>
<div class="my-div">
<!-- Content of the div goes here --> </div>
You can include comments in HTML documents using <!--text--> and in CSS documents using /*--text--*/ tags. Did You Know?
In this example, ‘background.jpg’ is the source file for the background image and ‘background-size: cover;’ ensures that the image covers the entire div.
In the last chapter, we created a project called Saving Endangered Species. In this chapter, we will add an image of wild animals to the project.
Project: Saving Endangered Species
Task 3: Adding an image of wild animals
Continue adding the code in your main HTML document at the respective places.
Code
<body>
<h1>Saving Endangered Species</h1> <img src="wild_animals.jpg" alt="wild animals" width="100" height="100"> <div class=content>
Output
Task 4: Adding a background image and changing the text colour Code
<html> <head>
<title>Saving Endangered Species</title> <style> body { background-image: url("forest_background.jpg"); color: white; text-align: center; } .content{ text-align: left; } </style> </head>
The remaining code will remain same as given in the <body> part in the last chapter.
Chapter 11 • Images and Hyperlinks in HTML

Styling Images
We can style an image in two ways:
1 Using a style attribute: To use a style attribute, specify the CSS properties you want to apply to the image, separated by semicolons.
For example, the following code makes the image 100% wide and auto height: <img src="https://example.com/image.jpg" style="width: 100%; height: auto;">
2 Using a class: To use CSS to style an image, you can either create a CSS class or ID and apply it to the image using the class or id attribute, or you can use an inline CSS block.
Here is an example of how to use a CSS class to style an image: <img src="https://example.com/image.jpg" class="image-style"> .image-style { width: 100%; height: auto; margin: 10px; }
You can use CSS to style images in many ways.
Here are some of the most common CSS properties used to style images:
• width: Specifies the width of the image.
• height: Specifies the height of the image.
• margin: Specifies the amount of space around the image.
• padding: Specifies the amount of space between the border of the image and its contents.
• border: Specifies the border around the image.
• border-radius: Specifies the radius of the corners of the image border.
• box-shadow: Specifies a shadow around the image.
• opacity: Specifies the transparency of the image.
• filter: Specifies a filter to apply to the image.
Project: Saving Endangered Species
Task 5: Adding an image and styling it using a class Code
<html> <head>
<title>Saving Endangered Species</title> <style>
body { background-image: url("wild_background.jpg"); color: white; text-align: center; }
.img-style{ border: 5px solid orangered; border-radius: 15px; width: 120px; height: 80px; margin: 10px; } .content{ text-align: left; margin: 10px; }
</style> </head> <body>
<h1>Saving Endangered Species</h1> <img src="wild_animals.png" align="left" class="img-style">
<img src="birds.jpg" align=left class="img-style"> <!-- The remaining code will be same--> Output

Do It Yourself 11A
1 Match the columns.
Column A
It is an attribute for specifying the source of an image
It is an HTML element for adding images
Column B
Used to provide alternative text for images
Using a class
It is a purpose of the alt attribute margin
It is a way to apply CSS styles directly to an HTML element src
It specifies the amount of space around the image <img>
2 Fill in the blanks.
a In an HTML document, you can add images using the element.
b The attribute of an <img> tag is used to style an image using a class.
c The property specifies the height of the image.
d To set background images for HTML elements, you use the property.
e The property can make the corners of an image round.
Flexbox
Imagine that a container element is like a box and the flex items are like the objects inside the box.
A flexbox is a CSS layout module that allows you to easily create flexible and responsive layouts by arranging the objects inside the box in a flexible and responsive way.
You can line up the objects in a row or a column, and you can control how much space each object takes up. You can also control how the objects are aligned inside the box, such as horizontally centred or vertically centred.

A flexbox works by dividing a container element into flex items. These items can be any type of an HTML element, such as divs, spans, and images. Flex items can be resized and rearranged to fit the available space in the container. Here is a simple example of how to use a flexbox:
<div class="container">
<div class="item">Item 1</div>
<div class="item">Item 2</div>
<div class="item">Item 3</div> </div>
.container { display: flex; }
.item { flex: 1; }
Share some of the applications or websites where you notice the use of flexboxes.
This code creates a container element with three flex items. The flex items are arranged horizontally and take up equal amounts of space.
You can also use a flexbox to control the alignment of flex items.
For example, the following code vertically aligns the flex items in the centre of the container: .container { display: flex; align-items: center;
}
You can also use a flexbox to control the direction of flex items.
For example, the following code arranges the flex items vertically instead of horizontally: .container { display: flex; flex-direction: column; }
Properties of a Parent (Flex Container)
Property Purpose
display: flex
Makes the parent container flexible.
flex-direction: row | column Allows flex items of the container to be displayed row-wise or column-wise.

flex-wrap: wrap | nowrap Allows flex items to wrap onto more than one line.

justify-content: centre | flex-start | flex-end Allows items to align along the main axis.

Property Purpose
align-items: centre | flex-start | flex-end Allows multiple lines of items to align along the cross axis.

align-content: centre | flex-start | flex-end Allows items to align along the cross axis in a single line.

Properties of a Child (Flex Item)
Property Purpose
order allows the change in order of items without altering the source order.
flex-grow allows an item to fill up the available free space.
flex-shrink allows an item to shrink if there is not enough free space available.
flex-basis defines the size of an item before space is distributed. flex shorthand for flex-grow + flex-shrink + flex-basis. flex-self can align a single item within the flex container.
Project: Saving Endangered Species
Task 6: Use a flexbox to place items within a web page.
1 Replace the body element with the header class and update as shown to add a flex container for the header part of your web page.
2 Update the content class by adding a flex container.
Code <html> <head> <title>Saving Endangered Species</title> <style> .header{ display: flex; background-image: url"(wild_background.jpg");
justify-content: center; color: white; border-radius: 5px; width: 100%; } .content{ display:flex; text-align: left; margin: 10px; }
3 Add the new classes for cards.
a .card-holder – a flex container for flex items
b .cards – flex items
c .cards-img – for images in flex items
d .cards:hover – to add a hover feature
Code
.card-holder { display: flex; justify-content: space-around; flex-wrap: wrap; } .cards { width: 16%; color: white; background-color: #2c3350; padding: 10px; border-radius: 5px; margin: 0.35%; font-size: 14px; text-align: center; } .cards-img { position: relative; width: 90px; height: 65px; border-radius: 5px; } .cards:hover { background-color: #646f9a; box-shadow: 5px 5px 5px 5px #d3d3d3; } </style> </head>
4 Add the header division.
<body>
<div class=header>
<h1>Saving Endangered Species</h1>
Code
<img src="wild_animal.png" alt="rocket" width="100" height="100"> </div>
5 Add a sub-heading for the article cards.
<div class=content>
Code
<p>From majestic animals to tiny insects, every creature plays a vital role in the ecosystem. Thus, protecting these creatures helps preserve biodiversity, which is essential for ecosystem flexibility. <br><br>It is also crucial for maintaining the <i><b> balance in nature. </b></i> <br><br> Conservation efforts, such as <u>habitat preservation,</u><u> anti-poaching measures,</u> and <u>breeding programs </u>are vital for protecting endangered species. <br> <br>By saving them, we will ensure that future generations benefit from a rich and diverse ecosystem. </p>
</div>
<h3> Links of articles on some endangered species in India:</h3>
6 Add the card-holder and cards div tags.
7 Add the image and text for the first article card.
<div class=card-holder>
<div class=cards>
<img src="tiger.jpg" class=cards-img>
<p>The Bengal Tiger</p> </div>
8 Duplicate the cards div of the first card.
9 Change the details of the second card.
<div class=cards>
<img src="lion.jpg" class=cards-img>
<p>Asiatic Lion</p> </div>
10 Repeat the process to create remaining cards.
<div class=cards>
<img src="bustard.jpg" class=cards-img>
<p>Great Indian Bustard</p> </div>
<div class=cards>
Code
Code
Code
Code
<img src="heron.jpg" class=cards-img>
<p>White-bellied Heron</p>
</div> </div> </body> </html>
When done, run your code to test it.

Hyperlinks
Hyperlinks, also known as links, allow users to navigate from one web page to another by clicking a text or an image link.
To create a hyperlink in HTML, use the <a> tag. The <a> tag has the required href attribute, which specifies the URL of the linked page. The text or the image that you want to be the link should be between the opening and closing <a> tags.
11 • Images and Hyperlinks in HTML
For example, the following HTML code creates a hyperlink to the Uolo home page:
Code
<a href="https://www.uolo.com">Uolo</a>
Uolo
Output
When a user clicks the word "Uolo", the web browser opens the Uolo home page.

You can also use the <a> tag to create links to other resources, such as images, PDFs, and other types of files.
Let us hyperlink the article cards for the Saving Endangered Species project.
Project: Saving Endangered Species
Task 7: Hyperlink the card images.
Use an anchor tag to add a link to the card image. Don’t forget to close the tag.
Code
<div class=cards>
<a href="https://en.wikipedia.org/wiki/Bengal_tiger"
<img src="tiger.jpg" class=cards-img>
</a>
<div class=cards>
Code
<a href="https://en.wikipedia.org/wiki/Asiatic_lion">
<img src="lion.jpg" class=cards-img>
</a>
Repeat the process for the remaining cards.
Code
<div class=cards>
<a href="https://en.wikipedia.org/wiki/Great_Indian_bustard">
<img src="bustard.jpg" class=cards-img>
</a>
<p>Great Indian Bustard</p>
</div>
<div class=cards>
<a href="https://en.wikipedia.org/wiki/White-bellied_heron">
<img src="heron.jpg" class=cards-img>
</a>
<p>White-bellied Heron</p>
</div>
</div> </body> </html>
Click a card to check if the link is opening or not.

Coding Challenge
Consider any four famous personalities who have made significant contribution in the field of space. Make a web page about them using flexboxes. Include a picture of them, a short story about their lives, and a link to another web page with more information about them.
Chapter Checkup
A Fill in the blanks.
1 The attribute is used to display the alternative text describing the image, if the image does not load on the web page.
2 The property allows flex items to wrap onto more than one line.
3 The tag is used to create a hyperlink.
4 The property allows multiple lines of items to align along the cross axis.
5 The flex container can change the width, height, and order of the elements.
B Tick () the correct option.
1 How do you create a hyperlink to an external website, using the <a> tag in HTML?
a <a href="#external-website">External Website</a>
b <a href="http://www.example.com">Visit Website</a>
c <a src="http://www.example.com">Open Link</a>
d <a link="http://www.example.com">Go There</a>
2 Which CSS property is used to create rounded images?
a border-radius b image-shape
c round-image d Image-border
3 What is the main purpose of flexboxes in web development?
a To add images to a web page
c To change the font style on a web page
b To create flexible layouts and arrange elements flexibly
d To add animations to web pages
4 How can you set a background image for an HTML <div> element, using CSS?
a Using the <background> element
b Using the background-image property
c Using the src attribute d Using the alt attribute
5 Which CSS property is used to make a parent container flexible in flexbox?
a display: flex b flex-grow
c flex-direction d align-items
C Who am I?
1 I have attributes like ‘src’ and ‘alt’ to specify the image source and the alternative text.
2 I ensure that a background image covers the entire HTML element.
3 I create a shadow around an image, using CSS.
4 I am a CSS property to specify a filter to apply to the image.
5 I control the alignment of items in a flex container.
D Write T for True and F for False.
1 In CSS, the ‘border-radius’ property is used to make images transparent.
2 You can style images using CSS in two ways—using the style attribute and using classes.
3 Hyperlinks can be created using text only, and images cannot be linked to other web pages.
4 The ‘margin’ property in CSS determines the space around an image.
5 The ‘flex-direction’ property determines whether flex items are arranged horizontally or vertically.
E Answer the following questions.
1 Identify and correct the error in the following HTML code for inserting an image: </img src="image.jpg" alt="A beautiful landscape">
2 Which CSS property is used to specify the amount of space between the border of the image and its contents?
3 Correct the CSS code that sets the background image for a <div> with class "my-div" and ensures that it covers the entire div: .my-div { background: url(‘background.jpg’); background-size: cover; }
4 Find the error in the following CSS code that arranges the flex items vertically in a flexbox: .container { display: flex; flex-direction: row; }
5 Explain the purpose of the ‘flex-grow’ property in a CSS flexbox.
F Apply your learning.
1 Given the following HTML and CSS code, what will be the background colour of the div when you hover over it?
<div class="hover-button">Hover Me</div> .hover-button:hover { background-color: yellow; }
2 If you have a web page with three images styled using the class ‘image-style’ and the following CSS code, what will be the output?
<img src="image1.jpg" class="image-style">
<img src="image2.jpg" class="image-style">
<img src="image3.jpg" class="image-style">
.image-style { width: 80%; margin: 10px; }
3 What is the output of the following HTML code?
<img src="https://example.com/image.png" alt="Image of my cat">
What error will you get if you try to display an image that is not found?
What error will you get if you forget to add the alt attribute to an image tag?
4 Consider the following HTML code:
<div class="flex-container">
<img src="https://example.com/image.png" alt="Image of my cat"> <a href="https://example.com/cat-breeds">Read more about cat breeds</a> </div>
What output will you get if you try to display the above HTML code without using a flexbox?
A. Fill in the blanks.
Test Paper 1 (Based on Chapters 1 to 5)
1 The octal number system has a base of
2 An attempt to trick a user to get his or her personal information through fake emails is called
3 in computational thinking refers to disregarding the minute details of a problem and focusing on its major issues.
4 means to arrange data in a particular sequence based on specific criteria.
B. Tick () the correct option.
1 A is a secret code that only you know and that can keep your online accounts safe from hackers?
a QR code
c Lock
b Password
d Computer program
2 Which term is used for breaking down a big, difficult task into smaller, easier ones in computational thinking?
a Abstraction
c Algorithm design
b Pattern recognition
d Decomposition
3 Which of the following functions returns remainder when the dividend is divided by the divisor?
a Max
c Min
C. Write T for True and F for False.
1 Charts help us look at data in the form of videos.
b Mod
d Average
2 There is no harm in sharing our date of birth with strangers online.
3 In abstraction, we should focus on the important details while ignoring useless information.
4 You cannot use cell references in a function in Google Sheets.
D. Answer the following questions.
1 Define a number system.
2 Write three rules to create a strong password for your online accounts.
3 Describe the importance of the algorithmic design step of computational thinking?
4 Define the concatenate function used in Google Sheets.
E. Apply your learning.
1 Sheena is trying to decipher a number written in a series of 0s and 1s. She does not know how to convert the number to a decimal number. Help her convert the number.
2 Avi’s father is a businessman and has become a victim of online fraud. What should Avi tell his father about cybercrimes against businesses?
3 Shalini wants to check today ’s date and time using a function in Google Sheets. Which function is suitable for this?
4 Pranjal is organising a survey and wants to visualise how many participants selected each option in a questionnaire. Which feature can she use to accomplish this?
Test
A. Fill in the blanks.
1 Python is a language because it can be used on a variety of hardware platforms.
2 is a process that makes sure the data is correct, whole, and the same as long as it exists in the database.
3 an object makes sure that the object remains on its place while you work on the other parts of the design.
4 The body part of an HTML document contains the of the web page.
B. Tick () the correct option.
1 What is the meaning of typecasting in a coding language?
a Conversion of one statement to another
b Conversion of one data type into another
c Casting of one data type into another statement
d Casting of one variable into another
2 occurs when we have multiple copies of the same data.
a Data Redundancy b Data Security
c Database d DBMS
3 Where will you type the URL of the website you want to visit?
a Navigation button b Bookmarks tab
c Address bar d Tabs
4 How can you style an image in an HTML document?
a Using a style attribute b Using a class
c Both a and b d None of these
C. Write T for True and F for False.
1 A database is a collection of information stored electronically in a computer system.
2 Indentation is optional in Python.
3 HTML tells a web browser how to display content on a website.
4 CSS cannot be used to style images.
D. Answer the following questions.
1 What is SQL?
2 What are control statements in Python?
3 How can you style an image using a style attribute?
4 What do you mean by duplicating a layer?
E. Apply your learning.
1 What will be the result of the following expression: (((3 * 2) + 4) % 7) * (8 - (10 / 2))
2 Imagine you are designing a smart home system that controls the heating and cooling of a house. The system needs to decide whether to turn on the heating or cooling based on the following conditions:
• Turn on the heating if the current temperature inside is less than the desired temperature, and it is not too hot outside.
• Turn on the cooling if the current temperature inside is greater than the desired temperature, and it is not too cold outside.
Write a Python program that uses logical operators to decide whether to turn on the heating or cooling system.
3 Reema has created a web page but she is not satisfied with the look of it. How can she style the web page to make it look interactive?
Machine Learning
Machine Learning (ML) is a branch of AI that makes machines learn from large amounts of data. By identifying patterns in this data, machines can make decisions without needing explicitly programmed instructions. Machine learning enables a computer system to learn from this experience of using the provided data and making accurate algorithms for predictions or decisions from them.
Types of Machine Learning
The three types of machine learning are supervised, unsupervised, and reinforcement learning. Let us learn about them.
Supervised Learning
Supervised learning is a machine learning method that uses well-labelled datasets to train algorithms to predict outcomes and recognise patterns.
Unsupervised Learning
Unsupervised learning is a machine learning technique in which models are not supervised using datasets. In unsupervised machine learning, machines do not know any patterns in the data. Instead, the model itself finds hidden patterns and insights from the given data.
Reinforcement Learning
Reinforcement learning is a type of machine learning where an agent learns to take actions in an environment to maximise a cumulative reward. The agent learns through trial and error, receiving rewards for good actions and penalties for bad ones.
Applications of Machine Learning
The following are the applications of machine learning that are transforming our daily lives.
Recommendation Systems: Imagine that you have been watching a lot of videos on YouTube that are on computer programming. The machinelearning algorithms on YouTube track your choices. By analysing this data, they can recommend programming videos that align with your interests.
Language Translation: Google Translate, a translation app, uses machine learning to understand and translate text instantly, enabling us to communicate in different languages. It learns from millions of translated texts to understand the patterns and meanings in different languages.
Customer Service Chatbots: Have you ever wondered how the chatbots seem to get smarter with every new conversation? It is because of machine learning. By analysing the questions that the customers ask, these chatbots learn to provide increasingly helpful and accurate answers.


Image Recognition: Applications like Snapchat or Instagram can add fun effects to your photos by analysing your facial features using machine-learning algorithms. A machine learning application looks at your face in the camera and figures out where your eyes, nose, and mouth are. Then, it puts the filter on the right spot to make it look like it is part of your face. For example, Snapchat might overlay a dog’s nose and ears on your face or add funky glasses.
Self-driving Cars: Self-driving cars use both computer vision (to see the road, pedestrians, vehicles, etc.) and machine learning (to make decisions). A self-driving car learns from all the different situations it encounters on the road, like slowing down on detecting pedestrians, stopping at a red light, or navigating around other vehicles.
Deep Learning
Deep Learning is a subset of machine learning in which a machine is trained with vast amounts of data which help it to train itself around that data. Some practical applications of deep learning includes virtual assistants, computer vision for driverless cars, detection of money laundering, face recognition, and many more. It is an AI function that mimics the working of the human brain in processing data and uses it in detecting objects, recognising speech, translating languages, and making decisions.

About the Book
Uolo has introduced a comprehensive program, Hexa, for grades 1 to 8, to empower young minds with the knowledge and the skills they need to thrive in the digital age. From the basics of how computers function to the tools that shape our digital landscape, this series opens the door to a world of endless possibilities. This series will build a strong foundation, helping shape the next generation of digital citizens and innovators. It aims to demystify the world of computer science, making it accessible and engaging for young learners, while preparing them for future academic and professional pursuits in the field.
Special Features
• AI Annexures: To offer a basic understanding of specific domains of Artificial Intelligence.
• Discuss: A multi-faceted probing question, related to the concept, that arouses curiosity.
• Think and Tell: Analysis, reflection, and text-to-self connection based prompts for discussion in class.
• Did You Know? Interesting facts related to the application of a concept.
• Do It Yourself: Short exercises between the chapter to pause and assess comprehension.
• Chapter Checkup: Chapter-end practice exercises aligned to different levels of Bloom's Taxonomy.
About Uolo
Uolo partners with K-12 schools to bring technology-based learning programs. We believe pedagogy and technology must come together to deliver scalable learning experiences that generate measurable outcomes. Uolo is trusted by over 15,000+ schools across India, South East Asia, and the Middle East.
ISBN 978-81-979297-2-4
