


Academic Authors: Jatinder Kaur, Ayushi Jain, Anuj Gupta, Simran Singh
Creative Directors: Bhavna Tripathi, Mangal Singh Rana, Satish
Book Production: Rakesh Kumar Singh
Project Lead: Jatinder Kaur
VP, Learning: Abhishek Bhatnagar
All products and brand names used in this book are trademarks, registered trademarks or trade names of their respective owners.
© Uolo EdTech Private Limited
First impression 2025
This book is sold subject to the condition that it shall not by way of trade or otherwise, be lent, resold, hired out, or otherwise circulated without the publisher’s prior written consent in any form of binding or cover other than that in which it is published and without a similar condition including this condition being imposed on the subsequent purchaser and without limiting the rights under copyright reserved above, no part of this publication may be reproduced, stored in or introduced into a retrieval system, or transmitted in any form or by any means, electronic, mechanical, photocopying, recording or otherwise, without the prior written permission of both the copyright owner and the above-mentioned publisher of this book.
Book Title: Hexa ICSE Computer Science 2
ISBN: 978-81-980880-9-3
Published by Uolo EdTech Private Limited
Corporate Office Address: 85, Sector 44, Gurugram, Haryana 122003
CIN: U74999DL2017PTC322986
Illustrations and images: www.shutterstock.com, www.stock.adobe.com and www.freepik.com
All suggested use of the internet should be under adult supervision.
In today’s rapidly evolving digital landscape, computer science has become an essential field of study, shaping the world around us in countless ways. From the smartphones in our pockets to the vast networks that connect people across the globe, computer science drives innovation and progress in nearly every aspect of modern life. In today’s fast-paced digital world, understanding the basics of computer science is as important as learning to read, write, or solve maths problems.
Recognising this imperative, the National Education Policy (NEP) 2020 has strongly recommended the integration of coding skills, computational thinking, critical analysis, and problem-solving abilities into the curriculum.
Inspired by these insights, Uolo has introduced a comprehensive program, Hexa, for grades 1 to 8, to empower young minds with the knowledge and skills they need to thrive in the digital age. From the basics of how computers function to the tools that shape our digital landscape, this series opens the door to a world of endless possibilities. This series will build a strong foundation, helping shape the next generation of digital citizens and innovators. It aims to demystify the world of computer science, making it accessible and engaging for young learners, while preparing them for future academic and professional pursuits in the field.
We believe that learning computer science should be an engaging and accessible experience for all children. This series takes a project-based approach, allowing students to learn by way of concurrently applying acquired knowledge and skills. As they progress through the course, they will build strong foundations in computational thinking, coding basics, and digital literacy. Our program focuses on three key areas:
1. Computer Science Fundamentals: Core concepts are introduced step by step, ensuring a solid grasp of how computers function, and how information is processed and stored.
2. Latest Computer Tools: Various computer tools relevant to today’s world are included, equipping students with the confidence to thrive in the digital age.
3. Introduction to Coding: The series offers an introductory look into coding, preparing students for more advanced learning in the future.
To broaden the learning process, we have included informational annexures on Artificial Intelligence (AI) and its related fields, offering students an early insight into the groundbreaking technologies that are shaping our world. These sections aim to inspire curiosity and encourage a deeper exploration of computer science.
Our mission is to make computer science approachable and exciting for young learners. By providing early exposure, we aim not only to teach about computers but also to cultivate skills that will benefit students in their future endeavours.
We invite you to embark on this exciting journey with us through the world of computer science. Let us empower the next generation with the skills and the knowledge they need to thrive in a digital world.
An Internet Service Provider, or ISP, is a company that provides you access to the internet, often for a fees. Some examples of ISPs are BSNL, Airtel, Jio, and Excitel.

Communication media helps us connect to the internet. Let us see some of their types.

Chapter Checkup
DSL stands for Digital Subscriber Line. It is a type of communication media that uses your telephone line to transmit data.
Project-based Learning: A project-based learning approach employed to foster an engaging and interactive learning experience

Cable is a type of communication media that uses the existing cable television wires to connect your computer to the internet.
Explore More: Short videos to find out more about the topic

Fibre optic cable is a type of communication media that uses light rays to connect your computer to the internet. Fibre optic cables are much faster than copper or cable wires. In fibre cables, the data travels in the form of light. Nothing in the universe travels faster than light. So, the internet through fibre optic cables is often the fastest type of internet connection available.


Discuss: A multi-faceted probing question, related to the concept, that arouses curiosity

Find out which type of internet connection your house or school has.
Now think of the fan speed knob, or regulator, on the switchboard. It changes the speed at which the fan spins, instead of just switching it on or off. We can have the fan spin at the fastest speed, reduce it to a slower speed, then much slower, and finally switch it off. We can do more things with the regulator than the switch. That is how analog signal works.
e I hold all the blocks for a block category. A Fill in the blanks.
Did You Know: Interesting facts related to the topic
India has the second-largest internet user base in the world, with over 70 crore users.
Think and Tell
Can you think of more examples of analog and digital signals?
Hints menu bar untitled backdrop blocks create
An Internet Service Provider, or ISP, is a company that provides you access to the internet, often for a fees. Some examples of ISPs are BSNL, Airtel, Jio, and Excitel.
Analysis, reflection, and text-to-self
1 In Scratch, we use colourful to create our own games, stories, and drawing.

2 To create a project in Scratch, you need to click .
Communication media helps us connect to the internet. Let us see some of their types.
3 By default, the name of the Scratch project is .
1. DSL
4 The purple bar at the top of the Scratch editor is called the
DSL stands for Digital Subscriber Line. It is a type of communication media that uses your telephone line to transmit data.
2. Cable
5 The background of the stage is called the . F Apply your learning.

Cable is a type of communication media that uses the existing cable television wires to connect your computer to the internet.
3. Fibre
hold all the blocks for a block category. A Fill in the blanks.
Chapter Checkup: Chapter-end practice exercises aligned to different levels of Bloom’s Taxonomy
Apply Your Learning: Intellectually stimulating questions designed for higher order thinking and analysis
Test Papers: Designed to evaluate understanding of core concepts and application of skills
A. Fill in the blanks.
Hints menu bar untitled backdrop blocks create
1 In Scratch, we use colourful to create our own games, stories, and drawing.
Fibre optic cable is a type of communication media that uses light rays to connect your computer to the internet. Fibre optic cables are much faster than copper or cable wires. In fibre cables, the data travels in the form of light. Nothing in the universe travels faster than light. So, the internet through fibre optic cables is often the fastest type of internet connection available.

1 Nia is making a Scratch project where she needs to move the dog from left to right. Which block should she use?
2 To create a project in Scratch, you need to click
e I hold all the blocks for a block category. A Fill in the blanks.

3 By default, the name of the Scratch project is
4 The purple bar at the top of the Scratch editor is called the
Hints menu bar untitled backdrop blocks create
Find out which type of internet connection your house or school has.
5 The background of the stage is called the
F Apply your learning.
Chapter 4 Browsing the Internet
1 In Scratch, we use colourful to create our own games, stories, and drawing.

Chapter Checkup A. Fill in the blanks.
2 To create a project in Scratch, you need to click
1 Nia is making a Scratch project where she needs to move the dog from left to right. Which block should she use?
3 By default, the name of the Scratch project is
4 The purple bar at the top of the Scratch editor is called the
5 The background of the stage is called the F Apply your learning.
Test Paper (Based on Chapters 1 to 4)

1 Nia is making a Scratch project where she needs to move the dog from left to right. Which block should she use?
Test Paper (Based on Chapters 1 to 4)
1 In Scratch, the blocks you put together in the script area are called a


2 The is the background of the stage.
1 In Scratch, the blocks you put together in the script area are called a The is the background of the stage.
* This chapter is not a part of the prescribed ICSE curriculum. It has been added after consideration of the latest trends in the computer science field. Teaching this chapter or including it in the assessment process is entirely at the discretion of the school and the subject teacher.
Just like Mel and Conji, we too have friends with whom we play, learn, and share our things.
Devices are things that help us to do specific tasks. For example, a phone is a device to talk to others.
An electronic device is a device that works on electricity. A computer is an electronic device that helps us do many things. The computer, then, becomes our electronic friend.
A computer is used for:


Charles Babbage is known as “the Father of Computers.” Did You Know?


A computer can do many things for us. Some advantages of computers are:

It can store a large amount of data like pictures, music, videos, and games. Storage 1
Calculation 4
Connectivity 2

We can share information and talk to each other using a computer.
Information 3
Computers have calculators in them that can help us do additions and subtractions.
Computers are very useful but they also have some disadvantages. Some of them are:
Entertainment 5
Computers can help us to know about new things and subjects.
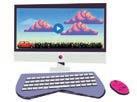
We can watch cartoons and films on a computer. We can also play games on it.
Is doing many things on a computer at the same time an advantage? Think and Tell
Do It Yourself 1A

Criminals


Computer parts like batteries are harmful for nature. Not recycling them, and throwing them in the garbage harms the soil. This pollutes the environment.

In today’s world, computers are used everywhere. They are used in:

• To let us take money out from our account.
• To tell us how much money we have left in our account.
• To help us send money to other accounts.

• To help us learn new things.
• To help teachers to make time tables and report cards.
• Help in collecting schools fees.

• To keep records of all the patients in a hospital.
• To help run big machines like X-ray machine.
• To prepare and print medical reports.

• To tell us about the timings of the flight, train or bus.
• To help us in booking tickets.
• To keep a record of all the passengers.

• To keep a record of the number of items in shops.
• To create and print orders and bills.
• To keep a record of people who work in the shops and offices.

How can computers help us in doing homework and creating projects? Explore More! Which other places use a computer?



Press the ON button on the monitor.

Wait for the computer to start. Once your computer is ‘awake’, you can use it.
To shut down a computer, we need to follow these steps:
1. Go to the Start button and click on it.
2. It will open a menu. Look for the power button on the bottom-left of the menu.
3. Click on the power button. It will open a menu. Start


4. Click on the Shut down option. The computer will start shutting down and after a couple of minutes, it will turn off.


Scan this QR code to learn other quick ways to turn off a computer.
You need to start your computer. Number the images in the correct order.


Number the steps to ‘Shut down’ a computer.
Go to Start Button.
Wait for the window to turn off.
Click on the power button. A menu will appear on screen.
You will see a menu.
Click on the ‘Shut down’ option.
Chapter Checkup
A. Fill in the Blanks. Hints:
To start a computer, first switch on the button.


C. Who Am I?
I am an electronic device that helps you do many things. I can help you play games, draw pictures, and find information on the internet.
I am the place where computers are used to keep records of all the patients.
I am a place where computers are used to withdraw money.
I am the button that helps you shut your computer down.
D. Write T for True and F for False.
A computer is an electronic device.
Hospitals use computers to keep records of patients.
Computers are only used for cooking food.
Computers help us to play music, videos, and games.
To start a computer, you need to press the button on the monitor first.
E. Answer the Following.
F. Apply Your Learning.
Sree wants to learn what computers can do. Can you help him?
Raj wants to switch the computer on. What does he need to do?
Archi is wondering about the disadvantages of using computers. Can you tell her?
Pranav wants to book a train ticket. Can you suggest what he should do?
Tanya wants to know where computers are used. She also wants to know how they are used there. Can you help her?
In chapter 1, we learnt about the computer. Now, let us learn about the different parts of a computer.
A computer has three types of parts. These are input devices, output devices, and storage devices.
We already know that a device is a tool that helps us to do a specific task. Now, let us learn about the different devices in a computer.

Think and Tell
Can you name a few devices in the classroom?
Computers can only help us if we tell them what we need. Input devices help us to tell a computer what to do. Input devices provide ways to ‘talk’ to the computer.
There are different input devices. Let us learn more about them.
Keyboard
A computer keyboard is a board with buttons on it. These buttons are called keys. Each key on the keyboard does one type of thing only. Using the keyboard, we can type on the computer.
Did You Know?
A standard keyboard has 104 keys. You can find more keys on a multimedia keyboard, which is used for playing audios and videos.
A computer mouse is a small input device. The mouse is used to move the pointer around the computer screen and click on files or icons to use them. It has two buttons and a wheel between them.

• Pointing at things on the computer screen.
• Moving pages on the computer screen up and down.
• Selecting items.
• Clicking on items to open them.
The first mouse was made of wood and had two wheels underneath it. It was invented by Douglas Engelbart. Did You Know?
A microphone is an input device that lets us use our voice to tell the computer what to do. Microphones these days are fitted into the computer itself. We can also buy microphones that can be plugged into the computer.
• Recording our voice.
• Talking to other people while online.
• Giving voice commands to the computer to play music, search for a film, or open a file.
Write T for True and F for False.
A device helps us to do specific tasks.
You can select items on the computer with a mouse.
The microphone helps us listen to the sounds made in the computer. The keyboard helps us to type on the computer.
The mouse has only one button.
We learnt that input devices help us tell the computer what we need. But how does the computer show us the results of our commands? It does so by using output devices.
Output devices show the results of what we want from the computer. Let us see some output devices.
Monitor
A monitor is the screen of your computer. It shows you the result of your input.
Uses of a Monitor
• Helps us to see what we are doing on the computer, like typing or moving the mouse.
• Lets us watch videos or films.
Printer
Do you want to know what is inside a monitor? See here!
A printer is used to print text or pictures on paper.
Uses of a Printer
• Lets us get a printout of text or pictures.
• Lets us get a black-and-white or colour printout of the text or the picture that we are printing.


Speakers and headphones help us to hear sounds that a computer creates as outputs.
This includes listening to music on the computer. It also includes listening to the voice of a person we have called using the internet.
Speakers are different from headphones.
Speakers are used when more than one person wants to hear the sounds and music. So, they are usually bigger.
Headphones are worn over the ears. They are meant for only one person to listen to sounds and music, without disturbing others.
• Helps in listening to music or sounds in a computer.
• Helps in listening to the voice of the person who we have called using the internet.
A hard disk is like a box that stores all the data in the computer. Every computer needs a hard disk to remember things.
• Keeps important things on the computer safe.


Did You Know?
We can do many things on a computer. We can listen to music, watch a video, and even get printouts.


Speakers use magnets to create sounds.
We can also store information in the computer, like our favourite songs, our school projects, films, and games. This is called data.
In the computer, data is stored in storage devices. Let us learn about them.
• Stores all that we have on the computer—including our favourite games, music, films, and projects.
CDs and DVDs are both storage devices. They are used by putting them in the CD/DVD Drive.
Both the CD and the DVD are round in shape and look similar, but they are different in functioning. Let us see how!

CD stands for Compact Disc. DVD stands for Digital Versatile Disc.
A CD holds less amount of data. A DVD holds a large amount of data.
• These can be carried around easily.
• These help us in storing things like music, films, and homework.
A pen drive is a small stick-like device in which you can store files. You can also transfer these files to another computer easily. It is also called a flash drive. It is smaller than CDs and DVDs.
• They can be used to easily transfer files from one computer to another.
• These are used to store a greater amount of data than CDs or DVDs.
• These, like CDs and DVDs, can be carried around easily.
Label the parts of the computer in the given image. 1


Computers work in a similar way. Let us see how.
Input: What we give to the computer.
Process: What the computer does with the input.
Output: What the computer gives us back.


Have you ever seen a plant grow? You give that plant water. The plant also breathes air. It also takes in sunlight. It takes in all these things and uses them to give us flowers and fruits!
This is called the Input, Process, and Output cycle or simply the IPO cycle. The IPO cycle tells us how a device works.
Let us see another example. This time, of a washing machine.
Can you think of another example for the IPO cycle?
Input We put dirty clothes in the washing machine.
Process The washing machine washes the clothes.

Output We get clean clothes.
Do It Yourself 2C
Write I for Input, P for Process and O for Output.
Alarm Clock
a You set the alarm on the clock.
b The clock keeps a track of the time and compares it with the time of the clock.
c When the time matches, the alarm rings.
Refrigerator
a The food is cold.
b The food is hot.
c The refrigerator absorbs heat from the food.
A. Fill in the Blanks.
help you listen to music.
A mouse is an device. A is a screen that looks like a TV. A can be carried around easily. We type on a computer using a .
B. Tick () the Correct Option.
Which device allows you to type letters, numbers, and special signs on a computer?
Keyboard d Hard Disk
Which of the following is a storage device?
Which device do we use to get a printed copy of a picture from the computer?
Which storage device is like a small stick?
Which device helps you move items on the computer screen?
C. Who Am I?
I let you listen to music without disturbing others.
I am round in shape and shiny. You can store things in me. I cost more than a CD.
If you use me, everyone can hear the sound given by me.
I keep all your favourite games and pictures safe in the computer.
When you type something on the keyboard, the numbers and the alphabets are seen on me.
D. Write T for True and F for False.
We give instructions to the computer using input devices.
A computer mouse helps you click on the computer.
A keyboard is small and round like a shiny plate.
A microphone records sounds.
A mouse is a box that stores photos in the computer.
E. Answer the Following.
What is an input device?
What is an output device?
F. Apply Your Learning.
On a family vacation, dad took many photos. Now, he wants to save them on a storage device that he can carry around with him. It would be great if the device can be carried safely in his wallet. Which device should he choose and why?
Riya wants to type a letter on the computer. Which devices will she use?
Aarav is watching a film on his computer. Which devices is he using? Also, write which device he will be using.
Tina was hungry. Her mother made her a sandwich using a toaster, bread, and cheese. Is this an IPO cycle? If so, correctly identify the input, process, and output.
Sagar loves drinking cold water. He keeps a glass of water in the refrigerator to make it cold. Explain the input, process, and output for this.
We use a pencil to write on paper. But how do we write on a computer?
We use the keyboard.


The keyboard is an input device. It has lots of buttons, called keys, on it. It helps us type letters, numbers, and symbols on the computer. Let us learn about these keys.
The alphabet keys are the keys with letters on them.

The computer keyboard is also called the QWERTY keyboard. It is based on the first six letters on the keyboard. Did You Know?
There are 26 alphabet keys, one for each letter in the English language. We use the alphabet keys to type words and sentences on a computer. The keys are arranged in such a way that they make typing letters easier.
The number keys are the keys with numbers on them. There are 10 number keys, from 0 to 9.
These keys help us to type numbers on a computer. Some keyboards have number keys on the righthand side also. This is known as the numeric keypad.
Do It Yourself 3A
Colour the vowels. 1

Can you use the computer keyboard to write in another language? Find out!

) the correct type for the given keys.


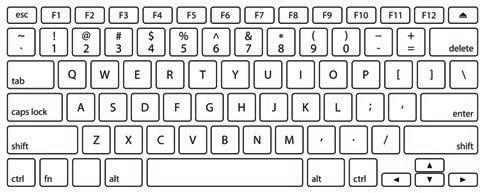
There are many special keys on a keyboard. These keys are used to do particular tasks.
Let us learn about them.
Sometimes, while typing, we make mistakes. We can correct them by erasing them.
The backspace key helps us remove the text or objects before the cursor (the blinking line).
Imagine we have typed ‘computerr’ by mistake instead of ‘computer’.
To fix this:
1. First, check if the cursor is at the right place. It should be after the letter to be erased, as shown.
2. Then, press the Backspace key.
Think and Tell
Which item in your pencil box works like the backspace key?
The Delete key also helps us remove text or objects but when they are after the cursor.
Imagine we have typed ‘machinee’. We can correct this mistake by clicking before the extra ‘e’ and pressing the Delete key.
To fix this:
1. Check if the cursor is before the extra ‘e’.
2. Press the Delete key.
computerr computer machine e machine

Punctuation keys are used to add punctuation symbols. These symbols are the question mark (?), exclamation mark (!), full stop (.), comma (,), semi-colon (;), and colon (:).
The Spacebar is also called the Space key. The spacebar is the largest key on the keyboard. It adds a space between two words. Imagine we have typed ‘Ahorse’.
To fix this:
1. Check if the cursor is where we want to add space.
2. Press the Space key.
Caps Lock key is used to type letters in capital.


If you press this key once, your letters will be in capital when you type. To write in small letter again, press the Caps Lock key again.

Caps Lock: ON
Caps Lock: OFF I PLAY FOOTBALL i play football
Just like Caps Lock, is there a key on the keyboard that helps us to type capital letters? Think and Tell
The Enter key is used to move the cursor to a new line while typing.
For example, imagine we have typed ‘I am a student. I study in grade 2’. To move the second sentence to the next line:
1. First, check if the cursor is before the sentence.
2. Then, press the Enter key.

I am a student. I study in grade 2.
I am a student. I study in grade 2.
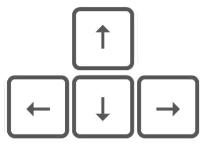
The arrow keys are four keys with arrows pointing in different directions.
They are used to move the cursor in the direction of the arrow.
The symbol keys have different symbols on them. For example, look at the number keys. They have symbols written above the numbers.

We can type these symbols using the Shift key.
A combination is when two or more things are done together. So, a combination on a keyboard happens when we press two or more keys together. For example, Shift, Ctrl, and Alt.
Let us learn these keyboard combinations.
The Shift key is used to type symbols and punctuation marks present on the upper part of other keys. It is also used to type capital letters when the Caps Lock is turned off.

For example, we want to type ‘Hello!’. Let us first type the word ‘Hello’.


Then, to add the exclamation mark (!), we will press and 1 together.
The Ctrl key is used with other keys to create shortcuts. For example, copying (Ctrl + C) or pasting (Ctrl + V).
The Alt key is used with other keys to do special tasks. For example, switching between windows (Alt + Tab).


The combination Ctrl + Alt + Del is used to open the task manager, restart, log out, and change the password of a computer. Did You Know?
b Adds space between two words. 1 Do It Yourself 3B
Colour the key that:
a Turns the small letters to capital letters.
2
Which key helps us type the symbol on the top of a key?
a Caps Lock b Shift c Backspace d Delete
3 Key Yes No ! ? & ; ,
Tick () Yes if the symbol can be used as combination key only. Tick () No if the symbol can be used without combination.
A. Fill in the Blanks.
Hints: capital numbers line backspace alphabet
The keys are used to type letters, words, and sentences.
The number keys are used to type .
The key on the keyboard is like an eraser for your words. Caps Lock key is used to write in letters.
The Enter key is used to move to a new when typing.
B. Tick () the Correct Option.
What is the use of alphabet keys?
a Typing numbers
c Enter key d Spacebar 1 2
b Typing special or punctuation symbols
c Typing words d Adding spaces between words
Which is the largest key on the keyboard? It also adds a space between two words.
a Backspace key b Caps Lock key
What are the arrow keys used for on the keyboard?
a Typing letters, words, and sentences
c Entering symbols and punctuation
Which key is used along with other keys?
a Enter key
c Arrow keys
b Moving the cursor in different directions
d Adding spaces between words
b Backspace key
d Shift key
How can you type the symbol above a number key?
a Press the Shift key and that number key together.
b Press the Caps Lock key and that number key together.
c Press the Enter key and that number key together.
d Press the Spacebar key and that number key together.
C. Who Am I?
I help to move the cursor to the next line.
If you have typed something wrong, I help you go back and remove it.
I make the letters capital when you type.
I add a space between two words.
D. Write T for True and F for False.
A keyboard is used to type letters, numbers, and symbols.
The alphabet keys on the keyboard are arranged as A, B, C, and so on.
The number keys are used to type letters, words, and symbols.
Some keyboards have number keys on the right-hand side also.
words.
E. Answer the Following.
What is a Spacebar used for?
F. Apply Your Learning.
Riya wants to type her name in capital letters. Which key should she use?
Raj wants to type an exclamation mark at the end of a sentence. Which keys should he use?
Alex wants to add a question mark to the end of a sentence. Which keys should he use?
Maya is wondering why the letters on the keyboard are in a different order than the book. What do you think is the reason?
Emma is playing a game on the computer. She needs to move the character on the screen. Which keys could help her?
We learnt that we could do so many things on a computer like listen to music, play games, and even study.
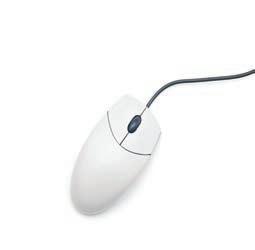
Look at the part of the computer that is labelled here.
1. Do you know what it is called? It is called the mouse!

2. When you move the mouse, an arrow also moves on the computer screen. This arrow is called the pointer.

Think and Tell Mouse
Is mouse an input device?
A mouse has three parts—a left button, a right button, and a scroll wheel.
Left Button
Right Button Scroll Wheel
The mouse was invented by Douglas Engelbart in the 1960s. Did You Know?
But how do these parts help us?
• Left Button: helps you click on things you want to open or use on the computer.
• Right Button: opens up additional options.
• Scroll Wheel: helps you move a page that is open on the computer screen up and down.
Now, let us learn how to hold the mouse properly. To hold a mouse properly, put your hand on top of it in such a way that:
1. Your index finger should be on the left button.
2. Your middle finger should be on the right button.
3. Your thumb and the other two fingers should be on the sides of the mouse.
Left Button
Thumb
Index Finger
Right Button
Middle Finger
Other Two Fingers
Now, move the mouse on the table. See how the pointer on the monitor also moves.
Does the mouse work when it is in the air? Why or why not?
Do It Yourself 4A
Colour the parts of the mouse with these colours: left mouse button in orange, right mouse button in blue, the scroll wheel in red and the body of the mouse in green.
The mouse pointer is the little arrow on the monitor that moves when we move the mouse. It helps you to point at, select, and click on many things that you see on the monitor. At first, the mouse pointer is simply a white arrow with a black border. What if we don’t like this arrow? Can we change it? Yes, we can!
There are many other types of mouse pointers. Let us look at some of them.

Find out how your mouse pointer can be changed.
We have learnt what a mouse is and how to hold it. Now, let us learn how to use it.
Pressing a mouse button is called clicking. We hear a soft clicking sound when we press the mouse buttons. Clicking with the left button is called a left-click. With one left-click, we can select an item.


Clicking the left button two times, very quickly, is called a double-click. When we double-click the left mouse button, it will open the selected item.


Clicking with the right mouse button is called a right-click. When we right-click, we get a list of choices that we can select.
Rolling the scroll wheel up and down using your index finger is called scrolling. Scrolling moves the page that is opened on the monitor up and down.
1. Select a file by left-clicking on it.

2. Then hold the left mouse button and move the mouse without leaving it. Moving the mouse without leaving the left mouse button is called dragging.
3. When you release the left button, you will see the file is placed where the pointer is.
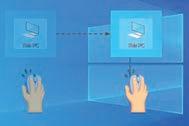
4. This way of moving the file is called drag and drop.
Drop Select an item. Match the following. 1
Left-click Keep holding the left button to do this.
Right-click Place an object at a new place on the monitor.
Drag Open a list of options.
Write T for True and F for False.
a Right-click is used to select an item.
b Drag is used to move an object.
c The default mouse pointer is a white arrow with a black border.
A. Fill in the Blanks.
Hints: scroll
A is an important input device of a computer.
The is the little arrow that appears on the monitor when you move the mouse.
The is used to select an item on the computer monitor.
The is used to see more options for a selected item.
The is used to scroll up and down on a page or a document.
B. Tick () the Correct Option.
Which part of the mouse is used to select an object on the computer monitor?
When we want to move up and down on the page opened on the monitor, we should on the page.
Which mouse pointer is shown on the computer screen, when you first use it?
Which finger is used to click the left button?
C. Who Am I?
I am a computer device. I have the name of a small animal.
I move on your monitor when you move your mouse.
You roll me up and down on the mouse. I help you go up and down on a page.
I am the button on the mouse that you use to open a list of choices.
I am the button on the mouse that you use to select an item.
D. Write T for True and F for False.
We cannot move the pointer on a computer monitor.
The mouse is an input device.
The computer mouse is an animal.
We can move an object from one place to another on a computer monitor using a mouse.
You can select a particular item by left-clicking on it.
E. Answer the Following.
What are any two uses of the mouse?
What is single-click and double-click?
What is left-click and right-click?
F. Apply Your Learning.
Aarna wants to move an item on the desktop from one place to another. What should she use?
Tiya sees an arrow on the monitor that moves when she moves the mouse, but she doesn’t know what it is. Can you tell her what it is?
Ravi is reading a story on the computer. He wants to move to the lower part. Which part of the mouse can help him?
Eva is new to computers. She doesn’t know how to open an item. Which button on the mouse can help her?
Look at this box. It has so many toys in it. There is a teddy bear, a toy guitar, and a toy plane in it.
Each toy has a name. So, if anyone asks you for the teddy bear, you can always easily find it in the box.
In the same way, our computer has many files in it.
A file is collection of data. It can be named. It has information stored in it.
Files can be of various types. A file may be of text, image, video, audio, or even a game type.
Let us learn how to create a Word file. You can type your best friend’s name and favourite colour in it.
Steps to create a file:
1. Right-click on the empty space on the desktop.
2. A list will appear.
3. Go to the New option. A dropdown will appear.
4. Click on the Microsoft Word Document option.
Discuss

5. The icon of the file appears on the desktop.
Tick () all the things that you can store as a file in your computer.
a An image b Your pencil
c Your favourite song
d A story
Number the steps to create a Word file in the correct order.
Click on the Microsoft Word Document option.
Position the cursor over the New option.
Right-click on the desktop.
You learnt how to create a file. Let us now learn how to open the file you have created.
1. Take your pointer to the file you created.
2. Double-click the picture of the file to open it.

Another way to open a file:
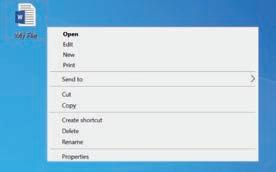
1. Right-click the file.
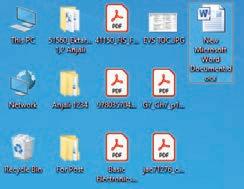
2. A list will appear. Select the Open option.

There is yet another quick way to open a file.
1. Select the file using the left mouse button.
2. Now, press the Enter key on the keyboard. The file will open.

Discuss Which way of opening a file do you find the quickest?
Now that we have opened the Word file, let us try writing something in it.
Let us try to type our best friend’s name and our favourite colour in it.
Steps to type:
1. Click on the white area. A blinking black line will appear. It is called the cursor. This is where we can type.

2. Use the keyboard to type your best friend’s name and your favourite colour here.

My best friend: Sree
My favourite colour: Red
We should always save our work. It helps us keep the text that we have written. It also saves our work from getting deleted by accident.
Steps to save a file:
1. Click on the File option.
Click on the File option.

2. Click on the Save As option.
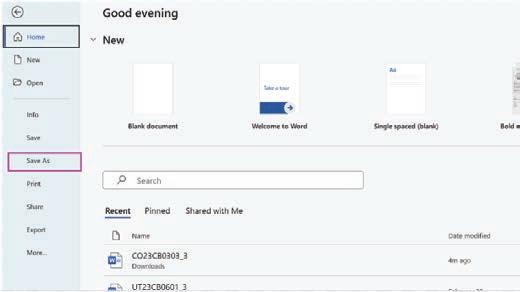
Click on the Save As option.
3. Choose where to save it.

4. Give a name to the file. Click on the This PC option. Click on the Desktop option. a b

Add a file name.
5. Click on the Save button. Click on the Save button.

Can we rename a file or folder? Find out more in here! Write T for True and F for False.
You can open a file by double-clicking the right mouse button.

You can open a file by clicking the right mouse button on the file and then clicking on Open.
A. Fill in the Blanks.
Hints: new files double-click videos are stored on a computer.
Files can hold text, pictures, songs, and even .
To create a new file, we can right-click and click the option.
To open a file, we need to the file.
B. Tick () the Correct Option.
What is a file like on the computer?
a Mouse b Power button c Keyboard d An item
A Word file helps us to:
a keep a song b type something in it c play a video d play music
How can you create a new file on the computer?
a Click Open b Click Save As
c Right-click and choose New → File d Double-click the file
How do you open a file that you saved?
a Click Save b Right-click and choose Open c Double right-click on the file
C. Who Am I?
I am an item on the computer that holds your drawings, stories, and music.
I show up when you right-click on a file, giving you options to choose from.
I am the blinking black line on the computer screen where you can type.
I keep the words you wrote in a file so that you can see it again.
D. Write T for True and F for False.
Saving a file makes sure that the words you wrote will be gone if you turn off the computer.
You can open a file by right-clicking on it and selecting the Open option.
Word files are used to type something in them.
After opening a file, you can type your name by clicking on the blinking black line.
E. Answer the Following. What
F. Apply Your Learning.
Tim has written a story on his computer. What do we call the item on which he has written it?
Rina just finished writing a letter to her friend on the computer. What steps should she follow to save it?
Tara wrote a short story on her computer. The next day, she switched her computer on. But her Word file was blank. Why do you think this happened?
Tim wants to type her name in a file. How will she do it?
Amit
There are so many beautiful things around us, like flowers and butterflies. Have you ever tried drawing them?
How do we make a drawing? We usually draw on a paper using pencils and colours. But do you know that we can also draw in the computer? Do you know how?
You can use MS Paint. MS Paint lets us draw and colour on the computer. Let us learn more about it!
To open MS Paint, follow these steps:
1. Click on the Search bar.

MS Paint was created in 1985. Did You Know?

3. Click on the Paint app.

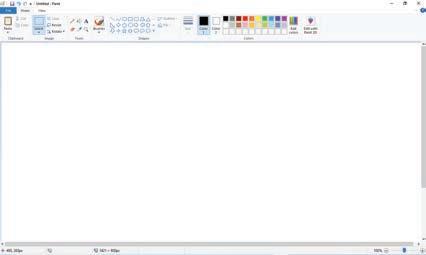
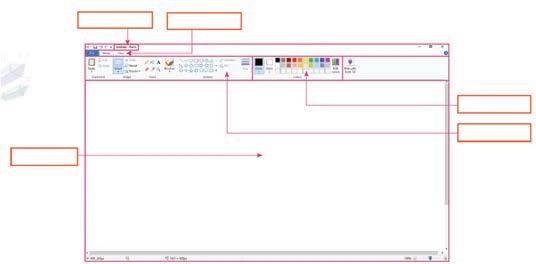
The Paint window has the following parts:
Title Bar Tools Group
Shapes Group Tabs

Drawing Area
Title Bar: Shows the name of your MS Paint file.
Tabs: This is where you can use different types of tabs like File, Home, and View.
Ribbon: Group of tools to help you draw.
Drawing Area: Space to draw.
Colors: Colour choices to choose colour from.
Shapes Group: Contains various shape tools using which we draw many shapes in Paint.
Tools Group: Contains various tools used in creating drawings.
Minimize: This button is used to hide the Paint window from the screen.
Maximize: This button is used to get the full screen of the Paint window, if it is in small size.
Close: This button is used to exit the Paint application.
Fill in the boxes. 1
Hints: title bar ribbon tabs colors drawing area
A shape is a figure that is made of lines or curves. There are many shapes like squares, circles, and triangles. In MS Paint, we have Shapes tools. They help us to draw shapes easily.
Let us learn how to draw some shapes in MS Paint.

Drawing a Line Steps to draw a line:
1. Choose the Line tool from Shapes.

2. Press and hold the left mouse button where you want to start drawing the line.
3. Move the mouse to where you want to end drawing the line.
End Point
4. Leave the left mouse button when you are done. Your line is drawn.

Drawing a Curve
Steps to draw a curve:
1. Choose the Curve tool from Shapes. Curve Tool

2. Press and hold the left mouse button.
3. Move the mouse to an end point and then leave it.
End Point
4. Press the left mouse button from where you want to make it curved and then move it.
5. Leave the left mouse button when you are done. The curved line is drawn.

Steps to draw a rectangle:
1. Choose the Rectangle tool from Shapes. Rectangle Tool

2. Press and hold the left mouse button where you want to start drawing the rectangle.
3. Move the mouse to where you want to end drawing the rectangle.
End Point
4. Leave the left mouse button when you are done. The rectangle is drawn.

Steps to draw a circle:
1. Choose the Oval tool from Shapes. Oval Tool

2. Press and hold the Shift key. Also press and hold the left mouse button where you want to start drawing the circle.
3. Move the mouse to where you want to end drawing the circle.
End Point
4. Leave the left mouse button when you are done. The circle is drawn.

A polygon is a shape with many sides. A triangle is a polygon with three sides. A square is a polygon with four sides. We can draw any shape with the Polygon tool in MS Paint.
Steps to draw a polygon:
1. Choose the Polygon tool from Shapes.
Polygon Tool

2. Press and hold the left mouse button where you want to start drawing the polygon.
3. Move the mouse where you want the next point of polygon.
4. Continue moving and pressing the left mouse button to add points.
5. Connect the last point added to the start point to complete the polygon.
6. Leave the left mouse button when you are done. The polygon is drawn. Discuss!

What things can you draw using the shapes we learnt? Match the following. 1
Draw a hut on MS Paint using the Shapes tool.
Hints:
• Use the Rectangle tool to draw two rectangles for the house base.
• Use the Triangle tool to add a roof on the second rectangle.
• Draw slanting lines on the sides with the Line tool.
• Add a smaller rectangle for the window, and draw cross lines inside it.
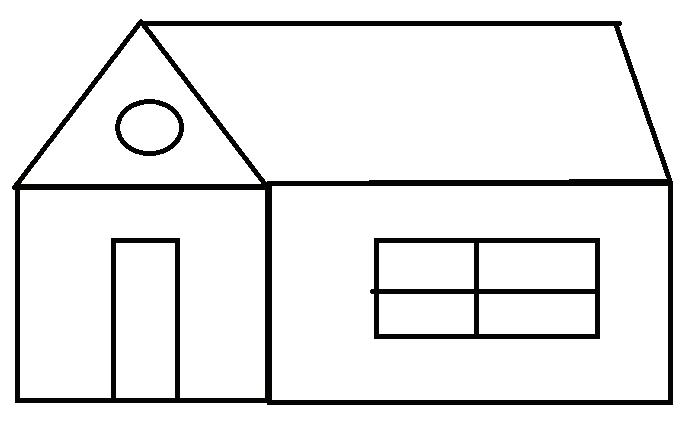
• Draw a rectangle for the door in the left rectangle.
• Use the Circle tool to add a circle inside the roof.
When you have finished drawing on MS Paint, you need to save it so that you can always see it again later. Let us see how we can do that.
Steps to save your MS Paint file:
1. Click on the File tab.
2. A menu will open up.


3. Click on the Save as option.

4. Another window will open which will allow you to save your file.
5. Type a name for your drawing in the File name box.
6. Click on the Save button. Type here Click here

Would you like to know what else can be drawn on MS Paint? See this video!

Let us now learn how to open a previously saved file.
Steps to open a drawing file:
1. Click on the File tab.
2. Click on the Open option.
3. Find the drawing file you want to open.

4. Select the file and click on the Open button.

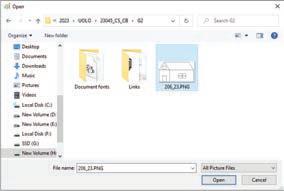
5. Your MS Paint file opens. Fill in the letters to complete the tool names.


A. Fill in the Blanks.
Hints:
To start MS Paint, first click on the button. shows the name of your MS Paint file. is the space where you draw. tool is used to draw a polygon.

Who Am I?


D. Write T for True and F for False.
Triangles, squares, and rectangles are types of polygons.
If we want to see our work again after closing MS Paint, we should save our file before closing it.
In MS Paint, we can only use one shape.
You can see your drawing only once after you save the file.
You can only use four colours to colour your drawings in MS Paint.
E. Answer the Following.
In the last chapter, we learnt about MS Paint. We drew interesting shapes like squares, circles, and triangles.
In this chapter, we will learn how to add colours to our shapes. MS Paint has fantastic tools to make our pictures colourful and exciting.
Did You Know?
Long, long ago, people drew on cave walls using rocks and colours found in nature.
These steps will help us colour the shapes we have drawn.
1. Open your drawing that you had made in MS Paint.
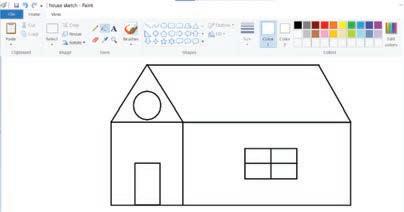
2. Go to the Shapes

3. Select a shape of your choice.

4. Click on the Outline option.

5. Choose a colour to outline. The colour you choose will be the colour of the outline of your star shape.

6. Click the Fill option. The colour your choose will be the colour that is filled inside the star shape.

7. Choose your favourite colour.

8. Fill in the shape by clicking in the area you want coloured. Here, you will click inside the star shape.
Doodle art: Doodle art means drawing without a plan. Find out more about doodle art here!

Discuss!
What shapes would you use to draw the windows, doors, and roof of your house?
Colour the rainbow with beautiful colours. 1
Let us learn about some tools in MS Paint. They help us to draw and make colourful pictures on the computer.

Fill
The Fill tool helps us add beautiful colours to our drawings. Let us try to colour the house using this tool!
Steps to fill the colour in your selected object:
1. Click on the Fill tool and then select the colour of your choice.

2. Colour the windows.
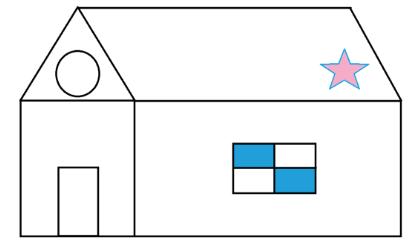
In the same way, colour all the other parts of the drawing you made.
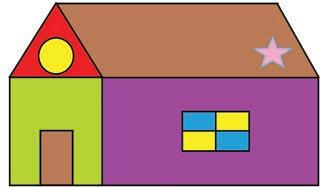
Now, your drawing will be bright and beautiful.
Think and Tell
What did you like the most about MS Paint, and why?
This tool helps us to put alphabets and numbers in our drawings.
Steps to use the Text tool:
1. Click on the Text tool.

2. Then, select any colour from the Colors palette.

3. Click where you want to write and start typing.
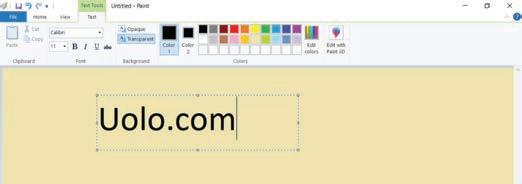
The Eraser tool is used to remove mistakes in our drawings.
Steps to use the Eraser tool:
1. Click on the Eraser tool.

2. Move the mouse pointer to the text which you want to remove.

3. Start erasing the text by moving the tool on the area with your left mouse button pressed.

The Color picker tool is a very interesting tool. It allows us to ‘pick’ the colour of an object without going into the colour section.
Color picker Tool

Let us learn to use it. Imagine you want to select the same blue colour that this circle has.
1. Click on the Color picker tool.
2. Take the tool to the same place where the blue colour is.
3. Click on the blue area.
You will notice that the blue colour has been selected. Now, you can take the mouse pointer to the area where you want to fill in this colour and click to fill the same selected colour.


Brushes help you make different lines, shapes, and textures, just like real paint brushes.
1. Click on the Brushes tool.

2. Select the option that you want to use.


Write T for True and F for False.
a We use the Fill tool to correct our mistakes while drawing.
b We use the Text tool to insert numbers and alphabets in our drawings.
c Imagine you have a pink figure. If you want to draw a circle of the same pink colour, you can use the Color picker tool.
d The Brushes tool can only draw bold strokes, not thin strokes.
A. Fill in the Blanks.
Hints:
The option helps us pick the outline colour and make it thicker or thinner.
The tool in MS Paint lets us pick any colour for our paint brush.
When we want to fix mistakes in our drawing, we use the tool.
The tool works like a special pen that lets us write words on our pictures.
B. Tick () the Correct Option.
What tool do we use in MS Paint to select shapes for colour?

c Writes words on the picture d Draws different styles of lines 1 2 3 4 5

How do ‘Brushes’ in MS Paint help us?
a Choose outline colours b Remove mistakes from the drawing
c Draw with different line styles d Fill shapes with colours
What does the ‘Fill’ option in MS Paint do?
a Allows us to choose the outline colour b Fills the shape with a colour c Removes mistakes from the drawing d Selects the shape for colouring
Which tool is used to pick a colour for the paint brush?

What is the use of the ‘Eraser’ tool in MS Paint?
a Adds colours to shapes b Removes mistakes from the drawing
Who Am I?
I let you select the shapes.
I allow you to fill a shape with your chosen colour.
I let you write “Kite” in your picture.
I allow you to pick any colour you like for your paint brush.
I help you remove mistakes from your drawing.
D. Write T for True and F for False.
In MS Paint, we can add colours to our shapes using the ‘Fill’ option.
We can open a saved drawing in MS Paint.
The ‘Select’ tool is used to remove mistakes from the drawing in MS Paint.
We cannot erase our mistakes in MS Paint.
The ‘Text’ tool in MS Paint functions like a special pen to draw different styles of lines.
E. Answer the Following.
What do we use to make our shapes colourful in MS Paint?
What tool do we use to fix a mistake in our drawing?
What is the use of Color picker tool?
What
F. Apply Your Learning.
You want to colour a picture of a cute puppy. Which MS Paint tool can you use to add colours to the picture of the puppy?
Sahiba drew a beautiful flower but made a mistake in one petal. Which MS Paint tool can help her fix the mistake?
Simran drew a happy sun and wanted to add some text to make it say “Hello!”. Which MS Paint tool allows her to write words on her picture?
Nikhil drew an apple using MS Paint. Now he is drawing cherries. He wants to make the cherries of the same red colour as that of the apple. How can he do that?
Can you understand the words in the talk bubbles in the given picture?
Can you understand the words in the talk bubbles in this picture too?
Yes!

This means you know English.
No!
This is because you may not know all these languages.
We must know the same language to talk to each other. You would have seen this machine.
This is a computer. It can help us do a lot of things.
We can draw pictures, play games, watch films, and more.
To make a computer let us do these things, we need to learn how to talk to it.
Computers cannot understand our words like people do.
We have to learn their language. That is what coding is.
Coding language is used to talk to a computer.
The coding language that we will learn is called Block-based Coding.
Block-based coding is a way to tell a computer what to do by joining colourful blocks together.
Let us learn about the platform that we will use to code and have fun.
Code.org is a fun coding platform where you can learn to use colourful blocks to make characters move, play games, and even tell stories.
It is a place where you can grow your coding skills and create amazing things using your imagination.
Before we learn to use this platform, let us learn about commands.
Look at the given picture.
What is the instruction here?
You are correct! The instruction is to jump.
For computers, an instruction is called a command.
A command is an instruction that tells a computer what to do.
In block-based programming, we use code blocks to give commands to a computer.

to make a character move up
Just like we join lego blocks, we can place a code block on top of another. Did You Know?
What instructions can you give to your pet?
Did You Know?
In block-based coding, the blocks can be of different colours, like crayons.
We all follow a routine in our daily lives. The pictures below show the steps to get ready for school in an order.
Wake up
Brush your teeth
Take a bath
Wear your uniform 5 Have your breakfast 6 Ready for School
Just like this, we do a lot of tasks in our daily lives.
A task is a piece of work that needs to be done.
It can be as simple as brushing our teeth or as fun as playing with our toys. We follow a particular sequence to do a task.
A sequence is when we do things step by step in an order.
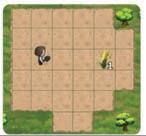
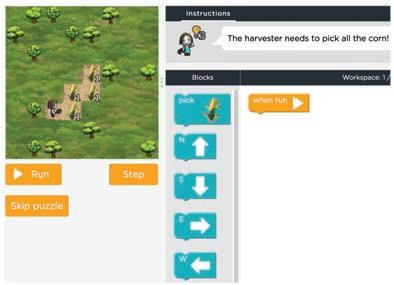
Let us say we need to help the harvester pick the corn.
What do you think? How many ways can we make the harvester pick the corn?
We can make the harvester pick the corn in many ways.

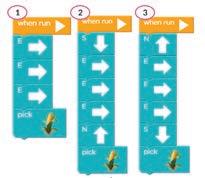
As there is more than one way. This means we may have one way or many ways to do a task.
A sequence can be a:
Fixed sequence : There is only one way to do the task.
Flexible sequence : There can be more than one way to do the task.
Let us take another example.
Observe the given picture and find out what type of sequence is this.

Making your bed! Is it a fixed sequence or a flexible sequence?
There is only one way to make the harvester pick the corn. So this is a fixed sequence.
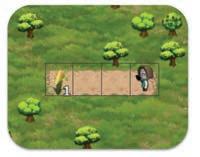


A problem is like a puzzle that needs to be solved. There can be more than one way to solve a problem. Each way has some steps to be followed to solve it.
The set of steps in an order to solve a problem is called an Algorithm.
In the example given in the previous section, getting ready for school is the problem. The steps given in order are the solution for this.
Think and Tell
Can we have more than one way to solve a problem?
Did You Know?
Some algorithms have fun names, like Hummingbird, Bat, Firefly, and Grey Wolf. You can give your algorithm a name too.
Sometimes problems can be too big to solve. But we can break them down into smaller ones to solve them easily. Let us talk about making a sandwich.
Making a sandwich may seem like a big problem. But we can solve it easily by breaking it into smaller steps, like gathering all the things we need for the sandwich like bread slices and cheese, and cutting veggies. When we are ready with all that we need, we can follow the given steps to make a sandwich.
Similar to how we solved the problem of making a sandwich, we can solve many problems in coding by putting the code blocks in a sequence.
Now, look at the given picture. We need to help the bird reach the pig.
We can do this by putting code blocks on top of each other in an order. Let us see how we can make the bird reach the pig.
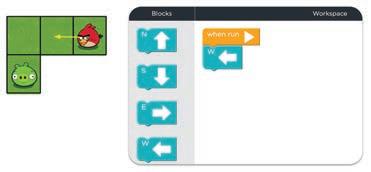
The W block will make the bird move one step left.
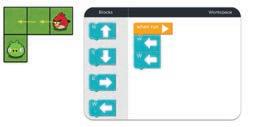


We need to give two W blocks to make the bird move in the left direction. The S block will make the bird move one step down. These blocks are called direction blocks as they are named after the four main directions: North, South, East, and West.

If we put the blocks in a different order, will the bird do something else? Think and Tell
1 Think of the story of Little Red Riding Hood. Then, number the given pictures in the correct sequence.
2 Tick () the correct sequences.
The Puzzle Code Studio on Code.org is the playground where we code to solve the given puzzles. There are four important parts:
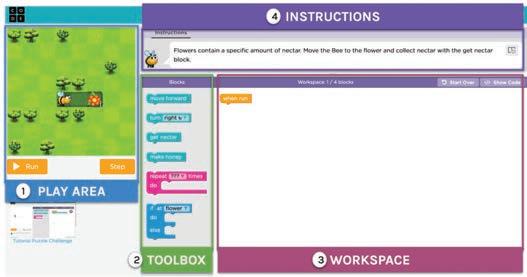
Play Area : The area where we can see things happening.
Toolbox : The area that holds all the code blocks which we can use to give commands.
Workspace : The area where we can drag and attach the blocks together to make things happen.
Instructions : The hints that help us know what to do next.
Code to help the harvester get all the corns. Scan the QR Code to open the activity.

A Fill in the Blanks.
Hints
coding sequence command flexible
1 is the language used to talk to a computer.
2 We can give a to a computer to do a task.
3 A is when we do things step-by-step in an order.
4 In a sequence, we can do a task in more than one way.
5 The is the area where we can see things happening.
B Tick () the Correct Option.
1 The set of steps in order to solve a problem is called a/an .
a Sequence b Command
c Algorithm
d All of these
2 Which block can help us move a character up?


C Write T for True and F for False.
1 Using coding, we cannot talk to a computer.
2 A sequence is an instruction.

a b c d All of these
3 There is a sequence to everything happening around us.
We all enjoy listening to stories. But do you know how stories are created? A story is made up of various elements, such as:
1. Characters : People, animals, or things in the story
2. Problem : Something that needs to be done or solved
3. Setting : The place where the story happens
4. Events : When and what happens
We can use block-based coding to make stories.
Let us make a story about an astronaut going on a space adventure.
An astronaut is a person who travels in space to do experiments and explore space.

But before we begin, we should find out the elements of our story. Who will be the main character in the story?
Correct! The astronaut will be the main character in our story.
A character in coding is called a Sprite.
So, the astronaut will be the main sprite in the story. Now, what does an astronaut need to travel in space? Yes! An astronaut needs a rocket to travel.
In coding, any other character or thing in the story is also called a sprite. So the rocket will be another sprite in our story. Where should the journey of the astronaut begin?
From the Earth, Right! And where is the astronaut travelling to? Mars, the red planet!
Do It Yourself 9A
1 Name the characters in the given picture from the story Hansel and Gretel.
2 Write down the number of sprites shown in the given pictures. a
Now, let us learn about the tool from code.org that we will use to make our story project. It is called Sprite Lab. A Sprite Lab is where we can create our own stories and games.
The Sprite Lab has three parts:
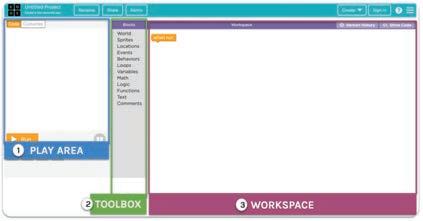
1. Play Area : The area where we can see things happening.
2. Toolbox : The area that holds all the code blocks and which we can use to give commands.
3. Workspace : The area where we can drag and attach the blocks together to make things happen.
It is time to make scenes for the exciting journey of the astronaut in Sprite Lab. We will have two scenes: one for the start of the story and another for reaching Mars.
Let us begin with the first scene. Who will be the characters? Where will the scene happen?

Characters: Sprites

Setting: Background
Now, let us find the steps to create the first scene in the Sprite Lab.

1 Set the background to a park. 2 Add the astronaut sprite.

3 Set the size of the astronaut sprite. 4 Add the rocket as the second sprite.
5 Set the size of the rocket sprite.

Now, let us follow the algorithm to code the first scene. Steps to code the first scene:
1 Set the background to a park.


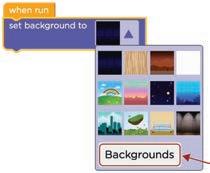
1. Drag the set background to block.
2. Drop it under the when run code block in Workspace. Set the background. c

2. Select Backgrounds. Select the background. d
1. Click the drop-down button.
Add the park background. e
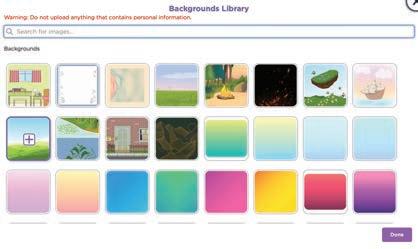
1. Click the plus sign.
2. Scroll down to choose the park background.
3. Click the Done button.

2 Add the astronaut sprite. Go to the Sprites section. a

Click and drag the make new sprite at code block. Find the “make new sprite at” code block. b

1. Click the drop-down button in the make new sprite at code block.
2. Click the Costumes button to add the astronaut sprite to your library. Open Costumes.
Click Costumes

Click the New Costume. Add a new costume. d
Open Space Costumes Library. e
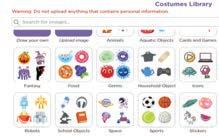

2. Click the Done button. Select the astronaut sprite. f
1. Select the astronaut sprite.

Move to the Code window. g
1. Click the Code tab.

Position the astronaut. i
1. Click the astronaut sprite. Select the sprite. h
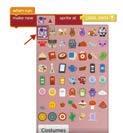
1. Click the location icon to change the position of the astronaut.

2. Move cursor in the Play Area.
3. Click where you want to place the astronaut.
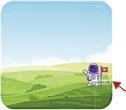
3
Set the size of the astronaut sprite.
Go to the Sprites section. a

1. Go to the Sprites section in Toolbox.
2. Click and drag the set size to code block. Find the “set size to“ code block. b
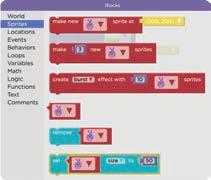
3. Change the value of size to 100. Set the size of the astronaut sprite. c
1. Click the drop-down in the set size to block.
2. Select the astronaut sprite.

4 Add the rocket sprite.
2. Click and drag the make new sprite at code block. Get another “make new sprite at“ code block. a
1. Go to the Sprites section in the Toolbox.

2. Select rocket from the list of sprites. Place the rocket where you want it. Add rocket sprite. b
1. Click the drop-down in the make new sprite at code block.

2. Change the value of the size to 200. Set the size of the rocket sprite. a
1. Go to the Sprites section in the Toolbox.
2. Click and drag the set size to code block. Find the “set size to“ code block. c

1. Click the drop-down and select rocket sprite.

Our first scene setup is done.
Now, we will add the moving behaviour of the astronaut.
Adding Behavior means telling our sprites what to do when we press the Run button.
Here, we need to make our astronaut sprite move to the right to reach the rocket.
Find the “sprite begins“ code block. 1
Go to the Behaviors section in the Toolbox.
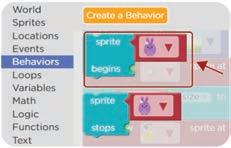
Set the “sprite begins“ code block. 2
1. Drag the sprite begins code block.
2. Attach it below the size block of the rocket sprite.
3. Select the astronaut sprite.
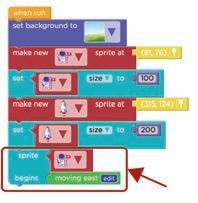
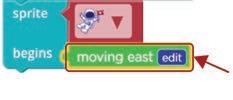
2. Scroll down and look for the moving east code block. Find the “moving east“ code block. 3
1. Go to the Behaviors section.

Drag the moving east code block next to begins. Attach the “moving east“ code block. 4
Click the Run button in the Play Area.

1 There are main elements that make up a story.
2 A character in coding is known as a .
3 You can change the of a sprite to place it anywhere in the Play Area.
4 You can change the of a sprite to make it big or small.
5 You can add and control the of a sprite.
B Tick () the Correct Option.
1 How many sprites are there in the picture given below?
a 1 b 2
c 0 d 3
2 Which block can be used to change the costume of a sprite?


C Write T for True and F for False.
1 We need to set the location of a sprite before we make it.
2 You can change the outfit of a sprite.
3 Sprites can touch each other.
4 You cannot add multiple sprites to a scene.
5 You cannot change the size of a sprite.
What happens when someone tickles you?
You laugh. Right?
Here, tickling is an event and laughing is an action.
An event tells you when an action will happen.
What will you do when you are hungry?
You will eat food. Right?
Here, being hungry is an event and eating food is an action.
Think and Tell
Are mouse clicks and keypress events too?
Events are important in coding too!
In a car game, we can make the car go left or right, using arrows.
Clicking the arrows is the event.
The car moving to the left or right is the action that happens!
Now it is time to complete our astronaut story.
Do you remember what the astronaut wants?
The astronaut wants to go to the planet Mars for space exploration.
We had set up our first scene in the previous chapter.
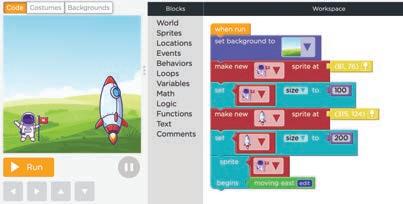
Now, we need to add code for the second scene.
The second scene is where the astronaut will reach the planet Mars.
When will the astronaut reach the planet Mars?
The astronaut will reach the planet Mars when it touches the rocket.
Here, touching the rocket is the event.
The astronaut reaching the planet Mars is the action.
What events and actions happen around us every day?
Event Action When astronaut touches the rocket
1. Change the costume of the astronaut
2. Stop moving the astronaut
We can even change the costume of the astronaut into another to show the victory.
A costume sets the appearance of a sprite.
It Yourself 10A
1 Match the correct event and action pairs.
Let us define the event to set up the second scene.
1 Set the event—when the astronaut touches the rocket. Find the “when touches” block. b
Go to Events. a


Drag and drop the when touches event block below the code we made last time. Add it to Workspace. c

2. Change the carrot sprite to the rocket. Change the sprites. d
1. Change the rabbit sprite to the astronaut.

2 Change the costume of the sprite.
2. Scroll down to find the change costume to block. Find the “change costume to“ block. a
1. Go to the Sprites section.

Drag and drop it below the when touches block. Attach it to the “when touches” block. b

2. Change the brown rabbit to the second costume of the astronaut Set the costume. c
1. Change the purple rabbit to the first costume of the astronaut.

3 Stop moving the astronaut when it touches the rocket.
3. Drop it below the change costume to block. Add the “sprite stops” code block. a
1. Go to Behaviors.
2. Drag the sprite stops block.

Set the “moving east” block. c
Drag and drop it to the stops section of the sprite stops block.

1. Scroll down and look for moving east block. Find the “moving east” block. b

Click the Run button in the Play Area.

A Fill in the Blanks.
Hints when touches change costume costume action event
1 Clicking the Run button to try the game is an .
2 Laughing is an for the tickling event.
3 The block is used to add the event for sprites when sprites bump into each other.
4 A sets the appearance of a sprite.
5 The block will change the costume of a sprite.
1 Which of the following statements is true about Events and Actions?
a An event tells you when an action will happen.
b An action tells you when an event will happen.
c Both actions and events will happen at the same time.
d Actions and events are both independent.
2 Choose the correct action for the given event.
C Write T for True and F for False.
1 An event always comes after an action.
2 You cannot change the behaviour of a sprite.
3 The ringing of a doorbell is an action.
4 Opening the door when a doorbell rings is an example of an action.
5 The “moving east” block stops the behaviour of a sprite.
In our daily lives, we do many activities.
Imagine that there are pieces of paper spread everywhere in your room. Your mother wants you to clean them up.
What if she tells you to do this for every piece?
She would have to say the same thing many times. But would it not be better if she said it just once?
In the same way, we can use a loop to tell a computer to repeat a command.
A loop is an action of doing something, again and again, until the task is complete.
In real life, while doing something, we know when to stop.
In the same way, we should know when to stop a task in coding as well.
In a loop, we need to know two things:
1 What to do?
2 When to stop?
Imagine we need to put five pieces of paper in the dustbin. Here, what we need to know is:
• What to do—pick a piece of paper and put it in the dustbin.
• When to stop—when all the five pieces are in the dustbin.
In coding, we can repeat a task a number of times using the repeat code block.
Let us see what can be the code for putting five pieces of paper in the dustbin.
The repetition of words is a common way used in poetry. Did You Know?
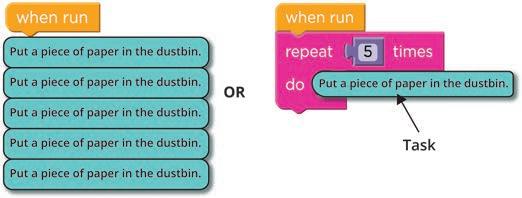
The repeat loop is used when we want to repeat a task a certain number of times.
By using the repeat loop, our code has become shorter. Remember the astronaut project?
We made the astronaut change its costume when it touched the rocket. Next, we need to change the background on the same event.
Then, we can add a twist to it using the repeat block.
Imagine the astronaut reaching the planet Mars.
People on Mars gather to see the astronaut.
Let us get started.
1 Change the background when the astronaut touches the rocket. Open your project. a

2. Click and drag the set background to block in the Workspace. Find the “set background to” block. b Join the set background block below the sprite stops block. Add the “set background” block. c
1. Go to the World section.


1. Click the drop-down button.
2. Click the Backgrounds button to add the Mars background. Change the background to Mars.

Click New Background to add Mars background to your library. Add new background.

Choose the Mars background.
Choose the Mars background and click the Done button.
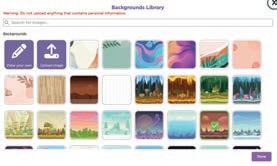
The background gets added to your library. Click the Code tab to set the Mars background.
2. Select the Mars background. Set the background. g
1. Click the drop-down button.

2 Add Mars people at random locations.
2. Click and drag the repeat block in the Workspace. Add repeat block. a
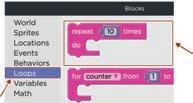
Set the number of times for the repeat block. b

1. Go to the Sprites section.
2. Drag and attach the make new sprite at block inside the repeat block. Make the Mars people sprite.


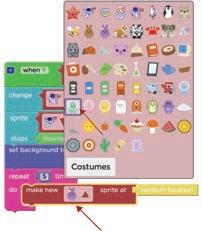
1. Go to the Locations section.
2. Click and drag the random location block.
Attach it to the make new sprite at code block. Place the green sprite at a random location.

This will make five green sprites and make them appear at random locations.
A random location is not a fixed place. It is like a surprise place that can be anywhere in an area. Our project is complete.
If you want, you can change the size of the green sprites using the set size code block.

Look at the given picture.
Which of the following codes will make the mouse reach the cheese?


Chapter Checkup
Fill in the Blanks.


1 A is an action of doing something, again and again, until the task is complete.
2 In a loop, we need to know when to .
3 The repeat loop is used when we want to repeat a task a number of times.
4 Using a repeat loop, your code will become .
5 A location is not a fixed place.
B Tick () the Correct Option.
1 Which block is used to do a task a certain number of times?


2 Which code will show the given picture in the Play Area?



A. Fill in the Blanks.
1 A is an electronic device that helps us do many things.
2 A lets us use our voice to tell the computer what to do.
3 A is a small stick-like device in which you can store files.
4 The mouse is the little arrow on the monitor that moves when we move the mouse.
B. Tick () the Correct Option.
1 Which device helps us print text or pictures on paper?
a Mouse
c Printer
2 A Word file helps us to:
a Keep a song
c Play a video
3 Which button is used to switch off the computer?
a Shut Down
c Switch off
b Monitor
d Keyboard
b Type something in it
d Play music
b On button
d Power off
4 Which button on the mouse is used for opening more options?
a Left button
c Right button
C. Write T for True and F for False.
b Scroll wheel
d Middle button
1 Using computers for a long time can harm our eyes.
2 A file is a collection of data.
3 The scroll wheel on a mouse can only move in one direction.
4 Numeric keys are used to type letters.
D. Answer the Following.
1 Write one use of a computer mouse.
2 How are computers useful for teachers?
3 What are punctuation keys?
4 Write the steps to open a file.
E. Apply Your Learning.
1 Ayush wants to type his name in capital letters on the computer. Which key should he use?
2 Aditi was thirsty. Her mother made her juice using an orange and a juicer. Is this an IPO cycle? If so, correctly identify the input, process, and output.
3 Pihu is new to computers. She does not know how to open an item. Which button on the mouse can help her?
Test Paper 2 (Based on Chapters 6 to 11)
A. Fill in the Blanks.
1 is the group of tools to help you draw.
2 is a figure that is made of lines or curves.
3 language is used to talk to a computer.
4 In a loop, we need to know when to .
B. Tick () the Correct Option.
1 shows the name of your MS Paint file.
a Tabs b Title bar
c Ribbon d Drawing area
2 What is an event in coding?
a Eating food
b Clicking a mouse
c Writing with a pen d Sleeping
3 The tool helps us to put alphabets and numbers in our drawings.
a Fill with color b Eraser
c Text d Color picker
C. Write T for True and F for False.
1 An algorithm refers to a set of steps in order to solve a problem.
2 A polygon is a shape with many sides.
3 The ‘sprite stops’ block is found in the Behaviors section.
4 A loop is an action of doing something, again and again, until the task is complete.
D. Answer the Following.
1 Which app is used to draw beautiful drawings?
2 How do you save your drawing in MS Paint?
3 What is the use of the eraser tool?
4 What is the use of a color picker tool?
E. Apply Your Learning.
Himanshu wants to know about the parts of the Paint window. Help him by labelling the parts.
Robots are machines that can do things for us. They can move, think, and even talk. Some robots look like people or animals, while others look like big machines or tiny helpers. People use robots to make work easier and to do things we can’t do by ourselves. Robots use Artificial Intelligence to work.
Robots at Home
• Robots can clean floors for us.
• Some robots can also cook.
• They can help carry things.
• Some robots can water plants.


Robots at Hospitals
• In hospitals, robots help doctors by treating the sick people.
• Robots can help people by reminding them to take medicine.


Robots at Factories
• In factories, robots help make things like cars and toys.
• They can lift heavy things.
• They work fast and don’t get tired.


Robots in Exploration


• Robots can explore outer space, like the ones on Mars.
• Robots can explore deep oceans where it is too dark and deep for humans.



• Robots on farms help plant seeds and pick crops to make food.
• Robots help in watering the crops.
• Robots can cook and bake delicious food in kitchens.
• Some robots work as waiters in restaurants and serve food.
• Firefighter robots help by going into burning buildings and rescue people.
• Police robots help people who are in danger and catch bad people.
• In schools, robots help kids learn to code and build things.
• Some robots can read stories to us and answer our questions.
• Robots can defuse bombs and scout.
• Some robots can even fight.
Uolo has introduced a comprehensive program, Hexa, for grades 1 to 8, to empower young minds with the knowledge and the skills they need to thrive in the digital age. From the basics of how computers function to the tools that shape our digital landscape, this series opens the door to a world of endless possibilities. This series will build a strong foundation, helping shape the next generation of digital citizens and innovators. It aims to demystify the world of computer science, making it accessible and engaging for young learners, while preparing them for future academic and professional pursuits in the field.
• AI Annexures: To offer a basic understanding of specific domains of Artificial Intelligence.
• Discuss: A multi-faceted probing question, related to the concept, that arouses curiosity.
• Think and Tell: Analysis, reflection, and text-to-self connection based prompts for discussion in class.
• Did You Know? Interesting facts related to the application of a concept.
• Do It Yourself: Short exercises between the chapter to pause and assess comprehension.
• Chapter Checkup: Chapter-end practice exercises aligned to different levels of Bloom's Taxonomy.
• Test Papers: Designed to evaluate understanding of core concepts and application of skills.
Uolo partners with K-12 schools to bring technology-based learning programs. We believe pedagogy and technology must come together to deliver scalable learning experiences that generate measurable outcomes. Uolo is trusted by over 15,000+ schools across India, South East Asia, and the Middle East.
ISBN 978-81-980880-9-3
