


Academic Authors: Muskan Panjwani, Anjana AR, Anuj Gupta, Simran Singh
Creative Directors: Bhavna Tripathi, Mangal Singh Rana, Satish
Book Production: Sanjay Kumar Goel, Vishesh Agarwal
Project Lead: Neena Aul
VP, Learning: Abhishek Bhatnagar
All products and brand names used in this book are trademarks, registered trademarks or trade names of their respective owners.
© Uolo EdTech Private Limited
First impression 2024
Second impression 2025
This book is sold subject to the condition that it shall not by way of trade or otherwise, be lent, resold, hired out, or otherwise circulated without the publisher’s prior written consent in any form of binding or cover other than that in which it is published and without a similar condition including this condition being imposed on the subsequent purchaser and without limiting the rights under copyright reserved above, no part of this publication may be reproduced, stored in or introduced into a retrieval system, or transmitted in any form or by any means, electronic, mechanical, photocopying, recording or otherwise, without the prior written permission of both the copyright owner and the above-mentioned publisher of this book.
Book Title: Imagine Mathematics Teacher Manual 6
ISBN: 978-81-984519-1-0
Published by Uolo EdTech Private Limited
Corporate Office Address:
85, Sector 44, Gurugram, Haryana 122003
CIN: U74999DL2017PTC322986
Illustrations and images: www.shutterstock.com, www.stock.adobe.com and www.freepik.com
All suggested use of the internet should be under adult supervision.
Mathematics is an essential tool for understanding the world around us. It is not just another subject, but an integral part of our lives. It shapes the very foundation of our understanding, personality and interaction with the world around us. Studies from across the globe have shown that proficiency in mathematics significantly influences career prospects and lifelong learning.
According to the NEP 2020, mathematics and mathematical thinking are crucial for empowering individuals in their everyday interactions and affairs. It focuses on competencies-based education, which essentially means actively and effectively applying mathematical concepts in real life. It also encourages innovative approaches for teaching maths, including regular use of puzzles, games and relatable real-world examples to make the subject engaging and enjoyable.
It is in this spirit that Uolo has introduced the Imagine Mathematics product for elementary grades (1 to 8). This product’s key objective is to eliminate the fear of mathematics by making math exciting, relatable and meaningful for children.
Imagine Mathematics positions itself on the curricular and pedagogical approach of the Gradual Release of Responsibility (GRR), which has been highly recommended by the NEP 2020, the NCF 2023 and other literature in learning and educational pedagogies. Subsequent pages elaborate further on this approach and its actualisation in this book.
This book incorporates highly acclaimed, learner-friendly teaching strategies. Each chapter introduces concepts through real-life situations and storytelling, connecting to children’s experiences and transitioning smoothly from concrete to abstract. These teacher manuals are designed to be indispensable companions for educators, providing well-structured guidance to make teaching mathematics both effective and enjoyable. With a focus on interactive and hands-on learning, the manuals include a variety of activities, games, and quizzes tailored to enhance conceptual understanding. By integrating these engaging strategies into the classroom, teachers can foster critical thinking and problem-solving skills among students. Moreover, the resources emphasise creating an enriched and enjoyable learning environment, ensuring that students not only grasp mathematical concepts but also develop a genuine interest in the subject.
In addition, the book is technologically empowered and works in sync with a parallel digital world, which contains immersive gamified experiences, video solutions and practice worksheets, among other things. Interactive exercises on the digital platform make learning experiential and help in concrete visualisation of abstract mathematical concepts. We invite educators, parents and students to embrace Imagine Mathematics and join us in nurturing the next generation of thinkers, innovators and problem-solvers. Embark on this exciting journey with us and let Imagine Mathematics be a valuable resource in your educational adventure.
Imagine Mathematics Headings: Clear and concise lessons, aligned with the topics in the Imagine Mathematics book, designed for a seamless implementation.
Alignment
C-1.1:
C-4.3:
2
Imagine Mathematics Headings
Place Value, Face Value and Expanded Form
Indian and International Number Systems
Comparing and Ordering Numbers
Learning Outcomes: Clear, specific and measurable learning outcomes that show what students should know, understand, or do by the end of the lesson.
Learning Outcomes
Students will be able to:
Rounding–off Numbers
Learning Outcomes
Students will be able to: write the place value, face value, expanded form and number names for numbers up to write numbers up to 8 digits in the Indian and International number system. compare numbers up to 8 digits and arrange them in ascending and descending order. round off numbers up to 8 digits to the nearest 10, 100 and 1000.
Alignment to NCF
C-1.1: Represents numbers using the place value structure of the Indian number system, numbers, and knows and can read the names of very large numbers
C-4.3: Selects appropriate methods and tools for computing with whole numbers, such as computation, estimation, or paper pencil calculation, in accordance with the context
C-5.1: Understands the development of zero in India and the Indian place value system for the history of its transmission to the world, and its modern impact on our lives and in all technology
Let’s Recall
write the place value, face value, expanded form and number names for numbers up to 8 digits. write numbers up to 8 digits in the Indian and International number system. compare numbers up to 8 digits and arrange them in ascending and descending order. round off numbers up to 8 digits to the nearest 10, 100 and 1000.
Place Value, Face Value and Expanded Form
Recap to check if students know how to write the place value, expanded form and number 6-digit numbers.
Indian and International Number Systems
Ask students to solve the questions given in the Let’s Warm-up section.
Comparing and Ordering Numbers
C-1.1: Represents numbers using the place value structure of the Indian number system, compares whole numbers, and knows and can read the names of very large numbers
Alignment to NCF: Learning Outcomes as recommended by NCF 2023.
Vocabulary
Rounding–off Numbers
C-4.3: Selects appropriate methods and tools for computing with whole numbers, such as mental computation, estimation, or paper pencil calculation, in accordance with the context
Learning Outcomes
C-5.1: Understands the development of zero in India and the Indian place value system for writing numerals, the history of its transmission to the world, and its modern impact on our lives and in all technology
Let’s Recall
expanded form: writing a number as the sum of the values of all its digits order: the way numbers are arranged estimating: guessing an answer that is close to the actual answer rounding off: approximating a number to a certain place value for easier calculation
Teaching Aids
Recap to check if students know how to write the place value, expanded form and number names for 6-digit numbers.
Students will be able to: write the place value, face value, expanded form and number names for numbers up to 8 digits. write numbers up to 8 digits in the Indian and International number system. compare numbers up to 8 digits and arrange them in ascending and descending order. round off numbers up to 8 digits to the nearest 10, 100 and 1000.
Ask students to solve the questions given in the Let’s Warm-up section.
Vocabulary
Chart papers with empty place value chart drawn; Buttons; Beads; Bowls; Digit
Alignment to NCF
4
5 number cards with a 7-digit or 8-digit number written on them; Two bowls with number 8-digit numbers in one bowl and rounded-off places in another bowl
expanded form: writing a number as the sum of the values of all its digits order: the way numbers are arranged estimating: guessing an answer that is close to the actual answer rounding off: approximating a number to a certain place value for easier calculation
Teaching Aids
Let’s Recall: Recap exercises to check the understanding of prerequisite concepts before starting a topic.
C-1.1: Represents numbers using the place value structure of the Indian number system, compares whole numbers, and knows and can read the names of very large numbers
C-4.3: Selects appropriate methods and tools for computing with whole numbers, such as mental computation, estimation, or paper pencil calculation, in accordance with the context
C-5.1: Understands the development of zero in India and the Indian place value system for writing numerals, the history of its transmission to the world, and its modern impact on our lives and in all technology
Let’s Recall
Chart papers with empty place value chart drawn; Buttons; Beads; Bowls; Digit cards; Bowls with 5 number cards with a 7-digit or 8-digit number written on them; Two bowls with number cards having 8-digit numbers in one bowl and rounded-off places in another bowl
Recap to check if students know how to write the place value, expanded form and number names for 6-digit numbers. Ask students to solve the questions given in the Let’s Warm-up section.
Vocabulary
expanded form: writing a number as the sum of the values of all its digits order: the way numbers are arranged estimating: guessing an answer that is close to the actual answer rounding off: approximating a number to a certain place value for easier calculation
Teaching Aids
Chart papers with empty place value chart drawn; Buttons; Beads; Bowls;

Students will be able to: write the place value, face value, expanded form and number names for numbers up to 8 digits. write numbers up to 8 digits in the Indian and International number system. compare numbers up to 8 digits and arrange them in ascending and descending order. round off numbers up to 8 digits to the nearest 10, 100 and 1000.
C-1.1: Represents numbers using the place value structure of the Indian number system, compares whole numbers, and knows and can read the names of very large numbers
C-4.3: Selects appropriate methods and tools for computing with whole numbers, such as mental computation, estimation, or paper pencil calculation, in accordance with the context
QR Code: Provides access to digital solutions and other interactive resources.
C-5.1: Understands the development of zero in India and the Indian place value system for writing numerals, the history of its transmission to the world, and its modern impact on our lives and in all technology
Let’s Recall
Recap to check if students know how to write the place value, expanded form and number names for 6-digit numbers.
Ask students to solve the questions given in the Let’s Warm-up section.
Vocabulary
Students will be able to: write the place value, face value, expanded form and number names for numbers up to 8 digits. write numbers up to 8 digits in the Indian and International number system. compare numbers up to 8 digits and arrange them in ascending and descending order. round off numbers up to 8 digits to the nearest 10, 100 and 1000.
expanded form: writing a number as the sum of the values of all its digits order: the way numbers are arranged estimating: guessing an answer that is close to the actual answer rounding off: approximating a number to a certain place value for easier calculation
Teaching Aids
Vocabulary: Helps to know the important terms that are introduced, defined or emphasised in the chapter.
C-1.1: Represents numbers using the place value structure of the Indian number system, compares whole numbers, and knows and can read the names of very large numbers
C-4.3: Selects appropriate methods and tools for computing with whole numbers, such as mental computation, estimation, or paper pencil calculation, in accordance with the context
C-5.1: Understands the development of zero in India and the Indian place value system for writing numerals, the history of its transmission to the world, and its modern impact on our lives and in all technology
Chart papers with empty place value chart drawn; Buttons; Beads; Bowls; Digit cards; Bowls with 5 number cards with a 7-digit or 8-digit number written on them; Two bowls with number cards having 8-digit numbers in one bowl and rounded-off places in another bowl
Let’s Recall
expanded form and number names for numbers up to 8 digits. Indian and International number system. arrange them in ascending and descending order. nearest 10, 100 and 1000.
place value structure of the Indian number system, compares whole names of very large numbers and tools for computing with whole numbers, such as mental pencil calculation, in accordance with the context zero in India and the Indian place value system for writing numerals, world, and its modern impact on our lives and in all technology
Teaching Aids: Aids and resources that the teachers can use to significantly improve the teaching and learning process for the students.
Recap to check if students know how to write the place value, expanded form and number names for 6-digit numbers.
Ask students to solve the questions given in the Let’s Warm-up section.
Vocabulary
expanded form: writing a number as the sum of the values of all its digits order: the way numbers are arranged estimating: guessing an answer that is close to the actual answer rounding off: approximating a number to a certain place value for easier calculation
Chart papers with empty place value chart drawn; Buttons; Beads; Bowls; Digit cards; Bowls with 5 number cards with a 7-digit or 8-digit number written on them; Two bowls with number cards having 8-digit numbers in one bowl and rounded-off places in another bowl
Place Value, Face Value and Expanded Form Imagine Maths Page 2 Learning Outcomes
write the place value, expanded form and number names for given in the Let’s Warm-up section.
the sum of the values of all its digits close to the actual answer to a certain place value for easier calculation
Place Value, Face Value and Expanded Form
Learning Outcomes
Teaching Aids
Imagine Maths Page 2
Students will be able to write the place value, face value, expanded form and number names for numbers up to 8 digits.
Students will be able to write the place value, face value, expanded form and number names for numbers up to 8 digits.
Chart papers with empty place value chart drawn; Buttons; Bowls; Digit cards
Activity
Teaching Aids
Chart papers with empty place value chart drawn; Buttons; Bowls; Digit cards
Activity
Instruct the students to work in small groups. Distribute the teaching aids among the groups. Keep number cards (0–9) in a bowl. Pick a card from the bowl and say the digit aloud along with a place, for example “3 in the thousands place.” Instruct the groups to place as many buttons as the digit in that place on the place value chart. Repeat this to form a 7-digit or 8-digit number. You can repeat digits in more than 1 place. Once the 7-digit or 8-digit number is formed, have each group record the expanded form and number names in their notebooks. Discuss the face value and place value of a few digits in the class. Ask the students to say the number names aloud.
Extension Idea
Activity: A concise and organised lesson plan that outlines the activities and extension ideas that are to be used to facilitate learning.
Instruct the students to work in small groups. Distribute the teaching aids among the groups. Keep number cards (0–9) in a bowl. Pick a card from the bowl and say the digit aloud along with a place, for example “3 in the thousands place.” Instruct the groups to place as many buttons as the digit in that place on the place value chart. Repeat this to form a 7-digit or 8-digit number. You can repeat digits in more than 1 place. Once the 7-digit or 8-digit number is formed, have each group record the expanded form and number names in their notebooks. Discuss the face value and place value of a few digits in the class. Ask the students to say the number names aloud.
Ask: In a number 1,67,48,950, if we interchange the digit in the ten thousands place with the digit in the crores place, then what is the difference in the place values of the digits in the ten thousands place?
Extension Idea
Say: On interchanging the digits, the new number is 4,67,18,950. Difference in the place values = 40,000 – 10,000 = 30,000.
Ask: In a number 1,67,48,950, if we interchange the digit in the ten thousands place with the digit in the crores place, then what is the difference in the place values of the digits in the ten thousands place?
Extension Idea: A quick mathematical-thinking question to enhance the critical thinking skill.
Indian and International Number Systems Imagine Maths Page 5
Say: On interchanging the digits, the new number is 4,67,18,950. Difference in the place values = 40,000 – 10,000 = 30,000.
chart drawn; Buttons; Beads; Bowls; Digit cards; Bowls with number written on them; Two bowls with number cards having rounded-off places in another bowl
Learning Outcomes
Students will be able to write numbers up to 8 digits in the Indian and International number system.
Indian and International Number Systems Imagine Maths Page 5
Teaching Aids
Learning Outcomes
Chart papers with empty place value chart drawn; Buttons; Beads
Students will be able to write numbers up to 8 digits in the Indian and International number system.
Activity
Teaching Aids
Chart papers with empty place value chart drawn; Buttons; Beads
Activity
Arrange the class in groups of 4, with each group split into teams of 2 students. Distribute the teaching aids among the groups. Guide the students to form 7-digit or 8-digit numbers on the chart using buttons and beads as in the previous lesson. Ask them to place buttons for the Indian number system on one chart and beads for the International number system on the other. The two teams should record the expanded form of the numbers using commas in their notebooks and number names. Ask the groups to find the similarities and differences between the two systems. Discuss the answers with the class.
Extension Idea
Arrange the class in groups of 4, with each group split into teams of 2 students. Distribute the teaching aids among the groups. Guide the students to form 7-digit or 8-digit numbers on the chart using buttons and beads as in the previous lesson. Ask them to place buttons for the Indian number system on one chart and beads for the International number system on the other. The two teams should record the expanded form of the numbers using commas in their notebooks and number names. Ask the groups to find the similarities and differences between the two systems. Discuss the answers with the class.
Ask: How many lakhs are there in 10 million?
Answers: Answers, provided at the end of each chapter, for the questions given in Do It Together and Think and Tell sections of the Imagine Mathematics book.
Say: To find out, we divide 10,000,000 by 100,000. So, there are 100 lakhs in ten million.
Extension Idea
Ask: How many lakhs are there in 10 million?
Say: To find out, we divide 10,000,000 by 100,000. So, there are 100 lakhs in ten million.
The teacher manuals corresponding to Imagine Mathematics books for Grades 1 to 8 align with the recently updated syllabus outlined by the National Curriculum Framework for School Education, 2023. These manuals have been carefully designed to support teachers in various ways. They provide recommendations for hands-on and interactive activities, games, and quizzes that aim to effectively teach diverse concepts, fostering an enriched learning experience for students. Additionally, these resources aim to reinforce critical thinking and problem-solving skills while ensuring that the learning process remains enjoyable.
In a typical school setting, there are approximately 180 school days encompassing teaching sessions, exams, tests, events, and more. Consequently, there is an average of around 120 teaching periods throughout the academic year.
The breakdown of topics and the suggested period plan for each chapter is detailed below.
1. Large Numbers and Operations 13
2. Patterns in Whole Numbers 7
3. Playing with Numbers: Factors and Multiples 12
Indian Number System
International Number System
Comparing and Ordering Numbers
Roman Numerals
Rounding Off
Estimation in Operations
Addition and Subtraction
Multiplication and Division
Parentheses and Order of Operations
Revision
Predecessor and Successor; Representing Numbers on the Number Line
Operations on a Number Line
Properties of Whole Numbers
Patterns in Numbers; Patterns in Shapes
Revision
Reviewing Factors and Multiples
Even and Odd Numbers; Perfect Numbers
Prime and Composite Numbers
Divisibility Rules
Prime Factorisation
Common Factors and Common Multiples
Highest Common Factor
Lowest Common Multiple
Word Problems on LCM and HCF
Revision
Key Geometrical Concepts
Measuring and Drawing Line Segments
Basics of Angles; Types of Angles
Measuring and Drawing Angles
Triangles and Their Features
4. Line, Angles and Shapes 13
5. 3-D Shapes 4
6. Integers 7
7. Fractions 10
Classification of Quadrilaterals
Polygons and Their Features
Types of Curves
Parts of a Circle; Circumference of the Circle
Constructing Circles
Revision
Features of 3-D Shapes
Nets of 3-D Shape
Revision
Representing Integers; Comparing and Ordering Integers
Addition of Integers
Subtraction of Integers
Revision
Representing Fractions
Comparing Fractions; Ordering Fractions
Conversion Between Mixed Numbers and Improper Fractions
Equivalent Fractions and Simplest Form
Addition and Subtraction of Fractions
Multiplying Fractions or Mixed Numbers
Dividing Fractions or Mixed Numbers
Revision
Representing Decimals on Number Line
Place Values in Decimals
Conversion Between Fractions and Decimals
Equivalent Decimals; Comparing Decimal
8. Decimals 10
9. Data Handling 6
Addition and Subtraction of Decimals
Multiplication of Decimals
Division of Decimals
Revision
Organising Data as Tally Marks
Pictographs
Bar Graphs
Revision
10. Mensuration 10
11. Introduction to Algebra 8
12. Introduction to Ratio and Proportion 8
13. Symmetry 6
14. Construction of Line Segments and Angles 9
Perimeter of Plane Figures
Perimeter of Regular Shapes
Area on Graph Paper
Area of Squares and Rectangles
Area of Triangles
Area and Perimeter of Combined Shapes
Word Problems on Perimeter and Area
Revision
Number Patterns
Rules in Patterns
Algebraic Expressions
Forming Algebraic Equations
Solving Linear Equations in One Variable
Revision
Introducing Ratios
Ratio in Simplest Form
Equivalent Ratios
Proportion abd Their Applications
Unitary Method
Revision
Lines of Symmetry
Reflection and Symmetry
Rotational Symmetry
Revision
Constructing Line Segments; Constructing a Copy of a Line Segment
Construction of Shapes and Figures
Constructing a Perpendicular Using a Compass
Constructing Angles of Given Measures
Constructing an Angle Bisector
Constructing 60°, 120° and 30° Angles
Revision
Total Number of Periods 123
Students will be able to:
read and write 9-digit numbers in the Indian number system. read and write 9-digit numbers in the international number system. compare and order 9-digit numbers and form numbers using the given digits. read and write Roman numerals. round off large numbers to the nearest 10, 100 or 1000. estimate the sum, difference, product or quotient in large numbers. add or subtract numbers up to 9 digits. multiply or divide large numbers up to 9 digits by numbers up to 3 digits. use parentheses to show the order of operations.
C-1.1: Develops a sense for and an ability to manipulate (e.g., read, write, form, compare, estimate, and apply operations) and name (in words) large whole numbers of up to 20 digits, and expresses them in scientific notation using exponents and powers
Let’s Recall
Recap to check if students know how to read and write 7-digit numbers. Ask students to solve the questions given in the Let’s Warm-up section.
9-digit numbers: numbers that have place values ranging from ones to crores, that is, from 10,00,00,000 to 99,99,99,999
roman numbers: a system where letters were used by ancient Romans to represent numbers, which is still used today
estimation: the process of guessing an answer that is close to the actual answer
DMAS: the order of operations (division, multiplication, addition, subtraction) that makes it easy to solve a mathematical problem with multiple operations
Number cards (0–9); Bowl; Indian place value chart; International place value chart; Blank cards; Clock with Roman numerals; Place value blocks of 10s, 100s and 1000s; Bingo cards with Roman numerals; Sticky notes; Cards with sets of numbers with operations; Puzzle cards; Bingo cards; Problem cards; Crayons; Puzzle interlocking cards

Number System
Learning Outcomes
Students will be able to read and write 9-digit numbers in the Indian number system.
Teaching Aids
Number cards (0–9); Bowl; Indian place value chart
Activity
Prepare a bowl of number cards (0–9) and keep it on your table for the activity.
Ask the students to work in groups of 4 and distribute one blank Indian place value chart to each group. Instruct one student from each group to come forward and pick 9 numbers from the bowl. Once they have selected the cards, they should return to their group and display the digits. Ask the groups to form the largest and the smallest 9-digit numbers on the place value chart using those digits. Instruct the students to write the expanded form of both the numbers, as well as their number names in the Indian number system in their notebooks. Repeat the activity with more number cards.
Ask questions like, “What are periods? What are all the places in the number? Does the face value of the digit change with its place value? Why and where do we put commas in the number?”
International Number System Imagine Maths Page 5
Learning Outcomes
Students will be able to read and write 9-digit numbers in the international number system.
Teaching Aids
Number cards (0–9); Bowl; International place value chart
Activity
Ask the students to work in groups of 4 and distribute one blank international place value chart to each group. Reuse the number cards (0–9) from the previous lesson. Repeat the activity to get groups to form the largest and smallest 9-digit numbers on the place value chart. Instruct the students to record the expanded form and number name in the international system in their notebooks.
Ask questions like, “How is the placement of commas different in the Indian and the international number systems? How does it impact the place value of each digit and the number name in the two systems?” Repeat the activity with more number cards.
Extension Idea
Ask: How many millions are there in 16,89,04,231?
Say: 16,87,04,231 is written in the Indian number system. In the international number system, it will be written as 168,704,231. So, there are 168 millions in this number.
Learning Outcomes
Students will be able to compare and order 9-digit numbers and form numbers using the given digits.
Teaching Aids
Blank cards
Activity
Tell the students that today they will create their own numbers. Ask the class to work in groups of 4. Distribute 4 empty cards to each group. Instruct them to create their own 9-digit numbers using different digits and write them on the blank card given to them. Everyone will place the card in the centre and then compare and order them as a group. If any two numbers are same in the group, one of them will change it, so that 4 different numbers are there to compare. Instruct the students to compare and arrange the numbers in ascending and descending order in their notebooks. Ask questions like, “How are the two orders different from each other? How many places have the same digits and different digits? What points should be kept in mind while comparing and ordering numbers?”
Extension Idea
Ask: Take the 9-digit number 87,06,98,543. If you add 1 to ones place then 1 to the tens place and so on (starting with the lowest) and form a new number each time, what numbers will you get? List the first four numbers and arrange them in descending order.
Say: The first four numbers would be 87,06,98,544 (87,06,98,543 + 1); 87,06,98,553 (87,06,98,543 + 10); 87,06,98,643 (87,06,98,543 + 100); 87,06,99,543 (87,06,98,543 + 1000). So, the descending order is 87,06,99,543 > 87,06,98,643 > 87,06,98,553 > 87,06,98,544. Roman Numerals Imagine Maths Page 10
Students will be able to read and write Roman numerals.
Clock with Roman numeralsl; Place value blocks of 10s, 100s and 1000s; Bingo cards with Roman numerals
Activity
Begin by showing the students a clock with Roman numerals. Explain the 7 basic symbols used to form Roman numbers. Tell them about the Roman numerals that can be repeated, added or subtracted. Elaborate on the rules used to form these numerals.
Ask the class to work in groups of 4. Distribute bingo cards with a 5 × 5 grid of random Roman numbers up to 2000 to each group.
Use the place value blocks to form a 2-digit, 3-digit or 4-digit number (up to 2000). Ask one student from each group to come up and read the number, then go back and tell their group the number. Instruct the group to find its corresponding Roman number and cross it off from their bingo card. Repeat this process until all the Roman numbers in a line—horizontally, vertically or diagonally—are crossed off. The group to cross off the Roman numbers in all three directions first wins the game.
Students will be able to round off large numbers to the nearest 10, 100 or 1000.
Teaching Aids
Sticky notes
Activity
Begin the class by asking the students where they might use rounding off numbers in real life. Use these scenarios to review the concept of rounding off large numbers to the nearest 10, 100 and 1000.
Write various large numbers on sticky notes and paste them on the board.
Divide the class into small groups and call a student from each group up to the board to select a number. Instruct group members to work together to round off the selected number to the nearest 10, 100 and 1000, and write their answers on another sticky note to be pasted on the board next to the original number. If their answers are correct, then the group gets a point; otherwise no points. Repeat this process until all the members of the group are covered. The group with the maximum points wins.
Extension Idea
Ask: I am thinking of a number. When I round off the number to the nearest 100, it is 2,43,26,500. When I round off the same number to the nearest 10, it is 2,43,26,450. What could my number be?
Say: Considering the possible numbers before rounding off to the nearest 10, the number may lie between 2,43,26,445 and 2,43,26,454. But to meet the condition for rounding off to the nearest 100, the number would be between 2,43,26,450 and 2,43,26,549. To satisfy both conditions, the numbers should be between 2,43,26,450 and 2,43,26,454
Students will be able to estimate the sum, difference, product or quotient in large numbers.
Cards with sets of numbers with operations; Bowls
Prepare some cards with sets of numbers and operations written on them, such as, Sum to the nearest 100: 1,24,37,548 + 3,25,43,768 and Difference to the nearest 1000s: 98,78,563 − 45,47,658, and keep them in a bowl. Divide the board into 4 columns for sum, difference, product and quotient. Then, divide the class into teams of equal sizes.
Start the activity by calling one student from each team to the front of the class. They should pick a card from the bowl, read the expression, quickly find the estimated answer and write it in the relevant column on the board. If the result is correct, award the team 1 point. Continue in this manner until all the students in each team have had a turn. The team with the highest total score wins the game.
Students will be able to add or subtract numbers up to 9 digits.
Puzzle cards
Activity
Prepare puzzle cards involving addition and subtraction of numbers up to 9 digits. Divide the class into groups of equal sizes. Distribute the puzzle cards (9 individual cards) to each group.
Instruct the students to solve the calculations on the puzzle cards and arrange the cards to form a 3 × 3 puzzle matrix.
The group which forms the matrix in the least time wins.
Review the matrix formed by each group and discuss the answers. Also ask the students to write the answers in their notebook.
Ask: Tripti is keeping track of how far she walks each week. On Monday, she walks 1780 m and on Tuesday she walks 50 m farther than on Monday. If her target is to walk 2000 m each day, then by how much is she short of her target over the two days?
Say: Tripti walks 1780 m on Monday. She walks 1780 m + 50 m = 1830 m on Tuesday. Her target distance for two days is 4000 m. So, she is short of the target by 4000 – (1780 + 1830) m = 390 m.
Learning Outcomes
Students will be able to multiply or divide large numbers up to 9 digits by numbers up to 3 digits.
Teaching Aids
Bingo cards; Problem cards; Crayons
Activity
Prepare a set of cards or small pieces of paper with multiplication and division problems, like 56 × 21 or 18,240 ÷ 5, written on them with their corresponding answers. Shuffle the cards and place them face down in a pile. Write the answers to the problems on bingo cards.
Ask the students to work in groups.
Distribute a bingo card to each group. Play the game by drawing cards, one by one, from the pile and reading the questions aloud. Ask the groups to calculate the answers (they may use their notebooks for rough work) and cross out/colour the corresponding square on their bingo card if the answer matches. The game will continue until a group successfully completes a row, column or diagonal on their bingo card and shouts “BINGO!” to indicate their win. Verify all the answers on the winning bingo card.
Parentheses and Order of Operations
Learning Outcomes
Students will be able to use parentheses to show the order of operations.
Teaching Aids
Puzzle interlocking cards; Bowls
Activity
Make sets of puzzle interlocking cards where one card (red) has an expression involving DMAS and brackets and its interlocking card (green) has the answer. Put the red cards in one bowl and the green cards in another bowl.
Maths Page 19
Divide the class into groups and distribute bowls with both types of cards to each group. Instruct each group to pick a red card, solve the expression, and match it with its corresponding green card. Instruct them to match all the cards in the two bowls. The group which completes all the pairs first wins. Verify all the answers and ask the students to write them in their notebooks.
Ask: What operations would you fill in these blanks to make the given statement true? (20 8) 2 9 = 5
Say: If we add 20 and 8, we get 28. Then, we divide it by 2 to get 14. Next, if we subtract 9 from 14, we get 5. So, the correct order of operations is: (20 + 8) ÷ 2 − 9 = 5.
1. Face Value and Place Value
Do It Together
3 is in the crores place.
The place value of 3 is 3,00,00,000.
The face value of 3 is 3
Think and Tell
Yes. Population of U.S.—33,99,96,563: thirty-three crore ninety-nine lakh ninety-six thousand five hundred sixty-three. Population of Russia—14,44,44,359: fourteen crore forty-four lakh forty-four thousand three hundred fifty-nine. Population of Japan—12,32,94,513: twelve crore thirty-two lakh ninety-four thousand five hundred thirteen.
Do It Together
56,70,34,219 = 500000000 + 60000000 + 7000000 + 30000 + 4000 + 200 + 10 + 9
Number name: fifty-six crore seventy lakh thirty-four thousand two hundred nineteen
3. Face Value and Place Value
Do It Together
4 is in the millions place.
So, the place value of 4 is 4,000,000. The face value of 4 is 4
Do It Together
902,564,875 = 900,000,000 + 2,000,000 + 500,000 + 60,000 + 4000 + 800 + 70 + 5
Number name: nine hundred two million five hundred sixty-four thousand eight hundred seventy-five.
Think and Tell
Population of Russia = 14,44,44,359
Population of Indonesia = 27,75,34,122
1 < 2, so 14,44,44,359 < 27,75,34,122. So, the population of Russia is less.
Think and Tell
Yes. Descending order: 33,99,96,563 > 27,75,43,122 > 14,44,44,359 > 12,32,94,513
Think and Tell
Yes, more such numbers can be formed. Some examples are 517860932, 783096521 and 602983571.
Think and Tell
The greatest 9-digit number can be formed by using the two greatest 1-digit numbers i.e. 8 and 9: 99,99,99,998. The smallest 9-digit number can be formed by using the two smallest 1-digit numbers i.e. 1 and 0: 10,00,00,000.
Do It Together
Ascending Order: 126,856,384 < 165,121,349 < 400,897,234 < 860,778,653
Descending Order: 860,778,653 > 400,897,234 > 165,121,349 > 126,856,384
6. Understanding Roman Numerals
Do It Together
1. 45 MCCCXC
2. 98 CX
3. 110 XLV
4. 185 XCVIII
5. 1390 CLXXXV
Think and Tell
To round off an 8-digit number to the largest place, that is, the crores place, we look at the digit to its right (that is the ten lakhs place). If the digit is greater than or equal to 5, the number rounds off to the next crores, else the number rounds off to the same crores.
Do It Together
So, the number 73,26,63,547 rounded off to the nearest 10 is 73,26,63,550
So, the number 73,26,63,547 rounded off to the nearest 100 is 73,26,63,500
So, the number 73,26,63,547 rounded off to the nearest 1000 is 73,26,64,000
Do It Together
1. 765 + 213 (to the nearest hundred)
765 rounded off to 100 800
213 rounded off to 100 200
So, the estimated sum of 765 and 213 = 800 + 200 = 1000.
2. 984 − 356 (to the nearest ten)
984 rounded off to 10 980
356 rounded off to 10 360
So, the estimated difference of 984 and 356 = 980 360 = 620.
3. 758 × 510 (to the nearest hundred)
758 rounded off to 100 800
510 rounded off to 100 500
800 × 500 = 4,00,000
So, the estimated product of 758 and 510 is 4,00,000
4. 332 ÷ 25 (to the nearest ten)
332 rounded off to 10 300
25 rounded off to 10 30
300 ÷ 30 = 10
So, the estimated quotient of 332 ÷ 25 is 10
Think and Tell
30 kg 100 g and 14 kg 500 g are written as 30.100 kg and 14.500 kg because 1 kg = 1000 g, so 1 g = 1 1000 kg = 0.001 kg.
Do It Together
Number of children in the city = 37,65,392 – (18,90,898 + 16,54,976)
So, the number of children in the city was 2,19,518
Do It Together
Total fee collected by the school = 5678 × 16,000
So, the total fee collected by the school is 9,08,48,000
Do It Together
8 × 105 = 8 × (100 + 5) = (8 × 100) + (8 × 5) = 800 + 40 = 840
Students will be able to: show whole numbers on a number line and identify the predecessor and the successor of a whole number. perform operations on whole numbers on a number line. identify and apply the closure, commutative, associative and distributive properties of whole numbers. identify patterns in whole numbers and shapes, and extend them.
C-1.1: Develops a sense for and an ability to manipulate (e.g., read, write, form, compare, estimate, and apply operations) and name (in words) large whole numbers of up to 20 digits, and expresses them in scientific notation using exponents and powers
C-1.2: Discovers, identifies, and explores patterns in numbers and describes rules for their formation (e.g., multiples of 7, powers of 3, prime numbers), and explains relations between different patterns
C-1.4: Explores and understands sets of numbers, such as whole numbers, fractions, integers, rational numbers, and real numbers, and their properties, and visualises them on the number line
Let’s Recall
Recap to check if students know how to recognise natural numbers and perform skip counting by various intervals on a number line.
Ask students to solve the questions given in the Let’s Warm-up section.
consecutive numbers: numbers one after another property: rules defining the relationship between numbers
Number cards per the number of students; Operation cards (including addition, subtraction, multiplication and division) per the number of students; Paper cups; Marbles; Beads; Shape cutouts; Chart paper
Predecessor and Successor; Representing
Numbers on the Number Line
Learning Outcomes
Imagine Maths Page 27
Students will be able to show whole numbers on a number line and identify the predecessor and successor of a whole number.
Teaching Aids
Number cards per the number of students
Activity
Prepare stacks of number cards per the number of students in the class.
Take the students out to the playground.
Shuffle the stack and distribute one card to each student.
Instruct the students to move around and find the student with the predecessor of their number and stand behind them, forming a line.
Once students have found their predecessors, they will naturally form a line based on the numerical order of their cards.
Repeat the activity by shuffling and distributing the cards again and asking the students to stand in front of the student that has the successor of their number.
Ask questions like, “What do you think is the importance of understanding the predecessor and successor of a number?”
Extension Idea
Ask: B is positioned 2 places behind A and 3 places in front of the number 26. What is A’s position?
Say: As B is 3 places in front of the number 26, B’s position is 23. As B is positioned 2 places behind A, A’s position is 21.
Operations on a Number Line
Learning Outcomes
perform operations on whole numbers on a number line.
Teaching Aids
Imagine Maths Page 28
Operation cards (including addition, subtraction, multiplication and division) per the number of students
Activity
Ask the students to form groups of 4. Distribute the operation cards to the groups. 4 + 6 12 – 3
Take the students out to the playground. Instruct each group to draw a large horizontal number line of range 0–20 on the ground. Instruct the students to show each operation on the number line.
For example to show addition of numbers, start from the first number and jump forward as many unit distance as in second number and arrive at the answer. Similarly, show subtraction, multiplication and division on the number line.
Back in the classroom, instruct the students to draw a number line in their notebooks and show the answers. Give them a few more questions to perform operations on whole numbers on a number line in their notebooks.
Ask: Ria bought 5 pencils for ₹20. How much did one pencil cost? Show your answer on the number line. Say:
Cost of 5 pencils = ₹20
Cost of 1 pencil = 20 ÷ 5 = 4
Therefore, the cost of 1 pencil is ₹4.
identify and apply the closure, commutative, associative and distributive properties of whole numbers.
Paper cups; Marbles; Beads
Activity
Ask the students to work in groups. Distribute paper cups and marbles to each group. Instruct the groups to show 3 + 5 using the marbles and cups and write the result in their notebooks. Verify if the obtained number is a whole number. Explain that this is the closure property. Ask them to now show 5 + 3 using the marbles and cups and note down the answer. Discuss the commutative property.
Instruct them to show 8 – 3 and then 3 – 8 using the cups and marbles and record the results in their notebooks. Discuss whether they get a whole number or the same answer in both cases and explain that subtraction of whole numbers does not satisfy the closure and commutative properties. Distribute beads to each group.
Instruct the groups to show 6 × 3 using beads and make 2 groups of 6 × 3. Help them understand that this can be shown as (6 × 3) × 2. Ask them to show 6 × (3 × 2) and check the result. Discuss the associative property and ask the groups to record the results in their notebooks. Instruct the groups to show 6 × 3; 6 × 2; 6 × 5; and 6 × 1; and record the results in their notebooks. Discuss how (6 × 3) + (6 × 2) = 6 × 5 and (6 × 3) – (6 × 2) = 6 × 1. Discuss the distributive property of multiplication and subtraction.
Instruct the students to show 10 ÷ 5 by threading a total of 10 beads with 5 beads in each group. Instruct the groups to show (10 ÷ 5) ÷ 2 and 10 ÷ (5 ÷ 2) using beads and discuss the associative property.
Extension Idea
Ask: Suppose you have one group of 13 red and 17 blue beads. How many beads are there in total if there are 10 such groups?
Say: 10 × (13 + 17) = 130 + 170 = 300. So, there are 300 beads in total.
Students will be able to identify patterns in whole numbers and shapes and extend them.
Teaching
Shape cutouts; Chart paper
Activity
Ask the students to form groups. Distribute the shape cutouts and chart paper to the students. Instruct each group to create 2 patterns one with whole numbers by drawing the dots and the other with shapes, by pasting shapes. Ask them to write the numbers below the dots in the number pattern.
They will then pass the chart paper to the group sitting next to them. Each group will then identify the rules and extend the patterns made by other groups.
Discuss the patterns in the class.
Extension Idea
Ask: A number is multiplied by 1. The product is multiplied by the next whole number, which is 2. The pattern continues 5 times. What is the original number if the final product is 1200?
Say: 1200 ÷ 5 = 240 → 240
So, the original number was 10.
Whole Numbers on a Number Line
Think and Tell
Yes. Whole numbers are numbers starting from 0 like 0, 1, 2, 3,... Natural numbers are numbers starting from 1 like 1, 2, 3,... So, all natural numbers are whole numbers.
Do It Together
The predecessor of 87,452 = 87,452 – 1 = 87,451
The predecessor of 87,451 = 87,451 – 1 = 87,450
Therefore, the three consecutive numbers before 87,453 are 87,452, 87,451 and 87,450
2. Representing Numbers on the Number Line
Think and Tell
The largest whole number is infinite because every whole number must have a successor.
Do It Together
1. If you are standing in section 3, the whole number that represents the section just before the one you’re in is section 2
2. If you take a step to the right and move to section 5, the whole number that represents the section you were previously in is section 4
3. Operations on a Number Line
Do It Together
–4 –4 –4 –4
Cost of 4 candies = ₹20 Cost of 1 candy = ₹20 ÷ 4
Therefore, the cost of 1 candy is ₹5
4. Properties of Whole Numbers
1. 6579 × 0 = 0
2. 56 + 45 = 45 + 56
3. 108 × 1 = 108
4. 29 + (12 + 16) = (29 + 12) + 16
5. 83 ÷ 1 = 83
6. 64 ÷ 64 = 1
5. Patterns in Numbers
a. 3, 9, 27, 81, 243
b. 5, 16, 49, 148, 445
c. 1, 2, 6, 24, 120, 720
Rule followed by the sequence: Number of triangles in each shape is 1, 4, 9, 16, 25.
The number of triangles in the next shape in the sequence is 36.
Students will be able to: list the factors and multiples of a number. identify perfect, odd and even numbers. identify prime and composite numbers and understand how to find co-prime numbers. identify and apply the divisibility rule for 2, 3, 4, 5, 6, 7, 8, 9, 10 and 11. use the factor tree and repeated division to express a number as a product of its prime factors. find the common factors and multiples of two or more numbers. find the HCF of 2 or more numbers using prime factorisation and repeated division. find the LCM of 2 or more numbers by prime factorisation and the division method. solve word problems on LCM and HCF.
C-1.2: Discovers, identifies, and explores patterns in numbers and describes rules for their formation (e.g., multiples of 7, powers of 3, prime numbers), and explains relations between different patterns
Let’s Recall
Recap to check if students know how to find the factors of any number. Ask students to solve the questions given in the Let’s Warm-up section.
Vocabulary
factor: any one of two or more numbers that are multiplied together to give a product multiples: number obtained when a number is multiplied by an integer prime factorisation: a way of expressing a number as a product of its prime factors lowest common multiple: the smallest multiple that two or more numbers have in common
Squared paper; Number cards; Slips with divisibility rules; Square and circle cutouts; Blank cards; Number cards (with numbers 6, 28, 56, 3, 11, 55 written on them); Orange ribbons/colour paper strips (24 cm, 18 cm); Yellow ribbons/colour paper strips (36 cm, 30 cm); Scissors; Glue; Ruler; Sheets of paper; Word problem cards
Learning Outcomes
Students will be able to list the factors and multiples of a number.
Teaching Aids
Squared paper
Activity
Provide each student with a sheet of squared paper. Ask them to draw as many different rectangles as possible, each with an area of 8 square units. Ask them to explore all the different lengths and widths possible for such rectangles. When they are done drawing, ask them to label the side lengths of each rectangle.
Discuss the side lengths and how they are related to the number 8. Summarise by saying that the side lengths 1, 2, 4, and 8 are the factors of 8.
Next, instruct the students to shade squares to show a 1 × 12 rectangle with an area of 12 sq. units, and then show stacks of up to 4 rectangles of 1 × 12 each. Ask them to write the area of each new rectangle formed and how the areas are related to the number 12. Summarise by saying that the areas of 12, 24, 36 and so on are multiples of 12.
Repeat the activity for a rectangle with an area of 15 square units.
Ask questions like, “How are the number of factors of a number different from the number of multiples of the same number?”
Extension Idea
Ask: What type of numbers have an odd number of factors?
Say: Only square numbers have an odd number of factors. For example, five numbers which have an odd number of factors are 1, 4, 9, 16, and 25.
Learning Outcomes
Students will be able to identify perfect, odd and even numbers.
Teaching Aids
Squared paper; Number cards
Activity
Ask the students to form groups of 6. Instruct each member of a group to take one number card (out of 6, 28, 56, 3, 11, 55).
Ask them to check if the number is exactly divisible by 2 or not. Explain the odd and even numbers.
Distribute a sheet of squared paper to each student and ask them to shade squares to form as many rectangles as possible with an area equal to that number. Ask them to list the factors of each number in their notebooks and then add all the factors except the number itself. Ask them to discuss in their groups what they notice about the factors and their sum.
Discuss how the sum of the factors decides if a number is a perfect number or not
Extension Idea
Ask: Check whether 28 perfect number or not.
Say: Factors of 28 = 1, 2, 4, 7, 14, 28
Sum of factors (excluding itself) = 1 + 2 + 4 + 7 + 14 = 28
Therefore, 28 is a perfect number.
Imagine Maths Page 46
Students will be able to identify prime and composite numbers and understand how to find co-prime numbers.
Teaching Aids
Squared paper
Activity
Provide each student with a sheet of squared paper. Ask them to draw as many different rectangles as possible, each with an area of 7 and 9 square units. Ask them to write all the factors of 7 and 9.
Discuss that the number 7 has two factors 1 and 7, and number 9 has three factors 1, 3 and 9.
Explain, a number greater than 1 that has exactly two factors is called prime number and if it has more than two factors it is called the composite number.
Next, instruct the students to write all the prime numbers between 10 to 20 in their notebooks.
Ask the students list the factors which are common to both 7 and 9 and explain the co-prime numbers.
Ask questions like, “Which even number is the prime number? ”
Extension Idea
Ask: Write any 3 pairs of twin prime numbers.
Say: Twin prime numbers are a pair of prime numbers with a difference of 2. Three pairs of twin prime numbers are (3, 5), (5, 7), (11, 13).
Learning Outcomes
Imagine Maths Page 48
Students will be able to identify and apply the divisibility rule for 2, 3, 4, 5, 6, 7, 8, 9, 10 and 11.
Teaching Aids
Number cards; Slips with divisibility rules
Activity
Prepare cards with numbers written on them, including some that are divisible by 2, 3, 4, 5, 6, 8, 9, 10 and 11 and some that are not.
Divide the class into 4 groups and assign each group with numbers. For example, Group 1 gets 2, 3 and 6, Group 2 gets 4 and 8, Group 3 gets 5, 9 and 10 and Group 4 gets 11.
Take the students out to the playground and distribute the slips with the divisibility rules of those numbers written on them.
Scatter the number cards all around the playground facing down.
Divisibility rule of 2: The digit in the ones place of the number is 0, 2, 4, 6 or 8.
Divisibility rule of 3: The sum of the digits of the number should be divisible by 3.
Instruct one student from each group to run around to find the number divisible by the number on their slip and bring it back. The group that collects the maximum number of cards wins.
If any of the cards have a number that is divisible by two numbers, then the student who finds it first should bring it back to their group.
Prime Factorisation
Learning Outcomes
Imagine Maths Page 50
Students will be able to use the factor tree and repeated division to express a number as a product of its prime factors.
Square and circle cutouts
Activity
Start by discussing what a factor pair of a number is.
Instruct the students to write any one factor pair of 24. Show the factor pairs of 24 using a factor tree as given.
Ask the students to work in pairs. Distribute square and circle cutouts to each pair.
Instruct them to create a factor tree on their desks for the number 48 using circle cutouts for the prime factors and square cutouts for the composite factors. Ask them to then write all the prime factors in their notebooks with multiplication signs in between and multiply to check if they get the same number.
Next, instruct the students to find the factors using the repeated division method. Let them write 48 inside the division house and ask them which prime number divides 48. Instruct them to write the prime number outside the division house and write the quotient below 48 and then continue dividing in this way until the quotient is 1. Finally, ask them to compare the answers that they got using both methods.
Imagine Maths Page 53
Students will be able to find the common factors and multiples of two or more numbers.
Number cards; Blank cards
Activity
Prepare cards with numbers 8 and 12 written on them.
Ask the students to work in pairs. Distribute 2 number cards and few blank cards to each pair.
Ask one student to write factors of the numbers shown in the cards and other multiples. Say that the common factors of 8 and 12 are 1, 2, 4 and common multiples are 24, 48, 72, …
Instruct them to observe common factors and common multiples of the given numbers.
Next, summarise saying them that 8 and 12 have limited number of factors but have infinite number of multiples. Discuss that for any 2 given number there are finite number of common factors but there are infinite number of common multiples.
Repeat the activity for a number 15, 20 and 30. Ask the students to find the common factors and common multiples of the given numbers, in their notebooks.
Extension Idea
Ask: What are the common factors of 2 prime numbers?
Say: The common factor of two prime numbers is 1. For example,
Factors of 7 are 1 and 7.
Factors of 11 are 1 and 11.
Common factors of 7 and 11 is 1.
Common Factor
Imagine Maths Page 54
Students will be able to find the HCF of 2 or more numbers using prime factorisation and repeated division.
Orange ribbons/colour paper strips (24 cm, 18cm); Yellow ribbons/colour paper strips (36 cm, 30 cm); A pair of scissors; Glue; Ruler
Activity
Divide the class into groups and distribute ribbons of length 24 cm (orange) and 36 cm (yellow) to each group. Ask the students what is the maximum length of ribbon possible if they want to cut the ribbons into equal pieces without having any left.
Ask them to place the orange ribbon along the yellow ribbon as shown. Instruct them to cut the additional part of the yellow ribbon and place it along the orange ribbon. They should repeat this process until both ribbons are equal in length. Ask them to measure the length of the equal ribbons using a ruler.
Explain that 12 cm (length of the last part cut) is the HCF of 36 cm and 24 cm.
Next, instruct the students to find the HCF of 24 and 36 using prime factorisation and the long division method in their notebooks. If time permits, give them 2 more ribbons of different lengths and ask them to find the highest common factor.
If time permits, distribute next set of ribbons of length 18 cm and 30 cm. Ask them to repeat the activity. If ribbons are unavailable, give them strips of coloured paper for the activity.
Extension Idea
Ask: What is the HCF of any 5 consecutive numbers?
Say: The HCF of any 5 consecutive numbers is 1.
Learning
Students will be able to find the LCM of 2 or more numbers by prime factorisation and the division method.
Teaching Aids
Sheets of paper
Activity
Ask the students to work in pairs. Distribute sheets of paper to each pair.
Instruct them to draw the factor pairs of 16 and 24. Instruct the students to list the prime factors of both numbers and write each number as the multiplication of its prime factors. Ask them to identify the prime factors common to both 16 and 24, and circle the prime factors. Ask them to write the all the circled common factors once and multiply it with non-common factors to find the LCM.
Ask questions like, “Is there any method to find the LCM quickly?”
Instruct the students to draw a division house and write the two numbers inside it. Ask them which prime number divides both numbers. Collect the responses and instruct the students to write the prime number outside the division house and write the quotients below 16 and 24. They should follow these steps to continue the process of dividing by prime numbers, when the quotients are no longer be divided by a common prime number, divide each quotient individually until both reach 1. Instruct the students to multiply the prime numbers to find the LCM.
Ask the students to compare the answers that they got using both methods.
Extension Idea
Instruct: Find the smallest number that is divisible by all the numbers from 1 to 10.
Say: To find the smallest number that is divisible by all the numbers from 1 to 10, we will find the LCM of all the numbers from 1 to 10. So, LCM = 2 × 2 × 2 × 3 × 3 × 5 × 7 = 2520.
Learning
Students will be able to solve word problems on LCM and HCF.
Teaching Aids
Word problem cards
Activity
Begin the class by discussing the concepts of LCM and HCF.
Divide the class into groups and distribute the word problem cards to each group.
Kushal has a book stare. He has 15 comic books and 24 history books in each cupboard.
(a) He wants to arrange the books in such a way that each shelf has the same number of comic books and the same number of history books. What is the maximum number of shelves he can fill in this way?
(b) Kushal packed the books into cartons. He packed sets of 15 comic books and sets of 24 history books such that the total number of each type of book was the same. What is the least possible number of each type of book he packed in the carton?
Instruct the groups to read the word problem on their card and determine whether it requires finding the LCM or the HCF. Discuss the reasoning for the answers and ask the students to write the answers in their notebooks.
Extension Idea
Instruct: Create an LCM word problem using the numbers 10, 24 and 30.
Say: “A water pump fills a tank in 10 hours, a second pump in 24 hours, and a third pump in 30 hours. The pumps are switched on to fill tanks at the same time. Find the least amount of time after which all three pumps will complete filling a tank at the same time.”
Reviewing Factors and Multiples
Do It Together
2. 21
Factors = 1, 3, 7, 21
Multiples = 21, 42, 63
3. 27
Factors = 1, 3, 9, 27
Multiples = 27, 54, 81
4. 39
Factors = 1, 3, 13, 39
Multiples = 39, 78, 117
2. Even and Odd Numbers
Do It Together
1. 91—Odd
2. 61—Odd
3. 79—Odd
4. 7—Odd 5. 45—Odd 6. 82—Even
3. Perfect Number
Do It Together
7. 39—Odd 8. 19—Odd
The factors of 8128 are 1, 2, 4, 8, 16, 32, 64, 127, 254, 508, 1016, 2032, 4064, 8128.
Sum of factors (excluding itself) = 1 + 2 + 4 + 8 + 16 + 32 + 64 + 127 + 254 + 508 + 1016 + 2032 + 4064 = 8128
Therefore, 8128 is a perfect number.
4. Prime and Composite Numbers
Think and Tell
There is only 1 even prime number which is 2.
Do It Together
1. Hence, 15 and 28 are co-prime numbers
2. Factors of 21: 1, 3, 7, 21
Factors of 40: 1, 2, 4, 5, 8, 10, 20, 40
Only 1 is the common factor Hence, 21 and 40 are co-prime numbers.
5. Divisibility Rules
Do It Together
1. 5628
Divisibility by 4: 28 is divisible by 4.
So, 5628 is divisible by 4.
Divisibility by 6: Digits at ones place is 8 which is divisible by 2.
5 + 6 + 2 + 8 = 21, which is divisible by 3
So, 5628 is divisible by both 2 and 3, hence it is divisible by 6.
Divisibility by 9: 5 + 6 + 2 + 8 = 21, which is not divisible by 9
So, 5628 is not divisible by 9.
Divisibility by 11: (6 + 8) – (5 + 2) = 7, which is not divisible by 11.
So, 5628 is not divisible by 11.
So, 5628 is divisible by 4 and 6.
2. 4356
Divisibility by 4: 56 is divisible by 4. So, 4356 is divisible by 4.
Divisibility by 6: Digits at ones place is 6 which is divisible by 2
4 + 3 + 5 + 6 = 18, which is divisible by 3
So, 4356 is divisible by both 2 and 3, hence it is divisible by 6
Divisibility by 9: 4 + 3 + 5 + 6 = 18, which is divisible by 9.
So, 4356 is divisible by 9
Divisibility by 11: (6 + 3) – (5 + 4) = 0.
So, 4356 is divisible by 11.
So, 4356 is divisible by 4, 6, 9 and 11.
6. Prime Factorisation
Do It Together
1. Prime factors of 76 2 76 2 38 19 19 1
2. Factor tree of 99 3 3 33 99 11
99 = 3 × 3 × 11
7. Common Factors and Common Multiples
Do It Together
1. 12, 18, 24: 6, 3, 2, 1 9, 18 4, 12 1, 3, 6 2 8, 24
Factors of 12
Factors of 18
Factors of 24
2. 18, 27, 36: 1, 3, 9 27 2, 6, 18 1, 9, 3, 4, 8, 12, 36
Factors of 18 Factors of 36 Factors of 27
8. Highest Common Factor
Do It Together
72 = 2 × 2 × 2 × 3 × 3 108 = 2 × 2
Hence, HCF of 72, 108 and 96 = 2 × 2 × 3 = 12
9. Lowest Common Multiple
Do It Together
1. 60, 84: 2 × 2 × 3 × 5 × 7 = 420
2. 126, 154, 189: 2 × 3 × 3 × 3 × 7 × 11 = 4158
10. Word Problems on LCM and HCF
Do It Together
Factors of 24 = 1, 2, 3, 4, 6, 8, 12, 24
Factors of 36 = 1, 2, 3, 4, 6, 9, 12, 18, 36
Factors of 48 = 1, 2, 3, 4, 6, 8, 12, 16, 24, 48
So, the HCF of the numbers is 12. Emily will make 2 packs of chocolate chip cookies + 3 packs of oatmeal cookies + 4 packs of peanut butter cookies.
Hence, Emily will make 9 packs.
Students will be able to: identify a plane, point, line segment, ray and line. measure and draw line segments.
identify the parts of angle and classify the different types of angles. measure and draw angles using a protractor. identify the parts of a triangle and classify them on the basis of their sides and angles. identify parts of a quadrilateral and classify quadrilaterals on the basis of their types. identify parts of a polygon and classify polygons on the basis of their sides, angles and diagonals. classify curves as open or closed, simple or non-simple. identify parts of circles and find the circumference of a circle using the formula. construct a circle for the given radius.
C-3.1: Describes, classifies, and understands relationships among different types of two– and three–dimensional shapes using their defining properties/attributes
C-3.2: Outlines the properties of lines, angles, triangles, quadrilaterals, and polygons and applies them to solve related problems
C-3.4: Draws and constructs geometric shapes, such as lines, parallel lines, perpendicular lines, angles, and simple triangles, with specified properties using a compass and straightedge
Let’s Recall
Recap to check if students know about various types of lines, angles and shapes. Ask students to solve the questions given in the Let’s Warm-up section.
line segment: a part of a line that has two definite end points angle: the space between two rays emerging from the same point vertices: points where the sides of a polygon meet sides: line segments that form a polygon quadrilateral: a polygon with four sides loop: a shape formed by a curve when it crosses itself line segment: a part of a straight line with two end points equidistant: at equal distances from a common point intersect: meet at a point
Set of cards showing points, lines, line segments, rays and planes; Pieces of string; Scissors; Ruler; Glue stick; Rectangular origami sheets in different colours (15 cm × 4 cm); Ice-cream sticks; Tape; Chart paper; Blue and orange buttons; Circular cutouts of radius 10 cm; Protractor; Sheets of coloured paper; Markers; Thermocol sheets; Quadrilateral cutouts; Geoboards; Rubber bands of different colours; Sheet of paper; Compass; Drawing sheets; Crayons; Pin; Pencil
Learning Outcomes
Students will be able to identify a plane, point, line segment, ray and line.
Teaching Aids
Set of cards showing points, lines, line segments, rays and planes
Activity
Ask the students to work in groups of 3. Distribute a shuffled set of cards showing points, lines, line segments, rays and planes to each group.
Instruct the groups to look at the cards and sort them according to their features. Once they are done, have a discussion around the features of all the elements.
Instruct the students to draw a table in their notebooks with columns for each element. Ask them to draw and label the elements and list the features discussed so far. Also ask them to add 2 examples for each element that they see in everyday life.
Measuring and Drawing Line
Imagine Maths Page 67
Learning Outcomes
Students will be able to measure and draw line segments.
Teaching Aids
Pieces of string; Scissors; Ruler; Glue stick
Activity
Begin by discussing the various units of length. Discuss the meaning of the big and small markings on the ruler. Ask the students to show various lengths such as 5 cm 3 mm in decimals.
Ask the students to work in pairs. Distribute a piece of string, a ruler, glue stick and a pair of scissors to each pair.
Instruct the students to measure 5.3 cm of the string, cut the string of that length and paste it in their notebooks. Ask them to draw a line of the same length using a ruler below the pasted thread and label it. Repeat the activity for various lengths of thread.
Extension Idea
Ask: What would be the total length of the line drawn below three pieces of string of lengths 2 cm 5 mm, 52 mm and 6.7 cm pasted end to end without any gaps?
Say: The length of the line will be the sum of the lengths of the three threads = 2.5 cm + 5.2 cm + 6.7 cm = 14.4 cm.
Imagine Maths Page 71
Students will be able to identify the parts of angles and classify the different types of angles.
Teaching Aids
Rectangular origami sheets in different colours (15 cm × 4 cm); Ice-cream sticks; Glue stick; Tape; Chart paper; Blue and orange buttons
Activity
Discuss an angle and the different parts of an angle, with the students.
Ask the students to work in groups of 6. Distribute origami sheets, ice cream sticks and glue sticks to each group.
Ask each student in a group to take one origami sheet, start from the smaller side and make accordion-style folds along the horizontal edge such that each fold is about 1 cm wide. Then, ask them to paste ice-cream sticks at both ends of the folded sheet and join the sticks together at one end using tape. Instruct the groups to take the first folded sheet and stick the ice-cream sticks on the chart paper so as to make an angle less than 90° .
Explain that angles less than 90° are called acute angles. Ask them to take the next sheet and stick it on the chart paper forming a 90° angle. Explain that a 90° angle is also known as a right angle. Instruct the groups in the same way so that they paste all six types of angles.
Instruct the groups to label the arms and vertex of the acute angle. Ask them to stick blue buttons outside and orange buttons inside the figure.
Explain that the blue buttons represent points on the exterior and orange buttons represent points on the interior of the angle.
Extension Idea
Ask: Can a point be on the exterior of an angle but on the interior of its adjacent angle? Draw and label such a figure.
Say: Point P is exterior to angle CAB but on the interior of its adjacent angle DAC.
Learning Outcomes
Students will be able to measure and draw angles using protractor.
Teaching Aids
Circular cutouts of radius 10 cm; Ruler; Scissors; Protractor
Imagine Maths Page 73
Activity
Recall the steps of measuring an angle using a protractor.
Ask the students to work in pairs. Distribute circular cutouts, a ruler, a pair of scissors and protractor to each pair. Ask the students to fold the circular cutout in half and then open it. Ask them to cut it along the fold using scissors to get 2 semicircles. Ask each student to take a semicircle cutout and fold it in half, then into a tri-fold twice to get a fan. Ask them to draw lines along the creases obtained starting from the centre of the semicircle. Then, ask them to measure each of the angles drawn on the semicircle using a protractor and mark them.
Ask questions like, “What have you noticed about the angles so formed in the semicircle?”
Imagine Maths Page 76
Students will be able to identify the parts of triangle and classify them on the basis of their sides and angles.
Sheets of coloured paper; Scissors; Tape; Markers; Thermocol sheets
Activity
Begin by discussing different parts of a triangle and how triangles can be classified.
Ask the students to work in groups of 3. Distribute the craft materials and a Thermocol sheet to each group.
Instruct each group to create 3 triangles on the Thermocol sheet using a ruler and different coloured paper. Ask them to label each type of triangle it represents. Encourage creativity in designing the triangles. Instruct each group to create triangles of all three types in varying shapes and sizes.
Instruct the students to create 3 more triangles each with different angle like aciute angled, right-angled and obtuse-angled on the Thermocol sheet using ruler and different coloured paper. Ask them to measure the angles and label the triangles.
Ask the students to collaborate to create aesthetic patterns using triangles they have created. Ask them to paste the pattern on a Thermocol sheet.
Ask question such as, “What were the measure of the angles? Were all the angles equal or different?”
Extension Idea
Ask: Can all the sides of a triangle be unequal, but the angles be equal?
Say: No, this is not possible. If the sides of a triangle are equal, its angles will be equal too and vice-versa.
Learning
Imagine Maths Page 79
Students will be able to identify parts of quadrilateral and classify quadrilaterals on the basis of their types.
Quadrilateral cutouts; Protractor; Ruler; Chart paper
Activity
Start by explaining the fundamental concepts of a quadrilateral, including the presence of 4 sides, 4 vertices, and 4 angles.
Ask the students to work in groups. Distribute cutouts of different types of quadrilaterals (convex, concave, square, rectangle, trapezium, and kite), a protractor, a ruler and chart paper to each group.
Instruct the groups to paste these cutouts on the chart paper and measure the angles, sides and diagonals of each quadrilateral using a protractor and ruler. Also instruct the students to mark the vertices, sides and diagonals of the quadrilaterals.
Ask the groups to record their observations about the angles, sides and diagonals of the cutouts on the chart paper.
Discuss the types of quadrilaterals based on their features. Ask the groups to classify and label the pasted quadrilaterals based on the discussion.
Extension Idea
Ask: Name a quadrilateral that shares characteristics with both a rhombus and a rectangle.
Say: A square shares characteristics with a rectangle as all its angles are right angles. Also, all the sides of a square are equal, so it shares characteristics with a rhombus too.
and Their Features
Imagine Maths Page 83
Students will be able to identify parts of polygon and classify polygons on the basis of their sides, angles and diagonals.
Geoboards; Rubber bands of different colours; Markers
Activity
Start by introducing the concept of polygons and their basic parts: vertices, sides, and angles.
Ask the students to work in groups of 6. Distribute geoboards, rubber bands and coloured markers to each group.
Instruct the groups to create two different polygons on the geoboards using the rubber bands. Ask them to use different colours of rubber bands to show the diagonals. Encourage them to experiment with varying the number of sides and vertices. As they create each polygon, ask the students to count the vertices, sides, diagonals and angles. Finally, ask them to recreate the shapes using coloured markers in their notebooks.
Instruct the students to discuss the various polygon that they formed based on their features like number of sides. Ask the students to discuss and classify different type of polygons.
Teacher Tip: In case of unavailability of geoboards, you can stick notice board push pins on a Thermocol sheet as a substitute.
Extension Idea
Ask: Can you name a polygon that does not have any diagonals?
Say: Triangles are polygons that do not have any diagonals.
Learning
Students will be able to classify curves as open or closed, simple or non-simple.
Teaching Aids
Pieces of string; Sheets of paper; Glue stick
Activity
Ask the students to work in groups of 4. Distribute the teaching aids.
Imagine Maths Page 86
Guide the groups to create a curved pattern of their choice using their pieces of string and paste them on the sheet of paper. Allow time for the glue to dry.
Collect all the sheets and mix them up. Redistribute the sheets, one to each group.
Instruct the groups to identify the type of curve on the sheet as simple or non-simple and open or closed. Ask each student in a group to write a reason for their answer in their notebook. Discuss the reasons and types of curves.
Ask questions like, “How did you know that a curve was a non-simple curve?”
Extension Idea
Draw a curve that is non-simple and open on the board.
Ask: What do you notice about this figure?
Say: The shape is an open non-simple curve because the starting point and the end point of the curve are different.
Learning
Students will be able to identify parts of a circle.
Teaching Aids
Compass; Ruler; Pieces of string; Circular cutouts; Drawing sheets; Crayons; Ruler
Activity
Imagine Maths Page 87
Ask the students to work in groups of 3. Distribute a compass, ruler and a piece of string to each group.
Distribute a circular cutout and drawing sheet to each pair.
Instruct them to identify the centre, radius, diameter and chord, and to mark and label the specified parts on the cutout using crayons. Allow them to use different ways like folding the cutout in half to identify the diameter. They will then shade the major and minor arcs in the circle.
Ask questions like, “How did you find the centre, radius and diameter of the circle?”
Draw a table as shown on the board. Ask the students to copy it into their notebooks.
Instruct each student in a group to construct one of the three circles of radius 4 cm, 5 cm and 6 cm using a compass and then measure the distance around the boundary (circumference) of that circle. Ask the students to write the circumference (C), the diameter (D) and the value of C ÷ D in the table. Then, they should discuss in their groups how they can form the formula for C if the value of R or D is given. Discuss how the circumference of a circle is pi (π) or around 3.14 times the diameter of the circle and how to find the circumference when the radius or diameter is given. Ask the students to find the circumference of a circle with a radius of 7 cm.
Ask: What is the diameter of a circle with a circumference of 88 cm?
Say: We know that the circumference = 2πr. So, r = 14 cm and diameter = 28 cm.
Students will be able to identify parts of a circle and find the circumference of a circle using the formula.
Drawing sheet; Pin; Pieces of string; Pencil; Compass Activity
Distribute the teaching aids to each student.
Instruct them to tie a pencil to one end of the string and a pin to the other end. Ask them to place the pin on the drawing sheet and then turn the string with the pencil end all the way around so that a circle is drawn. Then, ask them to measure the radius of the circle.
Next, ask the students to use the compass to construct a circle with the same radius as the circle drawn using the string on the drawing sheet. Explain that without moving the compass needle, they should rotate the compass around it in a way that the pencil draws a circle. Instruct them to keep turning until the pencil goes all the way around. Then, ask them to mark and label the centre, radius and diameter.
Ask questions like, “How can you identify the centre and the diameter in the circle?”
1. Key Geometrical Concepts
Think and Tell
No, the surface of a volleyball is not the part of a plane. The volleyball court is a part of a plane.
Do It Together
Real‐life Example Football Field Stars in the Sky Straw Pipe Light Emitted by the Sun
Geometry Plane Point Line segment Ray Figure
2. Measuring and Drawing Line Segments
Do It Together
3. Comparison of Line Segments
Do It Together
Measures
4. Basics of Angles
Do It Together
1.
5. Types of Angles
6. Measuring and Drawing Angles
Do It Together
The smallest angles are
7. Triangles and Their Features
Do It Together
1. Students will measure the lengths of the sides.
Equilateral Scalene Isoceles
2. Students will measure the angles of the triangles.
8. Parts of a Quadrilateral
Do It Together
9. Types of Quadrilaterals
Do It Together
Think and Tell
All the sides in a right-angled triangle are not equal therefore it is not a regular polygon.
Do It Together
Vertices:
Diagonals:
Think and Tell
Yes curves that are simple and closed can be drawn. One example is a circle.
Do It Together
Figures may vary. Sample figures.
Simple Open Curve Simple Closed Curve
Non-simple Open Curve Non-simple Closed Curve
12. Circles: Parts and Construction
Think and Tell
No. The diameter of a circle is the longest chord.
13. Constructing Circles
Do It Together
Students will be able to: list the features of 3-D shapes, and differentiate between prisms and pyramids. identify and draw the nets of a 3-D shape.
C-3.1: Describes, classifies, and understands relationships among different types of two- and threedimensional shapes using their defining properties/attributes
C-3.3: Identifies attributes of three-dimensional shapes (cubes, parallelepipeds, cylinders, cones), works hands-on with material to construct these shapes, and also uses two-dimensional representations of three-dimensional objects to visualise and solve problems
Let’s Recall
Recap to check if students know how to identify the faces of a 3-D shape. Ask students to solve the questions given in the Let’s Warm-up section.
Vocabulary
polygon: a 2-D shape made up of 3 or more line segments
prism: a 3-D shape with identical and parallel opposite bases, and square or rectangular lateral faces pyramid: a 3-D shape in which the base is a polygon and all the other faces are triangles tapered to a vertex
net: a 2-D figure that can be folded to form a 3-D shape
Plastic prisms and pyramids; Boxes shaped like a pyramid and a prism; A pair of scissors; Thick chart paper; Sellotape
Learning
Imagine Maths Page 96
Students will be able to list the features of 3-D shapes, and differentiate between prisms and pyramids.
Teaching Aids
Plastic prisms and pyramids
Activity
Ask the students to work in groups. Distribute the plastic prisms and pyramids to each group. Instruct them to sort the shapes into 2 groups and then ask them what the similarities and differences between the two groups are. Ask the students to name the type of prisms and pyramids, and list their features. Let them discuss in their groups, the similarities and differences between a prism and a pyramid.
Note: In case the shapes are unavailable, ask the students to look at the picture of the shapes in their Imagine Mathematics books.
Ask questions like, “What is one major difference between a prism and a pyramid?”
Extension Idea
Ask: If you cut a cuboid diagonally, what other 3-D shape do you get?
Say: If a cuboid is cut diagonally, we get a triangular prism.
Learning
Students will be able to identify and draw the nets of a 3-D shape.
Teaching Aids
Boxes shaped like a pyramid and a prism; Scissors; Thick chart papers; Sellotape
Activity
Imagine Maths Page 99
Show the students a pyramid-shaped paper box and ask them which and how many 2-D shapes do they see in its faces. Then, lay out flat the faces of the box to show them the faces in the net of the box. Ask the students to try and describe how 3-D objects are different from their 2-D representations.
Ask the students to work in pairs. Distribute the teaching aids to each pair. Allow the students to imagine what the nets of the prism and pyramid might look like, and ask them to draw the nets on the thick chart paper. Finally, instruct them to cut out the nets, fold them, stick the edges together using Sellotape to see if the shapes look the same as the given boxes.
Extension Idea
Ask: In how many ways can we create the net of a tetrahedron?
Say: A tetrahedron is also called a triangular pyramid. There are two different nets of a tetrahedron.
Think and Tell
No. A decagonal prism has 12 faces, and a decagonal pyramid has 11 faces. Do It Together
3. Nets of Cones and Cylinders Do It Together
2. Nets of Cubes and Cuboids Do It Together
There are 2 ways of placing rectangles to form the net of a closed cuboid.
4. Nets of Pyramids and Prisms Do It Together
Name of the shape: Hexagonal pyramid
Students will be able to: represent integers on a number line and compare them. add integers using the rules. subtract integers using the rules.
C-1.4: Explores and understands sets of numbers, such as whole numbers, fractions, integers, rational numbers, and real numbers, and their properties, and visualises them on the number line
Let’s Recall
Recap to check if students know how to find the predecessor and successor of a given number. Ask students to solve the questions given in the Let’s Warm-up section.
Vocabulary
predecessor: the number that comes before a number successor: the number that comes after a number integer: a positive or negative whole number or zero absolute value: distance of an integer from zero
Chart paper; Index cards; Integer tiles made using red and yellow paper square cutouts to show negative and positive integers, respectively
Ordering
Learning Outcomes
Students will be able to represent integers on a number line and compare them.
Teaching Aids
Chart paper; Index cards
Activity
Begin the class with a discussion on how to write a number for the second floor and Basement 2, to bring out the uses of integers. Discuss more examples with the students. Ask the students to work in groups. Distribute a sheet of chart paper to each group and one index card to each student in the group. Each index card should describe a different situation involving integers.
Spending `5 4 kg decrease in weight
Predecessor of 3
Successor of 6 Absolute value of –7
Instruct the groups to draw a number line from −10 to +10 on the chart paper, ensuring that it is clearly labelled. Ask the groups to read and discuss the situation on their index card, and represent the corresponding integer on the number line pasting the index card above or below the number line at that mark. They will then compare the integers marked on the number line to say which is biggest and which is the smallest.
Have a discussion around how to compare integers.
For practice, give them some more integers and ask them to arrange them in ascending and descending order.
Learning Outcomes
Students will be able to add integers using the rules.
Teaching Aids
Integer tiles made using red and yellow square paper cutouts to show negative and positive integers, respectively
Activity
Ask the students to work in pairs. Distribute the integer tiles to each pair. Instruct them to add 3 and −4 using the tiles. Ask them to first show the positive integer using the yellow tiles and then the negative integer using the red tiles. Explain that one positive tile and one negative tile cancel each other out because they make 0, so they should be removed. Explain that the remaining number of integer tiles (−1 in this case) is the answer. So, 3 + (−4) = −1.
Give the students more problems to solve using the integer tiles. Ask questions like, “What is the sign of the sum of two negative integers? Discuss the rules of adding integers. Give students some addition problems to solve in their notebooks. Instruct them to add the integers using addition rules.”
Extension Idea
Instruct: Find three integers whose sum is −25.
Say: There are multiple sets of three integers whose sum is −25. One such set could be −10, −8 and −7.
Students will be able to subtract integers using the rules.
Teaching Aids
Integer tiles made using red and yellow square paper cutouts to show negative and positive integers, respectively
Activity
Begin the class by asking the students the difference between the two floors of a building: Floor 5 and Basement 2. Discuss the answers.
Ask the students to work in groups. Distribute the integer tiles to each group.
Instruct them to subtract –6 from 3. Ask them to use yellow tiles to show the integer 3.
Ask questions like, “Can you take away 6 negative tiles from the 3 positive tiles?”
Explain that they can do so only if they have 6 negative tiles, which they don’t. To take away 6 negative tiles, they need to add 0 tiles, that is, pairs of positive and negative tiles. So, to take away 6 red tiles, they need to first add 6 red and 6 yellow tiles. Ask the students to add the required zero tiles, show the subtraction and find the answer. They will then show the subtraction in their notebooks by drawing the tiles and writing the subtraction sentence in their notebooks. Discuss the answer in class.
Instruct the students to next subtract −7 from 4 using the integer tiles and note down the result in their notebooks as a subtraction sentence.
Ask questions like, “What is the sign of the answer when you subtract one negative integer from another? What is it when you subtract one negative from one positive integer? What does the sign depend on?”
Discuss the rules of subtracting integers. Give the students more subtraction problems to practise solving using the rules.
Extension Idea
Ask: Find the missing integer: − (19) = −34.
Say: We can find the missing integer by adding 19 to −34.
−34 + 19 = −15.
−15 − (19) = −34. So, the missing integer is −15.
1. Representing Integers
Think and Tell
The largest negative integer is –1, as it is the closest to zero on the negative side of the number line. Negative integers go infinitely in the negative direction. So, we cannot find the smallest negative or the largest positive integer.
Do It Together
2. Comparing and Ordering Integers
Do It Together
Rudra’s flat
Suhani’s flat
Rudra’s car parking
Suhani’s car parking
3. Addition of Integers Using Tokens
Do It Together
+3 + (–8) = –5
4. Rules for Addition of Integers
Do It Together
1200 feet beneath the surface = –1200
Rise of 635 feet = +635
Descend again 455 feet = –455
Current location of vessel = (–1200) + (635) + (–455) = –1020
Hence, the vessel is 1020 feet below the surface of the water.
5. Properties of Addition of Integers
Do It Together
1. –25 + 0 = –25 Existence of additive identity
2. –15 + 35 = 35 +(–15) Commutative property
3. 39+ (−12) = +27 Closure property
4. 26 + (–13 + 9) = (26 + (–13)) + 9 Associative property
6. Subtraction of Integers Using Tokens
Do It Together
7. Rules for Subtraction of Integers
Do It Together
1. –36 from 58
= 58 – (–36)
= 58 + 36 = 94
3. –247 from 354
= 354 – (–247)
= 354 + 247 = 601
2. –145 from –365
= –365 – (–145) = –365 + 145 = –220
4. 3654 from –5214
= –5214 – 3654
= –5214 + (−3654)
= −8868
8. Properties of Subtraction of Integers
Do It Together
1. Property Used: Commutative Property
523 – 365 = 158
365 – 523 = − 158
Thus, 523 − 365 ≠ 365 – 523
2. Property used: Associative property
(125 – 523) − 363 = −761
125 – (523 – 363) = −35
Thus, (125 – 523) − 363 ≠ 125 − (523 – 363)
Students will be able to: represent fractions and classify them as proper, improper and mixed. compare and order unlike fractions. convert improper fractions to mixed numbers and vice versa. find equivalent fractions and the simplest form of fractions. add and subtract unlike fractions. multiply fractions and mixed numbers. divide fractions and mixed numbers.
C-1.2: Represents and compares commonly used fractions in daily life (such as 1 2 , 1 4 ) as parts of unit wholes, as locations on number lines and as divisions of whole numbers
C-1.4: Explores and understands sets of numbers, such as whole numbers, fractions, integers, rational numbers, and real numbers, and their properties, and visualises them on the number line
Let’s Recall
Recap to check if students know how to identify and write fractions. Ask students to solve the questions given in the Let’s Warm-up section.
Vocabulary
fractions: numbers of the form a b , where a and b are whole numbers and b ≠ 0 like fractions: fractions with the same denominator reciprocal: fraction obtained by interchanging the numerator and denominator
Fraction cards (including 2 proper, 2 improper and 2 mixed fractions); Circle cutouts; Chart paper; Scissors; Glue stick; Rectangular strips; Colour pencils; Fraction circles; Fraction strips
Learning
Imagine Maths Page 125
Students will be able to represent fractions and classify them as proper, improper and mixed.
Teaching Aids
Fraction cards (including 2 proper, 2 improper and 2 mixed fractions); Circle cutouts; Chart paper; Scissors; Glue stick
Activity
Begin with a discussion on proper, improper and mixed fractions. Give some examples for each type of fraction. Ask the students to work in groups. Distribute the fraction cards and other teaching aids to each group.
Explain that the fraction cards represent the fraction of pizza left after a party. Ask them to consider each circle cutout as a whole pizza. Instruct them to divide and cut the circular cutouts as per the fraction on the fraction cards and paste them on the chart paper. When they are done, ask them to exchange charts with other groups for peer review.
Ask questions like, “How is an improper fraction different from a mixed number?”
Learning
Students will be able to compare and order unlike fractions.
Teaching Aids
Rectangular strips; Colour pencils
Activity
Ask the students to work in pairs. Distribute the rectangular strips and colour pencils to each pair.
Imagine Maths Page 125
Instruct them to show 1 3 and 3 4 on two rectangular strips and compare them. Discuss how to divide the strips such that both show the same total number of equal parts, either by finding the LCM of the denominators or by multiplying the denominators.
Instruct the pairs to divide each strip into the same number of parts as the LCM of the denominators and then compare the shaded parts.
Then, ask them to compare the two fractions by first converting them to like fractions and then comparing the numerators in their notebooks.
Give the students some practise questions on ordering unlike fractions.
Extension Idea
Ask: Which is bigger: 6 1 2 or 5 1 4 ?
Say: We convert the mixed numbers into improper fractions as 13 2 and 21 4 . We know that 13 2 = 26 4 and as 26 > 21, 6 1 2 > 5 1 4 .
Learning Outcomes
Students will be able to convert improper fractions to mixed numbers and vice versa.
Teaching Aids
Fraction circles
Activity
Ask the students to work in pairs. Distribute the fraction circles showing improper fractions to each pair.
Instruct one student in each pair to look at the circles and write the fraction as an improper fraction and the other student to look at the same circles and write the fraction as a mixed number. Ask them to look at the fractions written by both partners and discuss how they are related and how to convert one form to the other without using fraction circles.
Discuss the answers with the whole class along with the method used for converting between improper fractions and mixed numbers without using fraction circles.
Extension Idea
Ask: My dog is 5 1 2 years old. My cat is 9 4 years old. Which is older?
Say: Here, we have a mixed number and an improper fraction. On converting the improper fraction 9 4 into a mixed number, we get 2 1 4 . As 5 1 2 > 2 1 4 , the dog is older than the cat.
Students will be able to find equivalent fractions and the simplest form of fractions.
Teaching Aids
Fraction strips
Activity
Imagine Maths Page 131
Ask the students to work in groups of 4. Distribute 4 fraction strips to each group. Instruct them to show 1 2 , 2 4 , 3 6 and 4 8 on the fraction strips. Once they have done so, ask them to place the number strips one below the other and discuss what they notice about the strips. Encourage them to share their observations with the rest of the class. Bring out the fact that the given fractions are equivalent.
Guide the discussion to help the students deduce the way to find equivalent fractions without using fraction strips.
Ask them to find 3 more equivalent fractions for the given fraction and write these in their notebooks. Give them 2 more fractions to find equivalent fractions in their notebooks.
Extension Idea
Ask: Molly baked 14 cookies. Her mother ate 2 cookies, and her father ate 4 cookies. What fraction of the cookies was left? Write it in its simplest form.
Say: We know that Molly’s parents ate 6 14 of the cookies, so 8 14 was left. The simplest form of 8 14 is 4 7
Addition and Subtraction of Fractions
Students will be able to add and subtract unlike fractions.
Teaching Aids
Rectangular strips; Colour pencils
Activity
Ask the students to work in pairs. Distribute the rectangular strips and colour pencils to each pair.
Instruct them to show 1 2 and 1 3 on two rectangular strips and add the two fractions.
Ask them to find the LCM of the denominators of the fractions and then divide each strip into the same number of equal parts as the LCM; in this case, each strip will have a total of 6 equal parts. Instruct them to then count the total number of shaded parts.
Next, instruct the students to add the two fractions in their notebooks by first converting them to like fractions and then adding the numerators.
Repeat the activity for subtraction of unlike fractions.
Extension Idea
Ask: How do we solve 5 1 4 − 2 2 3 ?
Say: We change the mixed numbers to improper fractions, convert them into like fractions and then subtract.
Students will be able to multiply fractions and mixed numbers.
Teaching Aids
Rectangular strips; Colour pencils
Activity
Ask the students to work in pairs. Distribute rectangular strips and colour pencils to each pair.
Instruct the pairs to multiply 3 8 and 4 5 using the strips. Ask them to first show 3 8 by dividing the strip horizontally into 8 parts and shading 3 parts using a colour pencil. Ask them to then show 4 5 on the same strip by dividing it vertically into 5 equal parts and crossing out 4 vertical parts. Ask them to now count the total number of equal parts and number of parts that have both shading and crosses. Explain that the fraction obtained is the answer of the multiplication. Then, ask them to solve the problem in their notebooks by multiplying the numerators and then the denominators.
Give the students a few problems on multiplication of fractions to solve in their notebooks.
Ask: Jen is preparing a dish that calls for 3 4 of a cup of oil per serving. If Jen needs to prepare 2 2 3 servings, how many cups of oil will she need?
Say: We need to multiply the two fractions. 3 4 × 2 2 3 = 3 4 × 8 3 = 2. Hence, she needs 2 cups of oil for 2 2 3 servings.
Students will be able to divide fractions and mixed numbers.
Rectangular strips; Colour pencils
Activity
Ask the students to work in pairs. Distribute rectangular strips and colour pencils to each pair.
Explain that if there is a division sign between the two fractions, we replace it with a multiplication sign and write the reciprocal of the divisor and then follow the steps of multiplication.
Instruct the pairs to divide 4 5 and 3 2 . Ask them write the reciprocal of the divisor 3 2 as 2 3 and then follow the steps of multiplication.
Ask them to first show 4 5 by dividing the strip horizontally into 5 parts and shading 4 parts using a colour pencil.
Ask them to then show 2 3 on the same strip by dividing it vertically into 3 equal parts and crossing out 2 vertical parts. Ask them to now count the total number of equal parts and number of parts that have both shading and crosses. Explain that the fraction obtained 8 15 , is the answer of the division.
Next, instruct the students to divide two fractions in their notebooks by first writing the reciprocal of the divisor and then multiplying the numerators and then the denominators. Give the students a few problems on division of fractions to solve in their notebooks.
Extension Idea
Ask: How many pieces, each measuring 7 3 of a foot, can be cut from a rope that is 9 1 3 feet long?
Say: We need to divide the two fractions. 9 1 3 ÷ 7 3 = 28 3 × 3 7 = 4 Hence, 4 pieces of 7 3 of a foot can be cut from the rope of length 9 1 3 feet.
1. Representing Fractions
Do It Together
A = 5 8 B = 12 8 or 1 4 8 C= 21 8 or 2 5 8
2. Comparing Fractions
Do It Together
LCM of 7 and 6 = 42
5 7 = 30 42 ; 3 6 = 21 42
As 30 > 21. Thus, the larger fraction is 30 42 or 5 7
3. Ordering Fractions
Do It Together
LCM of 4, 5, 2, 8 = 40
3
4 = 30 40; 4 5 = 32 40
1 2 = 20 40; 7 8 = 35 40
35 > 32 > 30 > 20
Thus, 7 8 > 4 5 > 3 4 > 1 2
4. Conversion Between Mixed Numbers and Improper Fractions
Do It Together
1. 10 4 5 = (5 × 10) + 4 5 = 54 5
2. 31 6 = 5 1 6
5. Equivalent Fractions and Simplest Form
Do It Together
Answers may vary. Sample answers.
Using multiplication:
8 10 × 3 3 = 24 30
Using division:
8 10 ÷ 2 2 = 4 5
6. Addition and Subtraction of Unlike Fractions
Do It Together
Fraction of the cake eaten by Radha = 1 9 ; Fraction of the cake eaten by Riya = 2 3
LCM of 9 and 3 = 9
Fraction of cake eaten by Radha and Riya
As the whole cake is 1.
So, the fraction of cake remaining = 1 –7 9 = 2 9
7. Addition and Subtraction of Mixed Numbers
Do It Together
LCM of 4, 6 = 12
On converting to improper fractions, we get:
5 2 6 = 32 6 7
8. Multiplying Fractions or Mixed Numbers
Think and Tell
The product of any number and its reciprocal is always 1. Hence, 5 8 × 8 5 = 1.
Do It Together
5 13 14 = 83 14 and 2 1 2 = 5 2
83 14 × 5 2 = 415 28 = 14 23 28
9. Dividing Fractions or Mixed Numbers
Do It Together
2 3 11 ÷ 15 11 = 25 11 × 11 5 = 5 1
Students will be able to: represent decimals on a number line. identify the place value of digits in a decimal number and write the decimal number in its expanded form and as a number name. convert fractions to decimals and vice versa. find equivalent decimals and compare decimals. add and subtract decimals up to 3 decimal places. multiply decimals up to 2 decimal places by whole numbers or decimals up to 1 decimal place. divide decimals up to 2 decimal places by whole numbers or decimals up to 1 decimal place.
C-1.6: Explores and applies fractions (both as ratios and in decimal form) in daily-life situations
Let’s Recall
Recap to check if students know about decimal numbers, their parts and how to rearrange them in increasing or decreasing order.
Ask students to solve the questions given in the Let’s Warm-up section.
Vocabulary
equivalent decimals: decimal numbers that have the same value
Decimal cards; Blank decimal place value chart (up to thousandths); Bowl of decimal number cards; Coloured counters; Shaded grids showing 0.8 and 1.05; 10 × 10 grid; Coloured pencils; Two decks of cards (one with decimal numbers and the other with their decimal equivalents); Grids to represent decimal numbers up to 2 decimal places
Students will be able to represent decimals on a number line.
Teaching Aids
Decimal cards
Activity
Briefly explain the concept of decimals and their relation to the number line. Explain that tenths can be further divided into hundredths.
Take students out to the playground and ask them to form groups of equal sizes. Give each student a decimal card.
Draw a large horizontal number line of range 1–5 on the ground. Ask students to read the decimal number on the card and to go and stand at the correct place on the number line with the card. The group with all its members to stand at the correct places first, wins the game.
Back in the classroom, instruct students to draw a number line in their notebooks and write the answers. Give them a few more decimal numbers to represent on a number line in their notebooks.
Place Values in Decimals Imagine Maths Page 145
Learning Outcomes
Students will be able to identify the place value of digits in a decimal number and write the decimal number in its expanded form and as a number name.
Teaching Aids
Blank decimal place value chart (up to thousandths); Bowl of decimal number cards; Coloured counters
Activity
Briefly explain the concept of decimals and their relation to tenths and hundredths. Prepare some decimal number cards and put them in a bowl.
Ask students to work in groups. Distribute a sheet of paper with a blank decimal place value chart (up to thousandths) to each group. Assign a colour to each place and distribute counters of the same colours to each group. Pick a decimal number card from the bowl. Ask the groups to place as many counters as the digit in the correct place on the place value chart. Help them identify the place value of each digit of the number.
Instruct them to interchange the counters at the tenths place and the tens place. Ask them to identify the new number and the place value of each of its digits. Discuss the importance of the placement of the digits in a number. Ask questions like: How does the value of a digit change depending on its place in the number?
Extension Idea
Ask: What is the decimal number for 50 + 4 + 2 10 + 8 1000 ?
Say: 50 + 4 + 2 10 + 8 1000 = 50 + 4 + 0.2 + 0.008 = 54.208.
Learning
Students will be able to convert fractions to decimals and vice versa.
Teaching Aids
Shaded grids showing 0.8 and 1.05
Activity
Imagine Maths Page 146
Begin the class by reviewing the concept of fractions and decimals. Give students some examples on conversion to emphasise that the numbers represent the same value even though they are expressed in different forms. Divide the class into groups of 4. Distribute the shaded grids to each group.
Ask 2 students from each group to write the fractions representing the given grids and 2 students to write the decimals representing the same grids. Then, have them compare their answers to see how one can be converted to the other.
Discuss the answers and the reasons for conversion. Give them a few more grids and ask them to write the corresponding fractions and decimals in their notebooks.
Learning
Students will be able to find equivalent decimals and compare decimals.
Teaching Aids
Imagine Maths Page 148
10 × 10 grid; Coloured pencils; Two decks of cards (one with decimal numbers and the other with their decimal equivalents)
Activity
Begin the class by reviewing the concept of like and unlike decimals. Give a few examples to emphasise how they are different from each other. Explain that we can convert unlike decimals to like decimals by adding zeroes to form equivalent decimals and then compare them.
Ask students to work in pairs. Distribute the teaching aids to each pair.
Instruct them to shuffle each deck of cards. Each student should draw 2 cards each from the decks and represent the numbers on the empty grids using coloured pencils. Then, ask them to match the grids with their partners and find out if their representations are equivalent decimals. If they are not equivalent, ask them to form equivalent decimals. Then, instruct them to compare the 2 representations. Explain that the student with the largest decimal number wins the round and keeps both cards.
Ask: A chef is baking cookies and needs to add exactly 1.75 cups of flour. She only has measuring cups in sizes of 0.25 cups, 0.5 cups and 1 cup. Find all the possible combinations she can use to achieve the measurement. Which combination requires the minimum number of cups?
Say: The possible combinations are: 3 × 0.5 cups + 1 × 0.25 cup; 1 × 1 cup + 1 × 0.5 cup + 1 × 0.25 cup; and 1 × 1 cup + 3 × 0.25 cups. The second option requires the minimum number of cups, that is, 3.
Addition and Subtraction of Decimals
Learning Outcomes
Students will be able to add and subtract decimals up to 3 decimal places.
Teaching Aids
Grids to represent decimal numbers up to 2 decimal places; Coloured pencils
Activity
Begin the class by reviewing the concept of adding and subtracting decimals. Give examples to emphasise the placement of digits of decimal numbers one below the other in the column method.
Ask students to work in pairs. Distribute the teaching aids and write an addition problem and a subtraction problem of decimals on the board.
Ask the pairs to represent the decimal numbers on the grid provided using coloured pencils. Explain that they may need more than one grid to represent the numbers. Ask them to add or subtract using the grid and by writing the decimals one below the other.
0.5 + 0.25
– 0.25 = 0.23
Repeat this for 5 rounds with different addition and subtraction problems of decimal numbers written on the board. The pair to get the maximum number of correct sums or differences wins the game.
Extension Idea
Ask: A theme park has 3 rides: a roller coaster costing ₹7.99, a water flume costing ₹6.50, and a mystery ride costing x rupees. You have ₹20.00 and want to go on 2 rides. What are the possible prices of the mystery ride if you spend exactly ₹20.00?
Say: Cost of the mystery ride if the roller coaster is included: ₹20 − ₹7.99 = ₹12.01. Cost of the mystery ride if the water flume is included: ₹20 − ₹6.50 = ₹13.50. So, the cost of the mystery ride is ₹13.50 or ₹12.01.
Students will be able to multiply decimals up to 2 decimal places by whole numbers or decimals up to 1 decimal place.
Grids to represent decimal numbers up to 2 decimal places; Coloured pencils
Activity
Begin the class by reviewing the concept of multiplying 2 decimals. Give examples to emphasise the placement of the digits of a decimal number at the appropriate places in the column method.
Ask students to work in pairs. Distribute the teaching aids and write a multiplication problem of decimals, say 0.2 × 0.7, on the board.
Instruct the pairs to represent the decimal numbers on the grid using coloured pencils and multiply them. Ask them to shade the first number (0.2) vertically on the grid and shade the second number (0.7) horizontally on the same grid. Explain that the portion of the grid shaded with 2 colours (merged portion) is the product of the 2 numbers.
Now, ask students to solve the problem in their notebooks by writing the decimals one below the other. Repeat the activity for 5 rounds and instruct students to write the answers in their notebooks. The pair to get the maximum correct products wins!
Extension Idea
Ask: Rubal hired a car costing ₹1500 plus 85 p for each km she travels. The car’s odometer showed 28361 km when she returned the car. How much would Rubal pay if the odometer showed 27612 km when she hired the car?
Say: Total distance travelled by Rubal = 28361 – 27612 = 749 km. So, she will pay 749 × ₹0.85 + ₹1500 = ₹2136.65.
Learning Outcomes
Students will be able to divide decimals up to 2 decimal places by whole numbers or decimals up to 1 decimal place.
Teaching Aids
Grids to represent decimal numbers up to 2 decimal places; Coloured pencils
Activity
Begin the class by reviewing the concept of dividing decimals. Give examples to emphasise the placement of the digits of a decimal number in the long division method.
Ask students to work in pairs. Distribute the teaching aids and write a division problem of decimals on the board.
Instruct the pairs to represent the decimal numbers on the grid using coloured pencils and divide. Explain that they will need more than one grid for the division. To divide, ask them to take as many empty grids as the divisor and then shade the dividend equally in the empty grids. Explain that the number of squares coloured in each group/grid is the quotient of the 2 numbers.
÷ 3 = 0.18 0.54
Instruct students to solve the problem in their notebooks using the column method. Repeat the activity for 5 rounds and instruct students to write the answers in their notebooks. The pair to get the maximum number of correct answers wins!
Extension Idea
Ask: A log is 17.60 m long. It is to be cut into fence posts which must be 80 cm long. What is the largest number of fence posts that can possibly be cut from this log?
Say: Length of the log = 17.60 m = 1760 cm, length of each fence post = 80 cm. So, the largest number of fence posts that can possibly be cut from this log = 1760 ÷ 80 = 22.
1. Representing Decimals on a Number Line
Do It Together
6. Comparing Decimals
Do It Together
2. Place Values in Decimals
Do It Together
Expanded form = 200 + 50 + 6 + 0.003 or 200 + 50 + 6 + 3 1000
Number name = two hundred fifty-six point zero zero three
3. Conversion Between Fractions and Decimals
Do It Together
1. 3.25 = 3.25 ×
2. 4.14 = 4.14 ×
4. Like and Unlike Decimals
Do It Together
Number of digits after the decimal point in 15.45 = 2
Number of digits after the decimal point in 814.012 = 3
So, the number of digits after the decimal point are not equal.
Thus, 15.45 and 814.012 are unlike decimals.
5. Equivalent Decimals
Do It Together
18.3 = 18.30, 18.300
On comparing, the descending order of the numbers is: 48.100 > 48.023 > 48.020 > 48
7. Addition and Subtraction of Decimals
Think and Tell
Weight he carries = 53.25 kg + 5.2 kg = 58.45 kg
Xavier can carry 65 kg – 58.45 kg = 6.55 kg more weight.
Do It Together
Thus, the difference of the heights of Aman and Rajneesh is 0.17 m
8. Multiplication of Decimals
Do It Together
Total cost of 18 books = ₹156.56 × 18 = ₹2818.08
9. Division of Decimals
Do It Together
Cost of each packet of paint = ₹3547.5 ÷ 15 = ₹236.5
Students will be able to: organise data in a table using tally marks. read and draw pictographs. read and draw bar graphs.
Alignment to NCF
C-5.2: Selects, creates, and uses appropriate graphical representations (e.g., pictographs, bar graphs, histograms, line graphs, and pie charts) of data to make interpretations
Let’s Recall
Recap to check if students know how to draw and interpret the data in a table. Ask students to solve the questions given in the Let’s Warm-up section.
Vocabulary
tally marks: a system of counting using vertical strokes, often in groups of five, to keep track of quantities pictograph: a table that shows the given data using pictures or symbols bar graph: a graph that shows information in the form of bars of different lengths
Ice-cream sticks; Buttons of 5 colours; Chart papers; Smiley stickers; Building blocks
Learning Outcomes
Students will be able to organise data in a table using tally marks.
Teaching Aids
Ice-cream sticks; Buttons of 5 colours; Chart papers
Activity
Demonstrate how to show tally marks to the students.
Ask the students to work in groups. Distribute the resources to each group.
Imagine Maths Page 162
Instruct the groups to make a tally marks table to show the number of each colour of the buttons.
Ask them to pick one button at a time and place an ice-cream stick as a tally mark under the column of that colour. Keep the button on the other side. Then, pick the next button, see its colour and place the ice-cream stick as a tally mark. Repeat till all buttons are used. Ask them to remember to place every fifth ice-cream stick across the previous 4 ice-cream sticks. The total tally marks tells us the number of buttons for each colour. Then, instruct the students to create a tally marks table in their notebooks.
Extension Idea
Ask: If each ice-cream stick stands for 5 items instead of just 1 item, how would this change the tally marks drawn for each colour?
Say: Suppose there are 10 red buttons and 20 blue buttons. The red buttons will be represented by 2 ice-cream sticks and the blue buttons will be represented by 4 ice-cream sticks.
Pictographs
Learning Outcomes
Students will be able to read and draw pictographs.
Teaching Aids
Chart papers; Smiley stickers
Activity
Imagine Maths Page 164
Begin by asking what mode of transport students use to get to school. As each student responds, write the name of the mode of transport on the board as bus, car, bicycle, and so on.
Ask the students to work in groups. Distribute the smiley stickers and chart paper to each group. Instruct the group to create a table on the chart paper and ask them to paste the smiley sticker to show the data as 1 smiley sticker = 5 students.
Ask the students to arrange the mode of transport used in increasing order.
Students will be able to read and draw bar graphs.
Chart papers; Building blocks
Activity
Ask each student to tell you the number of hours he/she spends playing outside every day. Draw a table on the board as given to show this data.
Ask the students to work in groups. Distribute building blocks and chart paper to each group.
Instruct the groups to draw the axes and write the title, label and scale on the chart paper. Next, ask them to create a bar graph to show the data by stacking the blocks, where each colour represents a specific time frame, like 1 hour, 2 hours, 3 hours or 4 hours and each block represents 5 students. Explain that the height of each stack corresponds to the number of students that spend that many hours playing outside.
Instruct the students to draw the bar graph in their notebooks. Ask questions like, “How many students spend 3 hours playing outside? What is the maximum number of hours spent playing outside in a day? If student A spends x hours in a day, how many hours will he spend playing outside in a week?”
Ask: How will the number of blocks you stack change if you take the key as 1 block = 20 students?
Say: If you take 1 block = 20 students as the key, the number of blocks that you stack will reduce to one-fourth.
1. Organising Data as Tally Marks
Do It Together
3. Drawing Bar Graphs
Do It Together
2. Pictographs
Do It Together
1. 480
2. Saturday, 800
3. Tuesday, 320
4. 41 × 80 = 3280
4. Interpreting Bar Graphs
Do It Together
1. March, 50 cm
2. 130 cm
3. 140 cm – 90 cm = 50 cm
Students will be able to: find the perimeter of plane shapes by adding the lengths of sides. find the perimeter of regular shapes by using formulas. find the area of regular and irregular shapes on graph or squared paper. find the area of squares and rectangles using the formula. find the area of triangles using the formula. find the area and perimeter of combined shapes. solve word problems on finding the perimeter and area of shapes and figures.
C-3.4: Understands the definition and formula for the area of a square or rectangle as length times breadth
C-3.5: Devises strategies for estimating the distance, length, time, perimeter (for regular and irregular shapes), area (for regular and irregular shapes), weight, and volume and verifies the same using standard units
C-3.6: Deduces that shapes having equal areas can have different perimeters and shapes having equal perimeters can have different areas
Let’s Recall
Recap to check if students know how to find the perimeter of a shape using a grid. Ask students to solve the questions given in the Let’s Warm-up section.
Vocabulary
plane figures: shapes that can be drawn on paper regular shapes: plane figures in which all the sides are equal combined shapes: combinations of more than one plane figure
Cutouts of polygons; Ribbon; Cutouts of regular polygons; Cutouts of rectangles; String; Marker; Ruler; Shape drawn on squared paper; Sheets of squared paper; Crayons; Leaves; Square and rectangle paper cutouts; Small square stickers; Rectangle paper cutouts with one diagonal marked with a dotted line; Scissors; Squared paper cutouts; Word problem sheets
Imagine Maths Page 178
Students will be able to find the perimeter of plane shapes by adding the lengths of sides.
Teaching Aids
Cutouts of polygons; Ribbons
Activity
Show the students an object with a border, such as a photo frame, and ask them how to determine how much ribbon would be required to cover its border. Explain to them that we would have to measure the lengths of all the sides and add them.
Ask the students to work in pairs. Provide each pair with some ribbon and a cutout of a polygon.
Instruct them to design a card using the cutout by adding a ribbon border. Ask them to determine the total length of ribbon that will be required for the border by first measuring the length of each side of the polygon cutout and noting down the measures in their notebooks; and then adding the lengths to find the perimeter of their cutouts.
Extension Idea
Instruct: The perimeter of a pentagon is 84 cm. Three sides measure 12 cm, 15 cm and 25 cm. The remaining two sides are equal. Determine the length of these two equal sides.
Say: The total length of the two remaining sides is 84 – (12 + 15 + 25), which equals 32. Therefore, each of the remaining sides measures 16 cm.
Students will be able to find the perimeter of regular shapes by using formulas.
Cutouts of regular polygons; Cutout of rectangles; String; Marker; Ruler Activity
Imagine Maths Page 179
Ask the students to work in groups. Distribute 3 cutouts of regular polygons, 1 cutout of a rectangle and string to each group.
Instruct each student in the group to take one shape. Using the string and ruler, have them measure the length of the boundary of each shape. Ask them to record the measure in their notebooks. Next, instruct the students to try forming a rule or formula that will help them find the perimeter of each shape quickly. Ask them to discuss in their groups the differences between the perimeter of polygons with equal sides and the perimeter of a rectangle. For example, in a regular polygon that has 5 sides, each measuring 10 cm, the perimeter will be 10 + 10 + 10 + 10 + 10 = 5 × 10 = 50 cm, whereas in case of a rectangle with sides measuring 5 cm and 10 cm, the perimeter will be 10 + 5 + 10 + 5 = 2 × (10 + 5) = 2 × 15 = 30 cm. Give them the length of the sides of 2–3 regular polygons and ask them to find the perimeter in their notebooks.
Ask: If a regular shape with 17 sides has a perimeter of 357 cm, what is the measure of each side?
Say: The measure of each side is 357 ÷ 17 = 21 cm.
Imagine Maths Page 182
Students will be able to find the area of regular and irregular shapes on graph or squared paper.
Shape drawn on squared paper; Sheets of squared paper; Crayons; Leaves
Activity
Begin by showing the students a shape drawn on squared paper. Explain that since 5 squares are fully shaded or filled, the area of the shape is 5 sq. units.
Ask the students to work in pairs. Distribute a sheet of squared paper, a leaf and crayons to each pair. Instruct the pairs to place a leaf on the squared paper and draw its outline. Ask them to colour their drawing using crayons, assigning different colours for fully filled, half-filled, more than half-filled, and less than half-filled squares. Instruct them to count each square that is more than half-filled as 1 square, count two half-filled squares as 1 square and do not count the less than half squares. Ask them to record the number of squares for each category in their notebooks. Then, instruct them to find the total area of the shape using the information obtained about the squares corresponding to each category.
Ask questions like, “Why do you think we do not consider the less than half-filled squares while finding the area?”
Students will be able to find the area of squares and rectangles using the formula.
Square and rectangle paper cutouts; Small square stickers
Activity
Distribute the square and rectangle paper cutouts to the students along with some stickers. Ask the students to work in pairs. Instruct them to fill the shapes using the stickers. Then, ask them to count the total number of stickers used for each shape and record it in their notebooks.
Next, ask the students to count the stickers in a row for the length and in a column for the breadth of the shape and record these in their notebooks. They should then multiply the number of stickers along the length and breadth. Guide them to verify how are the areas obtained by both methods related. Ask them to write a formula for the area of both shapes based on their finding.
Ask question like, “Why do you think we multiply the same length by itself for a square but multiply different lengths for a rectangle?”
Give the students more problems to solve using the formula.
Extension Idea
Ask: The area of a square field is 100 sq. m. The owner wants to fence this field. The cost of fencing for 10 m is ₹500. How much would it cost to fence the entire field?
Say: As the area is 100 sq. m., the measure of each side is 10 m. So, the cost to fence the entire field would be ₹500 × 4 = ₹2000.
Learning Outcomes
Find the area of triangles using the formula.
Teaching Aids
Rectangle paper cutouts with one diagonal marked with a dotted line; Scissors
Activity
Imagine Maths Page 185
Ask the students to work in pairs. Distribute the rectangle paper cutouts and scissors to each pair. Instruct the students to measure the length of the sides of the rectangle and find the area. They will then cut the rectangles along the dotted lines to get 2 triangles. Ask them to place one triangle over the other to ensure that they overlap. Discuss with them that the area of each triangle is half the area of the rectangle. Ask them to write the formula for the area of a triangle using the formula for the area of a rectangle.
Ask questions like, “Which lengths in a rectangle and a triangle equal? What are the lengths needed in a triangle to find its area?”
Extension Idea
Ask: The area of a triangle doubles when the height of the triangle is doubled? Justify the statement with an example.
Say: The statement is true. Area of a triangle = 1 2 � Height � Base. When height is doubled, Area of the triangle = 1 2 � 2 � Height � Base = B � H.
For example, H = 25 cm, B = 20 cm. A = 250 sq. cm. H = 50 cm, B = 20 cm, A = 500 sq. cm.
Students will be able to find the area and perimeter of combined shapes.
Teaching Aids
Squared paper cutouts
Activity
Imagine Maths Page 186
Ask the students to work in pairs. Distribute squared paper cutouts to each student. Instruct each pair to cut out the squared cutouts into smaller squares or rectangles and put them together to form a combined shape. Ask them to work together to find the perimeter of their combined shape by counting the number of squares along each side and adding the lengths of all the sides.
When they are done, ask the students to count the total number of squares inside their combined shapes (representing the area) and record the counts in their notebooks. Then, instruct them to find the areas of the individual shapes in the combined shapes and write the total area in their notebooks. Ask them to verify the value with the area obtained earlier and check whether they are the same.
Students will be able to solve word problems on finding the perimeter and area of shapes and figures.
Word problem sheets
Activity
Give each student a sheet of squared paper and a sheet with a word problem, such as: A playground is divided into two rectangular areas. The first section measures 25 metres by 20 metres, and the second section has dimensions of 15 metres by 10 metres. If the cost of planting grass is ₹50 per m2, what is the total cost of planting grass in the playground? How much fencing is needed for the two sections?
Instruct the students to use the CUBES strategy by circling the numbers, underlining the question, boxing the key words, evaluating and solving the problem. Ask them to solve the problem in their notebooks.
Extension Idea
Instruct: Create a problem that requires finding the combined area of a triangle and a square sharing the same base. Say: A sample problem is: Aman is planning a garden area. He wants to have a square patch of grass with an equilateral triangular flower bed next to it. The side of the square patch is 5 metres, and the height of the triangle is 4.3 cm. Find the total area
Do It Together
1. Perimeter
= 7 cm + 5 cm + 6 cm + 2 cm
= 20 cm
2. Perimeter
= 6 m + 2 m + 2 m + 6 m + 3 m
= 19 m
3. Perimeter
= 9 cm + 5 cm + 5 cm + 11 cm + 6 cm
= 36 cm
Think and Tell
The perimeter of a regular octagon with sides of 7 cm will be 8 × 7 cm = 56 cm.
Do It Together
1. Regular Hexagon
Number of sides = 6
Perimeter = 6 × 6 cm = 36 cm
2. Equilateral Triangle
Number of sides = 3
Perimeter = 3 × 6 cm = 18 cm
Do It Together
Length of the side of heptagon = 8 m
Perimeter of heptagon = 7 × 8 m = 56 m
Length of rectangle = 15 m
Perimeter of rectangle = Perimeter of heptagon
2 × (L + B) = 56
B = 56 2 – L; B = 28 – 15 = 13 m
Hence, the breadth of the rectangle is 13 m.
Do It Together
1. Fully filled squares = 33
Half-filled squares = 5
More than half-filled squares = 10
Less than half-filled squares = 3
Area = 33 + 5 × 1 2 + 10 = 45 1 2 sq. units
2. Fully filled squares = 30
Half-filled squares = 0
More than half-filled squares = 14
Less than half-filled squares = 10
Area = 44 sq. units
3. Fully filled squares = 5
Half-filled squares = 2
More than half-filled squares = 12
Less than half-filled squares = 8
Area = 18 sq. units
.
Think and Tell
Yes.
Do It Together
Width of the room = 5 m; Length of the room = 6 m
Area of the room = Length × Breadth = 6 × 5 = 30 sq. m
Width of the rectangular tile = 0.2 m
Length of the rectangular tile = 0.3 m
Area of one tile = Length × Breadth = 0.3 × 0.2 = 0.06 sq. m
Number of tiles required = Area of the room Area of one tile = 500
Thus, the number of tiles required is 500
Do It Together
Height of the triangle = 6 cm
Length of base = 11 cm
Area = 1 2 × 6 × 11 = 33 square cm
7. Area and Perimeter of Combined Shapes
Do It Together
We split the shape into parts. Name them and find the missing dimensions.
Area of part A = l × b = 5 × 3 = 15 sq. cm
Area of part B = l × b = 2 × 6 = 12 sq. cm
Area of the figure = 15 + 12 = 27 sq. cm
Perimeter of the figure = 5 + 3 + 2 + 6 + 7 + 3 = 26 cm.
8. Word Problems on Perimeter and Area
Do It Together
Cost of installing a border around the rectangular crop field = ₹5200
Width = 8 m; Rate of installing the border = ₹130 per metre
Total cost of installing the border = Perimeter × Rate of installing the border per metre
Perimeter = Total cost of installing the border ÷ Rate of installing the border per metre
Perimeter = ₹5200 ÷ ₹130 = 40 metres
Perimeter = 2 × (Length + Breadth)
Length + Breadth = Perimeter ÷ 2
Length = (Perimeter ÷ 2) − Breadth
Length = 20 − 8 = 12 metres
Area = Length × Breadth = 12 × 8 = 96 square metres
Students will be able to: identify or form the rule of a pattern using variables and use it to find the nth term. use variables to write rules to deduce formulas for finding the perimeter or area of shapes. form algebraic expressions for given statements and solve them for the given value of variables. form algebraic equations for given statements. solve linear equations in one variable to find the value of the variable.
C-2.1: Understands equality between numerical expressions and learns to check arithmetical equations
C-2.2: Extends the representation of a number in the form of a variable or an algebraic expression using a variable
C-2.3: Forms algebraic expressions using variables, coefficients, and constants and manipulates them through basic operations
C-2.4: Poses and solves linear equations to find the value of an unknown, including to solve puzzles and word problems
C-2.5: Develops own methods to solve puzzles and problems using algebraic thinking
Let’s Recall
Recap to check if students know how to recognise and extend patterns. Ask students to solve the questions given in the Let’s Warm-up section.
pattern: an arrangement of shapes, lines, letters, numbers or colours that keep repeating polygon: a 2-D shape made up of 3 or more line segments
algebraic expression: a statement formed by meaningful combinations of variables, constants and operators linear equation: an equation in which the highest power of each variable is 1
Matchsticks; Sheet of paper with a table drawn on it; Toothpicks; Slips of paper with statements written on them; Two sets of index cards (one set with statements and the other set with the corresponding algebraic equations); Index cards (with a linear equation in one variable)
Number Patterns
Learning Outcomes
Imagine Maths Page 196
Students will be able to identify or form the rule of a pattern using variables and use it to find the nth term.
Teaching Aids
Matchsticks; Sheet of paper with a table drawn on it
Activity
Begin with a discussion about patterns in everyday life. Write a simple pattern on the board, for example, 5, 7, 9, 11 …
Ask the students to find the rule of the pattern. Discuss how to find the rule. Explain that the rule is 2 times the term number added to 3 and that this rule will help find any term of the pattern. So, the nth term is 2n + 3.
Ask the students to work in groups.
Distribute matchsticks and the sheets with the following table drawn on them.
Shape Number 1 2 3 4 5
Number of Sticks Required 5 9 13 Rule
Number of sticks required =
Instruct each group to use matchsticks to form the pattern as shown in the table. Let them form at least 5 terms of the pattern. After forming the shapes, ask each group to discuss among themselves to identify the rule of the pattern and write the rule on the sheet.
Allow the students to show one more pattern with matchsticks and identify the rule.
Extension Idea
Instruct: Consider (3, 6), (5, 10), (7, 14). Identify the rule that describes how to get the second number from the first number in every ordered pair.
Say: In each pair, the pattern is: [2 × 1 + 1, 2 × (2 × 1 + 1)] = (3, 6); [2 × 2 + 1, 2 × (2 × 2 + 1) = (5, 10) and [2 × 3 + 1, 2 × (2 × 3 + 1)] = (7, 14). So, the rule is [2n + 1, 2 × (2n + 1)].
Imagine Maths Page 197
Students will be able to use variables to write rules to deduce formulas for finding the perimeter or area of shapes.
Teaching Aids
Toothpicks
Activity
Say: Consider a square with sides measuring x. To find the perimeter, we just multiply the number of sides by the length, i.e., 4 × x, and for the area, we multiply the lengths of two sides, i.e., x × x.
Ask the students to work in pairs. Distribute a set of toothpicks to each pair.
Instruct them to form polygons using toothpicks and write down the number of sides (which are all equal) for each polygon in their notebooks. Then, ask them to assign a variable, let us say x, as the length of one toothpick, calculate the perimeter of each polygon and write the results in their notebooks. Guide them to use the toothpicks to create squares and rectangles, using x as the length of one toothpick. Instruct them to calculate the area of each square and rectangle.
Ask questions like, “Is there a connection between the side length and the number of toothpicks?”
Students will be able to form algebraic expressions for given statements and solve them for the given value of variables.
Slips of paper with statements written on them
Activity
Write a statement on the board, such as, “3 less than the perimeter of a square of side ‘a’”. Discuss the algebraic expression for this statement, which is 4a – 3. Write the expression on the board. Explain to the students that 4 is the coefficient of a, a is the variable, 3 is a constant and 4a and 3 are the terms of the expression.
Divide the class into groups. Distribute the slips of paper with statements written on them.
2 more than 4 times m 7 less than 5 times a number 8 times a number decreased by 32
Instruct the students to write the algebraic expressions for the statements written on their slips, for example, 4m + 2.
Ask the students to find the value of the algebraic expressions for any given values of the variables.
Extension Idea
Ask: For the statement, “3 less than 4 times a number is equal to 13”, a student wrote the equation 3a – 4 = 13. Was his response accurate? If not, what is the correct equation for the statement?
Say: His response was not correct. The correct equation is 4a – 3 = 13.
Students will be able to form algebraic equations for given statements.
Two sets of index cards (one set with statements and the other set with the corresponding algebraic equations) Activity
Write a statement on the board, such as, “4 more than 4 times ‘a’ is twice of 8”. Discuss the algebraic equation for this statement, which is 4 + 4a = 16.
Explain that 4 + 4a is the LHS and 16 is the RHS and the highest power of a in the equation is 1, so this is a linear equation.
Divide the class into 2 equal groups.
Give one group the set of index cards containing written statements, such as “5 times m less than 10 is 5”.
Give the other group the set of index cards containing the corresponding algebraic expressions for the statements, such as 10 – 5m = 5. Ensure that both sets of cards are thoroughly shuffled.
Instruct the first group to write the algebraic equations for their statements and the second group to write the possible statements for their equations.
Instruct the student look for a student from the other group who has a card that matches their work.
Students will be able to solve linear equations in one variable to find the value of the variable.
Index cards (with a linear equation in one variable)
Activity
Write a statement on the board, such as, “If a number is tripled, its result is 30.”
Discuss with the class how, if the number is n, then 3n = 30 ⇒ n = 30 ÷ 3 ⇒ n = 10.
Ask the students to work in pairs. Give each pair an index card with a linear equation in one variable written on it. Instruct one student in each pair to use the trial and error method to find a solution and the other student to use the transposition method to solve the equation. Ask them to write the solutions in their notebooks.
When they are done, ask the pairs to compare and cross-verify their solutions. Ask, “Which do you think is easier: the trial and error method or the transposition method?”
Extension Idea
Instruct: Find the number if 15 added to three times the number results in 45.
Say: Let the number be x. As 15 + 3x = 45, using the transposition method, we get
⇒ x = 10.
1. Number Patterns
Think and Tell
There will be 10 × 3 = 30 seats in the tenth row.
Do It Together
Number of Sticks Required 5 10 15 20 25 75
Rule Number of sticks required = n × 5
2. Rules in Patterns
Do It Together
Perimeter of a regular pentagon = sum of the lengths of all its sides
So, P = a + a + a + a + a = 5 × a = 5a
Thus, we get the rule for the perimeter of a regular pentagon as 5a.
3. Forming Algebraic Expressions
Do It Together
Let Anil’s age be x years.
So, the age of Anil’s mother = 3x – 2 years.
4. Solving Algebraic Expressions
Do It Together
1. 4a(b + c)
= (4 × 6) (1 + 3)
= 24 × 4 = 96
5. Forming Algebraic Equations
Do It Together
Let the number be z.
Adding 3 to 4 times this number can be written algebraically as 4z + 3
So, the required equation is 4z + 3 = 21.
6. Solving Linear Equations in One Variable
Do It Together
Let Sonal have x number of friends.
Number of balloons distributed among friends = 5x.
She has 3 balloons left. But the total number of balloons is 33. So, the equation that satisfies the condition is 5
Therefore, Sonal has 6 friends.
Students will be able to: represent a ratio in the form a:b, a b or a to b. reduce a given ratio to its simplest form. find equivalent ratios for a given ratio. check whether 4 terms are in proportion. solve word problems on the unitary method.
C-1.6: Explores and applies fractions (both as ratios and in decimal form) in daily-life situations
Let’s Recall
Recap to check if students know about fractions and their types. Ask students to solve the questions given in the Let’s Warm-up section.
Vocabulary
ratio: a relation or comparison between numbers equivalent: equal in value
Colour buttons (red, blue, green and yellow); Index cards (with ratios written on them); Marbles in two different colours; Cotton balls; Ice cream sticks; Chart paper; Red and blue ribbons; Ruler; Scissors; Crayon box; Pencil box, Tiffin box; Water bottle; Price tags
Learning Outcomes
Students will be able to represent a ratio in the form a:b, a b or a to b.
Teaching Aids
Colour buttons (red, blue, green and yellow)
Activity
Begin by explaining what a ratio is and give an example. Place some number cards on the table. Distribute coloured buttons to each pair.
Ask the students to pick one colour button and find the ratio of that colour button to the total number of buttons. Instruct the students to write down the ratio in their notebook.
Then, ask the students to find the ratio of red colour button to blue button. Ask, “How will the ratio change when the number of red buttons is increased?”
Extension Idea
Ask: A wall has a width of 5 m. The ratio of the width of a window on the wall to that of the wall is 2:5. What is the width of the window?
Say: As the ratio is 2:5, the width of the window is 2 m.
Learning Outcomes
Students will be able to reduce a given ratio to its simplest form.
Teaching Aids
Index cards (with ratios written on them); Marbles in two different colours
Activity
Ask the students to work in groups. Distribute index cards with a ratio written (example: 12:15) and marbles to each group.
Instruct them to use marbles of two different colours to represent the ratio (example: 12 red marbles and 15 blue marbles to show 12:15). Next, ask them to divide each set of marbles into the same number of groups. For example: The 12 red and 15 blue marbles can be divided into 3 groups each to get 4 red marbles in each group and 5 blue marbles in each group. Ask them to count the number of marbles in each group and write the new ratio. Explain that the number of marbles in each group for each colour gives the simplest form, 4:5, of the given ratio, which can be written as 4/5. Ask the students to write the ratio in the simplest form in their notebooks. Discuss how to divide the numerator and denominator by their HCF to find the simplest form. Ask questions like, “Why do you think it is important to simplify a ratio?”
Extension Idea
Ask: Can you divide 50 marbles into two cups in the ratio 3:7? How many marbles will there be in each cup? Say: Yes, we can divide 50 marbles into two cups in the ratio 3:7. There will be 15 marbles in one cup and 35 in the other.
Learning Outcomes
Students will be able to find equivalent ratios for a given ratio.
Teaching Aids
Cotton balls; Ice cream sticks; Chart paper
Activity
Ask the students to work in groups. Distribute the cotton balls, ice cream sticks to each group. Instruct them to place 4 ice cream sticks and 8 cotton balls together. Then place 3 ice cream sticks and 6 cotton balls together. Finally they write the ratios for both groups. Instruct them to bring down the ratios to their simplest form. Explain that when the simplest form of two or more ratios is the same, they are known as equivalent ratios. Ask them to take away 1 ice-cream stick and 2 cotton balls for each ice-cream stick taken away, from the 2 sets.
Ask: What do you notice about the ice cream sticks and cotton balls left in both sets?
Proportion and Their Applications
Learning Outcomes
Students will be able to check whether 4 terms are in proportion.
Teaching Aids
Red and blue ribbons; Ruler; Scissors
Activity
Imagine Maths Page 219
Ask the students to work in groups. Distribute red and blue ribbons, a ruler and a scissors to each group. Instruct the groups to cut red ribbons of lengths 2 cm and 6 cm, and then to cut a blue ribbon of length 3 cm. Then, ask them to think and cut another length of blue ribbon such that the ratio of the 2 cm red ribbon to the 3 cm blue ribbon is equivalent to the ratio of the 6 cm red ribbon to the length of blue ribbon they cut. Once they cut the blue ribbon, ask them to note down the ratios in their notebooks. Discuss the sign of proportion and the terms. Instruct the students to use the formula and find the correct length of the blue ribbon in their notebooks.
Then, ask them to find the length of the red ribbon if a third blue ribbon is 15 cm long and write the answer in their notebooks.
Extension Idea
Ask: Do the ratios 25 cm to 1 m 50 cm and 30 seconds to 2 minutes 30 seconds form a proportion?
Say: The ratio of 25 cm to 1 m 50 cm is 25:150 = 1:6. The ratio of 30 seconds to 2 minutes 30 seconds is 30:150 = 1:5. So, the ratios are not in proportion.
Students will be able to solve word problems on the unitary method.
Crayon box; Pencil box, Tiffin box; Water bottle; Price tags
Activity
Box of 6 crayons with price tag of ₹60; Pencil box with price tag of ₹80; Tiffin box with price tag of ₹250; Water bottle with price tag of ₹100


Set up the things with the price tag on the table. Divide the class into groups. Ask each group to come forward and buy any 2 items in any quantity.
Ask the students to find the cost of the items and also the total cost of items in the notebook.
Ask all the groups to come forward and share the cost of the items that they chose and the total cost of the items that they had bought.
Ask, “What is the cost of 1 crayon? What is the cost of 6 water bottles?”
Extension Idea
Instruct: Create your own word problem based on unitary method. Say: There can be many such problems. One could be: Rahul purchased 15 kg of oranges for ₹600. How much will 4 kg of oranges cost?
1. Introducing Ratios
Do It Together
1. Number of red balls = 4; Number of white balls = 9
The ratio of the number of red balls to the number of white balls = 4:9
2. Number of black balls = 5; Total number of balls = 20
The ratio of the number of black balls to the total number of balls = 5:20
2. Ratio in Simplest Form
Do It Together
1 year 8 months = 12 months + 8 months = 20 months
The required ratio = 20 months : 5 months = 20 5 = 4 1
The ratio of 1 year 8 months to 5 months is 20:5 or 4:1.
3. Equivalent Ratios
Think and Tell
A ratio can have infinite equivalent ratios.
Do It Together
Number of parts given to group A = 5 out of 9 parts = 5 9
Number of parts given to group B = 4 out of 9 parts = 4 9
Number of chocolates given to group A = 5 9 × 90 = 50 chocolates
Number of chocolates given to group B = 4 9 × 90 = 40 chocolates
4. Introducing Proportion
Do It Together
Mansi’s weight = 25 kg; Mother’s weight = 60 kg
Ratio of Mansi’s weight to mother’s weight = 25:60 = 25 60 = 5 12
Ramesh’s weight = 30 kg; Father’s weight = 75 kg
Ratio of Ramesh’s weight to father’s weight = 30:75 = 30 75 = 2 5
Hence, the given weights are not proportion.
5. Proportional Terms
Do It Together
Let the number of cups of flour required be x.
Using proportion, 3:x::2:16
Therefore, x × 2 = 3 × 16 ⇒ 2x = 48 ⇒ x = 48 2 = 24
Hence, 24 cups of flour are required to make 16 dozen cookies.
6. Continued Proportion
Do It Together
7:14::14:x 7 × x = 14 × 14 ⇒ 7x = 196 ⇒ x = 28
So, the third term is 28
7. Unitary Method
Do It Together
Cost of 15 litres of paint A = ₹750
Cost of 1 litre of paint A = 750 15 = ₹50
Cost of 20 litres of paint B = ₹900
Cost of 1 litre of paint B = 900 20 = ₹45
Hence, paint B will be cheaper than paint A.
Students will be able to: draw lines of symmetry in given shapes or figures. draw the reflection of a shape or figure on squared paper. determine the angle through which a shape or figure rotates to show rotational symmetry.
C-2.3: Recognises and creates symmetry (reflection, rotation) in familiar 2D and 3D shapes
Let’s Recall
Recap to check if students know what symmetrical and non-symmetrical shapes are. Ask students to solve the questions given in the Let’s Warm-up section.
Vocabulary
line of symmetry: a line that divides a shape into equal and identical halves reflection: an image of the original formed in the mirror rotational symmetry: property of a shape where the shape appears unchanged when rotated by a specific angle
order of symmetry: number of positions in which a figure can be rotated and still appears exactly as it did before the rotation
Picture cards with figures having 0, 1 or more lines of symmetry; Sheets of paper; Shape cards with shapes/designs having 1 line of symmetry; Mirror; Squared paper with half shapes drawn; Shape cards with shapes/designs having 2/3/4 angles of rotation
Students will be able to draw lines of symmetry in given shapes or figures.
Teaching Aids
Picture cards with figures having 0, 1 or more lines of symmetry; Sheets of paper
Activity
Ask the students to work in groups of 3. Distribute picture cards and sheets of paper to each group.
Instruct the groups to fold the picture cards to identify the lines of symmetry in them and then draw lines of symmetry on each card for the shapes/designs drawn. Ask them about the similarities and differences in these shapes/designs.
Ask if there can be designs that have no lines of symmetry or infinite lines of symmetry. Instruct them to verify their answers by creating designs on a sheet of paper that have 0, 1 or more than 1 line of symmetry. Instruct them to exchange their designs with another group and compare the lines of symmetry.
Extension Idea
Ask: How many lines of symmetry does the cross section of a lemon have?
Say: The cross section of a lemon is a circle, so it has infinite lines of symmetry.
Learning Outcomes
Students will be able to draw the reflection of a shape or figure on squared paper.
Teaching Aids
Shape cards with shapes/designs having 1 line of symmetry; Mirror; Squared paper with half shapes drawn
Activity
Instruct each student the day before to bring a plane mirror to the class.
Ask the students to work in groups. Distribute 2–3 cards with different shapes/designs having 1 line of symmetry to each group.

Instruct the groups to place the shape cards on a piece of paper one by one and draw a vertical line on the right for each card. Guide them to place the mirror along the line such that the given shape is reflected in it.
Ask them to observe and draw the reflected shape in their notebooks and compare the two shapes to tell if they are symmetrical.
Ask questions like, “Is the image in the mirror the same shape and size as the original figure? Is it at an equal distance from the mirror line as the original?”
Distribute a sheet of squared paper with half a shape drawn on it to each group. Ask the students to complete the shape by drawing its other half on the squared paper itself. Ask them to exchange sheets with other groups for peer review. Help them generalise that in all cases of mirror symmetry, there is a line of symmetry along which the mirror symmetry is shown.
Extension Idea
Ask: What are the first 5 letters of the English alphabet that appear to be the same as their reflections in the mirror?
Say: A, H, I, M and O are the first 5 letters of the English alphabet that appear to be the same as their reflections.
Students will be able to determine the angle through which a shape or figure rotates to show rotational symmetry.
Teaching Aids
Shape cards with shapes/designs having 2/3/4 angles of rotation
Activity
Ask the students to work in groups. Distribute 2–3 cards with different shapes/designs having 2/3/4 angles of rotation to each group.
Instruct the groups to rotate the shape cards around the fixed point, so that the rotated figure should look exactly same as the figure before rotation. Ask them to observe that different shapes have different number of rotations.
Ask the students to count the number of positions through which the figure can be rotated and appear the same as before the rotation. Discuss in class the centre of rotation and the angle of rotational symmetry in different shapes/designs.
Instruct them to exchange their designs with another group and find angle of symmetry and order of symmetry.
Extension Idea
Ask: What is the relationship between angle of symmetry and rotational symmetry?
Say: Angle of symmetry × Order of symmetry = 360°
Think and Tell
We can draw a line of symmetry exactly at the centre of a line segment.
Think and Tell
A parallelogram is asymmetrical since it cannot be divided into two identical halves by a straight line.
Do It Together Lines of symmetry = 5 Lines of symmetry = Lines of symmetry = Lines of symmetry =
2. Symmetry in Designs or Figures
Do It Together
Think and Tell
The word “AMBULANCE” is written in the form of its mirror image so that drivers in vehicle ahead can view it in their mirror and instantly identify the word as “AMBULANCE” giving way in an emergency.
Do It Together
Think and Tell
The angles of symmetry of a wheel are infinite. Do It Together
Number of angles of symmetry = 6
Angles
1
Students will be able to:
construct a line segment and the copy of a given line segment using a compass.
construct 2-D shapes and figures using a compass. construct a perpendicular using a compass.
draw angles of given measures using a protractor.
construct an angle bisector using a compass.
construct angles of 60°, 120° and 30° using a compass.
C-3.4: Draws and constructs geometric shapes, such as lines, parallel lines, perpendicular lines, angles, and simple triangles, with specified properties using a compass and a straightedge
Let’s Recall
Recap to check if students know the basics of line segments and angles. Ask students to solve the questions given in the Let’s Warm-up section.
Vocabulary
perpendicular: two lines that intersect at a right angle, forming a 90° angle perpendicular bisector: a perpendicular that divides a line segment into two equal parts angle bisector: a line or ray that divides an angle into two equal angles
Straws; String; Ruler; Compass; Pencil; Picture cards figures made with 2 shapes like a house or a tree; Chart paper; Colour pencils; Sheets of paper; Protractor
Learning Outcomes
Students will be able to construct a line segment and the copy of a given line segment using a compass.
Teaching Aids
Straws; String; Ruler; Compass; Pencil
Activity
Ask the students to work in pairs. Distribute a straw and a length of string to each pair.
Instruct the pairs to cut the straw such that it has a length of 6.3 cm. Ask them to use the string to check the length. Then ask them to make a copy of the straw by placing it on paper and drawing a line along it.
Instruct the students to read the steps of construction of a line segment and its copy from the Imagine Mathematics book. Ask each student to draw a line segment of any length in their partner’s notebook and then use a compass to construct a copy of the line segment drawn by their partner below it.
Ask questions like, “How do you know that the line segment and its copy have the same length?”
Extension Idea
Ask: How will you construct a line segment equal to the sum of two lengths?
Say: First, you will copy the length of the first line segment. Then, from the end point of this line segment, you will draw a line segment of the second length.
Learning Outcomes
Student will be able to construct 2-D shapes and figures using a compass.
Teaching Aids
Imagine Maths Page 245
Picture cards figures made with 2 shapes like a house or a tree; Chart paper; Pencil; Compass; Colour pencils
Activity
Ask the students to work in pairs. Distribute one picture card to each pair. Ask the students to identify the shapes in the picture card. Ask them to start making a copy of shapes one by one. For example, if the picture is a house made of a triangle and a square, ask the students to first copy the line segments of the square and then the triangle.
Ask the students to colour the picture on the chart paper.
Ask questions like, “What type of shapes/figures cannot be constructed using compass?”
Extension Idea
Ask: How will you construct a curve or an arc in a figure?
Say: Draw a line segment and mark the centre points above or below the line segment. Taking the points as centre, draw an arc.
Learning
Students will be able to construct a perpendicular using a compass.
Teaching Aids
Straws; Ruler; Compass; Pencil; String; Sheets of paper Activity
Introduce the concept of a perpendicular.
Imagine Maths Page 249
Ask the students to work in pairs. Provide each pair with 2 straws, some string, a pencil, and a sheet of paper. Give them a specific length, say 4.3 cm. Ask them to cut one straw to the given length and affix it to the sheet of paper horizontally. They should tie one end of a length of string to a pencil. Then, with the other end fixed to any point on the straw, they should stretch the string and move the pencil to draw arcs cutting the straw at 2 points, marking the two points. Next, ask them to take a longer piece of string, tie one end to the pencil, place the other end on one of the two points marked on the straw and draw an arc above the straw. They should repeat this by holding one end of the string on the other point marked on the straw. The two arcs will intersect at a point. Instruct the students to connect the initial arc’s centre to the intersection point and paste the second straw vertically along this line. This will help students understand the concept of constructing a perpendicular.
Ask the students to read the steps of construction of a perpendicular in their Imagine Maths books and then use a compass to construct a perpendicular in their notebooks.
Learning
Students will be able to draw angles of given measures using a protractor.
Teaching Aids
Protractor; Ruler
Activity
Begin the class by discussing angles and how to measure them using a protractor. Ask the students to form pairs. Provide each student with a protractor and ruler.
Instruct the students to draw a line segment in their notebooks and label it as PQ. Ask them to use the protractor to draw angles of 45° and 57° from points P and Q, respectively, and extend them to meet at a point. Then, ask them to measure the third angle of the triangle formed. Finally, ask them to exchange notebooks to measure the angles drawn by their partners and check if the angle measure is correct.
Extension Idea
Ask: Using a protractor that measures up to 180°, how can you draw an angle of 200°?
Say: To begin drawing 200°, we will first subtract 180 from 200. 200° − 180° = 20°. Then, we will draw a 20° angle and mark the reflex angle.
Students will be able to construct an angle bisector using a compass.
Teaching Aids
String; Sheets of paper; Compass; Ruler; Protractor; Pencil
Activity
Begin the class by discussing examples of using angle bisectors in real life such as to divide a slice of pizza to share equally with a friend. Explain that the imaginary line from the edge of the slice to the centre dividing it into 2 equal parts is like an angle bisector.
Ask the students to work in pairs. Distribute the teaching aids.
Instruct the students to use the protractor to draw an angle of 80° on the sheet of paper. Ask them to tie a pencil to one end of the string and place the other end on the vertex of the angle drawn; then, stretch the string and draw an arc cutting the arms of the angle. From the points where the arcs cut the arms, instruct them to draw two more arcs cutting each other and draw a line segment joining the intersection point to the vertex of the angle. Ask them to measure the angles formed.
Instruct the students to use the same method of constructing an angle bisector using a compass.
Extension Idea
Draw a triangle and angle bisectors to the three angles in the triangle on the board.
Ask: What do you notice about the angle bisectors drawn to the three angles in the triangle?
Say: The angle bisectors meet at one point in the centre of the triangle.
Students will be able to construct angles of 60°, 120° and 30° using a compass.
Teaching Aids
Protractor; Compass; Ruler
Activity
Ask the students to form pairs. Provide each student with a ruler, compass and protractor.
Instruct the students to use the protractor to draw a line segment AB of length 8 cm in their notebooks.
Ask them to read the steps of constructing 60°, 30° and 120° angles in their Imagine Maths books and use these steps to construct angles of 60° using a compass on points A and B (ensuring that the rays do not meet). Then, ask them to construct an angle bisector to the 60° angle created on point A to get the 30° angle.
Instruct them to use the 60° angle constructed on point B as the base to draw another 60° to get a 120° angle at point B.
Ask the students to exchange notebooks with their partners to check each other’s work.
1. Constructing a Copy of a Line Segment
Do It Together
2. Constructions of Shapes and Figures Do It Together
3. Constructing a Perpendicular Using a Compass Do It Together
4. Drawing Angles of Given Measures Do It Together
5. Constructing an Angle Bisector Do It Together
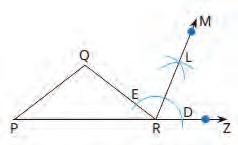
6. Constructing 60°, 120° and 30° Angles Do It Together
The Imagine Mathematics teacher manuals bridge the gap between abstract mathematics and real-world relevance, offering engaging activities, games and quizzes that inspire young minds to explore the beauty and power of mathematical thinking. These teacher manuals are designed to be indispensable companions for educators, providing well-structured guidance to make teaching mathematics both effective and enjoyable. With a focus on interactive and hands-on learning, the lessons in the manuals include teaching strategies that will ensure engaging lessons and foster critical thinking and problem-solving skills. The teaching aids and resources emphasise creating an enriched and enjoyable learning environment, ensuring that students not only grasp mathematical concepts but also develop a genuine interest in the subject.
• Alignment with Imagine Mathematics Content Book: Lesson plans and the topics in the learners’ books are in sync
• Learning Outcomes: Lessons designed as per clear, specific and measurable learning outcomes
• Alignment to NCF 2022-23: Lessons designed in accordance with NCF recommendations
• Built-in Recaps: Quick recall of pre-requisite concepts covered in each lesson
• Supporting Vocabulary: Systematic development of mathematical vocabulary and terminology
• Teaching Aids: Resources that the teachers may need to facilitate the lesson
• Activity: Concise and organised lesson plans that outline each activity
• Extension Ideas: Analytical opportunities upon delivery of each lesson
• Detailed Solutions: Solutions to all types of questions in the Imagine Mathematics Content Book
• Digital Assets: Access to supplementary interactive resources
Uolo partners with K-12 schools to provide technology-enabled learning programs. We believe that pedagogy and technology must come together to deliver scalable learning experiences that generate measurable outcomes. Uolo is trusted by over 15,000+ schools across India, Southeast Asia and the Middle East.
ISBN 978-81-984519-1-0
