
NEP 2020 based | Latest CBSE Curriculum Aligned

Windows 11 and LibreOffice

In today’s era of digital revolution, technology stands as the driving force, propelling our daily lives forward. It profoundly influences every facet of our existence, shaping the way we interact with one another, conduct our work, and engage in the process of learning. It is not merely a domain of technical expertise; rather, it represents an essential skill for individuals of all backgrounds.
Acknowledging this pivotal role of Information Technology, the National Education Policy (NEP), 2020 underscores the necessity of instilling practical IT competencies in school curricula, ensuring that students are well-prepared for the challenges of the 21st century.
On that note, Uolo is proud to present a two-book series dedicated to Information Technology (Subject Code 402), and meticulously designed for students of grades 9 and 10. This series goes beyond delivering theoretical knowledge as it also fosters the development of hands-on experience in IT skills.
These books are meticulously crafted to align seamlessly with the most up-to-date CBSE curriculum, presenting the material in a lucid manner. Within these pages, students will discover all the resources they need to excel in both theoretical and practical IT examinations.
Our books encompass all the prescribed CBSE learning objectives and introduce students to the foundational principles of digital documentation, spreadsheets, presentations, database management, and internet security. Moreover, these volumes incorporate units that nurture essential employability skills and vocational proficiencies among students.
We hope that this series becomes a trusted companion on your educational journey, empowering you to attain academic excellence and equipping you to seize the opportunities offered by the modern world.
Verbal Communication
Verbal communication is the process of transmitting ideas and information about thoughts, feelings, ideas, and messages to another person. Ideas and information can be expressed through the use of words. Verbal communication is a vital aspect of human interaction, enabling individuals to convey ideas, build relationships, and function effectively in both personal and professional settings.
Communication is the process of transmitting information from one individual or group to another, using various methods and media
People talk, write, or show visuals to communicate information about their ideas, thoughts, feelings, or send other messages to each other. Communication is a fundamental aspect of human interaction and is essential for acquiring knowledge and developing relationships.
We use verbal communication to tell stories, ask questions, and share thoughts. We also write down to explain or pass any information.
For example, when you talk to your friends, family, or teachers, you are using verbal communication to share what is on your mind.
Communication can be interpersonal, i.e., between two people: communal (within a group) or broadcast (one person to multiple people or groups).
Important points to aid memory and recall.
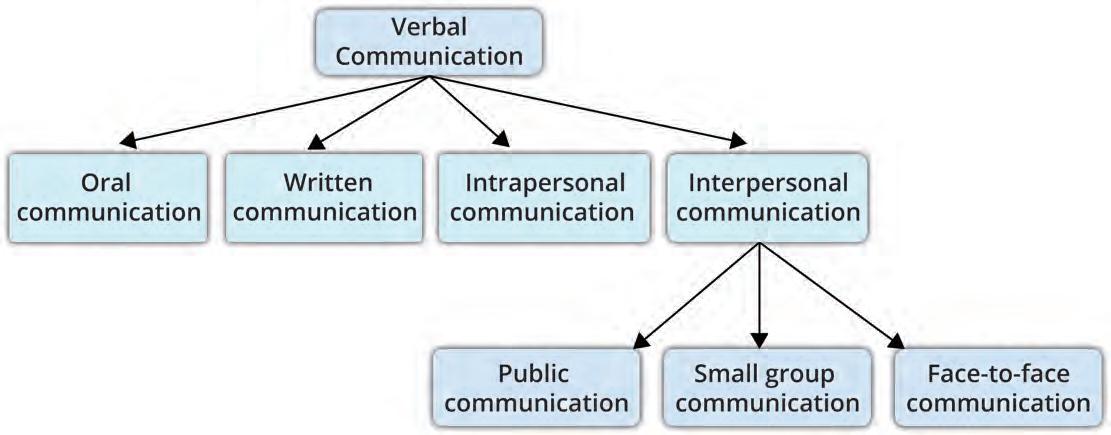
Verbal communication can be further divided into four major categories:
1. Oral communication
Good communication does not only mean sending a message, but also making sure others understand what is being said or shown.
2. Written communication
In this chapter, we will learn about the various types of communication, their functions, and their use in our daily lives.
• Non-specific feedback: It lacks details and fails to pinpoint areas for improvement, making it less actionable.
3. Intrapersonal communication
4. Interpersonal communication
It is a misconception that immediate feedback is always better. Effective feedback requires thoughtful interpretation and understanding.
Phrases A phrase is a group of words. Unlike sentences, phrases do not have both a subject and a predicate, so they do not express a complete thought on their own.
Three Forms of Communication Forms of Communication
Sentence: A sentence is a group of words that make complete sense on their own. It’s like thoughts captured in words.
Error Alert!
Declarative sentence: It is a sentence that states a fact or an argument and ends with a full stop (.).

Interrogative sentence: It is a sentence that asks a direct question. Interrogative sentences always end with a question mark (?).
Fun facts related to the topic, included to captivate students’ interest.

Verbal Non-Verbal Visual
Imperative sentence: Like declarative sentences, imperative sentences usually end with a full stop (.). Unlike declarations though, the subject (you) is understood and an imperative sentence makes a command or a request.


Talk! Talk! Talk! We always think that communication is only about a person talking, but for effective communication to happen, the other person needs to listen carefully also.
Exclamatory sentence: A sentence that expresses strong feelings like surprise, wonder, sorrow, or happiness. It is a complete statement that ends with an exclamation mark (!).
Transition words: Transition words, also known as linking words, are essential for creating smooth and coherent writing. They help guide readers through your text, showing the logical relationships between ideas and signalling shifts in thought or direction.
Did You Know?
7 Cs of Communication:
Pigeons were used as messengers in ancient times. Messages were written on paper and attached around the necks of pigeons who were trained to send and receive messages. Even in the inaugural Olympics in ancient Greece, pigeons were used to send information about the results to an athlete’s home town.
Clarity: Messages should be clear, straightforward and easy to understand.
Conciseness: Being concise means conveying the message using a few words to make it brief and comprehensive.
Concreteness: Being concrete means being very specific and using tangible examples to make your message vivid and convincing.
Correctness: It pertains to the accuracy of your message in terms of grammar, spelling, punctuation and factual correctness.
Chapter-end point-wise summary to consolidate concepts.
Key Terms Articles: Articles are special words (a, an, the) that are used before nouns to specify whether we are talking about something in particular or something general.
Communication: It is the process of transmitting information from one individual or group to another, using various methods and media.
Verbal Communication: It is the process of transmitting ideas and information about thoughts, feelings and messages from one person to another using words. There are four types of verbal communication:
• Oral Communication: It is a form of verbal communication that involves conveying information through spoken words and sentences.
Coherence: It involves organising your message logically and ensuring that the ideas flow smoothly from one point to another.
Completeness: A complete message provides all the necessary information that the recipient needs to take necessary action or make informed decisions on.
Courtesy: It refers to the tone and manner in which a message is conveyed. There should be respect and consideration for the recipient’s feelings and opinions.
Usage The best way to express thoughts in small and large groups, interpersonally. It is used to express emotions and feelings. It
• Interpersonal communication can be further divided into three types – face-to-face communication, small-group communication and public communication.
It is a form of verbal communication that involves transmitting information through spoken words and sentences. It is the most common medium of communication. Effective oral communication is a two-way process, which includes speaking and listening. Mechanical devices such as a telephone, loud speakers, or tape recorders can be used to communicate messages orally. It also includes attending lectures, classroom teaching and learning, and giving presentations in a meeting. When communicating orally, the speaker needs to give clear, concise, and complete information. A conversation with a
Types Written or oral. Body language, facial expressions, gestures, and eye contact. Graphics, visuals, images, videos, and symbols
• The communication cycle has various elements like the sender, message, encoding, channel, receiver, decoding and feedback.
Advantages It is helpful for long discussions and for expressing thoughts in detail. It saves time and expresses emotions directly. It is a universal language and can be understood by everyone.
• Feedback is a crucial element within the communication cycle. For communication to be effective, the feedback should be timely and appropriate. It can be either positive or negative.
• Descriptive feedback must be goal-oriented, actionable, user-friendly, timely, continuous and consistent.
Disadvantages It is time-consuming, and the wrong selection of words may lead to confusion.
• The 7’ Cs of communication help ensure that a message is conveyed clearly and comprehensively.
• A communication barrier is an obstacle that prevents the receiver from receiving and understanding the message that has been sent by a sender.
It becomes difficult to get detailed information through non-verbal communication. Some information cannot be explained through visuals and requires detailed explanation.
Classroom and laboratory-based group and individual activities for an enhanced learning experience.
Examples Letter, e-mail, speech, group discussions, etc. Eye contact, posture, hand movements, etc. Road signs, emoticons, etc.
Activity Time
Activity 1: Pros and Cons of the Methods of Communication (Group Work)
In a group of four to five students, discuss the three methods of communication. Highlight the advantages and disadvantages of all the three methods.
On an A3 size sheet, list down the pros and cons of the three methods of communication. When participating in a discussion, be an attentive listener and respect others’ opinion.
Activity 2: Role Play—Common Body Language Mistakes
(Group Work)
Get into a small group of four-five students. Choose any one of the scenes of communication from daily life. Prepare
Reference list of viva questions to better prepare for oral examinations.
body language.
Encourage the other students in the class to list down the dos and don’ts of miscommunication because of body language. Scenes
1. Conversation at restaurant between a waiter and customer
2. Conversation between a salesperson and customer
3. Conversation between a teacher and student
4. Conversation between a
Sample paper, adhering to CBSE guidelines, to ensure preparedness for theoretical exams.
Important terms to ensure a firm grasp of important concepts.
Chapter-end exercises containing objective and subjective questions to enable comprehensive practice of concepts.
• Written Communication: It is a formal and structured mode of communication that uses written language to record and transmit information.
• Intrapersonal Communication: It is essentially a private communication that happens entirely within our own minds and can be defined as ‘dialogue with oneself.’
• Interpersonal Communication: It allows individuals to effectively interact and exchange information with others in various personal, social and professional settings.
Select the correct option.
Non-verbal Communication: It refers to the messages and information that are conveyed without using words or spoken language; it includes expressing thoughts, ideas and feelings through gestures, facial expressions and body language.
Visual Communication: It is the process of providing information, data, ideas and thoughts through visuals and graphics. It only uses images, graphs, charts, videos, presentations and other graphics to convey the message or information to other people or organisations.
Recommended list of practical questions for active learning. Common misconceptions with clear solutions.
1 Which of the following is an example of visuals? a E-mail b Speech c Eye contact d Graphics
Decoding: It is the process by which the receiver interprets and understands the message sent by the sender.
2 If we are using hand gestures to deny something, then which of the a Verbal communication b Non-verbal communication
Effective communication: It means conveying ideas, thoughts, opinions, knowledge and data clearly, and in a way that others can easily understand, leading to meaningful interactions.
c Visual communication d All of these
Encoding: It is the process of converting the sender’s thoughts and ideas into a form that can be understood by others.
3 Which of the following is not an advantage of verbal communication? a It helps in understanding. b It helps in effective sharing.
Face-to-Face: This type of communication occurs when two people interact with each other in person.
c It reaches a larger audience. d It does not use words.
Feedback: It is the response or reaction provided by the receiver to the sender’s message. It helps the sender understand the effectiveness of their communication and whether the intended message was understood accurately. There are three types of feedback:
• Descriptive feedback: It is a detailed and specific input provided to an individual, focusing on their strengths and areas for improvement in their communication skills or work.
4 Which of the following can be used to communicate with one or many a Face-to-face conversation b An email c Posters d Diary entry
B Fill in the blanks with the most suitable words.
• Specific Feedback: It focuses on the particular aspects of a person’s performance or communication skills and offers concrete suggestions for enhancement.
1 , , and visual are the three methods of communication.
2 is used to describe the non-verbal elements (tone, pitch, and accompanies speech.
3 Eye contact is an example of .
4 While talking to someone, we should always use to explain
C State whether the following statements are True or False. Correct the
1 Use of non-verbal and visual communication for a verbal message makes
2 Graphics are examples of non-verbal communication.
Detailed projects that promote the application of knowledge. Solutions to unsolved questions to support independent practice and learning.
3 Communication is the process of exchanging information, ideas, thoughts,
4 Symbols are the oldest form of communication.
D Answer the following questions. (Solved)
Q1. What is communication?

A1. Communication is the process of transmitting information from one methods and mediums. People talk, write, or show visuals to communicate feelings, or send other messages to each other. Communication is a essential for acquiring knowledge and developing relationships. Communication can be interpersonal, i.e., between two people; communal to multiple people or groups).
Good communication does not only mean sending a message but also said or shown.
Q2. What are the three methods of communication?
A2. There are three methods of communication:
Verbal communication: Verbal communication is the process of transmitting feelings, ideas, and messages with another person. Thoughts can be each other to tell stories, ask questions, and share thoughts. We also
Examples: Writing an email, group discussions, public speaking, etc.
Non-verbal communication: It is the process of expressing thoughts communication includes gestures, body language, eye contact, and Examples: Using eye contact to accept or deny something, using hands
Project Work/Field Visit
Any interdisciplinary real world case study to be taken. Summarised data reports of same can be presented in Base. Input should be taken using forms and output should be done using reports using Base. Documentation of the case study should be presented using Writer.
Communication is the process of transmitting information from one individual or group to another, using various methods and media.
People talk, write, or show visuals to communicate information about their ideas, thoughts, feelings, or send other messages to each other. Communication is a fundamental aspect of human interaction and is essential for acquiring knowledge and developing relationships.
Communication can be interpersonal, i.e., between two people: communal (within a group) or broadcast (one person to multiple people or groups).
Good communication does not only mean sending a message, but also making sure others understand what is being said or shown.
In this chapter, we will learn about the various types of communication, their functions, and their use in our daily lives.


Pigeons were used as messengers in ancient times. Messages were written on paper and attached around the necks of pigeons who were trained to send and receive messages. Even in the inaugural Olympics in ancient Greece, pigeons were used to send information about the results to an athlete’s home town.
Verbal communication is the process of transmitting ideas and information about thoughts, feelings, ideas, and messages to another person. Ideas and information can be expressed through the use of words. Verbal communication is a vital aspect of human interaction, enabling individuals to convey ideas, build relationships, and function effectively in both personal and professional settings.
We use verbal communication to tell stories, ask questions, and share thoughts. We also write down to explain or pass any information.
For example, when you talk to your friends, family, or teachers, you are using verbal communication to share what is on your mind.
Verbal communication can be further divided into four major categories:
1. Oral communication
2. Written communication
3. Intrapersonal communication
4. Interpersonal communication
Improving oral communication takes time. Be patient with yourself and keep practicing. The more you practice, the more comfortable and skilled you will become at talking and sharing your thoughts with others.
Type of Verbal Communication
Oral communication
Explanation
It is a form of verbal communication that involves transmitting information through spoken words and sentences. It is the most common medium of communication. Effective oral communication is a two-way process, which includes speaking and listening. Mechanical devices such as a telephone, loud speakers, or tape recorders can be used to communicate messages orally. It also includes attending lectures, classroom teaching and learning, and giving presentations in a meeting. When communicating orally, the speaker needs to give clear, concise, and complete information.
Examples
A conversation with a friend, family, or a colleague while giving a presentation or speech are examples of oral communication.
(continued...)
Type of Verbal Communication
Written communication
Intrapersonal communication
Interpersonal communication
Explanation
It is a form of communication using written words. It is a formal and structured mode of communication that uses a written language to record and transmit information. It involves using symbols such as alphabets and numbers to create messages that others can read.
It is a more reliable source of communication than speech. Written communication is used extensively for official work. It creates a permanent record that can be referred to and reviewed over time. Such communication is valuable for documentation, legal, and maintaining historical records purposes.
Intrapersonal communication is an essentially private communication that happens entirely within our own minds. It is defined as a dialogue with oneself. It occurs when one reflects on situations, makes choices, or analyses one’s emotions and thoughts.
This type of communication also involves rehearsing a dialogue or speech within their mind or writing a personal diary.
Interpersonal communication takes place when individuals effectively interact, exchange information, and connect with others in various personal, social, and professional settings. It involves two or more people.
It is a one-on-one conversation in which the individuals are constantly changing their roles as the sender and the receiver.
Interpersonal Communication Is Further Divided Into: Type of Interpersonal Communication Explanation
Face-to-face communication
This type of communication occurs when two people interact with each other.
Small group communication
Public communication
It is the process of exchanging ideas, information, and opinions among a small number of people who are working together or discussing a specific topic. Each participant takes part in the discussion.
It is a form of communication where an individual addresses a larger audience. This communication involves delivery of information, ideas, opinions, or messages to a group of people, usually in a structured and organized manner.
Examples
Writing an email, letter, or writing on the social media, writing reports, articles, etc.
Writing about one’s innermost thoughts, feelings, and emotions in a diary; debating with oneself about a choice or a situation.
Board meetings, discussion between friends, team meetings, group discussions, etc.
Examples
A special talk between two friends or two people working together. They take turns between talking and listening, and it is a bit more personal and private than talking in a big group.
Study groups, board meetings, press conferences, and team meetings.
A speech delivered by a politician or a leader in a meeting.
1. Helps in Understanding: When we talk to each other, we can quickly explain things and understand each other better. If we are confused, we can ask questions right away to clear things up.
2. Effective Sharing: Verbal communication helps us share how we feel. Our tone of voice can show if we are happy, sad, excited, or angry. This communication helps others know how we are doing.
3. Reduce the Likelihood of Misunderstandings: When we express our thoughts and receive feedback quickly, there are very less chances of misunderstanding.
4. Reach a Larger Audience: Through verbal communication, we can reach a large number of people and convey our message.
5. Building Rapport: Verbal communication fosters connections and builds rapport among individuals. Engaging in meaningful conversations helps establish and strengthen personal and professional relationships.
6. Negotiating and Convincing: It is useful when you are trying to agree on something or get others to see things your way.
7. Social Interaction: In social settings, conversations and verbal exchanges are fundamental for networking, socializing, and building social connections.
1. Practice speaking every day with as many people as you can.
2. Practice good listening skills when the other person is speaking to you.
3. Speak slowly and use clear words so that your ideas are conveyed easily.
4. Use gestures while talking, and maintain eye contact, tone, volume, and pace.
5. Plan what you want to write and speak ahead of time.
6. Proofread your writing, before you deliver it.
7. Record your speech so that you can later analyse how you are speaking.
8. Stay confident while speaking.
9. Be clear and simple so that your idea reaches everyone.
10. Use appropriate vocabulary and sentence structure in your writing.
Non-verbal communication refers to the messages and information that are conveyed without using words or spoken languages; it includes expressing thoughts, ideas, and feelings through gestures, facial expressions, and body language.
Non-verbal communication can effectively convey thoughts, emotions, and feelings even though no words are used.
Non-verbal communication is important in the classroom and at professional places because it helps understand the mood and thoughts of another person.
Type
Gestures
Gestures are intentional and often include symbolic physical movements, postures, or actions made by individuals, using their hands, arms, or other parts of the body.
We use our body parts to express our thoughts.
Various cultures may have unique interpretations for some gestures.
Examples
Showing your palm when you want to stop something.
Showing numbers through your fingers.
Nodding your head when you want to confirm something.
Facial expression
Eye contact
Touch
Facial expressions are perhaps the most noticeable form of non-verbal communication. It is when we use our faces to show our emotions and feelings such as sadness, happiness, confusion, or anger.
They include smiles, frowns, raised eyebrows, and other movements of the face.
These expressions play an important role in expressing your thoughts.
Eye contact refers to the act of individuals making direct visual connection by looking into each other’s eyes during a conversation or interaction.
It involves using eyes to express, thoughts, or indicate attentiveness, interest, or disinterest.
Touch, as a form of non-verbal communication, involves physical contact among individuals, using various parts of the body, typically the hands or other body parts like the shoulders or back.
Touch is a powerful means of conveying emotions, feelings, and intentions.
It can have both positive and negative connotations, depending on the context and cultural norms.
Raising an eyebrow when you are not sure about something.
Smiling to show you are happy. Opening your mouth wide to show how surprised you are.
Opening eyes wide indicates surprise.
Looking into the speaker’s eyes indicates attentive listening.
Space refers to the physical distance between two people.
It plays a significant role in conveying messages and establishing relationships.
A pat on the back or a reassuring hand on the shoulder can communicate empathy and support.
A friendly handshake or a high-five can signify camaraderie and positive social interactions.
Space can include standing close to someone to indicate intimacy or maintaining distance to signal respect for personal boundaries.
(continued...)
SpaceParalanguage
Paralanguage is a term used to describe the non-verbal elements of spoken communication that accompany speech. This includes the tone, pitch, volume, and speed of your voice.
For instance, a high-pitched, fastpaced voice may indicate excitement or nervousness, while a slow, lowpitched voice can convey seriousness or sadness. Posture
Posture refers to the position and alignment of an individual’s body, including how they hold their head, torso, arms, and legs. It is a fundamental element of nonverbal communication and can convey a lot of information about a person’s emotions, attitudes, and intentions.
Leaning forward or tilting the head slightly can indicate interest and engagement in a conversation or an activity.
A slouched or hunched posture can convey timidity, insecurity, or submission.
1. Facial Expression: Make sure that you look confident. Smile when needed and avoid showing too many expressions, such as confusion or fear on face.
2. Body Language: Always sit and stand straight. Do not bend because that can show tiredness or boredom.
3. Gestures: Gestures can be used to show affirmation while expressing yourself, but make sure that you do not move your hands. Always keep your hands straight on your lap or in a cross position. Never talk to anyone with your hands in the pockets.
4. Eye Contact: Always make eye contact with the other person. Never talk with your eyes down or never roll your eyes.
1. Making Messages Clearer: It adds extra information to what you are saying with words. For example, you can nod your head while saying “yes” to make it clearer that you agree.
2. Quick Communication: It can be faster than talking. For example, you can signal “stop” with your hand without saying a word and people will understand.
3. Building Trust: It helps build trust and connection with others. When you look at them in the eyes or shake hands, it shows you are friendly and trustworthy.
4. Conveys Emotions and Feelings: Non-verbal communication is a powerful tool for expressing emotions and feelings. Facial expressions, body language, and the tone of voice can convey happiness, sadness, anger, fear, and other emotions, often more vividly than words alone.
5. Support Verbal Communication: Non-verbal cues can complement, enhance, and reinforce verbal messages. These cues can help make the overall communication more effective and easier to understand.
6. Helpful for People with Disabilities: They can use gestures to convey their ideas and thoughts.
Let us see how we can use verbal and non-verbal communication in our daily life.
Salesperson: (with his hands folded, smiling and in a very soft tone) Good morning, madam! How can I help you?
Customer: Good morning! I want to buy a washing machine for my home.
Salesperson: (smiling widely) Oh! That is great, madam. We have many options available for washing machines. Which machine are you looking for, semiautomatic or automatic?
Customer: (looking confused) Umm! What is the difference between the two?
Salesperson: (pointing towards a machine) Madam, a semiautomatic machine washes clothes on its own, but you need to take out clothes and dry them separately in the dryer, so it requires a little more effort. Whereas, an automatic machine does not require your efforts, you just need to put clothes in it and start it. It will wash and dry them on its own.
Customer: (opening her mouth wide) Wow! That is a major difference. Then, I would like to buy an automatic washing machine.
Salesperson: (shaking his hands with the customer) Great choice, madam! Let us go to the billing department.
Visual communication is the process of providing information, data, ideas, and thoughts through visuals and graphics. This type of communication uses only images, graphs, charts, videos, presentations, and other graphics to convey the message to other people or organisations.
Visual communication remains the oldest form of communication as even before speaking, people used to provide information through symbols and pictures. All the ancient scripts are written in symbols and provide us with information about those times.
It is the most effective way of passing information, as the human mind processes images quickly.
Verbal communication can be made more effective and meaningful with the use of visual aids like posters, signs, diagrams, and images.
Example: A speaker is conducting a seminar on ‘Following Road Safety’. His ideas and messages would be clearly communicated and perceived if he used standard signs related to traffic rules while communicating.

1. Easy to Understand: Pictures make things simpler to understand, especially if the topic is complicated. They allow for the presentation of data and concepts in a clear and concise manner.
2. No Language Barrier: You don’t need to know a specific language to understand a picture. It’s like a universal language.
3. Easier to Remember: Visuals are often more memorable than text alone. People tend to retain and recall visual information better.
4. Keeps You Interested: Pictures and videos can keep your attention better than long paragraphs of text.
5. Quick Information: Visuals can convey information quickly. A well-designed infographic, for example, can convey a complex message in much less time than it would take to read a lengthy document.
6. Helps in Making Choices: Visuals can help you make decisions, especially when comparing different options.
7. Accessible to Everyone: Visuals can be adapted for people with disabilities, like those who can’t see well.
Definition
Usage
Information is shared in the oral or written form, using words.
The best way to express thoughts in small and large groups, interpersonally.
Types Written or oral.
Advantages
Disadvantages
Examples
Information and ideas are shared without words, using body gestures, space, or eye contact.
It is used to express emotions and feelings. It is mostly used to supplement verbal communication.
Body language, facial expressions, gestures, and eye contact.
It is helpful for long discussions and for expressing thoughts in detail. It saves time and expresses emotions directly.
It is time-consuming, and the wrong selection of words may lead to confusion.
Letter, e-mail, speech, group discussions, etc.
It becomes difficult to get detailed information through non-verbal communication.
Information is shared through visuals, images, and graphics.
It is suited for sharing information with versatile groups at a mass level.
Graphics, visuals, images, videos, and symbols
It is a universal language and can be understood by everyone.
Some information cannot be explained through visuals and requires detailed explanation.
Eye contact, posture, hand movements, etc. Road signs, emoticons, etc.
Activity 1: Pros and Cons of the Methods of Communication (Group Work)
In a group of four to five students, discuss the three methods of communication. Highlight the advantages and disadvantages of all the three methods.
On an A3 size sheet, list down the pros and cons of the three methods of communication. When participating in a discussion, be an attentive listener and respect others’ opinion.
Activity 2: Role Play—Common Body Language Mistakes (Group Work)
Get into a small group of four-five students. Choose any one of the scenes of communication from daily life. Prepare a role play using verbal and non-verbal communication. Show a character using the wrong body language and the impact of the same on the other characters and the overall communication.
At the end of your performance, specify the common body language mistakes and the dos and don’ts of avoiding miscommunication because of the body language.
Encourage the other students in the class to list down the dos and don’ts of miscommunication because of body language.
Scenes
1. Conversation at restaurant between a waiter and customer
2. Conversation between a salesperson and customer
3. Conversation between a teacher and student
4. Conversation between a parent and child
5. Conversation between friends at park
A Select the correct option.
1 Which of the following is an example of visuals?
a E-mail
c Eye contact
b Speech
d Graphics
2 If we are using hand gestures to deny something, then which of the following are we using?
a Verbal communication
c Visual communication
b Non-verbal communication
d All of these
3 Which of the following is not an advantage of verbal communication?
a It helps in understanding.
c It reaches a larger audience.
b It helps in effective sharing.
d It does not use words.
4 Which of the following can be used to communicate with one or many individuals living at various locations?
a Face-to-face conversation
c Posters
B Fill in the blanks with the most suitable words.
b An email
d Diary entry
1 , , and visual are the three methods of communication.
2 is used to describe the non-verbal elements (tone, pitch, and volume) in a spoken communication that accompanies speech.
3 Eye contact is an example of .
4 While talking to someone, we should always use to explain it better.
C State whether the following statements are True or False. Correct the statements that are false.
1 Use of non-verbal and visual communication for a verbal message makes the communication more complex.
2 Graphics are examples of non-verbal communication.
3 Communication is the process of exchanging information, ideas, thoughts, and feelings.
4 Symbols are the oldest form of communication.
D Answer the following questions. (Solved)
Q1. What is communication?
A1. Communication is the process of transmitting information from one individual or group to another, using various methods and mediums. People talk, write, or show visuals to communicate information about their ideas, thoughts, feelings, or send other messages to each other. Communication is a fundamental aspect of human interaction and is essential for acquiring knowledge and developing relationships.
Communication can be interpersonal, i.e., between two people; communal (within a group); or broadcast (one person to multiple people or groups).
Good communication does not only mean sending a message but also making sure others understand what’s being said or shown.
Q2. What are the three methods of communication?
A2. There are three methods of communication:
Verbal communication: Verbal communication is the process of transmitting ideas using information about thoughts, feelings, ideas, and messages with another person. Thoughts can be expressed through the use of words. We speak to each other to tell stories, ask questions, and share thoughts. We also write down to explain or convey any information. Examples: Writing an email, group discussions, public speaking, etc.
Non-verbal communication: It is the process of expressing thoughts and messages without using words. Non-verbal communication includes gestures, body language, eye contact, and postures to convey feelings.
Examples: Using eye contact to accept or deny something, using hands to show numbers, etc.
Visual communication: Visual communication is the oldest form of communication; it includes symbols and graphics to communicate. It is less time-consuming and helps people understand things even if they are not familiar with the language. Any person can understand the symbols and pictures, and can easily find out the meaning. These three are the methods of communication, which helps us in our day-to-day life and make communication easier.
Q3. Mridul is a student of class 10. He needs to take a workshop on ‘Say No to Bullying’. He has prepared his speech for the workshop. His friends have been advising him to use visual aids to make his presentation more impactful, but Mridul is not convinced. If you were Mridul’s friend, what would you say to convince him into using visual aids to communicate his message?
A3. If I were Mridul’s friend, I would state the advantages of using visual communication as a support to the verbal message that he would be using during his workshop. I would try to make him understand that his speech can be made more effective and meaningful with the use of visual aids like posters, signs, diagrams, images, and so on.
• Easy to understand: Pictures make things simpler to understand, especially if the topic is complicated. They allow for the presentation to be clear and concise.
• Easier to remember: Visuals are often more memorable than the text alone. People tend to retain and recall visual information better.
• Keeps you interested: Pictures and videos can keep your attention better than long speeches.
• Quick information: Visuals can convey information quickly. A well-designed infographic, for example, can convey a complex message in lesser time.
• Helps in making choices: Visuals can help you make decisions, especially when comparing multiple options.
A 1. d 2. b 3. d 4. b
B 1. Verbal, non-verbal 2. Para-language 3. Non-verbal communication 4. gestures
C 1. False. Use of non-verbal and visual communication for a verbal message makes the communication more effective.
2. False. Graphics are examples of visual communication.
3. True.
4. True.
The art of communication involves more than selecting the right words or mediums. Communication is a dynamic process that encompasses not only the transmission of information but also the reception, interpretation, and response to that information. Thus, it is important for us to delve into an understanding of the elements within the communication cycle, as well as acknowledge the crucial role that feedback plays within it.
Communication is the process of transmitting information from one source to another through messages using the mediums of speech, writing, gestures, visuals, or symbols.
We have an English test tomorrow. I thought I would inform you as you were not in class today.
Tests are a useful tool for understanding what you have already learnt. Do not worry about it, please. You will do well, I am confident. Okay, I will try not to worry.
Thank you for informing me about this.
Thank you for believing in me. Your confidence in me helped me overcome my stress and do well in the test. You’re always welcome.
These examples serve as an illustration of the communication process, in which one person, known as the sender, sends a message to another person (or group of people), known as the receiver. When the receiver receives the message, they usually acknowledge it in two ways, either verbally, as illustrated in the above examples, with a sound like “hmm”, or non-verbally, for example, with a nod. This acknowledgement can be termed as feedback. Feedback assures the sender that the message has been received as intended and completes the cycle of communication.
Sender
Message
Encoding
Channel
Receiver
Decoding
Feedback
A sender is a person who initiates a communication by creating and sharing a message with the intention of conveying information, ideas, or thoughts to another person or a group.
A message refers to information, ideas, or thoughts that a sender wants to communicate to a receiver. The message can be in the form of spoken or written words, images, gestures, or any other means of expression.
Encoding is a process of converting a sender’s thoughts and ideas into a form that can be understood by others. This process involves choosing relevant words, arranging sentences, and using symbols to create a message that can be effectively transmitted.
A channel is a means or method through which a message is transmitted from a sender to a receiver. The channel can include verbal communication, written communication, visual presentations or electronic mediums, like email or video calls.
A receiver is an individual or a group who receives and interprets a message sent by a sender. The receiver is responsible for understanding and making sense of the information conveyed.
Decoding is a process by which a receiver interprets and understands a message sent by a sender. This process involves analysing the words, symbols, and context to derive the intended meaning.
Feedback is the response or reaction provided by a receiver to a sender’s message. This response helps the sender understand the effectiveness of their communication and whether the intended message was understood accurately.


It is important for effective communication that the sender encodes the message and the receiver decodes the message in the manner it is intended. Encoding means that the sender shares information in a way that is understandable to the receiver, such as using a shared language understood by both the sender and the receiver. Decoding means that the receiver accurately understands the meaning of the information sent by the sender.
Look at the illustration of communication cycle. It shows a communication cycle which involves a sender and a receiver of information. The sender encodes the message and sends it to the receiver who decodes the message and responds to it appropriately. The effectiveness of a communication cycle depends on how long it takes for the feedback to be received by the initial sender. In general, the faster the response, the more effective the communication cycle is.
The sender or receiver of the information needs to take the necessary time to analyse the information being transmitted to them in order to respond faster. The following examples illustrate this:
Hello, I am Amit.
Hi Amit, nice to meet you.
Imagine that your teacher assigns you a challenging math problem-solving exercise. The instructions are to carefully read the problem and then solve it step by step. The correct approach will be to follow your teacher’s instructions, read the problem carefully, analyse the given data, and solve the problem step by step. However, if you are impatient or overconfident, you may skip the reading part and immediately start attempting the problem. Because of this, you may find yourself struggling to grasp the problem’s requirements and end up making mistakes in your calculations. This will eventually take you more time to rectify the errors.
Your manager Rakesh has assigned you a complex report to analyse and provide insights on. He has instructed you to thoroughly review the report, extract relevant data, and then offer your analysis. The correct approach will be to follow your manager’s guidance and manage your time well to finish the task appropriately. However, if you are not provided sufficient time and are assigned a tight deadline, you can end up skimming through the report quickly and immediately starting with your analysis. Unfortunately, without a clear understanding of the report’s content, your insights may lack depth and you may even misinterpret some data. These issues will force you to revise your work multiple times and spend more time than expected.
Both the examples showcase the importance of taking time to understand and process the information properly before responding. Therefore, for a communication to be effective, the feedback should be timely and appropriate.
It is a misconception that immediate feedback is always better. Effective feedback requires thoughtful interpretation and understanding.
Feedback is a crucial element of a communication cycle. It is the response or reaction of the receiver upon perceiving or understanding the message. By receiving the receiver’s response, the sender gains understanding which leads to further actions, thereby completing the communication cycle. Feedback allows the roles of sender and receiver to be interchanged.
Let us understand this with the help of the following examples:
Example 1
Raj has written a creative story and has shared it with his classmates. They offer their thoughts and opinions on his story’s characters, plot, and overall theme. Their responses and suggestions help him in understanding how his writing is being perceived and guide him in making improvements.
Tina presents a new idea during a brainstorming session at her workplace. Her colleagues listen attentively and then provide their insights and suggestions on how the idea can be implemented. Their feedback helps her refine her idea and consider various angles for its execution.
In each of these examples, feedback is the response or input received from others after conveying something, whether it is a piece of writing, an idea, a performance, or a project. This feedback is essential for understanding the effectiveness and impact of your communication and making necessary adjustments to improve its quality.
Let us break down these examples into the elements of the communication cycle—the sender, receiver, feedback, and future action:
ExampleSenderReceiver Feedback Future Action
1 RajClassmates
2 TinaColleagues
Opinions and suggestions on creative writing Makes improvements to the story based can be rephrased.
Insights and suggestions on the implementation of her idea
Refines the idea and explores various aspects.
Feedback can be negative or positive. Understanding various types of feedback allows us to refine our communication and life skills.
• Positive feedback is an indicator to the sender of the message to continue following the mode of the communication.
Positive Feedback
• It helps increase the confidence of the sender and motivates the person to excel.
• For example: “The speech was outstanding. Keep it up!”
• Negative feedback is an indicator to the sender of the message that there is a need to modify or change the mode of communication as their ideas are not being communicated effectively.
• This may lower the sense of self-esteem and morale of the sender.
• For example: “The pace was too fast to understand. I wish you went a little slow and understood the needs of your audience”.
Both positive and negative feedbacks provide valuable insights for enhancing communication. Positive feedback encourages you to continue with the effective methods, whereas negative feedback requires adjustments for better clarity and comprehension.
Think of the last time you received feedback, and it helped you to improve the quality of your work.
Feedback is an important component of effective two-way communication. Feedback needs to be heard, interpreted, and accepted for ensuring that the process of communication is smooth and clear. The sender gets an opportunity
to assure that his message was received as intended. Feedback is also essential to fill any gaps between what is understood and what the actual aim was.
Imagine that your friend Rashmi is explaining a complex science concept to the entire class. As she proceeds, she senses some confusion among her classmates and asks if they need further clarification. Their questions and responses provide her with feedback that the concept needs more explanation, prompting her to simplify her explanation and provide additional examples.
These are various ways in which feedback is important:
Basis of problem-solving
Feedback acts as a valuable tool for identifying areas of confusion or misunderstanding in communication. When feedback highlights these gaps, it helps individuals recognise where their message may not have been clear or well-received. This insight becomes a starting point for problemsolving as the receiver of the feedback can address these issues and find ways to convey information more effectively.
Feedback encourages effective listening as it provides an immediate indication of whether the message was accurately received and comprehended by the audience.
Effective listening
Motivation
Performance improvement
Tool for continued learning
When someone receives feedback that aligns with their intended message, it signifies that their communication was successful. On the other hand, if the feedback indicates confusion, it prompts them to reevaluate their message and make necessary adjustments.
Positive feedback can be a powerful motivator. When someone receives praise for their communication skills, it boosts their confidence and encourages them to continue using effective methods of communication.
Feedback can be valuable for improving the performance and communication skills of an individual. Feedback includes inputs, suggestions, and areas of improvements which are helpful to achieve better results.
Feedback fosters a culture of learning by enabling individuals to adapt and grow based on external input. When people receive feedback, they learn about their areas of improvement. This process helps them stick to their goals and continue learning, and gives them new opportunities.
Imagine that a sales team is presenting the Annual Sales Report to all their colleagues. There were a lot of numbers and percentages involved which resulted in a lot of confusion and ambiguity. Seeing such confused responses of their colleagues, the sales team took corrective measures and addressed their colleagues’ all queries.
Imagine a student explaining a historical event to their classmates. If their classmates respond with relevant questions and thoughtful comments, it shows that the message was well understood. On the other hand, if the classmates are puzzled, the student knows they need to provide more context or clarification.
When a student confidently presents their research in the classroom and receives applause from their peers and teachers, they feel motivated to keep creating such presentations and enhancing their skills.
If a student delivers a speech and receives feedback that their voice projection needs improvement, they can work on their voice modulation techniques to engage the audience more effectively.
Think of a student who participates in an elocution competition for the first time. After their speech, they receive feedback from the teacher about the structure and delivery of their content. This feedback will help them improve for future events and competitions.
Therefore, feedback plays a vital role in shaping effective communication. Feedback helps identify communication gaps, promotes active listening, boosts motivation, drives performance improvement, and supports continuous learning. Through feedback, individuals can refine their communication skills and enhance their ability to convey ideas clearly and convincingly.
1. How does effective feedback contribute to improving communication?
2. Can you provide examples of situations where effective feedback can make a significant impact on the outcome?
Descriptive feedback is detailed and specific input provided to an individual, focusing on their strengths and areas for improvement in their communication or work. Such feedback goes beyond generic statements, offering actionable insights that facilitate growth and enhancement. Descriptive feedback includes specific information in the form of written comments or verbal conversations that help the receiver of the feedback understand what all improvements can be made in their work. Letter grades, number grades, or coded symbols do not fall under the purview of descriptive feedback.
Imagine you have given a presentation in a class about one of the chapters of this book. Instead of merely saying, “Good job on the presentation”, your teacher provides descriptive feedback by telling you the ways in which you can enhance the engagement by incorporating more visuals and pictures to support your points.
Feedback is highly important for students’ learning. It helps the students understand their current strengths and weaknesses and offers suggestions to enhance their performance. Moreover, feedback provides guidance and assists students in recognising the necessary steps to reach their goals and objectives.
Provides useful information
Fills gaps between the present level of performance and the learning outcome
Descriptive feedback goes beyond just indicating whether something is right or wrong. Such feedback offers specific details about what is done well and what can be improved.
If you have written an essay for your English class, descriptive feedback highlights the strengths of your essay, such as strong arguments and clear organisation. It also points out areas that need improvement, like using more varied vocabulary or adding more examples. This information helps you understand exactly what you are doing right and what needs further attention.
Descriptive feedback acts as a bridge between where you currently stand in terms of your performance and where you aim to be.
Imagine you are learning to play a guitar. Your goal is to play a specific song flawlessly. When you perform the song in front of your music teacher, they provide you with descriptive feedback. They may mention that your chord transitions are mostly correct, but there is a specific section where your timing is slightly off. This feedback highlights the gap between your current performance level and your goal of playing the song perfectly.
(continued...)
Self-assessment
Detailed feedback encourages you to take ownership of your learning journey. When you receive descriptive feedback, you can reflect on it and assess your own work. This self-assessment process empowers you to recognise your strengths and areas for improvement. If you have participated in a group project and your teacher provides descriptive feedback on your contribution, you can use that feedback to evaluate your role in the project objectively. This self-awareness allows you to take steps to enhance your performance in future projects.
In essence, descriptive feedback not only tells you what is working and what is not, but also guides you on how to bridge the gaps and refine your skills. It is like having a personalised roadmap for improvement that empowers you to take charge of your own learning and growth.
The following factors should be considered to make descriptive feedback effective:
Goal-oriented Feedback should align with the intended learning objectives or communication goals.
Actionable It should provide actionable steps for improvement, suggesting specific strategies or changes.
User-friendly Feedback should be easy to understand and easily comprehensible. Avoid use of complex language.
Timely Giving feedback on time ensures its relevance and impact on the receiver’s work or communication.
Continuous Regular feedback fosters a culture of ongoing improvement and learning.
Consistent Consistency in providing feedback ensures fairness and enables tracking of progress over time.
The effectiveness of feedback is based on its quality. Feedback must be task-oriented so that students can hone their abilities, re-engage in their studies, and focus on their objectives.


Specific Feedback
Focuses on exact aspects of the performance or work and offers concrete suggestions for enhancement.
It is a misconception that feedback is only about pointing out mistakes. Feedback also highlights strengths and provides suggestions for improvement.
Nonspecific Feedback
Nonspecific feedback lacks detail and fails to pinpoint areas for improvement, making it less actionable.
1. It gives elaborate information on exact aspects of communication or performance and offers substantial suggestions to the receiver.
2. It is advantageous because it provides the receiver directly with valuable points to consider and enables them to focus on the areas that need improvement.
3. But most individuals hold back their feedback to prevent a defensive response.
4. Feedback can significantly alter a person’s attitude or performance if it is offered with appropriate intentions.
5. To ensure that others accept and value your feedback, it is important to be courteous and clear with it.
6. In other words, the power of specific feedback is like having a treasure map for improvement! If you have just shown your awesome project to a friend. They tell you, “Wow, it’s great!” That is nice, but it would be even better if they said, “Your project’s visuals were super engaging, especially the colourful charts. To make it even cooler, you can add captions for all the pictures you included in it”. See the difference? When feedback is given with care and good intentions, it can work wonders.
The following are the appropriate examples of specific feedback.
Example 1
After Ali finished his presentation, his teacher praised him by saying, “The introduction of your presentation effectively captured the audience’s attention with a thought-provoking question”.
Example 2
During a science fair, Asma’s classmate, Mohit, looked at her work and remarked, “Your analysis of the data was thorough, but it can be supported by relevant examples”.
1. It lacks the necessary details to guide someone on how to enhance their performance or work.
2. It is less helpful because it does not highlight specific strengths or areas that need improvement.
3. It is vague and does not guide the receiver directly about the aspects which require his immediate attention. The following examples illustrate the concept:
Example 1
After Shruti finished her speech, her friend Aarushi commented, “Good job on the presentation”. While Aarushi meant well, her feedback did not provide specific insights into what parts of the presentation were effective or how Shruti can further enhance the less effective parts.
Example 2
When Maya shared her essay with her teacher, Mr. Rajesh, she received the remark, “Your writing needs improvement”. Although Mr. Rajesh’s intention was to help, his feedback did not specify which aspects of Maya’s writing needed enhancement. As a result, Maya found it challenging to know where to focus her efforts to make her writing better.
The importance of specific feedback in various contexts, including education, workplace, and personal development, cannot be overstated.
1. Clarity and Precision: Specific feedback provides clear and precise information about what was done well and what requires improvement.
2. Give Guidance to Act: Specific feedback not only points out areas for improvement but also provides details on how to make those improvements. This guidance encourages individuals to take concrete steps towards better performance.
3. Enhanced Learning: In educational settings, specific feedback aids learning by highlighting strengths and weaknesses. Learners can focus their efforts on specific skills or concepts that require improvement, leading to more effective learning and skill development.
4. Motivation: When individuals receive recognition for their specific achievements, it boosts their self-esteem and confidence, encouraging them to continue working on their goals.
5. Goal Setting: Specific feedback plays a key role in motivating an individual in setting and achieving goals. Such feedback helps individuals set realistic goals by identifying areas in which they need to grow or improve.
6. Performance Improvement: In the workplace, it is essential for employee development and performance improvement.
7. Makes one Responsible and Accountable: Motivated and encouraged individuals take full ownership of working towards their goals and improving performance.
8. Effective Communication: Specific feedback contributes to effective communication. It minimizes misunderstandings and misinterpretations by providing precise information, ensuring that messages are conveyed accurately.
9. Self-Reflection: Specific feedback encourages self-reflection. Recipients can assess their performance in a more objective manner and gain insights into their strengths and areas for growth.
10. Continuous Improvement: Specific feedback aligns with the principle of continuous improvement. Such feedback fosters a mindset of always seeking ways to get better and achieve higher standards.
Activity 1: Enhancing Feedback Skills (Pair Work & Class Discussion)
In a pair, reflect and write on what you have learnt from this chapter. Write down your understanding of the key concepts and note something new that you have discovered. Then, swap your written reflections with your partner.
Next, read through your partner’s reflection and consider their insights. Craft a paragraph of specific and descriptive feedback for them based on their write-up. Focus on highlighting their strengths and providing suggestions for improvement.
Now, share the feedback that you have received from your respective partner to the whole class. Listen to the other feedbacks shared in the class and take notes.
In pairs, students will prepare and present a one-minute speech on a topic of their choice. The partners will provide feedback sandwich after the presentation. Each feedback session should include three components:
• Positive Comment (Compliment): Start with a positive comment or praise related to the topic.
• Constructive Feedback (Critique): Offer specific, constructive feedback on what can be improved or what needs attention.
• Positive Comment (Encouragement): End with another positive comment or words of encouragement.
Topics for speech: Rising Global Warming, Climate Change, Sustainable City, or Electric Vehicle.
Remember to focus on using the 7 Cs (Clear, Concise, Concrete, Correct, Coherent, Complete, and Courteous) when delivering the speech and while providing feedback. Switch the role and repeat the process.
A Select the correct option.
1 Feedback is important in communication because it:
a delays the communication process.
b adds complexity to the message.
c encourages active listening and clarifies understanding.
d disrupts the communication cycle.
2 Descriptive feedback provides:
a general observations without details. b specific information on strengths and areas for improvement.
c letter grades and number grades. d sudden and unexplained reactions.
3 Which of the following is an example of specific feedback?
a “Your presentation was nice”.
b “Your essay needs improvement”.
c “Your use of visuals enhanced the impact of your presentation”.
d “You did well overall”.
B Fill in the blanks with the most suitable words.
1 In the communication cycle, the sender the message, whereas the receiver the message.
2 allows the roles of the sender and the receiver to interchange.
3 encourages you to maintain effective methods, whereas prompts adjustments for better clarity and comprehension.
4 Descriptive feedback helps learners understand their and areas that need
C State whether the following is True or False. Correct the statements that are false.
1 Specific feedback offers concrete suggestions for enhancement.
2 Nonspecific feedback provides clear insights into strengths and weaknesses.
3 Feedback is not essential for improving communication skills.
4 Descriptive feedback focuses on general observations.
D Answer the following questions. (Solved)
Q1. Define specific feedback and explain why it is considered valuable in a learning process.
A1. Specific feedback focuses on the exact aspects of performance or work and offers concrete suggestions for enhancement.
Such feedback is considered valuable as:
• It provides clear insights into what worked well and what needs improvement.
• It guides the receiver to make precise adjustments to enhance their communication or work, ultimately leading to more effective outcomes.
Q2. Elaborate on the five factors that are essential when providing descriptive feedback. How do these factors contribute to the effectiveness of the feedback process?
A2. The five essential factors to be kept in mind when providing descriptive feedback are:
• Feedback should align with the intended learning objectives or communication goals.
• Feedback should provide actionable steps for improvement, suggesting specific strategies or changes.
• Feedback should be easy to understand and easily comprehensible. Avoid the use of complex language.
• Providing feedback on time ensures its relevance and impact on the receiver’s work or communication.
• Regular feedback fosters a culture of ongoing improvement and learning.
Q3. Rishika received her term end report card. She had been eagerly waiting for the day as she would get to read the feedback from her subject teachers. She performed exceptionally well in her term, and the teachers gave her feedback like ‘Good Job, Rishika!’, ‘Congratulations, Rishika’, and ‘Keep it up, Rishika!’. Though Rishika was happy, she was looking for something else in her feedback.
What do you think was missing in Rishika’s feedback? Why is that missing element so important for students like Rishika?
A3. Rishika was disappointed as the feedback from her teachers lacked descriptive details. The feedback responses did not mention her strengths or the areas to work on. They did not provide her any way forward, which would help her improve herself and her performance in the future.
Having descriptive feedback is significant for learners like Rishika because:
• It acts as a bridge between where you currently stand in terms of your performance and where you aim to be.
• Detailed feedback encourages you to take ownership of your learning journey. When you receive descriptive feedback, you can reflect on it and assess your own work.
• It goes beyond just indicating whether something is right or wrong. It offers specific details about what was done well and what can be improved.
A 1. c 2. b 3. c
B 1. encodes, decodes 2. Feedback 3. Positive Feedback, negative feedback 4. strengths, improvement C 1. True
2. False. Nonspecific feedback does not provide clear insights into strengths and weaknesses.
3. False. Feedback is essential for improving communication skills.
4. False. Descriptive feedback focuses on specific observations.
Effective communication is the process of exchanging ideas, thoughts, opinions, knowledge, and data so that the related messages are received and understood with clarity and purpose. When we communicate effectively, both the receiver and the sender feel content and satisfied.
There are various methods of communication and all these methods of communication can only be effective if we follow the 7 Cs of communication, i.e., clear, concise, concrete, correct, coherent, complete, and courteous. Absence of any C can lead to miscommunication.
Be clear in what you want to say
Use simple words (say only what is needed)
Words should make sense and relate to the main topic
Use exact words and facts
Include all the needed information
The process of communication has multiple barriers. A communication barrier is an obstacle that prevents the receiver from receiving and understanding the message that has been sent by a sender. If the message has not been understood well, it can lead to gaps, causing confusion, misinterpretation, and misunderstanding. Thus, it is important for the communicator to ask for feedback or ask questions to check that the message has been understood clearly.
Use correct spelling and grammar
Be respectful, friendly, and honest
Think of a situation where you had to face a challenge in expressing your thoughts and feelings to your closed ones.
The barriers to effective communication can be of many types, like linguistic, physical, interpersonal, cultural, or organisational.
1. The language barriers are considered as one of the main and the most common barriers that limit the effective communication.
2. The inability to communicate using a language is known as the language barrier to communication.
3. All regions have their own language and not knowing them can lead to misunderstandings, misinterpretation, and miscommunication.
4. Such barriers can occur because of limited vocabulary, problems related to accents and pronunciations, speech disorder, multiple meanings, and cultural references of symbols, and so on.
5. As per some estimates, the dialects of every two regions changes within a few kilometres.
The concept of “Chinese Whispers” or “Telephone” is often used to illustrate how communication barriers can lead to misunderstandings. This game is known by various names around the world and has been played for centuries. It is a playful reminder of how easily miscommunication can occur even when sending a simple and short message, highlighting the importance of clear and effective communication in our daily lives.
6. For example: Even in the same workplace, each employee will have a unique linguistic skill. As a result, the communication channels within the organisation can be affected by this. Thus, keeping this barrier in mind, considerations must be made for various employees, as some of them can be fluent in a certain language, whereas others can be basic users of these languages.
7. Imagine a situation where two people, one who primarily speaks English and the other who primarily speaks Spanish, are trying to communicate without a common language: Rishi (English speaker): I need directions to the nearest hospital.
Joseph (Spanish speaker): Hospital?
Rishi: Yes, hospital.
In this scenario, Rishi is seeking directions to a hospital, but Joseph, who primarily speaks Spanish, has limited knowledge of English. The language barrier becomes evident when Joseph repeats the word “hospital” in English because he is unsure about how to provide directions or how to ask for more information in English.
1. Physical obstacles such as distance, noisy environments, or poor audio quality can make it difficult to hear or understand each other.
2. These are obstacles or conditions in the environment that can hinder effective communication between individuals or groups.
3. Physical barriers can exist in the form of noise, distance, infrastructural barriers (wall, closed doors), visual distractions (flashing lights, overcrowded places), insufficient or poor lighting, technical issues (poor network connections, defective speaker, or microphones), and so on.
4. Natural conditions like physical disabilities (hearing impairment or poor eyesight) may also cause obstacle while communicating.
5. Example: Imagine a factory floor where workers operate with heavy machinery. The noise generated by the machines is extremely loud, making it difficult for the workers to hear each other or hear any verbal instructions
from their supervisors. As a result, crucial information regarding safety protocols, task assignments, or emergency procedures may not be effectively communicated due to the overwhelming noise.
6. Imagine a classroom where there is poor lighting. The students may have difficulty reading teachers’ written notes on the board or understanding their facial expressions. The lack of proper lighting becomes a physical barrier to effective teaching and learning.
1. An interpersonal barrier in communication refers to obstacles that arise because of the equation in the relationship between people, affecting the exchange of information and understanding.
2. It becomes difficult and challenging to communicate with a person who is not willing to listen, talk, and express their feelings and views.
3. Interpersonal barriers often arise from differences in personalities, perspective, communication styles, or behaviours.
4. Major interpersonal obstacles include ego, pride, stereotypes, lack of empathy, inactive listening, making assumptions, having preconceived notions, and emotional barriers (anger, fear, stress).
5. Example: Imagine two colleagues in a workplace who have a history of personal conflicts. Due to these conflicts, they have developed negative perceptions of each other. When they need to work on a project, their history and personal differences may hinder open and effective communication. They may misinterpret each other’s messages or be reluctant to share information, leading to incomplete and inaccurate communication.
6. Imagine a situation of a team working on a project. One member of the team insists on a particular way of achieving the goal and rejects other ideas. This closed-mindedness can create a barrier to communication and collaboration.
1. An organisational barrier refers to any obstacle or challenge within a company or institution that affects the effective flow of communication among individuals, teams, or departments.
2. These barriers can arise from factors such as hierarchical structures, inadequate communication channels, lack of transparency, conflicting goals, and differing priorities.
3. Organisational barriers can obstruct the timely and accurate exchange of information, leading to misunderstandings, decreased efficiency, and overall communication breakdowns within an organisation.
4. Example: If we see two colleagues working on a project and they face any challenges, it is important for them to communicate to their respective departments or supervisor, to ensure effective flow of communication.
5. Imagine a scenario where a subordinate feels shaky and nervous, fidgets when standing, and fails in communicating the message correctly. On the other hand, the boss is impatient and starts advising even before the subordinate has fully explained the case.
1. Our country is diverse and has rich culture. However, because of this richness, people find it difficult to understand each other’s culture and traditions which can result in inconveniences and difficulties.
2. Cultural barriers to communication arise from differences in cultural backgrounds, customs, norms, and values between individuals or groups.
Removing all barriers is possible! While it is essential to minimise communication barriers, it is unrealistic to expect that all barriers can be eliminated. Communication barriers can arise from various sources, including individual differences and external factors. The goal is to reduce obstacles and improve communication and not to eliminate all barriers entirely.
3. Not only this, there can also be stereotypical assumptions on the cultural differences that may lead to differences in opinion and can be a major barrier to effective communication.
4. Imagine an organisation that has offices in both the United States and Japan. The employees from the US are used to expressing their opinions, agreements, and disagreements openly during meetings. On the other hand, the employees from Japan are more reserved and tend to avoid contradicting their superiors in public. During a joint video conference, the American team proposes an idea, and some Japanese team members have concerns. However, due to their cultural norms, the Japanese team members hesitate to voice their reservations, leading the American team to believe that everyone is on board with the idea.
In this scenario, the cultural difference in communication styles creates a barrier.
Lack of Clarity Unclear or incomplete messages can lead to confusion, misunderstanding, and misinterpretation. Thus, it is extremely important for a sender to send clear and concise messages.
Lack of Feedback Without feedback or confirmation, a sender will not know if the message was understood correctly or not. Effective communication includes continuous feedback. In the absence of any feedback, the sender may never feel the need to make necessary adjustments.
Too much information Providing excess or too much information can overwhelm the receiver and make it challenging to process the main points. This factor can cause the receiver to either miss or forget the main points.
Distractions Any type of noise or interruptions can divert the attention of the receiver which can lead to incomplete communication, where the receiver may not have perceived it correctly.
Cultural Differences Different customs or value systems can cause misunderstanding among cultures. What may be considered appropriate and respectful communication behaviour in one culture can be considered disrespectful or confusing in another culture.
Power Dynamics Unequal power relationships can hamper communication within any organisation. Subordinates may hesitate to express their opinions to their seniors.
Perceptual Differences People interpret messages based on their individual perspectives or experiences. However, this can lead to interpreting the same message in different ways.
Technological Issues In the present world, where technology is the king of effective communication, there are challenges and glitches that can cause obstructions. Poor internet connectivity, software errors, or not understanding the communication tools can disrupt the flow of information.
The following are some of the measures that can be used to overcome various barriers to effective communication.
1. Communication should take place as per the understanding and capabilities of the receiver. It is always best to use a language that can be understood by the receiver.
2. The language, tone, and content of the information should be carefully chosen. It should be understandable and not harm any human sentiments.
3. There should be no room for incomplete information and ambiguity. Information shared should be complete in every way.
4. The idea of a communication is to be clear between the sender and the receiver. The communication must be conveyed effectively and in simple language.
5. Proper and effective feedbacks must be taken from the receiver. The receiver should always be encouraged to respond during a conversation.
6. There should be mutual trust and respect between the sender and the receiver, this helps in reducing perception errors.
7. It is a good idea to communicate in person as much as possible. This enables the sender to receive immediate feedback by looking at the nonverbal cues of the receiver.
8. When it comes to culture or traditions, forming assumptions and stereotyping one should not be encouraged.
9. Using visuals while communicating an idea or information, will ensure that the message or information is communicated completely and effectively.
10. The sender of the information should also be a patient listener and be open to all sorts of communication.
11. Physical disabilities or any other physical barriers should be taken into consideration during the communication. Appropriate means of communication, such as sign language, visual aids, or written communication should be used in such situations.
Think and Tell
How can you remove barriers to effective communication?
Activity 1: Listen and Draw (Individual Work)
This game is easy to play but not so easy to “win”. It requires participants’ full attention and active listening. Take a piece of paper and pen or pencil. Listen attentively to the step-by-step instructions on drawing an object.
The instructions may include:
1. Draw a square, measuring 5 inches on each side.
2. Draw a circle within the square, such that it fits exactly in the middle of the square.
3. Intersect 2 lines passing through the circle and dividing the circle into 4 equal parts.
As the exercise continues, it will get progressively harder. One misstep can mean that every following instruction is misinterpreted or misapplied. Listen carefully to ensure that their drawing comes out accurately. Once the instructions is complete, compare the drawings and decide who won.
Activity 2: Role Play on Barriers to Effective Communication (Group Work)
In a group of five students, plan and present a role play. You may pick one barrier of communication and plan a scene from daily life around it. Also, present the measure you would take to overcome the barrier chosen by your group.
Activity 3: Overcoming Barriers (Group Work)
In a group of five students, choose a barrier of communication for your group discussion. Discuss the factors of the chosen barrier and the measures needed to overcome them.
After the discussion, create a poster highlighting the factors and measures discussed in the group.
A Select the correct option.
1 Which of the following is a common barrier, and causes misunderstanding and misinterpretations between people?
a Physical barriers
c Interpersonal barriers
b Linguistic barriers
d Organisational barriers
2 Which of the following can be considered as an interpersonal barrier?
a Being shy
c Natural condition
b Slang language
d Religion colloquialism
3 Which of these is not a common communication barrier?
a Linguistic barrier
c Financial barrier
B Fill in the blanks with the most suitable words.
b Interpersonal barrier
d Organisational barrier
1 When a sender sends a message which is received differently from how it was intended will be considered a barrier.
2 The barrier leads to stereotypical assumptions about others, based on their cultural background.
3 Using is one of the ways of overcoming communication barriers.
4 communications are less effective than face-to-face communication.
C State whether the following is True or False. Correct the statements that are false.
1 Inability to communicate using a language is known as an interpersonal barrier.
2 Text messages are more effective than face-to-face communication.
3 The superior-subordinate relationship is a type of an organisational barrier.
4 To overcome linguistic barriers, take the help of a stenographer.
D Answer the following questions. (Solved)
Q1. Explain the physical and linguistic barriers with appropriate examples.
A1. Barriers of communication cause hindrances and obstacles in communicating a message or an idea effectively, correctly, and clearly.
Physical Barrier
• The environmental and natural condition that act as a barrier is known as a physical barrier.
• A gesture, posture, or body language that cannot reach the receiver makes communication less effective.
• Text messages are less effective compared to face-to-face communication.
Linguistic Barrier
• This is the most common barrier
• It can cause misunderstandings and misinterpretations between people.
• Slang language, professional jargon, religious colloquialisms
Q2. Explain how can you overcome barriers to communication?
A2. The following are some of the measures that can be used to overcome various barriers to effective communication.
• The communication should take place as per the understanding and capabilities of the receiver. It is always best to use a language that can be understood by the receiver.
• The language, tone, and content of the information should be carefully chosen. It should be understandable and not harm any human sentiments.
• Proper and effective feedbacks must be taken from the receiver. The receiver should always be encouraged to respond during the conversation.
• There should be no room for incomplete information and ambiguity. Information shared should be complete in every way.
• The idea of communication should be clear between the sender and the receiver. The idea must be conveyed effectively.
• The sender of the information should also be a patient listener and be open to all sorts of communication.
Q3. Nikita has recently joined Tiara Cosmetic Company as an Associate Manager in Marketing. She must collaborate with the product and sales department to understand about the latest product. In spite many efforts, she is not able to overcome the communication barrier she is experiencing because of the structure of the company. What kind of barrier is it? Explain this barrier in about 75 to 100 words.
A3. This kind of barrier is an organisational barrier. An organisational barrier refers to any obstacle or challenge within a company or an institution that affects effective flow of communication among individuals, teams, or departments. These barriers can arise from factors such as hierarchical structures, inadequate communication channels, lack of transparency, conflicting goals, and different priorities. Organisational barriers can impede timely and accurate exchange of information, leading to misunderstandings, decreased efficiency, and overall communication breakdowns within an organisation.
B 1. Interpersonal 2. Cultural 3. visuals 4. Nonverbal communications
C 1. False. Inability to communicate using a language is known as a language barrier.
2. False. Face-to-face communication is more effective than text messages.
3. True
4. False. To overcome linguistic barriers, take the help of a translator.
Imagine a world where our ideas, thoughts, and dreams remain locked in our mind, unable to reach others. Such a world would lack progress and understanding. Communication is the key that unlocks this world, allowing us to share our ideas, connect with others, and bring our aspirations to life. In a world driven by connections and collaborations, effective communication is the key to success. It is the invisible thread that weaves through every aspect of our lives, from the classroom to the workplace and beyond.
Effective communication is more than just exchanging words; it is about conveying our thoughts in a way that others can understand and appreciate. It involves not only the words we choose, but also our tone of voice, our body language, and our ability to actively listen.
Imagine communication as a bridge that brings people, ideas, and opportunities together, helping them travel the wide world of human interaction.
Effective communication means expressing our thoughts, ideas, or information clearly and in a way that others can easily understand, leading to successful understanding and meaningful interactions.
Rohan and Ashima work as the Associate Marketing Manager at Idea Advertising Firm. They need to pitch a new advertising idea to a beverage brand. Both Rohan and Ashima are excited and buzzing with ideas. They brainstorm ideas with their respective teams and are ready for the final day’s presentation.
In order to impress, Rohan begins his presentation with heavy data, technical terms, and complex ideas. The brand team feels disengaged and unclear. On the other hand, Ashima expresses her ideas with relatable and realistic examples. She uses easy-to-understand language, which leaves a lasting impact.
Who do you think communicated more effectively?

Humans process visual information much faster than text. Studies have shown that the brain can process images in as little time as 13 milliseconds. This is why using visual aids, such as diagrams, charts, and infographics, can be a powerful way to enhance communication and quickly convey complex ideas to our audience.
To engage in effective communication, one should take care of the following principles:

Simple Language Definite purpose


and Concision


It is commonly misunderstood that clear speech is the only important factor of effective communication. But effective communication involves much more than just speaking clearly. While clear speech is important, to be able to communicate effectively, one needs to listen actively, understand nonverbal cues, adapt to various contexts, and empathise with others.
Simple Language Using language that is easy to understand helps ensure that both the sender and the receiver grasp the message without confusion. For example, explaining the objective of a project using simple words makes it easier to understand the need and purpose of the project, thereby improving efficiency.
Definite Purpose Having a clear purpose in mind when communicating prevents misunderstandings and ensures that the message’s intent is well-understood.
For example, a leader should clearly communicate the goal of a group project before assigning it to a team.
Completeness and Concision Providing all necessary information in a concise manner ensures that the recipient gets the full picture without being overwhelmed.
For example, a senior is providing the steps for data study to his subordinate. The senior breaks down the instructions into clear, crisp, and concise statements and provides complete information to avoid confusion.
Appropriate Medium Choosing the right communication medium and considering factors, such as timing, distance, and the nature of interaction ensure effective communication.
For example, sending a text message to a team member to confirm the meeting time may work, but using a message to discuss the future course of action can cause ambiguity.
Authenticity Sharing accurate and honest information builds trust and credibility in communication. For example, it is important to provide reliable sources when presenting information to others.
Courtesy Politeness and respect in communication contribute to a positive atmosphere and healthy relationships. For example, thanking a team member for clarifying doubts creates a positive atmosphere for further communication.
Active Listening Effective communication involves not only speaking or writing but also actively listening to others. Active listening involves giving full attention to the speaker or the message, asking clarifying questions if needed, and avoiding interruptions.
Adaptability Tailoring communication to fit the needs and preferences of the audience or receiver. Consider the level of knowledge, communication style, and the context of the interaction. For example, when communicating ideas to young students, the language and content should be chosen according to their age group and understanding. The content should be supported with visual aids to make it interesting.

Clarity:
Ensure that your message is easily understood and is free from ambiguity.
Conciseness:
Convey information concisely, without sacrificing essential details.
Correctness:
Maintain accuracy in grammar, spelling, and factual information.
Courtesy: Use a respectful and considerate tone that promotes positive relationships.
Concreteness:
Coherence:
Use specific and tangible examples to make your message more relevant.
Organise your message logically for smooth comprehension.
Completeness:
Provide the necessary information to prevent misunderstandings or doubts.
The 7 Cs of effective communication are a set of principles that helps ensure that messages are conveyed clearly and comprehensively.
These principles aid in avoiding misunderstandings, misinterpretations, and confusion, thus enhancing the overall quality of communication.
Clarity
1. Clarity is the most important factor, impacting effective communication. Messages should be clear, straightforward, and easy to understand.
2. We should avoid technical words, complex vocabulary, or difficult sentence structures that can confuse the receiver of the information.
3. The sender should have clarity of thoughts so that the message is conveyed clearly.
4. The sender should not mix many ideas together when sending a message or information, as it may lead to confusion.
5. Example: Imagine you are a customer service representative addressing a customer’s complaint about a defective product. Here, using clear language and providing step-by-step instructions on how to return the item ensures better understanding of the process for the customer and builds trust.
Conciseness
1. Being concise means conveying the message using the fewest possible words to make it brief and comprehensive.
2. Adding unnecessary details while communicating can lead to disinterest or loss of focus. Only state what is necessary to know. Avoid overexplaining to avoid confusion.
3. The message should be to the point and precise with essential details.
4. The words used should be meaningful and of interest to the receiver.
5. Example: Consider the difference between these two messages: “I just wanted to let you know that the upcoming meeting scheduled for next Monday at 9 AM may be postponed to the following Wednesday at 2 PM due to unforeseen circumstances that have arisen.” In contrast, “The meeting on Monday at 9 AM may be postponed to Wednesday at 2 PM due to unforeseen circumstances.” By being concise, the revised message conveys the same information in a more brief and engaging manner.
1. Concreteness in communication means being clear and specific in what you are saying.
2. It is like using detailed examples and facts to make your message easy to understand and convincing.
3. Providing concrete examples, facts, and figures can help clarify your points and make the message more convincing.
4. Example: When making a presentation about the change in choices of the consumers, directly saying that consumers show desires to own luxury products may not have as much impact as when confirming the same through statistical data.
1. Correctness pertains to the accuracy of your message in terms of grammar, spelling, punctuation, and information. Errors can undermine your credibility and cause confusion.
2. Always proofread your communication to ensure accuracy and professionalism.
3. Example: Imagine receiving a message with errors like “The employees meeting their managers to discuss performance or goals.” Revise it to “The employees are meeting with their managers to discuss performance and goals”. Here, grammar is corrected, leading to a more accurate message and better impact.
1. Coherence involves organising your message logically and ensuring that the ideas flow smoothly from one point to another.
2. Each part of the message should connect naturally, allowing the receiver to follow the thought process effortlessly.
3. Logical coherence enhances understanding and prevents confusion.
4. In simpler terms, when your communication is coherent, it is like telling a story that has a clear beginning, middle, and end, and all the parts fit together logically.
5. Example: Consider the original message “The project deadline is approaching. Will you attend the launch party tonight? Will you be able to meet your deadline?” The topics are disjointed. However, if revised to “As the project deadline is approaching, I wanted to know if you will be able to meet the deadline? By the way, would you be attending the dinner party tonight?” the connection between the project and the party inquiry makes the message more coherent.
1. A complete message provides all the essential information a recipient needs to take the necessary action or make informed decisions.
2. Incomplete messages can lead to misunderstandings or lead to follow-up questions, time wastage, and effort.
3. It is important to ensure that your communication includes all relevant details and addresses potential questions or concerns.
4. Example: Think about the message “Please send me the report.” It lacks details. In contrast, “Could you please send me the quarterly sales report by Friday at 3 PM?” provides essential information about the specific report and the deadline, making it a complete and more actionable question.
Courtesy
1. Courtesy refers to the tone and manner in which a message is conveyed. Respect and consideration for the recipient’s feelings, opinions, and perspectives are vital.
2. A courteous tone fosters positive relationships and encourages open communication.
3. Avoid aggressive language or insensitive remarks that may hinder understanding or cooperation.
4. Example: Imagine receiving a message that demands “I need this report now!” This tone may come across as rude or threatening. However, when revised to “Could you please send me the report at your earliest convenience? Your assistance would be greatly appreciated,” the message becomes more courteous and acknowledges the recipient’s effort.
Imagine you are a manager in an Indian company. You need to deliver feedback to an employee about their performance. How would you apply the principle of “concreteness” to ensure that your message is clear and well-received? Share a real or fictional example of how you would do this effectively.
By adhering to the 7 Cs of effective communication, you can create messages that are clear, concise, meaningful, and respectful. These principles are applicable across various communication channels, from face-to-face conversations to written documents and digital communication. Embracing the 7 Cs can significantly enhance your ability to communicate effectively in both personal and professional contexts.
Clear Understanding Good communication helps people understand each other better, reducing confusion and mistakes.
Stronger Relationships When we communicate well, we build better relationships with friends, family, and colleagues.
Solving Problems Effective communication is crucial for solving arguments and disagreements. It helps find solutions everyone can agree on.
Persuading Others If we talk well, we can convince others more easily. This is useful in getting what we want or need.
Career Success Having good communication skills provides ample of opportunities for professional growth and development.
Less Stress Misunderstandings and miscommunication can lead to reasons of stress. Effective communication helps us feel better by solving problems and worries.
Personal Growth Learning to communicate better makes us more confident and helps us express ourselves.
Changing the World On a larger scale, good communication can help with important issues like raising awareness or making positive changes in society.
In short, effective communication is a valuable skill that can make life easier and more successful by promoting clear understanding and positive connections with others.

Activity 1: C for Communication (Group Work)
Form a group of four to five students. The teacher can help each group pick one C of communication and ensure that the topic is not repeated.
Each group is to discuss about the chosen C of communication. Finally, create a poster highlighting all the important details and examples related to the topic.
Present your poster and learning to the whole class.
Activity 2: Phone Conversation Challenge (Pair Work)
In pairs, engage in a phone conversation where one student plays the role of a customer with a complaint or inquiry and the other student plays the role of a customer service representative.
The customer’s issue should be related to a simple product or service concern, and the customer service representative must address the issue effectively and respectfully, using the principles of clear communication, active listening, and empathy.
After each role play, the students can switch roles and discuss their experiences.
Activity 3: Note Your Thoughts (Whole-Class Work)
Arrange the class in a big circle. Teacher will set the timer to 30 seconds. Start the activity by passing a chart paper to the student on the right-hand side of the teacher. Encourage learners to write their thoughts on the 7 Cs of Communication. They can either express in words, phrases, or complete sentences. After every 30 seconds, the student will pass the chart to the one on their right. This process continues till the sheet completes the circle and returns to the teacher. This chart can then be displayed on the board as the class summary.
A Select the correct option.
1 Which of the following is NOT one of the 7 Cs of effective communication?
a Clarity
c Coordination
b Completeness
d Courtesy
2 Which of the following best represents the “Completeness” principle of effective communication?
a A message that is vague and unclear
b A message that includes the necessary information
c A message that uses complex vocabulary d A message that is overly lengthy
3 Which of the following is an attribute of the “Conciseness” principle of effective communication?
a Providing clear and specific details
c Including unnecessary information
B Fill in the blanks with the most suitable words.
b Using polite language
d Active listening during a conversation
1 Concreteness involves using examples to make a message more relevant and relatable.
2 Effective communication goes beyond just speaking clearly; it also encompasses active .
3 involves adjusting your communication style to fit the context and audience.
4 Correctness in communication refers to maintaining accuracy in and information.
C State whether the following is True or False. Correct the statements that are false.
1 Effective communication only involves conveying information clearly through spoken words.
2 Empathy is the ability to understand and acknowledge the emotions and viewpoints of others.
3 Feedback in communication is discouraged as it can lead to conflicts and misunderstandings.
4 Adaptability in communication means using complex vocabulary to impress the audience.
D Answer the following questions. (Solved)
Q1. Why is clarity an important aspect of effective communication in the workplace?
A1. Clarity is a fundamental element of effective communication because it ensures that your message is crystal clear and easily understood by your audience. In the Indian employability sector where diverse backgrounds and languages are prevalent, being clear in your communication is essential. When you use plain and precise language, along with wellstructured information, you reduce the chances of creating misunderstandings and causing confusion. This fosters trust and enhances your professional image. Clear communication also promotes efficient decision-making and problemsolving within teams and organisations, which are critical skills in the Indian job market.
Q2. How can practising the 7 Cs of communication, especially being considerate, improve your workplace relationships and career prospects?
A2. Practising the 7 Cs of communication, especially being considerate, can significantly improve your workplace relationships and career prospects. When you show consideration for your colleagues’ needs and emotions, you create a positive and respectful work environment. Such environment can lead to better teamwork, stronger collaboration, and increased support from your peers. In the Indian employability sector, where interpersonal relationships are highly valued, being considerate in your communication can set you apart as a trusted and valued team member. Over time, your communication skills can open opportunities for career growth and advancement as your colleagues and superiors recognise your professionalism and empathy.
Q3. Imagine you are a project manager in an Indian IT company. You have a diverse team working on a critical project, and miscommunication has led to confusion and delays. Apply the principles of the 7 Cs of effective communication to explain how you would address this issue and restore clarity and efficiency in your team’s communication.
A3. In this scenario, I would address the miscommunication issue by applying the 7 Cs of effective communication:
Clarity: I would ensure that all team members clearly understand their roles and responsibilities in the project.
Conciseness: I would encourage my team members to provide concise updates and reports to avoid overwhelming others with unnecessary details.
Coherence: I would establish a standardised reporting structure to ensure that all project updates and communications follow a logical flow.
Consistency: I would implement regular communication checkpoints to ensure that everyone is on the same page and consistency is maintained.
Correctness: I would emphasise the importance of accurate data and information in all communications.
Consideration: I would encourage team members to be considerate of each other’s perspectives and provide feedback respectfully.
Completeness: I would ensure that all necessary information is included in project documentation and communications to prevent gaps in understanding.
By applying these principles, I would foster better communication within the team, reducing confusion and delays, and ultimately ensuring successful completion of the project.
A 1. c 2. b 3. a
B 1. specific 2. listening 3. Adaptability 4. language
C 1. False. Effective communication involves various forms of communication, not just spoken words.
2. True
3. False. Feedback is encouraged as it helps in improving communication.
4. False. Adaptability in communication means adjusting your communication style to suit the audience, not using complex vocabulary to impress.
Writing helps us share ideas, feelings, and information in a way that lasts. In today’s world, with the expanding presence of information communication and technology, writing is even more important. It is not just about sending an email or typing an essay; it is a skill that helps us express ourselves clearly and connect with others.
Sentences are the building blocks of writing. A sentence is a group of words that make complete sense on their own. It is like a thought captured in words. When you speak or write, you are creating sentences to communicate your ideas.
Example:
The sun is shining.
This is a sentence because it is a complete thought. The sentence tells us something about the sun.
Bright and early every morning.
This is not a sentence because it is not a complete thought. It is just a group of words.
Every sentence can be broken down into two essential parts, a subject and a predicate. A subject in a sentence is a word or a group of word that tells the name of a person or thing that the sentence is about.
A predicate in a sentence is the part of a sentence that tells what the subject is doing or what the subject is. For example:
The man drove the car swiftly.
In this sentence, “The man” is the subject. It is who the sentence is talking about. “Drove the car swiftly” is the predicate, as it tells us what the man is doing.
Remember, a sentence cannot exist without a subject and a predicate. They work together to create a complete thought. If you have only one or the other, it is not a sentence; it is just a group of words. For example:
• Subject without a predicate: “The book.”
• Predicate without a subject: “jumped over the fence.”
In both cases, we do not have a complete idea. We are left wondering, “What about the book?” and “Who or what jumped over the fence?” By understanding the subject and predicate of a sentence, you will be able to recognise and create clear, meaningful sentences. This knowledge forms the foundation for constructing sentences that effectively convey your thoughts and ideas in writing.
There are four basic types of sentences:
1. Declarative Sentence (statement)
2. Interrogative Sentence (question)
3. Imperative Sentence (command)
4. Exclamatory Sentence (exclamation)
Declarative Sentence A sentence that states a fact or an argument and ends with a full stop (.). This is the most frequently used sentence type.
For example:
Mount Everest is the highest mountain in the world. Mamta is playing badminton in the garden.
Interrogative Sentence A sentence that asks a direct question. Interrogative sentences always end with a question mark (?).
For example:
Why are you late for the meeting?
Where did you keep the packet?
Consider the following sentence: “She asked what had happened to the containers with melted ice cream in them.” Is this an interrogative sentence? No, it is not an interrogative sentence, as no one is doing the asking. The event is just recorded as a statement, making it a declarative sentence.
Imperative Sentence Like declarative sentences, imperative sentences usually end with a full stop (.). Unlike declarations though, the subject (you) is understood and an imperative sentence makes a command or a request. For example:
Read chapter 4 for tomorrow’s class. (command)
Please leave this file on my desk. (request)
Exclamatory Sentence A sentence that expresses a strong feeling like surprise, wonder, sorrow, or happiness. This sentence is a complete statement that ends with an exclamation mark (!).
For example:
Tanmay scored five goals in the game! Wow, that is a beautiful painting!
Knowing the various types of sentences and how they function helps you decide what kind of sentence to write for a situation.
The table below outlines the differences between the four types of sentences.
Declarative States a fact or an argument
Interrogative Asks a question
Imperative Gives a command
Exclamatory Shows an emotion
We are going to the library today.
Are you presenting your topic tomorrow?
Ends with a full stop (.)
Ends with a question mark (?)
Stop! Do not enter that room. Ends with a full stop or an exclamation mark (.) (!)
The exclamation word ends with an exclamation mark (!)
Wow! We won.
The sentence may or may not end with an exclamation mark.
A phrase is a group of words that work together to convey a specific meaning. Unlike sentences, phrases do not have both a subject and a predicate, so they do not express a complete thought on their own.
Instead, they are essential components within sentences, adding depth, detail, and nuances. Understanding the phrases is essential for improving writing. They add richness and detail to sentences, making communication more vivid and engaging.
Types
Noun phrase
Verb phrase
Adjective phrase
Adverb phrase
Prepositional phrase
Definition
A group of words centred around a noun, which can include articles, adjectives, and other modifiers.
A group of words centred around a verb, often containing auxiliary verbs and other elements.
A group of words centred around an adjective, providing additional information about a noun.
A group of words centred around an adverb, providing more details about a verb, adjective, or adverb.
A group of words that starts with a preposition and includes an object. A prepositional phrase shows the relationship between the object and other parts of the sentence.
Helps to provide descriptive detail Use adjective phrases to paint a clearer picture for your readers. Instead of saying “the car”, you can say “the sleek, red sports car”. Adds variety to sentence structure Use various types of phrases to add variety to your writing. Mix up noun phrases, verb phrases, and adverb phrases to keep your readers engaged.
For example:
1. Noun phrase: “The big, old tree shaded the playground, providing a cool spot-on hot day.”
In this sentence, a noun phrase “big, old tree” is used to describe the subject of the sentence.
Identify and state the types of the sentences given below.
1. Roshan was worried about his exam preparation.
2. Do you know the directions to the Qutub Minar?
3. Stop talking!
4. They were driving to Agra.
5. Please help me in organising the shelf.
6. Hurray! We won the match.
Example
The big red apple fell from the tree. The old oak tree swayed in the wind.
She is studying for her exams. They have been practicing for the upcoming concert.
The house, with a stunning view of the mountains, is for sale.
He bought a car with sleek, modern design.
She danced gracefully
The athletes ran incredibly fast during the race.
The book is on the table. They went on a vacation to the beach
Underline the phrases in the given sentences and state their types.
1. She walked to the park.
2. The old book on the shelf is a family heirloom.
3. Running in the morning, he felt refreshed.
4. He plays the guitar skilfully.
5. The concert will be held in the auditorium.
2. Verb phrase: “She laughs happily whenever she plays with her friends.” Here, a verb phrase “laughs happily” describes how she laughs, adding detail to the action.
3. Adverb phrase: “He spoke very slowly to make sure everyone could understand him.”
In this case, the adverb phrase “very slowly” tells us how he spoke, giving us more information about the action. Clarify relationships Prepositional phrases can help clarify the relationship between various elements in a sentence.
For example, “The book on the table is mine” makes it clear which book is being referred to.
Imagine language as a toolbox, and each word as a unique tool. These tools are called “parts of speech,” and they serve specific functions in constructing sentences. Understanding parts of speech is like knowing how to use various tools for multiple tasks; it allows you to craft sentences that convey your thoughts precisely. There are eight parts of speech in the English language.

Definition
Noun names of people, animals, places, things, or ideas manager, presentation, love
Pronoun used in place of a noun to avoid repetition he, she, it, they
Verb action words; tells what the person/thing is doing type, collaborate, achieve
Adverb words that modify and describe verbs, adjectives, or other adverbs effectively, very, carefully
Adjective words that describe or modify nouns efficient, experienced, essential
Preposition words that show relationships between words in, on, at, with
Interjection words or phrases expressing strong emotions or exclamations wow! oh! alas!
Conjunction words that connect words, phrases, or clauses and, but, or, because
The manager scheduled a presentation to assess our skills
He went to the store and bought the groceries.
We collaborate effectively to achieve our project goals.
She communicates effectively and manages her time carefully.
An efficient and experienced team is essential for success.
The meeting is scheduled in the conference room at 10 AM.
Wow, your presentation was outstanding!
We need to review our project and make necessary revisions.
Articles are special words (a, an, the) that are used before nouns to specify whether we are talking about something specific or in general.
There are two main types of articles:
1. Definite Article (the)
2. Indefinite Articles (a, an)
Definite Article (the)
We use “the” when we are talking about a specific thing that the listener or reader already knows about or can easily identify.
Examples:
• The manager called a staff to carry the files.
• Please pass the documents.
Rules for Using the Definite Article (the)
1. Specificity: Use “the” when referring to a specific item or group of items that the listener or reader can identify or is already familiar with.
Example: I saw the cat in the playground. (You are referring to a particular cat and a specific playground.)
2. Unique Objects: Use “the” when referring to a unique object or something that is one of a kind.
Example: The Eiffel Tower is in Paris. (There is only one Eiffel Tower.)
3. Superlative Forms: Use “the” before superlative adjectives (e.g., the best, the tallest) to indicate that something has the highest degree of quality.
Example: She is the best employee we have. (Indicating that she is the employee with the highest level of performance)
4. Ordinals: Use “the” with ordinal numbers (e.g., the first, the second) when referring to specific items in a sequence.
Example: He won the first prize in the contest. (Referring to a specific prize—the first one)
5. Geographical Features: Use “the” before the names of oceans, seas, rivers, mountain ranges, and other geographical features.
Example: The Ganga River flows through eleven Indian states.
6. Countries with Plural Names: Use “the” when referring to countries with plural names, such as “the United States” or “the Netherlands.”
Example: I have never been to the United States.
7. Musical Instruments: Use “the” before the names of musical instruments.
Example: She plays the sitar beautifully.
8. Newspapers: Use “the” before the names of newspapers.
Example: I read the Indian Express every morning.
9. Religious Books: Use ‘the’ with religious books to indicate a specific, well-known, and revered text within a particular religious tradition.
Example: I find comfort in reading the Bible every morning.
Indefinite Articles (a/an)
We use “a” or “an” when we are talking about something in a general or nonspecific way. Examples:
• I have a meeting at 2 p.m.
• She is an excellent candidate for the job.
1. Countable Nouns: Use “a” or “an” with countable nouns when you are referring to one nonspecific item or thing. Example: I saw a dog in the park. (Referring to one dog in general.)
2. Singular Nouns: Use “a” before singular nouns that begin with a consonant sound. Example: He is a teacher. (Teacher starts with a consonant sound: /t/.)
3. Singular Nouns Starting with a Vowel Sound: Use “an” before singular nouns that begin with a vowel sound. Example: She has an umbrella. (Umbrella starts with a vowel sound.)
4. Singular Nouns Starting with a Silent “H”: Use “an” before singular nouns that begin with a silent “h”. Example: He’s an honest person. (Honest starts with a silent “h” and begins with vowel sound of “o”.)
5. Professions and Nationalities: Use “a” or “an” when referring to someone’s profession or nationality without specifying a particular person. Example: She is a lawyer. (Referring to any lawyer in general.)
6. General Statements: Use “a” or “an” to make general statements about a group. Example: I need a book for my research. (Referring to any book that fits the research.)
7. First Mention: When you introduce a new, singular, and nonspecific noun in a conversation or text, use “a” or “an.”
Example: I saw a car on the street. (The car has not been mentioned before in the conversation.)
When you write, you use paragraphs to make your ideas easy to understand. A paragraph is like a group of sentences that stick together because they talk about the same thing. They are the building blocks that structure your ideas and thoughts. They provide organisation and coherence to your text, making it easier for readers to follow along and grasp your message. When writing a paragraph, the idea should be clear to you and there should be a definite topic. Without the two, your paragraph will lack focus, clarity, and uniformity.
Specific vs. Nonspecific: Remember that “a” and “an” indicate a nonspecific or generic item, whereas “the” indicates a specific or previously mentioned item.
Example: “I need a pen.” (Any pen will do.) “I need the pen you borrowed yesterday” (Referring to a specific pen.)
Even though using articles is important in the English language; however, they are not used everywhere! Cases with zero article usage, often referred to as “zero article”, occur when we don’t use any article (neither “the,” “a,” nor “an”) before a noun.
Example: What time do you have breakfast? We went to the shopping mall last week.
A well-structured paragraph typically consists of three essential elements:
1. A topic sentence
2. Supporting details
3. A concluding sentence
Topic Sentence The topic sentence is like the headline of your paragraph. It introduces the main idea or point that the paragraph discusses. It is a crucial element that guides the reader’s understanding of what is to come.
Example: “One of the key benefits of regular exercise is improved physical health.”
State whether the articles in the sentences have been used correctly or not. If not, replace the article with the correct one.
1. Please pass me a salt.
2. He is a honourable man.
3. Rishi has moved to the United States of America.
4. My father is the honest man.
Supporting Details Supporting details are sentences or examples that provide evidence or an explanation for the topic sentence. They add depth and context to your main idea.
Example: “Exercise helps strengthen the heart, reduce the risk of chronic diseases, and improve overall fitness.”
Concluding Sentence The concluding sentence summarises the paragraph’s main point and often provides a smooth transition to the next paragraph.
Example: “Incorporating regular exercise into your daily routine can lead to a healthier and happier life.”
Effective paragraphs are not just about structuring sentences, but also about conveying your ideas clearly and persuasively. By constructing paragraphs properly, you are better equipped to communicate your thoughts and engage your readers effectively.
Every writer should remember that it is important that their paragraphs are coherent and well-structured. Use the tips given below as a checklist while constructing and writing paragraphs:
1. Unity: Ensure that all sentences in a paragraph relate to the main idea expressed in the topic sentence. Irrelevant information can confuse readers.
2. Coherence: Use transition words and phrases (e.g., “furthermore,” “in addition,” “however”) to connect ideas within a paragraph and make the text flow smoothly.
3. Order: Organise your supporting details logically. You can use sequential order, order of importance, or any other suitable pattern to structure your paragraph effectively.
4. Conciseness: Be clear and concise in your writing. Avoid unnecessary repetition or overly long sentences that may confuse the reader.
5. Variety: Use a mix of sentence structures and lengths to keep your writing engaging. Short, direct sentences can be followed by longer, more descriptive ones for variety.
6. Proofreading: Always proofread your paragraphs for grammar, punctuation, and spelling errors. Clear, error-free writing enhances your credibility.
Transition words, also known as linking words, are essential for creating smooth and coherent written pieces. They help guide readers through the text, showing the logical relationships between ideas and shifts in thought or direction. Here are some common transition words and phrases, grouped by their functions:
Beginning To begin with
On the one hand Generally speaking To be sure
Comparison/Contrast
On the other hand Nevertheless Despite In spite of Still Although Yet
Emphasis Indeed
Certainly In fact Especially Furthermore
Transition Between Paragraphs First and foremost
On the contrary Moving on, to begin with In regard to
To sum up
Conclusion
To conclude In the final analysis On the whole In brief As a result
Activity 1: Paragraph Writing (Individual Work)
Imagine your teacher has given you a school assignment about the Importance of Internet. Write a 200-250-word paragraph explaining why internet has become a necessity in today’s world. Use transition words to make your paragraph flow smoothly.
Topic Sentence
Supporting Details
Conclusion
Activity 2: Planning a Podcast (Pair Work) Get in pairs. Use the graphic organiser given below to plan your own podcast. In this graphic organiser template, prompts are given to guide your podcast planning. Choose any one topic, idea, or theme that you want to work on. Using the three essential elements of a paragraph: Topic Sentence, Supporting Details, and Concluding Sentence/s, write a paragraph that you would like to share about. Include information about the concept, audience, and important details for the podcast.
Podcast Name:
Episode Title:
Length:
Purpose or Goal: What do you hope to accomplish through your podcast episode?
Overview: What topic will you discuss? (Global Warming, Importance of Reading, The Indian Constitution, Neeraj Chopra, etc.)
Topic Sentence: (What will you say to introduce your topic and hook your listeners?)
Supporting Detail 1: (Details, Evidence, Examples)
Supporting Detail 2: (Details, Evidence, Examples)
Supporting Detail 3: (Details, Evidence, Examples)
Concluding Sentence/s: (What should listeners do with the information you shared in this episode? What call to action do you have for them?)
A Select the correct option.
1 Which type of sentence asks a direct question?
a Declarative
c Interrogative
2 When do you use the definite article “the”?
a When talking about something in general
b Imperative
d Exclamatory
b When referring to a unique object or that is one of a kind
c When referring to an unspecific item
d When making a general statement about a group
3 Which part of speech is used to replace nouns and avoid repetition?
a Verb b Adjective c Adverb d Pronoun
B Fill in the blanks with the most suitable words. Use transition words or phrases from the boxes to fill in the blanks in the paragraphs. consequentlyfor instancehoweverfurthermoreparticularlylikewisenonethelessmoreover
Most habitable places on Earth have at least one species of snake. (1) , the rich, green land of Ireland is one place where ophidiophobes—those who have an excessive fear of snakes—can rest easy, for Ireland has no snakes. The most recent ice age, which ended about 10,000 years ago, made many places in the world too cold for reptiles like snakes to survive. (2) , snakes survived the period by migrating to warmer climates. Once the ice age ended, snakes were able to return to many of those original locations. But why not Ireland? Due to melting glaciers, Ireland’s land link to the mainland Britain and the rest of Europe was cut off thousands of years prior to the end of the most recent ice age. (3) , snakes were blocked from migrating to Ireland by the newly formed seas that surrounded it. As a large island cut off from other land masses, Ireland has maintained its snake-free status for thousands of years. (4) , the large islands of Antarctica, Iceland, Greenland, and New Zealand are also without any wild snakes.
C State whether the following is True or False. Correct the statements that are false.
1 A well-structured paragraph consists of a topic sentence, supporting details, and a concluding sentence.
2 In the sentence, “The book on the table is mine”, the article “the” is used correctly.
3 A sentence can be considered complete if it contains either a subject or a predicate, but not both.
4 A declarative sentence gives a command and ends with a full stop.
D Answer the following questions. (Solved)
Q1. Explain the three essential elements of a well-structured paragraph, with an example. A1. A well-structured paragraph has three essential elements: a topic sentence, supporting details, and a concluding sentence.
• Topic Sentence: The topic sentence tells you what the paragraph is going to be about. It is usually the first sentence of the paragraph.
Example: “Summer is my favourite season because of the warm weather and outdoor activities.”
• Supporting Details: These are the sentences that come after the topic sentence. They give more information, examples, or reasons related to the main idea in the topic sentence.
Example: “During summer, the sun shines brightly, and the days are longer. It is the perfect time for going to the beach, having picnics, and playing outdoor sports.”
• Concluding Sentence: The concluding sentence is the suitable ending for your paragraph. It wraps up the main points and sometimes gives a final thought.
Example: “In short, summer brings joy and opportunities to enjoy nature and various outdoor activities.”
Q2. What is a sentence? Describe the four basic types of sentences in detail. Provide examples for each type.
A2. A sentence is a group of words that forms a complete thought, conveying a specific meaning. It is the basic unit of communication in written and spoken language. A sentence typically consists of a subject, which is what the sentence is about, and a predicate, which contains the verb and other words that provide information about the subject’s action or state.
The four basic types of sentences—declarative, interrogative, imperative, and exclamatory sentences.
• Declarative Sentences: Declarative sentences make statements or convey information. They end with a full stop.
Example: “The sun rises in the east.”
• Interrogative Sentences: Interrogative sentences ask questions. They end with a question mark.
Example: “Did you finish your homework?”
• Imperative Sentences: Imperative sentences give commands, requests, or instructions. They can end with a full stop or an exclamation mark.
Example: “Please pass the salt.”
• Exclamatory Sentences: Exclamatory sentences express strong emotions, excitement, or surprise. They end with an exclamation mark.
Example: “What a beautiful sunset!”
Q3. Rohan is writing a speech on the topic ‘Sustainable Development Goals’. He needs to deliver his speech in the school assembly. He needs your help in writing the speech. What are the tips that you would like to give him?
A3. I would ask Rohan to remember that it is important that the paragraphs are coherent and well-structured. The tips given below would help him while constructing and writing paragraphs:
• Unity: Ensure that all sentences in a paragraph relate to the main idea expressed in the topic sentence. Irrelevant information can confuse readers.
• Coherence: Use transition words and phrases (e.g., “furthermore,” “in addition,” “however”) to connect ideas within a paragraph and make the text flow smoothly.
• Order: Organise your supporting details logically. You can use sequential order, order of importance, or any other suitable pattern to structure your paragraph effectively.
• Conciseness: Be clear and concise in your writing. Avoid unnecessary repetition or overly long sentences that may confuse the reader.
• Variety: Use a mix of sentence structures and lengths to keep your writing engaging. Short, direct sentences can be followed by longer, more descriptive ones for variety.
• Proofreading: Always proofread your paragraphs for grammar, punctuation, and spelling errors. Clear, error-free writing enhances your credibility. Answer Key
C 1. True
2. True
3. False. A sentence can be considered incomplete if it contains either a subject or a predicate, but not both.
4. False. An imperative sentence gives a command and ends with a full stop.
Articles: Articles are special words (a, an, the) that are used before nouns to specify whether we are talking about something in particular or something in general.
Communication: It is the process of transmitting information from one individual or group to another, using various methods and media.
Verbal Communication: It is the process of transmitting ideas and information about thoughts, feelings, and messages from one person to another using words. There are four types of verbal communication:
• Oral Communication: It is a form of verbal communication that involves conveying information through spoken words and sentences.
• Written Communication: It is a formal and structured mode of communication that uses written language to record and transmit information.
• Intrapersonal Communication: It is essentially a private communication that happens entirely within our own minds and can be defined as ‘dialogue with oneself.’
• Interpersonal Communication: It allows individuals to effectively interact and exchange information with others in various personal, social, and professional settings.
Non-verbal Communication: It refers to the messages and information that are conveyed without using words or spoken language; it includes expressing thoughts, ideas, and feelings through gestures, facial expressions, and body language.
Visual Communication: It is the process of providing information, data, ideas, and thoughts through visuals and graphics. It only uses images, graphs, charts, videos, presentations, and other graphics to convey the message or information to other people or organisations.
Decoding: It is the process by which the receiver interprets and understands the message sent by the sender. Effective communication: It means conveying ideas, thoughts, opinions, knowledge, and data clearly, and in a way that others can easily understand, leading to meaningful interactions.
Encoding: It is the process of converting the sender’s thoughts and ideas into a form that can be understood by others.
Face-to-Face: This type of communication occurs when two people interact with each other in person.
Feedback: It is the response or reaction provided by the receiver to the sender’s message. It helps the sender understand the effectiveness of their communication and whether the intended message was understood accurately. There are three types of feedback:
• Descriptive feedback: It is a detailed and specific input provided to an individual, focusing on their strengths and areas for improvement in their communication skills or work.
• Specific Feedback: It focuses on the particular aspects of a person’s performance or communication skills and offers concrete suggestions for enhancement.
• Non-specific feedback: It lacks details and fails to pinpoint areas for improvement, making it less actionable.
Phrases: A phrase is a group of words. Unlike sentences, phrases do not have both a subject and a predicate, so they do not express a complete thought on their own.
Sentence: A sentence is a group of words that make complete sense on their own. It’s like thoughts captured in words.
Declarative sentence: It is a sentence that states a fact or an argument and ends with a full stop (.).
Interrogative sentence: It is a sentence that asks a direct question. Interrogative sentences always end with a question mark (?).
Imperative sentence: Like declarative sentences, imperative sentences usually end with a full stop (.). Unlike declarations though, the subject (you) is understood and an imperative sentence makes a command or a request.
Exclamatory sentence: A sentence that expresses strong feelings like surprise, wonder, sorrow, or happiness. It is a complete statement that ends with an exclamation mark (!).
Transition words: Transition words, also known as linking words, are essential for creating smooth and coherent writing. They guide readers through your text, showing the logical relationships between ideas and signalling shifts in thought or direction.
7
Clarity: Messages should be clear, straightforward, and easy to understand.
Conciseness: Being concise means conveying the message using a few words to make it brief and comprehensive.
Concreteness: Being concrete means being very specific and using tangible examples to make your message vivid and convincing.
Correctness: It pertains to the accuracy of your message in terms of grammar, spelling, punctuation, and factual correctness.
Coherence: It involves organising your message logically and ensuring that the ideas flow smoothly from one point to another.
Completeness: A complete message provides all the necessary information that the recipient needs to take necessary action or make informed decisions.
Courtesy: It refers to the tone and manner in which a message is conveyed. There should be respect and consideration for the recipient’s feelings and opinions.
• Interpersonal communication can be further divided into three types: face-to-face communication, small-group communication, and public communication.
• The communication cycle has various elements like the sender, message, encoding, channel, receiver, decoding, and feedback.
• Feedback is a crucial element within the communication cycle. For communication to be effective, the feedback should be timely and appropriate. It can either be positive or negative.
• Descriptive feedback must be goal-oriented, actionable, user-friendly, timely, continuous, and consistent.
• The 7 Cs of communication help to ensure that a message is conveyed clearly and comprehensively.
• A communication barrier is an obstacle that prevents the receiver from receiving and understanding the message that has been sent by a sender.
• The barriers to effective communication can be of many types, like linguistic, physical, interpersonal, organisational, and cultural.
• There are various factors which can act as barriers in effective communication like lack of clarity, lack of feedback, distractions, cultural differences, power dynamics, technological issues, etc.
• To engage in effective communication, one should take care of the following principles: simple language, definite purpose, completeness and concision, appropriate medium, authenticity, courtesy, active listening, and adaptability.
• Every sentence can be broken down into two essential parts: a subject and a predicate. A subject in a sentence is a word or a group of words that tell the name of a person or thing that the sentence is about. A predicate in a sentence is the part of a sentence that tells what the subject is doing or what/who the subject is.
• There are eight parts of speech in the English language: Noun, Pronoun, Adverb, Adjective, Verb, Preposition, Conjunction, and Interjection.
• There are two main types of articles: Definite article (the) and Indefinite Articles (a/an).
• A well-structured paragraph should include three elements: a topic sentence, supporting details, and a concluding sentence.
A. Select the correct option.
1. What are the types of communication barriers?
a. Linguistic, personal, private, public, and cultural.
b. Linguistic, physical, interpersonal, organisational, and cultural.
c. physical, mental, private, public, and linguistic.
d. interpersonal, emotional, private, public, and cultural.
2. Which of the following types of feedback focuses on the strengths and areas for improvement in communication?
a. Negative
c. Non-specific
b. Descriptive
d. No feedback
3. Which of the following is an example of oral communication?
a. Newspapers
c. Phone call
b. Letters
d. Email
4. A message is transferred from its sender to the receiver through a .
a. Decoder
c. Channel
b. Feedback
d. Encoder
5. Which of the following can be considered as a physical barrier?
a. Two people communicating in different languages.
b. Two people arguing at the office.
c. Two people talking on the phone with a poor line connection.
d. Two students giving speeches on the same topic but with different accents.
6. Which of the following is defined as dialogue with oneself?
a. Intrapersonal communication
c. Public communication
b. Oral communication
d. Small-group communication
7. Which of these is an example of a Declarative Sentence?
a. It is raining outside.
c. Please open the door.
b. Who are you?
d. Hurray! It’s raining outside.
8. Which of the following sentences has an adjective?
a. Raj has a blue shirt.
c. She will go by train.
b. He can speak Spanish
d. Meera can run fast.
9. Which of the following includes expressing thoughts, ideas, and feelings through gestures, facial expressions, and body language?
a. Verbal communication
c. Visual communication
b. Non-verbal communication
d. Interpersonal communication
10. means use of brief and comprehensive words to convey the message.
a. Clear
c. Conciseness
b. Completeness
d. Correctness
B. Fill in the blanks with the most suitable words.
1. Unclear or incomplete messages can lead to confusion, , and misinterpretation.
2. An barrier in communication refers to obstacles that arise due to the equation of the relationship between two people.
3. The is the individual or group who decodes and interprets the message sent by the sender.
4. feedback is an indicator to the sender that there is a need to modify the mode of communication as their ideas are not being communicated effectively.
5. communication is the process of providing information, data, ideas, and thoughts through pictures, images, and info graphics.
6. Transition words are also known as words.
7. involves organising your message logically and ensuring that ideas flow smoothly.
8. Delivering a speech in public is an example of communication.
C. State whether the following statements is True or False. Correct the statements that are false.
1. All regions have their own languages and not knowing them does not cause any hindrance.
2. A communication barrier is an obstacle that prevents the receiver from receiving and understanding the message that has been sent by the sender.
3. A message refers to the information, ideas, or thoughts that the sender wants to communicate to the receiver.
4. Feedback is an important component of an effective one-way communication.
5. Face-to-face communication is a type of communication when two people interact with each other in person.
6. Non-verbal communication refers to the messages and information that is conveyed by using words or spoken language.
7. We do not use ‘the’ before the names of newspapers.
8. Good communication helps people understand each other better, reducing confusion and mistakes.
D. Short answer-type questions.
1. Explain organisational barriers with an example.
2. Differentiate between encoding and decoding.
3. Define written communication.
4. Explain the two parts of a sentence with an example.
5. Describe effective communication.
E. Long answer-type questions.
1. What are the factors contributing to communication barriers?
2. Differentiate between specific and non-specific feedback.
3. What is non-verbal communication? State its advantages.
4. Define phrases. Give examples of each of the four types of phrases.
5. Explain the principles of effective communication.
F. Competency-based questions.
1. Professor Krishna teaches at Tamil Nadu University. He needs to deliver a speech at a university located in Delhi, North India. But, Prof. Krishna is under-confident due to the language and cultural barriers. What, in your opinion, might be the actions that Prof. Krishna need to take?
2. Rakesh and Vinay, who are the senior employees of an organisation, are required to provide detailed feedback to a junior worker. What factors must they take into account before giving the feedback?
3. Prakshi has to appear for an interview for the role of sales manager. Although Prakshi is well-versed in her subject matter and has good communication skills, what steps should she follow in the interview which can increase her chances of getting hired?
4. Moksh works for a multi national firm. He was asked to write a paragraph about teamwork so that other workers could read it and understand the value of teamwork. Moksh is confused about how he should structure his paragraph. What suggestions would you like to give to Moksh?
5. Some parts of the city of Raipur were being affected by the rising communal riots. The senior manager in a corporate bank advised employees who were from riot-affected areas to avoid coming to the office the next day. However, because the information was shared with many people working at different levels, when it got to the employees, it was modified to a workfrom-home notice for everyone. What might have been the best course of action for the bank manager to follow?
Self-management is the capability of an individual to manage their behaviours, thoughts, and emotions in a productive way that helps them to reach their goal and feel good about themselves. It enables a person to excel in both personal and professional spheres. When people can manage themselves well, they generally become more productive and content. An individual should understand his responsibilities and work towards fulfilling them on their own.
For example, Vikas is a Product Manager at Prepare EdTech Co. He effectively manages himself to ensure productivity and happiness. He has a morning routine, he prioritises things in his to-do lists, keeps track of his time, and doesn’t get distracted easily. He sets his goals and achieves them; he connects with other people and aims to learn continuously. He also practices healthy living and as a consequence, gets sufficient time to spend with his family. Hence, self-management is an integral part of his life.
Time Management The capacity of an individual to manage and allocate time to various tasks and responsibilities while minimising distractions and unproductive activities.
Self-motivation It’s the internal drive and enthusiasm that prompts an individual to take initiative, set goals, and persistently pursue them.
Self-awareness Self-aware individuals can reflect on their internal experiences and gain insight into their personality and skills. This will help them to make informed decisions.
Stress Management The ability of an individual to handle their work efficiently and effectively even under pressure or difficulties.
Decision Making The capacity to resolve issues, address the problems, and make rational decisions by considering all the factors involved.
To Have a Goal It is essential for an individual to have a fixed goal and to continuously work towards achieving it.
Personal Development A person should continuously strive hard and improve their existing knowledge and learn new things.
Stress is an automatic physical, mental, and emotional response to a challenging and difficult event. It is a common phenomenon in everyone’s fast-paced life and can get triggered due to various personal and professional reasons. The threats, challenges, and difficult events causing an emotional disturbance or stress are called stressors. They can be self-induced or external.
Few examples of stressors can be:
1. You are feeling unprepared for an examination.
2. You haven’t completed your project before the submission date.
3. You experience the loss of someone close to you.
Various factors that contribute to stress are:
• Personal Relationships
• Financial Issues
• Health Concerns
• Greed for materialistic pleasures
• Unrealistic Goals
• Lack of Control
• Societal or Peer Pressures
• Technology Overload
• Bad Experiences
• Discrimination
Stress can cause anxiety, irritability, and other serious ailments like headaches, body pains, loss of appetite, heart-related issues, etc. It can impact your mental health severely. You can also lose your ability to concentrate properly and can start feeling lonely even in familiar surroundings. But we have to cope with it to lead a happy and fulfilling life.
It is a misconception that all stress is harmful. Stress necessarily does not have a negative impact on us. Positive stress, often referred to as “eustress,” can motivate and energise you to perform well and achieve goals.
An individual can experience eustress when they are quite confident about their abilities and it leads to a positive response. After coping with a situation, they feel a sense of accomplishment. For example, Richa had to submit her project before the deadline and she successfully achieved her goal. She had to manage her time well and organised her tasks efficiently. The situation was stressful but it motivated her to take up more challenges in life.
The way in which we respond to stress and manage in today’s world is of utmost importance. Stress management refers to the different ways, strategies, techniques, and practices used to reduce, cope with, and ease the physical, emotional, and psychological effects of stress. There are a variety of mechanisms which can help you to deal with stress in your life in a better way. Stress management is about learning how to deal with tough situations in a healthier and calmer way, so we can feel better and stay balanced.
The importance of stress management lies in its ability to promote overall well-being and help individuals to effectively navigate through the challenges of life. These are a few reasons:
Stress can have a negative impact on physical health as it can lead to high blood pressure, cholesterol, obesity, and other lifestyle diseases. It is important to manage your stress to remain physically fit.
Stress can have an equal amount of negative impact on one’s mental health and can lead to depression, anxiety, and many other related issues. Thus, stress management can help you cope with mental health issues.
Cognitive Functioning
Productivity
Relationships
Quality of Life
Resilience
Emotional Regulation and Adaptability
To Enhance Performance
If you learn to manage your stress well, your cognitive skills, decision making abilities, problem-solving abilities, and rational thinking will not get hampered.
Excessive stress can lead to decrease in one’s productivity as it leads to distraction and reduction in focus. Hence, stress management can help in making you more productive.
High-stress levels can lead to strained relationships as people become irritable and are not able to communicate well. Thus, stress management is all the more important.
Effective stress management definitely helps in improving one's quality of life. Destressing leads to improved communication and a better lifestyle, thus improving the quality of life.
Learning how to manage stress builds resilience, enabling individuals to cope better with future challenges.
Stress management also helps in regulating one’s emotions well. Thus, it improves your relationships and helps you to adapt to changing environments.
Stress management has always helped individuals enhance their performance. When anyone is in better control of their emotions, they automatically perform better.
1. Keep a positive attitude.
2. Assert your feelings, opinions, or beliefs instead of becoming angry, defensive, or passive.
3. Learn to manage your time more effectively.
4. Set limits appropriately and refuse requests that would create excessive stress in your life.
5. Create time for hobbies and interests.
6. Seek out social support. Spend enough time with your loved ones.
7. Reach out to a psychologist or other mental health professionals if you need any help.
It is common to encounter stressful situations in life. But there are various techniques and methods to manage our stress effectively so that such situations do not overwhelm us. Let us look at some of them:
Physical Exercise It includes all the activities that help an individual maintain physical fitness, and mental wellbeing, and help improve their sleep. Engaging in physical exercises keeps us healthy, active, and helps to build immunity. Various organ systems of our body start functioning properly. We can indulge in various exercises, like running, jogging, dancing, cycling, swimming, aerobics, etc.
Here are a few benefits of doing exercises regularly:
1. Release of Endorphins: Physical activity triggers the release of endorphins, which are natural “feel-good” chemicals that reduce stress and improve our mood.
2. Reduces Stress: Exercise helps to lower the level of the stress hormone like ‘cortisol’, which leads to a decrease in stress and anxiety. An individual can also vent out negative emotions and feelings using vigorous exercises.
3. Enhances Coping Mechanism: Regular exercises build resilience and strengthen a person physically and mentally. Thus, people are able to cope better with stress in the long term.
4. Boosts Confidence: It helps an individual feel more confident by improving their body image.
5. Better Mood: Regular exercise can make you feel less worried and avoid daily life stressors. It’s like a natural mood enhancer.
Think and Tell
• Imagine sitting down in a quiet corner and listening to soft music at the end of a hectic day. How would you feel?
• Is ‘all work and no play’ a right way to lead your life?
6. More Energy: Exercise gives you an energy boost, which is great when stress is making you feel tired.
Yoga Yoga is a part of our culture and its popularity is growing considerably as people are experiencing various health benefits. Different physical postures, meditation, breathing exercises, and relaxation techniques are very useful in reducing stress. The yoga exercises that focus on slow movement, stretching, and deep breathing are best for lowering your anxiety and stress levels. It should be a part of your daily routine so that it can provide a positive impact, both physically and mentally.
Here are a few benefits of doing yoga regularly:
1. Improves strength, balance, and flexibility of an individual.
2. Can help you manage stress and reduce stress hormones.
3. Relaxes your mind to help you sleep better.
4. Provides relief in back pain and can ease symptoms of various ailments, like arthritis, asthma, etc.
5. Promotes self-care and helps in keeping your emotions in control.
6. Ensures more energy, a sense of happiness, and brighter moods.
Laughing counts as an exercise and acts like a mini-workout. It aims to cultivate joy, engages various muscles, and helps you let go of stressors.
Meditation Meditation gives a sense of calm and balance to an individual’s life. It has worked wonders for many people and has many benefits. You need to focus your attention on something calming, like an image or chant a mantra; it will lower your stress and anxiety considerably. It will help you relax and improve your sleep, energy levels, and mood. To meditate, you will need to have the following things in place:
1. Find a quiet place.
2. Get into a comfortable position.
3. Focus your attention on a word, image, phrase, object, or even your breath.
Here are a few of the most common benefits that people experience when they practice meditation on a regular basis:
1. Reduces stress and helps control our anxiety
2. Helps increase our concentration power and attention span
3. Promotes emotional health and doesn’t let you fall in the trap of negative thinking
4. Clears your mind and enhances your creativity and imagination
5. Helps us stay calm during stressful situations
6. Ensures that an individual becomes more self-aware
7. Improves the sleep cycle of an individual
Enjoying Engaging in enjoyable activities is a wonderful way to improve your mental health and well-being. One should find time to indulge in hobbies, activities, and events that they enjoy the most. It helps us cope with stressful situations in daily life.
Enjoying your life can help you with stress management by:
1. Mood Enhancement: Doing things that you enjoy releases positive chemicals in your brain, like endorphins. That will instantly boost your mood and reduce stress.
2. Stress Relief: Participating in activities you love shifts your focus away from daily life stressors. It provides a healthy distraction and lowers stress levels.
3. Provides a Necessary Break: Enjoyable activities give your mind a break from excessive worrying and overthinking, allowing you to relax and recharge.
4. Positive Emotions: Laughter and joy associated with enjoyable activities trigger the release of chemicals that counter stress hormones.
5. Reduced Tension: Engaging in activities that you like relaxes your tense muscles and alleviate physical symptoms of stress.
6. Escape from Routine: Indulging in fun activities can provide a break from your regular schedule and create an opportunity to refresh your mind.
7. Restored Energy: Having fun can provide a burst of energy that can help you combat fatigue, which often accompanies stress.
Going for Vacations and Holidays Vacations and holidays with friends and family can provide a necessary break from the mundane routine of life. It provides an opportunity to break free from the hectic schedule and helps in slowing down the pace of one’s life. It helps an individual to indulge in refreshing experiences, come close to nature, strengthen bonds with family, and let go of their stress.
Here’s why vacations are great for reducing stress:
1. Relaxation: Vacations offer a much-needed break from the monotonous routine, allowing you to relax and unwind, which can significantly reduce stress levels.
2. Change of Environment: Going to a new place can help you detach from your usual stressors and gain a fresh perspective on different things.
3. Disconnecting: Taking a break from work, emails, and social media during a vacation gives your mind a chance to rest and reduces information overload.
4. Physical Rest: Vacations usually involve more sleep and physical rest, which helps your body recover from stress.
5. Positive Memories: The memories you create during vacations will serve as positive anchors when you struggle to manage stress during difficult times.
6. Stress Hormone Reduction: Vacations can lead to decreased levels of stress hormones like cortisol and make you more relaxed.
Taking a vacation, whether short or long, allows you to recharge both physically and mentally, ultimately helping you better manage and cope with stress when you return to your regular routine.
Nature Walk It is important that one goes back to nature or at least be with nature from time to time. Nature is the besthealer. Taking a nature walk is a simple yet powerful stress management technique that involves walking in a natural environment, such as a park, forest, beach, or any outdoor space with greenery.
Here’s why nature walk can help to considerably reduce stress levels:
1. Fresh Air and Oxygen: Being outdoors exposes you to fresh air and provides an abundance of oxygen, which can help clear your mind and improve your mood.
2. Natural Beauty: Surrounding yourself with the beauty of nature, including trees, mountains, and water bodies, can calm and soothe your mind.
3. Reduced Mental Fatigue: Nature also helps in reducing mental fatigue caused by constant screen time and mental demands, giving your brain a much-needed break.
4. Time for Reflection: Nature provides a peaceful setting where you can introspect and contemplate about various solutions to challenges.
5. Improved Mood: Exposure to natural sunlight can boost serotonin levels. It will promote feelings of happiness and reduce anxiety.
6. Technology Detox: A nature walk provides a golden opportunity to disconnect from screens and digital devices, reducing stress caused by external factors.
A small amount of stress may be beneficial for us and help us stay motivated, but too much stress can interfere with our daily life. The inability to cope with stress can cause many health problems. Stress can be dealt with the help of the techniques discussed in this chapter.
Activity 1: Let’s Exercise Together (Group Work)
As we all know, stress has become a part of our daily life and we have to deal with such situations regularly. Your teacher has suggested that it will be beneficial to conduct a few stress management exercises in the class daily for 10 minutes. Get in groups of four and propose one exercise each that can be conducted in your class and highlight its importance to your classmates.
Activity 2: A Wonderful Trip (Individual Work)
You went on a trip with your family and friends during your summer vacations. It helped you to relax and spend some quality time with your closed ones. Write an essay on how was your trip and recount a few memories from those days.
A Select the correct option.
1 Which is a stress management technique?
a Cycling
c Chatting with others
2 How can we manage stress effectively?
a By having a negative attitude
b By creating time for our interests and hobbies
c By worrying continuously
d By having no goal in life
b Watching TV all day
d Spending excess time on social media
3 How is nature walk helpful in making our mind calm?
a By increasing mental fatigue
b By spoiling our mood
c By spending extra time on screens
d By giving us time to reflect on our actions
B Fill in the blanks with the most suitable words.
1 Positive stress is referred to as .
2 individuals have an ability to reflect on their internal experiences.
3 Exposure to can boost seroton in levels.
4 By being and not aggressive, one will be able to put across one’s feelings and thoughts properly.
C State whether the following is True or False. Correct the statements that are false.
1 Meditation helps in relaxing our body and mind.
2 Indulging in fun activities forces you to adhere to your regular routine.
3 Doing exercises regularly will improve your sleeping patterns.
4 Nurturing hobbies and interests are a waste of time.
D Answer the following questions. (Solved)
Q1. What are the different stress management techniques an individual can use to de-stress themselves?
A1. The various stress management techniques are as follows:
• Physical Exercise
Yoga
• Meditation
• Enjoying
• Vacations with friends and family
• Taking a nature walk
Q2. Why do you think vacations are important?
A2. Vacations can be very relaxing and rejuvenating. They provide a much-needed break from the mundane routine and hectic schedules. The reasons why vacations are important are as follows:
• Vacations give you time to unwind and relax.
• They help you connect with the nature.
• They also help you to disconnect from usual stressors and provide a digital detox.
• Vacations with friends and family also provides physical rest to your body.
• It gives you a chance to create positive memories.
Q3. Rahul is about to appear for his annual exams. He is studying very hard to score good marks. However, he is under a lot of stress due to his family’s expectations from him. What measures do you suggest he should undertake in order to appear for his exam without any stress?
A3. Measures that can be undertaken by Rahul are as follows:
• Study regularly and avoid any last-minute preparations as it would lead to more stress.
• Time management is the key. Rahul should use his time judiciously and prepare/revise according to the time tables created by him.
• Sleep well and have a proper diet.
• Arrange all the things required for the exam the previous night as it helps avoid any stress at the last moment.
• Do not think too much about the expectations of your family as stress is not healthy for your mind.
• Relax yourself by meditating daily as it will improve your concentration power.
• You can take a break for a short period by indulging in any activity that you love, like dancing or listening to music. It will allow you to relax and recharge yourself.
1. True
2. False. Indulging in fun activities gives you a break from your regular routine.
3. True
4. False. Nurturing hobbies and interests is very useful.
In a professional setting, individuals get the opportunity to complete their tasks in two main ways: with a group of colleagues or all by themselves. When people work in a group, they learn to work as a team. This can be helpful because everyone brings different skills and ideas to the table. Working within a group encourages different perspectives and the sharing of responsibilities. People come up with creative solutions and new ways of doing things together.
On the other hand, working on our own has its own advantages. When someone works independently, they have the freedom to make decisions and work at their own pace. An independent worker can concentrate deeply on their work without distractions. They also don’t have to wait for others’ opinions or approval, which can speed things up. It is important for individuals and organisations to think about what works best for their goals and preferences.
The ability to work independently means being capable of completing tasks and responsibilities on your own, without needing constant guidance from others. It means that you have to make your own decisions and organise your work properly because only you are accountable for it. It will increase your confidence and self-esteem.
1. When you work independently, it helps you set and achieve your goals on time. It also helps you understand yourself better.
2. You become less dependent on others and also develop leadership qualities.
3. Time management is an essential aspect of independent work. You need to manage and organise your tasks effectively.
4. You become your own boss and learn to take initiatives. You have to pave a path to success for yourself.
5. For example, if you are given the responsibility to make a PowerPoint presentation on a project, you will learn to execute your skills efficiently. You have to bring your own ideas to the forefront and also manage your time well. If the presentation turns out well, it will boost your self-esteem and motivate you to grow further.
1. They are self-reliant and do not depend on others for approval or meeting deadlines.
2. They are very determined about their work and set their own goals.
3. They are self-motivated and push themselves to overcome challenges.
4. They have problem-solving and decision-making abilities as they encounter difficulties and seek answers on their own.
5. They are confident in their own actions and decisions. They develop an ability to handle their problems well.


Boosts Confidence Working individually without any other support definitely boosts the confidence of an individual. You are like your own boss and do not have to follow anyone’s instructions. This will enhance your confidence and your ability to work, as you will gain more knowledge.
Improves Decision-Making Skills An independent worker needs to take all the important decisions on their own to keep moving ahead. One cannot rely on other opinions and has to make bold and timely calls. This helps in building decision-making skills in an individual, as they know that it will only impact them in the future.
Brings out the Best in a Person If you work alone, then you put in more effort to make your work stand out. You get the opportunity to express your ideas and thoughts without any obstacles. Thus, it brings out the best in you. The final work is the end result of the time and efforts you have put in.
Makes You More Accountable If you are working without a team, then you are responsible for both accurate and inaccurate outcomes. You need to inculcate a sense of responsibility for your work and take full ownership of it, even if something goes wrong.
Increases Self-esteem When people accomplish a goal on their own, it improves the way they think about themselves, and other people also perceive them in a different light. It boosts their self-esteem and makes them value themselves more.
Enhance Time Management Skills Working independently also teaches you a very important skill—time management. You learn how to manage your things efficiently and organise your tasks in a proper manner so that there is no delay in producing the outcome.
To achieve self-independence, we need to hone the following three skills:


List down all your hobbies and interests. Discuss how you will manage your hobbies and studies together.
The ability to recognise and understand one’s own thoughts, feelings, behaviours, and qualities is referred to as self-awareness. It involves being aware of your own strengths and flaws, as well as your values, beliefs, and emotions. You will know how they influence your actions and interactions with others. A person is prepared to work towards his goal in an effective manner when he is aware of how he thinks and what he thinks. It also involves having a good understanding of one’s own identity, desires, and motives. Only then can individuals make more informed decisions.
1. It is the ability to recognise, focus on, evaluate, and overcome one’s own weaknesses and limitations.
2. It will help you develop a positive mindset and progress towards achieving your goals.
3. The most important step towards self-awareness is paying attention to our emotions, thoughts, and behaviour.
4. For example, Rohan has joined a new firm as a Communications Trainer. He has his first project and has to give training to the Sales Department. He is feeling nervous and under-confident. He starts to make a list of their strengths and weaknesses. Then, he spots the areas where more attention is required and prepares himself accordingly. This increased his confidence in his abilities and made him more self-aware.
Type of Self-awareness
Explanation
Public self-awareness When you are conscious of how you are perceived publicly by other individuals or society, you have developed public self-awareness.
Some people behave in a certain manner that is acceptable in society, as they are aware that they are being evaluated by other people. Such individuals are called ‘pleasers.’
All individuals try to impress others with their actions and behaviour when they are aware that all attention is on them.
This type of self-awareness can also be harmful, as individuals can become pressurised by the expectations of society.
Examples
If we have to give a speech on our organisation’s Annual Day event, we will be aware that everyone’s attention is on us, so we become conscious of how we speak, what we speak, and our body language.
Private self-awareness
When you are conscious of how you behave about certain things or situations and how it will impact others.
With this type of self-awareness, you are able to notice and examine your own thoughts, feelings, and motivations.
All individuals are aware of their actions and can reflect on them personally. Others cannot easily observe what is going on inside their minds.
Even when we have properly revised everything the night before an exam, our hearts still beat fast as the examination time approaches.
We need to be self-aware publicly and privately because these two aspects are very important for our mental health. Our mental health gets hampered from unnecessary negative thoughts.
Imagine you had a very rough day at school, how will you make sure that your day ahead doesn’t go like that?
1. Meditation helps in knowing and relaxing your body and mind.
2. Journal writing helps you note down your emotions, feelings, strengths, and weaknesses.
3. One needs to learn to create boundaries in order to maintain a healthy body and mind. We should refuse if we do not feel comfortable.
4. In talk therapy, you can express your emotions, feelings, and insecurities to a professional or a close person. They can talk to you about both your positive and negative thoughts.
5. Expressing your thought process to other people is also important. No one will clearly know what goes on in your head until you tell them.
Self-motivation refers to the internal drive and determination that inspire an individual to take actions, achieve goals, and put in efforts even when faced with challenges or obstacles. It is the ability to find inspiration and energy within oneself, rather than relying on others. A self-motivated individual always takes the lead, works hard, and pushes himself to achieve his goals. It’s like having your own cheerleader within your own mind, who encourages you to keep going and do your best.
1. It is a life skill that needs to be inculcated within every individual.
2. It can be seen as an inner force that motivates every person to work towards accomplishing their goals and living a meaningful life.
Why do I need to know myself? People frequently wonder why they need to know themselves. They feel they already know everything. However, when you begin to learn about yourself, you will discover a new aspect every time.
Intrinsic self-motivation Intrinsic self-motivation is the drive that comes from within to accomplish a particular goal by putting in a lot of effort and hard work.
This typically comprises a job or a hobby that a person finds enjoyable rather than a huge burden of work to complete. This, the process of completing a task more rewarding than the actual accomplishment.
So, this motivation comes from within and the individual is not concerned about the rewards or appreciation that come along with it.
Extrinsic self-motivation The drive to achieve a particular goal that comes from outside is known as extrinsic self-motivation. An action is performed due to external motivations like power, money, or rewards.
This usually refers to a task that a person performs solely due to external factors and without any genuine passion for it. Every person likes when they receive appreciation for any task they have completed, and working only by keeping that in mind is extrinsic motivation.
When you practice your favourite sport without feeling burdened or tired even after getting up early in the morning.
When you want to learn a new skill, then you take out time from your hectic schedule.
When you study hard to get good grades because your father promised a new gift.
An employee works day and night for a project because it will be reviewed for his salary increment.
Self-motivation is a critical attribute that can significantly impact various aspects of life. It is a valuable trait that can empower individuals to lead successful and fulfilling lives.
Goal Achievement Self-motivated individuals are more likely to set and work towards achieving their goals. They have a strong internal drive that drives them forward, even in the face of obstacles.
Productivity and Efficiency Self-motivated people tend to be more productive and efficient in their work. They have the initiative to start tasks and the determination to complete them with high quality results.
Resilience A self-motivated individual is more likely to bounce back and persevere at the face of setbacks or failures. This makes them resilient by nature.
Personal Growth Self-motivation is a driving force behind personal growth and self-improvement. It encourages individuals to continuously learn, develop new skills, and seek opportunities for self-enrichment.
Independence and Autonomy Self-motivated individuals are often more independent and self-reliant. They are less dependent on external factors like rewards or external pressure to take action.
1. Develop healthy practices for progress toward your goals.
2. Set SMART goals for yourself. Your goal should be specific, measurable, attainable, relevant, and time-bound.
3. Prioritize your work and avoid all the distractions that come your way.
4. Always be grateful and humble for what you have achieved.
5. Self-evaluation is very essential to assess one’s growth, weaknesses, and strengths.
6. Learn to manage your time and maintain a healthy lifestyle.
The ability to control and manage your thoughts, emotions, and behaviours in different situations is referred to as self-regulation. When you practice self-regulation, you can calm yourself even when you’re unhappy, be patient even when things are difficult, and stay focused even when there are distractions. It is about controlling your own reactions, behaviours, and state of mind. It is about teaching your brain to process information before acting and not reacting in a hurried manner.
1. It is like having a control centre in your mind which helps you to regulate your feelings and make good decisions.
2. It helps you to focus on pursuing your goals without any distractions.
For example, a person going through overwhelming emotions on their personal front does not let that overpower their professional commitments.
Self-regulation is needed in various aspects of life, as it plays a vital role in personal development, mental and emotional well-being, and success in both individual and societal contexts.
Emotional Well-being Self-regulation helps individuals manage their emotions effectively. It enables them to recognize and cope with stress, anxiety, anger, and other negative emotions, leading to improved mental health and overall well-being.
Adaptability People with self-regulation skills are more adaptable to change. They can adjust to new situations, environments, and circumstances with greater ease.
Ethical Decision-Making It helps people make ethical and moral decisions by considering the consequences of their actions and aligning them with their values.
Stay Positive Self-regulated individuals look at the situations from a positive point of view. It helps them remain calm at time of stress. They consider every challenge as an opportunity to learn and improve their efforts.
To Resolve Conflicts Self-regulation allows an individual to consider different opinions and empathise with colleagues and others they interact in the workplace. A self-regulated professional help in solving workplace conflicts without emotions guiding their decisions.
People will often misunderstand you as being selfish after you start working on yourself. But remember that it is always important to be a better version of yourself.
Activity 1: Working Independently vs Working in a Group (Group Work) In a group, discuss whether you like to work individually or in a group. Then, prepare a chart on the pros and cons of working independently.
Activity 2: Role Play on Self-awareness (Group Work) Prepare a role play on ‘Self-awareness’ in the class within a fixed time period. Prepare a storyline and include all the steps taken to become a self-aware person. Students can volunteer for the roles. You cannot take the help of your teacher.
Error Alert!A Select the correct option.
1 Ability to work independently means
a completing one’s own responsibilities.
b completing others’ responsibilities.
c completing everyone’s responsibilities.
d completing one’s own and others’ responsibilities.
2 The capacity to be aware of one’s thoughts, values, and emotions is called a selfishness
c motivation
b self-awareness
d discipline
3 Which of the following is NOT a step to improve self-awareness?
a Journal writing
c Talk therapy
B Fill in the blanks with the most suitable words.
b Meditation
d Fighting
1 is the process of writing down one’s thoughts and emotions to work upon them.
2 self-motivation is the drive that comes from within to accomplish a task.
3 The ability to control and manage your thoughts, emotions, and behaviours is called .
4 The ability to work independently will your confidence.
C State whether the following is True or False. Correct the statements that are false.
1 The ability to know yourself and your emotions is called selfishness.
2 There is no need to regulate your emotions.
3 Self-awareness, self-motivation, and self-regulation are essential skills that we need to hone if we want to work independently.
4 Meditation helps in relaxing your body and mind.
D Answer the following questions. (Solved)
Q1. What is self-regulation?
A1. Self-regulation is knowing one’s behaviour, emotions, and ideas, and controlling them for future objectives. It involves controlling your state of mind and the situations that upset you. It’s about teaching your brain to process information before acting. It places a strong emphasis on concentrating and pursuing goals, and helps in regulating emotional reactions and controlling them.
Q2. Differentiate all the three skills needed to work independently.
A2.
DefinitionThe ability to recognise and understand one’s own thoughts, feelings, behaviours, and qualities is referred to as self-awareness.
ExamplesWriting down your strengths and flaws, so that you become more aware about yourself.
Self-motivation refers to the internal drive and determination that inspires an individual to take an action, achieve goals, and put efforts even when faced with challenges or obstacles.
Learning a new skill on your own, being appreciated for doing good work, etc.
The ability to control and manage your thoughts, emotions, and behaviours in different situations is referred to as self-regulation.
A person going through overwhelming emotions on their personal front does not let that overpower their professional commitments.
Q3. Nitesh is a senior in high school. He is the captain of the school basketball team, as well as a member of the school drama and debate clubs. As college admissions approach, Nitesh is unsure which course to pursue further because he is interested in all three. What is your opinion on Nitesh’s approach to resolving the problem?
A3. Nitesh’s involvement in the school basketball team, drama club, and debate club showcases his diverse interests and talents. This not only reflects his willingness to explore different areas but also exposes him to a variety of skills and experiences. All three aspects provide different learning, exposure, and experience. Moreover, Nitesh’s ability to manage multiple commitments shows that he possesses good time management and organisational skills. These skills are important in college, regardless of the path he chooses. His experience in managing different activities effectively could give him an advantage in adapting to the demands of college projects and extra-curricular involvement. Firstly, Nitesh needs to be self-aware about his area of interest. He needs to reflect on the co-curricular activity that he wishes to pursue further. Then, he needs to start journalling about his strengths, weaknesses, likes, dislikes, and opportunities. Finally, he needs to know which of the interests motivates him internally and not externally. This will help him know about his interests and then, he can easily choose his course.
C 1. False. The ability to know yourself and your emotions is called Self-awareness.
2. False. Regulating your emotions helps in achieving your future goals.
3. True
4. True
Ability to Work Independently: It means being capable of completing tasks and responsibilities on your own, without needing constant guidance from others.
Eustress: It is a positive stress that can motivate and energise an individual to perform well and achieve their goals.
Extrinsic self-motivation: The drive to achieve a particular goal that comes from outside a person is known as extrinsic self-motivation.
Intrinsic self-motivation: The drive that comes from inside a person to accomplish a particular goal by putting in a lot of effort and hard work.
Private self-awareness: When you are able to examine and reflect on your own thoughts, feelings, and motivations, you have developed private self-awareness.
Public self-awareness: When you are conscious of how you are perceived publicly by other individuals or society, you have developed public self-awareness.
Self-awareness: The ability to recognise and understand one’s own thoughts, feelings, behaviours, and qualities is referred to as self-awareness.
Self-management: It is the capability of an individual to manage their behaviours, thoughts, and emotions in a productive way that helps them to reach their goal and feel good about themselves.
Self-motivation: It refers to the internal drive and determination that inspires an individual to take an action, achieve goals and put efforts even when faced with challenges or obstacles.
Self-regulation: The ability to control and manage your thoughts, emotions, and behaviours in different situations is referred to as self-regulation.
Stress: It is an automatic physical, mental, and emotional response to a challenging and difficult event.
Stressors: The threats, challenges, and difficult events causing an emotional disturbance or stress are called stressors.
Stress Management: It refers to the different ways, strategies, techniques, and practices used to reduce, cope with, and ease the physical, emotional, and psychological effects of stress.
• There are various elements of self-management, like time management, self-motivation, self-awareness, stress management, decision making, personal development etc.
• Various factors that contribute to stress are personal relationships, financial issues, lack of control, unrealistic goals, greed for materialistic pleasures, bad experiences, technology overload, etc.
• Stress management can help in improving our physical and mental health, enhancing our cognitive abilities, productivity, and the quality of life, and building resilience and emotional control.
• There are various stress management techniques, like physical exercise, meditation, yoga, enjoying our favourite activities, nature walks, and going for vacations.
• An independent worker is self-reliant, determined, self-motivated, confident and possesses decision making abilities.
• The ability to work independently boosts your confidence, improves decision making skills, makes you more accountable, increases your self-esteem, and teaches you how to manage your time effectively.
• To achieve self-independence, we need to hone the three skills: self-awareness, self-motivation, and selfregulation.
• A self-motivated person is able to work productively and efficiently with resilience to achieve their goals. They can work independently for their personal and professional growth.
• Self-regulation is important to monitor one’s emotional well-being and to stay optimistic. A self-regulated individual is able to resolve conflicts with their ethical decision-making.
A. Select the correct option.
1. Which of the following is not an importance of working independently?
a. Boost in confidence
c. Increased self-esteem
b. Improved decision-making skills
d. Demotivation
2. What do you possess if you are conscious of how people will view you in public?
a. Public self-awareness
c. Self-motivation
b. Private self-awareness
d. Stress management
3. Which hormone is often referred to as the ’stress hormone’ and is released due to excessive stress?
a. Dopamine
c. Cortisol
b. Serotonin
d. Endorphin
4. is the internal force and determination that drives you to complete tasks which seem to be difficult.
a. Self-motivation
c. Self-respect
5. What is stress management?
a. Thinking about stressful situations
c. Ignoring stress
B. Fill in the blanks with the most suitable words.
b. Self-regulation
d. Self-praise
b. Coping with stress effectively
d. Avoiding stressful situations
1. A self-motivated individual always takes the lead, works hard, and pushes himself to achieve his .
2. The ability to control and manage your thoughts, emotions, and behaviours in different situations is referred to as
3. is about learning how to deal with tough situations in a healthier and calmer way.
4. self-motivation is the drive to attain a specific goal that emerges from external motivations, such as money or power.
5. Enjoying life works as mood enhancement and releases positive hormones, like
C. State whether the following is True or False. Correct the statements that are false.
1. Self-regulation helps to regulate your feelings and enables you to make good decisions.
2. Stress is an intentional physical, mental, and emotional response to a challenging and difficult event.
3. Independent workers are very determined about the work but someone else sets their goals.
4. Stress can have a negative impact on our physical health only.
5. Time Management is the capacity of an individual to manage and allocate time to various tasks and responsibilities.
D. Short answer-type questions.
1. What is intrinsic self-motivation? Explain with the help of an example.
2. In a Unit Test of grade 10, Rashika received low marks. She needs to keep herself motivated so that she can improve her performance in the next test. Define self-motivation and suggest some tips which can be followed by Rashika.
3. How can yoga help in managing stress?
E. Long answer-type questions.
1. Differentiate between the two types of self-awareness. Give an example.
2. Define Stress Management. What are the different ways in which you can manage your stress effectively?
3. What do you mean by the ability to work independently? Discuss its significance.
F. Competency-based questions.
1. Sakshi is a media manager at an advertising agency. She was initially very passionate about her work, but due to a lack of acknowledgment and a heavy workload, she has recently started to lose interest in it and has no motivation. What steps can she take to motivate herself to do better at work?
2. Jay works as a manager in Mitali Pvt. Ltd. His job involves meeting tight project deadlines and dealing with a demanding workload. Lately, the pressure has been taking a toll on his mental and physical health. You are Jay’s friend and are worried about him. You have decided to help your friend realise the need and importance of managing stress. What would you tell him?
In the early days of computers, there were no operating systems, so every program had to be created with its own specific set of instructions, which made computing complex and time-consuming. Then, in 1956, General Motors developed an operating system for a single IBM computer, marking the first step towards simplifying computer operations. As the 1960s rolled in, IBM began incorporating operating systems into their computers, making computing more accessible and efficient. A significant milestone came with the introduction of UNIX in the 1960s, a revolutionary system that allowed multiple users to work on a computer simultaneously and was written in the C programming language. Microsoft also entered the scene later, playing a pivotal role in the evolution of personal computing by developing its own operating system. Today, virtually all major computer devices come equipped with operating systems, each possessing unique features and contributing to the diverse landscape of modern computing.
An operating system, often called an OS, is like the boss of a computer. It’s the important software that helps your computer do its job smoothly. Think of it as the traffic police of your computer world, directing all the programs and making sure they work together without crashing into each other.
Processor Management The operating system oversees the functioning of the processor by assigning tasks to it, ensuring that each process and application get sufficient processor time for proper operation.
Memory Management The operating system handles the distribution of internal memory (like RAM, cache, etc.) among various applications to ensure smooth execution of each process.
Device Management An operating system controls the operation of input and output devices, receiving their requests, performing specific tasks, and communicating with requesting processes.
File Management The operating system maintains organized records of file actions, such as creation, deletion, transfer, copying, and storage. It also preserves data integrity and directory structures.
Security An operating system employs various techniques to safeguard user data’s confidentiality and integrity, typically involving usernames, passwords, and firewalls.
Error Detection The operating system periodically checks for external threats, malicious software, and hardware issues, alerting users when necessary.
Job Scheduling In multitasking systems where multiple programs run concurrently, the operating system decides which applications run and in what sequence, also determining their allocated time.
Following are the different types of Operating System:
Single-user Operating System
These operating systems were designed to accommodate just one user performing a single task at a time. Among the most well-known single-user operating systems were Microsoft Windows 3.1, Microsoft Windows 95, and Microsoft DOS.
Batch Operating System
In a batch operating system, there is no direct interaction between the user and the computer. Instead, an operator is responsible for grouping similar tasks into batches. Multiple users can submit their jobs to the operator. It’s good for handling a large volume of work efficiently. Example: Early mainframe computers used batch processing for tasks like payroll processing.
Graphical User Interface
This operating system employs a graphical interface that encourages user interaction. Within this system, menus and icons facilitate all tasks, simply requiring a click to execute. This eliminates the necessity for users to recall complex commands or their syntax, as was necessary in the Command-Line Interface (CLI) or Character User Interface (CUI). Notable examples of GUI-based systems include the Windows operating system, the Mac OS, and Linux.
Multi-user Operating System
Multi-user operating systems enable multiple users to utilise the same computer simultaneously. Examples of operating systems falling into this category include Linux, Unix, and various versions of Microsoft Windows. Windows 2000 marked a significant milestone as the initial Windows iteration permitted users to establish multiple user accounts on a single machine.
Multitasking Operating System
Multitasking refers to the capability of handling multiple tasks simultaneously. A multitasking operating system can manage multiple processes using shared resources like the CPU.
Multithreading Operating System
These are operating systems that enable various components of an application or program to operate concurrently. Multithreading, a characteristic of such systems, can potentially lead to delayed response times for specific processes. For instance, if you host a game server on a local area network (LAN), your friends can connect to your machine simultaneously, allowing them to engage with different aspects of the same game.
Real-time Operating System
Real-time operating systems are super quick. They process user commands with minimal delay. Used in scenarios where rapid responses are crucial, like in aviation or medical devices. Example: Aircraft control systems often run on real-time operating systems.
Time-sharing Operating System
This type of operating system allows multiple users to use a computer simultaneously from different terminals. The goal is to minimize response times
The first Graphical User Interface (GUI) operating system, called “Xerox Alto,” was developed in the 1970s at Xerox’s Palo Alto Research Centre (PARC). It introduced concepts like windows, icons, and menus, which later inspired the GUIs of popular systems like Windows and macOS. In essence, your computer’s familiar desktop environment can be traced back to the groundbreaking work done at Xerox PARC.
for users. Example: Unix-based systems offer time-sharing capabilities, allowing multiple users to work on the same server.
Distributed operating systems connect multiple systems, allowing them to share resources and work together. They use multiple central processors to serve real-time applications. If one system fails, it doesn’t affect others. Example: Google’s distributed operating system, known as the Google File System (GFS) and the MapReduce framework. These systems are designed to manage vast amounts of data across thousands of servers, allowing Google to perform tasks like web indexing and data analysis on an immense scale.
Imagine a world where each operating system is a character with its own unique superpower. For example, one OS can organise information super-fast, another can protect against viruses, and yet another can create amazing graphics. If these operating systems were superheroes in a computer universe, what adventures and challenges might they face? How would they work together to keep the computer world safe and efficient?
Let your imagination run wild and tell us a story about these OS superheroes and their exciting journeys in the digital realm.
Windows 11, launched on October 5, 2021, represents Microsoft’s latest iteration of its personal computer operating system. While it maintains the underlying foundation of Windows 10, Windows 11 introduces a fresh user interface and various novel functionalities. Notable enhancements encompass a reimagined Start menu, updated snap controls for multitasking, and the inclusion of virtual desktops. It’s worth noting that Windows 11 brings revised system requirements into play, meaning that not all devices compatible with Windows 10 can accommodate Windows 11.
When you power on your computer, Windows starts automatically and shows a welcome screen with a login message. Subsequently, you’re greeted by the initial Windows screen, referred to as the Desktop, which showcases graphical symbols known as icons.

The term ‘Desktop’ draws its inspiration from the physical desk in your workspace, where you typically keep items like a pen holder, notepad, calculator, and files. Similarly, the Windows desktop replicates this concept by displaying icons such as shortcuts, documents, and disk drives for easy access.
Icons
Icons are the small graphical symbols you see on your computer screen, and they allow users to perform various tasks by double-clicking on them. Each icon corresponds to a specific program.
Menu
In a Graphical User Interface (GUI), menus are used to help users find information and execute program functions. A menu is a structured collection of options related to a particular operation.
Taskbar
The taskbar is a horizontal bar usually located at the bottom of the desktop. It has several sections:
1. Start Button: Found at the bottom-left corner, clicking it opens the Start menu, where you can access various tasks like launching programs, searching for files, and shutting down the computer. It also provides quick access to File Explorer, Settings, and frequently used apps.
2. Middle Section: This part displays buttons for currently open programs, making it easy to switch between them with a single click. Active programs are highlighted.
3. Notification Area: Located on the right side, it shows the system date and time along with icons that provide information and notifications about various aspects of the computer, such as software updates, network status, battery life, and volume control. The Peek button on the extreme right minimizes all open program windows to reveal the desktop.
Feature Menu
Definition A digital menu card for your computer’s programs and options.
Purpose Helps you find and open programs and options easily.
Function Lists all available programs and options on your computer.
Example Imagine it’s like a restaurant menu, showing all the dishes you can order.
Icons
Tiny pictures or symbols representing programs, files, or folders on your screen.
Visual shortcuts for quick access to programs and files.
Represents programs, files, or folders visually.
Think of them as road signs on your computer screen that help you find what you need.
Usage You use it to open programs and access various computer functions. Click on icons to open programs, files, or folders without reading long names.
Taskbar
A bar usually at the bottom of your screen that helps manage open programs.
Manages open programs and allows you to switch between them quickly.
Displays icons for open programs and provides quick access to them.
It’s like having a personal assistant on your computer desk, keeping things organized.
Helps you switch between different tasks or programs you’re working on.
A file is like a digital document that can store information, data, or programs on a computer. It can hold text, images, music, and more. Just like you keep your school assignments in folders, a computer uses files to store and organize information. Each file has a unique name and a specific type, like a document (e.g., a Word file) or a picture (e.g., a JPEG image). Files help computers understand and manage the data they store. Example: Think of a file as a digital version of a book. A book can contain stories, pictures, or information, and you can give it a title like “My Vacation Photos.docx.”
File operations are actions you can perform on files, like creating, opening, saving, copying, moving, or deleting them. When you work on a computer, you use these operations to manage files. For instance, you create a new document, open an existing photo, save changes you made to a file, copy a song to another folder, move a video to a different drive, or delete a file you no longer need. Example: Imagine you’re working on a project. You create a new file to write down your ideas, open it to edit, and save it when you’re done. These are file operations in action.
Create Making a new file or folder.
Open Accessing and viewing an existing file.
Save Storing changes made to a file.
Copy Duplicating a file or folder.
Example
Creating a new Word document.
Opening a PDF to read its contents.
Saving edits made in a text document.
Copying a photo to create a backup.
Move Relocating a file or folder to a different location.Moving a video from one folder to another.
Delete Removing a file or folder from the system.
Rename Giving a new name to a file or folder.
Properties Viewing and changing file attributes like size, date, and author.
Deleting a document you no longer need.
Renaming a file from “File001” to “Report.”
Checking the properties of an image file.
File organisation refers to how files are structured and arranged on a computer’s storage, like in folders and drives. Just like you use folders or drawers to organise your belongings, a computer uses folders to organise files. Files can be grouped into folders based on their type or purpose, making it easier to find and manage them. Example: Think of file organisation as arranging your school assignments in subject-specific folders. You have a “Math” folder for maths-related papers and a “Science” folder for the science-related ones.
A directory structure is the way folders and subfolders are organised on a computer to create a hierarchy. Imagine a tree with branches. The main folder is like the tree trunk, and subfolders are like branches. This structure helps you organise and access files efficiently. You can have folders within folders to create a hierarchy. Example: Picture your computer’s directory structure as a tree. The “C:” drive is the trunk, and you have branches like “Documents,” “Pictures,” and “Music.” Inside “Documents,” you might have sub-branches like “Work” and “School.”

Definition A digital document or data item that can contain text, images, programs, or other types of data.
Purpose Stores and manages specific data or content, such as a text document, image, or program.
Content Contains data or information, such as text, images, audio, video, or executable code.
Representation Typically represented by an icon with a specific file extension (e.g., .txt, .jpg, .exe).
Example Examples include a Word document (document.docx), an image (photo.jpg), or a music file (song.mp3).
Usage Used to store and manage specific data or content. Files are the building blocks of digital information.
Actions Files can be opened, edited, copied, moved, renamed, and deleted.
Hierarchy Typically, files are organised within folders
A file system is the underlying software that manages how files and directories are stored and accessed on a computer’s storage device. Think of the file system as the rules that govern how files are saved, organised, and retrieved. Different operating systems (like Windows, macOS, or Linux) have their own file systems with their own set of rules. Example: It’s like the foundation and framework of a building. Without a proper structure (file system), the files and folders (the building’s rooms and floors) wouldn’t be organised or accessible.
A container used to organise and store files and other folders.
Provides a way to group and organise related files and subfolders together.
Contains files, subfolders, or a combination of both. It does not hold data directly but organises it.
Usually represented by a folder icon, and its contents are visible when opened.
Examples include a “Documents” folder, a “Pictures” folder, or a “Projects” folder.
Used to organise and group related files and folders to maintain an orderly digital workspace.
Folders can be created, opened, copied, moved, renamed, and deleted.
Folders themselves can be organised hierarchically within other folders.
File Operations: Actions like creating, opening, saving, copying, moving, and deleting files.
File Organisation: Structuring files within folders and drives for easy management.
Directory Structures: Hierarchical arrangement of folders and subfolders for efficient organisation.
File-System Structures: Underlying software governing file storage and access, unique to each OS.
To create a new file, think of it like starting a new document or drawing. You need an application, such as OpenOffice Writer, Microsoft Word or Notepad (for text) or Paint (for images).
To create a new file on your desktop, follow these steps:
1. Right-click on an empty area.
2. From the menu that appears, choose the New option. You’ll then see a list of file types and applications, like MS Excel, MS Word, OpenOffice Writer, or any other application. Pick the one you need.
3. Enter a file name where the cursor is and press Enter, and a new file will be generated.
 Fig. 8.3: To create a new file
Imagine a folder as a digital container where you can keep your files organised.
To create a new folder on your desktop, follow these steps:
1. Right-click on an empty area.
2. From the menu that appears, choose the New option. You’ll then see the option Folder.
3. Click on Folder, and a new folder will be generated.
Renaming a file or folder can be done in various ways:

1. Right-click on the file or folder, choose the Rename option from the context menu, then type the new name and press Enter.
2. Open “This PC” by double-clicking the icon.
3. Navigate to the location of your file or folder in the left panel. In the right panel, select the file or folder, and then click on the “Rename” command in the “Organize” group on the Home tab.
4. Type the new name and press Enter.
To delete a file or folder, there are several methods you can follow:
1. Select the file or folder you want to delete and press the Delete key.
2. Right-click on the file or folder, then choose the Delete option from the context menu.
3. Use the This PC icon method:
• Double-click on the This PC icon to open it.
• Navigate to the location of your file or folder in the left panel.
• Select the file or folder in the right panel.
Misconception—File Deletion is Permanent!
It’s a common misconception that when you delete a file on your computer, it’s gone for good and there’s no way to get it back. But don’t panic just yet! Computers are smarter than that, and they have a special place called the “Recycle Bin” to give you a second chance.
•

Step 1: Locate the Recycle Bin. The Recycle Bin is like a digital safety net for deleted files. You can usually find it on your desktop or in your file explorer.
Step 2: Double-click on the Recycle Bin icon to open it. Inside, you’ll see a list of files and folders that you’ve deleted.
Step 3: Look through the Recycle Bin list to find the file you want to restore. It might be hiding among other deleted items.
Step 4: When you’ve found your file, double-click on it. A dialog box will appear. Choose “Restore.” This action will your file back to its original location.
Step 5: Go back to where your file was originally saved (like, your “Documents” folder) and make sure it’s back in its rightful place.
To permanently remove all items from the Recycle Bin, you can take either of these actions:
1. Right-click on the Recycle Bin icon and choose Empty Recycle Bin. You will be prompted to confirm the permanent deletion of the files. Click on Yes to proceed.
2. Double-click on the Recycle Bin icon on your desktop to open it. Then, click on Empty Recycle Bin in the Manage group on the Recycle Bin Tools tab to permanently delete all deleted files and folders.

Moving a file or folder involves relocating it from its original place (source) to another location (destination). Copying, on the other hand, means making a duplicate of the selected file or folder.
To perform a move or copy action on a file or folder, follow these steps:
1. Double-click on the “This PC” icon on your desktop.
2. Choose a location from the left pane where you want to move or copy the file/folder.
3. Select the specific file or folder you wish to move or copy from the right pane.
Options for copying/moving a file
4. Use one of the following methods to move or copy your file/folder:
• Select Copy and choose the destination to copy the file to.
• Right-click the file/folder and select Cut to move it or Copy to make a duplicate. Then, right-click an empty area in the right pane and choose “Paste” from the menu to select your desired location.
• You can also press Ctrl+X to move or Ctrl+C to copy the selected file/folder and then press Ctrl+V at the destination where you want to move or copy it.
Managing files and folders is crucial for maintaining order, efficiency, and data security in the digital age. It’s a fundamental skill that can save you time, prevent headaches, and ensure your digital assets remain accessible and protected.
1. Organisation: Proper file and folder management helps you keep your digital life organised. It’s like tidying up your room or arranging your books on a shelf. When files are well-organised, you can quickly find what you need without wasting time searching.
2. Efficiency: An organised file structure boosts productivity. You can work more efficiently because you know where to locate your documents, photos, or projects. This reduces frustration and helps you complete tasks faster.
3. Preventing Data Loss: Good file management reduces the risk of losing important data. When you organise files into folders and regularly back up your files, you have a safety net in case of computer crashes, hardware failures, or accidental deletions.
4. Accessibility: Properly organised files and folders make your data accessible from various devices and locations. You can access your work documents, photos, or music whether you’re on your computer at home, on a work computer, or using a mobile device.
5. Collaboration: When working with others, an organised file system makes it easier to collaborate. You can share specific files or folders without confusion, and everyone involved knows where to find and save their contributions.
6. Data Security: Organised file management can enhance data security. You can protect sensitive files by placing them in password-protected folders or encrypting them. It also helps you keep track of what’s important and needs safeguarding.
7. Saving Space: Managing files and folders efficiently can help you save storage space. You can delete unnecessary files and keep your computer running smoothly.
8. Backup and Recovery: When you have a structured file system, it’s easier to back up your data regularly. In the event of data loss, you can quickly restore your files from backups.
Activity 1: Taskbar Exploration and Icon Hunt
(Individual Work & Class Discussion) Identify and list five icons on the taskbar and describe their functions. Participate in the discussion on the significance of the taskbar and icons based on the findings.
Activity 2: File and Folder Management Adventure
(Individual Work & Class Discussion)
Perform actions like creating a new folder, renaming a file, deleting a folder, and saving a file within a specific subfolder. Finally, share your experiences and troubleshoot challenges faced during the activity.
Activity 3: Recycle Bin Rescue Challenge
(Individual & Group Work)
Delete a file from your computer and try to access and restore it from the Recycle Bin. Finally, in a group of four to five students, discuss the importance of the Recycle Bin in preventing permanent file deletion.
A Select the correct option.
1 Which type of operating system allows multiple users to use a computer simultaneously from different terminals with the goal of minimising response times?
a Real-Time Operating System
c Batch Operating System
b Distributed Operating System
d Time-Sharing Operating System
2 Which action involves relocating a file or folder to a different location?
a Copying
c Creating
3 What makes a folder different from a file?
b Opening and Editing
d Moving
a It can store various types of data. b It usually has a specific file extension.
c It contains files, subfolders, or both. d It can be opened, edited, and deleted.
B Fill in the blanks with the most suitable words.
1 An operating system is like the of a computer, directing all the programs and ensuring they work together smoothly.
2 The first operating systems emerged in , marking a significant step towards streamlining the computer operations.
3 Real-time operating systems are used in scenarios where rapid responses are crucial, such as in or medical devices.
4 To create a new folder, right-click on a file explorer window or on your desktop, choose “New,” and then select .
C State whether the following is True or False. Correct the statements that are false.
1 Files can store various types of data, including text, images, music, and programs.
2 The taskbar helps manage open programs and allows quick switching between them.
3 File operations include actions like creating, opening, saving, copying, moving, and deleting files.
4 File organisation involves arranging files within folders and drives to make them easier to find and manage.
D Answer the following questions. (Solved)
Q1. What is the purpose of a file system structure in an operating system?
A1. The purpose of a file system structure in an operating system is to govern how files and directories are stored and accessed on a computer’s storage device. It defines the rules for organising, naming, and managing files. Different operating systems have their own unique file systems, ensuring efficient storage and retrieval of data.
Q2. Explain the role of the Recycle Bin in managing deleted files on a computer.
A2. The Recycle Bin is a digital safety net for deleted files. When a file is deleted, it is not permanently removed but moved to the Recycle Bin. Users can open the Recycle Bin, locate the deleted file, right-click on it, and choose “Restore” to return the file to its original location. This feature helps prevent accidental data loss and provides a second chance to recover deleted files.
Q3. Rohan is using his uncle, Mr Rakesh’s desktop, when he notices the poor manner in which his uncle organises his files containing personal and professional details. Rohan decides to explain to his uncle that organising his files would lead to data security. What should Rohan say to his uncle?
A3. Rohan should educate his uncle that proper file organisation can enhance data security by enabling users to categorize and protect sensitive files within password-protected folders or encrypted storage areas, thereby reducing the risk of unauthorized access.
Taking proper care of our things, whether they are books, clothes, furniture, or electronic gadgets, is of extreme importance. It is important to ensure the smooth operation of electronic devices, such as computers and mobile phones. As we maintain our personal hygiene through daily routines like bathing, brushing our teeth, and eating, we must also realise the importance of the regular maintenance of our machines.
Computers are complex devices with many delicate electronic components that require protection from dust and potential damage. Neglecting their maintenance can result in reduced efficiency.
Considering the expense associated with computers and mobile phones, it becomes essential to take consistent and vigilant care of them.
Computer maintenance means ensuring that computers are well-maintained to function properly. This maintenance can be categorised into two parts: Hardware maintenance and Software maintenance.
Hardware maintenance involves taking care of the physical parts of a computer, like the monitor, keyboard, CPU cabinet, mouse, and any additional devices connected to it. You need to ensure that these components work well by cleaning them, storing them correctly, and fixing them when needed.
Properly maintaining your computer is essential for its smooth operation. If you avoid cleaning and caring for your computer, dust can build up, which will lead to decreased performance. To keep your computer running well, stick to these guidelines for cleaning its different hardware parts.
Monitor
1. Use a gentle and damp cotton cloth for cleaning.
2. Never spray any liquid directly onto the screen, and refrain from touching it with your hands.
3. Use a pointer or stylus to prevent potential damage to your computer screen.
Keyboard
1. You can use compressed air, a soft brush, or an anti-static vacuum cleaner to remove dust from the keyboard.
2. Avoid eating while using the computer to prevent food particles from getting stuck between the keys, which could harm it.
3. In cases of severe dirtiness, you might have to physically remove and clean the keys.
4. To clean the top surface of the keys, a soft, damp cloth is suitable for removing oil and dirt.
1. When dealing with a mechanical mouse that contains a ball beneath it, it is more prone to gathering dust.

2. In such cases, you might have to open the mouse and take out the ball. Dip it in isopropyl alcohol to eliminate dust, oil, or grease.
3. For an optical mouse, a simple wipe from both above and below using a clean cotton cloth is sufficient.
CDs and DVDs
1. Always store CDs and DVDs in their appropriate cases to keep them safe against scratches.
2. Avoid touching the surfaces with your hands.
3. To clean the CD surface, you can apply a specialised cleaning solution to a cotton cloth and gently wipe the CD.
CPU Cabinet
1. Make sure to clean both the exterior and interior parts of the CPU cabinet.
2. Use a soft cotton cloth to wipe the outer surface, and do not forget the back.
3. Inside the cabinet, use a blower to remove dust, but be cautious not to touch the small components on the motherboard.
Digital Camera
1. Avoid touching the lens of the camera.
2. Use a soft brush or dry cotton cloth to eliminate dust.
3. You can also use a specific cleaning solution for the lens, but never directly apply it to the lens.
Software maintenance refers to the cleaning of computer programs. This includes tasks like scheduled disk cleaning, protection against viruses, removing temporary and unnecessary files, creating backups regularly, updating software, and checking for security threats.
Virus

Computers and data are crucial for any organisation’s operations. If something goes wrong with computers or data, it will cause business activities to stop, resulting in the loss of many hours of hard work and research.
A computer virus is a program or set of programs that interrupts a computer’s normal functioning and can infect or destroy data. It enters a computer without the user’s permission or knowledge, at times through infected storage devices like CDs or pen drives, and can even enter while browsing the internet. To avoid detection, these viruses hide silently. They can remain undetected and inactive for a long time, waiting for a specific signal or event to activate them.
Signs of a virus attack on a computer can be identified in several ways:
1. Slowing down the computer by consuming memory
2. Causing unusual movements or patterns on the screen
3. Displaying strange messages like “Your PC is stoned,” and more
4. Increasing disk space usage and file sizes as the virus attaches itself to many files
5. Resulting in frequent system freezes
6. Showing abnormal ‘write protect error’ messages
7. Changing data in the directory against the filename when a virus modifies a file
8. Formatting the hard disk
9. Deleting or damaging files
Protecting Computer Against Virus
Virus attacks can harm not only your data but also the functioning of your computer. Malware attacks can result in modified files, frequent disruptions, reduced speed, and more. Therefore, it is important to ensure your safety online.
1. Use Security Software: Install trustworthy antivirus software and keep it updated. Set it to regularly scan and isolate potential threats.
2. Employ Firewalls: Configure your web browser settings to block access to unwanted websites.
3. Be Cautious Online: Exercise caution when sharing information online. Use secure websites for financial transactions, avoid saving personal data on websites, and restrict yourself from downloading software from unauthorized sources.
4. Update Software: Keep your computer’s software and applications up-to-date to patch security vulnerabilities.

5. Beware of Spam: Delete emails from unknown sources without opening them or downloading attachments.
6. Backup Your Data: Regularly back up your data to protect against loss and use encryption software to secure it.
7. Scan Portable Devices: Before using USB drives or other portable storage devices, scan them for viruses.
8. Disable Cookies: To protect your personal information, consider disabling cookies in your web browser.
Antivirus software is a set of computer programs that are created to find, prevent, and delete viruses from a computer. They perform these tasks:
1. Check computer files for known viruses by comparing them to a virus dictionary.
2. Recognise unusual behaviour in computer programs that could indicate an infection.
The full form of Virus is Vital Information Resources under Siege. Which is the largest and most complex virus known?
However, merely installing antivirus software does not guarantee complete protection because it cannot detect new virus programs. To stay safe, you should regularly update your computer with the latest antivirus software versions. Most antivirus companies allow users to download these updates from their websites. Some well-known antivirus programs include Quick Heal, Norton Antivirus, Avast One, and AVG Antivirus.
Given below is the process that is followed to scan a system for various kinds of viruses and malwares.
The steps to use an antivirus software are as follows:
We will study the steps for McAfee antivirus software here, but you can use any antivirus software that you have, like Norton, AVG, Avast One, etc., on your computer.
To open McAfee antivirus, follow these steps:
1. Go to Start and search for McAfee Security Scan Plus.
2. The McAfee window appears.
3. Click on the Scan option, and it will scan your system within a minute.
The first antivirus software was invented in 1987 by Andreas Luning and Kai Figge. Can Antivirus programs detect every virus?
4. If it detects any threat, then it will also ask for your permission to fix the issue.
Maintaining a computer system is often overlooked, which can lead to equipment damage and even accidents. To prevent this, it is important to create a maintenance schedule covering daily, weekly, monthly, and yearly tasks.
When you save files on your computer, they may not be stored in contiguous memory locations, resulting in fragmented data that slows down your system. To address this issue, regularly run the Disk Defragmenter utility program.
1. Click on Start > All Apps >Windows Tools > Defragment and Optimize Drives.
2. In the Optimize Drives dialog box, select the partition you want to optimise (e.g., Drive C:).
3. Click Optimize to improve your computer’s efficiency.
You can also schedule disk optimisation by following these steps:
1. Click on the Change settings button in the Optimize Drives dialog box.
2. The Optimization Schedule window appears.
3. Check the box next to “Run on a schedule (recommended).”
4. Choose the frequency for running the Optimize Drives program: Daily, Weekly, or Monthly.
5. Click the Choose button in the Drives option to select the disk you want to optimise, or you can choose all partitions.
6. Click OK and then Close to save your Optimize Drives settings. Your computer will now run the optimised schedule based on this schedule, so make sure it is powered on during these times.
Sometimes you may have noticed that your computer is working very slowly. It can happen due to the temporary internet files that need to be deleted from your computer regularly. To delete these files, follow these steps:
1. In the Search box on the taskbar, type “disk cleanup”, and select Disk Cleanup from the list of results.
2. Select the drive you want to clean up, and then select OK
3. Under Files to delete, select the file types to get rid of. To get a description of the file type, select it.
4. Select OK.
If you need to free up more space, you can also delete system files:
1. In the Disk Cleanup dialog box, select Clean up system files.
2. Select the file types to get rid of. To get a description of the file type, select it.
3. Select OK.
By following these steps, you can effectively set up an optimisation schedule for your computer and remove unnecessary temporary files to keep it running smoothly.
To delete temporary files using an alternate method:
1. On the taskbar, enter %temp% in the Search box.
2. Click on the %temp% file folder that appears.
3. The b folder with temporary files will open.
4. Highlight all the files by using the Ctrl+A key combination.
5. Hit the Delete key.
6. This action will remove all the files from this folder.
Removing Spam from an Email Account
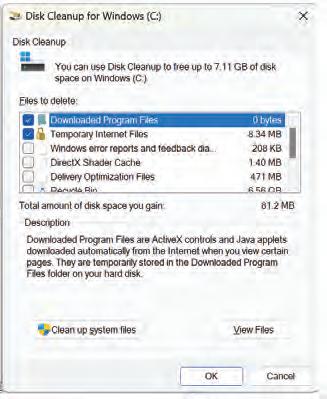
Spam, or unwanted emails, arrive from unknown senders, and they are generally related to advertising, spreading harmful software, attempting phishing, and sometimes containing inappropriate content. If you open these spam emails, there’s a risk of your system getting infected by a virus or your personal information being compromised.
To protect users, nearly all email services offer a filter feature that stops spam messages from reaching your main inbox. Now, let us talk about how to use a filter in your Gmail account.
To make a filter in your Gmail account that automatically moves suspicious emails to the spam folder, follow these steps:
1. Log in to your Gmail account.
2. In the Search bar at the top, click the Filter option.
3. A pop-up box will appear.
4. Set the criteria for creating the filter.
5. Click on the Create filter option. Another pop-up box will show different choices.
6. Choose the relevant option and click the Create filter button.


To create a filter for a specific email account in Gmail, use these steps:
1. Log in to your Gmail account.
2. Select the checkbox next to the email for which you wish to create a filter.
3. Above, click on the More icon, which will open a pop-up menu.
4. Choose the option Filter messages like these

5. A pop-up box will appear where you can specify the filter criteria.
6. Select the relevant options and click the Create filter button. Deleting Spam
To remove spam messages from your Gmail account, follow these steps:
1. Access your Gmail account.
2. On the left-hand pane, click the More option and select Spam from the drop-down list of folders.
3. At the top, click on the “Delete all spam messages now” link.
4. A confirmation dialogue box will appear.
5. Click OK
6. This will delete all the spam messages from your email account.

Activity 1:
Divide yourself into groups of four or five and create a chart showing the step-by-step (Group Activity) process of how scanning is done in the system.
Activity 2:
Imagine that Ramesh has a computer system, which he has been complaining about, that has become very slow. What action would you ask him to take in order to increase the speed of the computer?
Activity 3:
Aman is feeling frustrated due to the frequent spam emails he receives. What steps can he take to set up an email filter and eliminate these unwanted messages from his inbox?
A Select the correct option.
1 Which of the following is NOT a recommended method for cleaning a computer keyboard?
a Using compressed air
b Using an anti-static vacuum cleaner
c Submerging the keyboard in water
d Physically removing and cleaning the keys
2 What is the primary function of antivirus software?
a Defragmenting hard drives
b Cleaning temporary files
c Detecting and removing viruses
d Creating backup copies of files
3 What is the purpose of disk defragmentation?
a Deleting temporary files
b Cleaning the computer screen
c Organising fragmented data on the hard drive
d Scanning for viruses
4 Which of the following is NOT a recommended action to protect against spam emails?
a Creating email filters
b Opening emails from unknown senders
c Deleting spam messages
d Using a spam filter feature
5 What does the “Run on a schedule (recommended)” option refer to in the context of disk optimisation?
a Running disk optimisation only once
b Running disk optimisation manually
c Scheduling regular disk optimisation at specified intervals
d Running disk optimisation in safe mode
B Fill in the blanks with the most suitable words.
1 To protect against virus attacks, it is important to regularly update software.
2 Disk defragmentation helps organise fragmented data on the hard drive to improve .
3 Creating an email in Gmail can automatically move suspicious emails to the spam folder.
4 One of the signs of a virus attack is an increase in space usage.
5 Temporary internet files should be deleted from your computer regularly to prevent it from working .
C State whether the following is True or False. Correct the statements that are false.
1 Computer maintenance is essential for ensuring the smooth operation of electronic devices.
2 Hardware maintenance includes cleaning and caring for physical computer components.
3 Regularly updating antivirus software is not important to protect your computer from new virus programs.
4 Disk optimisation can help improve a computer’s efficiency by defragmenting data.
5 Creating filters in Gmail can help automatically scan suspicious emails.
D Answer the following questions. (Solved)
Q1. What are the key components of computer hardware maintenance, and why is it important?
A1. Computer hardware maintenance encompasses cleaning and caring for physical components like the monitor, keyboard, CPU, and more. Regular maintenance is crucial because neglecting it can lead to dust buildup and reduced performance. Cleaning, storing components correctly, and addressing issues promptly help ensure the smooth operation of electronic devices.
Q2. How can users protect their email accounts from spam in Gmail?
A2. Users can protect their Gmail accounts from spam by creating email filters that automatically move suspicious messages to the spam folder. Additionally, being cautious about opening emails from unknown senders and regularly deleting spam messages helps maintain a clean inbox and avoids potential security risks.
Q3. Sharmila’s computer is behaving in a strange manner. What are the warning signs that her computer might have a virus, and how can she keep her computers safe from harmful software?
A3. Signs of a virus attack include slowed performance, unusual screen behaviour, error messages, increased disk space usage, and file modification. To protect their systems, users should install reliable antivirus software, install firewalls, avoid suspicious websites, keep software updated, and practice safe online behaviour.
3. False. To stay safe, you should regularly update your computer with the latest antivirus software versions.
4. True 5. True
Operating System: It is an important software that helps the computer do its job smoothly. There are many types of operating system:
Single-User Operating System: These operating systems were designed to accommodate just one user, performing a single task at a time.
Batch Operating System: In a batch operating system, there is no direct interaction between the user and the computer. Instead, an operator is responsible for grouping similar tasks into batches.
Graphical User Interface: This operating system employs a graphical interface that encourages user interaction. Within this system, menus and icons facilitate all tasks, simply requiring a click to execute.
Multi-user Operating System: Multi-user operating systems enable multiple users to utilise the same computer, simultaneously.
Multitasking Operating System: A multitasking operating system can manage multiple processes using shared resources like the CPU.
Multithreading Operating System: These are operating systems that enable the various components of an application or program to operate concurrently.
Real-Time Operating System: Real-time operating systems are super quick. They process the user commands, with minimal delay.
Time-Sharing Operating System: This type of operating system allows multiple users to use a computer, simultaneously from different terminals. The goal is to minimise the response time for users.
Distributed Operating System: They connect multiple systems, allowing them to share the resources and work together. They use multiple central processors to serve real-time applications.
Desktop: The Windows desktop displays icons such as shortcuts, documents, and disk drives for easy access.
Icons: Icons are the small graphical symbols you see on your computer screen, and they allow the users to perform various tasks by double-clicking on them. Each icon corresponds to a specific program.
Menu: In a Graphical User Interface (GUI), menus are used to help users find information and execute the program’s functions. A menu is a structured collection of options related to a particular operation.
Taskbar: The taskbar is a horizontal bar usually located at the bottom of the desktop. It has several sections including the start button, the middle section, and the notification area.
File: A file is like a digital document that can store information, data, or programs on a computer. It can hold text, images, music, and more.
Folder: A container used to organise and store files and other folders.
File operations: They are actions you can perform on files, like creating, opening, saving, copying, moving, or deleting them.
File organisation: It refers to how files are structured and arranged on a computer’s storage, like in folders and drives.
Directory Structure: A directory structure is the way folders and subfolders are organised on a computer to create a hierarchy.
File System: It is the underlying software that manages how files and directories are stored and accessed on a computer’s storage device.
Computer Maintenance: Computer maintenance means ensuring that computers are well-maintained to function properly. There are two types of computer maintenance:
• Hardware Maintenance: Hardware maintenance involves taking care of the physical parts of a computer, like the monitor, keyboard, CPU cabinet, mouse, and any additional devices connected to it.
• Software Maintenance: Software maintenance refers to the cleaning of computer programs. This includes tasks, like scheduled disk cleaning, protection against viruses, removing the temporary and unnecessary files, creating backups regularly, updating the software, and checking for security threats.
Virus: A computer virus is a program or set of programs that interrupts a computer’s normal functioning and can infect or destroy data.
Anti–Virus Software: They are the computer programs that are created to find, prevent, and delete viruses from a computer.
• Various functions of an Operating System are: processor management, memory management, device management, file management, security, error detection, and job scheduling.
• Maintaining files and folders is crucial for maintaining order, efficiency, preventing data loss, accessibility, collaboration, data security, saving space, backup, and recovery.
• Regular cleaning of both the hardware and software components of a computer is very important, as it helps in the smooth working of the system.
• When a virus attacks a computer, it slows down the system, causes unusual movements on the screen, displays strange messages, increases disk space usage, changes data in the directory against the file name, formats the hard disk and deletes or damages files.
• Malware attacks can result in modified files, frequent disruptions, reduced speed, and more. Therefore, it’s important to ensure your safety online by using security software, employing firewalls, updating software, being cautious of spam, backing up your data, scanning portable devices, and disabling cookies.
• An antivirus helps in checking computer files for known viruses by searching for them in a virus dictionary and recognising unusual behaviour in computer programs that could indicate an infection.
• Some well-known antivirus programs include Quick Heal, Norton Antivirus, Avast One, AVG Antivirus.
A. Select the correct option.
1. Accumulation of dust on the computer may result in .
a. virus
c. software malfunction
b. slow performance
d. filled-up disk space
2. Which of the following is a single-user operating system?
a. Microsoft DOS
c. Mac OS
b. Linux
d. Unix
3. Which method cannot be used to clean a keyboard?
a. Using a soft brush to remove dust
c. Using a damp cloth to remove dirt
4. Windows 11 was launched in which year?
a. 2022
c. 2023
b. Physically removing and cleaning the keys
d. Eating while using a keyboard
b. 2021
d. 2020
5. Which operating system is used in scenarios where rapid responses are crucial?
a. Multi Operating system
c. Multithreading Operating system
b. Multitasking Operating system
d. Real Time Operating system
B. Fill in the blanks with the most suitable words.
1. It is important to make sure to any programs and files that you no longer use.
2. are the small graphical symbols you see on your computer screen.
3. are usually created to steal information and important data from various users.
4. The is a horizontal bar usually located at the bottom of the desktop.
C. State whether the following is True or False. Correct the statements that are false.
1. A menu is a structured collection of options related to a particular operation.
2. To rename a file, left-click on the file or folder and choose the Rename option from the context menu.
3. Computer maintenance means ensuring that computers are well-maintained to function properly.
4. Email services do not have a feature to stop spam messages from reaching your email inbox.
D. Short answer-type questions.
1. What is the need for the care and maintenance of computers?
2. Differentiate between Single-user and Multi-user Operating System.
3. What is the importance of managing your files and folders?
1. What are the functions of an operating system?
2. What is a computer virus and how is it harmful to computers?
3. Differentiate between Menu, Icon and Taskbar.
1. Smita is facing several issues with her computer. Lately, she has not been able to perform any task on her computer because a virus has attacked her system. It is running very slowly and many duplicate files have been created on their own on the desktop. Suggest some ways in which Smita can avoid this situation in the future.
2. Mukesh is 50 years old and he is learning to operate computers. He needs to create a new file to store his official documents but he is not familiar with the steps. List the steps by which Mukesh can create a new file on his computer.
A long time ago, in a busy neighbourhood in Indianapolis, America, there lived a lady named Sarah. She worked hard and washed clothes for a living. Sarah had a dream, and it all started with talking to her neighbour, Addie. Sarah told Addie about her hair troubles. She wanted her hair to look as beautiful as those of the women in magazines, but there weren’t many good hair products for black women back then. Addie who knew a lot about hair care gave Sarah some advice. She told Sarah about natural things that could make her hair healthy and pretty. Sarah was excited and decided to try them.
Sarah worked hard and made special hair products just for black women. She called her products “Madam C. J. Walker” after herself. Sarah travelled around the country, teaching other black women how to use her products and take care of their hair. What started as a casual conversation between neighbours led to a successful entrepreneurial venture. Madam C. J. Walker changed how people took care of their hair and helped black women feel confident and independent. Sarah’s journey is truly inspiring, isn’t it? It is a wonderful example of someone recognising a need and then taking the initiative to create a business that addresses that need. But what is truly amazing is that Sarah’s story is just one of many that highlight the entrepreneurial spirit.
Sarah and many like her possess the passion to be self-employed and start a new venture with a sense of ownership. These people are called entrepreneurs. An entrepreneur can be an individual or a small group of partners striving to venture into an unknown territory to establish a business, work hard to succeed, and take complete ownership of their failures. These people aim to create an ‘Enterprise’ by taking the initiative to develop innovative ideas, products, or services and then bringing them to the market. They leave no stone unturned in this journey.
Entrepreneurship is the process of transforming an idea into a bigger business enterprise by identifying the opportunity and creating the market through thorough planning and management skills, typically with the goal of achieving financial profitability and long-term success.
In today’s world, entrepreneurship is a subject of great discourse, particularly in India. It is a form of self-employment where individuals manage a business to meet people’s needs while continually seeking ways to innovate their business and generate profits.
The relationship between entrepreneurship and society is direct. An entrepreneur needs society to build a business; and the society needs entrepreneurs to identify its problems and come up with ideas, products, and services to solve them.
Entrepreneurship and society share a dynamic and mutually influential relationship. Entrepreneurship, the process of identifying, creating, and pursuing opportunities, has far-reaching impacts on various facets of society. They contribute to the economic growth of the country, leading to development and growth in the society by generating employment opportunities.
When there is an exchange of goods and services, it is not just beneficial for the entrepreneurs but for everyone involved. The buyers get what they need, and the sellers earn a living. Entrepreneurship plays a crucial role in the flow of money and generation of work opportunities enabling the growth and prosperity of local regions, communities, and society at large.
Let us look at an example of Arjun who is a young entrepreneur in your neighbourhood. Arjun noticed something interesting—everyone in his community loved fresh, homemade snacks, but they were often hard to find. One day, while chatting with his friends, they mentioned how they wished they could enjoy delicious homemade snacks more often.
Arjun saw an opportunity here. He decided to start a small business of making and selling homemade snacks. He began experimenting with recipes in his kitchen, creating mouthwatering snacks like crispy kachoris, flavourful mathris, and crunchy potato chips.
Arjun’s business grew quickly! Soon, his snacks became popular in the neighbourhood. But here is the twist: Arjun did not do it all alone. He hired a group of local cooks, mostly homemakers looking for part-time work. This not only helped him meet the growing demand but also provided much-needed employment to people in his community.
As Arjun’s business became more popular, he regularly started donating a portion of his earnings to support a local charity that fed underprivileged children.
Thus, entrepreneurship is not just about making money but also about making a difference.
So, what do entrepreneurs like Arjun do when they run their businesses?
Fulfill Customer Needs
Support Local Talent
Benefit Society
Entrepreneurs are like problem solvers. They pay attention to what people need or want but cannot easily find in the market. Then, they come up with innovative ideas to meet those needs.
Entrepreneurs often collaborate with people in their community who have special skills or talents. This collaboration provides opportunities for local talent to shine and earn a living.
Successful entrepreneurs feel a responsibility to give back to their communities. They may support charities, contribute to building schools or hospitals, or engage in environmental initiatives. By doing this, they help address social issues and improve the overall well-being of the society in which they operate.
Create Jobs As entrepreneurs’ businesses grow, they need more hands to help. This leads to the creation of jobs. When more people in the community have job opportunities, it reduces unemployment rates and enhances economic stability.
For example, Arjun noticed the demand for homemade snacks and created a solution by making and selling them.
In Arjun’s case, he employed local cooks, empowering them to showcase their culinary abilities.
Arjun, for instance, donated a portion of his earnings to help feed underprivileged children.
Arjun hired local cooks to keep up with the demand of snacks, thereby providing employment.
Share Wealth Entrepreneurs do not keep all their earnings for themselves. They reinvest in communities, which can include paying fair wages to their employees and contributing to local development. This sharing of wealth improves the living standards of those in the community.
Lower Prices Entrepreneurs introduce or increase competition in markets. When they offer new and better products or services, it forces other businesses to improve and lower their prices to remain competitive. This benefits consumers, as they get better products at more affordable rates.
Arjun did not just make money; he used some of his profits to make a positive impact on the lives of others.
Arjun’s success may have encouraged others to offer similar snacks, potentially leading to competitive pricing in the neighbourhood.
Successful entrepreneurs possess a combination of personal qualities, skills, and traits that enables them to navigate the challenges of starting and running a business. While there is no one-size-fits-all formula for success, here are some common qualities and characteristics often found in a successful entrepreneur:
Vision Successful entrepreneurs have a clear vision of their business. They can see opportunities and future possibilities. For example, successful Indian entrepreneur Ratan Tata had a vision for Tata Group to become a global business. Under his leadership, Tata Group expanded its presence and diversified into various industries, including automobiles, steel, and information technology.
Passion Entrepreneurs are deeply passionate about their work. They are not motivated by money alone; they love what they do and are willing to work hard and dedicate extra hours to make their business successful. For example, N. R. Narayana Murthy, cofounder of Infosys, is known for his passion for technology and entrepreneurship. He was instrumental in building Infosys into one of India’s leading IT services companies.
Risk-taking Entrepreneurship involves calculated risk-taking. Successful entrepreneurs are willing to step out of their comfort zones and take risks when they believe in their ideas. For example, Mukesh Bansal and Ashutosh Lawania, the cofounders of Myntra, are prime examples of entrepreneurs who took significant risks in the e-commerce industry by pioneering online fashion in India in the year 2007.
Adaptability Successful entrepreneurs adapt to changing circumstances. They are flexible and open to change. They can change their strategies based on their learnings and changing market conditions. For example, Mukesh Ambani, chairman and managing director of Reliance Industries, transformed the company from a textile-focused business to a diversified company with interests in telecommunications, retail, and digital services.
Innovative Thinking Entrepreneurs seek creative solutions to problems and constantly look for ways to improve their products, services, or processes. For example, Kunal Shah, the founder of CRED, is an Indian entrepreneur known for his innovative thinking in the financialtechnology sector. Kunal Shah launched CRED as a platform that rewards credit card users for paying their bills on time. This innovative approach transformed the traditional process of credit card bill payments into a rewarding experience.
Self-motivation Entrepreneurs are self-starters. They are intrinsically motivated to work and succeed. For example, Ritesh Agarwal, the founder of OYO Rooms, displayed self-motivation by starting as a teenager and building OYO into one of India’s largest hospitality companies.


 Ratan Tata
N.R. Narayan Murthy
Mukesh Bansal and Ashutosh Lawania
Mukesh Ambani
Kunal Shah
Ratan Tata
N.R. Narayan Murthy
Mukesh Bansal and Ashutosh Lawania
Mukesh Ambani
Kunal Shah
Resilience and Persistence Entrepreneurs bounce back from setbacks and failures. Entrepreneurship is full of ups and downs, and the ability to persevere in the face of adversity is crucial. For example, Kiran Mazumdar-Shaw, founder of Biocon, faced numerous challenges in the biotechnology industry but persevered to make Biocon a global biopharmaceutical company.
Leadership Entrepreneurs must lead their teams and inspire others to share their vision. Effective leadership and communication skills are essential. For example, Adi Godrej, chairman of the Godrej Group, has shown effective leadership in directing the diversified business through various industries such as consumer goods, real estate, and agribusiness.
Networking Building a strong network of contacts can provide valuable resources, advice, and opportunities. Successful entrepreneurs often have excellent networking skills. For example, Kishore Biyani, founder of Future Group, used his extensive network to establish Future Group as a major player in the retail sector in India.
Customer Focus Entrepreneurs prioritise understanding customer needs and delivering value to them. Customer feedback is essential for product or service improvement. For example, boAt’s products are often praised for their sleek and trendy designs. The founders, Aman Gupta and Sameer Mehta understood that customers not only wanted great sound but also stylish accessories.
Time Management Entrepreneurs need to juggle multiple responsibilities. Effective time management skills help them prioritise tasks and stay organised. For example, N. R. Narayana Murthy emphasised time management and a disciplined work culture at Infosys, which contributed to its success as an IT services leader.
Decision-making Successful entrepreneurs make well-informed decisions, often relying on data and analysis. They are not afraid to make tough choices when necessary. For example, Binny Bansal, cofounder of Flipkart, one of India’s largest e-commerce companies, took significant strategic decisions that shaped the company and when required, didn’t hesitate to step down from his role as CEO in 2018.
Problem-solving Entrepreneurship involves solving a variety of problems, from operational challenges to strategic dilemmas. For example, Shiv Nadar, founder of HCL Technologies, excelled in problem-solving by providing innovative IT solutions to global clients and building HCL into a multinational IT services company.
Open-mindedness An open-minded trait is essential for entrepreneurs, as it allows them to be receptive to new ideas, feedback, and various perspectives. They see every event and situation as a business opportunity. For example, Nithin Kamath, cofounder of Zerodha, applied his open-mindedness for embracing innovation, user feedback, and a customer-centric approach and transformed the Indian stock brokerage industry. He continues to be a catalyst for positive change in the financial services sector.
Ethical Conduct Maintaining high ethical standards is crucial. It involves adhering to a set of moral principles, rules of conduct and values in all business activities, interactions, and decisionmaking processes. Ethical entrepreneurship contributes to long-term success, trust from stakeholders, and a positive impact on society. For example, Anita Roddick, the founder of The Body Shop, built her business on principles of ethical consumerism and sustainability.


Disciplined While adaptable, entrepreneurs often have a well-structured business plan. They take a disciplined approach in their work and take steps every day towards achieving their objectives. For example, Dhirubhai Ambani, the founder of Reliance Industries, adhered to a well-structured business plan while expanding his empire, which laid the foundation for the huge success of his organisation.
Entrepreneurs possess a unique blend of qualities that set them apart from the crowd. These qualities not only drive their own success but often inspire those around them.
Entrepreneurs can drive innovation, economic growth, and societal change. Entrepreneurs’ function encompass a wide range of activities and responsibilities. These functions play a crucial role in their journey towards success.
Decision-making Entrepreneurs are like the captains of their ships, making choices that steer their businesses. Entrepreneurs are the chief decision-makers in their enterprises. They need to make decisions about the products or services they offer, the production policy, the purchase and sale of the goods and services, and the marketing strategy their organisation employs.
Management Control Entrepreneurs are responsible for managing and controlling their businesses. They are responsible for overseeing the day-to-day operations of their businesses, ensuring that resources are used efficiently and goals are timely met. It is crucial for them to have good management skills and employ people with good management skills as well.

COVID-19 saw the rise of many small businesses that helped solve the problem of hygiene and sanitization. Mention a few quality traits that these entrepreneurs displayed.


Division of Income Entrepreneurs need to divide the total revenue among various factions of production like rent, interest, and purchase of raw material. Entrepreneurs also decide how profits and incomes are to be distributed among stakeholders, including employees, investors, and themselves.
Risk-taking Entrepreneurs are inherently risk-takers. They identify opportunities and are willing to invest time, effort, and resources into pursuing these opportunities, even if success is uncertain. They understand that taking calculated risks is often necessary to achieve significant gains and create value.
Bearing of Uncertainties Entrepreneurs operate in environments characterised by ambiguity, incomplete information, and unpredictable market conditions. They must make decisions and take actions in the face of uncertainties. Uncertainty-bearing involves making informed judgments, adapting to changing circumstances, and being resilient in the face of setbacks.
Innovation Entrepreneurs are change-makers who drive economic growth, improve quality of life, and shape the future through their innovative efforts. Whether it is a small business owner introducing a new product to a local market or a tech startup disrupting entire industries, innovation is at the heart of entrepreneurial endeavours.
These functions form the foundation of entrepreneurship, and it is the skill with which entrepreneurs balance these functions that often determine their success in the world of business.
Entrepreneurship benefits the entrepreneur and plays a crucial role in making communities and regions prosper. Entrepreneurs contribute to innovation, economic growth, job creation, and overall progress. Their importance cannot be overstated, and their roles encompass various aspects that benefit individuals, communities, and nations. Helps in Wealth Creation Successful entrepreneurs have the potential to accumulate wealth, which can be reinvested in their businesses or new businesses. Such reinvestments can result in the creation of more jobs, stimulating economic activity and benefiting the broader community.
Adds to National Income Entrepreneurs drive economic growth by identifying and exploiting opportunities, introducing innovative products and services, and contributing to increased productivity. They contribute to national income by earning revenue and paying taxes.
Creates Employment Opportunities Entrepreneurs are significant job creators. They start and expand businesses, which in turn hire employees, thus reducing unemployment and stimulating economic activity.
For example, Elon Musk, the entrepreneur behind companies like SpaceX, has significantly impacted job creation in the aerospace industry. SpaceX, founded in 2002, has been at the forefront of commercial space exploration and transportation.
Improves Standard of Living Entrepreneurs enhance the standard of living by introducing products or services that enhance convenience. They help improve the standard of living not only by providing income to many families through job opportunities but also by fostering new products and services that enhance the living standards of all the stakeholders.
Creates Social Change Social change denotes significant alterations in societal norms, behaviours, or structures. Entrepreneurs drive social change by introducing innovations that challenge existing practices.
For example, Harish Hande, an Indian social entrepreneur, cofounded SELCO India in 1995 with the mission to provide sustainable energy solutions to rural and underserved communities in India. Harish Hande’s vision and SELCO India’s initiatives have demonstrated the transformative power of social entrepreneurship. By providing sustainable and clean energy solutions to rural communities, SELCO has not only improved the standard of living but also empowered individuals and communities to take control of their own development and related environmental impact.
Community Development Community development refers to initiatives aimed at enhancing the well-being of a local community. Entrepreneurs contribute by supporting local causes, schools, and charities. For example, the Tata Group invested heavily in building infrastructure and amenities for the community. This includes hospitals, schools, housing complexes, sports facilities, parks, and cultural centres. Tata Steel’s community development programs aim to enhance the quality of life for its employees and residents of the city.
The Role of Government Government policies have a significant impact on encouraging entrepreneurship. The economy may benefit from a government-regulated, balanced approach to fostering entrepreneurship. Uncontrolled entrepreneurship may result in undesirable social effects like unethical business practices, corruption, financial crises, and criminal activity.
Let us look into some of these myths.
Myths
Expectation
Every Idea Must Be Unique This myth suggests that to be an entrepreneur, you need to develop a groundbreaking idea that has never been used before.
Many successful entrepreneurs succeed by adding a unique twist to existing concepts.
Priya wanted to start a bakery in her neighbourhood, where several bakeries were already operating. Instead of creating entirely new products, she focused on adding a unique cultural touch by incorporating traditional Indian flavours and spices into her baked goods. This innovative approach helped her stand out and attract a loyal customer base.
You Need Lot of Money
Another misconception is that launching a business requires a substantial amount of money or capital.
Although capital is essential, it is not always the determining factor for success.
Only Big Business Owners Are Entrepreneurs
Many people believe that entrepreneurs exist only in the world of big corporations.
Entrepreneurs Are Born, Not Made
This misconception suggests that entrepreneurship is an innate talent and you either have it from birth or you don’t.
Entrepreneurship can thrive in small and medium-sized businesses too.
Ravi dreamt of opening a technology repair service in his town but had limited funds. He started small, offering his repair services from a small kiosk. As his reputation grew, he reinvested his earnings into expanding his business, eventually opening a proper repair shop. Ravi’s business success was built over time, starting with modest resources.
Sita runs a small tailoring business from her home, creating custom dresses for local customers. While her business is not at a large scale, she is an entrepreneur because she identified a market need, established her business, and steadily grew her customer base through her tailoring skills and excellent customer service.
In truth, anyone can develop entrepreneurial skills and mindsets.
Rahul, a high school student, organised a charity event to raise funds for a local orphanage. He came up with creative fundraising ideas, organised volunteers, and managed the event effectively. Rahul’s entrepreneurial spirit shone through his ability to identify a need, plan, and execute a successful project, showing that entrepreneurship can be nurtured and developed at any age.
Countries are making a shift from ‘managerial’ to ‘entrepreneurial’ economies. India is known to be a land of ideas. Since a long time, we have had craftsmen, artisans, farmers, and traders working outside the formal employment structure. From a small departmental store owner to a prominent industrialist, business sense flows through the Indian society.
List a few myths that you have heard about entrepreneurs.
1. Entrepreneurs are being recognised as role models in our country. Webinars, seminars, videos, blogs, and books are being used as the media of motivation and encouragement.
2. Online courses are being offered to help youth take up entrepreneurship as a serious career option.
3. Educational institutes are providing courses on entrepreneurship.
4. Institutes are inviting alumni to meet for mentoring and career guidance sessions.
5. The government has gauged the shift and has taken many initiatives.
• Startup India: Launched in 2016, it aims to promote entrepreneurship and innovation in the country. This initiative provides various benefits to startups, including tax exemptions, funding support, and simplification of regulatory procedures.
• Make in India: Make in India is a campaign launched in 2014 to encourage manufacturing and production within India. This campaign seeks to transform the country into a global manufacturing hub by promoting ease of doing business, simplifying regulations, and attracting foreign investments.
• Stand-up India: This scheme, launched in 2016, aims to promote entrepreneurship among women and underprivileged sections of society by offering loans and support.
• Mudra Yojana: The Pradhan Mantri Mudra Yojana (PMMY) was initiated to financially support small businesses and micro-enterprises. This scheme offers loans at various stages of business development, from startup to growth and expansion.
• Atal Innovation Mission (AIM): Launched in 2016, this scheme focuses on promoting innovation and entrepreneurship among students and startups. It includes initiatives such as Atal Tinkering Labs in schools and Atal Incubation Centres to support startups.
• Entrepreneurship and Skill Development Program: It is run by various agencies, including the Ministry of Skill Development and Entrepreneurship, and offers training and skill development programs to aspiring entrepreneurs.
• Pradhan Mantri Employment Generation Programme (PMEGP): PMEGP aims to generate employment opportunities in rural and urban areas by providing financial assistance for setting up micro-enterprises. This programme supports various sectors, including manufacturing and services.
• Research and Development Grants: The government offers grants and incentives to startups and businesses engaged in research and development activities to promote innovation and technology advancement.
6. In today ’s digital age, entrepreneurship has become more accessible than ever. The internet has opened up countless opportunities for online businesses, making it easier for aspiring entrepreneurs to reach a global customer base.
7. In the world of entrepreneurship, your success is not limited by titles or corporate hierarchies. The effort you put into your business directly correlates with the outcomes you achieve. Entrepreneurs often find that their income potential is limited only by their ambition and hard work.
In conclusion, entrepreneurship offers a career path that combines passion, creativity, independence, and the potential to make a meaningful impact. It is a journey filled with challenges and rewards, making it an attractive option for those with vision and the determination to pursue their dreams.
Activity 1: Writing a Note on Entrepreneurship as a Career Option (Group Work and Independent Work)
In a group of four to five students, discuss the importance of entrepreneurship as a career option. You may highlight the key points from the chapter, emphasising how entrepreneurship nurtures creativity, offers independence, and has a positive impact on society.
After the discussion, write down a short note on ‘Entrepreneurship: An Appealing Career Option’ in about 150 to 200 words. Activity 2: Researching Success Stories of First-Generation and Local Entrepreneurs (Pair Work)
Get in pairs for the research-based project. Research on the success stories of two first-generation and local entrepreneurs. Your research should include the following:
1. About the founder(s)
2. Business idea
3. Role towards the society
Present your findings to the whole class.
Activity 3: Analysing Strengths and Weaknesses (Individual Work)
Reflect and introspect yourself as a budding entrepreneur. Create a list of the entrepreneurial qualities that you hold. Assess yourself based on the qualities you have listed to identify your areas of strength and weakness.
You can use a simple scale, rating yourself from 1 to 5 for each quality (1 being the lowest and 5 being the highest).
Get in pairs to share your qualities, strengths, and weaknesses. Take feedback and suggestions from your partner to help improve the areas of weakness.
Activity 4: Listing Entrepreneurial Qualities (Group Work)
Divide yourselves into small groups, each consisting of four to five members. Within your groups, engage in a lively discussion to compile a list of qualities you believe are necessary for entrepreneurs to succeed. Feel free to draw from your personal experiences or share anecdotes that illustrate these strategies.
Each group should nominate a spokesperson who will present your list of qualities and provide real-life examples or stories to support them.
After all the groups have presented, reflect on the presentations as a class. Discuss any common qualities that multiple groups mentioned and whether there were any differences in perspectives among the groups. This collective insight can be enlightening.
Activity 5: Data for a Business (Group Work)
Form a group of five students. Imagine each member of the group to be a cofounder of a business venture. As a team, brainstorm and conceive a business idea that can solve an existing problem in the society.
Collect data and information about your business idea, the future scope of growth and the market where your business can thrive. Map out a business setup plan.
Imagine your class to be a room full of investors. Present your findings and the business setup plan to them.
After all the groups have presented, as a class, discuss the best business idea you liked and why.
Activity 6: Guest Speaker Session (Group Work)
Imagine you need to invite a successful entrepreneur for a guest lecture. Your teacher has provided you a list of business ventures and their entrepreneurs.
Form a group of four to five students each and select a business venture with the mutual consent of your group.
1. Myntra 2. Nykaa
3. Mamaearth 4. Zomato 5. Uber
6. Lenskart 7. BharatPe 8. Zepto 9. MakeMyTrip 10. PharmEasy
Now, as a team, research the success story of the founder(s) of the selected business, the reason behind starting the business, and their contribution to the community. Present your findings to the class while trying to convince them why should your chosen entrepreneur be invited as a guest speaker.
A Select the correct option.
1 What inspired Sarah to start her own business?
a She wanted to become famous.
c She inherited a business.
b Her neighbour, Addie, suggested it.
d She had a lot of free time.
2 Which of the following qualities is NOT typically associated with successful entrepreneurs?
a Innovation
c Delaying things
b Resilience
d Confidence
3 What is the one way in which entrepreneurs can contribute to society?
a By hoarding their wealth
c By avoiding risks
B Fill in the blanks with the most suitable words.
b By creating job opportunities
d By keeping their ideas secret
1 Entrepreneurs often take calculated in the pursuit of their goals.
2 The standard of living in a community can be improved by introducing and that enhance convenience.
3 Entrepreneurs contribute to the national income by earning revenue and paying
4 One myth about entrepreneurship is that every idea must be
C State whether the following is True or False. Correct the statements that are false.
1 Entrepreneurship can thrive only in big corporations.
2 The impact of entrepreneurship on society is limited to economic growth.
3 Entrepreneurs are always born with innate talents for doing a business.
4 Wealth creation involves generating assets, income, or value by using resources effectively.
D Answer the following questions. (Solved)
Q1. Explain one quality that entrepreneurs often possess and provide an example of how this quality can benefit their business.
A1. One quality that entrepreneurs often possess is “creativity”. Creativity allows entrepreneurs to think out of the box and develop innovative solutions to problems. For example, a cloth designer can use their creativity to design unique and eye-catching clothing, setting their business apart from competitors.
Q2. Discuss the role of entrepreneurship in creating employment opportunities and its impact on the overall well-being of a community or a region.
A2. Entrepreneurship plays a crucial role in creating employment opportunities within a community or a region. When entrepreneurs set up or expand their businesses, they often hire residents of the neighbouring areas, thus reducing unemployment rates and improving economic stability. This job creation not only benefits individuals by providing them with a regular income but also enhances the overall well-being of the community. It can further lead to better living standards, increased access to goods and services, and a stronger sense of community pride. Additionally, as businesses grow and succeed, they contribute to the economic growth of the region, attracting further investment and development. Therefore, entrepreneurship is a driving force behind both individual and community prosperity.
Q3. Meet Raj, a Craft Innovator. Raj is a young and spirited entrepreneur who hails from Jaipur, Rajasthan. In his vibrant city, traditional artistry is treasured, and one craft that stands out is block printing on fabric. Raj recognised a growing interest in handcrafted, eco-friendly clothing not only in Jaipur but also across India.
With a vision to blend traditional craftsmanship with current fashion trends, Raj started his business, “Rajrang Apparel”. He sources organic cotton from local farmers and employs skilled artisans from his community. Raj personally designs unique block patterns that reflect the rich heritage of Rajasthan.
Initially, he worked with a small team of artisans, but as the demand for his beautifully crafted clothing grew, so did his team. Raj provided employment opportunities to more artisans, empowering them to showcase their talents while earning a sustainable income.
Raj’s efforts not only benefited his team but also the local farmers who supplied him with organic cotton. With increasing orders, he purchased larger quantities of cotton, contributing to the farmers’ income. As Rajrang Apparel thrived, Raj made sure that everyone involved shared in the success.
Moreover, Raj was conscious of his responsibility to the environment. He implemented eco-friendly practices in his production process, such as natural dyeing techniques and minimal water usage. He also supported his community by supporting local charities and sponsoring education programs. Raj not only created beautiful clothing but also contributed to a positive change. His journey showcases how entrepreneurship can uplift not only individuals and communities but also honour age-old traditions in the modern world. What roles of an entrepreneur do you think Raj fulfilled?
A3. Raj is a successful entrepreneur who identified a potential opportunity in the market and is working hard to generate employment and fulfil his responsibilities towards the environment, society, and nation.
• Helped in Wealth Creation: Successful entrepreneurs have the potential to accumulate wealth, which can be reinvested in their businesses. Raj showed the potential in the market, and now he is using the earned revenue to expand and upscale his business. He is making sure to share the success with all the stakeholders.
• Added to the National Income: Entrepreneurs drive economic growth by identifying and exploiting opportunities. Raj saw an opportunity gap, and his idea and production have been able to fulfil the market need. His small business has ensured the flow of money in the economy as his business sources organic cotton from local farmers and employs skilled artisans from his community.
• Created Employment Opportunities: Entrepreneurs are significant job creators. Raj provided employment opportunities to more artisans, empowering them to showcase their talents while earning a sustainable income.
• Improved Standard of Living: Entrepreneurs enhance the standard of living by bringing sustainable fashion to the people of their community and globally.
• Created Social Change: Raj is conscious of his responsibility to the environment. He implemented eco-friendly practices in his production process, such as natural dyeing techniques and minimal water usage. He also supported his community by supporting local charities and sponsoring education programs.
B 1. risks
product; services
taxes
unique
C 1. False. Entrepreneurship can thrive not only in big corporations, but also in small and micro-businesses.
2. False. The impact of entrepreneurship on society includes economic growth, job opportunities, and community development.
3. False. Entrepreneurs are not born; entrepreneurship is a skill that can be developed.
4. True
Community Development: It refers to initiatives aimed at enhancing the well-being of a local community.
Entrepreneurs: They are individuals or small groups of partners striving to venture into unknown territories to establish a business, willing to work hard to succeed, and take complete ownership of their failures.
Entrepreneurship: It is the process of transforming an idea into a big business enterprise by identifying the opportunity, and creating a market through thorough planning and management skills, typically with the goal of achieving financial profitability, and long-term success.
Social Change: It denotes significant alterations in societal norms, behaviours, or structures.
• Entrepreneurship and society share a dynamic and mutually influential relationship. When entrepreneurs run their businesses, they fulfil customer needs, support local talent, benefit society, create jobs, offer products and services at lower prices, and share the wealth.
• Successful entrepreneurs have a clear vision, passion for work, ability to take risks, and can also adapt and innovate. They are self-motivated, resilient, and persistent individuals with leadership skills and a vast network of people. Their approach is customer-focused and they maintain ethical conduct and discipline.
• An entrepreneur’s role includes decision-making, management control, division of income, risk-taking ability, bearing of uncertainties, and innovation.
• Entrepreneurs help in wealth creation as they add to the national income by creating employment opportunities, and improving the standard of living. They may be the torchbearers of social change, and community development. Government policies play an important role in encouraging entrepreneurship.
• Entrepreneurs’ ideas may not necessarily be unique. They need not have lots of money or big businesses. Anyone can develop entrepreneurial skills and mindsets.
• Countries are making a shift from ‘managerial’ to ‘entrepreneurial’ economies.
• Entrepreneurs are being recognised as role models in India.
• Online courses are being offered to help the youth take entrepreneurship as a serious career option.
• Educational institutes are providing courses on entrepreneurship.
• The Indian government has introduced many initiatives, such as Startup India, Make in India, Stand-Up India, MUDRA Yojana, Atal Innovation Mission (AIM), National Entrepreneurship Development Program (NEDP), Pradhan Mantri Employment Generation Programme (PMEGP), Research and Development Support, and so on, to promote entrepreneurship in India.
• The internet has opened up countless opportunities for online businesses, making it easier for aspiring entrepreneurs to reach a global customer base.
A. Select the correct option.
1. What is the nature of the relationship between entrepreneurship and society?
a. Indirect
c. Not related
b. Direct
d. None of the above
2. How can a successful entrepreneur give back to his community?
a. By supporting charities
c. By building own houses
b. By keeping all the profit
d. By investing in gold
3. Which of the following is not a trait of a successful entrepreneur?
a. Decision-making
c. Adaptability
b. Leadership
d. Risk-fearing
4. Entrepreneurs contribute to the national income by earning revenue and paying .
a. Fines
c. Duties
5. The full form of PMMY is .
a. Prime Minister Money Scheme
c. Pradhan Mantri Mudra Yojana
b. Money
d. Taxes
b. Pradhan Mantri Money Yojana
d. Pradhan Mantri Madad Yojana
B. Fill in the blanks with the most suitable words.
1. is a campaign launched in 2014 to encourage manufacturing and production within India.
2. Entrepreneurs introduce into the market.
3. Countries are making a shift from ‘managerial’ to economies.
4. The has opened up countless opportunities for online businesses, making it easier for aspiring entrepreneurs to reach a global customer base.
C. State whether the following is True or False. Correct the statements that are false.
1. A person is considered an entrepreneur if they begin making chocolates at home and selling them to others.
2. Mudra Yojana, which was launched in 2016, focuses on promoting innovation and entrepreneurship among students and start-ups.
3. Only a big business owner is an entrepreneur.
4. Government policies have a big impact on encouraging entrepreneurship.
D. Short answer-type questions.
1. Explain the relationship between entrepreneurship and society.
2. Is it important to be passionate as an entrepreneur?
3. Mention any two government initiatives that promote entrepreneurship in India.
E. Long answer-type questions.
1. Define entrepreneurship. What is the role and importance of an entrepreneur?
2. ‘You need a lot of money to become a successful entrepreneur.’ It is a popular statement regarding entrepreneurship. Do you agree with this statement? Support your reasons with an example.
3. What are the different functions of an entrepreneur?
F. Competency-based questions.
1. Latika is an enthusiastic home baker who is famous for her delicious cakes, cookies, and pastries. She has decided to turn her passion for baking into a home-based bakery business. She started by selling her baked goods to her friends and family, and they quickly gained popularity due to their taste and quality. What qualities of a successful entrepreneur does Latika possess?
2. Raj is a young entrepreneur in India who is passionate about clean energy solutions. He has developed a unique solarpowered water purification device that can provide clean drinking water to rural communities with limited access to clean water sources. Raj’s innovation has the potential to address a critical problem and improve the lives of many people. However, Raj is facing challenges in scaling up his business and bringing his invention to a wider audience. Name various Indian government schemes and initiatives that are available to support entrepreneurs like Raj.
In the rapidly changing world that we all are a part of, our environment is also changing. From rising global temperatures to shifts in weather patterns and from the depletion of important natural resources to the alarming loss of biodiversity, it has become increasingly evident that our planet is facing unforeseen challenges. The once stable and predictable patterns of nature are being disturbed and demand our attention and action. We are responsible for taking care of our planet, which is full of life.
“Sustainable Development is development that meets the needs of the present without compromising the ability of future generations to meet their own needs.”1
Let us break this definition down to two parts:
Meeting Our Present Needs This means that we must ensure that presently, all people have access to things like clean water, food, shelter, education, and healthy living conditions. It’s about making sure that everyone has a chance to lead a decent life.
Without Compromising the Future Needs This means that we should not meet our present needs in a way that harms the planet or uses up resources so quickly that there is nothing left for our future generations. We need to take care of the environment so it stays healthy and can provide for our children, their children, and so on.
At its heart, sustainable development is about finding a balance which will not only enable us to optimally utilise the resources in the current times but also ensure that there is no scarcity in the future.

1
EVOLUTION OF SUSTAINABLE DEVELOPMENT
1987 (BRUNDTLAND REPORT)
The seeds were sown in 1960s when environmental concerns gained global attention. Early movements like Rachel Carson's "Silent Spring" and the first Earth Day in 1970 raised awareness about environmental issues.
THE CONCEPT HAS EVOLVED SIGNIFICANTLY OVER THE YEARS, RESPONDING TO THE CHANGING NEEDS AND CHALLENGES OF THE WORLD.
1960-1970 (EARLY ROOTS)
The seeds were sown in 1960s when environmental concerns gained global attention. Early movements like Rachel Carson's "Silent Spring" and the first Earth Day in 1970 raised awareness about environmental issues.
It is like a roadmap for building a better future. It is an integrated approach to development which will prevent us from exhausting all the natural resources and damaging the environment to a point from where it cannot recover.
When we practise sustainable development, we become responsible caretakers of our planet. Sustainable development is a strategy for driving growth in an environmentally smarter way. It is about growing and being successful while also being kind to our environment and people.
2000 - 2015 (MILLENNIUM DEVELOPMENT GOALS)
The international community focused on MDGs which included objectives like eradicating poverty and achieving universal primary education. Along with sustainability, it was recognised '!hat a more holistic approach is needed.
1992 (RIO EARTH SUMMIT)
The UN Conference on Environment and Development also known as the "Earth Summit," held in Rio de Janeiro, Brazil was an important milestone. It produced a comprehensive plan of action for sustainable development.
2015-PRESENT (SUSTAINABLE DEVELOPMENT GOALS)
In 2015, !he world adopted !he SDGs. These 17 goals provided a comprehensive framework that addressed poverty, inequality, climate change etc. They emphasised on interconnectedness of social, economic and environmental issues.
If development is not driven by keeping a particular need in mind, it will cause economic, environmental, and social issues. Hence, sustainable development means to meet the diverse needs of the present and the future generations by promoting wellbeing, social inclusion and the creation of equal opportunities.
The three main pillars of sustainable development are:
Environmental This is all about protecting and being friendly to the environment. It includes reducing waste and pollution, using less energy, a wise usage of natural resources, and preserving our biodiversity. By doing these things, we can help solve issues like pollution, global warming, and climate change.
Economic This means using assets and resources wisely and efficiently to ensure economic growth and produce profit. It aims to improve the standard of living of the public. The resources should be used responsibly to meet development goals and build a competitive economy.
Social This is about making sure that the public is safe, healthy, and treated fairly. Also, it is about being inclusive and welcoming to people from different social and cultural backgrounds. The development needs to focus on creating accessible services for the community which cater to various aspects like health, security, education, etc.

The concept of sustainability is accepted worldwide, and the United Nations General Assembly released a guideline for the world called the Sustainable Development Goals in 2015 for the year 2030. The Sustainable Development Goals, also called the SDGs, are like a global ‘to-do list’ for making the world a better place and addressing global issues like hunger, poverty, education, peace, global warming, environmental issues, inequality, and injustice.
There are seventeen SDGs and one hundred and sixty-nine targets in total, which are a part of this agenda. Each goal has a specific aim, like ending hunger, ensuring clean water, providing quality education, etc. These goals cover many different aspects of life, from taking care of the environment to ensuring everyone is healthy and has enough to eat. These goals aim to include people of all the countries to enhance economic growth and create a more prosperous world.
By understanding the definition and evolution of Sustainable Development, we now know that it is a critical approach that shapes our future.
But why is sustainable development so important? Read the table given below to understand its significance:
1. Ensuring Our Planet Remains Healthy
Our planet Earth is our only home, and its health directly impacts our well-being. Sustainable development prioritises environmental protection and resource conservation. It’s a way to ensure that our natural resources, such as air, water, and fertile soil, remain clean and abundant for the current and the future generations.
3. Enhancing Quality of Life
Ultimately, sustainable development is about improving the quality of life for all individuals. It’s about clean air to breathe, safe and vibrant communities, and a world where future generations can look forward to their future without worrying about basic amenities.
5. Preserving Our Biodiversity
Sustainable Development also aims at preserving the ecosystem and the habitats of all birds and animals and, thus, helping to maintain our biodiversity.
2. Combating Climate Change
Sustainable development is a powerful tool to combat the looming threat of climate change. It encourages the reduction of greenhouse gas emissions, promotes renewable energy sources, and advocates for sustainable transportation; all crucial steps in mitigating the effects of global warming.
4. Leaving a Legacy
Sustainable development is about creating a legacy we can be proud of, one that reflects our values and commitment to a better world. It is about ensuring that our children and their children inherit a planet that is thriving and abundant.
6. Financial Stability
There is a continuous effort to stabilise the economies of all countries and a promise of steady growth. The use of fossil fuels, which cannot be replenished easily, is being replaced by cost-effective renewable sources of energy.
Sustainable practices are the actionable steps we take to achieve the objectives of sustainable development. They guide us in making everyday decisions that reduce negative environmental impact, promote fair practices, and contribute to economic well-being. Some key and popular sustainable practices are: Reduce, Reuse, Recycle This mantra covers the essence of sustainable waste management. Reducing waste at the source, reusing items whenever possible, and recycling materials are fundamental practices that conserve resources and reduce landfill waste.
Energy Efficiency Using energy more efficiently is the cornerstone of sustainable practices. It includes strategies like insulated buildings, upgrading lighting systems, and investing in energyefficient appliances. Reducing energy consumption decreases our carbon footprint and lowers our energy bills.
Conservation of Water Sustainable water consumption practices involve using water wisely in domestic areas and avoiding unnecessary waste in industrial sectors. This can be achieved through efficient irrigation methods, fixing leaks promptly, and adopting low-flow fixtures (water saving plumbing equipment to reduce the flow of water). Water conservation is crucial in regions prone to drought and in the face of growing global water scarcity.
Sustainable Transportation Choosing eco-friendly modes of transportation, such as walking, biking, carpooling, or using public transit reduces greenhouse gas emissions and eases traffic congestion. Electric and hybrid vehicles are also increasingly popular sustainable options.
Sustainable Agriculture Sustainable agricultural practices promote soil health, reduce chemical inputs, and prioritise biodiversity. Organic farming, crop rotation, and the use of natural fertilisers are examples of methods that maintain the long-term fertility of agricultural land.
Name any one sustainable practice that you follow in your daily life. Share why it is beneficial for our environment. Think and Tell
Eco-friendly is a term used to describe products and activities that are designed and carried out with minimal harm to the environment. This can include the production of materials, the use of renewable energy sources, and practices that reduce water, air, and land pollution.
Eco-friendly practices are an integral part of sustainable development. They align with the principles of responsible resource use, environmental protection, and social equity. By adopting eco-friendly habits, individuals, businesses, and communities contribute to the broader goals of sustainability, fostering a world where the needs of the present are met without compromising the ability of future generations to meet their own needs. So, whether you reduce waste, conserve energy, or support sustainable products, every eco-friendly choice is a step towards a more sustainable and harmonious world. These are some eco-friendly products that are used worldwide:

Reusable shopping bags are a great eco-friendly alternative to disposable plastic bags. They are durable, long-lasting, and can be used to reduce the amount of plastic waste.
Bamboo is a fast-growing and sustainable material that can be used to make a varietly of product. Bamboo products are durable. Lightweight and look great.
Recycle paper products are a great way to reduce the amount of trees being cut down. They are made from post-consumer paper and are an eco-friendly alternative to traditional paper products.
Reusable water bottles are a great way to reduce plastic waste and save money. They are designed to be used for years and are made from durable materials like stainless steel, glass and aluminium.
Sustainable development requires resources, concentrated efforts, and a shift in society’s mindset to understand and adapt to a sustainable lifestyle. On the surface, the concept may sound simple to implement; however, it faces numerous issues. As responsible citizens, it is important to be aware of the challenges and complexities associated with sustainable development.
Limited Resources One of the foremost challenges is the scarcity of vital resources. As the global population continues to grow, there is increased pressure on resources like freshwater, land, and energy sources. Sustainable development requires us to manage these resources carefully, which often demands innovation and conservation efforts.

Short-term Vs Long-term Interests Balancing short-term economic interests with long-term sustainability goals can be challenging. Some policies and practices prioritise immediate gains over the well-being of future generations, making it crucial to shift this mindset.
Lack of Awareness Not everyone is fully aware of the importance of sustainable development and its implications. Raising awareness and educating communities about the benefits and necessity of sustainable living is an ongoing challenge.
Global Cooperation Many sustainability challenges are global in nature, such as climate change. Addressing these issues requires cooperation among countries, which can be complicated because of differing priorities and interests.
Measuring Progress Tracking progress towards sustainable development is a complex task. Developing accurate metrics and indicators that consider economic, social, and environmental factors is a challenge in itself.
Corporate social responsibility (CSR) is a sustainable business practice where companies develop global programmes that help the surrounding communities and society at large. For example: ITC, Tata Steel, etc. The CSR departments in big companies often tackle significant global challenges such as climate change, poverty, and education.
Sustainable development demands innovation, commitment, and collaboration on a global scale.
Strategising to solve problems is an important skill that we must learn. Here are a few possible strategies and solutions for sustainable development.
Sustainable Resource Management
1. Resource Efficiency: Implementing resource-efficient practices in industries, agriculture, and households can help reduce the strain on natural resources. This includes recycling, reusing, and adopting eco-friendly products.
2. Conservation: Protecting and restoring natural habitats and ecosystems is vital. Conservation efforts can help safeguard biodiversity, promote clean water sources, and mitigate climate change.
Social Equity
1. Education and Awareness: Promoting education about sustainable development and environmental conservation helps empower communities to make informed decisions.
International Cooperation
1. Climate Agreements: Encourage international cooperation through agreements, like the Paris Agreement, which aims to limit global warming. Collaboration on a global scale is essential for addressing climate change.
2. Aid and Assistance: Developed countries can provide financial and technical assistance to developing nations to support their sustainable development efforts.
Addressing the challenges related to sustainable development requires a multifaceted approach involving individuals, communities, governments, and businesses. By adopting these strategies and solutions, we can collectively work towards a more sustainable, equitable, and harmonious world. Each action, no matter how small, contributes to the greater goal of a better future for all.
If you were leading a country which was on a path to adopt sustainable practices, what strategies and solutions would you have suggested or implemented? Think and Tell
Activity 1: Conservation of Cultural Heritage (Group Work)
Get into groups of four and discuss how we can conserve our indigenous knowledge and cultural heritage.
Guiding Questions:
1. Which indigenous knowledge and cultural heritage are you focusing on?
2. Why is it important to respect and conserve indigenous knowledge and cultural heritage?
3. How can indigenous knowledge contribute to sustainable development and environmental conservation?
4. What are some challenges indigenous communities face in preserving their knowledge and heritage?
5. What can individuals and society do to support and respect indigenous knowledge and cultural heritage?
Activity 2: Save the Capital (Pair Work)
Our country, especially our capital, New Delhi, has been facing a grave issue of air pollution. Delhi has consistently ranked among the most polluted cities in the world, primarily due to vehicle emissions, industrial pollution, and stubble burning.
Imagine you and your classmate are research analysts working at the New Delhi Air Pollution Control Centre. Work on this major problem related to sustainable development and brainstorm potential solutions.
Follow the given activity steps:
• Brainstorming: Find out more information related to the issue or any other related issues.
• Research and Analysis: Gain information on the current state of the issue, its impact on people, and what the government has done to address this issue.
• Solution Brainstorming: Think creatively and list short-term and long-term approaches to solve the problem at hand.
• Presentation: Present your research, findings, and solutions to the class.
(Group Work)
Get into groups of five. Design and create a sustainable technology model on rainwater harvesting, drip/sprinkler irrigation, vermicompost, solar energy, solar cooker and/or any other technology of your choice.
A Select the correct option.
1 What does sustainable development aim to achieve?
a Unlimited economic growth
b Immediate benefits for the present generation
c Balancing current needs with those of future generations
d Maximizing resource consumption
2 What do the Sustainable Development Goals (SDGs) represent?
a A global to-do list for making the world a better place
b A set of economic policies for developed countries
c A set of guidelines for exploiting natural resources
d A list of challenges that cannot be solved
3 Which of the following is NOT a pillar of sustainable development?
a Economic
b Environmental
c Social
d Political
B Fill in the blanks with the most suitable words.
1 The United Nations adopted the in 2015, which consists of 17 goals and 169 targets covering various aspects of sustainability.
2 is a term used to describe products and activities that are designed and carried out with minimal harm to the environment.
3 Reduce, Reuse and Recycle covers the essence of sustainable
4 Eco-friendly practices align with the principles of responsible resource use, environmental protection, and .
C State whether the following is True or False. Correct the statements that are false.
1 Sustainable practices, such as energy efficiency and water conservation, play a crucial role in reducing environmental impact and promoting responsible use of resources.
2 Sustainable development focuses only on economic growth and profit maximisation.
3 Developed countries should not provide financial or technical assistance to developing nations to support their sustainable development efforts.
4 The Sustainable Development Goals (SDGs) address various aspects of sustainability, including poverty, health, education, and climate action.
D Answer the following questions. (Solved)
Q1. Explain the concept of sustainable development.
A1. According to the World Commission on Environment and Development, Sustainable Development is the “development that meets the needs of the present without compromising the ability of future generations to meet their own needs.” It is about finding a balance which will enable us to optimally utilise the resources in current times so that there will be no scarcity in the future. It is an integrated approach to development which will prevent us from exhausting all the natural resources and damaging the environment to a point from where it can’t recover.
Q2. List any five ways in which sustainable development is important for us.
A2. Sustainable Development is a critical approach essential for shaping our future in the following ways:
• Combating climate change: It is a powerful tool to combat the threat of climate change and global warming. It results in the reduction of greenhouse gas emissions and the use of renewable resources of energy.
• Ensuring a healthy planet: It prioritises environmental protection and resource conservation.
• Leaving a legacy: It wants to create a legacy that we all can be proud of and ensure that our children inherit a planet with abundant resources.
• Enhancing biodiversity: It aims to preserve the ecosystem and the habitats of different birds and animals.
• Providing financial stability: It promises steady economic growth and tries to stabilise the economies by optimum use of resources.
Q3. Read the case study given below and answer the questions in detail that follow.
The government of Madhya Pradesh has introduced a bicycle-sharing program to reduce traffic congestion and carbon emissions in the city.
1. How does promoting cycling contribute to sustainable transportation in a city?
2. What are some potential challenges for implementing such a program?
A3. 1. Cycling is an eco-friendly mode of transportation, and promoting its usage is a great initiative by the government. It will reduce traffic congestion and the carbon footprint of the city. By using such a sustainable mode, the amount of greenhouse gases like carbon dioxide will decrease considerably in the city.
2. Some potential challenges for implementing such a program are:
• Lack of funds and finances for creating such assets.
• Inconsistent maintenance and availability of bikes.
• Lack of infrastructure like proper streets and sidewalks, bike lanes etc which can threaten the safety of daily riders.
• Lack of an existing cycling culture and health-oriented ecosystem.
• Lack of awareness in people about sustainable transportation and its benefits.
Sustainable Development Goals (SDGs)
1. True
2. False. Sustainable development does not only focus on economic growth and profit maximisation.
3. False. Developed countries should provide financial or technical assistance to developing nations to support their sustainable development efforts.
4. True
Crop Rotation: Crop rotation is the practice of growing different types of crops in the same area in sequential seasons.
Eco-friendly: It is a term used to describe the products and activities that are designed and carried out with minimal harm to the environment.
Organic Farming: It is a sustainable way of producing crops without the use of artificial/ synthetic fertilizers and pesticides. It uses natural fertilizers, composts, and manure.
Low-flow Fixtures: It is a water-saving fixture created to reduce the flow of water in order to save water.
Sustainable Development: It is the development that meets the needs of the present without compromising the ability of future generations to meet their own needs.
Sustainable Development Goals: The United Nations General Assembly published them in 2015 as a global ‘to-do list’ for the year 2030, with the goal of making the world a better place and addressing global problems like hunger, poverty, education, peace, global warming, environmental issues, inequality and justice.
Sustainable Practices: These are the actionable steps we take to achieve the objectives of sustainable development.
• Sustainable development is about finding a balance which will enable us to optimally utilise the resources in current times so that there will be no scarcity in the future.
• The three main pillars of sustainable development are: Environment, Economic, and Social.
• There are 17 Sustainable development goals and 169 targets in total for the year 2030.
• Sustainable development prioritises environmental protection and resource conservation. It encourages the reduction of greenhouse gas emissions, promotes renewable energy sources, and advocates for sustainable transportation. It also aims at preserving the ecosystem and the habitats of all birds and animals.
• Reduce, Reuse, and Recycle are fundamental practices that conserve resources and reduce landfill waste.
• Sustainable practices that can promote reduce, reuse, and recycle at individual level may include: reducing the use of single use plastics, reducing food wastage, reusing containers, repurposing things, separating biodegradable and non-biodegradable wastes, and recycling electronic wastes.
• Energy Efficiency includes implementing strategies like insulated buildings, upgrading lighting systems, and investing in energy-efficient appliances.
• Sustainable water practices involve using water wisely and avoiding unnecessary waste.
• Choosing eco-friendly modes of transportation, such as walking, biking, carpooling, or using public transit, reduces greenhouse gas emissions and eases traffic congestion.
• Sustainable agricultural practices promote soil health, reduce chemical inputs, and prioritise biodiversity.
• By adopting eco-friendly habits, individuals, businesses, and communities contribute to the broader goals of sustainability.
• Limited resources, short-term vs. long-term interests, lack of awareness, lack of global cooperation, and improper measures to track progress are the various problems related to sustainable development.
• Efficiency of resources, conservation of resources, education and awareness among people, climate agreements between countries, and aid and assistance are the possible strategies and solutions for sustainable development.
A. Select the correct option.
1. What are the three main pillars of sustainable development?
a. Environment, Government, Social
c. Social, Economic, Finance
b. Environment, Social, Economic
d. Political, Social, Economic
2. Sustainable Development Goals were released in which year?
a. 2016
c. 2015
b. 2020
d. 2014
3. is an eco-friendly mode of transportation.
a. Electric vehicles
c. Diesel cars
b. Trucks
d. Airplane
4. Which of the following is not a sustainable practice?
a. Reuse, Recycle, Reduce
c. Conservation of water
b. Energy Efficiency
d. Use of plastic products
5. Which of the following is not an example of sustainable farming?
a. Organic farming
c. Use of natural fertilisers
b. Crop Rotation
d. Deforestation
B. Fill in the blanks with the most suitable words.
1. Sustainable development meets the diverse needs of present and future generations by promoting wellbeing, and creating of equal opportunities.
2. Sustainable development helps to preserve the habitats of birds and animals, thus helping to maintain our .
3. The General Assembly released a global ‘to-do list’, called the Sustainable Development Goals (SDGs).
4. Eco-friendly is a term used to describe products and activities that are designed and carried out with minimal harm to the
C. State whether the following is True or False. Correct the statements that are false.
1. Reduced chemical use and biodiversity preservation will damage the health of the soil.
2. Eco-friendly practices are an integral part of sustainable development.
3. Developing countries can provide financial and technical assistance to developed nations to support their sustainable development efforts.
4. Protecting and restoring natural habitats and ecosystems is vital.
D. Short answer-type questions.
1. Give a few examples of sustainable water practice.
2. What is the importance of sustainable development in enhancing our quality of life?
3. Mention ways to follow the sustainable practice of ‘reuse, reduce, and recycle’ at your home.
1. Explain the three pillars of sustainable development.
2. What are the sustainable practices that we can follow to achieve SDGs?
3. What are the different challenges associated with sustainable development?
1. Rakesh is working as an engineer for a government-owned company. He uses his car every day to make the hour-long commute to work through congested traffic. He occasionally rides in his colleague’s car. How can Rakesh change his means of transportation to promote sustainable development?
2. Kanha is a farmer in Saharanpur district of Uttar Pradesh. He possesses a lot of land for farming, but in order to boost his income, he over-irrigates, uses chemicals, and grows numerous crops on the same plot of land despite the depletion of the soil. What are the methods that he can follow to maintain the long-term viability of his agricultural land?

In the previous class, you have learnt about various formatting features of Writer. Formatting the complete text becomes tedious when you have a long document. Instead of making individual changes to each part of your document, you can use Styles in Writer.
Styles are a set of pre-defined formatting rules that define the look and feel of your document. It includes a group of formatting effects, i.e., font, font size, color scheme, spacing, etc., which are applied to the text to make it look effective. These rules are used to keep your writing organised and consistent. For example, if you want to change the font style and indentation of your document, it will be a time-consuming task to make changes to the font for each paragraph or to indent each section individually. By applying styles, these changes can be made easily and quickly across the whole document. Let us now discuss the different categories of styles in Writer.
LibreOffice.org provides various style categories to efficiently format and structure your documents. Let us learn about the different style categories in detail.
Paragraph Styles: Paragraph styles help in maintaining consistent formatting throughout your document. They control the formatting of paragraphs, like text alignment, spacing, and indentation.
Character Styles: Character styles are useful for emphasising text with different fonts, colors, or sizes.
Frame Styles: Frame styles define the appearance and behaviour of frames. Frames contain images or other content.
Page Styles: Page styles control the layout elements, such as margins, headers, footers, and so on. Different page styles can be applied to different parts of your document.
List Styles: List styles are used to edit the appearance of lists, whether they are numbered or bulleted.
Table Styles: Table styles are applied to set the appearance of tables, including borders, shading, and text formatting in cells.
Paragraph Styles
Character Styles
Page Styles
Frame Styles
List Styles
Table Styles

Some other important styles that you should know are as follows:
Cell Styles: Cell styles define the layout of cells within a table. This makes table layouts consistent and organised. Cell styles are more frequently used in spreadsheets.
Character Set Styles: Character Set styles are used to define specific character values, such as fonts and font size for different languages or scripts.
Presentation Styles: Presentation styles can be applied to the slide master in an Impress presentation. They mainly affect the three elements of a slide master: the background, background objects, and the text placed on the slide.
Graphics Styles: Graphics styles are also applied to the drawings and presentations in Impress. You can apply the style to the graphic elements, including the text.
You can apply styles in your document in two ways:
1. Using the Styles pane
2. Using the Fill Format Mode
Using the Styles Pane
To apply a predefined style using the Styles pane, follow these steps:
Selecting and applying a style depends on which component of LibreOffice you are working with.
1. Launch LibreOffice Writer, open a new document, and write the given sample content.
2. Click on the Styles menu and select the Manage Styles option. Or Click on the Styles icon on the sidebar.
3. A dockable Styles menu will open. Click on the Paragraph Styles icon if it is not selected by default.
4. Click and drag your cursor over the text you want to apply a style to or place the cursor within a paragraph to style the entire paragraph.
You can also open Styles option using F11 key.
5. In the Styles pane (usually on the right side of the window), double-click on the category that corresponds to the type of style you want to apply. A list of available styles in the chosen category will appear.
6. Select the desired style you want to apply, for example, Heading style.


7. The selected style will be applied immediately. Similarly, you can apply other styles to the selected text.
Modifying Styles
If you want to modify the formatting of a style in your document, follow these steps:
1. Right-click on the style name in the Styles pane.
2. Choose Modify from the context menu.
3. Change the settings of the style, such as Font, Style, or Size, and click on OK.
The Fill Format Mode in LibreOffice Writer is like a magic tool for making your writing look not only consistent but also neat. This feature is especially useful when you are trying to keep the same style across the different parts of your text. It saves you from making multiple selections first and then applying a style to the text. It is used for consistent formatting of text within your document, especially when dealing with headings, subheadings, or any repeated styling.
To apply a style using the Fill Format Mode, follow these steps:
1. Open a document and select the desired heading or text.
2. Now, open the Styles pane and double-click on the style, for example, Heading 1.
3. Click on the Fill Format Mode icon available on the top of the Styles pane.
4. Your cursor will change to a paintbrush icon.
5. Select the text on which you want to apply the same style.
When the Fill Format Mode is active, a right-click anywhere in the document undoes the last Fill Format action.
Fig. 1.3: Applying Heading style

6. The selected text will now adopt the formatting of the source text.
7. After applying the desired formatting, you can exit Fill Format Mode by clicking on the Fill Format Mode icon again in the toolbar. OR Press the Esc key.
Double-click to apply style
If you link styles and then change the base style (for example, changing the font size from 11 to 14), all the linked styles will get changed as well.
Sometimes you may not be happy with the built-in styles and want to include your input in the styles. Creating a new style in Writer is like customising your document. Once you have created a style, you can save it and use it in the other parts of your document. This saves your time and effort since you do not have to remember all formatting options to apply in different places.
You can inherit properties from an existing style to create a new style. To do this, right-click on the style you want to inherit, and select New. Then, the Paragraph Style dialog will appear. Go to the Organizer tab, enter a name for your style, and then select the name of your existing style. Click on OK.
Writer provides you the two methods to create a new style:
1. Creating a new style from a selection
2. Creating a new style using drag and drop
Let us now discuss both the Styles in detail.
To create a custom style in Writer from a selection, follow these steps:
Press Shift + F11 key combination to create a new style.
Fig. 1.5: Selecting the New Style from Selection option
1. Open a document and format the text as per your requirement.
2. Open the Styles pane and click on the category you want to apply the style to. For example, click on Paragraph Styles.
3. Click on Styles actions icon in Styles pane and choose New Style from Selection from the drop-down menu.
4. When the New Style from Selection dialog box appears, enter a suitable name for the style.
5. Click on OK. The new style will be added in the Styles pane under the selected category.
To build a custom style in Writer using drag and drop, follow these steps:
1. Open the document and format the text as per your requirement.
2. Open the Styles pane and click on the category you want to apply the style to. For example, click on Paragraph Styles category.
3. Next, click on the text that you want to use as the base for the style, and drag and drop the selection into the Styles pane.
4. When the New Style from Selection dialog box opens, type a name for the new style, and click on OK. The new style will be added in the Styles pane under the selected category.


You cannot use the drag and drop method to create a new page or table style.
You can easily modify both the predefined and custom styles in Writer by using the following methods:
1. Updating a style from a selection
2. Loading a style from a template or another document
Fig. 1.7: Using drag and drop option Drag and drop the selection hereYou can update a style from a selected part of a text. This means you can adjust the formatting of an existing style based on the formatting of the selected text.
To update a new style from selection, follow these steps:
1. Open the document and select an existing paragraph or create a new paragraph.
2. Format the paragraph as per your requirement. For example, you can modify font properties, align the paragraph, etc. Make sure that all the properties in the paragraph are uniform.
3. Select the paragraph in the document.
4. Select the style you want to update in the Styles pane.
5. Click on the Styles actions icon and select Update Selected Style
6. The selected style will be updated with the new formatting effects.
Press Ctrl + Shift + F11 key combination to update a style.
In Writer, it is easy to import formatting settings from templates or other documents. This helps maintain consistency and saves time. To do so, follow these steps:
1. Open the document in which you want to copy the styles.
2. In the Styles pane, click on the Styles actions icon and select Load Styles from Template.

Any style change you make is only applicable to the current document. If you want to use the same style in another document, you’ll need to either modify the template or paste the style directly into that document.


3. When the Load Styles from Template dialog box opens, choose any or all from the following options to select the styles to be copied:
• Paragraph and Character: This option loads the paragraph and the character styles into the current document.
• Frame: It loads the selected frame styles into the current document.
• Page: It loads the selected page styles into the current document.
• List: It loads the selected numbering styles into the current document.
• Overwrite: It replaces styles in the current document that have the same name as the styles you are loading.

4. Select the template to copy styles from, or if you want to copy styles from a text document, click on the From File button. When the Open dialog box appears, locate and select the document and click on Open
5. The styles of the selected document or template will be loaded into the current document.
Think and Tell
Styles with the same names are automatically overwritten. What is the difference between the frame and the page option while using the Load Styles from Template dialog box?
Fig. 1.9: Selecting Load Styles from Template option Fig. 1.10: Load Styles from Template dialog boxActivity 1: Text Style (Individual Work)
You are writing a research paper that requires specific formatting for quotes from different authors. Create a new custom style called “Author Quote” with the following properties:
• Font: Times New Roman
• Font Size: 12 pt
• Text Alignment: Justified
• Line Spacing: 1.5 lines
• Background Color: Light Yellow
• Borders: 1pt Solid Line, Color: Dark Gray
Apply the “Author Quote” style to a paragraph of text that you want to format as a quote. Write down all the steps you would take to accomplish this task.
Activity 2: Heading Style (Individual Work)
Your assignment is to format a document for your school project. According to the project guidelines, all headings must be formatted in a specific style called “Project Heading,” which includes the following:
• Font: Arial
• Font Size: 16pt
• Text Color: Blue
• Bold Text
Create the “Project Heading” style and apply it to a heading of your choice. Write down all the steps you would take to accomplish this task.
Activity 3: Writing Article on Chandrayaan-3 (Individual Work)
Write an article on ‘Chandrayaan-3’ in about 100 words.
• Give an appropriate title, headings, and subheadings in the document.
• Apply some styles to the similar headings and subheadings using Fill Format Mode.
• Customise an existing style by changing its font properties.
• Add your salutation at the end of the document.
• Format it as per your choice and create a new style using the drag-and-drop method.
A Select the correct option.
1 Which style category controls the consistency of formatting across paragraphs in your document?
a Character Styles
c Page Styles
b Frame Styles
d Paragraph Styles
2 Which style category can you use to highlight text using different fonts, colors, or sizes?
a Character Styles
c Table Styles
b List Styles
d Page Styles
3 Which dialog box appears when you click on the Styles actions icon to create a new style in Writer from a selection?
a Format Style dialog box
c New Style from Selection dialog box
b Style Creation dialog box
d Style Customization dialog box
B Fill in the blanks with the most suitable words.
1 loads the selected frame styles into the current document.
2 styles are applied to set the appearance of tables, including borders, shading, and text formatting within cells.
3 styles are useful for emphasising text with different fonts, colors, or sizes.
4 After applying the desired formatting, you can exit Fill Format Mode by pressing the key.
C State whether the following is True or False. Correct the statements that are false.
1 Styles in Writer are predefined formatting rules used for creating complex drawings and designs.
2 You can exit the format mode using Esc key.
3 Character Styles control the formatting of paragraphs, including alignment, spacing, and indentation.
4 List Styles are used to edit the appearance of numbered or bulleted lists.
D Answer the following questions. (Solved)
Q1. What are styles?
A1. Styles are a set of pre-defined formatting rules that define the look and feel of your document. It includes a group of formatting effects, such as font, font size, color scheme, spacing, etc., which are applied to the text to make it more effective. These rules are used to keep your writing organised and consistent.
Q2. Explain the difference between “Character Styles” and “Paragraph Styles.”
A2. “Character Styles” are used to apply specific formatting to individual characters or words, such as changing the font or color. “Paragraph Styles,” on the other hand, control the formatting of entire paragraphs, including properties like alignment, spacing, and indentation.
Q3. Pragati wants to know how to create a new custom style in Writer using the “New Style from Selection” option. Help her by proving the appropriate steps.
A3. To create a custom style in Writer from a selection, we follow these steps:
• We open a document and format the text as per our requirement.
• We open the Styles pane and click on the category we want to apply the style to. For example, we click on Paragraph Styles category.
• We click on Styles actions icon in the Styles pane and choose New Style from Selection from the drop-down menu.
• When the New Style from Selection dialog box appears, enter a suitable name for the style.
• Next, click on OK. The new style will be added in the Styles under the selected category.
Answer Key A 1. d 2.
B 1. Frame 2. Table 3. Character 4. Esc
C 1. False. Styles are a set of pre-defined formatting rules that define the look and feel of your document. 2. True.
3. False. Character styles are useful for emphasising text with different fonts, colors, or sizes.
4. True.
When you write a text in Writer, you might need to include images, shapes, or other drawing objects in your text. Graphics are inserted in the text documents to support the description given in the text, to provide an immediate visual effect to the content, to grab the reader’s attention, and to better understand the content. In this chapter, you’ll learn how to include and modify images in your text document.
In Writer, there are several ways to insert images in a text document. Some of them are as follows:
1. Inserting an image using Insert Image option
2. Inserting an image using the drag-and-drop method
3. Inserting a scanned image
4. Inserting an image from the clipboard
5. Inserting an image from the Gallery
Let us learn about each of these in detail.
Inserting an image into a text document means adding a picture or graphic from a file that is stored on your computer or a connected storage device. You can save images on your computer from many different sources, including downloading them from the web, scanning them, creating them with graphic applications, or capturing them with a camera.
To insert an image from your computer, follow these steps:
1. Place the cursor where you want to insert an image.
2. Click on Insert menu.
3. Select Image option.
4. When the Insert Image dialog box appears, select the image you want to insert.
Fig. 2.1: Inserting an image from file
5. Click on Open button. The image will be inserted into your document.
In the Insert Image dialog box, you’ll find a Link checkbox at the bottom. Check this box so that the Writer creates a reference link to the image file rather than saving a copy of the image directly into the document.
Inserting a scanned image is the process of adding a digital copy of a physical document or picture to your document. To scan a document, ensure that you have a scanner connected to your computer. Writer allows you to use your scanner directly within the program, enabling you to scan a document or image and insert it into your document as a picture.
To insert a scanned image in the document, follow these steps:
1. Place the cursor where you want to insert the scanned image.
2. Click on the Insert menu.
3. Select the Media > Scan > Select Source option.
4. When the Select Source dialog box appears, select the scanning source you want to scan from the list under Sources

2.2: Using Scan option
5. After choosing the Source, select Insert > Image > Scan > Request.
6. This will scan an image and open it in the imaging software. Adjust the settings for image quality, image size, etc. Make the required changes and click OK.
This process is fast and easy, but it may not give you a high-quality image. Before inserting the content into LibreOffice, you can scan it using graphics software and improve the image quality.
The inbuilt gallery of LibreOffice is accessible to all its components, offering a convenient means to organise reusable elements like graphics and sounds that can be inserted into a document. The Gallery includes ready-to-use objects like arrows, bullets, diagrams, symbols, and many more. Although it doesn’t have an extensive collection of graphics, it allows you to insert your own images or explore extensions for additional graphic resources. By default, the Gallery is docked above the Writer workspace.
Fig.You can insert an image from Gallery into your documents by following these steps:
1. Place your cursor at the location where you want to insert the image.
2. Click View and then click on Gallery OR
Click the Insert menu and then click on Media > Gallery.
3. A Gallery dialog box will appear, displaying a collection of preloaded clipart and images.
4. Navigate through it to find the desired image or object, and select it. You can use the categories and filters (given in the left pane) to narrow down your search.
5. Drag and drop the selected object into the document, or right-click on the picture and choose Insert > Copy
6. You can then resize and format the inserted image as needed.
7. Click on the Cross icon again to close it.
Adding New Image to the Gallery
You can also add new images to your Gallery by following the given steps:
1. Click on the New Theme button.
2. The Properties of New Theme dialog box appears.
3. Select the General tab and type the name of the new theme.
4. Click on the Files menu, and then click on the Add button.
To enlarge the Gallery, hover your cursor over the dividing line between the Gallery and the workspace. When the cursor changes to parallel lines with arrows, click and drag it inwards or outwards per your requirement.
5. Select the desired images to be added to the theme and click on Open.
6. The images will be added to the selected folder in the Gallery.
If you want to see the entire Writer workspace while the Gallery is docked, click on the middle of the narrow bar that separates the Gallery from the workspace.

The Drag-and-drop method is a fast and easy way to add images to your documents. Simply select the image file you want to insert in your document from your computer and drag it into your document.
Follow the given steps to do so:
1. Place the cursor at the location where you want to insert the image.
2. Minimize your LibreOffice window so you can see both the document and the location where your image file is stored on your computer.
3. Click on the image file, hold down the mouse button, and drag it into your document.
4. The image will be inserted into the document.
Inserting an image from the clipboard means adding a picture or graphic to a document using an image that has been previously cut or copied to the clipboard. The clipboard is a temporary storage area in your computer’s memory where you can place images or text for later use, such as another document, a website, or an image editing program, into your current document at the location of your cursor. This method helps with quickly moving images between documents without the need to save them as separate files.
Follow the given steps to do so:
1. Open the document in which the image already exists.
2. Click on the image you want to insert and select the cut or copy option.
3. The image gets copied to the clipboard.
4. Now, open the other document in which you want to insert the image and place the cursor where you want to paste the image.
5. When you select the Paste option, the copied image will be pasted into the document.
If you close the source document from where you have copied the image before pasting it in your document, then the image may be lost from the clipboard.
Modifying Images refers to making changes to images or graphics to make them look better. You can do things like resize, crop, put filters or effects on them, and more. By modifying the image, you can customise the visuals to fit the layout and design of your document, making sure they go with the content and make it look better. To make such changes in images, Writer provides the Image toolbar and Image dialog box.
The Image toolbar contains several components, each serving a specific purpose for applying special effects or making modifications to a picture. You can access the Image toolbar by going to View > Toolbars > Image or you can also access it by clicking on any Image within a document. You can also add the control buttons from the Image toolbar to the standard toolbar for quick access.
The following are the components of a Image toolbar.
You can access the filter toolbar in your document by clicking on its icon. It provides various effects that can be applied to your picture to make it more attractive. Let us discuss these effects:
1. Invert: This effect changes the color values of a colored image or the brightness values of a grayscale image.
2. Smooth: Smooth softens the contrast of an image by reducing sharp transitions between its shades.
3. Sharpen: Sharpening increases the contrast of an image by improving its edges and details.
4. Remove Noise: This filter removes small imperfections (noise) from an image.
5. Solarization: Solarization simulates the effect of excessive light in a picture. A separate dialog box appears to adjust the parameters.
6. Aging: The Aging effect replicates the impact of time on a picture. It can be applied multiple times, and a separate dialog box opens for adjusting the level of aging.
7. Posterize: Posterize reduces the number of colors used in an image, giving it a poster-like look.
8. Pop Art: The Pop Art filter dramatically transforms the image’s look. It uses bold and contrasting colors to get a pop art style.
9. Charcoal Sketch: This effect converts the image into a sketch that looks like a charcoal drawing.
10. Relief: The Relief effect allows you to control the light source, creating shadows and a 3D relief effect on the image. A dialog box opens for adjusting the parameters.
11. Mosaic: Mosaic groups pixels into single areas of one color, producing a mosaic or pixelated effect.
Image mode provides you with options like Default, Grayscale, Black/White, and Watermark.
Rotate 90° Left
It rotates the image by 90° to the left.
Rotate 90° Right
It rotates the image by 90° to the right.
Rotate
It is used to rotate an image at any angle.
Color
The Color option is used to modify the RGB (red, green, and blue) colour components of the image. It can also be used to set the brightness, contrast, and gamma of the image.
The transparency option is used to increase or decrease the transparency of an image. It is mostly used while setting a watermark or wrapping the image in the background.
Flip Vertically or Horizontally
You can flip an image either vertically or horizontally by clicking on the respective buttons present on the Picture toolbar.
The formatting toolbar is used to do various formatting operations on an image. You can customise the appearance of an image by resizing, aligning, adding borders, changing colors, and more. You can also use the Image dialog box to apply formatting effects to images.
Cropping Images
Cropping means deleting the unwanted areas of an image in order to improve its appearance.
You can crop any image by following the given steps:
1. Right-click on the image and select the Properties option from the context menu.
2. The Image dialog box appears.
3. Select the Crop tab. You will see various options, as shown in Figure 2.7.

4. Change the desired values and click OK
5. The image will be cropped as per your requirements.
The different options that appear in the Crop tab of the Image dialog box are discussed below:
1. The Keep scale option is the default option. This option does not change the scale of the picture.
2. The Keep image size option is used to keep the image size constant. If you set it to positive, the image will grow. If you set it to negative, the image will shrink. If you set the image size constant, the image may be distorted.
Fig. 2.7: Cropping an imageLeft, Right, Top, and Bottom
You can crop the images by entering the values in the Left, Right, Top, and Bottom boxes.
You can observe that the values in the Width and Height fields under either Scale or Image size change in response to values entered in the Left, Right, Top, and Bottom fields.
Resizing means increasing or decreasing the size of an image as per your requirements. Follow the given steps to resize an image:
1. Click on the image that you want to resize. Once you’ve clicked on the image, you will see four side handles and four corner handles.
2. Take the pointer to any of the handles. The shape of the pointer will change to a double-headed arrow.
3. Drag the arrow to increase or decrease the size of the image.
Also note that the handles given at the center of the edge enable you to adjust either the height or width at a time. On the other hand, the corner handles allow you to resize both the width and height of the image simultaneously. To reduce the image proportionally, press the shift key while dragging the mouse.
You can also create graphics in Writer using various objects. To view the Drawing toolbar in your document, click on View > Toolbars > Drawing.
To use any tool from the Drawing toolbar, follow the given steps:
1. Place the cursor at the position where you want to draw an object.
2. Select the required shape from the Drawing toolbar. The mouse pointer changes to a cross hair symbol (+ sign).
3. Hold the mouse button and drag to draw the required drawing object. Release the mouse button.
4. Observe that the selected drawing function remains active, so you can draw more objects of the same type.
After drawing an object, you can modify your drawing. For example, you can change the fill color, the line type, the weight, the anchor, etc. Right-clicking on the drawing object and selecting the option you want from the context menu will also let you edit the properties. You can also select the desired settings from the corresponding dialog boxes.
RememberIf you want to cancel the selected drawing function, press the Esc key or click on the Select icon (the arrow) on the Drawing toolbar.
You can set the properties of a drawing object before you draw it. You can also make the modifications after drawing the object. Follow the given steps:
1. Click on the Select tool on the Drawing toolbar.
2. From the Drawing Object Properties toolbar, click on the icon for each property and select an appropriate value.
3. For more control, or to set specific attributes, you can click on the Area or Line icons on the toolbar to display detailed dialog boxes.
To change the properties for an existing drawing object:
1. Select the object.
2. Continue as described above.
You can resize an object in the same way as you resize an image. Select the object, click on any of the eight handles around it and drag it to its new position. For a scaled resizing, select any corner handle and hold down the Shift key as you drag the handle to the new position.
To group drawing objects:
Select one object, then hold down the Shift key and select the other objects you want to include in the group. The bounding box expands to include all the selected objects.
With the selected objects, hover the mouse pointer over one of the objects and right-click to choose Group > Group from the context menu.
When inserting an image into a text document, you need to set its position in relation to the text as well as other images. Placement of graphics is very important in Writer document. Since Writer is a word processing application and not a desktop publishing application, there are some restrictions on the flexibility in the positioning of images. Positioning of a graphic is controlled by four settings:
1. Arrangement refers to the placement of a graphic on an imaginary vertical axis. Arrangement controls how graphics are stacked upon each other or relative to the text.
2. Alignment refers to the vertical or horizontal placement of a graphic in relation to the chosen anchor point.
3. Anchoring refers to the reference point for the graphics. This point could be the page, or frame where the object is, a paragraph, or a character. An image always has an anchor point.
4. Text wrapping refers to the relation of graphics to the surrounding text, which may wrap around the graphic on one or both sides, be overprinted behind or in front of the graphic, or treat the graphic as a separate paragraph or character.
The settings can be accessed in a number of ways, depending on the nature of the graphics:
1. From the Format menu, where you can find Alignment, Arrange, Wrap, and Anchor options (both for images and drawing objects).
2. From the pop-up menu displayed when you right-click on the graphic.
3. From the Object toolbar.
4. For images, from the Type and Wrapping pages of the Image dialog box.
You cannot control the arrangement using the dialog box. To open the Image dialog box, click on the image to select it and then choose Format > Image.
Activity 1: Copying an Image (Individual Work)
Write the steps to Copy an Image from the Clipboard to a Document in Writer. Also, write about the advantages of using this method.
Activity 2: Cropping an Image (Individual Work)
Explain the steps to add a new image, let’s say, an elephant to the Gallery in LibreOffice Writer. Now, insert the elephant’s picture into the Writer. Then, crop the image in Writer.
A Select the correct option.
1 Which method allows you to insert an image into a Writer document directly from a physical picture? a Drag-and-drop b Clipboard c Gallery d Scan
2 What is the use of the Keep Scale option in the Crop tab of the Image dialog box?
a It is used to resize the image. b It does not change the scale of the image. c It adjusts the image’s brightness. d It applies a filter effect.
3 Which toolbar provides the options for modifying images, including resizing, applying filters, and changing colors? a Standard Toolbar b Insert Toolbar c Image Toolbar d Gallery Toolbar
B Fill in the blanks with the most suitable words.
1 The Image toolbar in Writer provides various components, including, Filters, and Color for making modifications to a .
2 You can the images by entering the values in the Left, Right, Top, and Bottom boxes.
3 softens the contrast of an image by reducing sharp transitions between its shades.
4 refers to the reference point for the graphics.
C State whether the following is True or False. Correct the statements that are false.
1 Graphics are inserted in the text documents to support the description given in the text.
2 The Clipboard includes ready-to-use objects like arrows, bullets, diagrams, symbols, and more.
3 The Mosaic effect allows you to control the light source and create shadows on the image.
4 You can flip an image either vertically or horizontally.
D Answer the following questions. (Solved)
Q1. What do you mean by modifying images?
A1. Modifying Images refers to making changes to images or graphics to make them look better. You can do things like resize, crop, put filters or effects on them, and more.
Q2. Define Solarization.
A2. Solarization simulates the effect of excessive light in a picture. A separate dialog box appears to adjust the parameters.
Q3. Shweta wants to insert images into her Writer document. Help her by listing the different ways of inserting images into a Writer document so that she can choose the most suitable one for her document.”
A3. The following are the ways to insert an image to a Writer document:
• Inserting an image from a file
• Inserting an image using the drag-and-drop method
• Inserting a scanned image
• Inserting an image from the clipboard
• Inserting an image from the Gallery
2. False. The Gallery includes ready-to-use objects like arrows, bullets, diagrams, symbols, and more.
3. False. The Relief effect allows you to control the light source and create shadows on the image.
4.
A 1. d 2. b 3. c B 1. image 2. crop 3. Smooth 4. Anchoring C 1. True
Atemplate is a sample that you can use as a starting point for creating something new. It’s a design or format that was already made beforehand.
You can customise different features of a template to suit your needs. Customised templates allow you to choose any format (word processors, spreadsheets, graphics, or presentations), making it easier and faster to create documents, websites, or other projects.
Default templates determine the document’s appearance when no template is provided during its creation.
These templates are generally made beforehand. The different types of predefined templates in LibreOffice are:
1. Document templates: These templates allow you to craft well-structured documents, such as letters, reports, and memos.
2. Spreadsheet templates: These templates are utilised to build financial and budgetary documents.
3. Presentation templates: These templates serve as the foundation for presentations like slideshows and training materials.
4. Drawing templates: These templates are utilised to generate visual representations like flowcharts and diagrams.
You can create your templates in two ways: From a document and using a wizard.
To create a template from a document:
1. Open a new or existing document with the desired template type (text document, spreadsheet, drawing, or presentation).

2. From the main menu, select File > Templates > Save As Template option. A dialog box appears.
3. Type the desired name in the Enter Template Name field.
4. In the Categories list, click the category to which you want to assign the template.
5. Click on Save option to save the new template.
You can also apply the following settings in a Writer document that can be saved as a template and used in the future.
Printer settings: You can choose from a range of printer options, such as singleor double-sided printing, paper size, and so on.
1. Select from a variety of styles, such as character, page, frame, numbering, and paragraph formatting styles. Templates can also contain text that is written beforehand. It helps you save time by avoiding typing the same kind of text again and again. An example of this type of letter would be your company’s logo, along with a standard format for business letters: name, address, and salutation.
A wizard in LibreOffice is a step-by-step guide that helps you create a document, spreadsheet, presentation, or other type of file. It can help you create templates for letters, faxes, agendas, and presentations with ease.
Follow the given steps to create a template using a wizard: 1. Choose File > Wizards > desired template
2. Follow the instructions on the pages of the wizard.
3. Once you reach the last page, type the name of the file and choose the location for saving your template. The default location is user templates directory.
3.4: Selecting the template
Fig. 3.3: Printer settings dialog box Fig. 3.2: Save As Template dialog box4. You have the option of creating a new document from your template immediately or by manually changing the template. For future documents, you can reuse the template created by the wizard, just as you would use any other template.
Which type of templates can be created by using Wizard?
If you create a document by choosing File > New > Text Document (or Spreadsheet, Presentation, or Drawing) from the main menu, LibreOffice creates the document from the default template for that type of document. You can set a custom template to be the default. You can also modify it as and when required.
Selecting any template, you can designate it as the default, but it must be present in one of the folders on display in the Templates dialog box.
To set a custom template as the default:
1. In the menu bar, click on File, then hover over Templates, and finally select Manage Templates. The Templates dialog box opens as shown in Fig. 3.5.
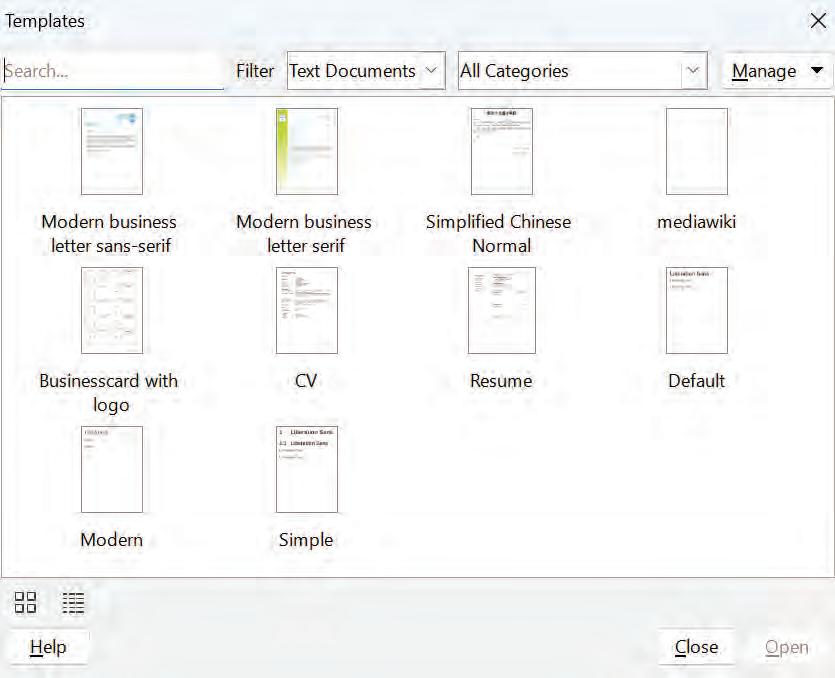
2. Choose the desired template.
3. Right-click on the desired template and click on Set As Default option.
The next time you choose File > New to create a document, it will be created using this template.
Let us now use the template that you have created.
Think and Tell
You and your friends are making a template using a Wizard. What are the basic types of predefined templates that you can use?
1. Under File > New, select Templates to access your desired template. You’ll observe the window displaying templates as shown in Fig. 3.6.
2. Select the template you want. Template details will be visible.
3. Click twice on the template to open it.
1. Under File > New, select Templates to access your desired template. You’ll observe the window displaying templates.
2. Select the template you want. The template details will be displayed.
The first computer wizard was named “ELIZA”. It was created in 1966 by Joseph Weizenbaum at MIT.
Fig. 3.6: Selecting the desired template Fig. 3.7: Opening templatesAny changes made to a document may be saved by selecting File > Save As after updating it.
Activity 1: Research Project Template (Individual Work)
Create a template for a research project by using the various options that you have learnt in the chapter.
Activity 2: Template for Flyer (Individual Work)
Create a template and use various options given by LibreOffice to make a flyer for a school event.
Activity 3: Birthday Card Template (Individual Work)
Make a template by using various facilities given by LibreOffice for a birthday card for your friend.
A Select the correct option.
1 What is the purpose of a template in software applications like LibreOffice?
a To save your document
b To print your document
c To serve as a starting point for creating new documents
d To edit existing documents
2 Which types of templates can be created using a wizard in LibreOffice?
a Document templates only
b Spreadsheet templates only
c Presentation templates only
d Various types of templates, including letters, faxes, agendas, and presentations
3 How can you set a custom template as the default in LibreOffice?
a You cannot set a custom template as the default.
b Right-click on the template and select “Set As Default” in the Templates dialog box.
c Click on “File” and select “Templates” to set a custom template as the default.
d Reset LibreOffice to its default template.
B Fill in the blanks with the most suitable words.
1 Using either a new or a wizard template, you can start the process of creating a new document.
2 When you select a template to create a new document, it serves as a helpful to get you started on your work.
3 You can create your templates in two ways: from a document or using a .
4 You can create templates for different types of documents, including text documents, spreadsheets, drawings, and
C State whether the following is True or False. Correct the statements that are false.
1 You can build a template from a document.
2 A template in software applications like LibreOffice is used for saving documents.
3 You cannot create new templates in LibreOffice.
4 Templates can also contain predefined text that saves your time by avoiding repetitive typing.
D Answer the following questions. (Solved)
Q1. How can we create a template in LibreOffice?
A1. To create a template in LibreOffice, you have two options: starting from an existing document or using a wizard. If you choose to start from a document,
• simply open the document you want to use as a template and save it as a template by selecting File > Save As.
• In the Save As Dialog box, choose Template from the Save as type list.
To access the Wizard,
• simply navigate to the “File” menu and select “New.”
• From there, you’ll see a section dedicated to templates follow the prompts provided by the Wizard to create your desired template.
Q2. How can you set a template as the default template in LibreOffice?
A2. To make a template the default template, you have two options. First, right-click on the template and choose “Set as Default.” Alternatively,
• Open the Templates Dialog box by going to File > Templates > Manage Templates.
• From there, select the desired template and click on the “Set as Default” button.
Q3. Juhi wants to make a few changes to her existing document. How can she do it?
A3. She can modify the existing template by revising the document with desired changes. Then, save the document. The modified template will retain the updated changes for future use in new documents.
A 1. c 2. d 3. b
B 1. Document 2. Guide 3. Wizard 4. Presentations
C 1. True.
2. False. A template is primarily used as a starting point for creating a new document.
3. False. You can create templates in LibreOffice from existing documents or wizard.
4. True.
You all have seen the index page, or contents page, in your book that you use to refer to a particular chapter or heading. The index page, or contents page, is also known as the Table of Contents (TOC). A TOC can be found at the start of any book, paper, report, or other document. It consists of headings or sub-headings of a chapter or unit, along with their respective page numbers. It provides an organised overview of the information included in the work. A table of contents helps readers find specific parts of a text without having to read the whole thing. It shows them how the content is organised and helps them quickly find what they’re looking for.
You can create an automated table of contents using the Writer’s Table of Contents tool. The headlines should be styled consistently before beginning. For example, you can use Heading 1 style for chapter titles, Heading 2, and Heading 3 for chapter sub-headings.
Follow the given steps to create the table of contents in Writer:
1. Use Headings
Ensure that headings are used to appropriately arrange your document. To arrange your information, use headers with varying levels (Heading 1, Heading 2, etc.). This is essential for the table of contents to function properly.
2. Insert a Table of Contents
• Set your cursor where you want the table of contents to appear.
• Click on the Insert menu and select the Table of Contents and Index option.
• From the context menu, select the Table of Contents, Index or Bibliography option.
3. Table of Contents, Index or Bibliography Dialog Box
• Select the Type tab in the Table of Contents, Index or Bibliography dialog box.
• Choose Table of Contents from the Type section.

• In the Title field, type the title for the TOC.
• Click on OK to insert the TOC. The TOC appears with the grey background colour around the text.
Fig. 4.2: Insert Table of Contents, Index or Bibliography dialog box
The table of contents can be customised in many ways in LibreOffice Writer. To customise, you need to right click on the table of contents and then select the option of Edit index. Afterwards, the Table of Contents, Index or Bibliography dialog box will appear.

Fig. 4.3: Table of Contents created
There are five tabs available in the Table of Contents, Index or Bibliography dialog box.
The Type tab helps in setting the attributes of the table of contents. Table of contents, indexes, and bibliographies are just a few of the several sorts of indexes or tables that can be created and customised using this tab.
1. Adding a Title
If you want to include a heading for the table of contents, input the desired title into the Title field. (If the Writer has automatically filled in a title in this field, you can modify it by directly typing the new title.) To remove the title, simply erase the content from the Title field.
2. Protected Against Manual Changes
Select the Protected against manual changes checkbox to prevent unintentional changes to the table of contents. If this box is checked, the context menu or the Table of Contents, Index or Bibliography window are the only ways to modify the table of contents.
3. Setting the Type
Choose Table of Contents from the Type drop-down menu under the Type and Title column.
4. Changing the Number of Levels
Whenever Writer creates the table of contents, by default, it assesses 10 levels of headings.
Enter the desired number in the evaluate up to level spin box to modify the number of levels being considered.
5. Assigning Custom Styles
To include paragraphs with custom formatting in the table of contents, follow these steps:
• Within the Create From section, ensure that you select the Additional styles option.
• Click on the button represented by (Assign styles...) next to this checkbox, which will open the Assign Styles window.
• Use the button to place the chosen style at the desired outline level. For instance, if you want the paragraphs with this style to be listed as main entries in the table of contents, click once to move the style to the first column. To move the style in the opposite direction, use the button.
• After making your selections, click on OK to save the changes and go back to the Type tab. Alternatively, you can click on Cancel if you don’t wish to save your changes.
The Entries tab is used to format the entries of table of contents. You have the flexibility to include or remove elements like chapter numbers and apply specific character styles to individual elements for each outline level.

Fig. 4.5: The Table of Contents, Index or Bibliography dialog box with active Entries tab
To start, select the outline level you wish to format by clicking on a level number in the Level column. (You can make adjustments to all outline levels collectively later.) The Structure Line exhibits the elements associated with entries at that specific level. Each button on the Structure Line corresponds to an individual element.
- The N# button denotes the chapter number.
- The E button denotes the entry text.
- The T button denotes a tab stop.
- The # button denotes the page number.
- The LS button marks the beginning of a hyperlink.
- The LE button designates the conclusion of a hyperlink.
1. Deleting Elements
Each white field on the Structure line denotes a blank space.
Click on the button next to the element you want to remove from the Structure Line, and then press on the Delete key. For instance, click on the T button and then press the Delete key to remove a tab stop.
2. Adding Elements
Follow the given steps to add a new element to the Structure Line:
• To the left of where you wish to enter the element, place the pointer in the white field.
• Just below the Structure Line, select one of the five buttons. For instance, click on the Tab stop button to add a tab stop. Observe that the Structure Line now has a new Tab (T) button.
If you include a hyperlink, you need to specify the start and end of the link. For instance, use these steps to modify the default Structure line so that the chapter number and entrance text link together:
• Position your cursor within the blank area to the left of the N# button on the Structure Line, which symbolises the chapter number.
• Click on the Hyperlink button, and you will see an LS button appear on the Structure Line, indicating the starting point of the hyperlink.
• On the Structure Line, move your cursor to the empty space to the right of the E button, which signifies the entry text.
• Click on the Hyperlink button once more, and you will notice an LE button appear on the Structure Line, marking the conclusion of the hyperlink.
3. Applying Character Styles
• To apply a style to an element, click on the button that represents that element.
• Choose the preferred style from the Character Style drop-down menu.
• The element is treated with the chosen style by the writer.
• To use the chosen style, select OK
4. Applying Changes to All Outline Levels
Choose All button to apply the display structure and formatting to all outlines.
Each level of the table’s outline can have a distinct paragraph style applied to it. The steps below can be used to apply a paragraph style to an outline level:
1. Click on the chosen outline level in the Levels selection box.
2. Select the paragraph style you wish to use by clicking on it in the Paragraph Styles list box.
3. To apply the chosen paragraph style to the chosen outline level, click on the OK button.

Fig. 4.6: The Table of Contents, Index or Bibliography dialog box with different styles
To eliminate paragraph formatting from a level of an outline, follow the steps below:
1. Click on the chosen outline level in the Levels list box.
2. Select Default from the menu.
3. Click on the style in the Paragraph Styles list box, then click on the Edit button to view or modify its attributes.
To create a multi-column table of contents, use the options available in the Columns tab within the Table of Contents, Index or Bibliography dialog box.

Fig. 4.7: The Table of Contents, Index or Bibliography dialog box with active Columns tab
To make a two-column TOC, follow these steps:
1. Right-click on the inserted table of contents and choose the Edit index option.
2. Click on the Columns tab.
3. In the Settings section, click on the arrow within the Columns box and select the value 2.
4. Adjust other preferences as needed, such as column width or spacing, within the Width and Spacing section. You can also pick a Separator Line style and set its thickness in the Separator Line section.
5. Click OK.
Background tab is used to add color or graphics in the background.
1. Adding Colour
Fig. 4.8: The Table of Contents, Index or Bibliography dialog box with active Background tab
Click on the desired colour in color grid from the background color tab.
2. Adding an Image
• Select the Image
• Choose how you want the background image to look in the Background tab:
Select Position, then click on the desired spot in the position grid to place the image in a precise point in the background.
Choose Tiling Position to have the design appear repeatedly throughout the full backdrop area.
3. Saving the Table of Contents
Click on OK to save your table of contents so it can appear in your document. Close the window and you will be able to see the table of contents.
This feature enables you to make certain changes in the table of contents with respect to changes in the document file. Some basic functions which can be used are:
Follow the given steps to modify an existing table of contents:
1. Right-click within the table of contents to access the context menu.
2. Select on the Edit index option from the context menu. This will open the Table of Contents, Index or Bibliography window, allowing you to make alterations and save the table.
To keep the table of contents up-to-date, Writer does not perform automatic updates. Therefore, you should manually update it whenever you make changes to the document. It involves the following steps:
1. Right-click anywhere within the table of contents to bring up the context menu.
2. Choose the Update Index option from the context menu.
Follow the given steps for deleting the table of contents from a document:
1. Right-click within the table of contents to reveal the context menu.
2. Choose the Delete index option from the context menu. This action will remove the table of contents from the document.
Activity 1: Making a Table of Contents (Individual Work)
Create a table of contents for a sample document as given in your textbook.
Activity 2: Writing an Article on Pollution (Individual Work)
Write an article on the topic ‘Pollution’ in about 500 words.
• Give appropriate headings or sub-headings.
• Create a TOC for all the essential headings along with the page number.
• Use the background feature to insert a background into the TOC.
A Select the correct option.
1 What is the primary purpose of a table of contents (TOC) in a written work?
a To provide a summary of the entire content
b To assist readers in navigation and finding specific information
c To add decorative elements to a document
d To replace headings and subheadings
2 In LibreOffice Writer, which heading styles are commonly used for chapter titles and chapter subheadings when creating a table of contents?
a Heading 4 and Heading 5
b Heading 2 and Heading 3
c Heading A and Heading B
d Heading Main and Heading Sub
3 To update a table of contents in LibreOffice Writer after making changes to headings in your document, what action should you take?
a Click on the “Update Index” button
b Press the “Ctrl + S” shortcut
c Restart the computer
d Reinstall LibreOffice Writer
B Fill in the blanks with the most suitable words.
1 To create a multi-column table of contents in LibreOffice Writer, you can adjust the number of columns in the tab of the Table of Contents, Index or Bibliography dialog box.
2 The Edit index option is used to an existing table of contents in LibreOffice Writer.
3 In the Entries tab of the Table of Contents, Index or Bibliography dialog box, you can format individual elements, such as chapter numbers, entry text, tab stops, page numbers, and .
4 The Style tab in the Table of Contents, Index or Bibliography dialog box allows you to apply different paragraph styles to each level of the table of contents, ensuring distinct for each level.
C State whether the following is True or False. Correct the statements that are false.
1 The table of contents in Writer can be automatically updated whenever there are changes to the document’s headings.
2 The Background tab in the Table of Contents, Index or Bibliography dialog box allows you to add color or graphics as a background to the table of contents.
3 In LibreOffice Writer, you can apply a different paragraph style to each level of the table of contents.
4 Each black field on the Structure line denotes a blank space.
D Answer the following questions. (Solved)
Q1. Explain the purpose of a Table of Contents (TOC) in a written work and how it benefits readers.
A1. A table of contents (TOC) in a written work serves the purpose of providing an organised overview of the information included in the work by listing major parts, chapters, headings, or subjects along with page numbers. It benefits readers by helping them quickly navigate the text, locate specific information, understand the structure of the material, and find relevant sections without having to read the entire work.
Q2. Describe the steps involved in protecting a table of contents against manual modifications when creating it in LibreOffice Writer.
A2. To protect a table of contents against manual modifications in LibreOffice Writer, we follow these steps:
• Check the Protected against manual changes checkbox in the Table of Contents, Index or Bibliography dialog box.
• This checkbox prevents unintentional changes to the table of contents, ensuring that every modification must be made through the context menu or the Table of Contents, Index or Bibliography window.
Q3. Pihu wants to apply custom formatting to specific elements of the table of contents in Writer. Help her by providing appropriate steps to do so.
A3. Follow the given steps to apply custom formatting to specific elements of the table of contents in Writer:
• In the Table of Contents, Index or Bibliography dialog box, go to the Entries tab.
• Select the outline level you wish to format by clicking on a level number.
• Use the buttons on the Structure Line to add or remove elements like chapter numbers, entry text, tab stops, page numbers, and hyperlinks.
• To apply character styles to elements, click on the button representing that element and choose the preferred style from the Character Style drop-down menu.
4. False. Each white field on the Structure line denotes a blank space.
A 1. b 2. b 3. a B 1. Columns 2. Modify or Edit 3. Hyperlinks 4. Formatting C 1. True. 2. True. 3. True.Styles: Styles are a set of pre-defined formatting rules that define the look and feel of your document.
Modifying Images: It refers to making changes to images or graphics to make them look better.
Cropping: Cropping means deleting the unwanted areas of an image in order to improve its appearance.
Resizing: Resizing means increasing or decreasing the size of an image per your requirements.
Template: A template is a sample that you can use as a starting point for creating something new.
Wizard: A Wizard in LibreOffice is a step-by-step guide that helps you create a document, spreadsheet, presentation, or any other type of file.
• Formatting the complete text becomes tedious when you have a long document. Instead of making individual changes to each part of your document, you can use Styles in Writer.
• The Fill Format Mode in LibreOffice Writer is like a magic tool for making your writing look not only consistent but also neat.
• Once you have created a style, you can save it and use it in the other parts of your document.
• Inserting an image into a text document means adding a picture or graphic from a file that is stored on your computer or a connected storage device.
• The Gallery includes ready-to-use objects like arrows, bullets, diagrams, symbols, and many more.
• Images are inserted in the text documents to support the description given in the text, to provide an immediate visual effect to the content, to grab the reader’s attention, and to better understand the content.
• The Picture toolbar contains several components, each serving a specific purpose for applying special effects or making modifications to a picture.
• When inserting an image into a text document, you need to set its position in relation to the text as well as other images.
• Customised templates allow you to choose any format making it easier and faster to create documents, websites, or other projects.
• Few pre-defined templates are: Document, Spreadsheet, Presentation and Drawing templates.
• Any changes made to a document may be saved by selecting File > Save As after updating it.
• A TOC can be found at the start of any book, paper, report, or other documents.
• A table of contents helps readers find specific parts of a text without having to read the whole thing.
A. Select the correct option.
1. mode allows you to reuse the same style on multiple selections of text.
a. Fill Format Mode
c. Formatting Mode
b. Modify Style Mode
d. Auto Style Mode
2. The placement of a graphic on an imaginary vertical axis is known as .
a. Alignment
c. Anchoring
b. Arrangement
d. Text Wrapping
3. serve as the foundation for presentations like slideshows and training materials.
a. Document Templates
c. Drawing Templates
4. TOC stands for
a. Table of Contacts
c. Table of Contents
b. Spreadsheet Templates
d. Presentation Templates
b. Table of Columns
d. Table of Contracts
5. Which method allows you to insert an image into a Writer document directly from a physical picture?
a. Drag-and-drop
c. Gallery
b. Clipboard
d. Scan
B. Fill in the blanks with the most suitable words.
1. Styles define the layout of cells within a table.
2. groups pixels into single areas of one colour, producing a pixelated effect.
3. determine the document’s appearance when no template is provided during its creation.
4. You can customise how dots and page numbers look between the headings and the page numbers using
5. You can create your templates in two ways: from a document or using a
C. State whether the following is True or False. Correct the statements that are false.
1. Page Styles define the appearance and behaviour of frames.
2. You can view the Drawing toolbar in your document by clicking on View > Toolbars > Drawing.
3. Presentation Templates are utilised to build financial and budgetary documents.
4. The LE button designates the conclusion of a hyperlink.
5. You can exit the format mode using the Esc key.
D. Short answer-type questions.
1. List two ways to apply styles in Writer.
2. How to modify images in LibreOffice?
3. Write the ways to create a template.
E. Long answer-type questions.
1. Discuss any three filter effects that can be applied to your picture to make it more attractive.
2. What is the use of the Entries tab?
3. What do you mean by the term ‘text wrapping’?
F. Competency-based questions.
1. Rani wants to build a custom style in Writer using the drag-and-drop option. Help her to do so by providing all the required steps.
2. Pihu wants to resize an image, but she is unaware of the concept and the steps to do so. Help her by defining and mentioning the steps to resize an image.
Calc is a popular open-source spreadsheet program that helps you do calculations automatically. It is mainly used to process numerical data like results, earnings, expenses, profit, and loss. It is also beneficial for analysing data and getting the result or summary quickly, which helps in making decisions.
The Data Consolidation function aggregates/combines data from multiple worksheets or workbooks into a single worksheet, making it easy to update. In other words, you can combine your data from multiple worksheets into one master worksheet using data consolidation.
For example, you have X PT1 and X PT2 marks for 5 students in 5 different subjects (where PT1 is Periodic test 1 and PT2 is Periodic test 2) . In such a case, to analyse the data, if you combine everything manually using the traditional approach of copying and pasting, it would become a lengthy and tiresome effort.
Calc has a Data > Consolidate tool that allows you to compile data with little effort. It gathers cell contents from multiple worksheets and stores the collected data in a master worksheet.
Let us consider an example where a teacher wishes to consolidate:
• Total marks (sum of scored marks in PT1 and PT2) of each student subject-wise, and
• Aggregate marks of all subjects, student-wise
1. Enter the student’s marks for each subject scored in PT1 and PT2 in separate worksheets with the sheet names PT1 and PT2, respectively, as shown in figures.
2. Open the third sheet and click on Data > Consolidate. The following Consolidate dialog box (Fig. 5.2) will appear.
5.2: Consolidate dialog box
3. Click on the field next to the Source data range.
Now, click on the PT1 sheet and select cells from A2:G7. After selecting, the Source data range is filled with $PT1.$A$2:$G$7 automatically. Now, click on the Add button.
Again, click on the PT2 sheet and select the cells from A2:G7 similar to PT1 sheet. Now, click on the Add button.
The selected data ranges are displayed in the Consolidation ranges box.
4. Now, click on the field next to Copy results to box and place the cell pointer in sheet3. The following $Sheet3.$A$2 will appear in the Copy results to box. (See Fig. 5.3)
5. Click on the Function drop-down menu and select the Sum function. (See Fig. 5.4)
5.4: Selecting Sum function
This specifies how the values of the consolidation ranges will be calculated. The default setting is Sum, which adds the corresponding cell values of the Source data range and gives the result in the target range. Now click on OK.
The following analysis will appear as shown in Fig. 5.5.

Fig. 5.5: Subject-wise total marks
The text in the labels must be identical for rows or columns to be correctly matched. If the row or column label does not match any of the rows or columns in the target range, it will be inserted as a new row or column.
You can view the Total marks (PT1 + PT2) subject-wise for every student and the total marks scored in both the PTs.
Most of the available functions in the Consolidate dialog box are statistical functions (such as Average, Min, Max, and StDev), and the tool is most useful when you are working with the same data over and over. At this stage, you can access the following additional parameters by clicking More in the Consolidate dialog box. Choose Link to source data to insert the formulas that generate the results into the target range instead of the actual results. When you link the data, any changes in the source range are automatically reflected in the target range.
6. Now click on More. Choose the Link to source data, and click OK. The following analysis of marks will appear as shown in Fig. 5.6.
 Fig.
Fig. 5.6: Analysis of marks
Fig.
Fig. 5.6: Analysis of marks
Spreadsheet software offers extensive functionality for data analysis. Certain advanced features assist in performing advanced functions on formula outcomes. One of them is subtotal. Subtotal is used to display formula results based on column groups and row labels. You can apply the subtotal formula to your spreadsheet in two ways:
1. Subtotal() formula: The subtotal() formula to group the results.
2. Data > Subtotals command: The graphical command to do subtotals.
If you’re often working with the same range, you should probably give it a name by going to Data > Define Range. The Data menu has a Define Range menu item. The consolidation and target ranges are saved within the document, and you can always access the data when you reopen a document where you have defined consolidation.
Let us consider an example where the regional manager of Haryana wants to find the total number of different Maruti Suzuki cars sold in the various locations of Haryana in December.
Enter the data in a Calc sheet to find the location-wise car sale subtotal as shown in Fig. 5.7.
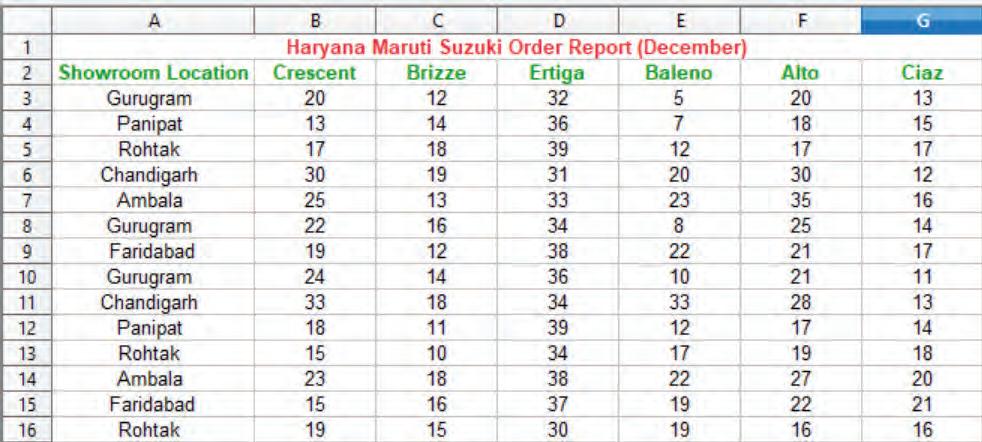
Follow the given steps to create subtotals:
1. Select the range of cells (A2:G16) that you want to calculate subtotals for, and then choose Data > Subtotals.
2. The Subtotals dialog box will appear. In the Group by drop-down, select the column showroom location to which you want to add the subtotals.
3. In Calculate subtotals for field, select all the car models for which you want to add the subtotals.
4. In the Use function box, select the function Sum that you want to use to calculate the subtotals.
5. Finally, click OK
The following result analysis will appear as shown in Fig. 5.8.
1. Subtotal number of different cars showroom location-wise sold.
2. Grand total number of different cars sold in Haryana.
If the contents of the selected column change, the subtotals are automatically recalculated.
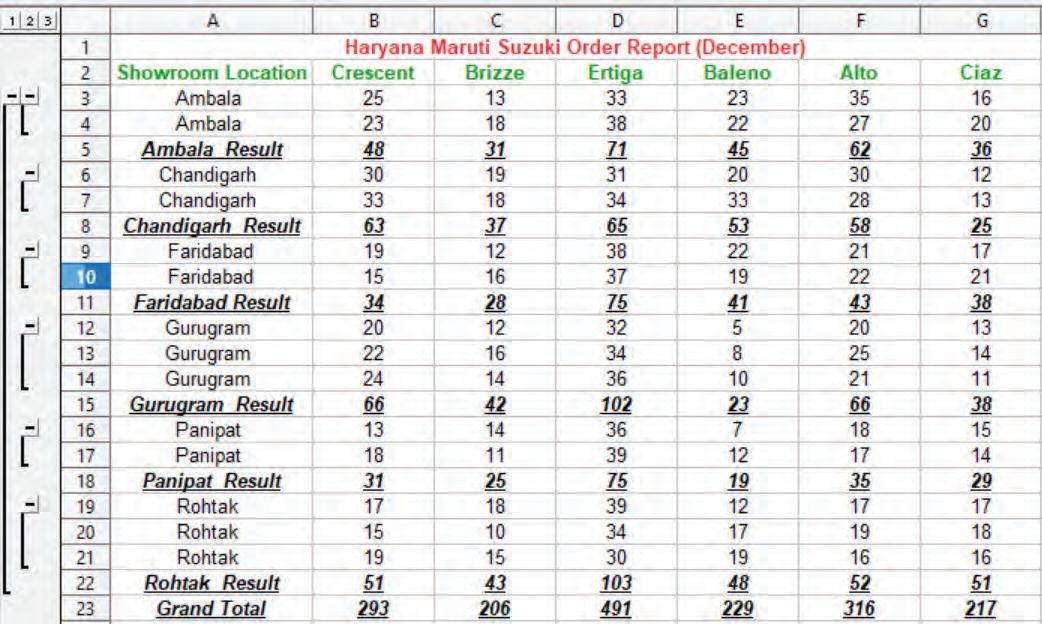
If you apply more than one group, you can additionally arrange the subtotals according to the options you select in the Options menu of the dialog box, such as ascending and descending order (as shown in Fig. 5.9) or utilising one of the predefined custom sorts available under the Tools menu as Tools > Options > LibreOffice.org Calc > Sort Lists.
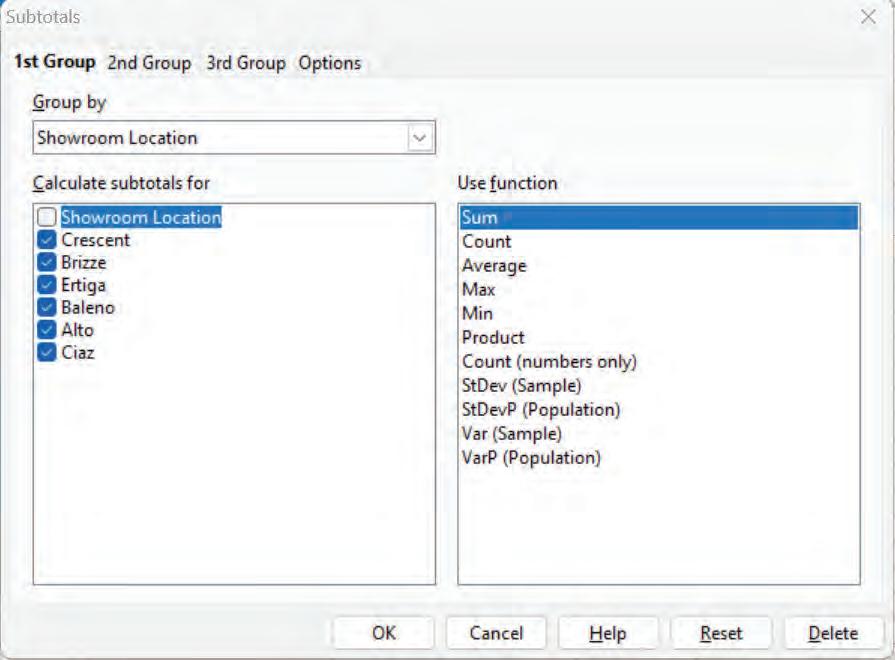 Fig. 5.8: Total number of cars location wise
Fig. 5.9 (b): Subtotals dialog box
What-if Analysis is the act of changing the values in the cells to examine how such changes affect the results of formulas of spreadsheet calculations.
Calc offers three types of What-If Analysis tools:
1. Scenarios
2. Goal Seek
3. Data Tables
Let us discuss Scenarios and Goal Seek in detail.
There are 3 group tab buttons given, so that you can group your columns from data up to 3 groups.
Scenarios are a method for exploring “what-if” scenarios. Each scenario has a unique name and can be changed and presented independently. When you print the spreadsheet, only the contents of the currently active scenario are printed.
A scenario is a set of values that LibreOffice can save and automatically substitute into your worksheet. You can create and save different groups of values as scenarios, then switch between these scenarios to view different results.
You can quickly navigate between these sets using the navigator or a drop-down list displayed next to the changing cells.
For example, to calculate a household’s total expenditures, you can create a scenario for each expense and immediately view the results. When you open the scenario, any formulas that rely on the values changed by your scenario are updated. If you used scenarios for all of your expenses, you could quickly create a complicated model of your savings.
To create scenarios in Calc, follow these steps:
1. Enter the expenses as displayed in the worksheet (see Fig. 5.10). Enter the formula '(=SUM(B5:B12))' in cell B13 and '=(B15-B13)' in cell B16.
2. Select cells A5:B12.
• Click on Tools > Scenarios.
• The Create Scenario dialog box will appear as shown in Fig. 5.11.
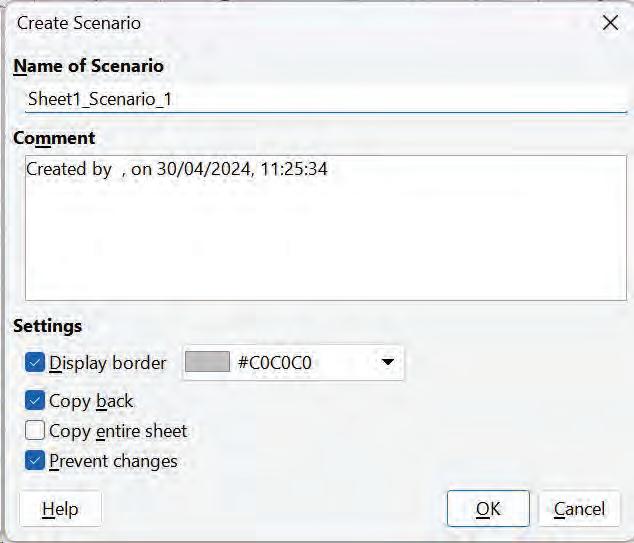
3. Rename the name of the scenario as Mar ‘23 in the Name of Scenario field. Enter some information about the scenario in the comment box (if required).
• Deselect Copy back check box. Otherwise, the values in the first situation will be overwritten mistakenly.
• Change the color to cyan in the field next to the display border and click OK.
Fig. 5.10: Scenario Fig. 5.11: Create Scenario dialog box• The screen should now appear as shown in Fig. 5.12.
4. Change the Phone Bill value in B6 to 799 and the Electricity Bill value in B7 to 4000. Select cells from A5:B12.
5. Click on Tools > Scenarios. Rename the name of the scenario as Apr’ 23 in the Name of Scenario field. Repeat the steps 3 and 4. Change the color to green. Similarly, create two more scenarios named May’ 23 and June’ 23 by changing values for any of the expenses.
Now, you can compare the savings across these four scenarios and then switch between them using a drop-down arrow, which is available next to the scenario name or the navigator as shown in Fig. 5.13.
Settings in the Create Scenario Dialog Box
The lower portion of the Create Scenario dialog contains several options. In most cases, the default settings (shown in the example) are likely to be suitable in most situations.
Display border
Display border sets a boundary around the range of cells that your scenario changes. Use the field to the right of this option to select the border color. The border includes a title bar that displays the name of the currently engaged scenario. To open a drop-down list of all the scenarios created for the cells within the border, click the arrow button to the right of the scenario name. You can select any scenario from this list at any moment.
Any modifications you make to the scenario cell values are copied back into the active scenario. If you do not pick this option, when you make modifications, the saved scenario settings will never be modified. The behaviour of the Copy back setting is determined by the cell protection, sheet protection, and Prevent Modifications settings.
This function adds a sheet to your document that permanently displays the new scenario in its entirety. This is in addition to establishing the scenario and making it a standard selection on the original sheet.
Prevent changes
When you examine a scenario with copyback enabled and then create a new scenario by altering the values and selecting Tools > Scenarios, the values in the previous scenario are mistakenly overwritten. This can be easily prevented by leaving the existing values alone, creating a new scenario with copy-back enabled, and then changing the values only when viewing the new scenario.
This function applies changes to a copy-back enabled scenario that are prevented when the sheet is protected but the cells are not.
Working with Scenarios Using the Navigator
You can jump to a specific scenario after it has been added to a spreadsheet by choosing it from the list in the navigator.
1. You can click on the Navigator icon in the right pane to open the Navigator dialog box.
2. To find a scenario, click the scenarios in the Navigator. The defined scenarios are listed, along with the comments that were entered when the scenarios were created as shown in Fig. 5.14.
3. Double-click a scenario name in the Navigator to apply that scenario to the current sheet.
4. To delete a scenario, right-click the name in the Navigator and choose Delete
5. To edit a scenario, including its name and comments, right-click the name in the Navigator and choose Properties. The Edit Properties dialog is the same as the Create Scenario dialog.
Fig. 5.14: List of scenarios through NavigatorUsually, you run a formula to calculate a result based on existing values. By contrast, using Tools > Goal Seek, you can discover what values will produce your desired result.
Goal Seek is a “what if” analysis tool that helps you to find the input value that will result in the target values which you want.
Using Goal Seek: Goal Seek tools need the following parameters:
1. The formula cell: This is the cell that contains the formula you want to resolve.
2. Target values: The required value that you want a formula to resolve to.
3. The variable cell: The cell that contains the unknown data for which you want to find a value.
For example, you want to calculate the marks of Computer to be scored by Danny to maintain the average of 6 subjects as 85.
Goal Seek Steps
1. Enter the data as shown in Fig 5.15 in cell C5:D12. Enter the average formula (=average(D7:D11)) in D12.
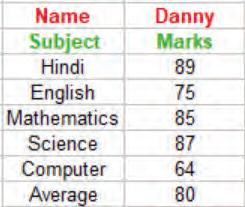
2. Place the cursor on D12. Now, click on the Tools menu.
3. Select the Goal Seek option. A Goal Seek dialog box will appear as shown in Fig. 5.16.
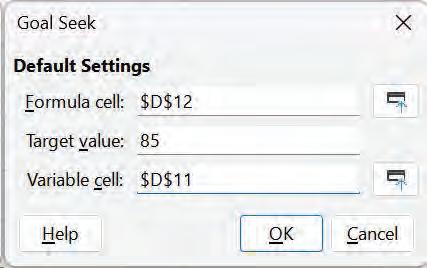
4. In the Goal Seek dialog box, fill in the parameters. The Formula cell is already filled in, as the cell pointer was already placed on the typed formula.
5. Type in the Target value as 85 (Danny’s target average score).
6. Enter the cell name (D11) as the Variable cell (This cell indicates how much Danny needs to score in Computer to achieve 85 as the average of all subjects). So, in the Variable cell field, place the cell pointer on the D11 cell as shown in Fig. 5.16.
7. Now, click on OK. Goal Seek now calculates and displays the result in another dialog box as shown in Fig. 5.17. Choose Yes to insert the result into the variable.
Now, the student knows that he must score marks 89 or more in the computer exam to score an average of 85.

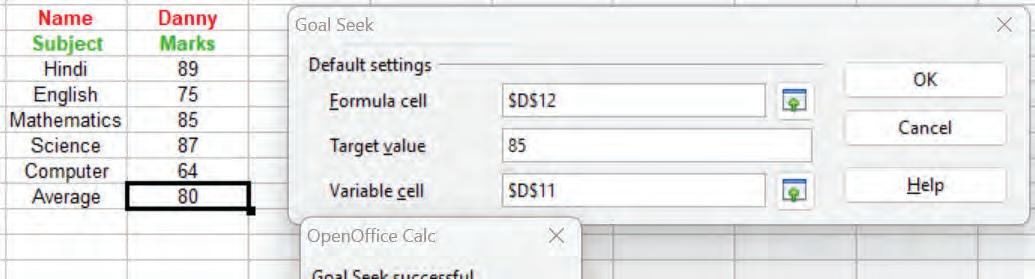
Using “What If” Solver Tool
Goal Seek can input only one input value at a time.
Tools > Solver amounts to a more elaborate form of Goal Seek. The difference is that Solver deals with equations with multiple unknown variables. It is specifically designed to minimise or maximise the result according to a set of rules that you define.
Each of these rules defines whether an argument in the formula should be greater than, lesser than, or equal to the figure you enter. If you want the argument to remain unchanged, you enter a rule that the cell that contains it should be equal to its current entry. For arguments that you would like to change, you need to add two rules to define a range of possible values and the limiting conditions.
As an illustration, you may specify that one of the variables or cells must be larger than another variable or smaller than a specific value. Additionally, you can specify that one or more variables must only have binary values (where only 0 and 1) or integer values (numbers devoid of decimals).
Once you have finished setting up the rules, click the Solve button to begin the automatic process of adjusting values and calculating results. Depending on the complexity of the task, this may take some time.
Consider the following example to understand the concept of Solver.
Suppose you got a gift voucher of Rs 2000/- and you want to purchase a shirt, t-shirt, jeans, and shoes. The price of each item is known to you. Let’s see how many items can be purchased with a target value of 2000. Since there are multiple unknown variables, we can solve this with the “What-if” analysis tool—Solver.
1. Enter the data as shown in the Fig. 5.18.
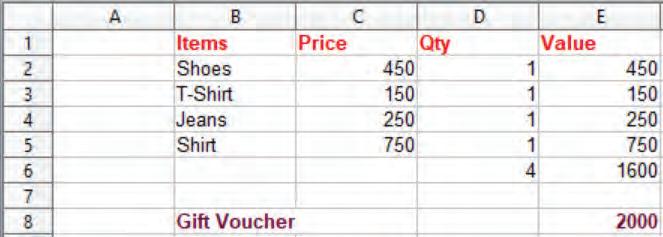
• Enter the formula in Column E as price * qty for all items. In D6 and E6 cells, put the formula '=SUM(D2:D5)' and '=SUM(E2:E5)', respectively.
Fig. 5.17: Variable cell value Fig. 5.18: Data for Solver2. Click on Tools > Solver option.
• After clicking, the Solver dialog box will appears as shown in Fig. 5.19
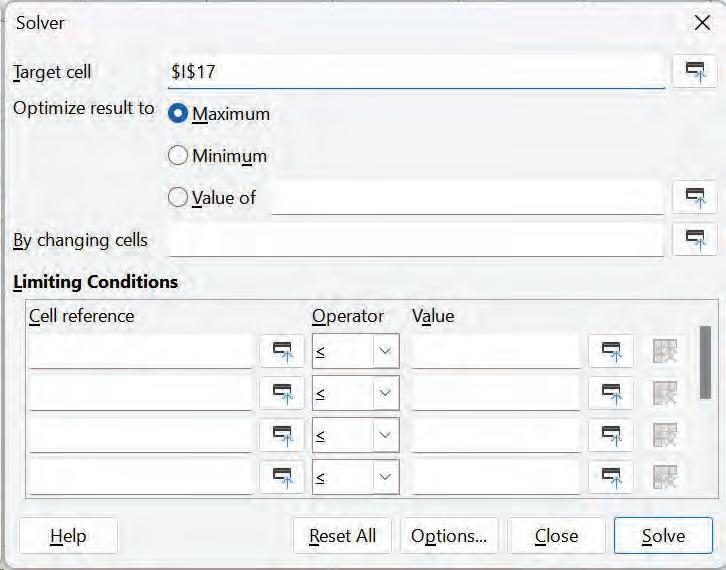
3. In the Target cell field, enter or click the cell reference of the target cell ($E$6). This field takes the address of the cell which has the target value.
4. Optimize result to field has three options:
• Maximum: Tries to solve the equation for a maximum value of the target cell.
• Minimum: Tries to solve the equation for a minimum value of the target cell.
• Value of: Tries to solve the equation to approach a given value of the target cell.
As per above example, click on value and enter $E$8 (target value).
5. By changing cells
• Enter the cell range that can be changed. These are the variables of the equations.
• Click on field By changing cells and enter $D$2:$D$5
6. Limiting Conditions
Add the set of constraints for the mathematical problem. Each constraint is represented by a cell reference (a variable), an operator, and a value.
• Cell reference: Enter a cell reference of the variable.
Click the Shrink button to shrink or restore the dialog box. You can click or select cells in the sheet. You can enter a cell reference manually in the input box.
• Operator: Select an operator from the list. Use the Binary operator to restrict your variable to 0 or 1. Use the integer operator to restrict your variable to take only integer values (no decimal part).
• Value: Enter a value or a cell reference. This field is ignored when the operator is Binary or Integer. In the above example, enter three limiting conditions in the Cell reference field as shown in the Fig. 5.20.
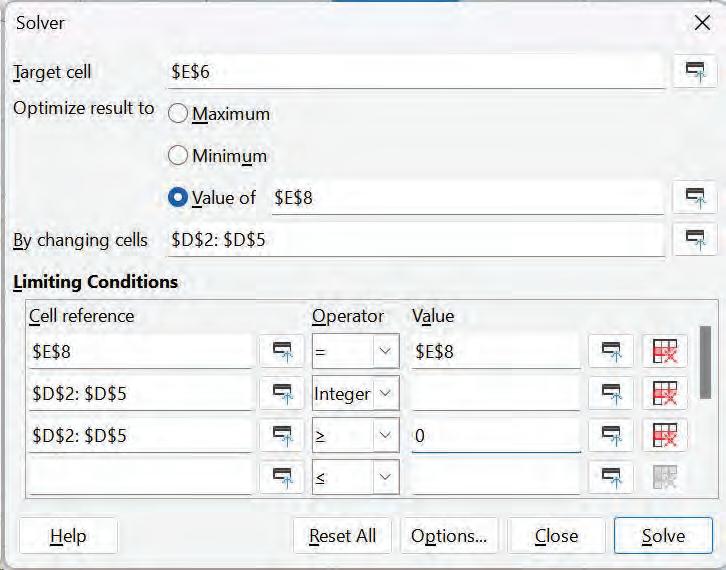
7. Click on Solve. The following result will be displayed (See Fig. 6.21). In total, 3 shoes, 1 T-Shirt, and 2 jeans can be purchased.
• If you want to keep the results, click on Keep Result else Restore Previous
Think and Tell


Change the price of all items (in Column C) above and see the difference in the number of items purchased with the help of the Solver tool.
Fig. 5.20: Filled values in Solver dialog box Fig. 5.21: Results of SolverActivity 1: Calculating Accumulated Amount (Individual Work)
How much down payment should a person deposit at the beginning of 5 year duration for accumulating Rs 100000 at the end of the term? The person also has a plan to deposit Rs 10000 per year as a recurring deposit at the end of each year. The bank offers an 8% of interest compounded annually. You can use FV to compute the accumulated amount at the end of the duration. Also, use Goal Seek for finding the answer instead of using PV.
Activity 2: Predicting Marks to Achieve a Distinction (Individual Work)
A student is planning to attain the marks she should score in the forthcoming Semester 4 examinations in order to achieve a distinction (75%). Assuming that examination of each subject is for 100 marks, her marks of the previous semesters are given as under.
Find out how much she should score in 4th semester to secure distinction.
Activity 3: Calculating Interest (Individual Work)
A certain sum of money is invested at 4% compounded annually. The interest for the second year is ` 25. Find the interest for the third year using Goal Seek.
A Select the correct option.
1 allows you to combine data from multiple worksheets into a single master worksheet.
a Data Consolidation
c Scenarios
b Multiple Data
d Goal Seek
2 help to discover what values will produce your desired result.
a Multiple Data
c Scenarios
b Data Consolidation
d Goal Seek
3 Which function cannot be performed through Subtotal in a Spreadsheet?
a Sum
c Average
B Fill in the blanks with the most suitable words.
b Product
d Percentage
1 A feature provides a target-based result and informs the user about the changes in value in the applied formula.
2 argument can be altered in Goal Seek.
3 A option displays a cell address in the Goal Seek dialog box.
4 The option allows you to select a cell to display or set the result value in the Goal Seek dialog box.
C State whether the following is True or False. Correct the statements that are false.
1 The Solver deals with equations with multiple unknown variables.
2 You must place a cursor in a formula cell before using Goal Seek.
3 The Goal Seek Successful Message box will show only the target value as a result.
4 You can set any kind of value like greater than, lesser than, equal, or specific value using Solver.
D Answer the following questions. (Solved)
Q1. What do you mean by Goal Seek?
A1. Goal seek is an important feature of the spreadsheet that is used to find the values which are required to achieve a certain target. It allows changing the cell value which produces the desired target value. In Goal Seek, any one value can be altered to get the desired result.
Q2. Distinguish between the Formula Cell and Variable Cell.
A2. The Formula Cell contains the formula. Whereas, Variable Cell is the cell whose value is changed to get the desired goal.
Q3. Megha needs to enlist the options provided by Goal Seek and explain all of them in one line to her friend who was not present in the class when her teacher taught the lesson to them. Help her to do so.
A3. The options provided by Goal Seek are as follows:
• Formula cell – A cell where the formula is used.
• Target Value – A numeric value that indicates what target can be achieved.
• Variable Cell – The variable cell is a cell whose value can be altered.
• OK Button – After setting up the goal seek parameter click on the OK button to see the result.
• Cancel Button – If the user wants to change any of the Goal Seek settings, this button should be used.
• Help Button – If any assistance is required related to Goal Seek, this button is used.
2. True.
3. False. The Goal Seek Successful Message box shows both the original value and the target value after successfully using Goal Seek. It helps you understand the change made to reach the target value.
4. True.
You are familiar with the fundamental concepts of formulas and functions, and advanced capabilities of LibreOffice Calc that help in data analysis or testing different “what-if” situations. In this chapter, you will learn to create references to other sheets and documents, link data, and create, edit, and remove hyperlinks.
The concept of spreadsheet linking can be defined as the process of linking data between two or more spreadsheets within the same workbook or between different workbooks. The spreadsheet linking function is useful when you need to change any data values in one sheet and want to update those values automatically in another copied sheet. This can be used to prevent the need of multiple copies of the same data in different spreadsheets.
For example, maintaining one master price list and linking any other spreadsheet that needs the same information on it. This helps maintain data accuracy as only one spreadsheet needs to be updated for price changes.
Let us learn some operations related to spreadsheets.
By default, LibreOffice Calc has one sheet, namely, Sheet1. But, you can create and manage multiple worksheets within a single spreadsheet.
You can insert multiple sheets as needed on the spreadsheet at any time and in any position you choose. There are different ways to insert sheet(s) in your spreadsheet.
1. Inserting sheet(s) using the Sheet tab.
• Click on the Sheet tab, and select the Insert Sheet option from the drop-down list as shown in Fig. 6.2.

• The Insert Sheet dialog box appears with several options.
• In the Position subgroup, click on the Before current sheet, if the new sheet is to be inserted before the current sheet. Or click on the After current sheet if the new sheet is to be inserted after the current sheet.
• Now, in the Sheet subgroup, click on New sheet if multiple sheets are to be inserted together. Mention the total number of sheets to be inserted in the No. of sheets field, as shown in Fig. 6.3.
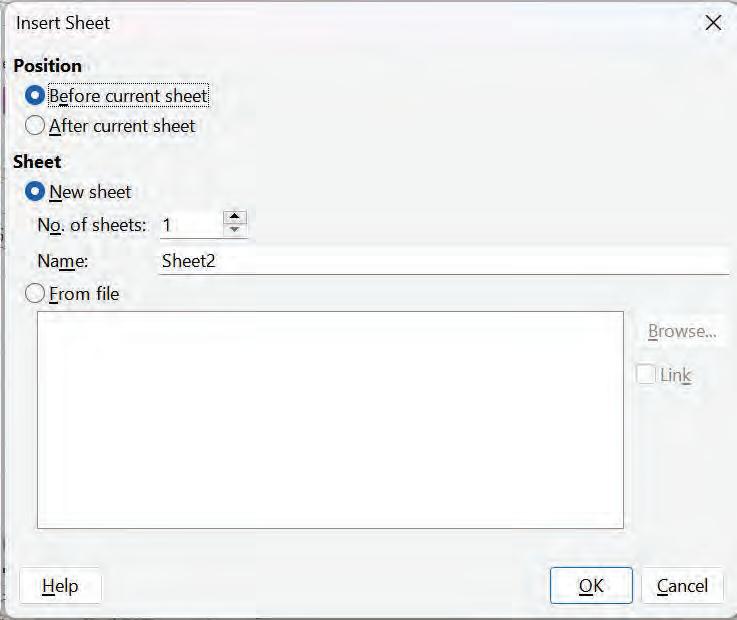
2. You can also insert a sheet by clicking on the Add new sheet (+) button of your spreadsheet as shown in Fig. 6.4.
 Fig. 6.2: Using Sheet tab
Fig. 6.3: Insert Sheet dialog box
Fig. 6.2: Using Sheet tab
Fig. 6.3: Insert Sheet dialog box
3. Another way to insert a sheet is to place the pointer on the sheet tab where you want to insert the new sheet. Right-click on the Sheet tab, a shortcut menu will appear. Select Insert Sheet as shown in Fig. 6.5.
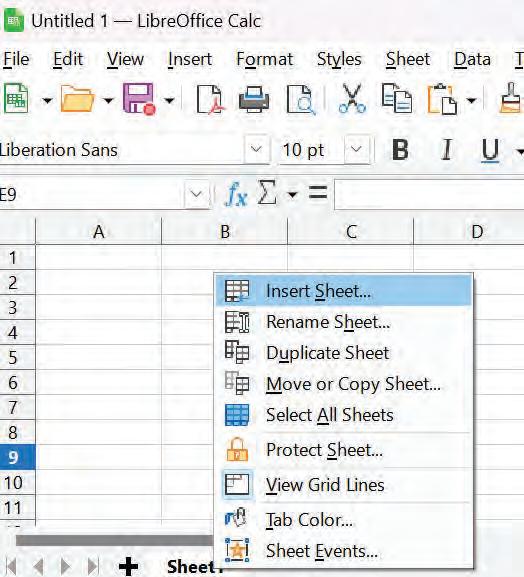
Fig. 6.5: Inserting sheet using shortcut menu
The Insert Sheet dialog box will appear. Choose between the several options per your requirement and click OK Sheet2 will be inserted in your spreadsheet.

When you are inserting more than one sheet, the Name field in the Sheet subgroup in the Insert Sheet dialog box is not active. Only in the case of single sheet insertion, the Name field in the Sheet subgroup will be activated.
The name of the sheet should be relevant and meaningful for the subject. The default names given by the software, such as Sheet1 can be changed or renamed to make it more meaningful to the user. This can be achieved by several methods.
1. Double-click on the sheet which you want to change/rename. For example, here, you want to change the name of Sheet2 to mySheet. A dialog box named Rename Sheet will be displayed. (See Fig. 6.7).
2. Here, type mySheet in the Name field. Fig. 6.8 displays the renamed sheet.

3. Alternatively, right-click on the sheet that you want to rename. A shortcut menu will appear. Select Rename Sheet. A similar dialog box, as shown in Fig. 6.7. Type mySheet in the Name field.
To add more features to the Calc application you can insert a sheet from file.
1. Select Insert Sheet from the Sheet menu.
2. Select the From file option in the Insert Sheet dialog box.
3. Click on Browse and select the file of your interest.
4. The sheet will be inserted as shown in Fig. 6.10.

RememberThis PT1, is the copy of the selected spreadsheet. The changes done in the selected sheet will not affect the copied sheet.
Fig. 6.8: Renamed sheet Fig. 6.9: Insert dialog box Fig. 6.10: PT1 sheet inserted from another spreadsheetYou can select the Link option in the Insert Sheet dialog box. It will insert the external sheet as a link instead of a copy. Using the Link option, you can include live data from the external spreadsheet into your current spreadsheet, as changes done in the external spreadsheet will be reflected in the current spreadsheet.
If you want the changes made in the original sheet to be reflected in your current sheet also, then the inserted sheet has to be copied as a Link.
When calculating data in Calc, you may often find yourself in a situation where you need to pull data from another worksheet or from a different Calc file. In this case, you just need to create a link between the worksheets (within the same spreadsheet or in a different spreadsheet) by using an external cell reference or a link. So, reference can be done:
1. Within the other sheets of the same spreadsheet
2. Within the different spreadsheets
Let us understand referencing sheets with the help of an example. Let us create 4 sheets with the name Mathematics, Science, Social Studies, and Percentage in the school.ods Calc spreadsheet.
Enter the marks scored by the students in Mathematics, Science, and Social Studies in the respective sheets as shown in Fig. 6.11, Fig. 6.12, and Fig. 6.13. The Percentage sheet will have the total marks obtained by each student and the percentage scored.
Using a Keyboard
Manual reference is required when you enter the cell reference using the keyboard. Follow the steps to create a reference using the keyboard.
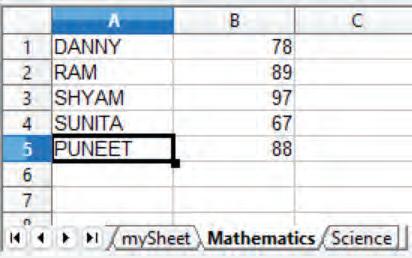
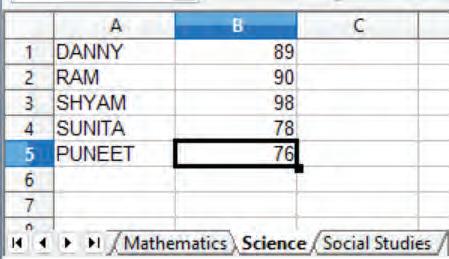
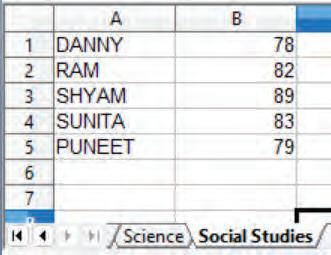
Note: Keep the data of column A, same in all the sheets.
1. Click on sheet Percentage and select cell B1.
2. Type ‘=SUM (MATHEMATICS.B1;SCIENCE.B1;SOCIAL STUDIES.B1)’ and press Enter. The total of all subjects of the first student (Danny) will be displayed.
3. Using arrow keys move to cell C1
4. Type ‘=(MATHEMATICS.B1+SCIENCE.B1+’SOCIAL STUDIES’.B1)/3’.
5. Press Enter key to calculate the percentage scored by the student.
6. Copy the contents of cell B1 and C1 of sheet percentage and paste it in cells B2 to C5.
The following results are displayed, as shown in Fig. 6.14 and Fig. 6.15
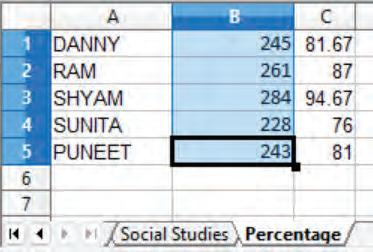
Using a Mouse
1. Click on sheet Percentage on cell B1.
2. Type ‘=SUM(’.
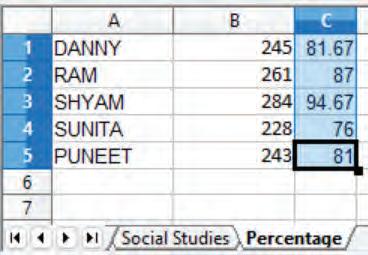
3. After typing the opening parenthesis, switch to the ‘Mathematics’ sheet using the mouse. Click on cell B1. Type semicolon(;) in the formula bar.
4. Switch to the ‘Science’ sheet with mouse. Click on cell B1. Type semicolon(;) in the formula bar.
5. Switch to the ‘Social Studies’ sheet with the mouse. Click on cell B1 and then type closing parenthesis in the formula bar. Press Enter key. The total of all subjects of the first student (Danny) will be displayed.
6. Drag the formula in the rest of the cells to get the total scored by each student. (Refer Fig. 6.14)
Now, to calculate the percentage:
1. Using the arrow keys move to cell C1.
2. Type ‘=(‘.
3. After typing the opening parenthesis switch to the ‘Mathematics’ sheet. Click on cell B1. Type ‘+’ in the formula bar.
4. Switch to the ‘Science’ sheet. Click on the cell B1. Type ‘+’ in the formula bar.
5. Switch to the ’Social Studies’ sheet using the mouse. Click on the cell B1. Then, type the closing parenthesis in the formula bar.
6. Type ‘/3’ after entering the formula and press the Enter key.
7. Danny ’s percentage will be displayed.
8. Drag the formula in the rest of the cells, to get the percentage scored by each student. (Refer Fig. 6.15)
Using a Keyboard
Let us take an example of the ‘Mathematics' sheet of the ‘school.ods’ spreadsheet (Refer Fig. 6.11).
The total marks scored by all students will be entered in the new sheet named as master.ods. In case of any changes in Mathematics marks, those changes will be automatically reflected in the master sheet.
Fig. 6.14: Total marks of all subjects of all students Fig. 6.15: Percentage marks of all subjects of all studentsLet us illustrate the above example by following the steps given below:
1. Open the ‘Mathematics’ sheet of ‘school.ods’.
2. Open a new spreadsheet and name it as master.ods. Enter Mathematics, Science, and Social Studies in A1, A2, and A3, respectively.
3. Type the formula 'Filepath,sheetname,cell reference', for example, Type ‘=SUM('file:///E:/class X IT 402/Session 1/school.ods'#$MATHEMATICS.B1:B5)’ in the cell B1.
Press Enter. The total marks in Mathematics are displayed.
4. Type ‘=SUM('file:///E:/class X IT 402/Session 1/school.ods'#$SCIENCE.B1:B5)’ in the cell B2.
Press Enter. The total marks in Science are displayed.
5. Type ‘=SUM('file:///E:/class X IT 402/Session 1/school.ods'#$'SOCIAL STUDIES'.B1:B5)’ in the cell B3.
Press Enter. The total marks in Social Studies are displayed. (See Fig. 6.16)

Fig. 6.16: Total marks for each subject scored by students
Here's a breakdown of the reference parts:
1. File Path: It points to the drive and directory in which ‘the.ods’ sheet is stored ('file:///E:/class X IT 402/Session 1/school.ods' in this example).
2. Sheet Name: This part of the Calc external reference includes the sheet name followed by a dot where the referenced cell(s) is located (#$MATHEMATICS in this example).
3. Cell Reference: It points to the actual cell or a range of cells referenced (B1:B5) in your formula.
Using a Mouse
The above example can be done with the help of a mouse.
1. Click on cell B1 in the ‘master.ods’ spreadsheet.
2. Type '=SUM'.
3. After typing the opening parenthesis, click on the Window menu. Names of the opened spreadsheet will be displayed, as shown in Fig. 6.17.
4. Click on ‘school.ods’. Click on the ‘Mathematics’ sheet. Select the cells from B1:B5.
master.ods - LibreOffice Calc
The path and file names are enclosed within single quotes (‘ ’) and start from three forward slashes (///), followed by the sheet name and cell reference.
school.ods - LibreOffice Calc master.ods - LibreOffice Calc
Fig. 6.17: Opened sheets
5. Again, click the Window menu option in the menu bar. Select ‘master.ods’.
6. Type the closing parenthesis in the formula bar and press Enter key.
The total marks in Mathematics will be displayed.
7. Now, click on B2. Repeat the steps from Step 2 to Step 6. In Step 4, instead of the Mathematics sheet, select the Science and Social Studies sheet to display the total marks of Science and Studies, respectively.
While using the internet, you would have come across webpages with links to other webpages. The feature that makes this possible is called a hyperlink. A hyperlink, also known as a link, is a reference or a connection between two webpages or documents that allows users to navigate from one location to another.
A hyperlink on a Calc document often be displayed as an underlined text, highlighted text, or as an image. When a user clicks on a link, they are taken to the resource or page that the link is pointing to. Any cell in the Calc document may include the hyperlink.
You have the option of storing links in your file as absolute or relative. In spreadsheet programs like Calc, relative and absolute hyperlinks are used to link cells or other resources within the same spreadsheet or to external files and webpages.
You can use the relative hyperlink ‘F1’ to link from cell D1 in the same sheet to cell F1 in the example above. Only when the source and destination files are on the same drive or directory, only then relative linking is used.
Absolute hyperlinks give the complete path or URL of the web page they are linking to.
When the start and target locations become no longer relative to one another, then a relative link ceases to function. A relative hyperlink won't break, for example, if you have two spreadsheets linked to each other in the same folder and you move the entire folder to a different location.
For instance, you can use the absolute hyperlink ’http://ncert.com/information-technology-class-10notes/’to connect to a webpage that is situated at ’http://ncert.com/information-technology-class-10notes/’address. The only time an absolute link will break is if the target is moved.
1. To create a link, click on the cell.
2. Click on the Insert tab.
3. Choose Hyperlink option.
Fig. 6.18: Hyperlink dialog box
As seen in Fig. 6.18, a dialog box for hyperlinks appears.
4. Choose the Hyperlink Type (Web or FTP) in the hyperlink window. Choose Web (refer Fig. 6.18).
5. Choose one of the four categories of hyperlinks from the left.
Using Internet Option
1. Click on the Internet icon. Enter the URL ʻhttps://cbseacademic.nic.in/curriculum_2023.htmlʼ in the URL box.
2. Select Text field and type ʻSecondary Curriculum (IX and X)ʼ, as shown in Fig. 6.19.
3. Select Apply and then Close.
4. The text ʻSecondary Curriculum (IX and X)ʼ appears hyperlinked in the cell where the cell pointer was positioned.
Using Mail Option
In this case, clicking the hyperlink opens an email message that has already been pre-addressed to a certain recipient. Type email id ʻinfo.cbse@gov.inʼ in the Recipient text box and ʻBoard Exams 2023-24ʼ in the Subject text box. Select Text in Form in the Further Settings section and type ʻBoard Examsʼ in the Text text box, as shown in Fig. 6.20.
RememberThis is an absolute hyperlink because if the target website addresses changes, this hyperlink will stop working. In an absolute hyperlink, a complete address is given.
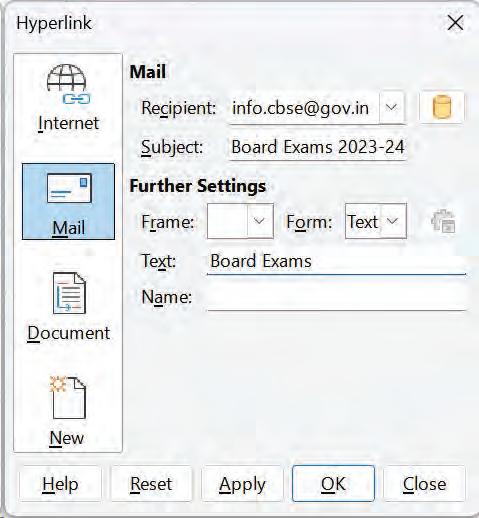
1. Select Apply and then click on Close
2. The text ‘Board Exams‘ appears hyperlinked in the cell where the cell pointer was positioned. The text is hyperlinked with the email address.
Using Document Option
1. If you select this option, the hyperlink you click will lead to either a different document or a different location within the current document.
2. Type the local document path in the Path text box. Type ‘C:\Users\Lenovo\Desktop\renu\school.ods‘ in Path text box.
3. Select Text in Form in the Further Settings and type ’School Sheet‘ in the Text text box, as shown in Fig. 6.21.
4. Select Apply and then click on Close.
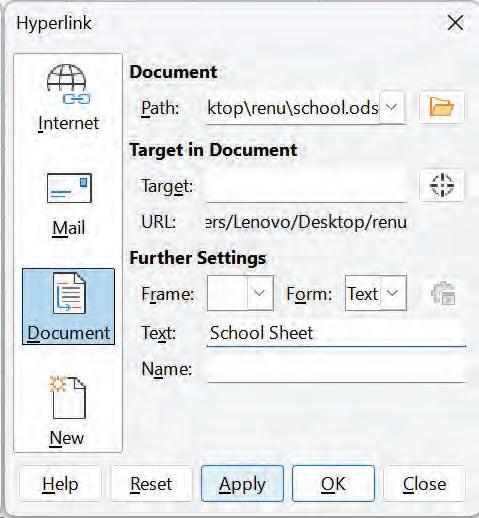
6.21: Document link
The text, ’School Sheet’ appears hyperlinked in the cell where the cell pointer was positioned. As you click on the hyperlinked text, the consolidated data spreadsheet opens.
Using New Document Option
To create a new document using the provided links, select the New Document option.
Edit now and Edit later are the two choices for starting a new document. When using the Edit now option, a new file is created right away. When using the Edit later option, a new file is simply created and edited later.
Fig. 6.20: Mail text Fig.1. In the File type field, select the type of file to create.
2. Type the document path as ‘E:\class X IT 402\’ in the File text box.
3. Select the Text Document in File type.
4. Select Text in Form in Further Settings section and type ‘Notes on Hyperlink’ in the Text text box, as shown in Fig. 6.22.
5. Click Apply and then click on Close button.

The text ‘Notes on Hyperlink’ appears hyperlinked in the cell where the cell pointer was positioned. As you click on the hyperlinked text, the new text document is opened.
1. Select the hyperlink to be deleted.
2. Right-click using the mouse button, as shown in Fig. 6.23.
3. In the menu select the Clear Direct Formatting option. The hyperlink is removed from the text.
1. Select the hyperlink to be edited.
2. Go to the Insert tab.
3. Select the Hyperlink option.
4. In the Hyperlink dialog box edit the hyperlink.
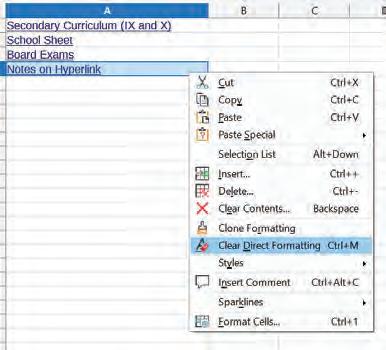
Fig. 6.23: Remove hyperlink
You can insert the data, tables from HTML documents, and data located within named ranges from an LibreOffice.org Calc into a Calc spreadsheet as a link. Two methods are described in this section:
1. Using the External Link and
2. Using the Navigator
It is quick and simple to use the External Link approach if your file has named ranges or named tables and you are aware of the name of the range or table you wish to link to. However, if the file has multiple tables and you want to select only one of them, it can be difficult to distinguish between them; in that case, the Navigator method might be simpler. Before we link the External Data into another Calc spreadsheet, let us first define the name of cell ranges in the source spreadsheet.
When you define a name for a range of cells, it's called a named range, or defined range. The Name Box in Calc is the fastest way to create a named range.
1. Double-click on the spreadsheet (source sheet) from which data is to be retrieved by a link.
2. Select a cell or a range of cells that you want to name.
3. Type a name into the Name Box
4. Press the Enter key.
1. Select the cell in the desired Calc document into which the external data will be entered.
2. Choose Sheet > External Links. External Data dialog box appears.
3. Enter the URL of the source document in the External Data dialog box, or choose it from the drop-down list if it is listed. (Files to be selected from the drop-down list will be loaded automatically). See Fig. 6.24.
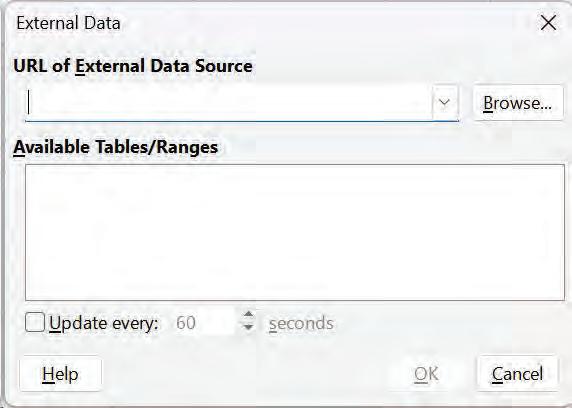
4. Click on the Browse button to open a file selection dialog. Press Enter key to get Calc to load the list of available tables.
5. In the Available Tables/Ranges list, select the named ranges or tables you want to insert (hold Ctrl key to select multiple entries). The OK button then becomes available. You can also specify that the ranges or tables are updated every (number of) seconds.
6. Click on OK to close this dialog and insert the linked data.
Fig. 6.24: External Data dialog boxNumerous databases and other data sources are accessible, and you can link them to Calc documents.
The data source must first be registered with Calc. (To register is to inform LibreOffice Calc about the type of data source and the location of the file.). The way to do this depends on whether or not the data source is a database in *.odb format.
A data source in ‘*.odb’ format should be registered as follows:
1. Choose Tools > Options > LibreOfficeBase > Databases.
2. Click on the New button (located beneath the list of registered databases) to display the Create Database Link dialog, as shown in Fig. 6.25.
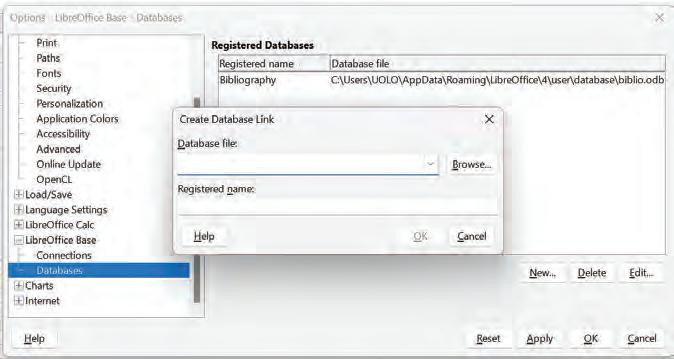
Fig. 6.25: Create Database Link dialog box
3. Type the database file's location or click Browse to display a file browser and choose the database file.
4. Enter a name to use as the database's registered name, and then click OK. The database is included in the list of databases that have been recorded. Only after both fields are filled in, then only the OK button become active.
Activity: Performing Operations in Spreadsheet (Individual Work)
• Create a new file in a spreadsheet software. Enter the data such as Emp code, Emp_First Name, Emp_Last Name, Emp_DOB, Emp_Father Name, Emp_Mother Name. Enter records for at least 10 students.
• Rename this spreadsheet as ’Employee Profile’.
• Insert 2 new spreadsheets and rename as ’Emp_Salary’, and ‘Emp_Sales’, respectively.
• In the ‘Emp_Salary ’ spreadsheet create a reference for Emp code, Emp_First Name, Emp_Last Name, columns from Employee Profile by using the keyboard.
• In the ‘Emp_Sales’ spreadsheet create a reference for Emp code, Emp_First Name, Emp_Last Name,columns from ‘Employee Profile’ by using the mouse.
• Now enter the salary and sales details for different employees in the spreadsheets ‘Emp_Salary’, and ‘Emp_Sales’, respectively.
• Delete the spreadsheet ‘Emp_Sales’.
• Insert a new spreadsheet and rename as ‘Consolidated Worksheet’.
• Move the spreadsheet to the beginning of the workbook sheet tab.
• Insert a new spreadsheet at the beginning.
• Create a hyperlink to move to a particular spreadsheet from the newly inserted worksheet.
A Select the correct option.
1 Linking helps in a Connecting data from different sources b Keep data organised between multiple sheets c Make calculations across multiple worksheets d All of these
2 Which of the following is not a type of hyperlink? a Web b FTP c Telnet d Relative
3 Which of the following options is not present in the insert sheet dialog box? a Location b Position c Sheet d From file
B Fill in the blanks with the most suitable words.
1 A refers to a cell or range of cells on a worksheet and can be used to find the values or data for calculations.
2 A link will stop working if the start and target locations change the relative of each other.
3 A hyperlink is also known as a
4 Link to external data option is available under menu.
C State whether the following is True or False. Correct the statements that are false.
1 We can link a text in spreadsheet to any Web URL.
2 Hyperlink dialog box shows five types of hyperlinks on left hand side.
3 If you have two spreadsheets in the same folder linked to each other and you move the entire folder to a new location, a relative hyperlink will work.
4 When you open a new spreadsheet, by default it has sheet named as Sheet _1.
D Answer the following questions. (Solved)
Q1. What are the advantages of linking data and spreadsheets?
A1. Advantages of linking data and spreadsheets are:
• Multiple sheets help to keep information organized.
• Create formulas that span different sources and make calculations using a combination of local and linked information.
• Summarised data from different sources.
Q2. What is the need for using multiple sheets in a spreadsheet?
A2. Needs of multiple sheets in a spreadsheet are:
• Different data can be stored in separate sheets for better organisation.
• It helps link the sheets easily and can be maintained easily.
• All the information can be stored on the different sheets in a file.
• Multiple sheets help keep information organised in a spreadsheet.
Q3. Rohan wants to create a hyperlink, but he is confused about which hyperlink is most suitable for his project. Help him by differentiating between relative and absolute hyperlinks.
A3. Hyperlinks can be used in Calc to jump to a different location from within a spreadsheet. An absolute link will stop working only if the target is moved. A relative link will stop working only if the start and target locations change relative to each other. For instance, if two spreadsheets in the same folder link to each other and you move the entire folder to a new location, a relative hyperlink will not break.
A 1. d 2. d 3. a
B 1. Cell Reference 2. Relative 3. Link 4. Insert
C 1. True.
2. False. Four types of hyperlinks on left hand side—Internet, Mail, Document, and New Document.
3. True.
4. False. When you open a new spreadsheet, by default it has a sheet named as Sheet1.
Whenworking on the same worksheet in collaboration with colleagues, but working at remote locations can make things difficult. Comparison of data entered by all the colleagues can be tedious. Also, it is very cumbersome to keep a record of the changes made by different colleagues at different points of time. In order to avoid such problems, Calc offers a feature, which enables us to share worksheets with others. Access can be provided to all or some of the people to prepare and make changes to the worksheets. This enables multiple workers to work on the same worksheet, by entering data, make changes in the data, comment on the changes made, all simultaneously.
Today, in most of the offices, there exists a ‘shared drive’, where employees of same or different teams can work, prepare, and store common files for everyone to use. Such a file opens, usually associated with the message: “The document [file name] is locked for editing by another user. To open a read-only copy of this document, click!”
This message appears when someone else already has the file open on another system. Sometimes however, it is required to have multiple people working on a file simultaneously. Such a shared file allows permitted users to add data, make necessary changes to the already entered data, adjust the formulas already entered, etc. This is done either to speed up data entry or simply make things easier for collaborative data entry purposes.
Spreadsheet software allows the user to share the worksheet and place it in the accessible network location, where several users can access it simultaneously.
At any time, you can set up a spreadsheet for sharing with others. The steps to be followed for the same are as follows:
1. Open the spreadsheet to be shared.
2. Click the Tools menu.
3. Select the Share Spreadsheet option.
4. The Share Document dialog box opens. Check the Share this spreadsheet with other users checkbox in this dialog box.
5. Click the OK button. If you have already saved the document, a message appears, stating that you must save it in the activated sharing mode.
 Fig. 7.1: Sharing a spreadsheet
6. Click the Yes button to continue. If the document has not been saved previously, the Save As dialog box will appear.

7. Name the document as required and save it. The word shared will appear on the title bar next to the name of the spreadsheet.
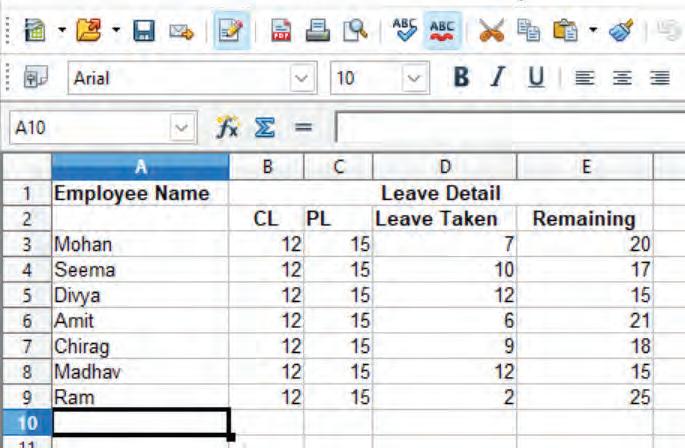
This enables all users to work together on this document.
Some commands are rendered inactive, when spreadsheet sharing is active.
The Tools > Share Spreadsheet command can be used to switch the mode for a worksheet from unshared to shared. However, if you want to use a shared worksheet in unshared mode, you need to save the shared worksheet using another name or path. This creates a copy of the spreadsheet that is not shared.
Steps to open a shared spreadsheet are as follows:
1. Locate the spreadsheet in the network location and double-click it to open. A message pops up displaying that the worksheet is in shared mode and that some features are not available in this mode. Here, you can select the checkbox Do not show warning again.
2. Click the OK button.
When you open a spreadsheet that is in shared mode, a message is displayed that the worksheet is in shared mode and that some features are not available in this mode. You can choose to disable this message in the future. After clicking OK, the worksheet is opened in shared mode.
3. The spreadsheet will open in the shared mode. Now you can enter new details into the spreadsheet, modify entries, edit these while working in networking mode.
The following features are known to be disabled in a shared spreadsheet: Edit Menu Options
• Undo
• Redo
• Repeat
• Links to External Files
• OLE Object
• Chart
• Pivot Table
• Named Range or Expression
• Comment
• Fontwork
• Signature Line
Saving a Shared Spreadsheet
• Sort
• Sort Ascending
• Sort Descending
• Define Range
• Refresh Range
• Validity
• Subtotals
• Streams
• Multiple Operations
• Text to Columns
• Consolidate
• Character
• Paragraph
• Page Style
• AutoFormat Styles
• Name
• Description
• Merge and Unmerge Cells
When you save a shared spreadsheet, you get to encounter one of the following:
• Thesaurus
• ImageMap
• Scenarios
• Protect Sheet
• Protect Spreadsheet Structure
1. If the worksheet was not modified and saved by another user ever since you opened it, the worksheet is saved.
2. If the worksheet was modified and saved by another user after you opened it, one of the following things would occur:
• If the changes do not conflict, the worksheet is saved, the dialog box will appear, and any cells modified by the other user are shown with a red border.
• If the changes are made by two users, the Resolve Conflicts dialog box will open. It is required that you decide for each conflict, which version to keep: Keep Mine or Keep Other.
Most spreadsheet software automatically turn off some features in shared workbooks. This is to simplify the workbook since multiple people can be working on the file simultaneously. Shared workbooks don‘t allow merging of cells, conditional formatting, or inserting of pictures.
Fig. 7.5: Dialog box showing spreadsheet in shared mode• When all the conflicts are resolved, the worksheet will be saved. Remember, when you are resolving the conflicts, no other user can save the shared worksheet.
• If another user is trying to save the shared worksheet and resolves conflicts, you will see a message that the shared spreadsheet file is locked due to a merge-in in progress. Here, you can choose to cancel the Save command or retry saving later.
• When you successfully save a shared spreadsheet, the worksheet will show the latest version of all changes that got saved by all users.
Shared spreadsheet can keep a record of all the changes made by all the users at any point of time. This feature can be activated or deactivated by the Track Changes feature of Calc. The command can be activated as follows:
1. Open the spreadsheet.
2. Go to the Edit menu.
3. Hover your mouse over Changes option and select the Record option. Fig. 7.6: Record changes option
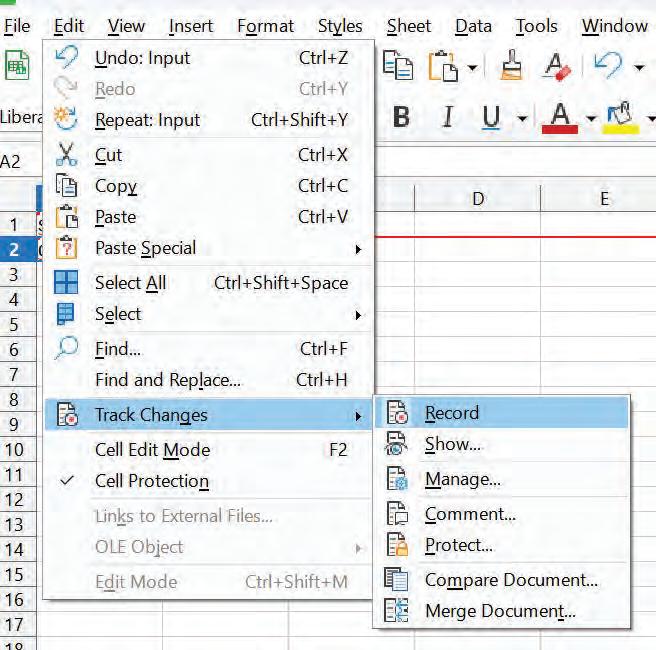
4. Now the changes made to this spreadsheet will be tracked, unless and until the feature is switched off. Begin editing the spreadsheet and it shall keep track of all the changes made now on. A coloured border, with a dot in the upper left-hand corner, will appear around a cell where changes were made. When the mouse is pointed at the red dot, some more information will be displayed such as the name of the author, date and time of change done etc. This allows other reviewers to know which cells were edited. A deleted column or row is marked by a heavy-colored bar.
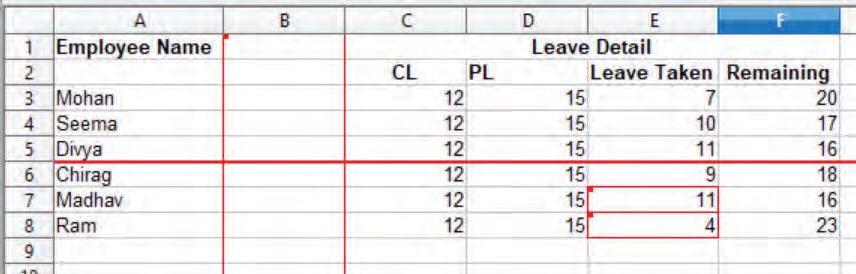
Some changes, for example, cell formatting are not recorded and marked.
The color options used for indicating the changes made in the spreadsheet can be changed. To change the colour that indicates changes, select Tools > Options > LibreOffice Calc > Changes
When a spreadsheet comes back to you after the changes made by all, you can review the changes and decide whether to accept or reject those changes. To review the changes, follow the steps:
1. Open the edited spreadsheet in which changes have been made.
2. Select the Edit > Track Changes > Show option from the menu bar.
3. The Show Changes dialog box will open. Using different settings, the changes that appear on screen can be changed from the Show Changes dialog box. You can filter based on:
• Date – Only changes made in a certain period of time.
• Author – Only changes made by a specific author are displayed. This is especially useful if you have multiple reviewers working on the worksheet.
• Range – Only changes made in a specific range of cells are displayed. This is especially useful if you have a large spreadsheet and need to review only a part of it.
• Comment – Searches the content for the specific comments and displays only the changes which have comments that match the search criteria.
• Show accepted changes – Show the changes that have been accepted.
• Show rejected changes – Show the changes that have been rejected.
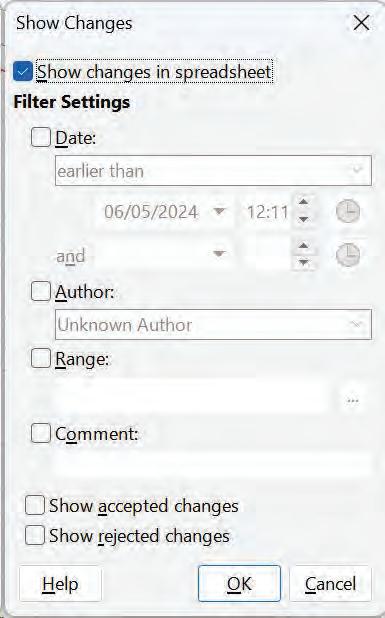 Fig. 7.7: Changes recorded and highlighted
Calc automatically adds a comment to any recorded change describing what was changed. Reviewers and authors can add their comments to explain their changes.
To add a comment to a change, the following steps are followed:
1. Make the required change(s) to the spreadsheet.
2. Select the cell with the change.
3. Choose Edit > Track Changes > Comments. The dialog box will appear.
4. In the Text box, the reviewer can add their name and the reason for making changes. The added comment will appear in the title bar of the shown dialog box also and it cannot be edited.
5. Type your own comment and click the OK button. The comment will also appear in the dialog box, when you accept or reject the changes.

Fig. 7.9: Inserting comment
Editing Change Comments
After you have added a comment to a changed cell, you can see it by hovering the mouse pointer over the cell as shown in the above figure.
After the comments have been added, you can edit them using the following steps:
1. Select the cell with the comment that you want to edit.
2. Select the Edit > Track Changes > Comments
3. Edit the comment and click the OK button.
When you receive a worksheet back after changes are made to it by various users, you can make a final decision on whether to keep the changes or revert them back.
To begin this process:
1. Open the edited worksheet.
2. Select Edit > Track Changes > Manage. The Manage Changes dialog box will open.
3. Calc steps through the changes one at a time. You can choose to accept or reject each change as you go through.
4. Or, you can click the Accept All or Reject All option, as the case may be.
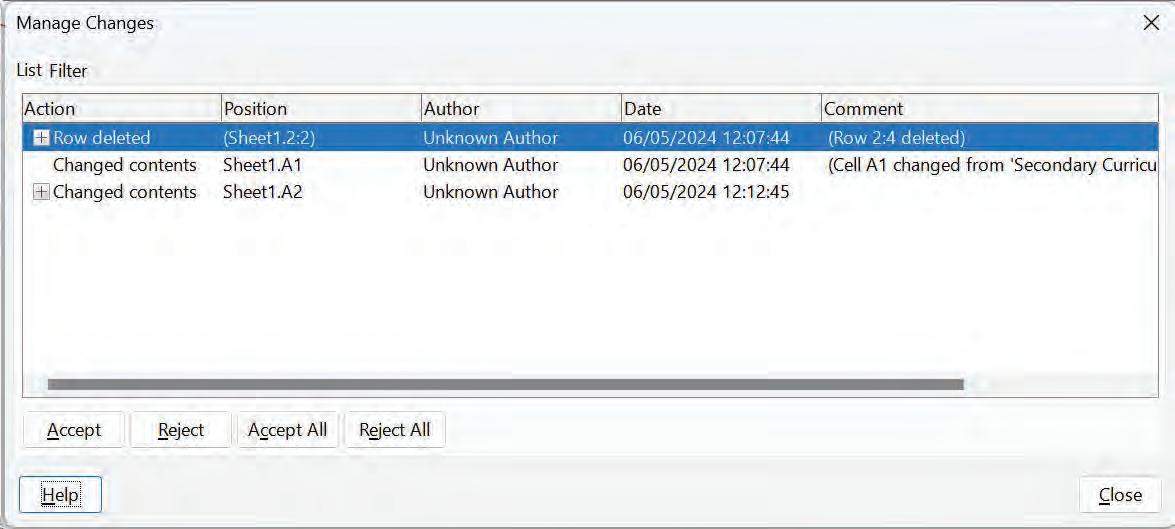
The Comment column in the dialog box by default contains an explanation of the change that was made. If the reviewer added a comment to the change, it gets displayed, followed by the description of the change. If more than one person has reviewed the worksheet, one reviewer may have modified another reviewer’s change. If so, the changes are chronologically arranged with a plus sign for opening up the hierarchy.
To filter the list of changes:
On the Filter tab of this dialog box (not shown here), you can choose how to filter the list of changes: by date, author, cell range, or comments containing the specific terms. After selecting the filter, switch back to the List tab to see the results.
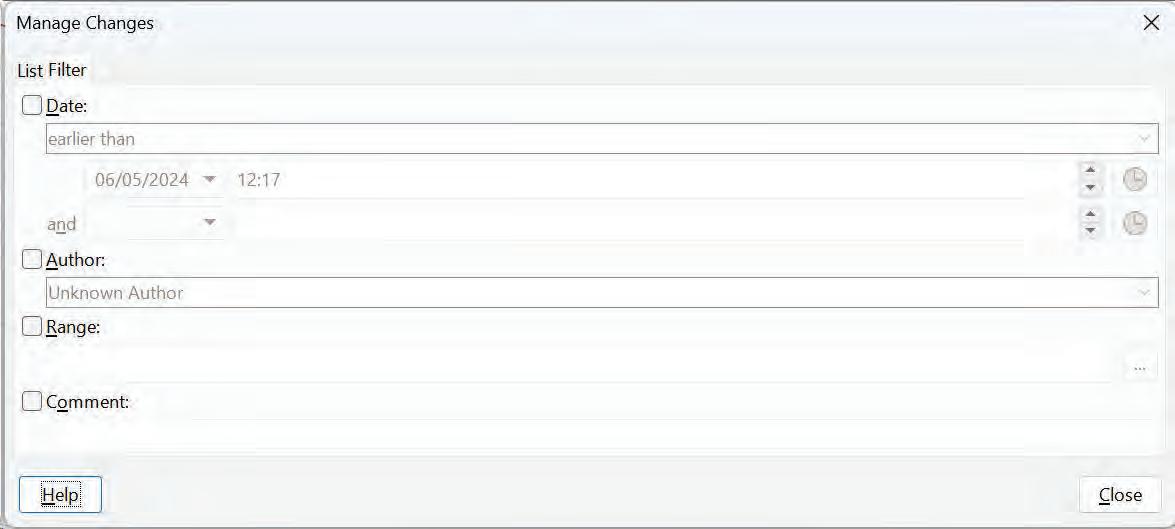
Sometimes there are multiple edited versions of a spreadsheet that reviewers return at the same time, then it is a difficult task to review all these changes one-by-one. For this purpose, Calc provides the feature of merging spreadsheets.
Fig. 7.10: Manage Changes dialog box Fig. 7.11: Filter tab in Manage Changes dialog boxTo merge worksheets, all the edited worksheets need to have recorded changes made in them. You can follow these steps for merging spreadsheets:
1. Open the original spreadsheet.
2. Select the Edit > Track Changes > Merge Document option. The Merge with dialog box will open.
3. Select a file you want to merge and click the Open button.
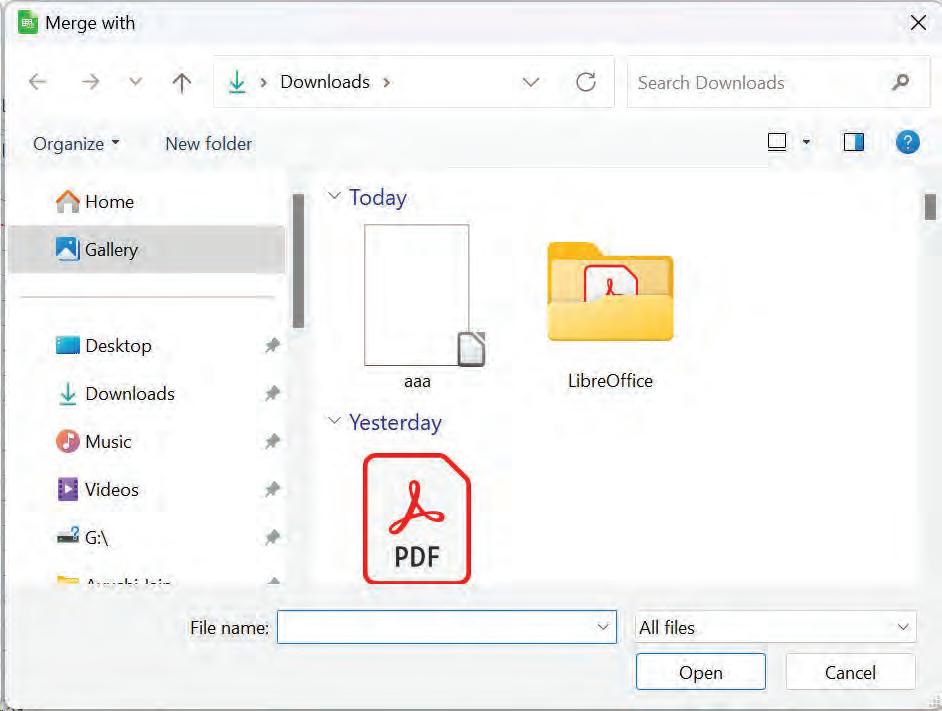
4. After the spreadsheets merge, the Merge Changes dialog box will open, showing the changes which are made by more than one reviewer. If you want to merge more spreadsheets, close the dialog box and then repeat the above steps.
When sharing spreadsheets, reviewers might edit it without switching to track changes recording (record) As Calc can find the changes only when track changes is on, now you cannot take its help for reviewing the changes that have been made to the document.
To solve this problem, there is a Compare Document option in Calc. For that, you need to have the original spreadsheet and the one that is edited. To compare them:
1. Open the edited spreadsheet that you want to compare with the original spreadsheet.
2. Select Edit > Track Changes > Compare Document. The Compare to Original Document dialog box will appear.
3. Select the original worksheet and click the Open button. Calc finds and marks the changes as follows:
The changes from different authors appear in the cells outlined with different colors.
• All data that occurs in the edited worksheet but not in the original is identified as inserted.
• All data that is in the original worksheet, but is not there in the edited worksheet is identified as deleted.
• All data that is changed, is marked as changed
Activity 1: Working in Shared Mode (Group Work)
Open a new worksheet and add data for the number of students studying in class 10th of your school in various sections, such as marks obtained in class 9 etc., for students. Please prepare data in shared mode, taking one student from each section of class 10.
Activity 2: Tracking Changes (Group Work)
Review and finalise the data entered in the above said worksheet by circulating the worksheet among all students of 10th class. Track changes made and add comments to the changes which are kept.
A Select the correct option.
1 Which of the following option of the Tools menu allows sharing of spreadsheet?
a Share Spreadsheet
c Changes
b Merge Document
d All of these
2 Which of the following option allows track changes in spreadsheet?
a Track Changes
c Compare Document
b Changes
d Share
3 Which of the following is a tab in the Manage Changes dialog box?
a List
c Both a and b
B Fill in the blanks with the most suitable words.
b Filter
d None of these
1 A colored border, with a in the upper left-hand corner, will appear around a cell where changes were made.
2 A deleted column or row is marked by a bar.
3 All data that is in the original worksheet, but is not there in the edited worksheet is identified as .
C State whether the following is True or False. Correct the statements that are false.
1 To merge worksheets, all the edited worksheets need to have recorded changes made in them.
2 Calc can find the changes only when track changes is off.
3 All data that is changed, is marked as changed.
D Answer the following questions. (Solved)
Q1. What is the purpose of adding comments?
A1. Calc automatically adds a comment to any recorded change describing what was changed.
Q2. What are the different options present in the Show Changes dialog box?
A2. There are different filtering options in the Show Changes dialog box:
• Date – Only changes made in a certain period of time.
• Author – Only changes made by a specific author are displayed. This is especially useful if you have multiple reviewers working on the worksheet.
• Range – Only changes made in a specific range of cells are displayed. This is especially useful if you have a large spreadsheet and need to review only a part of it.
• Comment – Searches the content for the specific comments and displays only the changes which have comments that match the search criteria.
• Show accepted changes – Show the changes that have been accepted.
• Show rejected changes – Show the changes that have been rejected.
Q3. Write the steps to edit comments in Calc.
A3. After the comments have been added, you can edit them using following steps:
• Select the cell with the comment that you want to edit.
• Select the Edit > Track Changes > Comments.
• Edit the comment and click the OK button.
2.
3.
Calc can find the changes only when track changes is on.
Danny and Sunny share an office space. They deal with many documents every day and use LibreOffice to do so. Danny has recently completed his work early, whilst Sunny had to stay late to complete his. Furthermore, Danny’s ways of working are more precise and organised than Sunny’s. As a result, Sunny is anxious to learn the key to Danny’s success. Can you guess what it is?
Well, Danny, on the other hand, has lately learnt how to program his LibreOffice.org suite. He has prepared macros for his regular tasks, and whenever there is a need for a lot of GUI operations, he simplifies the process by automating them with macros. Danny has thus avoided several manual and mundane repetitious activities through a single click or a shortcut key combination.
Consider the following scenario. You need to create a new spreadsheet daily and duplicate specific data and processes from the previous day’s sheet. Every day, this is going to take a significant amount of time. However, by using a macro, you can perform this task in a fraction of the time taken earlier.
A macro is used to save a sequence of commands or keystrokes that are stored for later use.
The LibreOffice Calc macro language is extremely versatile, allowing for both simple and sophisticated tasks. Macro is typically written in the basic programming language.
A macro is useful for continually carrying out the same task.
1. It saves the user ’s time.
2. Repeat several commands in just one click or using a shortcut-key combination.
3. It reduces the errors occurring because of repetitive tasks.
4. It can perform any kind of complex calculations easily.
It is a tool that allows recording a macro. By default, this option is turned off. To enable the macro recorder:
Click on the Tools > Options. A dialog box appears. Click on the LibreOffice > Advanced option. Select the Enable macro recording option. Click on OK. Now, you can record macros in Calc.
Before we get to the steps for recording a macro, let us create a sheet, as shown in Fig. 8.1. Save this sheet using the name Consolidate.ods.
Now, let us record a macro that displays the highest, lowest, and average values for each subject. Steps to record a macro are as follows:
1. Click on the Tools > Macros > Record Macro option. (See Fig. 8.2.) The Record Macro dialog box with Stop Recording button is displayed. This dialog box indicates that the recording of the macro has started.
2. Click on the cell B9 and type ‘=MAX(B3:B7)’. Press the Enter key.
3. Bring the cell pointer to B10 using the down arrow key, and then type ‘=MIN(B3:B7)’. Press the Enter key.
4. Bring the cell pointer to B11 using the down arrow key, and then type ‘=AVERAGE(B3:B7)’. Press the Enter key.
5. Click Stop Recording in the Record Macro dialog box.
6. The BASIC Macros window is displayed, as shown in Fig. 8.3.

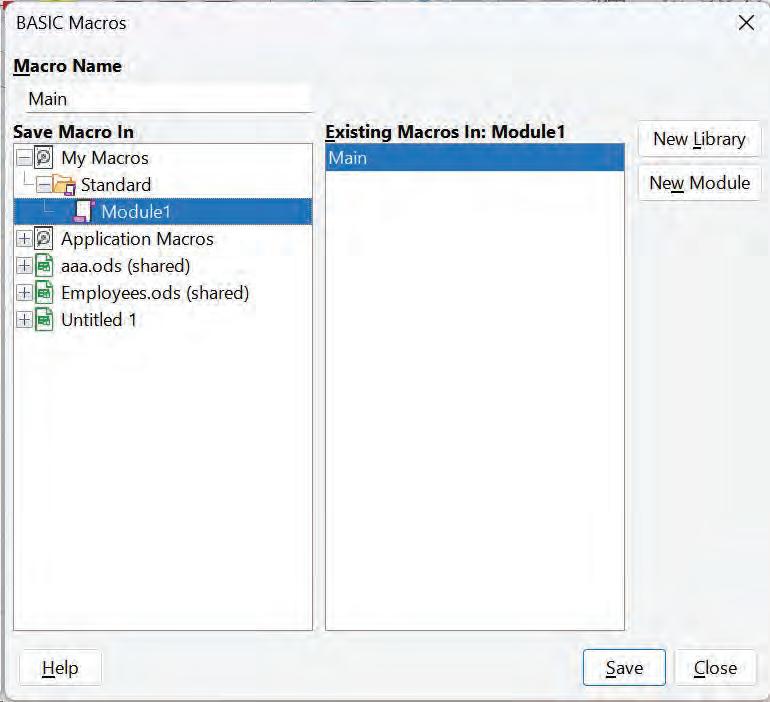
7. Choose an appropriate spreadsheet from the dialog box. Existing spreadsheets display a typical library name Standard. Now, your new spreadsheet (Consolidate. ods) does not have a library; you can build a new library to retain the macro, but this is not required. This library is not generated until the spreadsheet is saved or the library is required.
8. To add a module to the Standard library, click New Module. Enter a name for the new module, such as Marks, as displayed in Fig. 8.4.
9. To create a new module, click on the OK button.
10. Under the Standard library, a newly created module called Marks is generated. Type a new name, such as ‘Analysis’, in the Macro Name text box, as shown in Fig. 8.5.
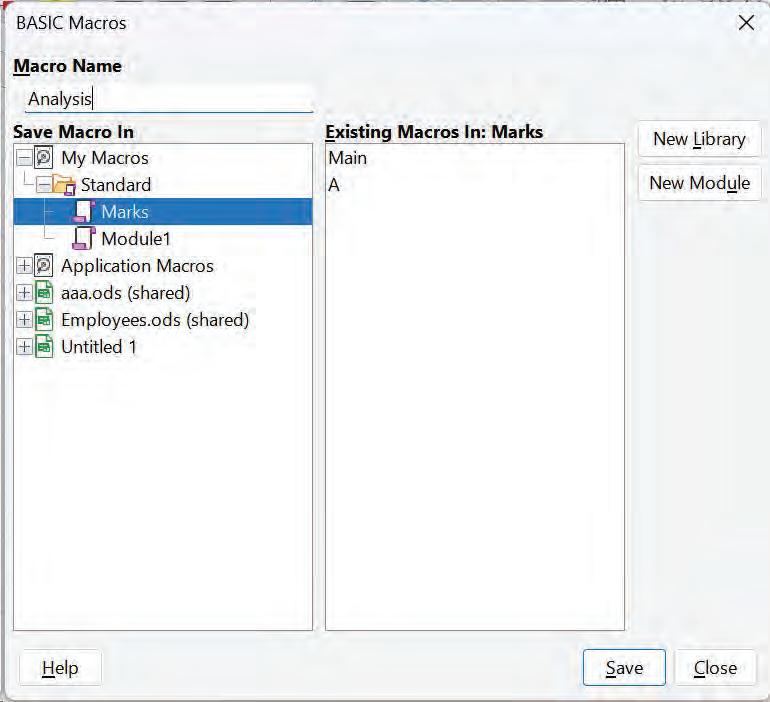
11. For the newly created macro to be saved, click on the Save button. The macro will be stored in Standard library.
Note: The first character of the macro name must be a letter. Subsequent characters can be letters, numbers, or underscore characters. Spaces cannot be used in a macro name; an underscore character works well as a word separator.
The following actions cannot be captured while constructing a macro:
• Actions performed in other windows.
• Opening of windows.
• Only when selections are made using the keyboard and not the mouse.
• Window switching actions.
Fig. 8.5: Typing macro nameFollow these instructions to run an existing macro:
1. Click the cell C9.
2. Click on the Tools > Macros > Run Macro option (See Fig. 8.6). The Macro Selector dialog box appears.

3. In the Library list (on the left), select the library and then the module. The available macros are visible in the Macro Name list box.
4. Select the Analysis macro, as shown in Fig. 8.7.
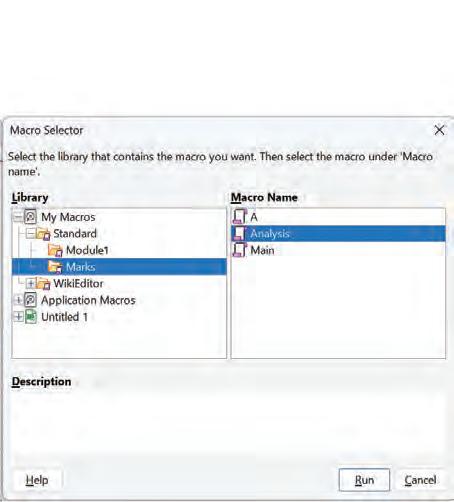
5. Click on the Run button. The maximum marks of the Social Studies subject are displayed.
You have already worked with in-built functions such as =MAX(B3:B7). These functions have a syntax, i.e., ‘=Function name(arguments)’.
Every function starts with a = sign followed by a function name, an opening parenthesis then arguments, and a closing parenthesis.
While recording a macro, we used three functions. MAX(B3:B7), MIN(B3:B7), and Average(B3:B7).
Let us explain the syntax of the function with MAX(B3:B7). In this case, MAX() is the function name, and B3:B7 are the arguments passed in the function.
So, a function is a block of code that runs only when it is called. When you run a function, it returns a value.
Now, we will work with a macro as a function. But the question arises, Why do we use macro as a function?
The main benefit of using macros is faster execution time. During preprocessing, a macro is expanded (replaced by its definition) inline each time it is used. A function definition occurs only once regardless of how many times it is called.
Secondly, a macro is used in place of a function because it reduces code size and is efficient.
The syntax to define a straightforward function without parameters is as follows:
Function function_name()
Body of function
Function_name = result
End Function
Follow these instructions to build a macro as a function:
1. Make a new Calc file called ‘create_macro.ods’.
2. Click on the Tools > Macros > Organize Macros > Basic to open the Basic Macros dialog box.

The Basic Macros dialog box appears.
Fig. 8.8: Organising macros3. Click on the Organizer button. The dialog box opens, as shown in Fig. 8.9.
4. Select the Libraries tab and then select the spreadsheet from the for example, create_macro.ods
5. Click on the New button. A New Library
6. Enter the new library name in the
7. Click on OK button. The ‘Test_macro’ name is displayed in the list, as shown in Fig. 8.11.

8.11: Displaying Test macro in Library list
8. Select the Test_macro in the Library list.
9. Click on the Edit button. The Basic Text Editor is displayed. A module named Module1 and a macro named Main are automatically created by Calc.
10. Type the following code (in Module1) to calculate the total of the first five even numbers (See Fig. 8.12).

Function Tot()
Tot = a+b+c+d+e
End Function
11. Save the Module1 by pressing the Ctrl + S keys.
12. Click on cell B1 of create_macro.ods. Type ‘=Tot()’ and then press the Enter key.
13. The value 30 is displayed as the output. Save the file and then close the spreadsheet.
14. Open the spreadsheet again. Cell B1 displays an error message because when a document is loaded, then macros are not enabled due to which Calc is cannot find the function Tot().
15. When Calc opens a spreadsheet, it does not open all macro libraries that it can find in the available library containers because this would be a waste of resources. Instead, Calc automatically loads just the Standard library within the My Macros library container and the documents own the Standard library. This is why you should create all the macros in the standard library.
16. In our example function, Tot() exists under the Test_macro library. So, Tot() will not execute unless the Test_macro library is loaded.
1. Click on Tools > Macros > Organize Macros > Basic to open the Basic Macros dialog box.
2. Expand create_macro.ods.
3. Click the Test_macro library.
4. Double-click the Tot(). The dialog box closes.
5. You can now call the function by typing the function name preceded by equal sign (=Tot()) and then press the Enter key. The value is displayed.
Fig. 8.12: Editing a libraryTo illustrate a function that accepts arguments, we will write a function using a macro that accepts two numbers as arguments. For example, we will create a function multiply(x, y) (passing two arguments within the function) as a macro. On calling the function in the sheet, the multiplied value of both arguments is displayed. You can write the code for multiply(x, y) function in the Test_macro library created earlier.
Function multiply(x , y)
multiply = x * y
End Function
To execute the above function, click any cell in the sheet and then type ‘= multiply(6,7)’.
The result 42 is displayed.
To edit a Calc document, you can directly access the internal LibreOffice objects. Let us develop a macro that will add the data from each cell (A2) of each sheet in the current document. When a macro begins referencing the current document, then StarBasic sets the ‘ThisComponent’.
The following is the code for adding the data from each cell (A2) of each sheet in the current document:
Function SumofCellsofAllSheets()
Dim Total As Double
Dim iAs integer
Dim oSheets
Dim oSheet
Dim Cell
oSheets = ThisComponent.getSheets()
For I = 0 To oSheets.getCount()–- 1
oSheet = oSheets.getByIndex(i)
Cell = oSheet.getCellByPosition(0, 1)
Total = Total + Cell.getValue()
Next
SumofCellsofAllSheets = Total
End Function
In above code:
SumofCellsofAllSheetsis a user-defined function
The Dim statement is used to declare variables.
ThisComponent.getSheets()—ThisComponent object of StarBasic represents the current document. For is a loop used for iteration.
getCellByPosition(col, row) returns a cell at the indicated row and column.
Cell = oSheet.getCellByPosition(0, 1) accessing a cell on a sheet.
You know how to sort data in LibreOffice Calc. You can do this by selecting a range and then performing the Data Sort command on the selected range.
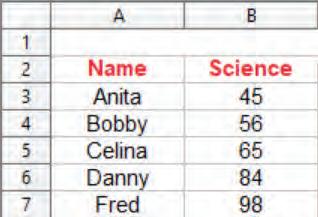
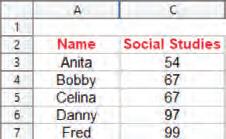
You can store these in the form of a macro and run it every time. But there is a condition—for sorting through a macro, the selected cell range must always be identical. That means you can create the Data sorting macro in a sheet and then using this macro, you can sort the same range in other sheets; but if you select a range different from the originally selected range in sorting macros, the macro will not work.
Let us understand it through an example. In our worksheet, two worksheets have some result data in the same range (A1:B6), as shown in Fig. 8.13 (a) and 8.13 (b).
We want to create a sorting macro in Sheet1 and then we will apply it in Sheet2. Note that both the sheets have the result data in the same rangE.
1. Click on the Tools > Macros > Record Macro. The recording of the macro starts.
2. Select the range B1:B7 in Sheet1
3. Click on the Data > Sort from the menu bar.
4. It will open the Sort dialog box, as shown in Fig. 8.14.
5. Select the desired Sort By field and desired Sort Order (ascending or descending). In our example, select the Science field and ascending order.
6. Click on the Stop Recording on Record Macro dialog box, and it will ask you to specify a name for macro. Specify a name sort_marks and then click on the Save button.
7. You will see that it has sorted the result data in Sheet1, as per the macro recorded. The result data has been sorted based on Science field in ascending order.
1. Open Sheet2, which contains the result data in the same range.
2. Click on the Tools > Macro > Run Macro.
3. Select the name of the sorting macro we created earlier in Sheet1
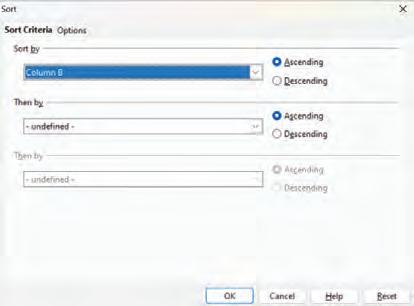
4. Click on the Run button. It will sort the same range in the same way, i.e., on the Science field in ascending order.
Note: Sorting the macro worked because the data contained two different sheets in identical cell ranges. It will not work if you have data stored in different cell ranges. This is because a macro recording, sorting internally stores the field’s cell range details.
Activity 1: Creating Macro (Individual Work)
Suppose your teacher has asked you to create a time table for fourth grade. Record a macro to enter and format the column labels of the timetable instead of typing them manually.
Activity 2: Passing Arguments to a Macro (Individual Work)
Create a macro as a function to calculate the sum of two numbers by passing arguments.
Activity 3: Sorting Data using Macro (Individual Work)
Create a macro to sort data by a single column.
Fig. 8.13 (b): Sorted Social Studies marks Fig. 8.13 (a): Sorted Science marksA Select the correct option.
1 Identify the valid macro name: a Mac 1 b 1_Mac c Mac_1 d 1Mac
2 Which of the following option needs to be clicked to start recording a macro? a Visual Basic b Macros c Record Macro d Use Relative References
3 Which of the following sign is used to run a macro as a function? a = b + c & d %
B Fill in the blanks with the most suitable words.
1 A is used to save a sequence of commands or keystrokes that are stored for later use.
2 Macro is typically written in the basic language.
3 A macro the errors occurring because of repetitive tasks.
4 Click on the option to start recording a macro.
C State whether the following is True or False. Correct the statements that are false.
1 The Stop Recording button is used to start the recording.
2 A macro can be created in a new workbook also.
3 A macro saves the user’s time.
4 The Average() cannot be used with a macro.
D Answer the following questions. (Solved)
Q1. Ms Anuja teaches Class 10 in a school. She is creating a worksheet in LibreOffice to enter the grades for five topics. She does not understand how to create a sample copy of the worksheet with just one click. Describe how a macro can be used to meet her needs.
A1. • She needs to create a worksheet and start the macro recorder.
• Then, select the required formatting.
• When the worksheet is ready, stop the macro recorder.
• Run the macro in a new worksheet.
Q2. Write the advantages of a macro.
A2. Advantages of a macro are as follows:
• It saves the user’s time.
• Repeat several commands in just one click or using a shortcut-key combination.
• It reduces the errors occurring because of repetitive tasks.
• It can perform any kind of complex calculations easily.
Q3. Write steps to start recording a macro.
A3. • Open LibreOffice Calc and the worksheet you want to record the macro in.
• Go to the Tools menu and then select Macros Record Macro.
• In the Record Macro dialog box, assign a name to the macro and choose where to save it.
Q4. Write the syntax to use write a macro function without parameters.
A4. Function function_name()
Body of function
Function_name = result
End Function
1. c 2. c 3. a
B 1. Macro 2. Programming 3. Reduces 4. Tools Macro Record Macro
C 1. False. The Stop Recording button is used to stop the recording.
2. True. 3. True. 4. False. The Average() can be used with a macro.
Data consolidation: You can combine your data from multiple worksheets into one master worksheet using data consolidation.
Subtotal: Subtotal is used to display formula results based on column groups and row labels.
Goal Seek: Goal Seek is a “what if” analysis tool that helps you to find the input value that will result in the target values that you want.
Spreadsheet Linking: It is the process of linking data between two or more spreadsheets within the same workbook or between different workbooks
Hyperlink: A hyperlink, also known as a link, is a reference or a connection between two webpages or documents that allows users to navigate from one location to another.
Macro: A macro is used to save a sequence of commands or keystrokes that are stored for later use.
• Spreadsheet software offers extensive functionality for data analysis.
• What-if Analysis is the act of changing the values in the cells to examine how such changes affect the results of formulas of spreadsheet calculations.
• You can insert multiple sheets as needed on the spreadsheet at any time and in any position you choose.
• The name of the sheet should be relevant to the subject.
• If you want the changes made in original sheet to be reflected in your current sheet as well, then the inserted sheet has to be copied as a Link.
• Absolute hyperlinks give the complete path or URL of the webpage they are linking to.
• Spreadsheet software allows the user to share the worksheet and place it in the accessible network location, where several users can access it simultaneously.
• Shared spreadsheet can keep a record of all the changes made by all the users at any point of time.
• The main benefit of using macros is faster execution time.
• A module named ‘Module1’ and a macro named ‘Main’ are automatically created by Calc.
A. Select the correct option.
1. function cannot be performed through Subtotal in a spreadsheet.
a. Sum
c. Average
b. Product
d. Percentage
2. What is the purpose of spreadsheet linking in LibreOffice Calc?
a. To create duplicates of data.
b. To link the data between multiple sheets or workbooks.
c. To format cells and rows.
d. To create charts and graphs.
3. Which menu option is used to share a spreadsheet with others?
a. File
c. Tools
b. Edit
d. View
4. Which feature allows users to track changes made by different users?
a. Revision History
c. Record Changes
b. Change Log
d. Version Control
5. programming language is used for creating macros in LibreOffice Calc.
a. Basic
c. Java
b. Python
d. C++
B. Fill in the blanks with the most suitable words.
1. Calc is used to process data like results, earnings, expenses, profit, and loss.
2. allows you to create a reference to other sheets or documents in LibreOffice Calc, ensuring data consistency.
3. feature of Calc allows multiple users to work together on the same spreadsheet simultaneously.
4. Macros are used to save a sequence of or that are stored for later use.
5. Macros can be used to reduce errors occurring due to tasks.
C. State whether the following is True or False. Correct the statements that are false.
1. You can apply the subtotal formula on your spreadsheet in three ways.
2. The name of the sheet should be relevant and meaningful for the subject.
3. Relative hyperlinks in Calc can break if the source and target locations are no longer relative to each other.
4. A shared spreadsheet can keep a record of all the changes made by all the users at any point of time.
5. Macros can be recorded for actions performed in other windows.
D. Short answer-type questions.
1. Define What-if Analysis.
2. What do you mean by a hyperlink?
3. Write any two advantages of a macro.
1. What is the role of optimized result to option in the Solver dialog box?
2. Explain the process of merging spreadsheets in Calc.
3. Discuss a few criteria that you can filter to review the changes.
1. Prachi has a hyperlink that contains the full address of the destination file. She is confused if it’s a relative hyperlink or an absolute hyperlink. Help her by suggesting the right answer.
2. You are working in a team where a shared spreadsheet contains critical project deadlines. One team member made changes to the deadlines that conflict with your updates. Name the method you would use in Calc to compare the conflicting versions.
Data is the backbone of this digital era. You knowingly or unknowingly use data of various types in your daily routine, such as while visiting a library, shopping online, playing a computer game, and more. In every example, you use one or another form of data. Let us understand what data and information are and why they are important.
The term ‘data’ is derived from the Latin word ‘datum’, which means “a piece of information”. It is a collection of raw facts that can be processed for any computing machine. Data is unprocessed and meaningless. Data can be gathered by observations, measurements, query, research, or analysis. It may consist of facts, numbers, names, images, or even description of things. Data is individual and sometimes unrelated. Data by itself has no such significance. For example—marks (50), weight (75.5), date (25/08/2009), temperatures (37°C), student name (Amit Mishra), etc. You can observe all these individual values have no significance and you cannot draw any conclusion by just looking at these values.
When we process data to achieve a meaningful result, it is called information. It is a collection of facts that has meaning. It is dependent on data. Information is valuable. For example, consider the given sentence: “Amit Mishra has got 50 marks in the Science subject. His weight is 75.5. He was born on 25 August 2009. His body temperature is 37°C.”
You can easily observe that when the given data is processed, it gives a meaningful inference, which is called information.
Let us consider an example to understand how information is dependent on data.
5 + 4 = 9
In the above example, 5, +, and 4 are data. When we add 4 and 5, we get the result 9, which is information, so we can say that when we process the data, we get a meaningful result, that is, information.
The term “database” can be used to describe anything starting from a single set of data. In other words, a database is a collection of data. A database may be generated and maintained manually or it may be computerised, such as a telephone directory.
Data in a database can be stored in the form of tables. A database can have one or more than one tables in it. The following figure describes the structure of a table:
Let us understand the components of a table:
1. Row: The horizontal set of values in a table is called a row. It represents the data values related to one object (entity). A row is referred to as a tuple or a record in a database.
2. Column: The vertical set of values in a table is called a column. It represents the data values related to one property (attribute) of an entity. A column is referred to as a attribute or a field in a database.
3. Cell: The intersection of a row and a column is called a cell. Each cell contains an individual data value. A cell cannot contain more than one data value.
4. Table: A set of rows and columns is called a table. It is a combination of values related to an entity.
Database Users
A database is usually used by developer, administrators, and end users.
1. Database developers: They are also called database programmers. They design and develop a database.
2. Database administrators: Database Administrator (DBA) is a person who has the responsibility of controlling and protecting data and ensuring that data is correctly stored and retrieved.
3. End users: Users are the persons who need the information from the database to carry out their primary business tasks, such as executives in an organisation, teachers, and students in a school, human resource representatives, finance personnel, or managers, etc.

Following are the features of a database:
1. The data is arranged in a tabular form.
2. A database consists of one or more tables. For example, consider the database of a hospital. There may be one table for doctors that stores their records. A table for patients stores the records of patients, and a table for medicines stores the records of medicines.
3. Each data value in a database contains information about a particular type of item.
4. The users can create queries to retrieve data.
5. While creating a database, record uniqueness is important to avoid duplication. This can be done by assigning a unique value to each entry.
6. Only authorised persons can access databases or tables.
A database management system is a collection of interrelated data and a set of programs to access those data. The main goal of a DBMS is to provide a convenient and efficient environment to retrieve and store database information. DBMS is a general-purpose software system that facilitates the process of defining, constructing, and maintaining databases for various applications.
Data can be organised into two types:
1. Flat-file: In a flat-file system, data is stored and organised in a single table. The data is stored in a plain text format. Each data value in a flat-file system is separated by comma, tabs, spaces, etc. This type of arrangement is suitable for a small amount of data.
2. Relational: In a relational system, data is stored in multiple tables. These tables are related to each other, and values can be accessed by creating relationships between them. This type of arrangement is suitable for a large amount of data.
Following are the advantages of DBMS:
1. Reduces data redundancy: Various programmers create files and application programs in various structures and programming languages. The same information is duplicated in numerous files. This causes data redundancy. Using a DBMS, there is no chance of data duplication because information is stored centrally and any change in it is reflected immediately.
2. Data integrity: Integrity constraints are the rules that are used to control an invalid data entry in a database. Data integrity ensures accuracy and consistency of data. The data values stored in the database must satisfy certain types of consistency constraints. Hence, data integrity can be maintained using a DBMS.
3. Data accessibility: In a database, users can share data among themselves. A database management system allows multiple users to access information that is accessible remotely and twenty-four hours a day, seven days a week.
4. Data security and privacy: Data security and privacy are an important concept in a database. Database Administrators (DBAs) have a complete control over their database. They can validate that only authorised persons can access the database.
5. Maintaining complex relationships: A database contains multiple tables that are related to each other through relationships. A DBMS can represent a variety of complex relationships among the various tables of a database.
6. Data independence: It the ability to change the database organisation without having an impact on the applications that use the data. Only a DBA has the authority to change the storage structure or the organisation of the database. Users can view the data in different ways based on their permissions.
7. Removing data inconsistency: Data inconsistency arises if a database has multiple copies of the same data. This problem can be solved if the database is centrally managed. Any changes made to the database are immediately communicated to all the users, and data inconsistency is avoided.
8. Backup and recovery: In a DBMS environment, the system automatically takes periodic backups and recovers the database to a consistent state when there are program and system failures.
MySQL is the most useful database management tool. It is used by top companies like Google, LinkedIn, YouTube, PayPal, Twitter, etc.
Following are the applications of DBMS:
Banking: Banks need DBMSs to store a lot of information about account holders like customer details, banking transactions, balance sheets, credit card and debit card details, etc. Everything is maintained with the help of a database.
Airlines: Airlines need DBMS to keep records such as passenger name, passenger check-in, passenger departure, flight schedule, number of flights, pilot details, route details, etc.
Telecommunication: The telecommunication field has a large amount of data, and it is very difficult to manage it without a database. It stores data such as customer names, phone numbers, calling details, prepaid & post-paid connection records, bill details, etc.
Railway Reservation System: Railways use DBMS for their efficient storage and retrieval purposes. They store information such as passenger name, mobile number, booking status, reservation details, train schedule, employee information, account details, seating arrangement, etc. All the fields are compulsory and need to be maintained.
Universities: Universities have huge data which can be stored in the database, such as student information, teacher information, non-teaching staff information, course information, etc.
Human Resources: In an organisation, the management keeps records such as employee name, joining details, designation, salary details etc., using DBMS.
Database servers are the dedicated computers that hold the actual databases and run only the DBMS and related software.
Manufacturing: Manufacturing companies make products and sell them daily. A DBMS is used to keep records of all those details.
The principle of relational model was proposed by Dr E. F. Codd. A relational model is based on a relational database. A relational database is a collection of various tables, referred to as relations. Each relation represents a table of values in relational model, and each row in a table represents a collection of related data values for that table. These values should be identified using a unique key. Relational databases can be accessed and modified by a language known as Structured Query Language (SQL). Some common examples of RDBMS are Oracle, MS Access, LibreOffice Base, MySQL, and MS SQL.
Example: To understand the concept of RDBMS, consider the following tables, namely, Student table and Course table.
In a college, there are four courses, B. Tech, M. Tech, MCA, and BCA. The information related to the courses, such as Course_Id, Course_Name can be accessed through Course table. Similarly, the information related to the students, such as Roll_no, Name, and Course_Id can be accessed through Student table.
These two tables have a common column, that is Course_Id. Whenever information related to a course has to be searched, the common key can be accessed and the information related to the course can be retrieved.
1. Values are atomic: The rows and columns have a single value.
2. Each row is unique: No two rows in the same relation can be identical.
3. Each column has a unique name: The name of columns within a table should be unique.
Data stored on local devices are more vulnerable to physical disasters, virus attacks, and/or thefts.
4. The sequence of columns is insignificant: The order of the columns in a relation can be changed without changing the meaning of the relation.
5. The sequence of rows is insignificant: The order of the rows may be changed or stored in any sequence, without changing the meaning of the relation.
The following table shows the differences between DBMS and RDBMS:
Database Management System
The relationship between two tables or files is maintained through programs.
Does not support client/server architecture.
Relational Database Management System
The relationship between two tables or files can be specified at the time of table creation.
Most of them support client/server architecture.
Allows only one person to access the database at any given time. Allows multiple users to simultaneously access the database.
Examples: MS Access, FoxPro
Example: Oracle, SQL Server, MySQL
A key is an attribute or a combination of attributes that is used to uniquely identify records. Sometimes, you might have to retrieve data from more than one table. In that case, you require to join the tables with the help of keys. The purpose of the key is to bind data together across tables without repeating the data in every table. There are various types of keys. Let us discuss each in detail.
It can be defined as a set of one or more keys that is able to uniquely identify a record in a table.
Example: Consider a table Employee with attributes {Id, Name, Address, Salary}:
The candidate keys are {Id} and {Name, Address}. Attribute Id can uniquely identify the record, and the combination of the name and address attributes can also uniquely identify the record.
An attribute that is used by the database designer to uniquely identify each record in the table is known as a primary key. A primary key cannot have duplicate entries. A table can have only one primary key.
Example: Again, consider the table Employee with attributes {Id, Name, Address, Salary}.
In this table, the field ‘Id’ can be the primary key since it is unique for each employee.
The primary key field cannot be null.
If you use multiple attributes to create a primary key, then that primary key is called the composite key (also called a compound key or a concatenated key).
Example: Again, consider the Employee table.
If we use attributes ‘Name’ and ‘Address’ to uniquely identify a table instead of ‘Id’, then {Name,Address} will be a composite key.
A foreign key is an attribute or a combination of attributes in one base table that points to the primary key of another table. The purpose of the foreign key is to ensure referential integrity of the data, that is, only values that are supposed to appear in the database are permitted.
Example: Consider the following tables with the given fields.
Department (DNo, DName) and Employee (Id, Name, Address, Salary, DNo).
In the Employee table, DNo is the foreign key that points to the primary key (DNo) of the Department table.
Activity 1: Analysing and Creating the Structure of a Database for School Library (Individual Work)
Analyse database requirements for a school library. Record the book requirement and create the structure of a database.
Activity 2: Analysing and Identifying Required Tables for Hospital Database (Individual Work)
Analyse database requirements for a hospital; visit various departments like medical, nursing, and pathology. Record the requirements and create the structure of the required number of tables.
Activity 3: Analysing a Table (Individual Work)
The following table contains a database of a school on the basis of a given sports activity:
a. What is the total number of rows in the given table?
b. What is the total number of columns in the given table?
c. Identify the primary key in the given table.
A Select the correct option.
1 Who gave the concept of RDBMS?
a Charles Babbage b Charles Bachman c Sharon B. Codd d Dr. E. F. Codd
2 Which of the following is a function of a database?
a Providing user interface b Backup and recovery
c Data security d All of these
3 A record in a table represents:
a A vertical set of data b A single entry c A collection of data d None of these
B Fill in the blanks with the most suitable words.
1 Duplication of data is called
2 The primary key field cannot be
3 A is a vertical set of data within a table.
4 Database developers are also called
C State whether the following is True or False. Correct the statements that are false.
1 A database administrator is responsible for overall control of the database.
2 A table is an unorganised collection of data.
3 Information is not dependent on data.
4 The term “database” does not include the application.
D Answer the following questions. (Solved)
Q1. What is a DBMS?
A1. A database management system is a collection of interrelated data and a set of programs to access those data. The main goal of a DBMS is to provide a convenient and efficient environment to retrieve and store database information. A DBMS is a general-purpose software system that facilitates the process of defining, constructing, and maintaining databases for various applications.
Q2. Write five advantages of DBMS.
A2. • Reduces data redundancy: Various programmers create files and application programs in many structures and various programming languages. The same information is duplicated in numerous files. This causes data redundancy. Using a DBMS, there is no chance of data duplication because information is stored centrally in a DBMS and any change in it is reflected immediately.
• Data integrity: Integrity constraints are the rules which are used to control invalid data entries in a database. These rules ensure accuracy and consistency of data. The data values stored in the database must satisfy certain types of consistency constraints. Hence, data integrity can be maintained using a DBMS.
• Data accessibility: In a database, the users can share the data among themselves. A database management system allows multiple users to access information that is accessible remotely and twenty-four hours a day, seven days a week.
• Data security and privacy: Data security is an important concept in a database. The Database Administrator (DBA) has a complete control over the database. He can validate that only authorised persons can access the database.
• Removing data inconsistency: Data inconsistency arises if a database has multiple copies of same data. This problem can be solved if the database is centrally managed. Any changes made to the database are immediately communicated to all the users to ensure that there is no data inconsistency.
Q3 Divyansh wants to create a table to invite all the participants who took part in the school competition. He is not aware of the primary key. Help him by explaining the concept of a primary key along with a suitable example.
A3. An attribute that is used by the database designer to uniquely identify each record in a table is known as a primary key. A primary key cannot have a duplicate value.
Example: Consider a table showing employee attributes {Id, Name, City, Salary}.
A 1. d 2. d 3. b
B 1. redundancy 2. null 3. field 4. database programmers
C 1. True.
2. False. Table is an organised collection of data.
3. False. Information is dependent on data.
4. True.
An RDBMS, or a Relational Database Management System, is a fundamental relational model concept in data management. An RDBMS allows organisations to store, manage, and retrieve data efficiently. In a database, tables organise and store information, which facilitates easy data search, organisation, and retrieval. A relational database uses Structured Query Language (SQL), which is a standard database application that provides a querybased programming interface for database interaction. Some examples of RDBMS are Oracle, LibreOffice Base, Microsoft Access, and Microsoft SQL Server.
LibreOffice Base uses Structured Query Language (SQL), a standard application that provides an easy interface for database interaction in relational databases. LibreOffice Base supports SQL and includes a core database platform, query tools, a report-building module, and a form editor.
MySQL was founded by a Swedish company MySQL AB in 1995 and is the most widely used opensource RDBMS.
Databases in LibreOffice Base consist of four objects: tables, queries, forms, and reports. Together, these objects allow you to enter, store, analyse, and compile your data wherever you want. Let us discuss each of the four objects in detail and how they interact with each other to create a fully functional relational database.
A table in LibreOffice Base is an organised set of rows and columns arranged to display data in a tabular form. An address book, a stock list, and a phone book are the types of information that you may store in a table.
Every table consists of the following elements:
Fields: In a database table, a field is an attribute of a record and all the columns in a table are referred to as fields. For example, if you are designing a form to manage leaves of employees, you can choose fields from the Employee table such as Employee Name, Date of Joining, and Designation. Consider the following table that contains employee data.

Records: A record is a collection of fields in a database table or you can say, one record is a complete row of table. For instance, if you are creating a form to handle leaves of an employee, then attributes like Employee Name, Start Date, and End Date of the employee in the Employee table are called records of that employee.
Data: Data is a collection of raw facts that can be processed for any computing device. An employee name, a product name, a student’s name, and a grade are a few examples.
Factual Information
Observation
Facts & Statistics
Values & Figures
A query is a form of a question or a command that you apply to a table to get some information from the table. This table is used to retrieve, manipulate, or analyse data stored in a database. They are also used to carry out tasks like inserting, removing, and updating data from a database based on your request criteria.
For example, if you want to order an Americano at a coffee shop, you request for the same by saying, ‘Can I have an Americano?’. The shop will understand your request and give you the ordered item. A query works in the same way: it analyses the meaning of code, allowing the system to understand and execute actions accordingly. Whether it is SQL or any other query language, both the user and the database can exchange information if they use the same language.
Forms are used for specific purposes like entering, modifying, and viewing records. For example, you may have filled forms on many occasions, like when visiting a doctor’s clinic, when applying for a job, before participating in a quiz, or when registering for a school. The reason forms are used often is that these are an easy way to guide people toward entering data correctly. When you enter information in a form, data is stored in one or more related tables, the way the database designer wants it to be.
Base saves files with the extension ‘.odb’.
Fig. 10.1: Elements of a table Database + DBMS Data Fig. 10.2: Data in DBMSA database report is a structured presentation of data from a database that provides useful information for decision-making, analysis, and presentation purposes. For example, some of the reports that can be generated from the Employees table are: Employee Performance Report, Sales Report, Financial Report, Employees Salary Report, and Department Employees Report.
To create a database using the LibreOffice Base application:
1. Click Start > All apps > LibreOffice. You will get a backstage view of the software.


2. Select the Base Database application. The Database Wizard window opens.
3. To create a new database, select the Create a new database option and then click Next
To open an existing database, select the Open an existing database file option.
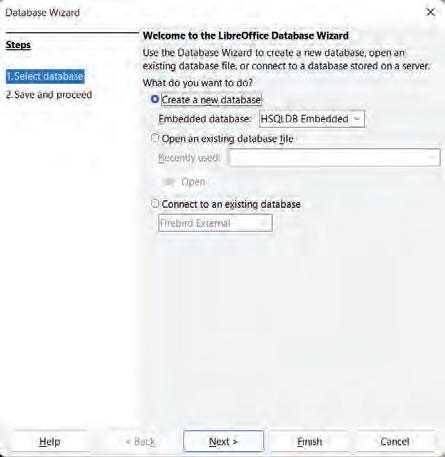
The next screen of the wizard appears. Register the database and then select the default option for opening the database for editing. After selecting these options, click Finish
1. The Save As dialog box appears. Specify a name for the database in the File name field, for example, Employee, and then click Save. This opens the Employee.odb — LibreOffice Base window.
The Employee.odb — LibreOffice Base window appears each time the Employee database is opened and can also be modified. LibreOffice Base is always displayed as a part of the window’s title.
If a database is not registered, it will not be accessible to other LibreOffice components such as Writer and Calc.
You know that a table in a database is a structured way of organising and storing data. Tables are fundamental components of relational databases, where data is stored in a tabular format, making it easy to manage, query, and retrieve information. There are two ways to create a table:
1. Use Wizard to Create Table
2. Creating Table in Design View
To create a table using a wizard:
1. Click Tables in the Database list.
2. Select Use Wizard to Create Table. The Table Wizard window appears.
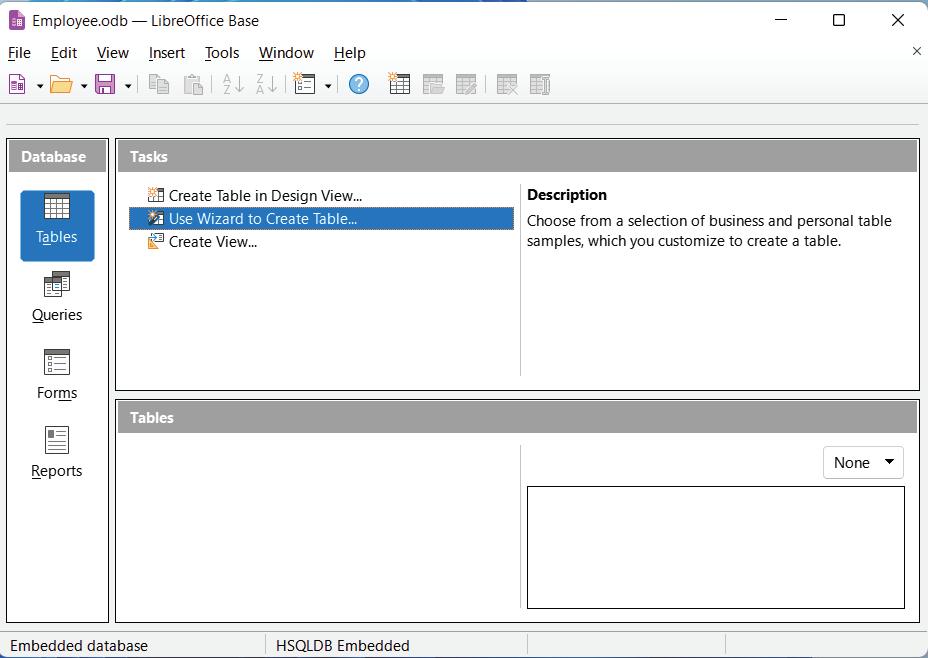
4. Choose Category. There are two categories: Business and Personal. Choose a category such as Business.
5. Each category has Sample tables from which you can choose any option. For example, choose the Customers table.
6. Each table has a list of Available fields. Select the required fields and then shift them in the Selected fields box by using the > or >> button. You can remove one or more fields from the Selected fields box by using the > or >> button.
7. Apart from adding and removing, you can also organise the fields in the Selected fields box by using the v or v button.
8. To move to the next step, click Next.
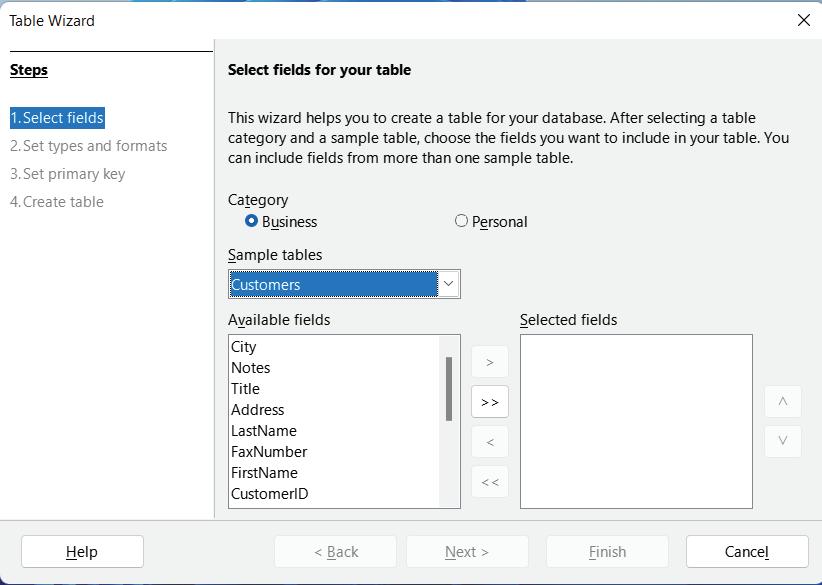
9. You set data types (field types) and properties of fields, as per your requirements. By default, all the selected fields will have default data/field types and properties, as shown in the figure below. Click Next

10. You need to set the primary key. A primary key uniquely identifies the data field in the table. A primary key is a standard feature of every database management system. This key checks that every record in the table is unique. The field that is designated as the primary key of the table can neither have duplicate data nor can it be left blank while entering data. Every record in the table is unique.
11. Base automatically adds the column to be set as primary key that helps you to enter unique values and helps create a relationship with the other table to extract data from multiple tables.
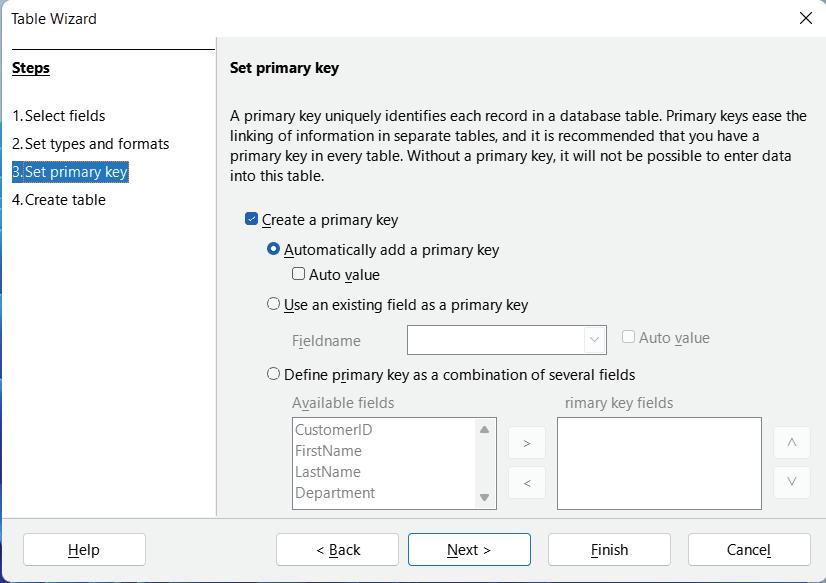
12. After setting the primary key, click Next
13. In the last step, Create table, you can assign a name to the table or use a default name, as assigned by the wizard. Select the Insert data immediately option to save the table design.
 Fig. 10.9: Setting primary key
14. Now, click Finish. The Customers table is displayed with the selected fields. Type the data in the table in the same way as you do in a spreadsheet.

Fig. 10.11: Entering data
The Customers table is created and visible in the Tables section.
To create a table in Design View:
1. Select Tables in the Database list.
The default view is the table data view, where you can edit tables and browse the records.
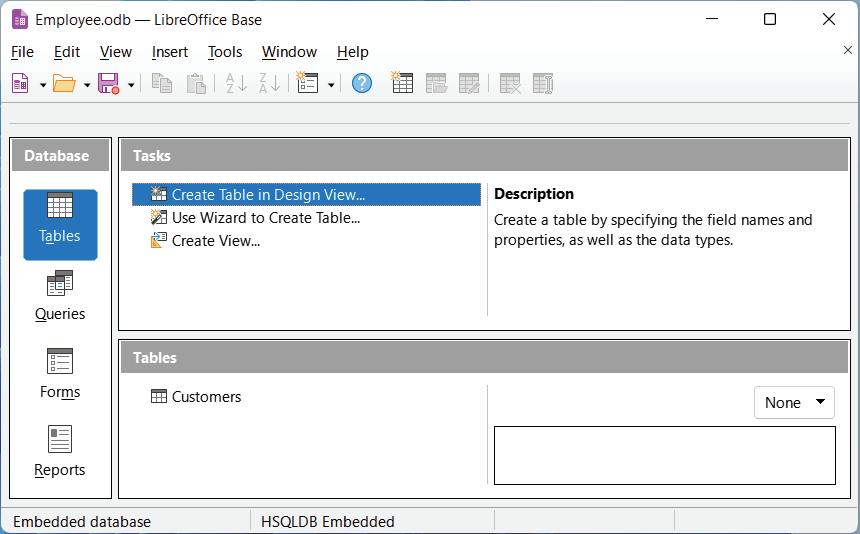
10.12: Selecting Tables from Database list
2. Select Create Table in Design View. The Table Design window appears.
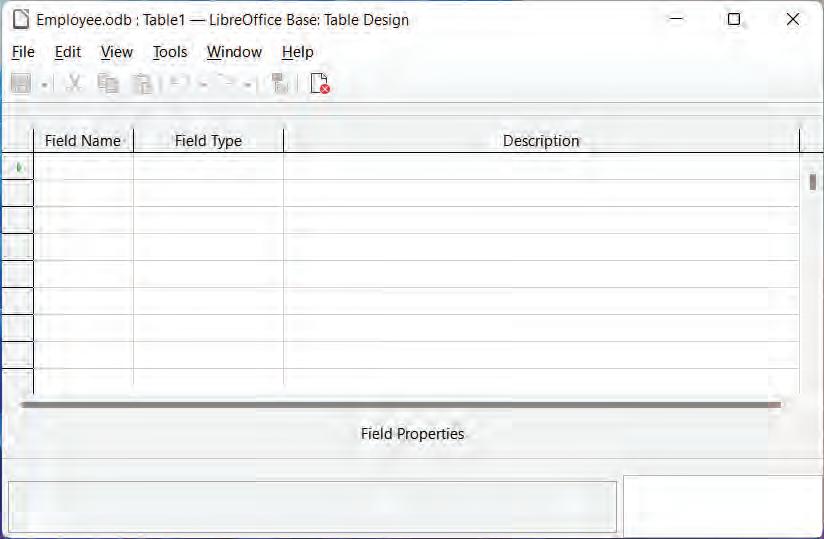
10.13: Creating a table in Design View
3. Enter Fields in the Design View: For each field in the table, type a name in the Field Name column and then press the Tab key to move to the Field Type column. By default, the text data type appears in this column. Change it to the number data type if you want to store numbers in it. In the Description column, you can type a description for each field. The description text is displayed in the Field Properties Pane when you select a Description for a Field Name.

4. After you fill the data, select File > Save As to save the table on the database. Assign a name to the table and then click OK.
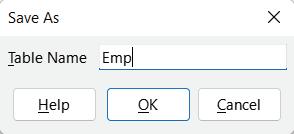
the missing primary key.
 Fig. 10.14: Typing fields in the Design View
Fig. 10.15: Saving a table
5. The LibreOffice Base dialog box appears, indicating
Fig. 10.14: Typing fields in the Design View
Fig. 10.15: Saving a table
5. The LibreOffice Base dialog box appears, indicating
6. Click Yes. The application automatically sets the first field as the primary key.
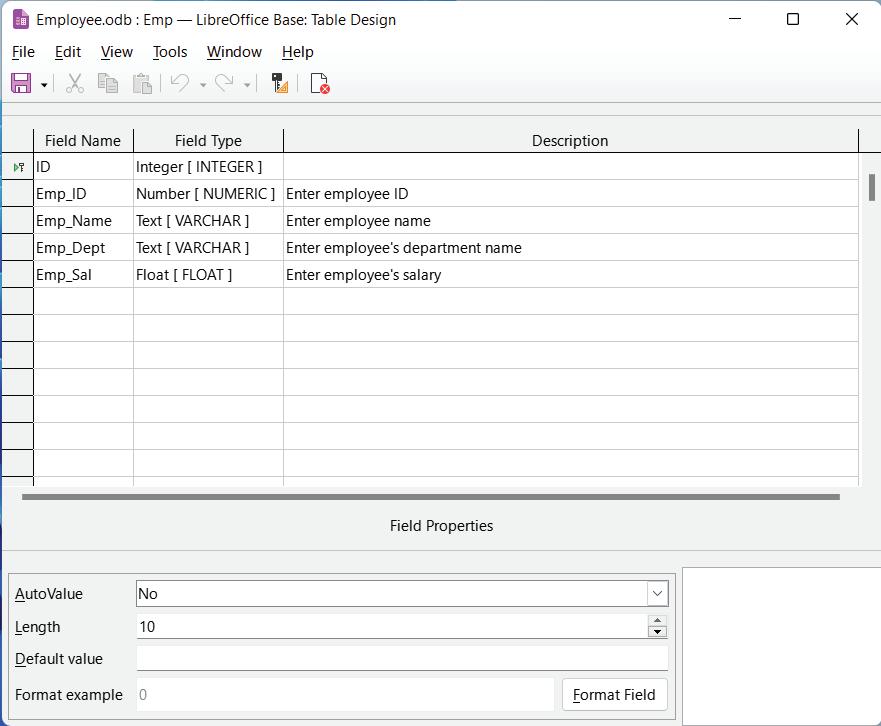
Fig. 10.17: Default primary key
The Emp table is created in the Tables section, as shown below.
Fig. 10.18: Viewing saved tables
In an RDBMS like LibreOffice Base, data types define the kind of data that can be stored in a table column in the database. The most important property of fields is their data type. The data type of a field determines what type of data (value) can be entered in it. For example, a field whose data type is Number can store only numeric data and will not allow you to enter text. There can be various types of fields depending on the data they contain. Data types in LibreOffice Base are broadly classified into five categories, as listed below:
5. Other Variable
Numeric Data Types: These data types help ensure that only numbers can be used in the table of a database. You can perform operations such as calculating sum and average with numeric data. These data types can be used for storing information, such as donation amounts, number of students in a school, phone numbers, flat and apartment numbers, salary of an employee, and pin codes of an area.
Various types of numeric data types available are listed here.
Name Data Type
BOOLEAN Yes/No
TINYINT Tiney Integer
SMALLINT Small Integer
INTEGER Integer
BIGINT Big Integer
NUMERIC Number
DECIMAL Decimal
REAL Real
Description
Values as 0 or 1. Example: True or False, Yes or No.
Store integer range between 0 to 255
Store integer range between –215 to +215–1
Store integer range between –231 to +231–1
Range Between –263 to +263–1
Maximum precision of e(+/–)231
Maximum precision of e(+/–)231
2–1074 to (2–2–52)* 21023
FLOAT Float 2–1074 to (2–2–52)* 21023
DOUBLE Double 2–1074 to (2–2–52)* 21023
Alphanumeric Types: These data types when assigned to a table allow the use of alphanumeric characters, letters, numbers, and symbols in it. You can perform various text-related operations and functions but no calculations. Using this data type, you can store information such as names of students in a class (only characters), names and ages of people eligible to vote in a residential society (letters and numbers), and the name and address of a person (letters, numbers, alphanumeric, and special characters).
Name
LONGVARCHAR Memo
CHAR Text (fix)
SMALLINT Text
INTEGER Text
Data Type
Description
Stores up to max length or number indicated by users. It accepts any UTF 8 Character.
Stores exactly the length specified by user. Pads with trailing spaces for shorter strings. Accepts any UTF 8 Character.
Stores up to specified length. No padding (Same as long var char)
Stores up to the specified length. Comparisons are not case sensitive but stores capital as you type them.
Binary Data Types: These data types are used for storing data values in binary formats. This data type allows storage of large amounts of data. So, binary data types can be used for various purposes such as storing images, photos, and audio files. The various types of binary data types available are listed here.
All fields have the Text [Varchar] data type by default. However, all these can be altered as needed.
Name
LONGVARBINARY
BINARY
VARBINARY
Data Type Description
Image
Binary (fix)
Binary
Store any array of bytes (image, sounds, etc.). No validation required.
Stores any array of bytes. No validation required.
Stores any array of bytes. No validation required.
Date and Time: The date and time data types help store values related to date, time, year, and other related fields. When storing such data, you need to be watchful, as some values can change to their default values and change the typed data. For example, if you enter 50 to indicate the year 1950, it will default to 2050. So, you need to enter the complete year 1950, to ensure the correct entry. The date and time data types in a database can be used to store data, such as birth dates, admission dates, sports time tracking data, and sale dates.
The various types of date and time data types available are listed here.
Name Description Format
DATE
Stores month, day and year information 1/1/999 to 1/1/9999
TIME Stores hours, minuted and second informationSeconds since 1/1/1970
Other Variable Types: Among other variable types, you can use spatial data type to store spatial data such as coordinates. You can store any serialised objects of Java-like connector or specific script through objects. It is mostly used for the coding purpose only.
Name Description
Other Stores serialised Java objects. User application must supply serialisation routines.
Object used for the coding purpose
Why is the primary key important for any table in the database?
Activity 1: Making a Database to Keep Track of Your Academic History (Individual Work)
• Create a database and assign it your name.
• Using the Table Wizard window, create the info exam table and then fill it with the following fields: “course_id”, “subject”, “required”, “passing”, and “percentage”.
• Assign proper data types to the fields.
• Make the course_id field as the primary key.
• Type data from your most current exam results in your database table.
Activity 2: Creating Table in Design View (Individual Work)
In a Railway database, create a table called ‘Reservations’ by using the Table Design view and add the following fields by choosing the relevant data types.
Customer ID, Payment Amount, Deposit Date, Reservation ID, Date, Time, and Total Payment
• Use the automatically generated number to set the Customer_id field as the primary key.
Activity 3: Creating a Database for Songs Collection (Individual Work)
Create a database for maintaining a song collection. Assign an appropriate name to the file. Create fields such as artist, movie, year released, and others.
A Select the correct option.
1 The data type is suitable for storing photos and music files in a database. a Alphanumeric b Date/Time c Binary d Numeric
2 Which data type will you use to store a date of admission? a Number [NUMERIC] b Date [DATE] c Text [VARCHAR] d Float [FLOAT]
3 The field type stores numbers with decimals: a Float [FLOAT] b Boolean [BOOLEAN] c Text [TEXT] d Date [DATE]
B Fill in the blanks with the most suitable words.
1 All fields in Base have the data type by default, but this can be altered as needed.
2 Binary data types are used for storing files of the format.
3 Date and time data types can be used to store information like .
4 Other variable types in Base are primarily used for storing objects.
C State whether the following is True or False. Correct the statements that are false.
1 The date and time data types in a database can be used to store admission dates.
2 There are three ways to create a table.
3 SMALLINT is used to store up to specified length.
4 If a database is not registered, it will not be accessible to other LibreOffice components.
D Answer the following questions. (Solved)
Q1. What is a database object that stores database data in rows and columns?
A1. A table is a database object that stores data organised in an arrangement of columns and rows. Each row is a record, and each column is a field within each record.
Q2. Explain the concept of a primary key in a table.
A2. A primary key uniquely identifies the data field in a table. A primary key is a standard feature of every database management system. The field that is designated as the primary key of the table can neither have duplicate data nor can it be left blank while making a data entry. Every record in the table is unique.
Q3. Sudheer is not clear on the terms table, query, and form. Explain all these terms to him for better understanding of the same.
A3. A table in LibreOffice Base is an organised set of rows and columns arranged to display data in a tabular form. An address book, a stock list, and a phone book are the types of information that you may store in a table.
A query is a form of a question or a command that you apply to a table to get some information from the table. Forms are used for specific purposes like entering, modifying, and viewing records. For example, you may have filled forms on many occasions.
A 1. c 2. b 3. a
B 1. Text [Varchar] 2. Any 3. Birth dates/Admission dates 4. Serialised Java
C 1. True.
2. False. There are two ways to create a table.
3. True.
4. True.
Tables are the crucial component in the database management system that are used to arrange and store data in a systematic way. Tables resemble spreadsheets as they have rows and columns. Each row of a Table represents a different record, and each column corresponds to an attribute or field of that record. This structure makes it possible to manipulate and retrieve data in an effective manner. Tables provide data sorting, filtering, and searching by offering a structured framework, improving overall data management and accessibility. The table capability in LibreOffice Base helps users to manage well-organised datasets, which improves the retrieval of information. In this chapter, we are going to learn about the different operation, which we can perform on the table.
To insert the data into a table, follow the below steps:
1. Launch your LibreOffice database.
2. Choose the table where you want to insert the data by double-clicking on it, see table, STUDENT RECORD in the given figure.
3. Now, you can enter the information for each column in the relevant cells.
4. Press the Enter key to move to the next row.

In 1960, Charles W. Bachman designed the Integrated Database System, the first database management system, followed by IMS which was developed by IBM in 1966.
Fig. 11.1: Inserting data into a tableTo edit or modify the existing data in a table, follow the given steps:
1. Open the datasheet and navigate to the table where you want to edit the records.
2. Click on the Edit menu and choose the Edit Data option.
3. The table will open in edit mode in Datasheet view.
4. Click on the cell you want to edit and make the required changes.
The process becomes easier when you use the navigation keys to move up, down, left, or right within a table.
5. Click on the Save option to save the changes or press the Enter key to confirm the changes.


To delete data from a cell, you need to follow these steps:
1. Navigate to the table where you want to delete the cell.
2. The table will open in Datasheet view.
3. Right-click on the cell you want to delete, and then select the Delete option.

To delete one or multiple records from the table, follow these steps:
1. Select one or multiple records from the table (use Shift key for adjacent rows or Ctrl key for non-adjacent rows).
2. Right-click on the record and select the Delete option, or click on the Edit menu and choose the Delete Record option. The record will be deleted.
 Fig. 11.2: Editing data in a cell
Fig. 11.3: Edited data of a cell
Fig. 11.4: Right-clicking on the cell to delete it
Fig. 11.5: Selecting Delete Record option from the Edit menu
Fig. 11.2: Editing data in a cell
Fig. 11.3: Edited data of a cell
Fig. 11.4: Right-clicking on the cell to delete it
Fig. 11.5: Selecting Delete Record option from the Edit menu
Sorting means to arrange the data in a specific order based on the given criteria. In database management system, sorting refers to the arrangement of rows in a sequence according to the values in one or more columns. This makes it easier to analyze the data. Sorting can be done in either ascending order or descending order. You can apply sorting operations by using a single field or multiple fields.
To sort the data from the table using a single field, you need to follow these steps:
1. Open the table and choose the field according to which you want to sort the data.
2. Click on either Sort Ascending or Sort Descending button on the Table Data toolbar.
3. The data will be sorted.


To sort the data from the table using multiple fields, you need to follow these steps:
1. Open the table. Suppose you want to sort the table on the basis of two criteria, as shown below:
Criteria 1 Sort the data by name in ascending order
Criteria 2 Sort the data by marks in descending order
2. Click on Sort option from the toolbar and a Sort Order dialog box appears.
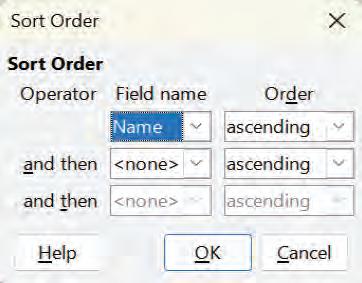
3. Select the Field name and the Order in which you want to sort the data.
4. Click on OK and your data will be sorted.

The attributes and behaviour of each field in a table are defined by its own unique set of properties. Data type, field length, default value, validation rules, and other attributes are among these features. In the Table Design View’s Field Properties window, the properties for each field are configured. You can choose a field’s attributes based on the type of data it contains. When creating your database table, you can access and change field properties.
To set the field properties, follow the given steps:
1. Select the table.
2. Right click on it.
3. Choose the Edit option. The Table Design window will open.
4. In Design View, different properties of fields depending on the data type set for each field will appear.
Field Property Description
Entry Required If set to yes, then it is mandatory to insert the data value in the particular field, and by default, if it is no, that means the field can be left blank.
Length Size of the field can be set to the maximum length, but by default it is 10.
Default Value It is the value which can be assigned to the field if the user does not provide any value.
Format Example It helps to format the data entered in a field.
Field Property Description
Auto Value If set to yes, then the field will get numeric values.
Length Size of the field can be set to the maximum length, but by default it is 10.
Decimal Places It gives clarity about the number of decimal places in a cell.
Default Value It is the value which can be assigned to the field if the user does not provide any value.
Format Example It helps to format the data entered in a field.
Fig. 11.8: Data sorted on multiple fields
Fig. 11.9: Table Design window
Referential integrity ensures the accuracy and consistency between the tables. It makes sure that the data is accurate and consistent when links are made between tables (Parent table and Child table) are established using keys (often primary and foreign keys). This means that if a foreign key in one table references a primary key in another table, the foreign key’s value must coincide with a value in the referenced table’s primary key. Referential integrity helps keep your database relationships reliable by preventing inconsistencies. The database will prevent you from trying to maintain the accuracy of the relationships if you attempt to insert or update data that violates this integrity.
A primary key is a unique identifier for a record in a table. It makes sure that each record is unique and enables access for updating and deletion of specified rows.
A foreign key is a field in a table which refers s to the primary key of another table. It helps in establishing relationships between two tables. It allows you to maintain the integrity, accuracy,and consistency within the database.
Example: Let’s say you have two tables “employee” and “employee details”. Here, employee is the parent table, and employee details table is the child table. In the employee table, we have EMP_ID as the primary key and in employee details table, we have EMP_ID as foreign key. This foreign key links each employee detail table to the employee table.
Following are the advantages of referential integrity:
1. Data accuracy and consistency: Referential integrity ensures that the relationships between the tables are accurate and consistent.
2. Data integrity: Referential integrity safeguards the integrity of the data, preventing it from corruption.
3. Data quality: With referential integrity, the data stored is more reliable, accurate, and trustworthy which leads to better decision making.
4. Prevention of inconsistent changes: Without referential integrity, it’s possible to update or delete records in one table without corresponding changes in related tables. This can lead to inconsistencies and errors in your data.
A relationship is a connection between two tables that links one field to another field. Data can be kept in several tables in a database. You must establish a relationship between the tables in order to combine that data. After the link has been established, data from many tables can be extracted by using a query, form, or report.
A field with the same name in both the tables must match in order for a relationship to exist. The primary key in one table and the foreign key in the other table are often these matching fields.
There are three types of relationships that exists within tables, which are explained below: One to One
Each record in the first table has a unique association with a single record in the second table, and vice versa. Because it frequently suggests that the data may be merged into a single table, this form of relationship is rarely employed in databases. For example, the “Person” table connected to the “Voter ID Card” table, where each individual has only one passport.
Let us understand it more briefly.
Consider the two tables named “Person” and “Personal Details”.
Primary Key
YCV0164689
YCV0164691
Foreign Key
VOTER
YCV0164689 RAHUL MR. PANKAJ
YCV0164690 SAKSHI MR. PRAMOD
YCV0164691 DHRUV MR. SATISH
Here, the voter ID number is the primary key in the person table and the foreign key in the personal details table. This helps in dividing the large tables into smaller tables which helps in easy access to data.
One to Many
The most typical kind of relationship that exists is ‘ONE TO MANY’. Each record in the first table can be associated with several records in the second table when there is a one-to-many relationship, but each record in the second table can only be related to one record in the first table. For instance, Consider the two tables named “Student” and “Courses”. A “Student” table and a “Courses” table may have a one-to-many relationship. A single student can be associated with many courses. STUDENT
Foreign Key
Primary Key
Here, the STU_ID is the primary key in the student table and foreign key in Courses table. This helps in allowing multiple instances of the same field.
When many records in one table can be associated with multiple entries in the other table, a many-to-many relationship is established. An intermediary (junction) table is employed to do this. For example, consider three tables ,”Student” table, “ Registration” table, and “Courses” table. Think of a “Registration” table, which contains data on students who are registered in courses. This can be used to create a many-to-many relationship.
STUDENT
STU_ID NAME
101 MAYANK
102 TISHA
103 JIYA
C_ID COURSE NAME
001 DIGITAL MARKETING
002 PERSONALITY DEVELOPMENT
003 ENGLISH SPEAKING
004 APTITUDE
REGISTRATION
STU_ID C_ID
001
002
003
004
Join Table
The student table contains the records of students with the primary key field STU_ID. The courses table contains the records of courses with the primary key field C_ID. The registration table is the join table that contains STU_ID and C_ID as foreign keys.
The benefits of building relationships are as follows:
1. Time saving: By eliminating the need to enter the same information many times in separate tables, relationships save time.
2. Reduced data entry errors: Data entry errors can also be avoided by establishing relationships between various tables.
3. Data summarization from related tables: Relationships are useful in data summarization from related tables.
You can create a relationship between two tables by following the given steps:
1. From the Tools menu, choose Relationships.
2. Suppose you want to add the Student table and Marks table to the Relationship pane, select Add and press the button.
3. Then select the Close button. You can then drag the Student table’s primary key over to the Marks table’s corresponding field. A relationship between the two tables has been established using the Stu_Id field.
4. To save the relationship, click the Save option in the toolbar.
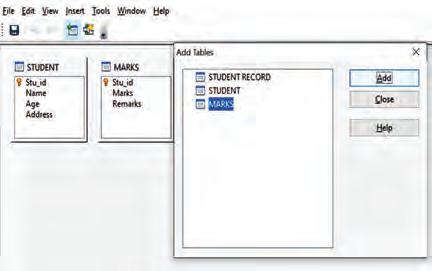
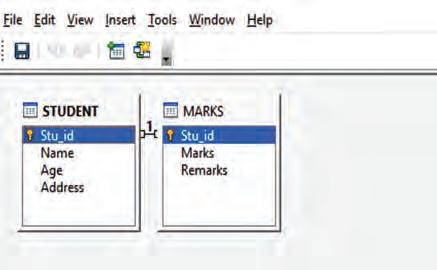
Fig. 11.10: Creating a relationship between two tables
To delete a relationship which you do not need anymore, you need to right click on the relationship line and then choose delete.
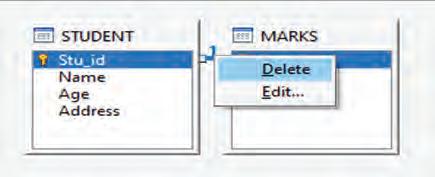
11.11: Deleting a relationship of two tables
Activity 1: Defining Primary Key (Individual Work)
Create a table structure and define appropriate field to include the primary key. Also, establish a relationship with another table.
Activity 2: Inserting, Sorting, and Deleting Records (Individual Work)
Create a table structure and define the appropriate field to define primary key. Insert the data, and explore the sorting feature, and also try to delete records.
A Select the correct option.
1 Referential integrity ensures:
a Data is stored in multiple tables.
c Data is encrypted for security.
b The accuracy and consistency between tables.
d Data is summarised from related tables.
2 In a one-to-many relationship between tables, what is true?
a Each record in the first table is related to one record in the second table.
b Each record in the second table is related to one record in the first table.
c Each record in the first table can be related to multiple records in the second table.
d Each record in the second table can be related to multiple records in the first table.
3 Field properties in a database table include:
a Data type, field length, default value, and validation rules.
c Font style, size, and colour.
B Fill in the blanks with the most suitable words.
b Sorting, filtering, and searching options.
d Encryption and security settings.
1 Referential integrity ensures that the data is accurate and consistent when linkages between are established using keys.
2 In a one-to-many relationship, each record in the table can be related to multiple records in the table.
3 Field properties define attributes, such as data type, field length, and value.
4 The purpose of a primary key is to uniquely identify each in a table.
C State whether the following is True or False. Correct the statements that are false.
1 A primary key ensures that each record in a table is unique.
2 Sorting data in a table can only be done in ascending order.
3 Referential integrity helps maintain accurate and consistent data between tables.
4 In a many-to-many relationship, an intermediary (junction) table is used to establish the connection between tables.
D Answer the following questions. (Solved)
Q1. What is the significance of a foreign key in a database table?
A1. A foreign key establishes a relationship between two tables by referencing the primary key of another table. It helps to maintain data integrity and accuracy within the database.
For example, consider a database with two tables: “Customers” and “Orders.” The “Customers” table might have a primary key called “CustomerID.” The “Orders” table, on the other hand, could have a foreign key called “CustomerID,” which references the “CustomerID” primary key in the “Customers” table. This establishes a relationship between the two tables, allowing orders to be associated with specific customers.
Q2. How does referential integrity contribute to data consistency?
A2. Referential integrity is a database concept that maintains the accuracy and consistency of data relationships between tables. It ensures that the relationship established through foreign keys remains valid and that no actions compromise the integrity of the data.
Referential integrity contributes to data consistency by enforcing certain rules. For instance, it prevents you from deleting a record in a parent table if there are related records in a child table that rely on the data in the parent table. This prevents orphaned records in the child table, which could lead to confusion and inaccurate data. Similarly, it prevents you from inserting data in a child table that references a non-existent record in the parent table.
Q3. Explain the concept of a one-to-one relationship in databases.
A3. A one-to-one relationship is a type of relationship between two tables in a database. In this relationship, each record in the first table is uniquely associated with only one record in the second table, and vice versa. This means that for every record in Table A, there is a single corresponding record in Table B, and vice versa.
One-to-one relationships are typically established when there’s a need to split data into separate tables for organisational or performance reasons while still maintaining a direct relationship between the tables.
A 1. b 2. c 3. a
B 1. tables 2. first, second 3. default 4. record
C 1. True.
2. False. Sorting data in a table can be done in both ascending and descending order.
3. True.
4. True.
The database of an organisation contains a huge amount of data in the form of multiple tables. When the number of tables increases in the database it becomes difficult to arrange the data and fetch specific records/data when needed. To provide a solution to this problem LibreOffice Base is introduced, in which with the help of queries we can extract data when needed.
A query is a simple question directed towards others to get precise information. For instance, you pose various types of questions to gather specific details, such as:
1. Identifying the students in your class with a score of 75% or higher.
2. Determining who received the title of “best student award.”
3. Finding out which team emerged victorious in the match.
In the context of Relational Database Management Systems (RDBMS), a query is a database element designed to retrieve records from one or more tables within the database or across different databases, based on specific conditions or criteria. It enables you to combine and refine data from various tables, where filtering involves using provided criteria to hide certain data and present only the necessary information. Queries can serve various purposes, including viewing, modifying, summarising, and analysing specific records from the tables in diverse ways. The data obtained through a query is stored in a distinct table referred to as the Query Table.
There are different ways to create a query in LibreOffice Base:
1. Using Query Wizard
2. Using Design View
3. Using SQL View
The Query Wizard is a beginner-friendly tool that assists you in creating a query using the chosen table, making it the simplest approach.
1. Open an existing database from which you want to retrieve data.
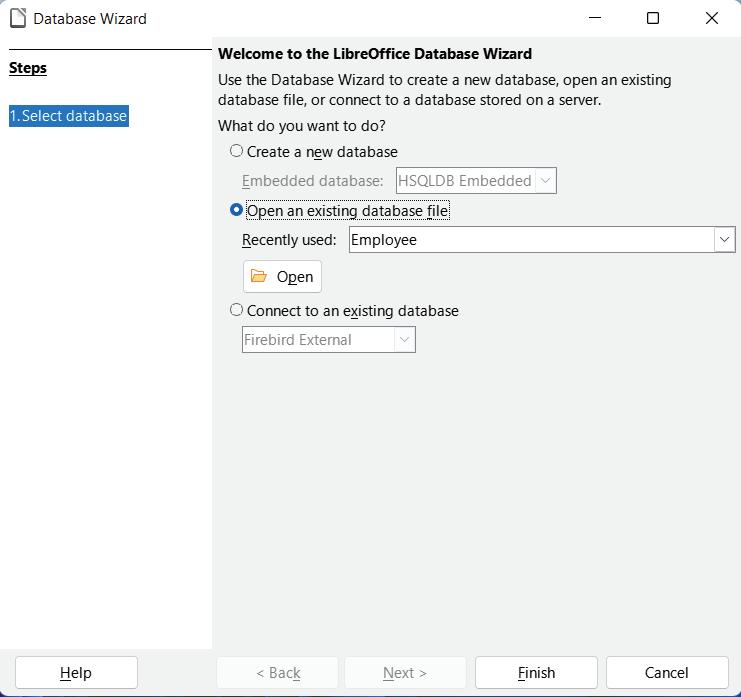
2. In the Database pane, select Queries as shown in figure 12.2.
3. Within the Tasks pane, click on Use Wizard to Create Query
4. This action will open the Query Wizard dialog box as in figure 12.3.
 Fig. 12.1: Opening an existing database file
5. In the Tables list box within the dialog box, choose the table from which you intend to retrieve records. For instance, you can select the STUDENT INFO table, which contains essential student information like Stu_ID, Name, Class, City, and Mobile Number as shown in figure 12.3.
6. To specify the fields you want in the query result, like Stu_ID, Name, and Mobile Number from the STUDENT INFO table, follow these steps:
• From the Available fields list, pick the desired field and click > button. This action moves the selected field to the Fields in the Query box.
7. Once you have selected the necessary fields, click the Next button to proceed.
RememberYou can remove one or more fields from the Selected fields box by using the or button.
8. Now, you will set the sorting order for the selected field as in Fig. 12.5. For example, you can choose the Stu_ID field and then opt for Descending to arrange the query results in descending order based on this field. Keep in mind that the default order is Ascending.
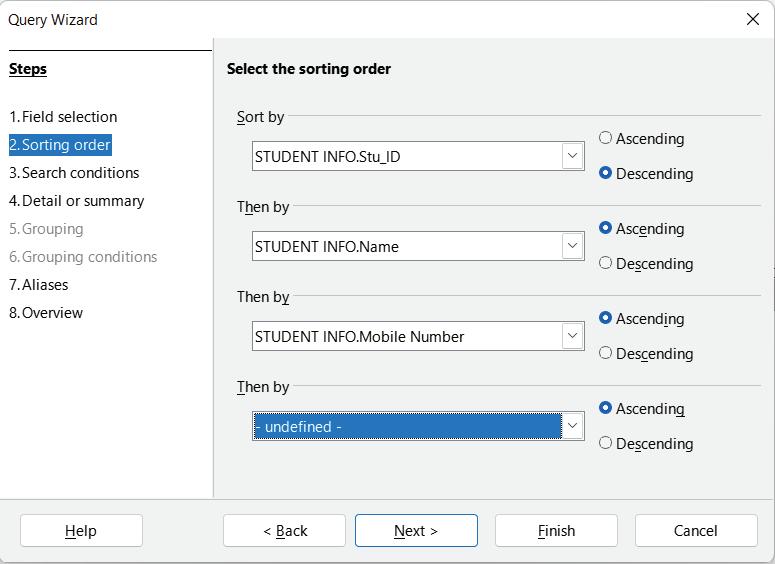
9. Afterward, click on the Next button to move on to the next screen, which asks you to select the search conditions. Since you’re creating a simple query to retrieve information from the Stu_ID, Name, and Mobile Number fields without any specific criteria, there’s no need to specify a condition. Just click Next to proceed.
10. Now you’ll choose the type of query like Detailed query or Summary query, and the Detailed query option is already selected by default. Stick with this option and click Next.
11. You can also assign alternative names to the fields if necessary, or keep the original field names as they are and click Next.
12. The Overview screen appears in the wizard as shown in Fig. 12.6. You can also enter a new name in the Name of the query box, if required.
 Fig. 12.5: Selecting sorting order
13. Click on the Finish button, and you’ll receive the query results. The Stu_ID field will be listed in descending order along with the Name and Mobile Number fields as shown in Fig. 12.7.
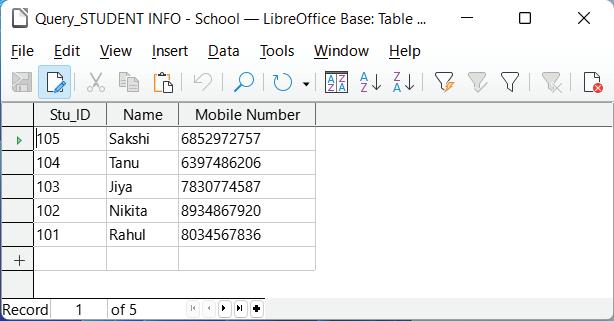
The Query Design View provides more control over queries and allows you to create them from scratch. It consists of two sections: Objects Relationship Pane and the Design Grid.

1. Objects Relationship Pane (Top Pane):
Objects Relationship Pane
• This section displays the tables selected for the query
• If multiple tables are involved, joined lines indicate the relationships between key fields with the same name.
• It helps you understand how data in one table relates to data in another.
2. Design Grid (Bottom Pane):
• Here, you can build your query by adding fields from selected tables.
• You can add fields by dragging them or double-clicking on them.
1. Field: Displays selected fields from the table.
2. Alias: Allows you to specify an alternate name for any field.
3. Table: Shows the name of the selected table.
4. Sort: Used to filter data in ascending or descending order (optional).
5. Visible: Determines whether a field’s information is displayed when the query runs.
6. Function: Enables applying functions to fields.
7. Criterion: Contains conditions to filter query records.
8. Or: Used to set multiple criteria, returning results if any condition is true.
Let us now create a query:
Suppose you have two tables: STUDENT INFO and STUDENT MARKS, and you want to retrieve records with Stu_ID, Name, and Total, listed in descending order of Stu_ID.
To apply this query in the Query Design View, follow these steps:
1. Open the existing database and select the Queries option from the Database pane.
2. Choose Create Query in Design View in the Tasks section.
3. The Query Design window will appear with the Add Table or Query dialog box as shown in Fig. 12.9.
4. Add the STUDENT INFO table by clicking the Add button.
5. Add the STUDENT MARKS table by clicking the Add button as well.
6. Close the Add Table or Query dialog box.
7. You’ll now see both tables in the Objects Relationship Pane of the Query Design window as shown in Fig. 12.10.

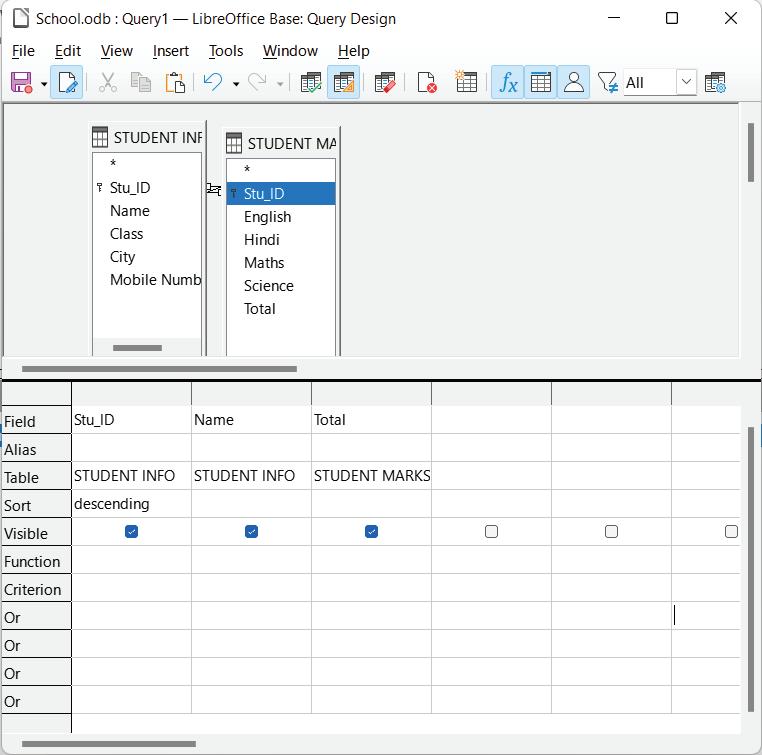 Fig. 12.9: Add Table or Query dialog box
Now, let us establish a relationship between both the tables:
1. Drag the primary key field, Stu_ID, from the STUDENT INFO table to the corresponding field in the STUDENT MARKS table.
2. A line will indicate the relationship between the tables.
3. In the Field row, select the desired fields using the Field drop-down list.
4. In the Table row, choose the table name to which the selected field belongs.
5. In the Sort row, specify the ascending or descending order. For example, select descending order for Stu_ID.
6. In the Visible row, check the fields you want to display in the query result.
To run the query
1. Click the Run Query button or press F5.
2. The records will be displayed according to your specified criteria.
To save the query
1. Click the Save button.
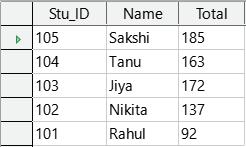
2. Enter a suitable name for your query in the Query name text box in the Save As dialog box or use the default name, Query1.
3. Click OK to save the query, and it will be added to the Database Objects List pane.
If you need to modify an existing query, here are the steps to follow:
1. First, select the query you want to edit from the Database Objects List pane. For instance, pick “Query1,” which contains student records with fields like Stu_ID, Name, and Total.
2. Next, right-click on the chosen query and select the Edit option. This will open the selected query in the Query Design view.
3. Now, make the necessary changes to the query as needed. For example, you can uncheck the “Name” field to hide it.
4. To execute the modified query, click on the Run Query button.
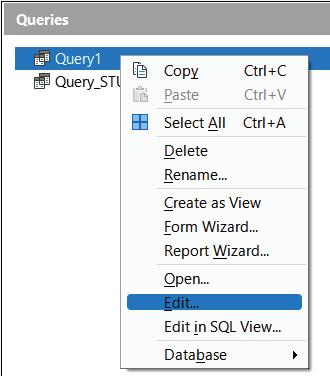
To extract the required information from the database through query, you can apply criteria on the field. Criteria are specified using the criterion row available in the Design Grid of the Query Design View.
Let’s assume you want to fetch the data of students who have scored more than 150 with the fields Stu_ID, Name, and Total from STUDENT INFORMATION and STUDENT MARKS table.
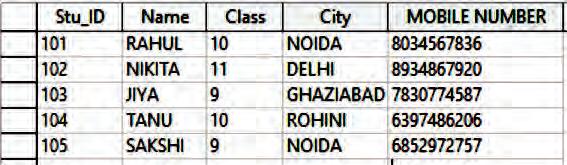
To use a criterion, follow these steps:
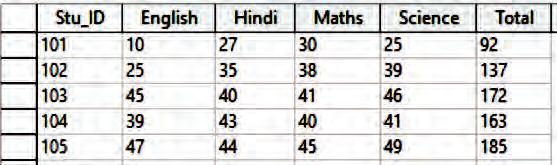
1. In the Database pane, select a recently generated query that contains student records including Stu_ID, Name, and Total.
2. Right-click on the chosen query and select Edit. This action will open the query in the Query Design View.
3. In the Query Design view, navigate to the Criterion row and input '> 100' under the Total column. This will filter the student records where the total marks are more than 100.
4. Run the query by clicking the Run Query button or press the F5 key. The result will display the records meeting the specified criteria as shown in Fig. 12.12.
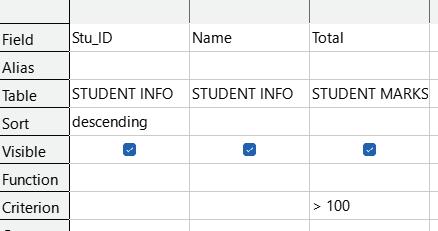
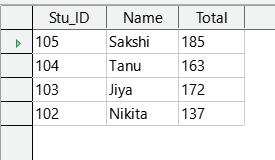
Fig. 12.12: Output of query based on some criterion
You can apply criteria to multiple fields, such as STUDENT INFORMATION and STUDENT FEES tables, to fetch records of students from Noida with a paid fee status.
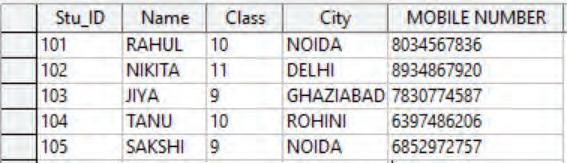

If you want to apply criteria on multiple fields, such as City and Status. In order to do that you can follow these steps:
1. To begin, go to the Database pane and select a query that includes student records with fields like Stu_ID, Name, City, Fees, and Status.
2. Next, right-click on the chosen query and select the Edit option. This will open the selected query in the Query Design View.
3. Within the Query Design View, navigate to the Criterion row. Under the City field, input ‘NOIDA,’ and under the Status field, input ‘Paid’ as shown in Fig. 12.13.
4. Finally, execute the query by clicking the Run Query button. This action will fetch records that meet the specified criteria, such as students from Noida with a ‘Paid’ status.
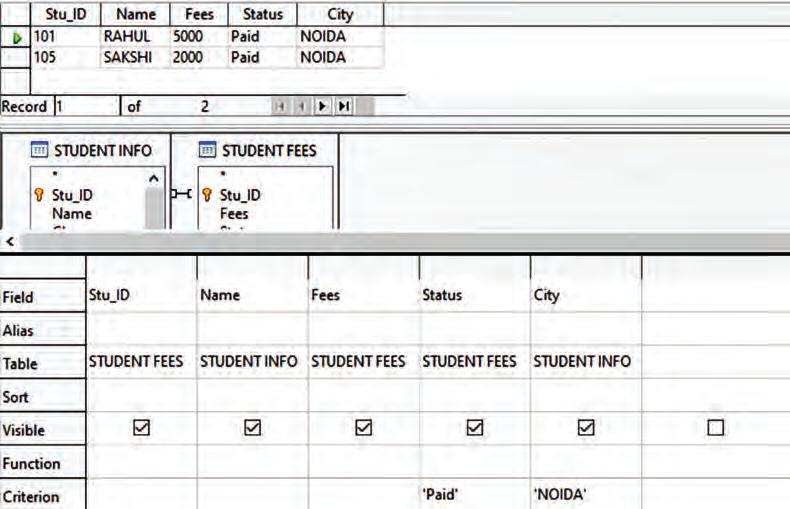
Fig. 12.13: Criteria for multiple fields
Wildcards are unique symbols employed as substitutes for one or more characters within a text string. They prove useful when searching for multiple items based on a particular pattern, even if the data isn’t exactly identical. By using wildcards, you can precisely define the outcomes of your search. Now, let’s learn about various types of wildcards.
Character
% *
Description
These can be used anywhere in the character string which represents zero or more characters.
These can be used anywhere in character string. It matches any single alphabetic character.
These can be used anywhere in character string. It matches any single character in the brackets.
These can be used anywhere in character string. It matches any character not in the brackets.
It matches any one the range of characters.
Example
sh* or sh% finds value finish, english and so on.
N_ida or N?ida finds Noida
B[ae]ll finds bell and ball, but not bill.
B[^ae]ll finds bill and bull, but not ball or bell.
B[a-c] finds bad, bbd and bcd
The LIKE operator is employed to search for specific patterns within a field, and it utilises wildcard characters to do so. These wildcards include the asterisk (*), percentage (%), and underscore (_). Here are examples demonstrating the utilisation of the ‘%’ and ‘_’ wildcards with the LIKE operator.
LIKE ‘b%’
LIKE ‘%e’
LIKE ‘%or%’
LIKE ‘_n%’
LIKE ‘a_%_%’
LIKE ‘d%i’
It will return values starting with “b”.
It will return values ending with “e”.
It will return values that have “or” in any position.
It will return values that have “n” in the second position.
It will return any values starting with “a” and at least three characters in length.
It will return values starting with “d” and ending with “i”.
1. Create a query to select the following fields from the STUDENT INFORMATION table: Stu_ID, Name, and City.
2. In the Criterion row for the City field, use ‘Like ‘R%’ or ‘Like ‘R*”.
3. Execute the query by clicking the Run Query button to retrieve records that match the specified criteria.
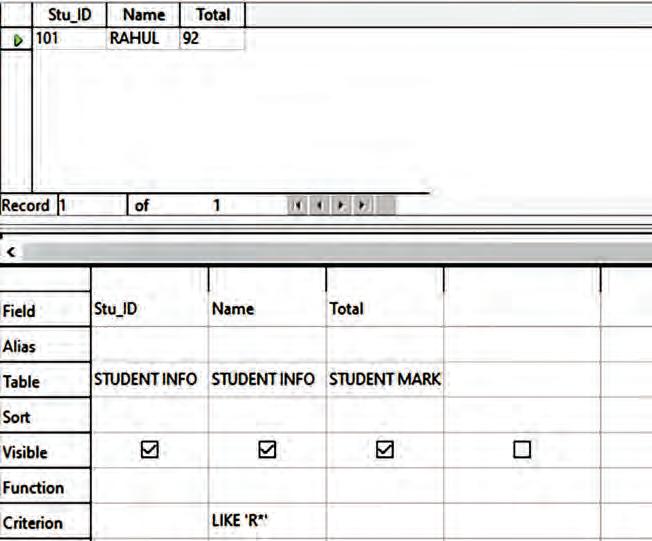
In LibreOffice Base, you can utilise fundamental mathematical symbols, including Addition (+), Subtraction (-), Multiplication (*), and Division (/), to execute computations on numerical and date-based information. This allows you to conduct calculations using these operators on your data.
 Fig. 12.14: Query using wildcards
To achieve this, follow these steps:
1. Open the Query Design window and choose the fields: P_ID, Name, and Purchase_Price.
2. To compute the total cost, use the formula: Purchase_Price multiplied by Quantity. Thus, the expression becomes: “Product”.”Quantity” * “Product”.”Purchase_Price.”
3. In this expression, “Product” refers to the table, while “Quantity” and “Purchase_Price” are fields within the table. The symbol “*” signifies the multiplication operation.
4. Enter this expression after the last field.
5. Execute the query by clicking the Run Query button. This will result in records that meet the specified criteria, and a new column will contain the product information.
6. Similarly, to calculate profit, you can use the formula: “Product Selling Price” - “Product Purchase Price.” Enter this expression in the last field, and execute the query. The result will be displayed.
Like Calc, LibreOffice Base offers a range of built-in functions for data calculations, which are found in the Function row of the Design Grid pane. These functions are also applicable in SQL queries. Options
No function No functions will be executed.
Average AVG Calculates average of a field.
Count COUNT
It counts the number of records in the table. Count (*): Count all records in a field. Count (field name): Count all records which contain value in a field.
Maximum MAX It returns the highest value from the field.
Minimum MIN It returns the lowest value from the field.
Sum SUM It calculates the sum of values from the field.
Group GROUP BY It groups query data according to the selected field name.
In order to retrieve information from the STUDENT MARKS table, you will have to perform the following operations:
1. Count the total number of students.
2. Find the highest score in English.
3. Determine the lowest score in Hindi.
When constructing your query, you’ll specify the following functions as shown in the figure below:
1. Count for the Stu_ID field.
2. Maximum for the English field.
3. Minimum for the Hindi field.
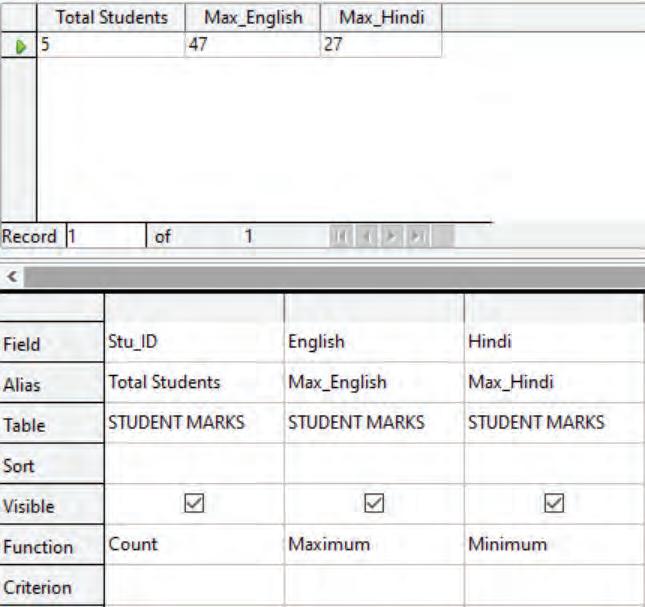
In LibreOffice Base, you can organise similar data into groups using the Group function. This function groups records with the same values and provides summary rows.
For example, if you want to count the number of students in each city from the STUDENT INFORMATION table, you can apply the Group function to the City field and use the Count function for the Name field. When you run the query, you’ll receive grouped data by city, showing the total number of students in each city as shown in Fig. 12.17.
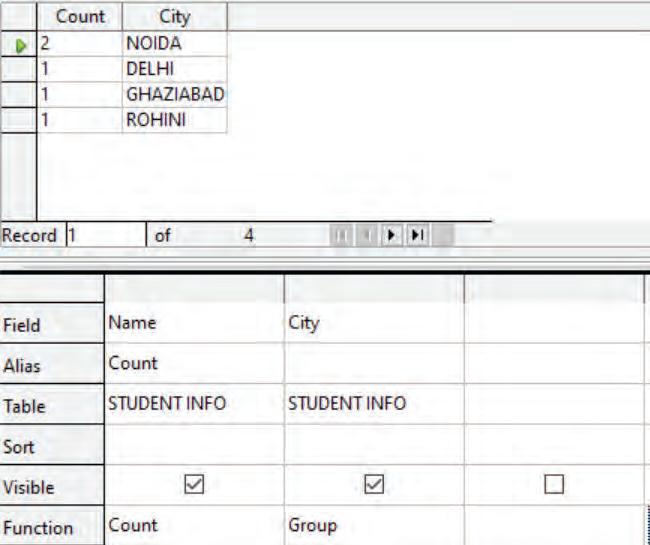 Fig. 12.16: Using functions in queries
SQL stands for Structured Query Language and it is used to communicate with a database. SQL statements are used to retrieve data from a database, update data on a database, insert data into a database and delete data from the database. Some common relational database management systems that use SQL are:
(a) Oracle (b) Sybase (c) Microsoft SQL server (d) MySQL, etc.
1. Easy to learn: It is a very easy and user-friendly language. SQL has a syntax that is similar to the English language.
2. Portability: SQL is a portable language. Applications can be moved from one machine to another.
3. Performance: It gives better performance even if the database size is very large.
4. Supports a wide variety of commands: It supports various useful commands like DDL, DML, DCL, etc.
5. Scalability and flexibility: SQL enables databases to handle growing volumes of data and adapt to changing business needs with ease.
6. Security: SQL provides robust security features, including user authentication, ensuring the confidentiality and integrity of sensitive data stored in databases.
1. Retrieving or fetching data.
2. Inserting, updating, and deleting data in a table.
3. Creating, altering, and dropping objects.
4. Maintaining database consistency and integrity.
Following are the different data types used that are used to specify the type of data the columns will hold.
1. CHAR: This is used to store character strings of fixed length. The maximum size of this data type is 255 characters, meaning it can hold up to 255 characters.
2. VARCHAR/VARCHAR2: This is used to store variable lengths of alphanumeric data. The maximum size of this data type is 2000 characters, meaning it can hold up to 2000 characters.
3. NUMBER or INTEGER: The number or integer data type is used to store numbers. Using this type of data type, we can store fixed or floating-point numbers.
4. DATE: Date data type is used to represent date and time. The standard format is DD-MM-YY.
There are two types of languages which are used in DBMS.
Data Definition Language (DDL): Data Definition Language (DDL) is used to define and modify the structure of a table. Some DDL commands are given below:
DDL Commands Usage
CREATE
ALTER
DROP
RENAME
Creates a new database or table
Modifies the structure of a database or table
Deletes an existing database or table
Renames an existing database or table
Data Manipulation Language (DML): DML commands are used to manipulate the existing database, such as insertion, deletion, modification etc. Some DML commands are given below:
DML Commands Usage
SELECT
INSERT
UPDATE
DELETE
Create Table Command
Retrieves data from the table
Inserts data into a table
Updates the existing data with the new data within a table
Deletes the records from the table
Create table command is used to create a table or database. It is a Data Definition Language (DDL) command.
Syntax:
CREATE TABLE TABLE_NAME
(column_name1 data type(size), column_name2 data type(size),…...);
In the above syntax:
1. table_name is the name of the table.
2. column_name1, coloumn_name2..... is the name of the columns/fields.
3. Data types are used to specify the type of data like char, varchar, number etc.
4. size is used to specify the length of the data type.
Always write SQL keywords in capital letters.
For Example: If we want to create the STUDENT table in base using SQL, follow these steps:
1. Open the database.
2. Select the Tools menu and choose SQL
3. The Execute SQL Statement window will open as shown in Fig. 12.18. below.
4. Type the CREATE TABLE command.
5. Click on the Execute button to run the command.
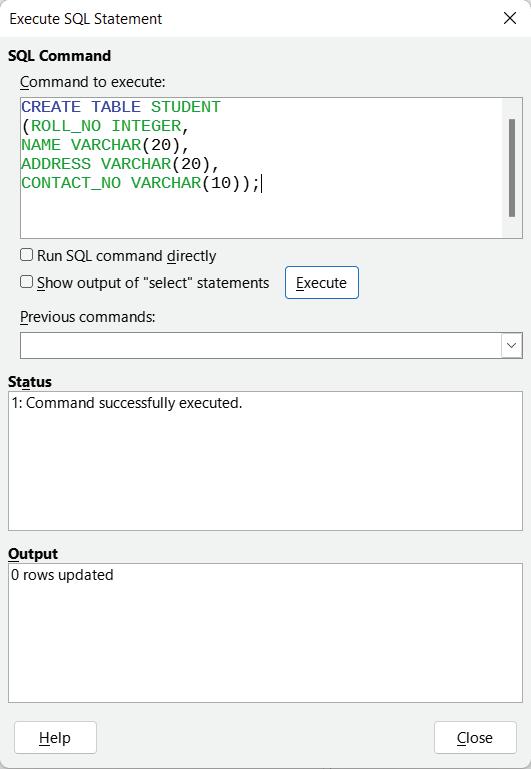
You will get the STUDENT table in the database as shown in Fig. 12.19.
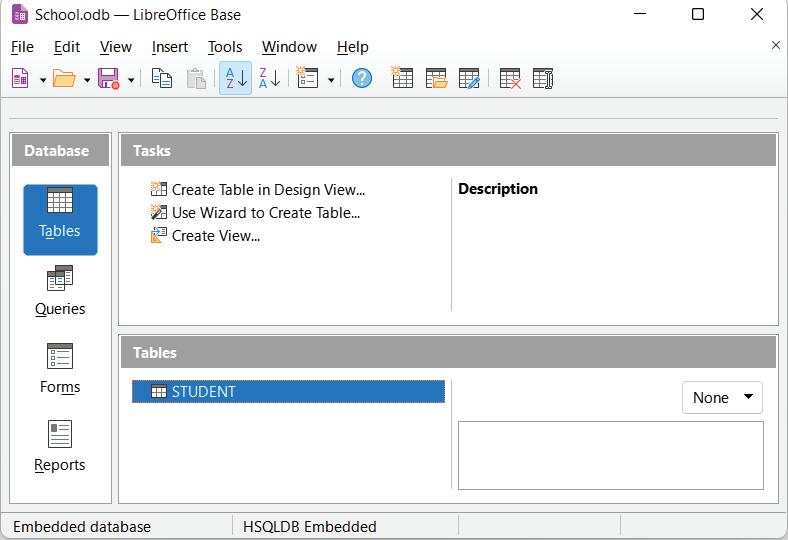
Table Command
It is a DML command and used to insert the record in a table. There are two methods to enter the values using insert command.
Method 1: You can specify both the column name and the values to be inserted.
Syntax:
INSERT INTO TABLE_NAME (column_name1, column_name2....)
VALUES (value1,value2....);
For Example: Insert data into the STUDENT TABLE.
INSERT INTO STUDENT (ROLL_NO,NAME,ADDRESS,CONTACT_NO) VALUES (‘222’,’DEEPTI’,’NOIDA’,’759846’);
Method 2: In this method, we can directly insert the values without writing column names.
Syntax:
INSERT INTO TABLE_NAME
VALUES (value1,value2....);
For Example: Insert data into the STUDENT TABLE.
INSERT INTO STUDENT VALUES (‘333’,’ANKIT’,’DELHI’,’458796’);

Select Command is used to retrieve the data from one or more tables. This is the most commonly used Data Manipulation Language (DML) command. We can use select commands with many other clauses, like WHERE clause, GROUP BY clause or as per requirements.
Retrieving all columns from the table.
Syntax: SELECT * FROM TABLE_NAME; Or
Retrieving specific columns from the table.
SELECT column name1, column name2 FROM TABLE_NAME;
Note: “ * “ is used to select all column names.
Fig. 12.20: Inserted records into the STUDENT table.Click on the Queries option which is available on the left side of the Database section as shown in Fig. 12.21.
Click Create Query in SQL View as shown in below figure:
Fig. 12.21: Executing queries
Example 1: Select all information of students from STUDENT TABLE.
SELECT * FROM STUDENT;
To execute the select command click Create Query in SQL View. Type the query and run it by pressing F5 or clicking on the Run Query button. The output appears as shown in the Fig. 12.22.
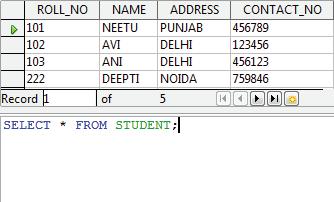
Fig. 12.22: Output of execute query
Example 2: Select the names and contact numbers of all students from the STUDENT TABLE.
SELECT NAME, CONTACT_NO FROM STUDENT;
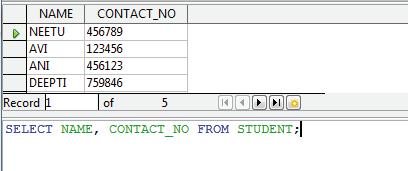
Where clause is used with select command to select the condition as per your requirement.
Syntax: SELECT * FROM TABLE_NAME WHERE CONDITION;
Example: Retrieve all information about those students who live in Noida, as shown in Fig. 12.23.
SELECT * FROM STUDENT
WHERE ADDRESS=’NOIDA’;
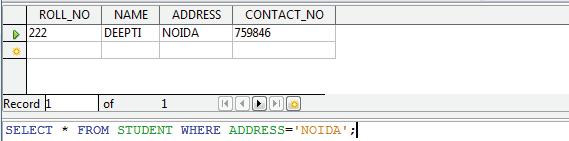
Example: Retrieve roll number and name of those students who live in Delhi, as shown in Fig. 12.24.
SELECT ROLL_NO, NAME FROM STUDENT
WHERE ADDRESS=’DELHI’;
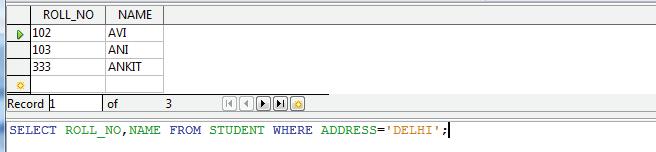
Order By Clause
Order By clause is used to display the result of a query in a sorted order either in ascending order or descending order.
Example: Select all information of students whose names are arranged in alphabetical order.
RememberBy default, the Order By clause displays data in ascending order, as shown in fig 12.25.
Fig. 12.23: WHERE clause Fig. 12.24: Information of students who live in Delhi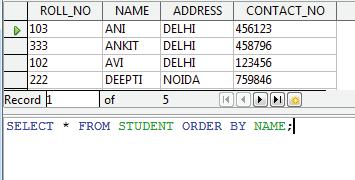
Update table command is used to modify the records of a table as shown in Figs. 12.26 and 12.27.
Syntax:
UPDATE TABLE_NAME SET COLUMN NAME=NEW _VALUE WHERE CONDITION;
Example: Suppose we want to update the address of the student whose name is AVI from STUDENT table.
UPDATE STUDENT SET ADDRESS=’BIHAR’ WHERE NAME=’AVI’;
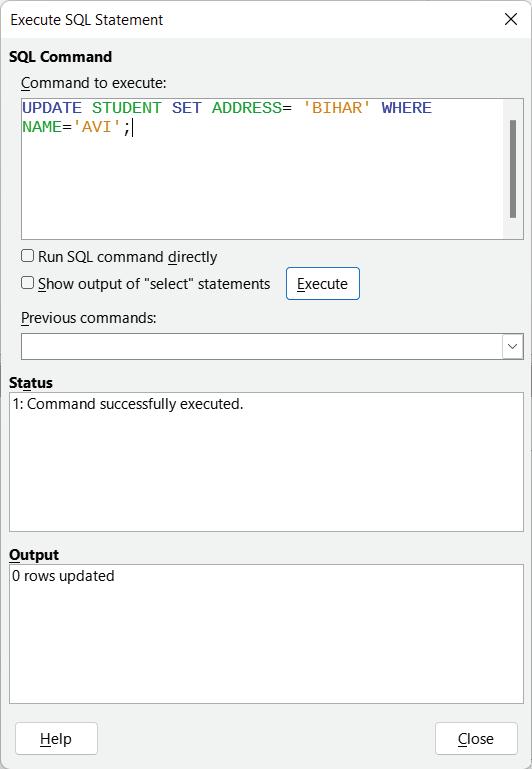
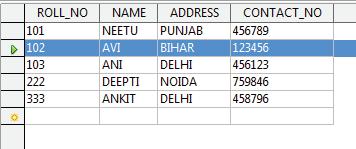
Delete Table Command
Delete command is used to delete the records of a table.
Syntax: To delete all records.
DELETE FROM TABLE_NAME; WHERE CONDITION;
Example: Delete whole records of the student whose roll number is 101 from the STUDENT table, as shown in Fig. 12.28. Figure 12.29 shows the details of the table after deletion.
DELETE FROM STUDENT WHERE ROLL_NO=’101’;

12.28: Status of delete query
Truncate Table Command

Fig. 12.29: Updated table after deletion
TRUNCATE command is used to remove the data from the database directly without copying it into rollback tablespace. It removes the records permanently.
Syntax:
TRUNCATE TABLE TABLE_NAME;
Example: Delete all records of the STUDENT table permanently.
TRUNCATE TABLE STUDENT; DROP TABLE Command
DROP command is used to remove an existing table from a database.
Syntax: DROP TABLE TABLE_NAME;
Example: drop table STUDENT.
DROP TABLE STUDENT;
Fig.Activity: Creating a Database Table (Individual Work)
Create a database of employees which should include Emp_ID, Emp_name, Emp_city, Emp_department, Emp_salary and perform the above queries which you have learned.
A Select the correct option.
1 What is the primary purpose of a query in a relational database system?
a To create new tables
b To organise data into groups
c To retrieve specific data from one or more tables
d To perform complex mathematical calculations
2 Which SQL clause is used to filter records in a SELECT statement?
a GROUP BY b ORDER BY
c WHERE d FROM
3 What is the purpose of the SQL LIKE operator with ‘%’ wildcard?
a It matches any single character.
b It matches zero or more characters.
c It matches only uppercase characters.
d It matches exactly one character.
B Fill in the blanks with the most suitable words.
1 SQL stands for Structured Query Language, and it is used to communicate with a
2 The SQL clause is used to filter records based on specified conditions.
3 The SQL operator is used with ‘%’ to match zero or more characters in a text string.
4 The SQL clause is used to group similar data and provide summary rows.
C State whether the following is True or False. Correct the statements that are false.
1 SQL is a portable language that can be used on different database systems.
2 The SQL DELETE command is used to permanently remove records from a table.
3 The SQL UPDATE command is used to insert new records into a table.
D Answer the following questions. (Solved)
Q1. Explain the purpose of the SQL UPDATE command. Give an example.
A1. The SQL UPDATE command is used to modify existing records in a table. For example, you can use it to change the address of a specific customer in a customer database.
Q2. What is the primary role of the SQL GROUP BY clause? Give an example.
A2. The SQL GROUP BY clause is used to group data in the result set based on the values in one or more columns. For example, you can use it to calculate the total sales for each product category in a sales database.
Q3. Manisha wants to know the use of Wildcards character. Describe two common wildcard characters used with the SQL LIKE operator and give examples of their usage.
A3. Two common wildcard characters used with the SQL LIKE operator are ‘%’ (matches zero or more characters) and ‘_’ (matches a single character). For example, ‘%apple’ would match any word ending with “apple,” and ‘c_rt’ would match words like “cart,” “cert,” and “court.”
3. False. The SQL UPDATE command is used to modify existing records in a table.
A 1. c 2. c 3. b B 1. Database 2. WHERE 3. LIKE 4. GROUP BY C 1. True. 2. True.
In the previous chapter, you learnt about tables and queries in DBMS. Let us learn how to create a form and generate a report in DBMS.
In real life, you have seen various types of forms such as examination forms, admission forms, and feedback forms, which may be in a hard copy or online format. All these forms have some labels, such as Name, Father’s Name, and Age, and then blank spaces associated with the labels to fill information. Similarly, DBMS also provides the concept of a form, which is a window with various fields or insertion spaces that asks users to enter data into them to store in a database. A form also allows you to view, update, and delete records from database tables. Each field is attached to a label that helps the users identify the value that is to be entered in a specific field.
A form wizard is a tool that assists you in creating a form by guiding you through various steps. Usually, it asks you questions about the layout you want to use, the data you want to collect, and the goal of the form. The form is then generated by the wizard using your responses.
This wizard provides users with direct access to database data. Enhancing the user experience, a user-friendly system grants access to the underlying database, without requiring direct manipulation of complex queries and commands.
Using a wizard, users can effortlessly generate forms without starting from scratch. The wizard supplies detailed instructions and predesigned templates to rapidly create practical documents.
Steps to create a form using a form wizard are as follows:
1. Open DBMS software. In our case, it is LibreOffice Base.
2. Open the database in which you want to create a form.
3. Click the Forms object in the Database pane.
Before creating a form in DBMS, you must have a table to use with the form.

13.1: Creating a form
4. The Form Wizard dialog box appears with Step 1: Field selection. Select the table from the Tables or queries drop-down list. In our case, we have selected the Authors table. All fields of the Authors table appear in the Available fields list box.
5. Select the field in the Available fields list box and then click the > button to add it to the Fields in the form list box.
Fig. 13.2: Select the fields for the form
6. You can click the >> button to forward all fields to the Fields in the form list box. You can also change the sequence of the fields by selecting the field in the Fields in the form list box and clicking the up and down arrow buttons beside it.
Fig.
13.3: Added all fields
The Step 2: Set up a subform of the Form Wizard appears. A sub-form is a form created in another form. You can skip this step if you don’t want to create a sub-form.
8. Click Next
13.4: To move to subform
Step 3 and 4 are skipped as you are not selecting to add a sub-form. The Step 5: Arrange controls appears.
9. You can organise the chosen fields in a format by selecting the desired layout for your form.

The Step 6: Set data entry appears.
11. Click Next.
13.6: To set data entry
The Step 7: Apply styles appears.
12. From the Apply styles list box, select the style to apply in the form.
13. Select the Field border style.
14. Click Next.
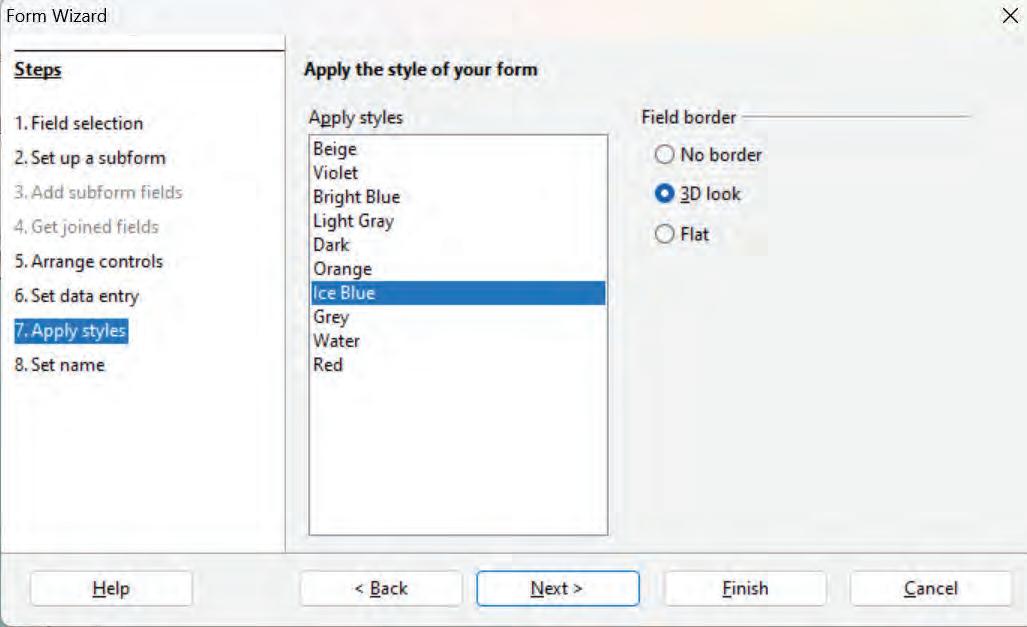
The Step 8: Set name appears.
15. A form name can be typed in this step.
16. Click the Finish button.

A form window appears. Observe how the table effortlessly displays records within the framework you crafted.

Which type of forms can be created using Form Wizard?
The Form Wizard was originally designed for novice users who were not familiar with the database Forms Designer.
When a form is created, it opens in the Form view. A Navigation toolbar appears just below the form, which helps you to navigate through the records in the table or add a new record. Follow the given steps to add a new record:
1. Click the New Record icon from the Navigation toolbar.
2. On clicking the icon, a window for creating records appears. Enter the required data into the textboxes provided, on the form. (See Fig.14.11.)
3. Click the Save Record icon to save the record to the table.
 Fig. 13.9: Form created
Fig.13.10: New Record icon
Fig. 13.9: Form created
Fig.13.10: New Record icon
4. Close the form by clicking the Close button in the top-right corner of the window.
5. Click the Tables object in the Database pane.
6. Double-click the table name in the Tables pane to view saved records. When a window similar to the one below is displayed, remember the record you created.
Here are the steps to delete records using the form:
1. Double-click the form name to open it.
2. Navigate to the record you wish to delete.
3. Click the Delete Record icon on the Navigation toolbar. A confirmation dialog appears.
4. Click Yes to confirm deletion.
Follow the given steps to search a record using form:
1. Open the form.
2. Click the Find Record icon on the Navigation toolbar. The Record Search dialog box will appear.
3. In the Text box, enter the part of the record for searching.
4. Select the All fields radio button under the Where to Search section. You can also select the Single field radio button to search in a particular field.
5. Click Search. If the searched record is present in the table, it will appear in the form.
6. Click the Close button, to close the Record Search dialog box.
To change the properties of labels:
1. Right-click the form name in the Forms section.
2. Select the Edit option. The form opens in the Design View.
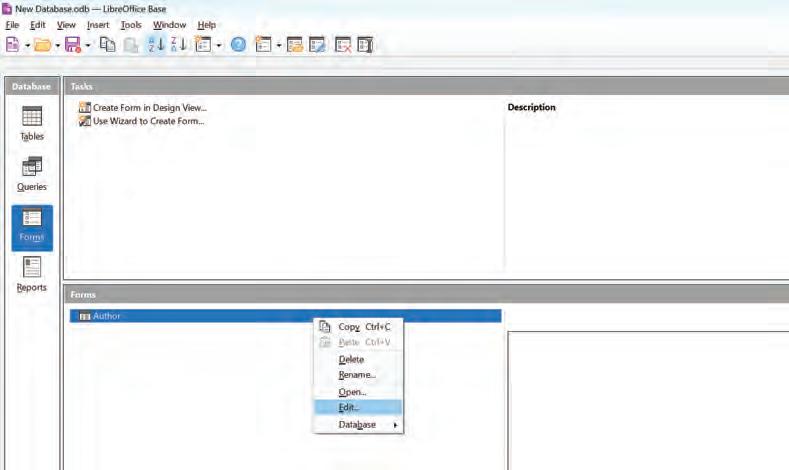
3. Double-clicking the label opens the Properties dialog box.
Fig. 13.16: Search record Fig. 13.17: Editing a form4. Modify the font, size, color, or other attributes of a label.

Follow the steps given below to change the background of the form:
1. Right-click the form. A context menu appears.
2. Select the Page option from the context menu. The Page Style dialog box appears.
3. Click the Background tab.
4. Select the desired colour from the Background color section.
5. Click OK
The background colour of the form is changed.
In LibreOffice, a report refers to a document that organises and displays data from a database in a clear and easily digestible format. A range of documents, including invoices, customer lists, and sales reports, can be generated using reports.
From a database, a report in LibreOffice Base pulls together data and forms it into a clear format. Document creation is just one of the many applications of reports, which can also produce invoices, customer lists, and more. Before creating a report, selecting the relevant table/query in LibreOffice Base is important. Format the report as per your choice after adding fields from a table or a query. Reports can take either a static or dynamic form. At the time of creation, static reports hold the contents of the database. When the database is updated, dynamic reports reflect these changes.
Data is summarised in reports. The data display format for reports in Base depends on the table chosen. Steps to create a report using the wizard are as follows:
1. Click the Reports object from the Database pane in the LibreOffice Base application.
2. Click the Use Wizard to Create Report option in the Tasks pane.
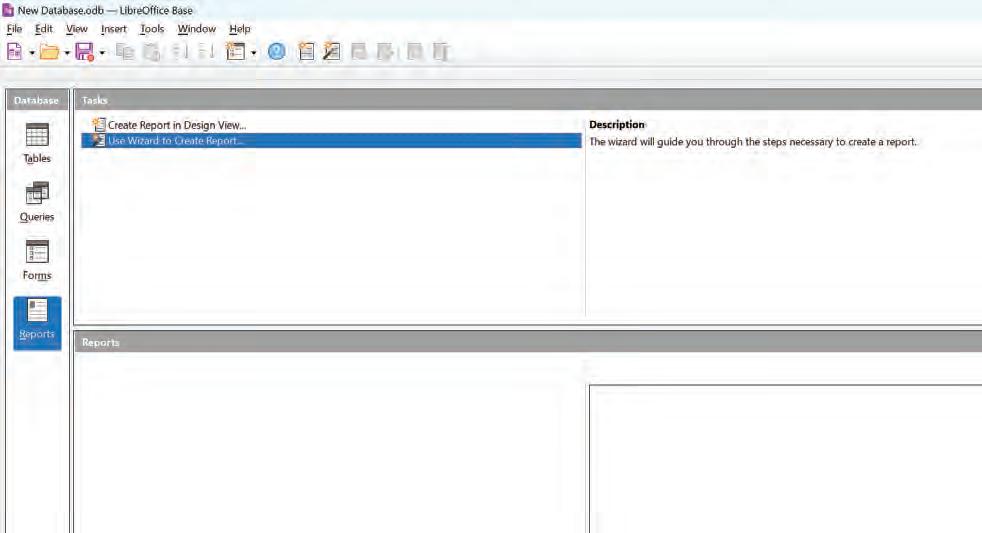
3. Report Wizard opens with Step 1: Field selection. You may now draft a report for the table previously created.
4. Select the table from the Tables or queries drop-down list. In our case, we have selected the Authors table. All fields of the selected table appear in the Available fields list box.
5. Select the field in the Available fields list box and click the > button to add it to the Fields in report list box.
6. You can click the >> button to forward all fields to the Fields in report list box. You can also change the sequence of the fields by selecting the field in the Fields in report list box and clicking the up and down arrow buttons beside it.
Fig. 13.21: Creating a report7. Click Next. The Step 2: Labeling fields appears.
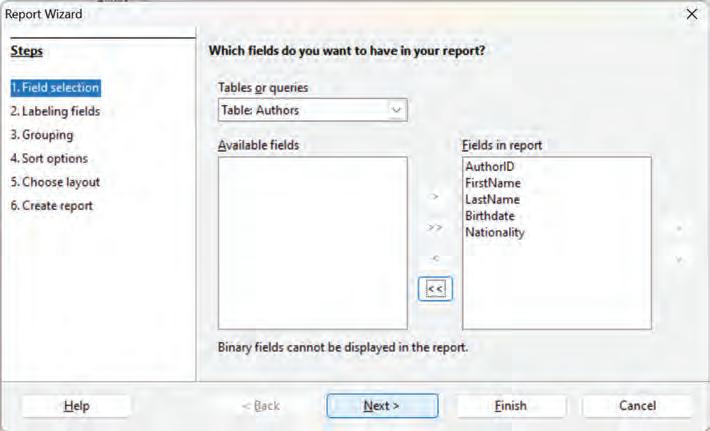
8. Change the labels according to the fields if you want. 9. Click Next.
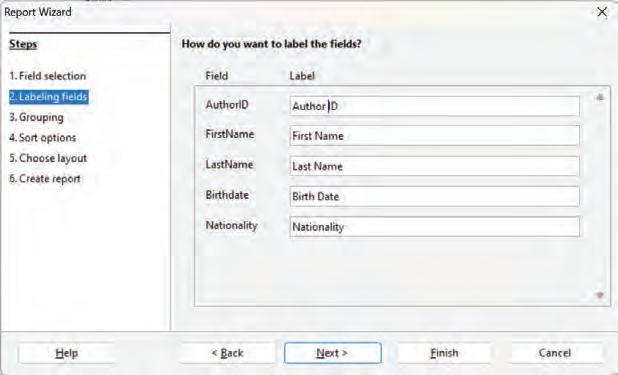
10. The Step 3: Grouping appears. Click Next.

You can now define the grouping structure for the table fields. In case you did not define the structure, it will be set by default.
11. The Step 4: Sort options appears. Here, you can apply sorting on any field if you need.
12. Click Next.
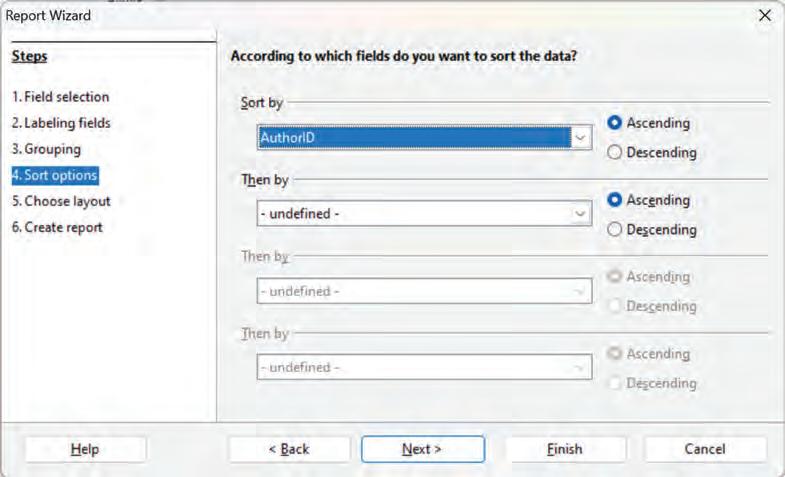
13. The Step 5: Choose layout appears. Choose the layout and orientation of your report by choosing the appropriate options under the Layout of data list box.
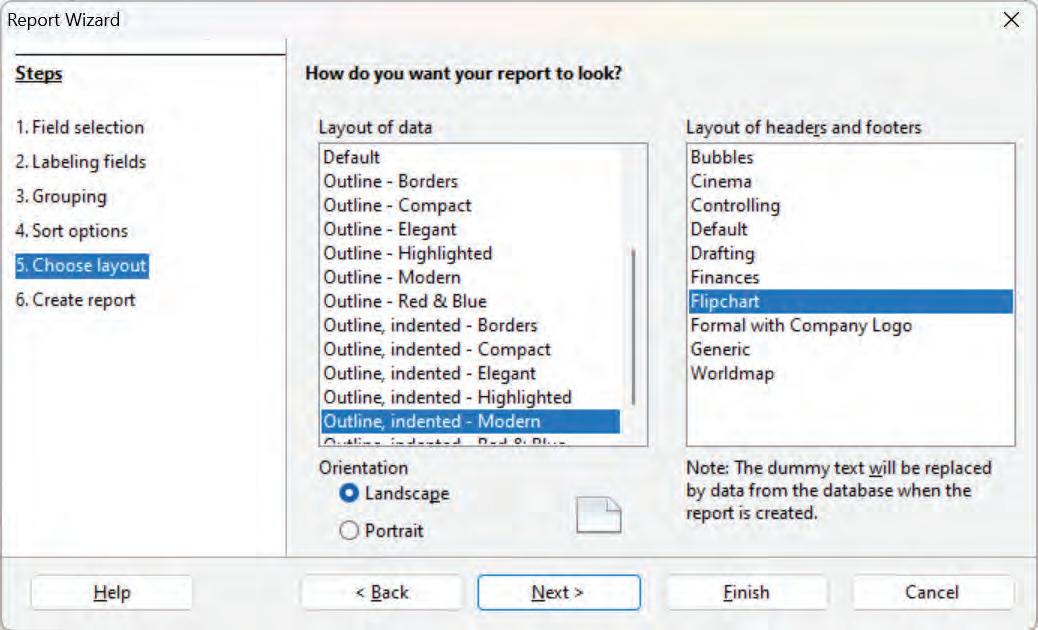
14. Click Next. The Step 6: Create report appears.
15. Type the title of report in the Title of report text box.
16. Select the type of report either static or dynamic.
Fig. 13.25: To sort the records Fig. 13.26: To choose layout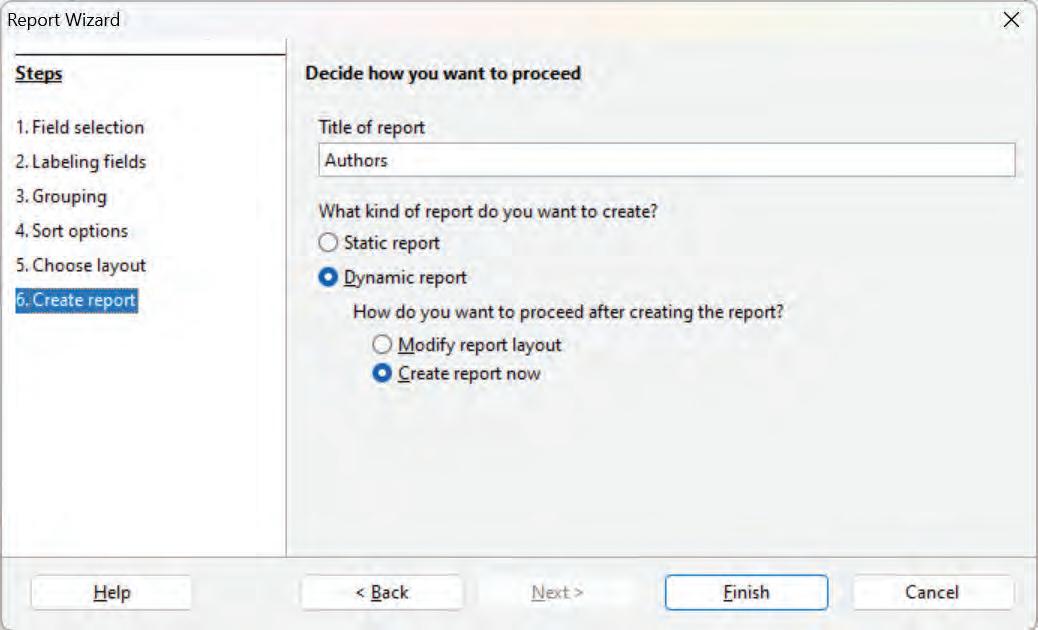
13.27: To create the report
A window displaying a report with a similar appearance to the one below appears.

13.28: Report created
After creating a report, you can edit it whenever required. To edit a report:
1. Click the Reports object in the Database pane.
2. Right-click the report in the Reports pane.
What is the difference between a form and a report?
3. Select the Edit option. Now, you can make the desired changes in the report.
Activity 1: Creating a Report
(Individual Work)
Create a report for the table Publishers_List, showing the following fields: Pub_ID, Pub_Date, Pub_Name, Cost. Save the report.
Activity 2: Creating a Form (Individual Work)
Your school has organised a writing competition for the students. The data related to the same is given in the following table. Create a form for the table and enter ten more records in it.
A Select the correct option.
1 Data is summarised in
a Form
c Table
b Query
d Reports
2 Which process step is optional when creating a report in LibreOffice?
a Select a table or a query
c Choose a layout
b Insert fields
d Create a form
3 A is a window with various fields or insertion spaces that ask the user to enter data into them to be stored in the database.
a Label
c Report
B Fill in the blanks with the most suitable words.
b Form
d All of these
1 A allows you to view, update, and delete records from database tables.
2 The supplies detailed instructions and predesigned templates to rapidly create practical documents.
3 The button forwards all fields of the table to the Fields in the form list box.
C State whether the following is True or False. Correct the statements that are false.
1 When adding a new record using a form, you need to click the Save Record button to save the record to the table.
2 You can change the background color of the form.
3 A form does not allow you to search for records in a form.
4 Reports can take either a static or dynamic form.
D Answer the following questions. (Solved)
Q1. What is the Form Wizard?
A1. A Form Wizard is a tool that assists you in creating a form by guiding you through various steps. This process asks you questions about the layout you want to use, the data you want to collect, and the goal of the form. The form is then generated by the wizard using your responses.
Q2. Write the steps to remove a record using a form?
A2. To remove a record using a form:
• Double-click the form name to open it.
• Navigate to the record you wish to delete.
• Click the Delete Record icon on the Navigation toolbar. A confirmation dialog appears.
• Click Yes to confirm deletion.
Q3. Shivani has forgotten the steps involved in Report Wizard. Help her by writing the step names that appear in Report Wizard.
A3. There are six steps in Report Wizard:
• Fields selection
• Grouping
• Choose layout
• Labeling fields
• Sort options
• Create report
2. True.
3. False. You can search a record using a form.
4. True.
Data: It is a collection of raw facts that can be processed for any computing device.
Information: When we process data to achieve a meaningful result, it becomes an information.
Table: A set of rows and columns is called a table.
Row: The horizontal set of values in a table is called a row.
Column: The vertical set of values in a table is called a column.
Cell: The intersection of a row and a column is called a cell.
Database Management System: A database management system is a collection of interrelated data and a set of programs to access that data.
Key: A key is an attribute or a combination of attributes that is used to uniquely identify records.
Candidate Key: It can be defined as a set of one or more keys that is able to uniquely identify a record in a table.
Primary Key: An attribute that is used by the database designer to uniquely identify each record in the table is known as a primary key.
Composite Key: If you use multiple attributes to create a primary key, then that primary key is called the composite key (also called a compound key or a concatenated key).
Foreign or Reference Key: A foreign key is an attribute or a combination of attributes in one base table that points to the primary key of another table.
SQL: A standard application that provides an easy interface for database interaction in relational databases.
Fields: In a database table, a field is an attribute of a record and all the columns in a table.
Records: A record is a collection of fields in a database table or, you can say that one record is a complete row of a table.
Query: A query is a form of a question or command that you apply to a table to get some information from the table.
Forms: Forms are used for specific purposes like entering, modifying, and viewing records.
Report: A database report is a structured presentation of data from a database that provides useful information for decision-making, analysis, and presentation purposes.
Sorting: Sorting means to arrange the data in a specific order based on the given criteria.
Wildcards: Wildcards are unique symbols employed as substitutes for one or more characters within a text string.
Data Definition Language (DDL): Data Definition Language (DDL) is used to define and modify the structure of a table.
Data Manipulation Language (DML): DML commands are used to manipulate the existing database such as insertion, deletion, modification etc.
Form Wizard: A form wizard is a tool that assists you in creating a form by guiding you step-by-step.
• Data may consist of facts, numbers, names, images, or even description of things.
• A database is a collection of data.
• Data in a database can be stored in the form of tables.
• A database is usually used by developers, administrators, and end users.
• Data can be organised into two types: Flat-file and Relational.
• A relational database is a collection of various tables, referred to as relations.
• A primary key cannot have duplicate entries. A table can have only one primary key.
• SQL stands for Structured Query Language.
• Databases in LibreOffice Base are composed of four objects: tables, queries, forms, and reports.
• A table is used to retrieve, manipulate, or analyse data stored in a database. They are also used to carry out tasks like inserting, removing, and updating data from a database based on your request criteria.
• There are two ways to create a table: Creating a Table using the Wizard tool and Creating a Table in Design View
• Data types define the kind of data that can be stored in a table column in the database.
• Data types in LibreOffice Base are broadly classified into five categories: Numeric, Alphanumeric, Binary, Date/ Time, Other Variable.
• Sorting can be done in either ascending order or descending order. You can apply sorting operations by using a single field or multiple fields.
• The attributes and behaviour of each field in a table are defined by their own unique set of properties.
• Referential integrity ensures the accuracy and consistency between the tables.
• A relationship is a connection between two tables that links one field to another field.
• There are three types of relationships that exists within tables: One to One, One to Many, Many to Many.
• Different ways to create a query in LibreOffice Base are: Using the Wizard tool, Using Design View, and Using SQL View.
• Wildcards prove useful when searching for multiple items based on a particular pattern, even if the data isn’t exactly identical.
• Some common relational database management systems that use SQL are: Oracle, Sybase, Microsoft SQL server, MySQL etc.
• When a form is created, it opens in the Form View.
• A range of documents, including invoices, customer lists, and sales reports, can be generated using reports.
A. Select the correct option.
1. Data in a database can be stored in the form of
a. Information
c. Tables
b. Cell
d. Rows
2. A is a form of a question or command that you apply to a table to get some information from the table.
a. Query
c. Record
b. Form
d. Table
3. properties of a design grid determines whether a field’s information is displayed when the query runs.
a. Sort
c. Or
b. Criterion
d. Visible
4. data type is used to store character strings of fixed length.
a. Char
c. Number
b. Varchar
d. Date
5. In type of relationship, each record in the first table has a unique association with a single record in the second table.
a. One to Many
c. Many to Many
b. One to One
d. None of the Above
B. Fill in the blanks with the most suitable words.
1. Database Developers are also called database .
2. are used for specific purposes like entering, modifying, and viewing records.
3. A Query Design View consists of two sections—Objects Relationship Pane and the .
4. A range of documents, including invoices, customer lists, can be generated using .
5. is used to define and modify the structure of a table.
C. State whether the following is True or False. Correct the statements that are false.
1. Only authorised persons can access databases or tables.
2. There is only one way to create a table.
3. The Query Design View provides more control over queries and allows you to create them from scratch.
4. Reports can take either a static or dynamic form.
5. SQL gives better performance only if database size is very small.
D. Short answer-type questions.
1. What are alphanumeric-data types?
2. Define Wildcards.
3. What do you mean by sorting?
E. Long answer-type questions.
1. Differentiate between Flat-file and Relational database.
2. Write the steps to delete one or multiple records from a table.
3. How can you edit a report?
F. Competency-based questions.
1. You are creating a database to store personal information, including birthdate and the time of your birth for a new application. Which data type will you use to store your birthdate and time?
2. Megha wants to know about grouping data in LibreOffice Base. Help her by proving the name of the function used to group data and its role.
Workplace safety is defined as a safe and healthy workplace environment in which each and every person feels comfortable. It involves identifying and eliminating potential hazards, implementing safety measures and protocols, and promoting a culture of safety within an organisation. It is the responsibility of an organisation or an employer to take proper safety precautions for the health, wellness, and safety of their employees. It also helps in reducing the risk of costly accidents and legal liabilities and maintaining a positive reputation for the organisation. When workplaces are safe, people are less likely to get hurt or sick. It is the basic right of the employees. Workplace safety is crucial, regardless of the size of the company. All organisations and businesses must incorporate safety measures to ensure the wellness of both employees and employers. Well-implemented safety measures protect employees as well as industrial equipment.
Following are the importance of workplace safety:
When employees know they’re safe, they feel happy and can focus on their jobs without worrying about getting hurt.
Governments have strict rules regarding workplace safety. If a company doesn’t follow these rules, they can get into serious trouble and have to pay heavy fines.
When there are fewer accidents or injuries, companies don’t have to spend as much money on medical bills, legal liabilities, or repair work. This means they can use the money for the welfare of the employees.
Employees like working at places where they feel safe. They’ll want to continue with their jobs. A safe workplace is important to build a sense of belongingness and an affirmation that they are valued. This encourages the employees to stay and work for the growth of the company, thereby adding to its market reputation.
Workplace safety is extremely necessary. Every employer has the legal and moral responsibility to create a safe workplace for its employees. However, it is not only the employers’ responsibility; everyone working in the organisation has to ensure the safety of the workplace.
Some basic rules that you need to follow at your workplace are:
Every employee should be aware of their surroundings and watch out for potentially hazardous scenarios. Everyone in an organisation should be alert and immediately report any danger to the authorities, as many hazards can be avoided if reported in a timely manner.
For example, if an employee notices a spark coming out of a wire or any exposed cables, they should notify the appropriate authorities right away.
First aid is the first and immediate assistance provided to a person before emergency medical help arrives. Every workplace should have a first-aid emergency kit on standby to deal with any emergency situation. There should also be someone appointed in the company who is trained in first aid so that, in any hazardous situation, first aid can be used. First-aid kits should be periodically updated to remove any outdated medications.
For example, if an employee suffers a cut or a burn at work, it can be treated with bandages, cotton, and ointment from the first-aid kit.
Employees should be aware of the types of clothing that can pose a risk in the workplace, according to the nature of the work conducted there. Wearing clothes that are safe to wear contributes to the safety of the environment.
For example, if an employee wears nylon clothes in a firecracker factory, their garments are very likely to catch fire while working.
Every organisation should ensure that its employees are trained on how to use safety equipment properly. They should be informed about where the equipment is located and when and how to utilise it.
For example, to understand how to use fire extinguishers, activate fire alarms, and use safely escape during emergencies.
In this way, employees go through regular fire safety training.
There should always be emergency safety exits at the workplace, and every employee should be aware of them so that during an emergency, individuals may use them to evacuate. To inform every staff member, a floor plan should be posted on the walls that shows the safety exits and any other potential exits.
For example, employees should use the safety exit to leave the floor in case of fire emergency rather than pushing everyone out of the main gate.
There should also be adequate warning signs everywhere to let people know which areas are dangerous and should not be touched or entered. The quickest and simplest way to raise awareness among people is to use signs. With just a quick glance, they can understand what the symbols are trying to convey, and during an emergency, they will follow those signs.
For example, by looking at the under-construction sign in a part of the building, the employees will remain cautious while being in and around that area.
Fire safety has a pivotal role in safeguarding both workplaces and homes. It includes a range of measures designed to prevent the initiation and spread of fires while also providing secure means for individuals to evacuate during emergency situations involving fire. Fire safety refers to the steps used to control and minimise the risks associated with fires. Fire safety at the workplace is required to prevent any hazards that can occur in a setting that involves chemicals, electricity, or fire. A company should implement stricter safety protocols to protect its employees and prevent fire-related accidents. Fire-related emergencies are very common at workplaces, and they can take place due to a number of reasons, including short circuits, electrical failures, carelessness, or flammable chemicals.
Some of the major causes of fire at a workplace are:
Electrical Malfunctions
Electrical fires can be caused by faulty wiring, overloaded circuits, or damaged electrical equipment.
Human Error
Workplace fires can also be caused by accidents or carelessness on the part of employees, which includes electrical faults, improper storage of inflammable materials, etc.
Faulty Equipment or Machinery
If equipment and machinery are not properly maintained, they may experience mechanical failures that produce heat and cause short circuits, thereby leading to fire.
Chemical Hazards
Fires can start in environments where dangerous chemicals or materials are handled and stored carelessly or without proper knowledge. This can lead to chemical reactions, spills, leaks, etc., and initiate fires.
Intentional Acts
Workplace fires can also be purposefully started by someone with bad intentions. It can also cause a lot of harm to people and property.
To maintain a safe working environment, it is necessary to follow proper fire safety rules:
Safety Equipment
Install sprinklers, fire alarms, fire extinguishers, and smoke detectors in the workplace. Smoke detectors can detect smoke in the vicinity; fire alarms generate sound and alert people about the danger; and sprinklers help extinguish
the fire. Also, fire extinguishers help control the fire. This equipment is essential for the safety of a workplace and the people working there.
Maintaining a clean environment is essential because clutter in the environment contributes to the spread of fire. A clean workplace offers space for people to move around freely, and in case of an emergency, it helps in quick evacuation. A congested environment allows fire to spread easily and makes it harder for people to move and evacuate the place quickly. In case where the work involves extensive use of inflammable chemicals and items, it is advised to store them safely.
Faulty wirings and overloaded sockets are two of the most common causes of fires. Electrical cables should always be maintained by replacing the damaged ones quickly. Employees should be watchful regarding overheated equipment and strangely smelling electrical lines. When electrical appliances are not in use, they should be turned off. Warning signs are very important where high-voltage wires are stored.
Proper signs will help the employees know what they should do if they are in danger. Signs indicating the location of a fire extinguisher, emergency numbers, and the way to an emergency exit are essential for employees’ safety. They are the simplest techniques for spreading awareness, as people can easily comprehend what is being communicated.
Staff members should be aware of fire evacuation procedures and the precautions they need to take during a fire emergency. For this, fire drills should be conducted every three months by a certified professional who should inform the participants about safe evacuation techniques and how to use tools like fire extinguishers. Understanding safety measures can help avert disasters.
Chemicals should be stored in labeled, airtight containers, away from heat sources and incompatible substances, and in a well-ventilated area, following all the safety guidelines.
Prevent Ignition in Explosive Areas
Employees should be instructed to refrain from using inflammable materials in the vicinity of explosive zones. Avoid sparks and open flames, use safe equipment, and make sure there is adequate ventilation to prevent explosions in hazardous locations.
Risk Assessment
It is the methodical process of detecting risks in the workplace, assessing the severity of the risk, and putting into place reasonable control measures to either eliminate or minimise such risks.


101 is the fire safety helpline number in India. By calling this number, you can get connected to the nearest fire station.
Numerous accidents are caused by falls and slips at work every year. Falling from a height due to negligence is a common cause of death, particularly in India. According to the World Health Organization, falls are the second-leading cause of unintentional injury deaths worldwide. Construction workers are more likely to get seriously injured from a fall since they work at heights with unprotected roof edges. It is important that proper safety equipment and safety gear be put in place to ensure the safety of the workers.
1. Poor lighting in the workplace can cause employees to trip and fall as they cannot see any obstacles in their way.
2. Uneven floor surfaces make it difficult to walk and can lead to falls and slips.
3. Wet or slippery floors often cause a person to slip, and that can also sometimes lead to severe injury.
4. Trailing cables on the floor can also cause a person to trip and fall, which can lead to several injuries.
5. Poor housekeeping in an untidy workplace with improper storage of material can cause hindrances in walking.
6. Weather conditions such as heavy rain can make the floors wet. It can also sometimes lead to slips and falls.
By following certain measures, we can prevent falls and slips in the workplace.
Proper Lighting
Lighting is a major cause of falls and slips. If a space is well illuminated, everyone can see objects around them and walk properly without tripping over anything.
Stairways
It is the riskiest location and has the highest number of falls. Stairs must have proper handrails and lighting, be free of any unsecured objects, such as nails, and the presence of slippery substances like oil, water, banana peels, etc.
Slips and falls are common in the workplace due to the abundance of cables and wires lying loose. To eliminate the risk of slipping due to loose and running wires on the floor, all cables should be secured to the corners of the floor or hung with pins along the walls.
Signage
Adequate signage plays an important part in the prevention of falls and slips. With proper signage, one can identify which areas require special attention. These signs provide a clear warning to the employees and also bring the issues to the attention of the employer.
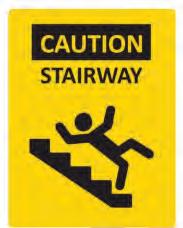


 Stairs Ahead Gap
Wearing footwear appropriate for the work environment decreases the chances of slipping and falling. People often wear uncomfortable or slippery shoes to work, causing them to fall and injure themselves.
Proper equipment, such as good-quality ladders and stools, allows workers to access places at a certain height. Employees who don’t use proper equipment are more likely to fall and injure themselves.
If something has been spilled unintentionally, then that should be cleaned immediately so that nobody falls because of that. Proper signs should be placed around the area to make people aware.
The state of the floor should always be monitored, and any necessary repairs should be undertaken immediately. Many people slip and fall on uneven floors, which results in injuries.
The human body is a good conductor of electricity, and when a body part comes in contact with an exposed electric wire, it suffers an electric shock. Electric shocks can cause injuries ranging from minor shocks to more fatal consequences. The amount of current passed by the shock causes harm to the body.
Electrical safety refers to the techniques, rules, and precautions used to avoid accidents that can occur while using electricity. It includes a variety of techniques and processes aimed at ensuring that electrical systems, equipment, and appliances are used, installed, and maintained in a manner that reduces the risk of electrical hazards.
Electrical safety is essential in both home and industrial settings because electricity can be extremely dangerous if handled without caution or if any electrical equipment is not properly maintained. Handling electrical appliances can pose a significant risk to workers, especially those whose jobs require them to work near high-voltage areas.
1. Electric shocks
2. Electrical fires due to short circuits
3. Overloaded circuits due to using too many appliances for a longer period of time
4. Exposed wires and conductors
5. Improper grounding of wires
6. Using electricity in wet conditions such as rain and snow
7. Faulty electrical equipment that can cause electric shocks
8. Inadequate wiring at various places
9. Lack of electrical safety training
Employee Training
Electrical safety procedures must be taught to employees in order to safeguard them from occupational hazards. Employee training and awareness of electrical safety measures are essential because electrical accidents can cause severe injuries or even fatalities. All the employees should be trained in electrical hazards, equipment, safety regulations, and standards.
Risk Assessment
It is the methodical process of detecting risks in the workplace, assessing the severity of the risk associated with it, and putting into place reasonable control measures to either eliminate or minimise such risks.
Cables, plugs, sockets, and other flexible leads and connectors get damaged easily. Inspect electrical systems, equipment, and wiring on a regular basis to discover and resolve any problems, such as damaged cables, frayed wires, loose connections, or symptoms of overheating.
Ensure that the wiring is correctly installed and has adequate capacity for the load. Replace the damaged wires with new ones on a regular basis. Cable connectors or couplers should be used in place of tape to connect wires.
Emergency Equipment
Have fire extinguishers and first-aid kits readily available, and ensure that employees know their locations and how to use them in case of electrical fires or accidents.
Electrical Safety Signs
Install suitable safety signs and labels to warn employees about electrical hazards, such as high-voltage regions or electrical equipment that requires specific measures. Signs or reminders to turn off electricity when not in use should be installed.
Protective Equipment for Employees
Protective equipment, including helmets, gloves, goggles, and masks, safeguards employees from workplace electrical hazards, ensuring their safety and well-being.

It is a misconception that minor or non-fatal incidents do not have to be recorded. People believe that minor workplace events, such as a cut from a sharp table edge, need not be documented. However, it is actually crucial to document every accident in a workplace, no matter how big or small, so that safety measures can be tracked easily in the future.
Injuries can happen to anyone at any time, from a minor cut to a serious accident, and we do not always have a doctor or a hospital nearby. First aid is the first and immediate care or assistance given to an injured person right after the accident or until hospital assistance arrives. First aid’s main objectives include preserving lives, preventing the condition from worsening, and facilitating recovery, with trained individuals providing initial assistance.
It contains all of the basic medicinal aspects required for dealing with an immediate crisis. First-aid kits are
Dial 108 for calling an ambulance in case of a medical emergency.
mandatory in every location, and the government recommends that they be kept everywhere, including school, home, or the office. Using a first-aid kit is a life skill that requires a blend of common sense and simple technology.
First aid is necessary in an emergency situation because it helps conceal wounds and treat minor injuries until medical assistance arrives.
The following are some further reasons why first aid is important:
Life Skill
First aid is a basic life skill that everyone should learn. Injuries are not optional; they can occur at any time, and one should be prepared to handle such situations in a medically appropriate manner.
Saves Life
Every year, many individuals lose their lives due to lack of first-aid knowledge. First aid can help control injuries in the early stages and, if administered promptly, can save lives. Heart attacks and choking are two of the most common life-threatening conditions, and first aid has the potential to save lives from these two.
Nobody can foresee an accident, and they can occur in schools, at workplaces, or even on the road. Keeping a first-aid kit can be beneficial in reducing the impact of some major accidents.
When someone is hurt, every second counts, and if those seconds are wasted on calling the hospital and waiting for them to arrive, then that person can die. First aid can help treat the injury at the initial stage. For example, if a person is hurt in an accident and is bleeding excessively, his life can be saved by controlling the bleeding immediately by covering it with cotton and a medical gauge; otherwise, a person can lose his life due to blood loss.
Imagine that one of your coworkers fainted in front of you at work. How will you provide first aid to them?
At a workplace, any accident or injury can happen that needs immediate treatment and cannot be delayed until reaching the hospital. These situations can occur at the workplace and require immediate first aid:
• Seizures
• Accidents
• Cuts
• Heart attacks
• Food Poisoning
• Burns
• Bites and stings
• Sprain
• High fever
• Other medical emergencies
A first-aid kit is a box that contains all the necessary supplies to provide initial treatment for injuries, illnesses, and emergencies. A well-stocked first-aid kit helps to respond effectively and quickly to situations ranging from minor injuries to serious medical conditions.
A basic first-aid kit should contain the following items:
• Bandage
• 10 adhesive cloth tapes
• A bottle of antiseptic liquid
• A thermometer
• Instant heat and cold pack
• An antibiotic ointment
• Cotton
• Scissors
• Tweezers
• A packet of pain reliever tablets
• Surgical gloves

These are the benefits of providing first-aid training to the employees:
Rapid Response in Emergency Situation
Reduced Workplace Accidents Through Awareness


All jobs may not be hazardous in nature, but it is the responsibility of all employers to keep their workers safe and provide a secure working environment. The employer has a moral and legal duty to ensure that workers receive first-aid instructions.
When staff members are trained in first aid, they can assist one another and act more quickly in an emergency. They learn about the procedures to follow and how to lower the risk of suffering a serious illness or injury.
First-aid training makes workers more aware of workplace safety, which reduces accidents and injuries because they take the necessary precautions and are informed of what to do in an emergency.
Safety at Home
If employees are trained regarding first aid, then they are safe at the workplace and also at home. They can assist a friend or relative; they can educate others about safety; and in the event of an accident or other emergency, they can help their family members and friends.
Adhere to Legal Obligations
Every employer who offers first-aid instruction at the workplace adheres to the law, which specifies that employers are required to train staff members and set up first-aid kits, tools, and other safety equipment at the workplace.
On June 3, 2020, an explosion occurred at the Yashashvi Rasayan Pvt. Ltd. pesticide facility in Gujarat’s Dahej (Bharuch district), resulting in eight casualties and more than 50 injured employees. The effect of the explosion could be felt from a distance of several kilometers. The factory was also seen emitting thick smoke. As a precaution, the administration ordered the evacuation of 4,800 residents from two villages nearby to the factory.

More than 15 chemicals were produced by the industry, of which the majority were hazardous to human health and the environment.
According to a preliminary assessment by the authorities, there were eight to nine chemical storage tanks, of which two or three contained solvents required to produce chemicals. Di-chloro benzene, di-chloro nitro benzene, di-methyl sulphate, nitric acid, and caustic were the chemicals kept in the tanks.
Causes:
1. Although the authorities claimed that the explosion came from these tanks, the reports found that the contractual workers were incompetent (not having the skill or ability to do the job and being undertrained in handling the chemicals).
2. As a result, they were unaware of the risks associated with the mixing of chemicals.
3. It was stated in the report that management had a careless attitude towards handling and managing the flow of hazardous chemicals. Additionally, they permitted untrained and unskilled employees to conduct the process.
Solutions:
1. If management had hired a skilled professional to assess the risk of these chemicals, this tragedy could have been prevented.
2. The staff should have received enough training about routine procedures and emergency scenarios.
3. If the workers would had been given safety equipment training and information regarding hazardous substances, they could have taken steps to avoid the tragedy.
Around 10:15 a.m. on May 24, 2022, a significant fire that engulfed a shoe factory resulted in at least 38 people being burnt alive and 10 more suffering severe burn injuries. Around 100 employees were there when the fire erupted at the factory and quickly spread throughout the two-story structure in the busy Jeoni Mandi market area of Agra city. The inflammable softener solution and stickers used in the production of the shoes instantly caught fire and started burning.
Causes:
1. Employees were not aware that smoking is a potential hazard in fire-prone areas.
2. Only one gate was open for entry and exit, and the other one was closed, which caused a ruckus during the emergency situation.
3. Lack of safety measures and equipment at the workplace.
Solutions:
1. Proper training should be provided for the safety of employees.
2. According to the number of employees present at that time, there should have been separate exit gates. There should have been an emergency gate as well.
3. Proper fire safety equipment should have been there on every floor, such as fire alarms, fire extinguishers, and sprinklers.
Poster Making on Safety Measures (Group Work)
Get into groups of five to six students each. Each group should choose one of the four situations given below. In your group, discuss the safety norms related to the selected situation that should be followed at the workplace to prevent accidents and protect workers. Design a poster mentioning the safety measures for the chosen situation and present it to the whole class.
Situation 1 – To avoid fire in a company
Situation 2 – To prevent your co-worker from slipping
Situation 3 – Safety norms for high-voltage areas
Situation 4 – Safety norms for working in a chemical factory
A Select the correct option.
1 Which of the following is not a common cause of slip and fall?
a poor lighting b short circuit c trailing cables d wet or slippery floor
2 Which item should be a part of any first-aid kit? a Stethoscope b Water c X-ray machine d Bandages
3 Which of these is not a measure for fire safety?
a installation of fire alarms b storing inflammable chemicals cautiously c proper fire exits d wet and slippery floor
B Fill in the blanks with the most suitable words.
1 is a box that contains all the necessary supplies to provide initial treatment for injuries, illnesses, and emergencies.
2 Fire safety is a that everyone should learn.
3 Electrical safety refers to the steps used to control and the electrical hazards.
4 clothes should not be worn by workers in firecracker factories.
C State whether the following is True or False. Correct the statements that are false.
1 Human body is a bad conductor of electricity.
2 When someone is hurt, they should wait until medical help arrives and not take any action.
3 Poor lighting is one of the reasons for falling at the workplace.
4 We can reduce workplace accidents by spreading awareness about workplace safety.
D Answer the following questions. (Solved)
Q1. What is workplace safety and why is it important?
A1. Workplace safety is defined as a safe and healthy workplace where each and every person feels comfortable and protected. It involves identifying and eliminating potential hazards, implementing safety measures and protocols, and promoting a culture of safety within an organisation.
It is the responsibility of an organisation or an employer to take proper safety precautions for the health, wellness, and safety of their employees.
Workplace safety is important because:
• Employees feel safe: When employees know they are safe, they feel happy and can focus on their jobs.
• Government rules: Governments have strict rules regarding workplace safety.
• People would want to continue working: Employees like working at places where they feel safe. This encourages them to stay and work for the growth of the company.
Q2. What is fire safety and how can you prevent a fire hazard at the workplace?
A2. Fire safety refers to the steps used to control and prevent a fire. It includes a range of measures designed to prevent the initiation and spread of fires while also providing secure means for individuals to evacuate during emergency situations involving fire. Fire safety at the workplace is required to avoid any type of hazard, and places that deal with chemicals or fire should apply stricter safety procedures.
To maintain a safe working environment, it is necessary to abide by the following safety rules:
• Safety equipment- Install sprinklers, fire alarms, fire extinguishers, and smoke detectors in the workplace.
• Electrical safety- Replace faulty wiring and overloaded sockets immediately. They are two of the most common causes of fires.
• Proper signs- Proper signs will help employees know what to do if they are in danger.
• Fire drills- Fire drills should be held every three months so that employees are familiar with fire evacuation protocols and can take precautions during an emergency.
Q3. Suppose you are working as a cashier in a fast-food restaurant. One evening, you notice that the floor near the kitchen area is wet. Customers are still moving around, and other employees are busy with their tasks. Describe how you would address this safety concern, considering your responsibility for maintaining a safe work environment. What actions would you take, and how would you communicate your concerns to your supervisor or coworkers?
A3. I would take the following steps to address this safety concern:
• Immediate action: First and foremost, I would immediately approach the area and ensure that it is well-marked with warning signs, such as ‘Caution: Wet Floor’ signs. The purpose of this action is to inform everyone.
• Communication: Next, I would inform my coworkers and supervisor about the situation. Effective communication is essential to ensure that everyone is aware of the hazard and can take precautions accordingly.
• Assistance: If I have the necessary equipment nearby, such as caution cones or absorbent clothes, I would take the initiative to place them around the wet area to prevent slips and falls. If not, I would request assistance from colleagues or the maintenance team to do so.
B 1. First-aid kit 2. life skill 3. prevent 4. Nylon
C 1. False. Human body is a good conductor of electricity.
2. False. When someone is hurt, they should be given first aid immediately.
3. True.
4. True.
and emergencies can strike anytime and anywhere, even when they are least expected. Therefore, it is important to take the necessary precautions. To tackle such accidents and emergencies, organisations follow safety plans to keep their people safe and secure. Also, policies and procedures are laid out to make sure that the business is able to recover from such incidents.
An accident is an unplanned, unexpected, and unintended event that typically results in damage or injury. When someone’s body suffers physical harm or damage due to an accident or attack, it is called an injury. Both accidents and injuries can take place anytime or anywhere and can even lead to fatalities. Therefore, it is important to control such accidents at workplace and make sure that minimal harm is caused to the people involved in them. A workplace accident cannot be anticipated by anyone and threatens the safety of every individual associated with the organisation including the employees, employers, and customers. It can cause serious physical or environmental damage and even disturb the functioning of an organisation.
There can be different types of accidents and the impact of these accidents can also vary from person to person.
Vehicle-related Accidents Accidents and serious injuries due to the crashing of vehicles on and off the premises happen quite frequently. Such accidents usually involve cars, trucks, or even small vehicles. These accidents and injuries can have a long-lasting impact on the people affected by them.
Machine-related Accidents While operating, maintaining, or cleaning the machines and equipment, workers can get injured. These results are due to inadequate training, a lack of safety equipment, and malfunctioning equipment. Sometimes, workers get pulled inside the equipment or get crushed while shifting or rolling the equipment.
Slips, Trips, and Falls Accidents or injuries can happen when an employee slips on a wet or slippery floor while walking or running. They can either fall from heights or trip over obstacles, such as protruding nails and boards, bunched-up floor mats, uneven stairs, etc.
Fire and Explosions At any workplace or organisation, accidents might occur due to fire or other explosive substances. There can be different reasons for such explosions, such as faulty electrical systems, gas leaks, or improper storage of flammable materials.
Violence Any kind of physical argument or confrontation can turn into violence at the workplace. Some industries such as healthcare, law enforcement, etc. are at risk of violence and assaults from customers, coworkers, or outsiders.
Chemical Spillage Workers can be exposed to hazardous chemicals and toxic fumes due to accidental spills, which can lead to respiratory problems, irritation in the eyes or skin, chemical burns, and other health issues.
Structural Collapse An accident where the infrastructure of any organisation collapses or is disrupted is known as a structural collapse. This can injure the people working in the organisation due to the collapse of a roof or a wall.
Electrical Incidents Accidents involving electric shocks or burns fall under the category of electrical incidents. Electrocution can result from faulty wiring, damaged equipment, or improper use of electrical devices.
Confined Space Accidents When workers enter confined spaces, such as tanks or sewers, they are at a high risk due to a lack of oxygen, toxic gases, and other physical hazards. These situations are highly dangerous.


An emergency is a sudden and often unforeseen situation or event that needs immediate attention and action. An emergency situation might pose a sudden risk to life, property health etc. and needs intervention to mitigate the losses and reduce the negative consequences.
A situation of emergency can:
1. threatens the employees, customers, or the public
2. disrupts or shuts down the operations
3. causes physical or environmental damage
There are various types of emergencies that may occur at home, school, or workplace. Hence, it becomes essential requirement to have an emergency plan to minimize their consequences.
Natural Disasters These include accidents or events that are caused by nature and are often uncontrollable. They pose a threat to human life, property, and the environment.
Earthquakes: Sudden shaking of the ground caused by the movement of tectonic plates.
Floods: Overflow of water onto normally dry land, often due to heavy rainfall, storm surges, or dam failures.
Wildfires: Uncontrolled fires in forests, grasslands, or urban areas, often exacerbated by dry conditions and high winds.
Tsunami: A series of large ocean waves generated by sudden and powerful disturbances beneath or near the ocean’s surface.
(continued...)
Weather-related Emergencies
These are situations that arise due to extreme or unusual weather conditions.
Medical Emergencies
Public Health Emergencies
These are sudden and often life-threatening situations that require immediate medical attention.
Severe Storms: Thunderstorms, hailstorms, and blizzards that can cause damage, power outages, and transportation disruptions.
Extreme Heat or Cold: Prolonged periods of excessively high or low temperatures, posing health risks.
Tornadoes: Violently rotating columns of air extending from thunderstorms to the ground.
Hurricanes, Typhoons, and Cyclones: Powerful tropical storms with strong winds and heavy rains.
Cardiac Arrest: Sudden loss of heart function, requiring immediate CPR and defibrillation.
Stroke: Sudden interruption of blood flow to the brain, necessitating rapid medical attention.
Severe Allergic Reactions: Anaphylaxis due to allergies, often requiring epinephrine administration.
Security and Safety Emergencies
These are situations or events that pose significant risks to the health and well-being of a community, region, or even the entire population. These emergencies can be caused by infectious diseases, environmental factors, or other health-related issues.
They encompass a range of critical situations that pose safety and security related threats to individuals, organizations, or communities.
Fire EmergenciesThey are critical situations that involve the uncontrolled outbreak of fire, posing risks to people, property, and the environment
Environmental Emergencies
They are critical events or situations that have the potential to cause significant harm to the environment, wildlife, and human health.
Pandemics: Widespread infectious disease outbreaks, such as COVID-19.
Epidemics: Regional outbreaks of contagious diseases.
Biological Threats: Deliberate release of biological agents or accidental exposure to hazardous materials.
Terrorist Attacks: Acts of violence or sabotage carried out by individuals or groups for political, religious, or ideological reasons.
Civil Unrest and Riots: Public demonstrations escalating into violent or destructive events.
Building Fires: Uncontrolled fires in residential or commercial structures. Wildfires: Uncontrolled fires in natural areas.
Oil Spills: Accidental or deliberate release of oil into the environment, posing ecological and economic risks. Chemical Contamination: Pollution or exposure to hazardous chemicals in the environment.
Think about any natural disaster that you have witnessed or heard about. Discuss its impact with your classmates.
Various safety measures can help prevent accidents and emergencies from occurring at a workplace. These measures include following the right procedures and training the staff adequately. Creating a safe workplace is a continuous process that requires commitment from all levels of the organisation. Here are a few ways to prevent accidents:
1. Risk assessment is an integral part of the safety measures required to prevent accidents. It is important for employers to identify potential hazards at all locations through regular inspections and risk assessments.
2. Organisations should ensure the supply and maintenance of proper protective equipment, like helmets, gloves, safety goggles, etc., to avoid any dangerous exposure to hazardous substances.
3. Employees should always be alert and attentive. They should be involved in safety programs, and their feedback should be recognised immediately.
4. There is a need to implement comprehensive safety policies and procedures regarding different hazards. All employees should be equipped with proper training and information regarding these policies.
5. Use clear and visible signage to indicate hazardous areas, safety precautions, and emergency procedures.
6. An emergency response plan, along with emergency evacuation strategies, should be developed and communicated effectively to all employees.
7. Practice drills should be conducted regularly in the workplace. Everyone should be aware of the evacuation routes, procedures for reporting injuries, emergency alarms, meeting points, etc.
8. All the machinery, tools, and equipment should have a maintenance schedule and be monitored accordingly. Any defects or malfunctions should be addressed promptly.
9. Foster open communication regarding safety concerns and encourage employees to voice their ideas for improvement. Update your safety policies regularly as per the latest technology and feedback.
Handling accidents effectively at a workplace is extremely important because they can occur anytime, in spite of safety measures or regulations in place. When such a situation arises, it should be handled carefully without blaming any particular individual. Effective accident management involves a timely response to minimise the harm caused and prevent future accidents. The following steps should be followed to handle an accident at the workplace:
Ensure Immediate Safety It will always be the first priority to ensure the safety of the injured or affected individuals and distance them from any ongoing hazardous situation.
Call for Medical Assistance If there are multiple or severe injuries in an accident, emergency services should be called for medical assistance. They should be informed about the number of injured individuals and the nature and extent of their injuries.
Provide First Aid Trained first aiders should provide immediate first aid to the injured individuals and try to stabilise their condition until medical help arrives.
Secure the Accident Scene The accident site should be isolated or cordoned off in case of serious accidents to avoid any further damage. The equipment should be shut down if necessary.

Notify Relevant Authorities Management or supervisors should be informed immediately without any delay so that they can initiate appropriate response procedures and coordinate with higher authorities as required by law.
Document the Accident Accident should be documented accurately with all the details in place, like the date, time, location, individuals involved, witnesses, etc. This documentation will be helpful for further investigation and understanding the causes of the accident.
Support Injured Workers Support injured employees financially or provide them with good medical treatment, if necessary. Make a plan for them to return to work as per their convenience.
Conduct a Detailed Investigation After ensuring the well-being of all the employees, conduct an investigation to find out the root cause of the accident. Use any preserved physical evidence to identify the exact reason behind such a dangerous situation.
Implement Corrective Actions After the investigation is successfully conducted, implement corrective actions on the basis of the findings. It may include changes in procedure, equipment, safety protocols, or training in order to prevent such accidents.
Review and Improve Safety Protocols Safety policies and procedures should be regularly reviewed and improved according to the lessons learnt from accidents and new proactive measures should be incorporated.
Activity 1: Role Play on Accident Management (Group Work)
Divide the class into six groups. Each group will be allotted different types of accidents that can occur in a workplace, as listed below. They will perform a role-play and illustrate the appropriate ways to deal with the particular accident.
Group 1 — Fire or explosion at the workplace
Group 2 — Any electrical incident at the workplace
Group 3 — Falling or tripping at the workplace
Group 4 — Structural collapse at the workplace
Group 5 — Machine-related accidents at the workplace
Group 6 — Vehicle-related accidents at the workplace
Activity 2: School Evacuation Drill (Group Work)
Conduct a simulated evacuation drill at your school. Follow the designated evacuation routes and gather at the assembly point on the school grounds. Afterwards, discuss the experience of the evacuation and suggest any improvements for a safer evacuation process.
A Select the correct option.
1 What is an unplanned or unintended event called that results in injury or damage?
a Emergency
c Accident
b Sickness
d Safety
2 Which of the following can be a cause of a fire emergency?
a Uneven stairs
c Water spilled on the floor
b Faulty electrical equipment
d Roof collapse
3 Which of the following steps should not be followed while handling an accident?
a Call for medical assistance
c Secure the accident scene
b Notify the concerned authorities
d Do not give first aid to the injured
B Fill in the blanks with suitable words.
1 refers to the physical harm that someone suffers due to an accident or an attack.
2 is a widespread outbreak of an infectious disease.
3 An accident where the infrastructure of any organisation is disrupted is known as
4 Foster open regarding safety concerns and encourage employees to voice their ideas.
C State whether the following is True or False. Correct the statements that are false.
1 A workplace emergency can be anticipated by everyone.
2 An employee can get injured by slipping on a wet or slippery floor.
3 Accidents should be adequately documented with all the details in place.
4 Emergency drills should not be taken seriously.
D Answer the following questions. (Solved)
Q1. What are the different types of accidents that may occur in an organisation?
A1. Various types of accidents that may occur in a workplace are:
• Slips, trips and falls
• Fire and explosions
• Structural collapse
• Vehicle-related accidents
• Machine-related accidents
• Electrical incidents
Q2. What do you understand by natural disasters? Give a few examples.
A2. Natural disasters include accidents or events that are caused by nature and are often uncontrollable. They pose a threat to human life, property, and the environment. They can have devastating consequences but can be mitigated through preparedness, mitigation efforts, and effective responsive strategies. For example, earthquake, droughts, tsunami, or floods.
Q3. Reena works for a multinational organisation. One day, she was running late, and unfortunately, the elevator was also not working. In a hurry, she failed to notice that the stairs were wet and sprained her ankle while tripping on them. What measures can be taken by the organisation to handle Reena’s case and avoid such scenarios in the future?
A3. Various steps can be taken by the organisation to help Reena and avoid such instances in the future:
• Medical assistance should be called immediately so that the doctor could ensure that there was no serious injury.
• Any trained employee should give first aid to Reena immediately to stabilise her condition until medical help arrives.
• The housekeeping staff should be given strict instructions by the authorities to place precautionary signs at necessary places to avoid such accidents in the future.
C 1. False. A workplace emergency cannot be anticipated by anyone.
2. True.
3. True.
4. False. Emergency drills should be taken very seriously.
In the busy landscape of India’s diverse work sector, ensuring the health and safety of employees is very significant. Every day, millions of individuals across the country step into various workplaces, where they can come across many hazardous scenarios. Understanding these hazards and their sources is the first step towards safeguarding the well-being of all employees.
Hazards, in the context of workplace safety, are conditions or situations that have the potential to cause harm to employees, ranging from minor injuries to life-threatening incidents. These hazards can stem from various sources, including the nature of the work, the environment, equipment, and even human factors. Let’s understand this concept with the help of different types of workplace hazards and their sources prevalent in the work sector.
Physical Hazards These hazards arise from the physical environment or setting of the workplace and the materials used while working. For instance, on construction sites across India, workers are exposed to various hazards, such as falling from heights, due to improper scaffolding or inadequate safety equipment. Additionally, improper handling of heavy machinery or tools can lead to accidents resulting in injuries or even fatalities.
Chemical Hazards In industries involving the use of chemicals, such as manufacturing and agriculture, employees may encounter hazardous substances that can cause skin irritations, respiratory problems, or even long-term health issues. For example, exposure to pesticides in agricultural fields or chemical spills in manufacturing plants pose significant risks.
Here are some risks caused by chemical hazards in industries:
1. Skin irritations: Exposure to hazardous chemicals can lead to skin irritations, rashes, and chemical burns.
2. Respiratory problems: Inhaling chemical fumes, dust, or aerosols can result in respiratory issues, including coughing, wheezing, and shortness of breath.
3. Eye irritation: Contact with chemicals can cause irritation in the eyes, redness, tearing, and potential eye injuries.
4. Allergic reactions: Some individuals may develop allergies or are sensitive to specific chemicals, leading to allergic reactions upon exposure.
5. Poisoning: Ingesting or absorbing certain chemicals can lead to poisoning, resulting in symptoms like nausea, vomiting, and dizziness. In severe cases, certain organs can be damaged.
Biological Hazards In sectors like healthcare and hospitality, employees face biological hazards from exposure to infectious agents. Hospital staff in India, for instance, must take precautions to prevent the transmission of diseases, like tuberculosis or COVID-19, which can be contracted through patient interactions.
Ergonomic Hazards Poor ergonomic conditions can lead to musculoskeletal disorders among workers. Employees in offices may experience discomfort and health issues due to improper workstation setup or prolonged sitting and computer use. Similarly, labourers in factories might suffer from back injuries or repetitive strain injuries due to unsafe working conditions like falling objects, malfunctioning equipment, poorly maintained personal protective equipment, etc.
Psychosocial Hazards These hazards result from the social and psychological aspects of the workplace. Stress, harassment, and excessive workload can have adverse effects on employees’ mental health and well-being. High-pressure jobs in sectors, like information technology, law, and finance, often lead to stress-related issues if not managed effectively.
Fire and Electrical Hazards Industries relying on electricity and heat sources, such as manufacturing units and construction sites, are prone to fire and electrical hazards. Faulty wiring, inadequate fire safety measures, and improper handling of electrical equipment can result in devastating fires that endanger lives and property.
Hazard Type
Example Situation
Physical Hazards Unequipped Construction Site
Chemical Hazards Pesticide use in agriculture
Biological Hazards
Taking care of a patient who is infected by a communicable disease
Ergonomic Hazards Improper office workstations
Psychosocial Hazards
Medical professionals or policemen
Fire and Electrical Hazards Faulty wiring in a shop
Issues and Consequences
Workers may fall, leading to injuries.
Improper handling can harm agricultural workers’ health and can cause diseases like skin irritation, rashes, etc.
Risk of contracting diseases like COVID-19 due to inadequate protection while patient interactions.
Poor ergonomics or repetitive tasks can cause back and neck pain.
Stress can affect mental health and well-being.
Fire risk increases due to a poor electrical setup.
Understanding these diverse sources of hazards in the workplace is crucial for both employers and employees. By identifying and preventing these risks, we can collectively create safer and healthier work environments, ultimately promoting employability skills that prioritise the well-being of the workforce. This chapter will delve deeper into strategies and practices to protect health and safety at the workplace, empowering learners with the knowledge to thrive in their careers while safeguarding their physical and mental health.
Evacuation during a hazard refers to the systematic and organised process of moving individuals, employees, and occupants out of a workplace to a safer area around it when there is a potential threat to their health and safety. This is a critical aspect of ensuring the well-being of employees and visitors in any workplace, as it helps mitigate serious risks and minimize the harm caused by various types of hazards.
General evacuation procedures are essential to ensure the safety of employees when a workplace hazard or an emergency situation occurs. These procedures provide a structured and organised way for everyone to leave the workplace quickly and safely. Here are the general steps involved in evacuation procedures:
Alert Everyone When a hazard is detected, the first step is to alert everyone in the workplace. This can be done through fire alarms, sirens, or other audible signals. In some cases, verbal announcements or messages through the intercom system may also be used to inform employees about the emergency.
Stay Calm It’s crucial for everyone to stay calm and avoid panic. Panic can lead to chaos and make the situation more dangerous.
Follow Designated Evacuation Routes Workplaces typically have designated evacuation routes marked with clear signs and illuminated exit signs. Employees should familiarise themselves with these routes in advance and follow them during an evacuation. These routes are chosen to minimize exposure to hazards and provide the safest path to exits.
Do Not Use Elevators Elevators can be dangerous during emergencies, as they may malfunction or become nonoperational. It’s a standard practice to avoid using elevators and use stairs instead.
Assist Others If possible, help colleagues or visitors who may have mobility issues or need assistance in evacuating. However, prioritise your own safety and do not put yourself at risk.
Gather at Assembly Points Once outside the building, employees should gather at predetermined assembly points that are a safe distance away from the place of hazard. These assembly points are typically located in open areas where emergency personnel can account for everyone and provide further instructions.
Do Not Re-enter the Building Under no circumstances should employees re-enter the building until it has been declared safe by authorised personnel. Re-entering too soon can expose individuals to ongoing situations.
Follow Instructions During the evacuation, employees should listen to instructions from designated personnel, such as fire wardens or emergency responders. These individuals are trained to manage emergencies and will provide guidance on what to do next.
Account for Everyone Employers are responsible to account for all the employees and visitors following an evacuation. They will often have procedures in place to track who were safely evacuated and who may still be inside the building.
Wait for the All-clear Instruction Once the hazard is resolved or the situation is deemed safe, employees will be allowed back into the building. Until then, it’s essential to remain at the assembly point.
The manufacturing company, named “SafetyTech Industries,” produces electronic components. The facility has approximately 200 employees working in various departments, including production, quality control, and administration.
One afternoon during the monsoon season, a heavy rainstorm struck the region, leading to localised flooding. The continuous rain caused water to accumulate around the factory premises, posing a potential threat to the employees’ safety.
SafetyTech Industries had a well-established evacuation plan that was regularly reviewed and updated. Here’s how the evacuation process was carried out:
1. Alert system: The company had an alert system in place that could quickly notify employees about any emergencies. In this case, the alert was sent out via text messages, loudspeakers, and other communication channels.
2. Immediate shutdown: All machinery and equipment were immediately shut down to prevent accidents during the evacuation.
3. Designated assembly points: There were designated assembly points for employees to gather in case of an emergency. These points were located on a higher platform, away from the flood-prone areas.
4. Clear communication: Supervisors and safety officers were responsible for ensuring clear communication during the evacuation. They used whistles and megaphones to guide employees to safety.
5. Buddy system: Employees were encouraged to use the buddy system, where they paired up with a colleague to ensure that no one was left behind during evacuation.
6. Safety drills: SafetyTech Industries conducted regular evacuation drills to ensure that employees knew the evacuation routes and assembly points.
After ensuring the safety of all employees, SafetyTech Industries:
1. Assessed the situation: Company officials assessed the flooding situation and other hazards to determine when it would be safe for employees to return to work.
2. Communication: Provided regular updates to employees regarding the situation and when they would be expected to return to work.
3. Employee assistance: If any employees required assistance due to the emergency, the company provided support, such as counselling or medical care.
Thus, SafetyTech Industries’ effective evacuation procedures and preparedness ensured the safety of its employees during the hazard caused by heavy rainfall and flooding.
Dos Don’ts
Do prioritise safety above all.
Do follow evacuation instructions.
Do help others if possible.
Do leave your belongings behind.
Do stay low in smoke-filled areas.
Don’t panic or rush blindly.
Don’t delay or hesitate.
Don’t use elevators during fires.
Don’t re-enter the building.
Don’t block exit paths.
• Imagine you are working in a multi-story office building in India. One day, a fire alarm goes off, signalling a potential fire emergency. You are on the 5th floor, and you need to evacuate the building quickly and safely. Would you rush towards the staircase and start descending without grabbing your personal belongings, or would you wait to grab your laptop and other essential things? Provide a valid reason for your answer.
• Have you ever been in any type of hazardous situation at home or at school? If so, please describe the situation and how you tackled it.
Achieving great heights and having a successful career is often a primary goal for people. Whether you want to become a doctor, engineer, teacher, or any other professional, the journey to achieving your dreams requires dedication, hard work, and the ability to make the right choices. While you may be familiar with the importance of learning the necessary skills and knowledge for your chosen field, it’s equally crucial to understand that your health plays a key role in your journey towards success. As a professional in the making, equipped with the skills and qualifications needed for a dream job and making a mark in the world, you put in countless hours of study and practice. However, without good health, you will not be able to progress on that path.
Aspects
Exercise
Nutrition
Sleep
Hydration
• Health is a priceless asset that impacts every aspect of your life, including your ability to excel in your career.
• It influences your energy levels, mental sharpness, and emotional well-being, all of which are essential for peak performance in the workplace.
• Your dreams and ambitions are worth pursuing, but they are best achieved when you are in good health.
Engage in regular physical activity for at least 150 minutes per week.
Maintain a balanced diet with a variety of fruits, vegetables, lean proteins, and whole grains.
Aim for 7-9 hours of quality sleep each night.
Drink an adequate amount of water daily (about 8 cups or 2 litres).
(continued...)
Stress Management
Mental Health
Work-Life Balance
Seek Support
Self-awareness
Positive Relationships
Emotional Health
Mindfulness
Gratitude
Use stress-reduction techniques, such as deep breathing, meditation, and time management.
Maintain a healthy balance between work and personal life.
Reach out for professional help if experiencing persistent mental health issues.
Practice self-reflection to understand and manage your emotions effectively.
Cultivate and nurture positive relationships with friends, family, and colleagues.
Incorporate mindfulness and relaxation techniques into your daily routine.
Express gratitude for the good things in your life regularly.
Remember, small, consistent steps toward a healthier lifestyle can make a significant difference in your overall well-being.
Workplaces should have a good health program to improve the health conditions of their employees in the long run, as it would be beneficial for both of them.
1. All the employees should figure out how to maintain a balance between their professional and personal lives. They should avoid working beyond the allotted work hours, as this would cause disturbances in their schedule.
2. Insufficient sleep or a lack of other physical activities would affect the productivity of any individual and can cause illnesses.
3. There can be a small exercise area in the workspace with some equipment to encourage the habit of being physically fit among the employees.
4. Everyone should be aware of how they are feeling physically or mentally during working hours. They should take a small break to relax their minds whenever required.
5. The organisation can organise regular health check-ups for the employees or recommend a doctor to give a thorough examination of their health and ensure that no employee neglects a serious ailment.
6. Every workplace should have a counsellor and try to conduct seminars on the importance of good mental health. It is very important to keep the employees motivated and happy.
“Extreme Measures Are Required for Good Health” It is a misconception that extreme diets and intense workouts are necessary for good health. They can be unsustainable, harmful, and neglect other crucial aspects of well-being. Maintaining health involves balance: balanced nutrition, regular but manageable exercise, rest, stress management, and attention to mental and emotional well-being.
Form a small group of four students, walk around your school, and identify potential hazards in the surroundings. Take notes on what you find and discuss how these hazards could cause accidents or safety issues in the future.
Create an informative poster highlighting common workplace hazards and proposing a few safety guidelines that need to be followed.
Conduct a simulated evacuation drill at your school. Follow the designated evacuation routes and gather at the assembly point. Pay attention to staying calm during the drill. Afterwards, discuss the experience of the evacuation and suggest any improvements for a safer evacuation process.
A Select the correct option.
1 What are hazards in the context of workplace safety?
a Risks that can be completely eliminated
b Conditions or situations that can cause harm to employees
c Safety measures implemented in the workplace
d Workplace accidents
2 Which of the following does not fall under the category of fire and electrical hazard?
a Faulty wiring
c Excessive workload
b Inadequate fire safety measures
d Improper handling of electrical equipment
3 What is the undeniable link between health and professional success?
a Good health is only relevant for physical well-being.
b Good health impacts every aspect of life, including career performance.
c Career success can be achieved without considering one’s health.
d Professional success relies solely on qualifications and skills.
B Fill in the blanks with the most suitable words.
1 hazards arise from the setting of the workplace and the materials used.
2 In industries involving the use of , employees may encounter hazardous substances that can cause skin irritations, respiratory problems etc.
3 refers to the systematic process of moving individuals out of a workplace due to a potential threat to safety.
4 Express for all the good things in your life regularly.
C State whether the following is True or False. Correct the statements that are false.
1 It’s recommended to use elevators during a fire evacuation for a quicker exit.
2 During an evacuation, employees should prioritise their personal belongings over their safety.
3 Physical health, mental and emotional health are all equally important for career success.
4 Re-entering a building immediately after an evacuation is generally safe.
Answer the following questions. (Solved)
Q1. Explain why it’s essential for employees to follow designated evacuation routes during an emergency.
A1. Designated evacuation routes are carefully planned to minimize exposure to hazards and provide the safest path to exits. Following these routes ensures that employees avoid potential dangers, such as fire or smoke, and reach safety efficiently. It also helps prevent chaos and confusion during evacuations by allowing emergency personnel to account for everyone and provide necessary assistance.
Q2. Discuss the relationship between health and professional success. Why is good health considered a priceless asset for individuals pursuing their careers?
A2. Good health is a priceless asset for individuals pursuing their careers because:
• It directly impacts their ability to excel in the workplace.
• It influences their energy levels, mental sharpness, and emotional well-being, all of which are crucial for peak performance.
• They are more likely to handle stress, meet deadlines, and maintain consistency in their work.
• They tend to have fewer sick days and higher job satisfaction.
This positive cycle of health and success can lead to career advancement and personal fulfilment. In essence, good health isn’t just a personal asset; it’s a key factor in achieving professional success and overall well-being.
Q3. Imagine you are a Safety Officer in a manufacturing company. During a routine safety drill, you notice that some employees hesitate to follow the designated evacuation routes and instead try to retrieve their personal belongings. How would you address this situation, and what steps would you take to ensure a safer evacuation in the future?
A3. In addressing this situation, my primary concern is the safety of all employees. I would take the following steps:
• Immediate action: During the drill, I would immediately remind employees that safety is the top priority and that they should leave personal belongings behind.
• Feedback and education: After the drill, I would gather feedback from employees to understand their concerns and reasons for hesitating. This would help identify any specific issues that need to be addressed.
• Training and awareness: I would conduct additional training sessions to emphasise the importance of following evacuation procedures, including leaving personal items behind. Visual aids and real-life examples can help prove this point.
• Regular drills: To reinforce the importance of following designated routes, we would conduct more frequent and surprise evacuation drills. This practice helps employees become more familiar with the process and reduces hesitation during real emergencies.
• Individual support: For employees who may have mobility issues or other concerns about leaving personal items behind, I would work with them individually to develop a plan that ensures their safety while still following evacuation procedures.
• Communication: Continuous communication about the importance of safety and adherence to procedures, both within the workplace and through safety campaigns, would be essential. By taking these steps, we can create a safer work environment where employees can understand the significance of following evacuation procedures and prioritise their well-being during emergencies.
Answer Key
A 1. a 2. c 3. b
B 1. Physical 2. chemicals 3. Evacuation 4. gratitude
C 1. False. It’s recommended to use stairs, not elevators, during a fire evacuation for a quicker exit.
2. False. During an evacuation, employees should prioritise their safety over personal belongings.
3. True.
4. False. Re-entering a building immediately after an evacuation is not safe.
First Aid: It is the first and immediate care or assistance given to an injured person right after an accident or until hospital assistance arrives.
Accident: An accident is an unplanned, unexpected, and unintended event that typically results in damage or injury.
Emergency: An emergency is a sudden and often unforeseen situation or event that needs immediate attention and action.
• Workplace safety is defined as a safe and healthy office environment in which each and every person feels comfortable.
• Handling accidents effectively at an office is extremely important because they can occur anytime, despite safety measures or regulations in place.
• Fire safety refers to the steps used to control and prevent a fire. It includes measures to prevent the initiation and spread of fire, as well as providing secure means for individuals to evacuate during fire emergencies.
• Hazards, in the context of office safety, are conditions or situations that have the potential to cause harm to employees, ranging from minor injuries to life-threatening incidents.
• Evacuation during a hazard refers to the systematic and organised process of moving individuals, employees, and occupants out of an office to a safer area around it when there is a potential threat to their health and safety.
A. Select the correct option.
1. Which of the following does not fall under the category of fire and electrical hazard?
a. Faulty wiring
c. Excessive workload
2. Evacuation procedures involves
a. Alert system
c. Buddy system
3. Which item should be a part of any first-aid kit?
a. Stethoscope
c. X-ray machine
b. Inadequate fire safety measures
d. Improper handling of electrical equipment
b. Immediate shutdown
d. All of these
b. Water
d. Bandages
4. What is an unplanned or unintended event called that results in injury or damage?
a. Emergency
c. Accident
b. Sickness
d. Safety
5. emergencies have the potential to cause significant harm to the environment, wildlife, and human health.
a. Security
c. Fire
b. Safety
d. Environmental
B. Fill in the blanks with the most suitable words.
1. The quickest and simplest way to raise awareness among people is to use
2. clothes should not be worn by workers in firecracker factories.
3. Fire safety is a that everyone should learn.
4. Poor conditions can lead to musculoskeletal disorders among workers.
5. Absorbing certain chemicals can lead to , resulting in symptoms like nausea, vomiting, and dizziness.
C. State whether the following is True or False. Correct the statements that are false.
1. A basic first-aid kit should contain cotton.
2. Contact with chemicals can cause irritation in the eyes, redness, tearing, and potential eye injuries.
3. One of the parameter of emotional health is stress management.
4. Risk assessment is an integral part of the safety measures required to prevent accidents.
5. Emergency drills should not be taken seriously.
D. Short answer-type questions.
1. Name any two types of emergencies that may occur at home, school, or the office.
2. What do you understand by natural disasters?
3. What is a chemical spillage?
E. Long answer-type questions.
1. What are the dos and don’ts during an evacuation process?
2. What are public health emergencies?
3. List any five causes of electrical hazards.
F. Competency-based questions.
1. Why is it important to keep the office clean and organised?
2. Rohan works at a construction company. What measures can his office take to prevent falls on construction sites?
1. Write an article on ‘Chandrayaan-3’ in about 100 words.
• Give an appropriate title to your essay and use suitable headings and subheadings in the document.
• Apply some styles to the similar headings and subheadings using the Fill Format Mode.
• Customise an existing style by changing its font properties.
• Add your salutation at the end of the document.
Format it as per your choice and create a new style using the drag-and-drop method.
2. Design a poster on ‘Deforestation’. Include appropriate images and objects in the poster.
3. Divyansh wants to create a table to invite all the participants who took part in the science quiz in Calc. Analyse the data required to be stored in this database and accordingly, create fields and records in it.
• Name four relevant fields to be added to the table.
• Enter 10 records in the table.
• Select a suitable primary key and give the reason for selecting it.
4. The current profit situation of a business owner is as follows. Current
Using the scenario manager, find the effect of sales on the new profit in case of the following situations.
a. Sales = 680000 and cost = 800000
b. Sales = 900000 and cost = 750000
5. Saraswati’s business of sports goods is growing, and she wants to open new branches around the city. She knows that she needs to create a database in order to record the stock, sales, and business transactions. Explain the following database concepts to help her computerise her business.
i. What is an DBMS? Give an example of DBMS software.
ii. What are the various ways to create a table using the LibreOffice Base?
iii. Explain the concept of a primary key.
iv. Is it possible to make more than one field as a primary key in your table? (Yes/No). Justify your answer.
6. Create a template of a resume with a standard format and save it with the filename: Yourname_ Resume. Your resume template must include the following:
• Contact number
• Your achievements
• Hobbies
• Skills
i. Set the ‘Resume Template’ as the default template.
ii. Create two more resumes using the created template.
7. Write an article on the topic 'First-Aid Kit' in about 150 words. Give appropriate headings and subheadings. Create a table of contents using the hierarchy of headings.
8. A manager wants to track the leaves taken by its employees in the first quarter. The employees are operating from different regions of the country—East, West, North, and South. The details of the leaves are maintained in Calc Sheet 1. Add a formula to calculate the total number of leaves taken by the employees in Sheet 2
9. Enter the records of company as shown in Sheet 1. Create a Sheet 2 and follow the instructions below:
• Copy the ‘Category’ column from Sheet 1 and paste it into Sheet 2.
• In Sheet 2, add a new column titled ‘Total Sales’ and calculate the total sales for each product category by referencing the cells of Sheet 1.
10. Create a spreadsheet to maintain your monthly expenses. Turn on the ‘Track Changes’ features while making corrections in the spreadsheet. Also, add comments to justify the expenses exceeding ₹100.
11. Create a macro as a function to calculate the sum of two numbers by passing arguments.
12. Enter the following data in a spreadsheet and perform the Goal Seek operation to know how much marks are needed by a student in the third term to score overall 80% marks.
13. You are working on setting up a database for a rental company. In this database, you need to create a table named ‘Rent_Records’ using the Table Design view. Define the following fields for the ‘Rent_Records’ table:
• Rent_ID (Primary Key, Auto-generated number)
• CustomerName (Text)
• Rent_Date (Date/Time)
• ReturnDate (Date/Time)
• Rent_Duration (Number, representing days)
• Rent_Cost (Currency)
Describe how you would set ‘Rent_ID’ as the primary key with an auto-generated number.
14. Create the given Product table with the mentioned fields in a database and add the following in it:
Product Table
• Product_ID Integer [INTEGER], Primary Key
• Product_Name Text [VARCHAR]
• Price Integer [INTEGER]
• Enter eleven records in the table.
• Edit the name in the tenth record.
• Review the entered data and edit the records wherever necessary.
• Delete the eleventh record from the table.
• Sort the data according to the Product_Name fields using the Sort Order dialog box.
• Sort the records in the descending order according to the Product_ID field.
Now, create another table with the name Sales and include the following fields:
Sales Table
• Sale_ID Integer [INTEGER], Primary Key
• Sale_Date (Date/ Time)
• Quantity_Sold Integer [INTEGER]
• Product_ID Integer [INTEGER], Foreign Key
• Total Amount Float [FLOAT]
• Add 10 records in the Sales table.
• Create a relationship between the Product and the Sales tables.
15. Create a database that contains information about a library’s book collection. The database has two tables: ‘Books’ and ‘Authors,’ with the following fields:
Books Table:
• BookID (Primary Key, Auto-generated integer)
• Title (Text)
• AuthorID (Foreign Key)
• Genre (Text)
• PublicationYear (Integer)
Authors Table:
• AuthorID (Primary Key, Auto-generated integer)
• AuthorName (Text)
• BirthYear (Integer)
Answer the following questions:
• Create an SQL query that retrieves the titles of all books published before the year 2000.
• Create an SQL query to count the number of books of each subject and display the subject name along with the number of books in that subject.
• Create an SQL query that finds the top 5 most recently published books, including their titles and publication years, and sorts them in descending order of their publication year.
16. Create a report for the Books Table (created for above question) showing the following fields:
• BookID
• Title
• Publication Year
Save the created report.
17. Ask the students to get more information about the features and shortcuts of Calc and discuss them in the class.
18. Create a chart on the types of emergencies. Write their examples and also paste their pictures.
19. Research on the internet about different types of hazards. Compare their consequences and make a presentation on it.
20. Create a document in LibreOffice Writer on the topic ‘Cyber Ethics’.
21. Create a form to fill in the basic details such as name, class, roll no., address, etc., using LibreOffice Base.
22. Visit your parents workplace and understand the safety measures taken by the company in case of a hazard. Write a report on your observation from the visit.
23. Get a first-aid kit that can be kept in your bags and list the items that you can keep in it.
24. Buy a scrap book and draw some common signs like safety signs, safety symbols, or accident prevention tags that can be used to warn people about the electrical hazards at a workplace.
25. Prepare a chart on the balanced-diet that should be followed by everyone and include the nutritional value of each item.
1. Define Cell.
Ans: The intersection of a row and a column is called a cell.
2. What is a record?
Ans: A record is a collection of fields in a database table. Or, you can say one record is a complete row of a table.
3. What is the use of the Query Wizard tool?
Ans: The Query Wizard is a beginner-friendly tool that assists you in creating a query using the chosen table, making it the simplest approach to do so.
4. What are the full forms of DML and DDL?
Ans: DML stand for Data Manipulation Language and DDL stands for Data Definition Language.
5. What is the Form Wizard?
Ans: The Form Wizard is a tool that assists you in creating a form by guiding you through various steps.
6. What are the templates in Writer?
Ans: A template is a predefined layout that contains a sample theme, background style, colours, etc.
7. Define workplace safety.
Ans: Workplace safety is defined as a safe and healthy workplace environment in which each and every person feels comfortable.
8. Mention a major cause of fire at a workplace.
Ans: Electrical malfunction
9. Define posterize.
Ans. Posterize reduces the number of colours used in an image, giving it a poster-like look.
10. What is Anchoring?
Ans: Anchoring refers to the reference point for the graphics. This point could be the page, or frame where the object is, a paragraph, or a character.
11. Which button denotes the page number while customising the TOC?
Ans: #
12. How is sharing a spreadsheet useful?
Ans: Sharing a spreadsheet is useful because many users can work on it simultaneously.
13. Define what-if analysis.
Ans: It is the act of changing the values in the cells to examine how such changes affect the results of formulas of spreadsheet calculations.
14. What is the main benefit of using macros?
Ans: The main benefit of using macros is faster execution time.
15. Give an example of chemical hazards.
Ans: Pesticides used in agriculture.
16. What do you mean by safety drills?
Ans: Safety drills ensure that employees in a workplace know the evacuation routes and the assembly points.
17. What is the vertical set of values in a table.
Ans: Column
18. What is a key?
Ans: A key is an attribute or a combination of attributes that is used to uniquely identify records.
19. Name the key that is used by the database designer to uniquely identify each record in the table.
Ans: Primary key
20. Define SQL.
Ans: A standard application that provides an easy interface for database interaction in relational databases.
21. What is an emergency?
Ans: An emergency is a sudden and often unforeseen situation or event that needs immediate attention and action.
22. Define Invert effect.
Ans: This effect changes the colour values of a coloured image or the brightness values of a grayscale image.
23. Mention the use of list styles.
Ans: List Styles are used to edit the appearance of lists, whether they are numbered or bulleted.
24. What are drawing templates?
Ans: These templates are utilised to generate visual representations like flowcharts and diagrams.
25. What is the use of the Type tab?
Ans: The Type tab helps in setting the attributes of the table of contents.
26. What is an accident?
Ans: An accident is an unplanned, unexpected, and unintended event that typically results in damage or injury.
27. Define cell reference.
Ans: It points to the actual cell or a range of cells referenced in your formula.
28. What is the use of macro?
Ans: A macro is used to save a sequence of commands or keystrokes that are stored for later use.
29. Name the two types of hyperlinks.
Ans: Relative and Absolute
Unit 1: Digital Documentation (Advanced)
Project 1: Create a poster for your school bulletin board to make everyone aware of bullying.

Intimidation of a weaker person; the process of intimidating or mistreating someone weaker or in a more vulnerable situation
Both boys and girls bully
• Boys tend to use physical aggression
• Girls are more likely to bully in a group
• Girls tend to use social
• Exclusion and teasing
• Avoid confrontation
• Assertive body language
• Try using humor, sarcasm, or
• Assertive language
• Get an adult
• Make more friends
Project 2: Create an invitation card in the Writer document to invite some guests to your younger brother’s birthday. Use Styles to write the text and in-built gallery to add objects in your card.

Project 1: A student is aiming to achieve an overall GPA of 3.5 or higher by the end of their first semester. Assuming each subject is worth 4 credits, and the student has completed the following subjects with the corresponding grade points:
Subject 1: 3 credits, Grade: B+ (3.3)
Subject 2: 4 credits, Grade: A- (3.7)
Subject 3: 3 credits, Grade: B (3.0)
Subject 4: 4 credits, Grade: C+ (2.3)
Calculate the student’s GPA based on the provided grades and credits for their first semester.
Project 2: A cafe owner is analysing the impact of the changing menu prices on their monthly profit. Currently, the cafe sells a popular dish for ₹150, with a cost per unit of ₹100, resulting in a profit of ₹50 per unit. Using a spreadsheet application and data tables, find the effect on monthly profit in the following scenarios:
a. Increase the menu price of the dish to₹180 while keeping the cost per unit at ₹100.
b. Reduce the cost per unit of the dish to ₹60 while keeping the menu price at ₹150.
c. Increase the menu price to ₹180 and reduce the cost per unit to ₹60 simultaneously.
d. Keep the menu price at ₹150 and the cost per unit at ₹100 but double the monthly sales of the dish from 500 to 1000 units.
Project 1: Consider the table ‘Employee’ having the following details:
Solve the following queries:
a. Write the query to create the ‘Employee’ table.
b. Insert 7 more records in the table.
c. Fetch the records of the employees who belongs to the Finance department.
d. Fetch the record of the employee with EmployeeID 2.
e. Create a form for the table.
Project 2: You are maintaining the record of your business with the help of the database management system. Two tables, Customers and Orders, are created having the following details:
Solve the following queries based on the given tables:
a. Write the queries to create both the tables.
b. Insert 5 more rows into both the ‘Customers’ and ‘Orders’ tables.
c. Fetch the order record with OrderID 1002, including the customer’s first and last name.
Information Technology (SUBJECT CODE - 402)
Class X (Session 2023-2024)
Max. Time: 2 Hours
General Instructions:
1. Please read the instructions carefully.
2. This Question Paper consists of 21 questions in two sections: Section A & Section B.
3. Section A has Objective type questions whereas Section B contains Subjective type questions.
Max. Marks: 50
4. Out of the given (5 + 16 =) 21 questions, a candidate has to answer (5 + 10 =) 15 questions in the allotted (maximum) time of 2 hours.
5. All questions of a particular section must be attempted in the correct order.
6. SECTION A - OBJECTIVE TYPE QUESTIONS (24 MARKS):
i. This section has 05 questions.
ii. Marks allotted are mentioned against each question/part.
iii. There is no negative marking.
iv. Do as per the instructions given.
7. SECTION B - SUBJECTIVE TYPE QUESTIONS (26 MARKS):
i. This section has 16 questions.
ii. A candidate has to do 10 questions.
iii. Do as per the instructions given.
iv. Marks allotted are mentioned against each question/part.
Q1. Answer any 4 out of the given 6 questions on Employability Skills. (1 x 4 = 4 marks)
1. Which factor should not be considered while writing descriptive feedback?
a. Goal-oriented
c. Actionable
b. Inconsistent
d. Timely
2. Which of the following is not a part of the 7 Cs of communication?
a. Concise
c. Concrete
b. Coherent
d. Careful
3. “Please leave this file on my desk.” Which type of sentence is this?
a. Declarative
c. Imperative
b. Exclamatory
d. Interrogative
4. The ability to work independently is important because it .
a. decreases self-esteem
c. brings out the worst in a person
b. makes you less accountable
d. boosts confidence
5. If Riya is able to recognise and understand her thoughts, feelings, behaviours and qualities, she is:
a. Self-aware
c. Disciplined
6. Which of the following is a sustainable practice?
a. Using petrol and diesel vehicles
c. Wastage of water
Q2. Answer any 5 out of the given 6 questions.
1. is the advantage of DBMS.
a. Data integrity
c. Data accessibility
b. Self-motivated
d. Stressed
b. Reduce, reuse, recycle
d. Use of chemical pesticides
(1 x 5 = 5 marks)
b. Data security
d. All of these
2. SQL clause is used to filter records in a Select statement.
a. Group by
c. Where
b. Order by
d. From
3. data type is suitable for storing your mobile number and statistical values in a database.
a. Alphanumeric
c. Binary
b. Date/Time
d. Numeric
4. Which function cannot be performed through Subtotal in a spreadsheet?
a. Sum
c. Average
b. Product
d. Percentage
5. mode provides you with options like Default, Grayscale, Black/White and Watermark.
a. Graphics
c. Posterize
6. An example of DBMS is
a. Oracle
c. MySQL
Q3. Answer any 5 out of the given 6 questions.
b. Aging
d. Pop Art
b. SQL Server
d. All of these
(1 x 5 = 5 marks)
1. The is a temporary storage area in your computer’s memory where you can place images or text for later use.
a. Drag-and-drop
c. Gallery
b. Clipboard
d. Scan
2. The field type holds numbers with decimals.
a. Float [FLOAT]
c. Text [TEXT]
b. Boolean [BOOLEAN]
d. Date [DATE]
3. The key can be defined as a set of one or more keys that is able to uniquely identify a record in a table.
a. Candidate
c. Composite
b. Primary
d. Foreign
4. Document templates allow you to craft well-structured documents such as letters, reports and memos. (True /False )
5. Which of the following option of the Edit menu allows the sharing of a spreadsheet?
a. Share Document
c. Changes
b. Merge Document
d. Share Spreadsheet
6. Which of the following sign is used to run a macro as a function?
a. =
c. &
Q4. Answer any 5 out of the given 6 questions.
1. Who gave the concept of RDBMS?
a. Charles Babbage
c. Sharon B. Codd
2. The field type stores numbers with decimals:
a. Float [FLOAT]
c. Text [TEXT]
b. +
d. %
(1 x 5 = 5 marks)
b. Charles Bachman
d. Dr E. F. Codd
b. Boolean [BOOLEAN]
d. Date [DATE]
3. data type contains text data that may contain alphanumeric characters, letters and symbols.
a. Alphanumeric
c. Binary
b. Numeric
d. Date and Time
4. Ingesting or absorbing certain chemicals can lead to , resulting in symptoms like nausea, vomiting and dizziness.
a. Eye irritation
c. Poisoning
b. Allergic reactions
d. Skin irritations
5. allows you to combine the data from multiple worksheets into a single master worksheet.
a. Data consolidation
c. Scenarios
6. Which of the following is not a type of hyperlink?
a. Web
c. Frame
Q5. Answer any 5 out of the given 6 questions.
b. Multiple data
d. Goal Seek
b. FTP
d. Relative
1. are used to store serialised Java objects.
a. Other variable types
c. Binary
(1 x 5 = 5 marks)
b. Date and Time
d. Numeric
2. Which of the following options is not present in the Insert Sheet dialog box?
a. Location
c. Sheet
b. Position
d. None of these
3. Which of the following is not an option of optimise result to field?
a. Maximum
c. Target cell
b. Minimum
d. Value of
4. can be defined as a set of one or more keys that is able to uniquely identify a record in a table.
a. Primary key
c. Reference key
b. Candidate key
d. Composite key
5. Click on the button next to the element you want to remove from the structure line, and then press the key(s).
a. Delete
c. Shift + Delete
b. Ctrl + Delete
d. Enter
6. Which of the following can be a cause of a fire emergency?
a. Uneven stairs
c. Water spilled on the floor
b. Faulty electrical equipment
d. Roof collapse
Answer any 3 out of the given 5 questions on Employability Skills.
Answer each question in 20–30 words.
Q6. List any two principles of effective communication.
Q7. Differentiate between specific and non-specific feedback.
Q8. Why is stress management important in our lives? Give any two reasons.
Q9. Explain any two types of communication barriers.
Q10. Discuss the two different types of articles.
Answer any 4 out of the given 6 questions in 20–30 words each.
Q11. Write the two ways to create a template.
Q12. What is the use of macros in a spreadsheet?
Q13. How can you create a name range in a spreadsheet?
Q14. List the Numeric Datatypes in a LibreOffice Base.
Q15. What do you understand by natural disasters?
Q16. Why is workplace safety important?
Answer any 3 out of the given 5 questions in 50–80 words each.
(2 x 3 = 6 marks)
(2 x 4 = 8 marks)
(4 x 3 = 12 marks)
Q17. Jatinder is preparing notes for her periodic test. Help her to write a short note on the following:
a. Primary key
c. Reference key
b. Candidate key
d. Composite key
Q18. Divyansh is a student studying in class 10th. He has learnt about the properties of the Design grid while creating a query using the design view. But, he is still confused. Help him recall the properties.
Q19. Consider the following table:
a. How many fields and records are there in the Product table?
b. Write the SQL commands for the following:
i. Display Product IDs and the and price of all products whose discount is more than 1200.
ii. Display the details alphabetically by product name.
iii. Display product name and price after deducting the discount from the price.
Q20. Manisha is designing a database for a library management system. She wants to include a field for ‘Book ID’ in the ‘Books’ table. Explain the significance of setting ‘Book ID’ as a primary key. Is it possible to make more than one field a primary key in your table? (Yes /No ). Justify your answer.
Q21. Krishna has created a spreadsheet with two worksheets. He want to rename both worksheets. Help him by suggesting different ways to do so.
For Visually Impaired Students.
Q22. Define the following terms:
• Biological hazards
• First aid
• Electrical safety
• Environmental emergencies
A. 1. b 2. b 3. c 4. c 5. c 6. a 7. a 8. a
9. b 10. c
B 1. misunderstanding/miscommunication 2. interpersonal 3. receiver 4. Negative
5. Visual 6. linking 7. Coherence 8. interpersonal
C 1. False. All regions have their own languages and not knowing them may create misunderstandings.
2. True.
3. True.
4. False. Feedback is an important component of effective two-way communication.
5. True.
6. False. Non-verbal communication refers to the ideas and information that are conveyed by using body language, posture, gestures, facial expressions, and so on.
7. False. We use ’the’ before the names of newspapers.
8. True.
D. 1. An organisational barrier refers to any obstacle or challenge within a company or institution that affects the effective flow of communication among individuals, teams, or departments. Hierarchical structures, ineffective communication channels, lack of transparency, conflicting objectives, and varying priorities are few causes of this barrier. Organisational barrier can make it difficult for information to be shared timely and accurately, which can result in misunderstandings, decreased efficiency, and general communication failures within the company.
Example: In a large organisation, there is no standardised method for employees to communicate important updates or information. Some teams rely on email, others on instant messaging, and some prefer in-person meetings. The lack of clear communication channels can result in employees missing critical information, duplication of efforts, and confusion about where to find the latest updates.
2
Encoding is the process of converting the sender’s thoughts and ideas into a form that can be understood by others.
Decoding is the process by which the receiver interprets and understands the message sent by the sender.
It involves choosing relevant words, arranging sentences, and using symbols to create a message that can be effectively transmitted. It involves analysing the words, symbols, and context to derive the intended meaning.
3. Written communication is communicating using written words.
a. It is a formal and structured mode of communication that uses written language to record and transmit information. It involves creating messages that other people can read, using symbols like letters and numbers.
b. For official purposes, written communication is frequently utilised since it leaves a permanent record that may be consulted and evaluated in the future. It is also useful for legal purposes, historical records, and documentation.
4. Every sentence can be broken down into two essential parts: a subject and a predicate.
A subject in a sentence is a word or a group of words that tells the name of a person or thing that the sentence is about. A predicate in a sentence is the part of a sentence that tells what the subject is doing or what the subject is.
Example: He enjoys going to the cinema.
5. The process of exchanging ideas, opinions, knowledge, and facts in order to ensure that the message is received and understood with clarity and purpose is known as effective communication. Effective communication means we know what we are trying to communicate and the audience/receiver is getting exactly what we are trying to say
E. 1. Factors contributing to communication barriers are:
a. Lack of Clarity: Unclear or incomplete messages can lead to confusion, misunderstanding, and misinterpretation.
b. Lack of Feedback: Effective communication includes continuous feedback and without the feedback, it becomes difficult for the sender to make necessary adjustments.
c. Too Much Information: Providing excess or too much information overwhelms the receiver and makes it challenging for them to process the main points.
d. Distractions: Any type of noise or interruptions can divert the attention of the receiver, which can lead to incomplete communication, where the receiver may not have perceived it correctly.
e. Cultural Differences: What may be considered appropriate and respectful communication behaviour in one culture might be seen as disrespectful or confusing in another culture.
f. Power Dynamics: Unequal power relationships can hamper the communication within any organisation. Subordinates might hesitate to express their opinions to their seniors.
g. Perceptual Differences: People interpret messages based on their individual perspectives or experiences; this can lead to interpreting the same message in a different way.
h. Technological Issues: Poor internet connectivity, software errors, or not understanding the communication tools can disrupt the flow of information.
2. Specific and Non-specific feedback can be differentiated in the following way:
It gives elaborate information on particular aspects of communication or performance and offers substantial suggestions to the receiver.
It is advantageous because it provides the receiver directly with valuable points to consider and enables them to focus on the areas that need improvement.
Example – ’I like the way you described your uncle’s character. it makes me feel like I know him too.’
It talks about the entire performance while giving a general overview. It does not particularly pinpoint a specific thing/ feature.
It lacks the necessary details to guide someone on how to enhance their performance or work.
Example- ’I like your story. It is good.’
3. Non-verbal communication refers to the messages and information that are delivered without using words or spoken language and involves expressing thoughts, ideas, and sentiments through gestures, facial expressions, and body language.
For Example, using the thumbs-up sign to indicate that you have understood.
The advantages of non-verbal communication are:
a. Making Messages Clearer: It adds extra information to what you’re saying with words.
b. Quick Communication: It can be faster than talking. For example, you can signal ’stop’ with your hand without saying a word, and people will understand.
c. Building Trust: It helps build trust and connections with others.
d. Conveys Emotions and Feelings: Facial expressions, body language, and tone of voice can convey happiness, sadness, anger, fear, and other emotions.
e. Support Verbal Communication: Nonverbal cues can support, enhance, and strengthen verbal information.
f. Helpful for Specially Abled People: They can use gestures to convey their ideas and thoughts.
4. A phrase is a collection of words used to express a single idea. They do not have both subject and predicate, so they do not express a complete thought on their own. They add depth, detail, and nuances to the sentences, making them crucial components. For better writing, it is crucial to understand phrases. They enrich and elaborate sentences, enhancing their vividness and interest.
a. Noun Phrase: A group of words centred around a noun, which can include articles, adjectives, and other modifiers. Example – Those new pink shoes are mine.
b. Verb Phrase: A group of words centred around a verb, often containing auxiliary verbs and other elements. Example – They were playing football.
c. Adjective Phrase: A group of words centred around an adjective, providing additional information about a noun. Example – He bought a car with a sleek, modern design.
d. Adverb Phrase: A group of words centred around an adverb, providing more details about a verb, adjective, or adverb. Example – She sings melodiously.
5. The process of exchanging ideas, opinions, knowledge, and facts in order to ensure that the message is received and understood with clarity and purpose is known as effective communication
Following are the principles of effective communication:
a. Simple Language: Using language that is easy to understand helps ensure that both the sender and receiver grasp the message without confusion.
b. Definite Purpose: Having a clear purpose in mind while communicating prevents misunderstandings and ensures the message’s intent is well-understood.
c. Completeness and Concision: Providing all the information required to the recipient in a clear and straightforward manner, guarantees that they will understand everything without feeling overburdened.
d. Appropriate Medium: Choosing the right communication medium, considering factors, such as timing, distance, and the nature of interaction, ensures effective communication.
e. Authenticity: Sharing accurate and honest information builds trust and credibility in communication.
f. Courtesy: Politeness and respect in communication contributes to a positive atmosphere and healthy relationships.
g. Active Listening: Effective communication involves not only speaking or writing, but also actively listening to others.
h. Adaptability: Tailor your communication to the needs and preferences of your audience. Consider their level of knowledge, communication style, and the context of the interaction.
F. 1. To ensure a successful speech in a university at Delhi, Professor Krishna can take several actions, including:
a. Language Preparation: Familiarize himself with the local language commonly spoken in North India. This will help him connect with the audience and convey his message effectively.
b. Cultural Sensitivity: Respecting local customs and incorporating them into his speech can establish rapport with the audience.
c. Visual Aids and Clarity: Using visual aids, such as slides or props, can aid in conveying the message even if there are language barriers.
d. Engage with the Audience: Encourage interaction with the audience through questions to maintain their interest and ensure better comprehension.
2. Rakesh and Vinay need to consider the following factors before giving descriptive feedback to the junior employee:
a. Goal-Oriented: Feedback should align with the intended goals.
b. Actionable: It should provide actionable steps for improvement and suggest specific strategies or changes.
c. User-Friendly: Feedback should be easy to understand and easily comprehensible.
d. Giving Timely Feedback: Feedback should be on time to ensure its relevance and impact on the receiver’s work or communication.
e. Positive Feedback: Feedback should include the strengths and positive points of the employee.
3. Prakshi should acquire some non-verbal skills to increase her chances of getting selected in the interview. She should focus on:
a. Professional Appearance: Dress appropriately, according to the job profile and company culture.
b. Eye Contact: Maintain consistent and friendly eye contact with the interviewer to convey confidence and engagement.
c. Smile: Offer a warm and genuine smile when appropriate. It creates a positive and approachable impression.
d. Body Language: Sit up straight and maintain a good posture.
e. Active Listening: Show that you’re actively listening to the interviewer by nodding and asking relevant questions.
4. There are three factors to keep in mind while writing a well-structured paragraph. I would suggest Moksh to write a paragraph on teamwork with:
a. Topic Sentence: The topic sentence is like the headline of your paragraph. It introduces the main idea or point that the paragraph will discuss. It is a crucial element that guides the reader’s understanding of what’s to come.
b. Supporting Details: Supporting details are sentences or examples that provide evidence or an explanation for the topic sentence. They add depth and context to your main idea.
c. Concluding Sentence: The concluding sentence summarises the paragraph’s main point and often provides a smooth transition to the next paragraph.
5. The bank manager should have made sure that the following points are kept in mind while conveying information:
a. The message should be communicated in simple, clear, and easy-comprehend language.
b. There should be no scope for incomplete information and ambiguity. Information shared should be complete in every way.
c. If the information or message has to travel to multiple employees, it should be communicated formally through an email, a notice, or in a formal gathering.
d. It is advisable to take feedback to ensure that the message is communicated clearly, with no confusion.
A. 1. d 2. a 3. c 4. a 5. b
B. 1. goals 2. self-regulation 3. Self-management 4. Extrinsic 5. endorphins. C. 1. True.
2. False. Stress is an automatic physical, mental, and emotional response to a challenging and difficult event.
3. False. Independent workers are very determined about work and set their own goals.
4. False. Stress can have a negative impact on our physical and mental health.
5. True.
D. 1. Intrinsic self-motivation is the drive that comes from inside to achieve a specific goal by working very hard and putting in a lot of effort. This usually consists of a profession or a hobby that a person enjoys and does not feel burdened by performing it. In this, finishing a task is more satisfying than succeeding at it. This motivation comes from within, and the person is not bothered with the benefits or compliments that come with it. For example: You enjoy music; therefore, you finish all the assignments for the music lessons quickly.
2. Self-motivation refers to the internal drive and determination that inspires an individual to take an action, achieve goals, and put efforts even when faced with challenges or obstacles.
Rashika can stay motivated by following these tips:
a. Establishing healthy habits for progressing toward her objectives.
b. Setting SMART (Specific, Measurable, Achievable, Relevant, and Time-bound) goals. She should work on priorities and stay away from any obstructions.
c. Self-evaluation is crucial in determining one’s development, flaws, and strengths. She can evaluate her work.
d. She can develop time-management skills and maintain a healthy lifestyle.
3. Yoga helps in managing stress by:
a. Yoga’s different physical postures, meditation, breathing exercises, and relaxation techniques are very useful in reducing stress.
b. The yoga exercises that focus on slow movement, stretching, and deep breathing are the best for lowering your anxiety and stress levels.
c. It can reduce stress hormones and relax your mind to help you sleep better.
d. Yoga promotes self-care and helps in keeping your emotions in control. It ensures more energy, a sense of happiness, and brighter moods.
E. 1.
When you are conscious of how you are perceived publicly by other individuals or society, you have developed public selfawareness. Some people behave in a certain manner which is acceptable in the society as they are aware that they are being evaluated by other people.
Example: Putting up your hand in the class to respond to the teacher’s question is a sign that you want everyone to see that you know the answer.
When you are conscious of how you behave about certain things or situations and how it will impact others, you have developed private self-awareness. In this type of selfawareness, you are able to notice and examine your own thoughts, feelings, and motivations.
Example: When you become conscious that you have broken something even though no one else has noticed.
2 Stress management refers to the numerous strategies, plans, techniques and tactics used to manage and diminish the negative impact of stress on one’s physical, emotional, and psychological health.
Various stress management techniques that we can follow are:
a. Physical Exercise: It includes all the activities that help an individual to maintain physical fitness, enhance mental wellbeing, and help improve their sleep.
b. Yoga: The yoga exercises that focus on slow movement, stretching, and deep breathing are the best for lowering your anxiety and stress levels. It should be a part of your daily schedule so that it can have a positive impact, both physically and mentally.
c. Meditation: A person’s life becomes more peaceful and balanced after practicing meditation. It has several advantages and has worked miracles for many people.
d. Enjoying: Enjoyable activities are a great approach to enhance your mental health and general well-being. One should take out time for their favourite pastimes, events, and activities.
3 The ability to work independently means being capable of completing tasks and responsibilities on your own, without needing constant guidance from others. It means that you have to make your own decisions and organise your work properly because only you are accountable for it. It will increase your confidence and self-esteem.
Working independently is significant because:
a. Boosts Confidence: Working individually without any other support, boosts the confidence of an individual.
b. Improves Decision Making Skills: An independent worker needs to take all the important decisions on their own to keep moving ahead. This helps in building decision-making skills in an individual.
c. Brings Out the Best In a Person: If you work alone, then you put more efforts to make your work stand out.
d. Makes You More Accountable: If you are working without any team, then you are responsible for both accurate and inaccurate outcomes.
e. Increases Self-esteem: When people accomplish a goal on their own, it boosts their self-esteem.
f. Time Management: Working independently also teaches you a very important skill – time management.
F. 1. Sakshi can motivate herself to work by the following steps:
a. Setting New Goals: Sakshi needs to set new goals for herself so that she does not find her job monotonous and starts working towards them.
b. Maintaining a Positive Mindset: She needs to remind herself of the importance of her role and how she contributed to the company’s success. This will help her to stay motivated.
c. Time Management: She needs to prioritise her tasks, manage her time, and complete her assignments on time. As a result, she will have more time for herself.
2. As a true friend, I will explain to Jay about the importance and need for stress- management. I shall highlight the benefits listed below:
a. Improved Physical Health: Stress can lead to high blood pressure, cholesterol, obesity, and other lifestyle diseases. Jay has to manage his stress to remain physically fit.
b. Improved Mental Health: Apart from physical health, stress will have an equal amount of negative impact on Jay’s mental health and can lead to depression, anxiety, and other related issues.
c. Enhanced Productivity: Excessive stress decreases one’s productivity as it leads to distraction and reduction in focus. Stress management can make him more productive.
d. Quality of Life and Relationships: Destressing leads to improved communication and a better lifestyle, thus improving the quality of Jay’s life and his relationships. He will be less irritable.
e. Emotional Regulation and Adaptability: Stress management helps in regulating one’s emotions and adapting to a changing environment. It will enhance Jay’s performance as he will be able to control his emotions better.
A. 1. b 2. a 3. d 4. b 5. d
B. 1. delete 2. Icons 3. Computer Viruses 4. Taskbar
C. 1. True.
2. False. To rename a file, right-click on the file or the folder, choose the Rename option from the context menu.
3. True.
4. False. Email services have a Filter feature to stop the spam messages from reaching your mail inbox.
D. 1. Computers are complex devices with many delicate electronic components that require protection from dust and potential damage. Neglecting their maintenance can result in reduced efficiency. Considering the expense associated with repairing computers and mobile phones and to ensure their smooth operation, it becomes essential to take consistent and vigilant care of them.
2.
Multi-user operating systems enable multiple users to utilise the same computer, simultaneously.
Example: Linux, Unix, and various versions of Microsoft Windows.
3. Managing files and folders is important because:
These operating systems were designed to accommodate just one user performing a single task at a time.
Example: Microsoft Windows 3.1, Microsoft Windows 95, and Microsoft DOS.
• Organisation: Proper file and folder management helps you keep your digital life organised. When files are wellorganised, you can quickly find what you need without wasting time searching.
• Efficiency: An organised file structure boosts productivity. You can work more efficiently because you know where to locate your documents, photos, or projects. This reduces frustration and helps you complete tasks faster.
• Preventing Data Loss: Good file management reduces the risk of losing important data. When you organise files into folders and regularly back up your files, you have a safety net in case of computer crashes, hardware failures, or accidental deletions.
E. 1. Functions of an operating system are:
• Processor Management: The operating system oversees the functioning of the processor by assigning tasks to it and ensuring that each process and application gets sufficient time for proper operation.
• Memory Management: The operating system handles the distribution of internal memory (like RAM, cache, etc.) among various applications to ensure smooth execution of each process.
• Device Management: An operating system controls the operation of input and output devices, receiving their requests, performing specific tasks, and communicating with requesting processes.
• File Management: The operating system maintains organized records of file actions, such as creation, deletion, transfer, copying, and storage. It also preserves data integrity and directory structures.
• Security: An operating system employs various techniques to safeguard user’s data confidentiality and integrity, typically involving usernames, passwords, and firewalls.
• Error Detection: The operating system periodically checks for external threats, malicious software, and hardware issues and alerting users when necessary.
A computer virus is a program or set of programs that interrupts a computer’s normal functioning and can infect or destroy data. It enters a computer without the user’s permission or knowledge through infected storage devices, like CDs or pen drives, and can even enter while browsing the internet. To avoid detection, these viruses hide silently. They can remain undetected and inactive for a long time, waiting for a specific signal or event to activate them.
Harms Caused by a Computer Virus:
If your computer is attacked by a virus, it can affect your computer in the following ways:
• Decreases the speed of the computer
• Damages or deletes files
• Displays strange messages
• Leads to the formatting of the hard disk
• Leads to frequent computer crashes
• Leads to the loss of data
Definition
A digital menu card for your computer’s programs and options.
Purpose
Function
Example
Usage
Helps you find and open programs and options easily.
Lists all available programs and options on your computer.
Imagine that it is like a restaurant menu, showing all the dishes you can order.
You use it to open programs and access various computer functions.
Tiny pictures or symbols representing programs, files, or folders on your screen.
Visual shortcuts for quick access to programs and files.
Represents programs, files, or folders visually.
Think of them as road signs on your computer screen that help you find what you need.
Click on the icons to open programs, files, or folders without reading long names.
F. 1. In order to avoid any type of computer virus, Smita needs to: -
A bar usually at the bottom of your screen that helps to manage open programs.
Manages open programs and allows you to switch between them quickly.
Displays icons for open programs and provides quick access to them.
It is like having a personal assistant on your computer desk, keeping things organized.
Helps you switch between different tasks or programs you are working on.
• Use Security Software: Install a trustworthy antivirus software and keep it updated. Regularly scan and identify potential threats.
• Employ Firewalls: Configure her web browser settings to block access to unwanted websites.
• Be Cautious Online: Exercise caution when sharing information online. Use secure websites for financial transactions, avoid saving personal data on websites, and restrict herself from downloading software from unauthorized sources.
• Update Software: Keep her computer’s software and applications up-date to patch security vulnerabilities.
• Beware of Spam: Delete emails from unknown sources without opening them or downloading attachments.
• Backup Your Data: Regularly back up her data for protection against loss and use encryption software to secure it.
• Scan Portable Devices: Before using USB drives or other portable storage devices, scan them for viruses.
• Disable Cookies: To protect her personal information, consider disabling cookies in her web browser.
2. To create a new file on Mukesh’s desktop, he has to follow these steps:
1. Right-click on an empty area.
2. From the menu that appears, choose the ‘New’ option. He will then see a list of file types and applications, like MS Excel, MS Word, LibreOffice Writer, or any other application. Pick the one he needs.
3. Enter a file name where the cursor is and press Enter, and a new file will be generated.
1. Make in India
C. 1. True.
2. False. Atal Innovation Mission (AIM) which was launched in 2016, focuses on promoting innovation and entrepreneurship among students and start-ups.
3. False. Whether big or small, every business owner is an entrepreneur.
4. True.
D. 1. Relationship between entrepreneurship and the society:
• Entrepreneurship and society have a direct relationship. In order to build a business, an entrepreneur requires the support of the community, and the community depends on entrepreneurs to identify its issues and provide solutions in the form of ideas, goods, and services.
• The relationship between entrepreneurship and society is dynamic and very powerful. The act of creating and pursuing opportunities through entrepreneurship has significant impacts on many sectors of society.
• By creating job possibilities, they aid in the nation’s economic growth, which in turn promotes social advancements.
2. Entrepreneurs are deeply passionate about their work. They are not motivated only by money or other materialistic gains. They also love what they do and are willing to work hard and dedicate extra hours to make their business successful. If a person follows their passion, then they don’t feel burdened while working and are instead more motivated to bring the final product in the market.
For example, the founder and CEO of MDH, an Indian spice producer, was Mahashay Dharampal Gulati. His love for creating and experimenting with spices propelled him to create a global brand and now, his company’s spices are used in many homes across the world.
3. Two government initiatives to promote entrepreneurship in India are:
a. Mudra Yojana: The Pradhan Mantri Mudra Yojana (PMMY) was initiated to provide financial support to small businesses and micro-enterprises. It offers loans at different stages of business development, from startup to growth, and expansion.
b. National Entrepreneurship Development Program (NEDP): The NEDP, run by various agencies including the Ministry of Skill Development and Entrepreneurship, offers training and skill development programs to aspiring entrepreneurs.
E. 1. Entrepreneurship is the process of transforming an idea into a big business enterprise by identifying an opportunity and creating a market through thorough planning and management skills, typically with the goal of achieving financial profitability and long-term success. An entrepreneur:
a. Helps in Wealth Creation: Successful entrepreneurs have the potential to accumulate wealth, which can be reinvested in their businesses or new businesses. This can result in the creation of more jobs, stimulating economic activities, and benefiting the community.
b. Adds to the National Income: Entrepreneurs drive economic growth by identifying and grabbing opportunities, introducing innovative products and services, and contributing to increased productivity. They contribute to the national income by earning revenue and paying taxes.
c. Creates Employment Opportunities: Entrepreneurs are significant job creators. They start and expand businesses, which in turn leads to hiring of employees and thus, they reduce unemployment and stimulate economic activities.
d. Improve the Standard of Living: Entrepreneurs enhance the standard of living by introducing products or services that enhance convenience. They help in improving the standard of living not just by providing income to families through job opportunities, but also by fostering new products and services that enhance the living standard of all the stakeholders.
e. Creates Social Change: Social change denotes significant alterations in societal norms, behaviours, or structures. Entrepreneurs drive social change by introducing innovations that challenge existing practices.
f Helps in Community Development: Community development refers to initiatives aimed at enhancing the wellbeing of a local community. Entrepreneurs contribute by supporting local causes, schools, and charities.
2. ‘You need a lot of money to become a successful entrepreneur.’ According to me, this statement is a myth because not every business requires a substantial amount of money or capital at the beginning. There are start-ups that began with very little funds and have now achieved a lot of success. Typically, a significant sum of money that is required to launch a business, is used to cover the costs of renting office spaces, purchasing supplies, paying employees, and other necessities. However, not every business begins in a large office space; some of them begins in a single room of a house.
For example, Reshma is a talented tailor who can sew any style of outfit by simply looking at the picture. With the use of the internet, Reshma set up her own webpage where she sold custom-made designer outfits and began accepting requests to design more of such dresses. She gradually launched her own fashion business and used the money she made to buy a design studio. She became an entrepreneur without any external financing.
Successful entrepreneurs often begin with innovative ideas and skills. If an entrepreneur has a ground-breaking concept, a unique product or service, or a valuable skill set, they can attract investors or secure loans even without a significant amount of personal capital. While capital is essential, it is not always the determining factor of success.
3. An entrepreneur must have the following skills to be successful in the business world:
a. Decision-making: They need to make decisions about the product or service they offer, the policy of production, purchase and sell of the goods and services, and the marketing strategies they employ.
b. Management Control: Entrepreneurs are responsible for managing and controlling their businesses. They are responsible for overseeing the day-to-day operations of their businesses, ensuring that resources are utilised efficiently, and goals are met.
c. Division of Income: Entrepreneurs need to make arrangements for the division of the total income among different factions of production like rent, interest, purchase of raw material, and so on.
d. Risk-taking: They identify opportunities and are willing to invest time, effort, and resources into pursuing these opportunities, even if success is uncertain.
e. Bearing of Uncertainties: They must make decisions and take actions in the face of uncertainty. Bearing uncertainty involves making informed judgements, adapting to changing circumstances, and being resilient in the face of setbacks.
f. Innovation: Entrepreneurs are changemakers who drive economic growth, improve quality of life, and shape the future through their innovative efforts.
F. 1. Latika possesses the following qualities which made her a successful entrepreneur:
a. Passion: Latika is passionate about baking, which led her to start a home-based bakery. Her enthusiasm for creating delicious baked goods is the driving force behind her business.
b. Creativity: She consistently comes up with unique and delicious recipes, showcasing her creativity in baking. This creativity is a key asset for developing new products and attracting customers.
c. Adaptability: Latika started small by selling to friends and family but is now considering expanding her business. Her ability to adapt to changing circumstances and explore new avenues for growth is a valuable entrepreneurial trait.
d. Risk-Taking: Starting a home-based bakery business involves a significant degree of risk. Latika took the initiative to turn her passion into a business venture, demonstrating her willingness to take calculated risks.
e. Persistence: Entrepreneurship often comes with challenges and setbacks. Latika’s determination to continue baking and grow her business despite obstacles shows her persistence.
2. The Indian government has implemented several schemes and initiatives to support entrepreneurs. These schemes aim to provide financial assistance, promote innovation, and facilitate the growth of businesses.
a. Atal Innovation Mission (AIM): Launched in 2016, it focuses on promoting innovation and entrepreneurship among students and start-ups. It includes initiatives, such as Atal Tinkering Labs in schools and Atal Incubation Centres, to support start-ups.
b. Startup India: Launched in 2016, it aims to promote entrepreneurship and innovation in the country. It provides various benefits to start-ups, including tax exemptions, funding support, and simplification of regulatory procedures.
c. Make in India: Make in India is a campaign launched in 2014 to encourage manufacturing and production within India. It seeks to transform the country into a global manufacturing hub by promoting ease of doing business, simplifying regulations, and attracting foreign investments.
A. 1. b 2. c 3. a 4. d 5. d
B. 1. social inclusion 2. biodiversity 3. United Nations 4. environment
C. 1. False. Reduced chemical use and biodiversity preservation will promote the health of soil.
2. True.
3. False. Developed countries can provide financial and technical assistance to developing nations to support their sustainable development efforts.
4. True.
D. 1. Sustainable water practices involve conserving water and using it responsibly. This can be achieved through various methods, such as:
a. Rainwater Harvesting: Rainwater is stored and reused for household consumption and other purposes.
b. Effective Irrigation Practice: Using sprinkler irrigation and drip irrigation methods to control the flow of water across farmlands can help to prevent water loss, which typically results from an excessive water supply.
c. Fixing Leaks: One common and significant form of water loss is leaking, which results in significant water loss. Repairing the leaks stop them from occurring again and conserve water.
d. Low-flow Fixtures: It is a water-saving plumbing fixture created to reduce the water flow rate in order to save water. Showerheads and toilets with low-flow fixtures use a lot less water.
2. Sustainable development is about improving the quality of life for all individuals. It involves creating a world where future generations can look forward to a better future, safe environment to live in, clean water to drink, and clean air to breathe.
a. Everyone gets the opportunity to live a decent life and have access to natural resources.
b. It ensures economic growth and prosperity to improve the standard of living, create job opportunities, and reduce poverty.
c. Preserves biodiversity, protects ecosystems, and reduces pollution to maintain the health of the planet for current and future generations.
3. Different ways to follow the sustainable practice of ‘reduce, reuse, and recycle’ at home are:
a. We can reduce the amount of plastic by using reusable cloth bags for shopping, instead of plastic bags.
b. Reduce food wastage by planning meals and storing food properly. Use reusable containers to store food instead of disposable ones.
c. Get creative and find new uses for old items. We can reuse glass bottles and old clothes to make flower pots and dusting clothes, respectively.
d. Set up a recycling station at home to separate recyclable materials from regular trash. Support the recycling industry by purchasing products from recycled materials.
E. 1. Three main pillars of sustainable development are:
Environmental: It is about preserving and protecting the environment. It involves conserving energy, cutting back on waste and pollution, utilising natural resources wisely, and protecting biodiversity.
Economic: This means using assets and resources wisely and efficiently to ensure economic growth and produce operational profit. It aims to improve the standard of living of the public. The resources should be used responsibly to meet the goals of development and build a competitive economy.
Social: It’s all about looking out for people. Making sure that the general population is secure, healthy, and treated fairly is a part of it. It also includes being welcoming and inclusive of individuals from various social and cultural backgrounds.
2. Sustainable practices are the actionable steps we take to achieve the objectives of sustainable development.
Following are the sustainable practices:
a. Conservation of Water: Sustainable water practices call for resposible water use and the reduction of waste. This can be accomplished by using effective irrigation techniques, rapidly repairing leaks, and installing low-flow fixtures.
b. Energy Efficiency: Sustainable practices are based on the principle of using energy more effectively. It includes measures, such as improving lighting systems, insulating buildings, and purchasing energy-efficient appliances. We can lessen our carbon footprint and energy costs by consuming less energy.
c. Sustainable Transportation: Reducing greenhouse gas emissions and reducing traffic congestion are achieved by choosing environmentally-friendly means of transportation, including walking, bicycling, carpooling, or public transportation.
d. Sustainable Agriculture: Sustainable agriculture methods prioritise biodiversity, improve soil health, and use fewer chemicals.
e. Reduce, Reuse, Recycle: Reducing waste at the source, reusing items whenever possible, and recycling materials are fundamental practices that conserve resources and reduce landfill waste.
3. Sustainable development faces challenges because it calls for resources, focused efforts, and a change in society’s mind-set. Following are the two problems related to sustainable development:
a. Limited Resources: The lack of essential resources is one of the biggest problems. Freshwater, land, and energy resources are under more stress as the world’s population continues to rise. We must carefully manage these resources for sustainable development, which often requires innovation and conservation measures.
b. Short-Term vs. Long-Term Interests: Balancing short-term economic interests with long-term sustainability goals can be challenging. Some policies and practices prioritise immediate gains over the well-being of future generations, making it crucial to shift this mind-set.
c. Global Cooperation: Many sustainability challenges are global in nature, such as climate change. Addressing these issues requires cooperation among countries, which can be complicated because of differing priorities and interests.
d. Lack of Awareness: The importance of sustainable development and its effects are not fully understood by everyone. Community awareness building and education regarding the importance of sustainable living are on-going challenges.
F. 1. Rakesh can take several steps to change his means of transportation and promote sustainable development:
a. Carpooling: Rakesh can explore carpooling options with colleagues or neighbours who have a similar route. This would reduce the number of vehicles on the road, easing traffic congestion, and lowering carbon emissions per person.
b. Public Transportation: Rakesh can switch to buses, metro, or train for his daily commute. This will support public transport system which is often more sustainable.
c. Electric or Hybrid Car: Rakesh can switch to an electric or hybrid vehicle. These vehicles produce fewer emissions, compared to traditional gasoline or diesel cars.
2. Kanha can adopt the following sustainable agriculture practices to improve the long-term health and productivity of his land:
a. Crop Rotation: Rotate crops to break the cycle of pests and diseases this improve soil fertility, and reduce the need for chemical pesticides and fertilizers.
b. Organic Farming: Shift to organic farming which avoids synthetic chemicals and instead uses natural inputs, like compost, manure, and biopesticides.
c. Natural Fertilisers: Natural fertilisers are particularly beneficial for crop growth and are also easy on finances because they are commonly found in daily life.
A. Select the correct option.
1. a. Fill Format Mode 2. b. Arrangement 3. d. Presentation Templates
4. c. Table of Contents 5. d. Scan
B. Fill in the blanks with the most suitable words.
1. Cell 2. Mosaic 3. Default
4. Separators 5. Wizard
C. State whether the following is True or False. Correct the statements that are false.
1. False. Frame Styles define the appearance and the behaviour of the frames.
2. True.
3. False. Spreadsheet templates are used to build financial and budgetary documents.
4. True.
5. True.
D. Short answer-type questions.
1. You can apply styles to your document in two ways:
• Using the Styles Pane
• Using the Fill Format Mode
2. Modifying images refers to making changes to images or graphics to make them look better.
3. You can create your templates in two ways: from a document and by using a wizard.
E. Long answer-type questions.
1. Three filter effects that can be applied to your picture to make it more attractive are:
• Invert: This effect changes the colour values of a coloured image or the brightness values of a grayscale image.
• Smooth: The smooth option softens the contrast of an image by reducing sharp transitions between its shades.
• Pop Art: The Pop Art filter dramatically transforms the image’s look. It uses bold and contrasting colours to create pop art style.
2. The entries tab is used to format the entries in the table of contents. You have the flexibility to include or remove elements like chapter numbers and apply specific character styles to individual elements for each outline level.
3. Text wrapping refers to how graphics interact with the surrounding text. It can involve wrapping text around the graphic, placing the graphic behind or in front of the text, or treating the graphic as a separate element.
F. Competency-based questions.
1. To build a custom style in Writer using drag and drop, follow these steps:
• Open the document and format the text as per your requirements.
• Open the Styles pane and click on the category you want to apply the style to.
• Next, click on the text that you want to use as the base for the style, and drag and drop the selection into the Styles pane.
• When the Create Style dialog box opens, type a name for the new style and click OK The new style will be added in the Styles pane under the selected category.
2. Resizing means increasing or decreasing the size of an image per your requirements. Follow the given steps to resize an image:
1. Click on the image that you want to resize. Once you have clicked on the image, the green resizing handles will appear.
2. Take the pointer to any of the handles. The shape of the pointer will change to a double-headed arrow.
3. Drag the arrow to increase or decrease the size of the image.
A. Select the correct option.
1. d. Percentage 2. b. To link data between multiple sheets or workbooks
3. c. Tools 4. c. Record Changes 5. a. Basic
B. Fill in the blanks with the most suitable words.
1. numerical 2. Spreadsheet Linking 3. Shared Spreadsheet
4. Command, Keystrokes 5. Repetitive
C. State whether the following is True or False. Correct the statements that are false.
1. False. You can apply subtotal formula on your spreadsheet in two ways .
2. True.
3. True.
4. True.
5. False. Macros cannot record actions performed in other windows; they are limited to the application in which they are recorded.
D. Short answer-type questions.
1. What-if Analysis is the act of changing the values in the cells to examine how such changes affect the results of formulas of spreadsheet calculations.
2. A hyperlink, also known as a link, is a reference or a connection between two webpages or documents that allows users to navigate from one location to another.
3. The advantages of a macro are:
• It saves the user’s time.
• Repeat several commands in just one click or using a shortcut-key combination.
E. Long answer-type questions.
1. The optimized result to option provides the value which can be achieved. LibreOffice Calc provides three options to optimize results:
• Maximum—It is the highest value that can be achieved if the parameters are provided.
• Minimum—It is the lowest value that can be achieved through the parameters supplied.
• Value of—The exact value which can be achieved using a solver.
2. Merging spreadsheets in Calc involves combining multiple edited versions of a spreadsheet into the original one. To merge worksheets, all the edited worksheets must have recorded changes. The steps include opening the original spreadsheet, selecting Edit -> Changes -> Merge Document, choosing the file to merge, and then reviewing the changes in the Accept or Reject Changes dialog box.
3. You can filter based on:
• Date Only changes made in a certain period of time.
• Author Only changes made by a specific author are displayed. This is especially useful if you have multiple reviewers working on the worksheet.
• Range Only changes made in a specific range of cells are displayed. This is especially useful if you have a large spreadsheet and need to review only a part of it.
• Comment Searches the content for the specific comments and displays only the changes which have comments that match the search criteria.
• Show accepted changes Show the changes that have been accepted.
• Show rejected changes Show the changes that have been rejected.
F. Competency-based questions.
1. Sub-total
2. You can compare prior versions by opening the original spreadsheet and the conflicting version. Go to Edit -> Compare Document.
A. Select the correct option.
1. c. Tables 2. a. Query 3. d. Visible
4. a. Char 5. b. One to One
B. Fill in the blanks with the most suitable words.
1. Programmers 2. Forms 3. Design Grid
4. Reports 5. Data Definition Language/ DDL
C. State whether the following is True or False. Correct the statements that are false.
1. True.
2. False. There are two ways to create a table: Creating a table using the Wizard tool and creating a table in Design View.
3. True.
4. True.
5. False. SQL gives better performance even if the database size is very large.
D. Short answer-type questions.
1. This data type contains text data that may contain alphanumeric characters, letters, numbers and symbols.
2. Wildcards are unique symbols employed as substitutes for one or more characters within a text string.
3. Sorting means to arrange the data in a specific order based on the given criteria. Sorting can be done in either ascending order or descending order.
E. Long answer-type questions.
1. Data can be organised into two types:
• Flat-file: In a flat-file system, data is stored and organised in a single table. The data is stored in a plain text format. Each data value in a flat-file system is separated by comma, tabs, spaces, etc. This type of arrangement is suitable for a small amount of data.
• Relational: In a relational system, data is stored in multiple tables. These tables are related to each other, and values can be accessed by creating relationships between them. This type of arrangement is suitable for a large amount of data.
2. To delete one or multiple records from the table, follow these steps:
• Select one or multiple records from the table.
• Right-click on the record and select the Delete option. The records will be deleted.
3. To edit a report:
• Click the Reports object in the Database pane.
• Right-click the report in the Reports pane.
• Select the Edit option. Now, you can make the desired changes in the report.
1. Date and Time
2. In LibreOffice Base, you can organise similar data into groups using the Group function. This function groups records with the same values and provide summary rows.
A. Select the correct option.
1. c. Excessive workload 2. d. All of these 3. d. Bandages
4. c. Accident 5. d. Environmental
B. Fill in the blanks with the most suitable words.
1. Signs 2. Nylon
4. Ergonomic 5. Poisoning
3. Life skill
C. State whether the following is True or False. Correct the statements that are false.
1. True.
2. True.
3. False. Self-awareness, positive relationships, mindfulness, and gratitude are some parameters of emotional health.
4. True.
5. False. Emergency drills should be taken very seriously.
D. Short-answer type questions.
1. Two types of emergencies that may occur at home, school, or the office are:
• Medical emergencies
• Fire emergencies
2. Natural disasters include accidents or events that are caused by nature and are often uncontrollable. They pose a threat to human life, property, and the environment.
3. Workers can be exposed to hazardous chemicals and toxic fumes due to accidental spills, which can lead to respiratory problems, eye or skin irritation, chemical burns, and other health issues.
E. Long-answer type questions.
1. Dos
Do prioritise safety above all.
Do follow evacuation instructions.
Do help others if possible.
Do leave your belongings behind.
Do stay low in smoke-filled areas.
Don’t panic or rush blindly.
Don’t delay or hesitate.
Don’t use elevators during fires.
Don’t re-enter the building.
Don’t block exit paths.
2. Public health emergencies are situations or events that pose significant risks to the health and well-being of a community, region, or even the entire population. These emergencies can be caused by infectious diseases, environmental factors, or other health-related issues.
3. These are the causes of electrical hazards:
• Electric shocks.
• Electrical fires due to short circuits.
• Overloaded circuits due to using too many appliances for a longer period of time.
• Exposed wires and conductors.
• Improper grounding of wires.
F. Competency-based questions.
1. A clean office means fewer chances of slipping or falling and ensuring everyone’s safety. Wet or slippery floors often cause a person to slip, and that can also sometimes lead to severe injury.
2. Rohan’s office can prevent falls by ensuring workers wear harnesses, providing safety nets, using guardrails on elevated platforms, and offering proper training on working at heights.
This two-book series on IT (Subject Code 402) has been designed for students in grades 9 and 10. The series accurately aligns to the latest CBSE curriculum, imparts theoretical knowledge, helps in developing practical skills of students and enables them to prepare effectively for examinations.
The series introduces students to fundamental concepts in digital documentation, spreadsheet, presentation, database management, and internet security. It also comprises units that cultivate the employability skills and vocational proficiencies of students.
Every chapter within the book consists of the following key elements that enhance the learning process and make exam preparations more effective.
• Remember: Important points to aid memory and recall.
• Error Alert: Common misconceptions with clear solutions.
• Did You Know?: Fun facts related to the topic, included to captivate students' interest.
• Key Terms: Important terms to ensure a firm grasp of important concepts.
• Points to Remember: Chapter-end point-wise summary to consolidate concepts.
• Chapter Checkup: Chapter-end exercises containing objective and subjective questions to enable comprehensive practice of concepts.
• Activity Time: Classroom and laboratory-based group and individual activities for an enhanced learning experience.
• Practical Section: Recommended list of practical questions for active learning.
• Viva Questions: Reference list of viva questions to better prepare for oral examinations.
• Projects: Detailed projects that promote the application of knowledge.
• Latest Sample Paper: Sample paper, adhering to CBSE guidelines, to ensure preparedness for theoretical exams.
• Answers Key: Solutions to unsolved questions to support independent practice and learning.
Uolo partners with K-12 schools to bring technology-based learning programs. We believe pedagogy and technology must come together to deliver scalable learning experiences that generate measurable outcomes. Uolo is trusted by over 10,000 schools across India, South East Asia, and the Middle East.