
Academic Authors: Jatinder Kaur, Ayushi Jain, Anuj Gupta, Simran Singh
Creative Directors: Bhavna Tripathi, Mangal Singh Rana, Satish
Book Production: Rakesh Kumar Singh, Sanjay Kumar Goel
Project Lead: Jatinder Kaur
VP, Learning: Abhishek Bhatnagar
All products and brand names used in this book are trademarks, registered trademarks or trade names of their respective owners.
© Uolo EdTech Private Limited
First published 2023
Second published 2024
Third published 2025
This book is sold subject to the condition that it shall not by way of trade or otherwise, be lent, resold, hired out, or otherwise circulated without the publisher’s prior written consent in any form of binding or cover other than that in which it is published and without a similar condition including this condition being imposed on the subsequent purchaser and without limiting the rights under copyright reserved above, no part of this publication may be reproduced, stored in or introduced into a retrieval system, or transmitted in any form or by any means, electronic, mechanical, photocopying, recording or otherwise, without the prior written permission of both the copyright owner and the above-mentioned publisher of this book.
Book Title: Tekie ICSE Computer Science Block Coding III
ISBN: 978-81-981317-2-0
Published by Uolo EdTech Private Limited
Corporate Office Address:
85, Sector 44, Gurugram, Haryana 122003
CIN: U74999DL2017PTC322986
Illustrations and images: www.shutterstock.com, www.stock.adobe.com and www.freepik.com
All suggested use of the internet should be under adult supervision.
Standing at the forefront of the digital and AI revolution, the importance of coding and computational skills has reached unprecedented heights. In today’s professional landscape, whether it is in the fields of medicine, space exploration, education, science, or business, no sector remains untouched by this transformative wave. To thrive in the 21st century, basic computer literacy is no longer sufficient. Learners must evolve into “digital natives” who can fluently read, write, and communicate in the languages that machines and AI comprehend. Recognising this imperative, the National Education Policy of 2020 (NEP 2020) has strongly recommended the integration of coding skills, computational thinking, critical analysis, and problem-solving abilities into the curriculum. Moreover, forward-looking subjects like AI, Data Science, Computer Applications, and IT have been introduced as elective subjects from grade 9 onwards. It would not be surprising if further transformative measures are taken even at the elementary education level.
Inspired by these insights, Uolo has introduced an innovative 360-degree program for a codingfocused computer science curriculum, known as Tekie, spanning grades 1 to 8. The program provides an experiential learning approach, going beyond theoretical knowledge. It not only covers theoretical aspects of computer science and coding, but includes hands-on activities and technology-based projects that enable students to experience computer science first hand. The program includes chapters that provide a deeper immersion in computer science that both learners and teachers may find interesting.
This coding book is a part of the larger Tekie program that also includes a main computer science textbook, covering the basics of computing, the latest technologies, and essential computer tools.
In addition to the textbooks, we provide a digital platform where students can actively engage in practical activities and hands-on learning projects. This platform is designed to enhance the learning process by allowing students to experiment and apply their knowledge in a real-world context.
We have meticulously aligned our activities with the guidelines of the National Education Policy (NEP) 2020, which emphasises a holistic approach to learning. This approach is aimed at developing critical thinking, logical reasoning, and practical skills among students. By integrating these elements into our coding program, we aim to prepare students for the future, equipping them with the necessary skills to navigate and excel in the ever-evolving world of technology.
Our mission is to cultivate a passion for coding and computer science among young learners, making the learning process enjoyable and impactful. We are confident that this series will not only help students grasp the fundamentals of coding but also inspire them to explore the endless possibilities that technology offers.
We invite you to embark on this exciting journey of learning and discovery. Let’s empower the next generation with the skills and knowledge they need to thrive in a digital world.
Creating a Project
Now,


It is below the stage and next to the Sprites pane. You can use it to add, upload, edit, or delete backdrops.

Did You Know: Interesting facts related to the topic
Go button and Stop button: The green flag is the Go button. You click it to run the script. The red button is the Stop button. You click it to stop the running script.


Discuss: A multi-faceted probing question related to the concept that arouses curiosity
Code Snippets: Complete code for each activity with output facilitating hands-on learning and immediate feedback


Think and Tell
Chapter Checkup
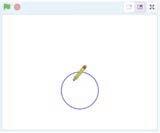

Why do we need to repeat 360 times to draw a full circle?


Think and Tell: Analysis, reflection, and text-to-self connection-based prompts for discussion in class
A Fill in the Blanks.
Do It Yourself 4A
1 What will be the output when you run the given script?


Hints thickness when I start as a clone delete this clone rotation clones is when an object moves around its centre. are the exact same copies of a sprite. The block runs the attached script when a sprite is cloned. block helps us remove a clone when it is no longer needed.


Checkup
Coding Challenge: Hands-on challenges to encourage and actively engage with the concepts learnt throughout the chapter

Fill in the Blanks.
5 The block sets the of the sprite’s pen.
Chapter Checkup: Chapter-end practice exercises aligned to different levels of Bloom’s Taxonomy
F Apply Your Learning.
Apply your learning: Intellectually stimulating questions designed for higher-order thinking and analysis
Test Papers: Designed to evaluate understanding of core concepts and application of skills
A. Fill in the blanks.
Hints thickness when I start as a clone delete this clone rotation clones
1 is when an object moves around its centre.
2 are the exact same copies of a sprite.
3 The block runs the attached script when a sprite is cloned.
1 Shreya is making a project to show the Earth rotating in space. Help her write the script to make the Earth sprite rotate.
4 The block helps us remove a clone when it is no longer needed.
1 is when an object moves around its centre. 2 are the exact same copies of a sprite.
5 The block sets the of the sprite’s pen.
F Apply Your Learning.
3 The block runs the attached script when a sprite is cloned. 4 The block helps us remove a clone when it is no longer needed.
1 Shreya is making a project to show the Earth rotating in space. Help her write the script to make the Earth sprite rotate.
5 The block sets the of the sprite’s pen.
F Apply Your Learning.
1 Shreya is making a project to show the Earth rotating in space. Help
Test Paper (Based on Chapters 1 to 5)
A. Fill in the blanks.
Test Paper (Based on Chapters 1 to 5)
1 is a way of giving instructions to tell a computer what to do.
2 The block repeats the instructions inside it forever, unless the Stop button is clicked.
3 A is a character or object that you can move around on the stage and make this object do things.
1 is a way of giving instructions to tell a computer what to do.
4 A is a measure of how much you turn.
2 The block repeats the instructions inside it forever, unless the Stop button is
• What Is Coding?
• Block-based Coding
• Algorithm
• Exploring Code.org
• Sprite
• Visiting the Sprite Lab
• Setting the Background
• Adding Behaviours
• Events
• Final Project
• Repeating Actions
• Repeat Loops
• Variables in Block Coding
• The for Loop
• Using for Loops
• Using if–else
•
Hello students! Let us do an activity of drawing the face of a dog. Follow the given steps: 1 2 3 4
You have just drawn the face of a dog by following a series of steps. In your daily life, your teachers and parents ask you to do some work by following various steps. In a similar manner, computers also need step-by-step commands to work. These commands are called instructions.
A set of instructions is called a program.
To write a program, you need to learn a special language that a computer can understand.
The languages that are used to write programs are called programming languages or coding languages.
Sometimes, a program is also called code. We can code a computer to make it do various tasks for us.
Additionally, learning coding helps us to: 1 think and ask questions. 2 understand problems.
In 2003, MIT introduced the first block coding language.
3 think of solutions.
4 solve problems in many ways.
5 break down a big problem into small parts to solve it easily.
6 learn how to decide what to do in various situations.
7 learn how to decide when to do a task.
You can use coding language to write the commands for a computer. Some coding languages use blocks to give commands to the computer. These coding languages are called block-based coding languages.
Block-based coding is visual programming. In this type of coding, you use colourful blocks. These colourful blocks are instructions. You use them to make a computer do a task.
Using block-based coding, you can:
1 easily remember colour-coded code blocks.
2 code using a simple drag-and-drop method.
3 code without worrying about the rules of a language.
4 learn to code while having fun.
5 be creative by making digital cards or apps.
Think and Tell
In which other game, can you join the blocks together to play?
Think about the steps that you can follow to get ready for school.
1 Wake up.
2 Brush your teeth.
3 Have breakfast.
4 Ready for school.
If you notice, you will see that even for getting ready for school, you follow a number of steps, one after the other.
Similarly, in coding, when we give more than one command in an order, it is called a sequence.
You can think of a task to be done as a problem to be solved. So, in the given example, getting ready for school is the problem. The steps you follow in an order are the solution to this problem.
The set of steps that you follow to solve a specific problem is called an algorithm.
Algorithms help you break down a big problem into small parts to make it easy to solve.
Let us see the algorithm to grow a plant.
1 Start.
2 Take a pot and fill it with soil.
3 Put the seed in the soil.
4 With proper amount of sunlight and water, the plant sprouts.
5 After some time, it flowers.
6 The plant bears fruit.
7 Stop.
This sequence cannot be changed. The seed will not grow into the plant if the sequence is not followed. So, in algorithms, it is important to follow a sequence to reach the solution of the problem.

Number the pictures below in the correct sequence.


In this book, you will learn block-based coding using a platform called Code.org. Let us explore the platform.
1 Visit the link: https://studio.code.org with the help of your teacher or parents.
2 You can sign in or create a new account on the platform.
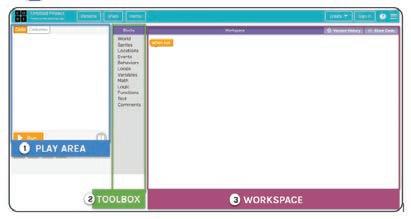
3 A screen similar to the following one appears.
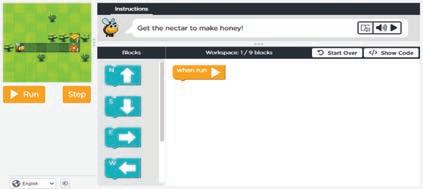
The main parts of the studio.code.org platform window are:
1 Play Area: The area where you can see things happening.
2 Toolbox: The area that holds all the code blocks, which you can use to give commands. It is also known as Blocks panel.
3 Workspace: The area where you can drag and attach the blocks together to make things happen.
4 Instructions: The hints that help you know what to do next.
We all enjoy listening to stories. But do you know how stories are created?
A story is made up of many parts, such as:
1 Characters: People, animals or things in the story
2 Problem: Something that needs to be done or solved
3 Setting: The place where the story happens
4 Events: When and what happens
You can use a block-based coding language to create interesting stories with various characters.
The characters that are used to make stories in a block-based coding language are called sprites.
You can:
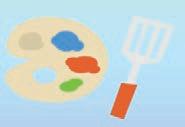
• change the costume, location or colour of a sprite.
• add and control the behaviour of a sprite. The behaviour of a sprite is how it interacts with other sprites or with the user.
Let us now learn how to make a sprite in Code.org.
The Sprite Lab is where you can create your own stories and apps. You can add sprites that can perform some actions and interact with each other.
When you click the Sprite Lab option on the Code.org platform, the following screen appears.
The components of the Sprite Lab are as follows:
1 Play Area: Where the story runs.
2 Toolbox: Holds the blocks needed to create the project.
3 Workspace: Where you code by dragging blocks from Toolbox.
Let us now use sprite lab to create a sprite.
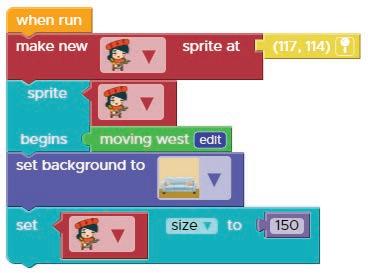
Using the Sprite Lab, you can make a sprite, add a behaviour to it, change its size, change its position, and do many more actions. Let us first start our project of making a sprite.
In the Blocks panel, the Sprites category has blocks related to creating sprites, changing their costumes, moving them, and performing other actions.
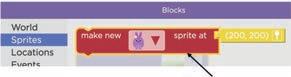
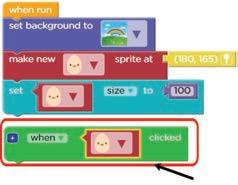
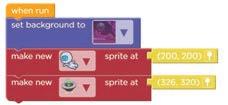
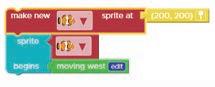
1 Click the Sprites category and then select the make new sprite at block.

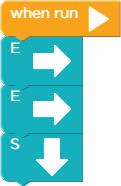
2 Drag it to the workspace and place below the when run block. The when run block is always present in the workspace, by default. This block makes
your project run. The blocks snapped together with the when run block are played when the project is played.
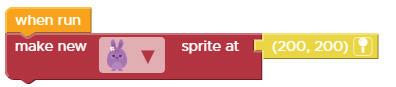
3 You can observe a default rabbit sprite in the make new sprite at block.
4 The make new sprite at block has the location (200, 200) block snapped to it. This block tells the current position of the sprite in the play area. You will hear a pop sound when you join the make new sprite at block below the when run block.
5 You can see the rabbit sprite that you selected in the play area.
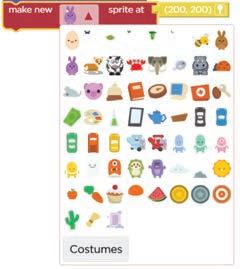
1 Instead of the rabbit sprite, you can choose a new sprite from the drop-down menu of the make new sprite at block by clicking the arrow, as shown.
2 If you cannot find the required sprite according to your project, then click the Costumes button at the end of the sprites list.
3 A new window under the Costumes tab opens, as shown.
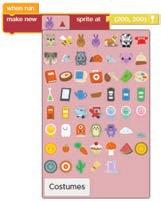
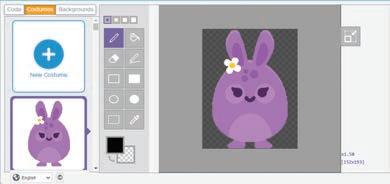
4 Click the New Costume button.
5 The Costumes Library opens as follows. The Costumes Library is the in-built library that contains various related groups of sprites.
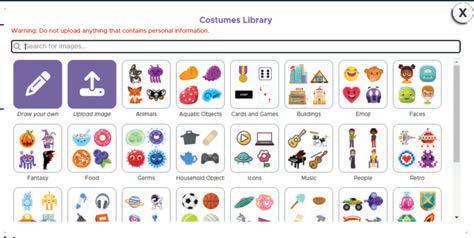
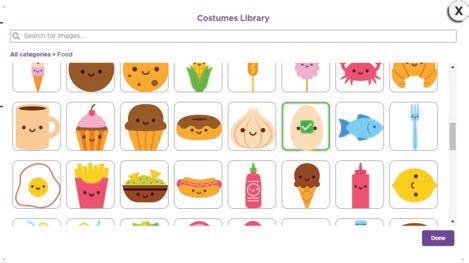
6 Click any category of your choice, for example, Food.
7 You will see several sprites related to food appear in the library.
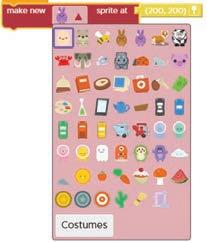
8 Click any sprite of your choice, for example, Egg, and then click the Done button.
9 The Egg sprite appears under the Costumes tab.
10 Go back to the Code window and click the drop-down arrow of the make a sprite at block. You will see the newly added sprite in the Sprites list.
11 You can select this sprite and add it to your project.
To change the size of a sprite, the set size to block is used. This block is present in the Sprites category in the Toolbox.
Let us increase the size of the rabbit sprite.
1 Go to the Sprites block category and drag the change size to block.
2 Join the change size by block with the make new sprite at block of the previous code.
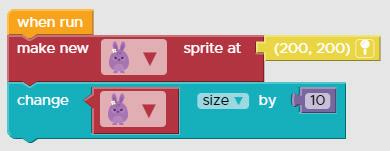
3 Click inside the text area of the change size by block and then change its value from 10 to 100.
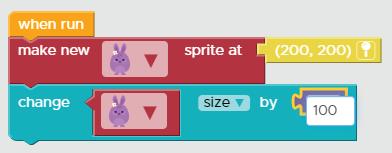
4 The size of the rabbit sprite is increased.
Match the component with its function. make new sprite at block Plays the project change size by block Creates a new sprite
Costumes library Changes the size of the sprite when run block Contains a group of sprites
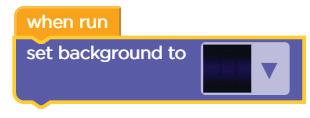
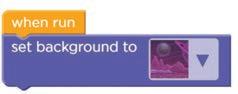
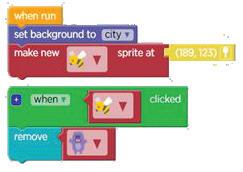
Backgrounds provide a meaningful context to your story. You can set a background for your project by using the blocks provided under the World category of blocks in Toolbox. To set the background:
1 Go to the Toolbox and then click the World category.
2 Drag the set background to block to below the change size by block.
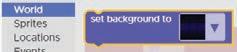

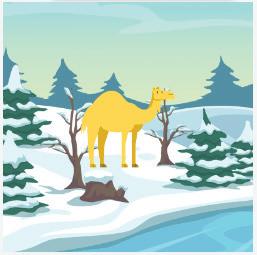
3 Click the drop-down arrow of the set background to block and then select the background of your choice, such as the park background.
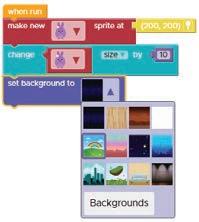
4 The first scene is set, as shown in the image.
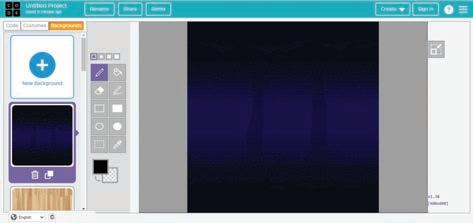
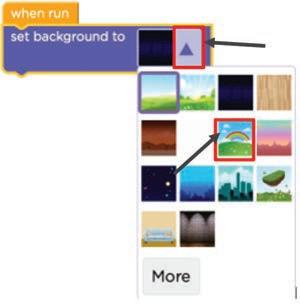
You can change the background to a different one by clicking the down arrow of the set background to block. Follow the given steps:
1 Click the down arrow of the set background to block.
2 A list of backgrounds appears. You can select any background that you like.
3 You can also click the Backgrounds button provided at the end of the list of backgrounds.
4 A new window opens under the Backgrounds tab, as shown below:
5 Click the New Background option.
6 An in-built library of backgrounds opens.
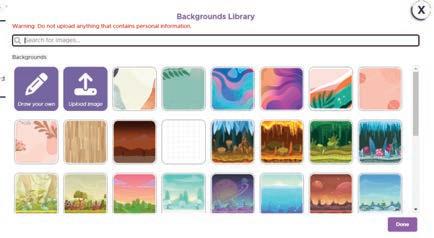
7 Select any background of your choice and then select from the down arrow of the set background to block.
8 The selected background is applied to your project.
Create a Desert scene.
a Set the background as Desert.
b Make a sprite of your choice in the desert area.
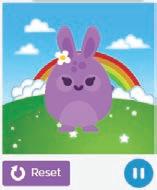
A behaviour of a sprite defines an action that a sprite can perform.
For example, you can make a sprite move, shrink, grow, flutter, wander, and so on. For making a sprite perform an action, various blocks are available under the Behaviors category in Toolbox.
Let us see how you can define a behaviour for a sprite in the project that you created in the previous sections.
To add a behaviour for the rabbit sprite:
1 Click the Behaviors category in the Toolbox.
2 The drawer containing the blocks related to Behaviors opens.
3 Drag the sprite begins block to below the set background to block, as shown.
4 Click the Behaviors category again.
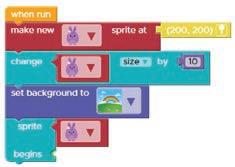
5 Drag the growing block and drop it in the groove of the sprite begins block.
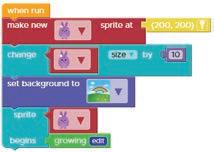
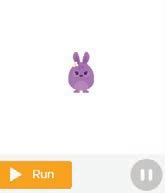
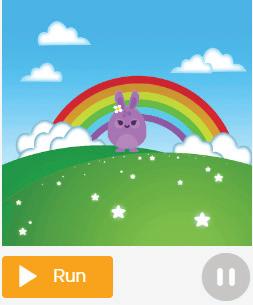
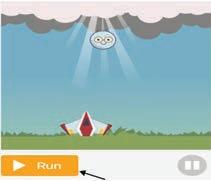
6 Click the Run button in the play area.
7 You can see the sprite growing in the play area.
8 To stop the sprite from growing, you can click the Pause button.
Events
What happens when you turn on the switch of a bulb? The bulb turns on. Similarly, when you turn off the switch, the bulb turns off.
What can you learn from it? Turning the switch on is an event, and turning on of the bulb is an action. So, an event can be defined as something that brings about an action or a change.
Now, let us read about the life cycle of a butterfly step by step.
1 Egg: The egg is the first stage. The egg hatches into a caterpillar.
2 Caterpillar: The caterpillar feeds on leaves. After a few weeks, it hangs upside down to form a pupa.
3 Pupa: The pupa is the shell inside which the caterpillar turns into a butterfly.
4 Butterfly: Again, the butterfly lays eggs and the process continues.
We will follow an algorithm to create the life cycle of a butterfly in Sprite Lab. Now, think about the following to create an algorithm:
• What do you need to do to set the scene?
• What happens in the scene? Setting: Background Characters: Sprites


Algorithm to Set Up the Scene
1 Start.
2 Set the background to park.
3 Add the egg sprite.
4 Set the position of the egg sprite.
5 Stop.
Follow the given steps to create the project:
1 Click the World category in Toolbox.
2 Drag the set background to block under the when run code block in Workspace.

3 Select the background by clicking the set background to drop-down button. Select the park background.
4 To select the sprite, click the Sprites category in Toolbox.
5 Click and drag the make new sprite at block.
6 Click the make new sprite at block drop-down and then select egg from the list of sprites.
Drop-down
Egg sprite
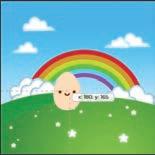
7 Place the egg at a specific location. Click the Location icon, as shown in the picture below.

8 Move the cursor in the play area to change the location of the sprite. Click where you want to place the sprite.
Now, let us see how to proceed for the project.
1 You will click egg. This is an event.
2 Egg will change into a caterpillar. This is an action or change.
3 Similarly, when you will click the caterpillar, it will change into a pupa and then the pupa will change into a butterfly.
Let us perform all these actions.
Follow the given steps to do this activity now.
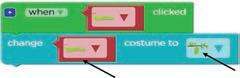
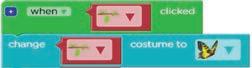
1 Click the Events category in Toolbox.
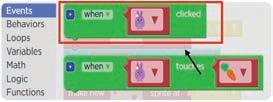
2 Drag the when clicked block from the Events drawer to inside the workspace.
3 Change the sprite from rabbit to egg by clicking the drop-down arrow of the block.
4 Now, from the Sprites category in Toolbox, drag the change costume to block and join it with the when clicked block.
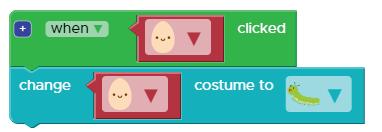
5 Change the sprites’ image by using the drop-down arrows.
6 Similarly, from caterpillar to pupa and pupa to butterfly, repeat the same process, as shown here:
Setting the Wandering Behaviour of the Butterfly
1 Let us set the wandering behaviour of the butterfly.
2 Drag the sprite begins block from the Behaviors category and join it with the change costume to block of the butterfly.
3 From the Behaviors category in Toolbox, drag the wandering behaviour and attach it to the sprite begins block, as shown.
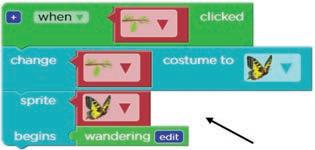
4 Now, click on the Run button in the play area and see your project in action. The project of the butterfly life cycle is complete now.
A Fill in the Blanks.
1 A cannot understand your language.
2 You can break down a big problem into parts to solve it easily.
3 Block-based coding is programming.
4 A character in coding is called a .
5 An brings about an action or a change.
B Tick () the Correct Option.
1 is an educational platform where we learn to code.
a Code.org
c Org.code
b Code.or
d Or.code
2 A is an instruction given to a computer to do something.
a Visual
c Command
b Coding
d Problems
3 is the place where a story runs.
a Workspace
c Play area
b Sprite lab
d Toolbox
4 The set of steps we follow to solve a specific problem is called .
a a Sequence
c a Coding
b a Command
d an Algorithm
5 is where you can create your own stories and apps.
a Science Lab
c Laboratory
C Who Am I?
b Sprite Lab
d Make a Sprite
1 I am a character in the project in block coding.
2 I am the place where a story happens.
3 I am the area where you will create a code by dragging blocks from Toolbox.
4 You can click me to see the sprites in action.
5 I am something that brings about an action or a change.
D Write T for True and F for False.
1 Using block-based coding, we can code using a simple drag-and-drop method.
2 There are four main elements that make up a story.
3 You cannot change the costume of a sprite.
4 You cannot set the size before making a sprite.
5 The algorithm does not produce a result if the sequence of steps is not followed.
E Answer the Following.
1 What is coding?
2 Name the elements that make up a story.
3 Define Toolbox.
4 What do you mean by a sequence?
5 Write the names of stages involved in the life cycle of a butterfly.
1 Write the correct sequence to eat an apple.
2 Write the correct sequence to prepare the sandwich.
3 Look at the given patterns and complete the sequence in the following pictures.
Think about the way you walk. You move one foot forward and then the other. You continue walking in the same manner. We can call this a loop.
A loop is an action of doing something over and over again. What will happen if you never stop walking? You will pass your destination and you will get very tired. It is important to know when to stop doing something.
Do It Yourself 2A
Tick () the picture that does not show an example of a loop.

What is easier to say—”Jump 4 times” or “Jump, jump, jump, jump”?
It will take us more time and energy to say “jump, jump, jump, jump”. Instead, we can just say “jump 4 times”. Thus, in this is where we are using a loop.
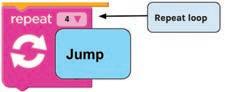
By using the repeat loop, our code becomes shorter.
The repeat loop is used when we want to repeat a task a certain number of times.
A good programmer always tries to use a loop to make their code as short as possible.
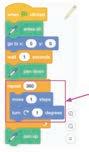
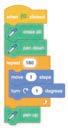
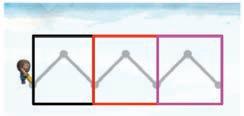
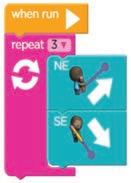
Let us build a program to make the character draw the given wave.

1 Think of the direction you would have to take to make each wave.

2 To make one wave, follow the arrows in the image and enter the following code.
3 To create three waves, we need to repeat the process three times. So, here we will use the repeat block.
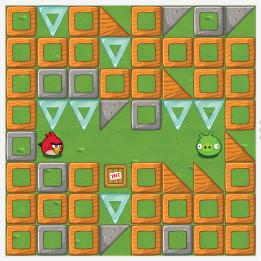
Consider the angry bird moves only one step forward. How many times should the loop repeat to make the angry bird reach the pig? Write the number in the space provided.
Suppose, your mother surprises you with a gift box. You open the box to see what’s inside. It’s full of your favourite chocolates!
If you look closely, you’ll notice that the box is a container to store chocolates. Here, the box is simply a variable having chocolates as the value assigned to it.
Chocolates Box
You can change the value of the variable to something else. For example, instead of chocolates, you can put cookies inside the box.
Now, if we have to label our box as “Chocolate” and fill it with your favourite chocolate, let’s say a KitKat, inside it, in programming terms, “Chocolate” is the variable name and KitKat is the value.
There are some rules to follow while naming a variable, just as you wouldn’t name a basket of chocolates “Fruits Basket.”
• Names can contain letters, digits, and underscores(_).
• Names cannot contain blank spaces.
• Names are case-sensitive: “Chocolate” and “chocolate” are two different names.
• Variable names can also begin with an underscore. A few examples of valid variable names are Name, MyName, _name, and my_name.
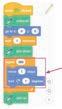
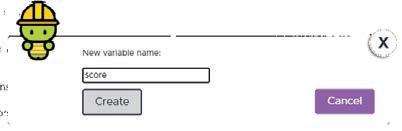
1 Drag the set i to block from the Variables category and keep it in the workspace.
2 Click on the drop-down arrow of this block and select Rename this variable option.
3 A new dialog box will open. Type a new name in the New variable name text box, for example, “score” and click on Create.

Suppose you have to skip 10 times.
How will you do it? You count your first skip as 1, second as 2, and so on. You will count till you have skipped 10 times and then you stop. You already know when to start, when to count, and when to stop. This is exactly how a for loop works.
There is an interval in every for loop.
In this case, the interval is equal to 1. As every time you skip, the count is increased by 1.
The for loop is a loop with a known beginning, end, and interval.
Parts of the for Loop
A for loop has three parts:
1 Start
2 End
3 Interval
The for loop has all the 3 parts in a single line of code. Look at the circled numbers and find the interval.
Starting value: 4
Ending value: 20 Interval: ?
Here, you can see that the circled numbers are 4, 8, 12, 16, and 20.
To find the interval, you can subtract the consecutive circled numbers. Hence, 8 − 4 = 4
It shows that 4 is the difference in each case, hence the interval is 4.
Starting value: 4
Ending value: 20 Interval: 4
1 Find the Interval by looking at the circled numbers.
Starting value: 0
Ending value: 18 Interval: ?
2 Find the ending and the interval.
Starting value: 7
Ending value: 14 Interval: ?
As you know, it is important to know when to end a loop.
Starting value of the counter
Value which keeps on changing as we add the interval
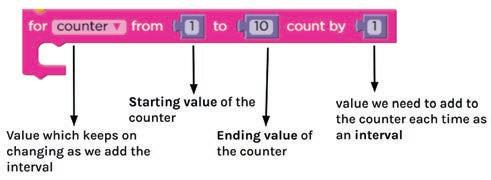
Value we need to add to the counter each time as an interval
Ending value of the counter
Here, the counter is like a score in a game; it keeps on changing as you score.
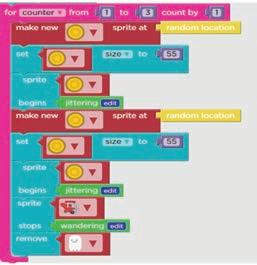
Let’s make a project called “Catch the Ghost” using a for loop.
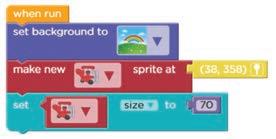
1 Change the background to park, create a new sprite plane, and set the plane’s size to 70.
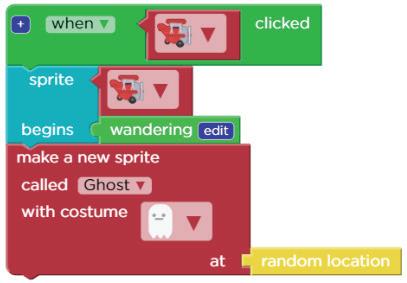
2 Add an event of clicking the plane, and then add a behaviour of wandering. Create a new sprite called Ghost and place it in a random location.
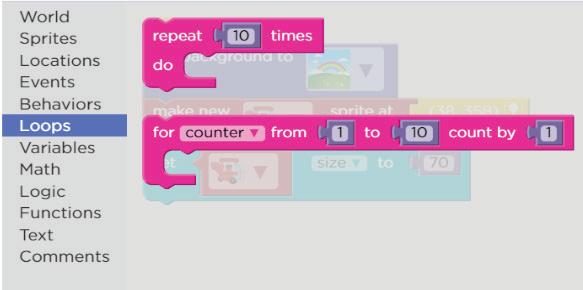
3 Now, when the plane touches the ghost, the ghost disappears and coins are awarded. Let us use a for loop for this. Select the for loop and set the counter.
4 We need to think about what should happen and when. Take a look at the following:
a A for loop should count till 3.
b Make a new coin sprite.
c Add a behaviour of the new coin sprite.
d Make another coin sprite.
e Add a behaviour of the second coin sprite.
f Remove the ghost sprite.
With these steps, we will set up the scene and reward coins when the plane touches the ghost.
5 Select an event and join the for loop, set the counter of the for loop to 3.
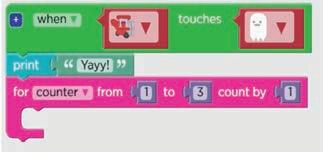
6 Add new coin sprite, set the size, and add behaviour. Repeat this twice. At last, remove the ghost.
Your project is ready!
Hint: 2 coins are created for every counter. Think and Tell
How many coins will be created in the play area after the for loop runs?
A Fill in the Blanks.
1 The loop is used when we want to repeat a task a certain number of times.
2 A good always tries to use a loop to make their code as short as possible.
3 names cannot contain blank spaces.
B Tick () the Correct Option.
1 loop is a loop with a known beginning, end, and interval.
a repeat
c nested
2 What does a loop do in programming?
a Repeats a set of instructions
b Deletes data from the computer
c Plays music on the computer
d Create drawing on the computer.
b for
d while
3 is the first component of a for loop.
a Start
c End
C Answer the Following.
1 Define a loop.
b Stop
d Pause
2 Name the three things that are need to make a for loop.
D Apply Your Learning.
1 Tick () the task that can be done continuously in a loop.
2 Draw the following patterns to complete the loops.
Will you play outside if it is raining? No. You should play inside if it is raining outside.
In our daily life, we all have to take some decisions. Usually, we take these types of decisions automatically, since we know what to do in these situations.
Computers can’t do that, that’s why we need to write codes so that they can take certain decisions as well.
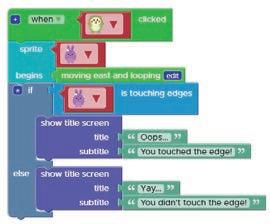
An if statement tells the computer what to do if a certain condition is true.
In the above situation, raining outside is a condition and playing inside is an action taken when the condition is true.
Sometimes different actions have to be taken per to the situation.
…then we will play inside
If it is raining…
…else we will play outside
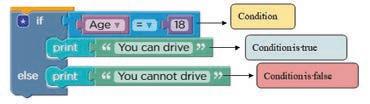
Let us look at one more situation.
If you are 18 or older...
…then you can drive

…else you can’t drive
The if–else statement is used for both the true part and the false part of a given condition. If the condition is true, the if block code is executed and if the condition is false, the else block code is executed.
1 You can vote if you are 18 years of age or older. Write conditional statements based on that. Write your answer in boxes.
If you are 18 or older…
2 Where will you go if you are sick? To the doctor’s or to school? Write your answer and the condition in the given boxes.
Now, let us create a game where you can use conditions.
1 You will create a scene in Sprite Lab using a Robot sprite.
2 You can select a background of your choice.
3 A score variable will be created.
4 Initially, the score variable will be set to 0.
5 When the project will run, you will have to click on the Robot sprite.
6 Every time, you click the Robot sprite, the score will be increased by 1.
7 When the score reaches 10, a message, “You win” will be displayed.
8 Till the score is less than 10, a message, “Keep trying” will be displayed.
Let us start creating the game.
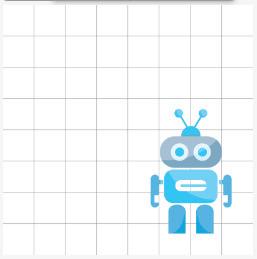
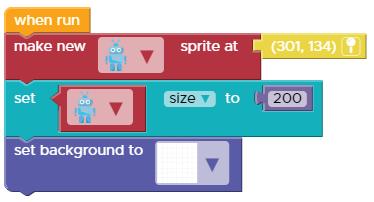
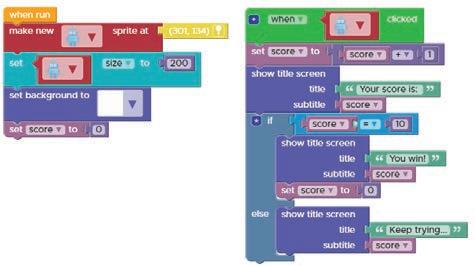
1 To set up the scene for your game, open a new project in Sprite Lab.
2 Go to the Toolbox and click on the Sprites block category.
3 Drag the make new sprite at block and drop it below the when run block in the workspace.
4 From the drop-down list of the make new sprite at block, select the Robot sprite.
5 If the Robot sprite is not present in the list, then you can click on the Costumes button at the bottom of the list and select the Robot sprite from the Costumes library.
6 Click on the Location button and place the Robot sprite in the Play area wherever you want.
7 Now, select the set size to block from the Sprites category and join it with the make new sprite at block.
8 Click inside the block after to and type “200” in it.
9 Now, from the World category in the Toolbox, drag the set background to block and drop it below the set size to block.
10 Select any background of your choice, for example, the grid background. Note that you can select the background from the Background library.
11 The scene for your game is set.
1 Drag the set i to block from the Variables category and keep it in the Workspace.
2 Click on the drop-down arrow of this block and select the Rename this variable option.
3 A new dialog box will open. Type a new name in the New variable name text box, for example, “score” and click on Create.
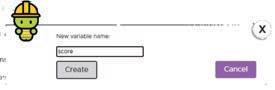
4 The name of the variable is changed to “score”.
5 Now, drag the “0” block from Math category in the Toolbox and join it with the set score to block.
6 Join the set score to 0 block below the set background to block.
7 This will initialise the score variable to 0.
Now, let us create the code for this game. Follow the given steps:
1 From the Events category, drag the when clicked block and place it in the Workspace.
2 Click on the drop-down arrow of the Rabbit sprite and select the Robot sprite from the list.
3 Drag set score to block from the Variables category and place it below the when clicked block.
4 From the Math category, drag the “+” block and join it with the set score to block.
5 Drag the score block from the Variables category and place it on the right side of the “+” block. The “0” block already placed there will be removed. You can delete the “0” block by dragging it back to the Toolbox.
6 On the right side of the “+” block, type “1” instead of “0”.

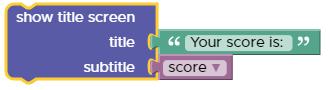
You can display a message using the show title screen block. This block has two attachments: title and subtitle. You can join different blocks with both the attachments according to your project. Let us see how you can use it in your project.
1 Drag the show title screen block from the Text category and place it below the set score to block in the code.
2 In the title attachment, type the message, “Your score is:”.
3 In the subtitle attachment, join the score variable.
Now, to create a condition, you can use the if block from the Logic category. Let us create the code for the condition to check.
1 Drag the if block with an equal to symbol from the Logic category and join it with the previous code in the workspace.
2 On the left-hand side of the equal to block, place the score variable by dragging it from the Variables category.

3 On the right-hand side, place the 0 block by dragging it from the Math category. Type 10 in place of 0.
4 Now, again drag the show title screen block from the Text category and place it inside the if block.
5 In the title attachment, type the message, “You win!”
6 Join the score variable with the subtitle attachment.
The if block can be extended with an else block by clicking on the star symbol present on the if block. You can add as many else blocks as you want with the if block. Follow the given steps:
1 Click on the star symbol present on the if block.
2 The pop up opens. Select the else block from the pop up and place it inside the block as shown.

3 You can observe an else block will be added below the if block.
4 Now, drag one more show title screen block from the Text category and place it inside the else block.
5 Type the message, “Keep trying…” in the title attachment and score variable in the subtitle attachment.
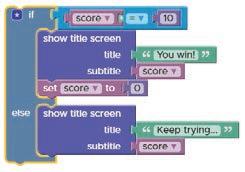
6 The if-else block is ready.
The Combined Code
The combined code for your game is as follows:
You can add as many else blocks as you want in your code. If you want to check more than one condition in the code, then you can given the condition in the else-if block.
To play the game:
1 Click on the Run button in the play area.
2 Click on the Robot repeatedly.
3 Observe the score is increasing and is displayed on the screen along with the “Keep trying…” message.
4 When the score will become 10, you will get a message, “You win!”
5 The game is complete.
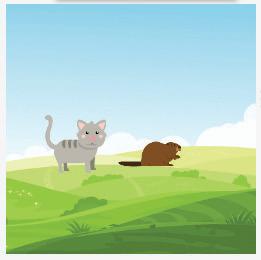
Create a chasing game where the cat has to chase the mouse. When the cat will touch the mouse, increase the score for the cat and make the mouse disappear from the play area.
1 An if statement tells the computer what to do if a certain is true.
2 The if-else statement is used for both the part and the part of a given condition.
3 Sometimes different have to be taken according to the condition.
B Tick () the Correct Option.
1 What does an if statement tell the computer?
a To perform an action regardless of the condition.
b What to do if a certain condition is true.
c What to do if a certain condition is false.
d To stop the program immediately.
2 In the game, what message is displayed when the score reaches 10?
a “Keep trying”
c “Game over”
b “You win”
d “Try again”
3 What is the purpose of an else condition in an if-else block?
a To check an additional condition.
b To perform the same action as the if condition.
c To execute code when the if condition is false.
d To display a message to the user.
4 In the game, what is the initial value of the score variable?
a 1 b 5
c 0 d 10
5 What happens when you click on the Robot sprite in the game?
a The game ends.
b The score decreases.
c The score increases by 1.
d The Robot sprite disappears.
1 I am a block used to check a condition in a program.
2 I am used to initialise the score variable in the game.
3 I am a programming concept used to perform different actions based on a condition.
D Write T for True and F for False.
1 An if statement is used to make a decision in a program.
2 The if-else statement is used for either the true part or the false part of a condition, not both.
3 The if-else block can have multiple else conditions.
E Answer the Following.
1 What is the purpose of an if statement in programming?
2 Explain the role of the else condition in an if-else block.
F Apply Your Learning.
1 Create an if-else statement to determine whether to go to the park or the library based on the weather. If it’s sunny, go to the park; otherwise, go to the library.
2 Design a simple game using Code.org where a player can keep adding up the points and display a message when they reach a certain score.
3 Write an if-else statement to check if a person is eligible to vote. If they are 18 or older, display a message that says “You can vote”; otherwise, display “You cannot vote.”
4 What will be the output of the following code?
You have already learnt about loops and conditionals in the previous chapters. Loops help you repeat particular instructions. Conditionals help you make a decision based on specific criteria. Now, let us learn how you can use loops within a condition and a condition within a loop.
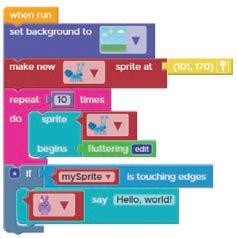
Let us understand the working of a loop inside the if condition by considering the following example.
Baby Joe is trying to find the shiny star shield. If she finds the star shield, she will be rewarded with two magic carrots!
Now, let us analyse what blocks we need to add in order to create this story.
1 We need three sprites: Joe, star shield, and carrot.
2 We will check the condition—if Joe touches the star shield, she will unlock the magical carrots.
1 Add two sprites, Joe and the star shield, at the start.
2 Next, check the condition.
3 If the condition is true, two magical carrots are revealed.
4 Use the repeat block to make two new carrot sprites.
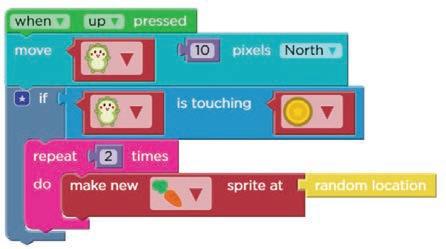
Note: We can add the same conditions from the Events for Joe to move around using the up, down, left, and right arrow keys.
Here, we make multiple new sprites after checking a certain condition.
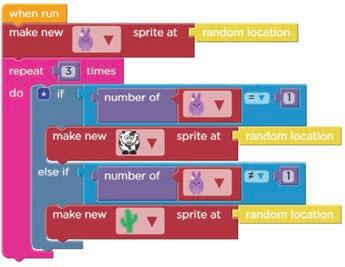
A loop inside another loop is called nested loop.
1 You have 1 bunny (you can change the number to see the effect).
2 You want to create 3 new sprites, so you can use a repeat loop.
3 If the condition is true, three cows appear at random positions.
4 If the condition is false, three cactus appear at random positions.
Now that you have understood the basics of using loops and conditionals together let us create a project to see the effect.
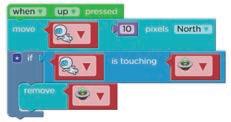
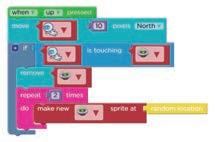
Ben is a little astronaut who has reached Mars. He meets new friends from space. The people from space, called spacers, have special crafts to move around. Ben is excited to meet the spacers.
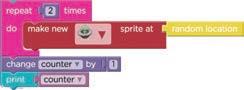
Every time Ben meets one spacer, he has a chance to meet two more spacers. Ben is keeping a count of the number of spacers he meets.
He will send a message to you so that you know how many friends he has made! Let us get started.
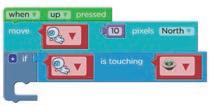
Use the remove block to make the spacer disappear.
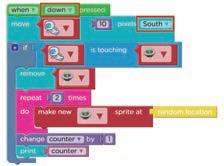
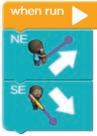
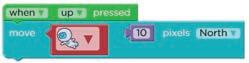
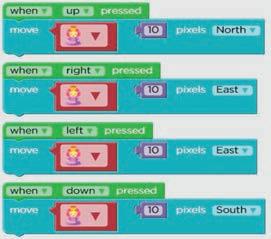
Be careful to change the direction of the movement of the sprite when the down arrow key is pressed. It should be South.
You can use copy-and-paste shortcuts Ctrl+C to copy and Ctrl+V to paste each block.
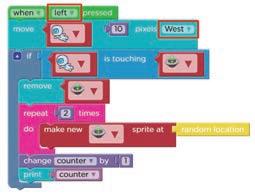
Be careful to change the direction of the movement of the sprite. When the left arrow key is pressed, it should be West.
Create a game for the following scenario:
the Same for When Right Pressed

Be careful to change the direction of the movement of the sprite when the right arrow key is pressed. It should be East.
There is a treasure hunter in search of rare diamonds. But we have a virus that is trying to stop the hunter. If the hunter collects 5 diamonds, we see a You win! message on the screen. If the hunter touches the virus, she loses.
1 Loops help you repeat particular . 2 Conditionals help you make a decision based on specific .
3 To create multiple new sprites after checking a condition, you can use a loop.
1 Which block is used to make a sprite disappear?
a Use the “when up pressed” block
b Remove the background
c Press the spacebar
d Use the “remove” block
2 Which key should be used to move a sprite to the South?
a Up arrow key
b Down arrow key
c Left arrow key
d Right arrow key
3 Which block can be used to create copies of a sprite?
a repeat block
c when down pressed clock
b when up pressed block
d change counter block
4 In which direction will the honey bee move in this block?

a Upwards
c Left
C Who Am I?
b Downwards
d Right
1 I am a programming construct that helps you repeat instructions.
2 I am a variable used to count the number of times a loop is being repeated.
3 I am a block used to make a sprite disappear in a project.
4 I am a block used to print a message or number.
5 I am a block used to move a sprite in some direction.
D Write T for True and F for False.
1 Loops are used to make decisions based on specific criteria.
2 You can use a loop inside an if block, but an if block cannot be used inside a loop.
3 Copy-and-paste shortcuts (Ctrl+C and Ctrl+V) are used to repeat blocks in the projects.
E Answer the Following.
1 Explain how loops can be used within a condition.
2 What happens in a project if the condition is false?
F Apply Your Learning.
1 Create a program that uses a loop to display numbers from 1 to 10 and checks if each number is even or odd using conditionals.
2 Design a project where a character collects coins (represented as new sprites) and keeps track of the number of coins collected.
3 Develop a simple game where the player accumulates points by clicking on a specific sprite, and the score is displayed using loops and conditionals.
4 Write code for a project where an animated character explores a maze, and when it reaches the exit, a message is displayed.
5 Build a program that simulates a simple quiz game, where the player’s score is calculated based on correct answers using loops and conditionals.
Find five mistakes in the following image. Keep those mistakes with you.
Now, see if your answers match with these points:
1 The umbrella should have only one stick.
2 Leaf should be of green colour.
3 The apple should have only one stem.
4 The wheels in the train bogies should be present.
5 The teapot should have only one spout.
Just like you found mistakes in these pictures, you can also find mistakes in coding. Such mistakes in coding are called bugs.
In this chapter, you will learn how to identify and fix bugs.
Bugs, in coding, are errors due to which you do not get the correct output.
While learning coding, its normal to find errors in the code. You can easily find and remove these bugs.
The process of finding and correcting bugs within the code is known as Debugging. You can remove bugs from your code by doing the following things:
1 Understand what the program should do.
2 Read the code carefully.
3 Look for mistakes in words, numbers, or values.
4 Compare what should happen to what is happening.
5 Test your code before finalising.
The process of finding and correcting bugs in the code is known as Debugging. Now let’s see some examples.
In this coding, a rocket sprite is coded to move up and touch the moon. It is also coded that as soon as it touches the moon sprite, the background should change into a galaxy. But it does not. Can you find out why?
When the rocket touches the moon, the background does not change because instead of moon sprite, there is a cow sprite in the block coding algorithm.
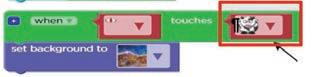
You can fix it simply by changing the cow sprite to the moon sprite. The final result should look something like this.
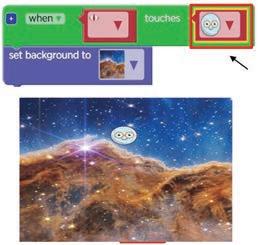
When the rocket touches the moon, the background does not change to a galaxy because instead of the moon sprite the cow sprite has been used in the block coding step.
Let us see another example.
The princes sprite should go left, but she is going right instead. You need to debug it.
Solution
1 Click on Run.
2 Press the left arrow key and check if the princess can go left or not.
3 Check the code especially for when princess is going left or west.
4 Instead of east princess should go west. Click on drop-down and change the direction from East to West. What will happen if the bugs are not corrected in the code?
Think and Tell
The honeybee should vanish when we click on her but it does not happen. Check and correct the bug.
Follow the steps given below to create a “Dino T-Rex” project on Sprite Lab.
1 Open Google Chrome.
2 Type the link given in the address bar. http://bit.ly/3Wuh6GG
3 Set a field background or any background of your choice.
4 Make a dinosaur sprite.
5 Make four hurdles of your choice.
6 Make an energy sprite or any sprite of your choice which a dinosaur can eat.
7 Make the behaviour of hurdles and energy sprite moving and looping.
8 Make a variable score.
9 Add an event where when the energy sprite touches the dinosaur:
a First, score will increase.
b Then, when score becomes 10, you can change the background and hurdles as well.
c Finally, at 15 you can end the game by saying you won.
10 Add an event when the hurdle sprite touches the dinosaur, the score will decrease.
11 Rename the project as “Dino T-Rex”.
A Fill in the Blanks. Hints correct bugs debugging
1 In coding, we make mistakes and then them.
2 are the errors in the code.
3 The process of finding and correcting bugs in the code is known as .
B Write T for True and F for False.
1 Is the combination of the sprite and the background correct, logically?
2 Is the combination of sprites, correct?
3 Will the sprite move in the left direction?
c Answer the Following.
1 What is a bug in coding?
2 What do you mean by debugging?
3 Write the correct sequence of the steps in the following code.
1 Identify the errors in the following code and write them in the space provided:

2 Circle the error in the following code. Write the error in the lines provided.
A. Fill in the blanks.
Test Paper (Based on Chapters 1 to 5)
1 A set of instructions is called a .
2 The statement is used for both the true part and the false part of a given condition.
3 Conditionals help you make a decision based on specific .
4 are errors due to which you do not get the correct output.
B. Tick () the correct option.
1 holds the blocks needed to create the project.
a Play area
b Toolbox
c Workspace d Instructions
2 The loop is a loop with a known beginning, end, and interval.
a repeat b for
c nested d while
3 Which block can be used to create copies of a sprite?
a repeat block
c when down pressed block
C. Write T for True and F for False.
b when up pressed block
d change counter block
1 The repeat loop is used when we want to repeat a task a certain number of times.
2 You can use a loop inside an if block, but an if block cannot be used inside a loop.
3 The down arrow key is used to move a sprite to the South.
4 The if-else block can have multiple else conditions.
D. Answer the following questions.
1 What is an algorithm?
2 What are sprites?
3 Define loop.
4 What do you mean by debugging?
E. Apply your learning. Help the diver reach the treasure.
This coding book is supplementary to the main “Mel and Conji” content book. This book represents a 21st-century approach to learning coding concepts and developing computational thinking and problem-solving skills. To prepare students for the digital age, the curriculum is interwoven with well-thought-out concept progression, real-life examples, and practice problems.
• Project-based learning: Engaging hands-on projects encouraging practical application of computer science and coding.
• Code snippets: Complete code for each activity with output facilitating hands-on learning and immediate feedback.
• Coding challenges: Includes projects through which learners can demonstrate their learning outcomes in coding and computer science.
• Test Papers: Designed to evaluate understanding of core concepts and application of skills.
Uolo partners with K-12 schools to provide technology-enabled learning programs. We believe that pedagogy and technology must come together to deliver scalable learning experiences that generate measurable outcomes. Uolo is trusted by over 15,000+ schools across India, Southeast Asia, and the Middle East.
ISBN 978-81-981317-2-0