10 minute read
Technicians Merit Awards Scheme Newsletter - Issue No. 2
ISSUE NO. 2 SEPTEMBER TECHNICIANS MERIT AWARDS SCHEME NEWSLETTER
Advertisement

CHRIS WIBBERLEY RDT (Dip CDT) GDC: 182605
n Chris is a Clinical Dental Technician based in Saddleworth, Oldham. He qualified as a Dental Technician from Manchester Metropolitan University in 2009.
In 2011, he was part of the first cohort of students to enrol onto the Clinical Dental Technology Course at The University of Central Lancashire (UCLAN), and graduated in 2013 as one of the youngest CDTs in the UK. His passion for working as a CDT saw him working for an NHS Domiciliary Service in the Huddersfield area along with running a clinic twice a week at a private Dental practice in Saddleworth. Chris now runs a bespoke Denture clinic called
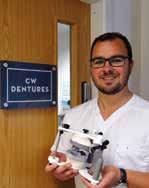
CW Dentures, and in recognition of the work he has done at his clinic, became the recipient of the BACDTs highest award, Member of the Year - 2018. Chris has lectured on some of the largest stages in Dental Technology, including the International Dental Show (IDS) in Cologne and at the Dental Technology Showcase (DTS), in Birmingham. He has gained a reputation for achieving extremely natural looking Denture Aesthetics for his patients and regularly runs training courses on how to achieve these results.
In his spare time Chris has numerous interests away from dentistry, which include road cycling and Brazilian Jiu-Jitsu. He’s a keen spectator of Rugby Union (because he’s now too old and injury prone to play) and loves to spend time walking with his Labrador, Ralph and young family in the Saddleworth Countryside (especially when it involves a pit-stop at the pub).
l l l CASE STUDY
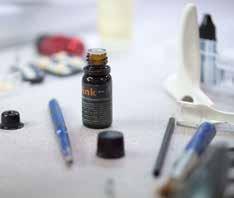
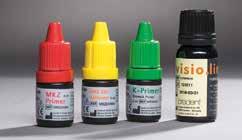
In this issue of the TMA newsletter, I thought I would write about a subject I get asked about an awful lot. It is related to Denture aesthetics, and how to make the borders of a full denture look like natural gingiva. It involves the use of composite material (and in this case I have used a number of pastes and stains from various companies/ suppliers), and the inclusion of a very important PMMA/Composite primer that binds this material together. That primer is known as visio.link (Bredent).
Before I explain how to apply the materials, it is very important to understand what we need to know about natural gingiva and it’s landmarks. When applying pink composite to a denture base, it is important to remember 5 gingival landmarks:
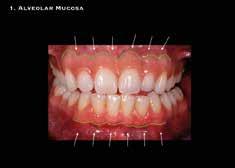
1. ALVEOLAR MUCOSA As shown in figure 1.1, the Alveolar Mucosa is a thin, soft and fragile continuation of the mucous membrane of the cheeks, lips and floor of the mouth. It is deep red in colour and smooth, with many visible blood vessels.
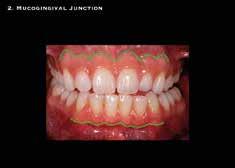
2. MUCOGINGIVAL JUNCTION The meeting point of the freely moveable tissue of the Alveolar mucosa and the firm tissue of the attached gingiva as shown in figure 1.2. It can be defined as the point where the firm tissue attaches to the underlying bone.


3. ATTACHED GINGIVA The firm, resilient, keratinised tissue that lies between the mucogingival junction and the free gingiva that surrounds the necks of the teeth (figure 1.3). This tissue is tightly bound to the underlying bone. When healthy it is an opaque, coral colour with fewer visible blood vessels than that of the alveolar mucosa.
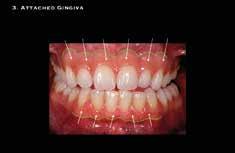
Fig 1.3
4. FREE GINGIVA As shown in figure 1.4, the free gingiva surrounds the tooth, creating a collar of tissue. It is not attached to the underlying bone or tooth surface. It usually measures from the margin of the attached gingiva to the crown of the tooth.
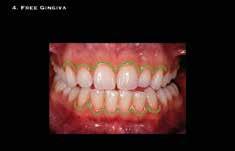
Fig 1.4
THE BUILD UP Now we understand the important landmarks of natural gingiva, we have an idea of where to start and with what colours when layering composite onto the denture base. First, we must prep the denture base after it has been processed. As you can see in figure 2.1 the wax up has been cut back prior to processing, thus exposing the necks of the teeth. This gives us enough room for our stains and pastes. The dentures are deflated and trimmed. They are then sandblasted, with pink wax covering the majority of the tooth surfaces.
Fig 2.1
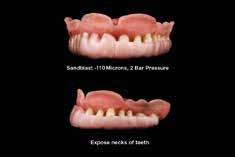
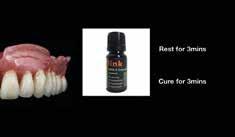
Using a microbrush, the denture base is then covered (with a VERY thin layer) using visio.link PMMA/Composite primer. This is then left for 3 mins, so the primer can soak into the denture base, followed by 3 mins of light curing (figure 2.2).
5. FREE GINGIVAL GROOVE A shallow line on the surface at the junction of the free gingiva and attached gingiva. It is formed due to the change in shape/profile of the tooth at the CEJ (cemento-enamel junction) as shown in figure 1.5.
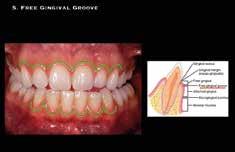
Fig 1.5
Fig 2.2
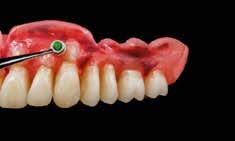
As shown in figure 2.3, once the denture base has been light cured, red and blue stains are added. The stains shown on this case are from the Schottlander enigma composite kit. Notice they are positioned mainly in the alveolar mucosa region, where natural gingiva is deep red in colour.
To represent underlying bone to which the attached gingiva is closely bound to, figure 2.4 shows dentine colours (from Ivoclar’s nexco range) layered beneath the necks of the teeth. This ‘boney’ coloured composite paste provides the underlying base colour for the healthy, coral coloured attached gingiva on the surface.
Fig 2.4
The final composite layer (figure 2.5) in this particular case is the ‘flamingo pink’ paste from the Schottlander enigma pink composite kit. It provides a covering layer that tones down the intense reds/blues and dentine that were first layered onto the denture base.
Fig 2.5
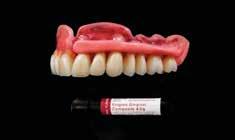
Using a small art brush, the material is very easy to manipulate into position around the necks of the teeth and across the borders of the denture base. This is shown in figure 2.6.
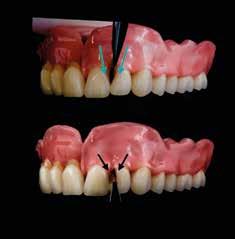
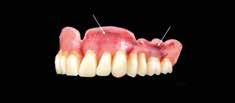
A brush can then be used to refine the shape of the composite paste so that it represents natural looking free gingiva, and the free gingival groove can be added using the same instrument as shown in figure 2.7. u
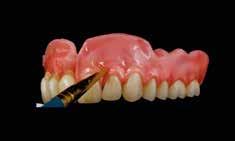
The case is then light cured for a further 3 mins. Once finished, the gel is cleaned off under cold running water, and the denture base is dried. Visio.link is then applied once again to the denture base, then cured for 3 mins. For the final layer, Nano-varnish (as shown in figure 2.8) is then applied using a separate, clean micro brush to the one used for the visio.link. It is then left for 1-2 mins so the varnish then becomes sticky/tacky.
Fig 2.7
Once the desired shape has been achieved on the covering layer, it must be light cured for 3 mins as with each of the composite stages included in this case study. The denture base is then covered in a glycerine based gel (Schottlander composite cover gel). The purpose of this is to remove the tacky, inhibition layer produced by composite materials when they have been light cured, and ensures the pastes and stains layered onto the denture have been thoroughly cured.
Fig 2.8
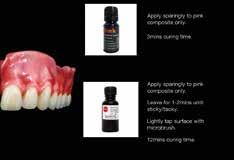
A fresh micro brush is then used to ‘dab/ lightly tap’ so that light scatters on the surface of the denture base. This will provide natural looking stippling and it will also bring out the multiple layers/colours you have previously added to the denture. Cure for at least 10 mins to ensure the
l bredent UK Ltd is pleased to support a scheme which sees technicians celebrating the skills of their peers. We are passionate about supporting and educating technicians to be the very best in their field and help improve industry standards.
Managing Director Stephen Denman said: “We work alongside some incredible technicians on a daily basis, supporting them in the fantastic work they do to improve smiles and transform lives. We’re
visio.link l Achieve adhesive bonding of composites to composites, PMMA materials and highperformance polymers.
Sandblast the resin/composite frameworks with aluminium oxide (grit size 110 µm) at a pressure of 2 to 3 bars. Do not clean with a steam jet! Use alcohol and a clean brush to remove any contaminations. Apply visio.link very thinly and cure for 90 seconds in a bre.Lux (wavelength range: 370nm - 400nm)
delighted to be able to sponsor this award which recognises the very best in their field. As an ex dental technician, myself, having the quality of your work recognised by peers, as this award scheme does, is very special.”
The bredent group has supported dentists and technicians working in partnership for more than 40 years and provides the dental technology market with world-class products designed by technicians for technicians.
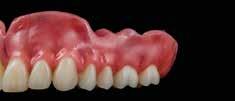
varnish is thoroughly cured. The final case will then appear to have extremely natural looking gingiva (figure 2.9).
Fig 2.9
REFERENCES
Bath-Balogh, Fehrenbach (2011), Illustrated Dental Embryology, Histology and Anatomy. Elsevier (2009), Mosby’s Medical Dictionary (8th Edition). Dental Juice (associated with university of Birmingham, 2019) Direct Restorations - Dentsply SDR. Dentodontics (Dental Student Blog - 2015), G.V Black’s Classification of Caries. Dept of Oral Medicine, MCODS, Figure 8; Deep Occlusal Caries with Brown Pigmentation. Deutsch A (2014), Silver Flouride Techniques for use in Aged Care Dentistry. Hai Ming-Wong (2014) Dept of Dentistry - University of Hong Kong Journal of Anatomy; Aetiological Factors for Developmental Defects of Enamel. John C Ness (2008), Anterior Anatomy and the Science of a Natural Smile. Science News (2016), Gum Disease opens the body up to a Host of Infections. www.dentalexcellencegreenbay.com Dr Brusky (2018) What you should know about Gingivitis.

Our readers are invited to enjoy a complimentary demonstration of bredent products at their lab. Demos are carried out by technical specialists and are a chance to try our industry-leading products for yourselves.
TO BOOK A COMPLIMENTARY DEMO AT YOUR LAB VISIT: www.bredent.co.uk/demo OR CALL 01246 641 050.
