
17 minute read
Zirkonzahn/3Shape
ZIRKONZAHN NEW M2 MILLING UNIT COMFORT LINE – FULLY AUTOMATIC, FLEXIBLE, OPEN
w The new M2 milling unit comfort line stands for modern operating comfort and flexibility. With the M2 Wet Heavy Metal, the M2 Teleskoper, the M2 Dual Wet Heavy Metal, the M2 Dual Teleskoper and the M2 Dual Double Teleskoper, the comfort line comprises five milling units with fully automatic 5+1 axis simultaneous milling technology. The highlight in terms of flexibility is the extra-large Teleskoper Orbit ( Ø 125 mm) that, in combination with special holders, permits to process all common soft and hard material blanks of Ø 95 mm, Ø 98 mm, Ø 106 mm or even Ø 125 mm. With the Teleskoper Orbit blanks can be removed and reinserted back into the orbit at exactly the same position with a precision in µm range. This is particularly helpful for adjusting the friction of telescopic jobs or for the twostage fabrication of immediate restorations in case of implant-supported prostheses (with the double milling technique).
Advertisement
All M2 milling units are stand-alone calibration processes or load elaboration tools directly from the machine via the integrated PC with touchscreen. The optical tool detection ensures greater safety during milling. The two separate large milling chambers are the trademark of the M2 Dual milling units. However, also the M2 and the M2 Telescoper milling units are characterised by spaciously designed,
ABOVE: Extra-large Teleskoper Orbit: for the elaboration of material blanks with Ø 95 mm, 98 mm, 106 mm or even 125 mm, as well as glass-ceramic and Raw-Abutments ® blanks. Discs can be removed and reinserted back into the orbit at exactly the same position with high precision in the μm range – particularly useful for the two-stage fabrication of immediate restorations in case of implantsupported prostheses (Double Milling technique).
optimally illuminated and easily accessible milling chambers as well as with a separated, contamination-protected tool chamber with 21-compartment automatic tool changer (optional up to 3 x 21 for the M2 Dual versions). The automatic selfcleaning function, the integrated Cleaning Kit for an easy cleaning of the milling chambers and the Ioniser (optional) ensure a particularly clean elaboration of solutions: it is possible to start milling and
the materials.
The performance range of the machines can be extended by integrating different accessories available, e.g. the Glass Ceramic/Raw-Abutment® Holder and the JawPositioner Support. With the M2/M2 Dual Upgrade Kit, the M2 Wet Heavy Metal and the M2 Dual Wet Heavy Metal milling units can be upgraded to the Teleskoper version.

FOR MORE INFORMATION VISIT : www.zirkonzahn.com Know more about the M2 line and the Double Milling technique! Scan the code.
STAY UP TO SPEED WITH THE BRAND - NEW 20% FASTER GENERATION RED E SCANNERS FROM 3SHAPE
w 3Shape announces the launch of its brandnew Generation Red E scanners for labs.
The Generation Red E scanners are upgrades of the 3Shape E1, E2 and E3 dental lab scanners to the same next generation platform as the award-winning E4 lab scanner. The next generation platform enables the three Generation Red E scanners to scan 20% faster for optimized productivity.
20% FASTER AT NO EXTRA COST! Despite the significant boost in scanning speed, all Generation Red E scanners are available at the same price points as their corresponding E models.
“With the 20% increase in speed, coupled with the already lightning fast E4, the Generation Red line of lab scanners make it easier than ever for labs to do more of what they love, faster. Productivity is paramount for labs. The speed and accuracy of Generation Red E scanners combined with our easy to use software ensure that lab professionals can work quickly, predictably, and at a great price!” says Rune Fisker, 3Shape Senior Vice President, Product Strategy.
GENERATION RED E SCANNER SPEEDS AND ACCURACY Generation Red E scanners include from two to four 5MP cameras (depending on the model) and auto start scanning. ISO-documented accuracy in the E4 and E3 models is suitable for implant bars. The E line of lab scanners are Red Dot international product design winners.
DISCOVER MORE ABOUT THE GENERATION RED E LAB SCANNERS : https://www.3shape.com/en/ scanners/lab
Full arch scan speed Full arch impression scan speed
Accuracy (ISO 12836)
Generation Red E4
9 sec.
45 sec.
4 µm
Generation Red E3
18 sec.
64 sec.
7 µm
Generation Red E2
24 sec.
72 sec.
10 µm
Generation Red E1
32 sec.
104 sec.
10 µm

KEMDENT Health & Safety - Pumice slurry and brushes
l A major source of cross-contamination in the dental lab comes from pumice slurry and brushes used to polish a denture before returning it to the dentist for fitting in the patient's mouth. One study found that slurry samples were heavily contaminated with pathogenic micro-organisms, and that adding a cleaner lowered the bacterial count.
This means that slurry, polishing instruments and the dental appliances being polished are all potential sources of cross-contamination. The technician doing the polishing is at risk, as well as the dentist who will handle the appliance and above all the patient who will wear it. Another study associated contaminated slurry with the high level of eye infections amongst dental technicians observed, due to spatter.
There are several preventive measures, which are very efficient at reducing the risks of crosscontamination; these include disinfecting the pumice pan and changing pumice slurry regularly, making up the slurry using an appropriate cleaner, soaking
Pumice made up with an appropriate cleaner reduces the risk of bacteria and fungi in the slurry, thereby limiting the risk of cross infection, as well as reducing bad smells
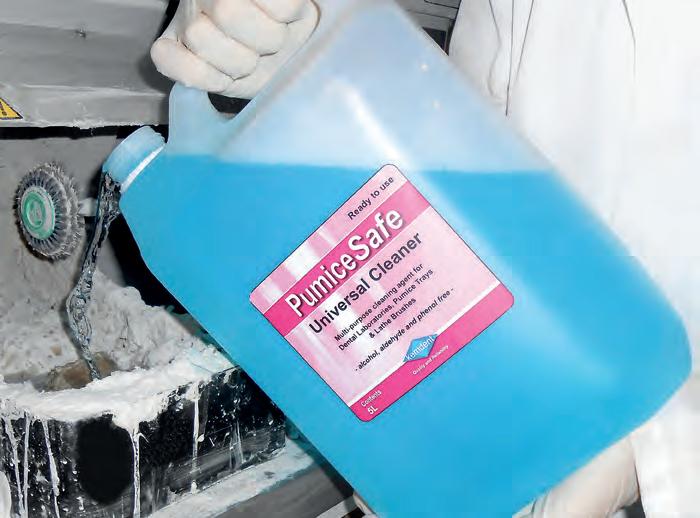
brushes and rag wheels after each use in cleaner to ensure they are not contaminated and wearing the appropriate protective clothing (such as eye protection and a dust mask to protect from spatter).

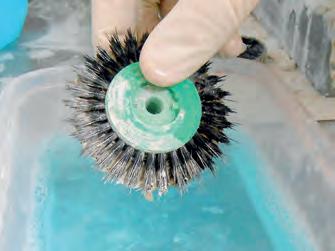
Brushes should be soaked in a cleaner
TESTING THE VITA AKZENT PLUS STAINS AND GLAZE MATERIALS: VERSATILE AND EFFECTIVE
Urszula Młynarska, Master Dental Technician (Warsaw, Poland), shows how she uses the VITA AKZENT PLUS stains and glaze materials effectively in her laboratory and demonstrates how versatile these materials are in practical application.

Throughout their professional lives, dental technicians continue to learn and perfect their skills in using ceramic to recreate typical features of dentition such as the internal structure, the surface, and transparent and translucent areas that are as natural in appearance as possible. In order to replicate these effects and characteristics, a wide variety of stains is required in addition to conventional ceramic materials. In addition to conventional tasks such as surface shade characterization and the application of cracks to the enamel or areas of abrasion, Ursula Młynarska also uses the complete range of VITA AZKENT PLUS products in her laboratory in Warsaw in order to increase or reduce the level of brightness with BODY STAINS or in order to replicate depth effects and translucency using EFFECT STAINS. In this article, you can find out how Urszula Młynarska uses the new stains and glaze materials effectively in her laboratory as well as how versatile these materials are in practical application.
More than just surface shine: glaze material Anyone with experience in biscuit bake firing of ceramically veneered crowns and bridges will agree that at this stage of the process, we cannot really evaluate either the tooth shade or the depth effects in a ceramic restoration. This is because the surface shine is not yet evident. In other words, without a glaze we cannot evaluate either the deep shade effects from within or the effects (usually varied) that we intended to achieve with our layering.
The VITA AKZENT PLUS glaze materials support the three-dimensional effect of the tooth shade, seal microporosities and improve the biocompatibility of the veneer, particularly in the tooth-neck area. You can choose from three glaze materials, each of which creates a different surface shine.
l The conventional VITA AKZENT PLUS Glaze is available as a powder, paste or spray. This glaze creates a natural-looking surface shine and retains all veneer detail as well as the surface texture.
l VITA AKZENT PLUS Finishing Agent - available as a powder or a spray - the shine is more silk-matte in appearance; however, it too facilitates reliably compacted surfaces. This material is especially recommended for the base area of bridge pontics and in the tooth-neck area where the gingiva is particularly sensitive.
l We use VITA AKZENT PLUS Glaze LT for ceramics that are fired at temperatures below 800 °C (LT stands for Low Temperature). This low-melting glaze material is also available as a powder, paste or spray.
The surface structure can also be influenced through the type of application: VITA AKZENT PLUS GLAZE SPRAY, for example, tends to result in a more homogenous surface, and when a brush is used to apply it, the scope for versatile effects can be controlled individually. Spray application is particularly suited to chairside restorations fabricated with CAD/ CAM technology, using VITABLOCS.
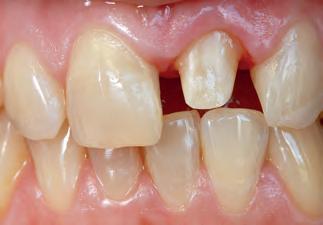
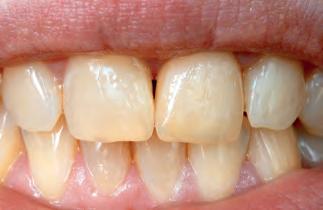
Glaze and natural surface shine in comparison Once the glaze has been applied and fired, most dental technicians have completed their work – or so it would seem. There is one more small thing, which, however, can only be seen when magnified using a camera lens. This is the only way to reliably verify the quality of a glaze and compare it with the shine of natural adjacent dentition. As part of the final step following glaze firing, the surface is matted using a silicone polisher. The result is a natural-looking shine (Case study 1: Fig. 1 to 3).
1
2
3
CASE STUDY 1
FIG. 1: Initial situation: the prepared stump (21).
FIG. 2: Verification using the lens of a digital camera: the excessive amount of shine of the glaze after firing is clearly visible.
FIG. 3: Level of shine of crown 21 following correction: the surface was matted manually using the silicone polisher.
Using stains to create nuances In order to adapt the shade of the restoration to that of the natural adjacent dentition, I use VITA AKZENT PLUS stains. They should be applied in thin layers so that the shade can be controlled and nuanced during adaptation. If they are applied too thickly, they prevent the transmission of light. We use the stains for internal coloring during layering as well as for the application of surface effects. They can be used with any kind of ceramic dental material within a CTE range of 6.9 – 15.7.
Classically simple: mixing the shades Mixing using the two processing forms (powder and liquid) is very simple: VITA AKZENT PLUS POWDER is mixed with the appropriate POWDER FLUID. The ready-touse paste comes pre-prepared for application.
In order to achieve a consistency that can be easily applied, the material is mixed 12 hours prior to use. Thanks to its creamy consistency, the individual shades can be easily and precisely applied without the formation of streaks.
For glaze firing, the same furnace programs are used as for VITA AKZENT shades; the effects that have been applied do not lose any of their effectiveness or intensity after firing.
Rich selection of shades with BODY STAINS The options in terms of shade selection are more than satisfactory. Adapted in order to match the basic shades, VITA AKZENT PLUS BODY STAINS (BS) offer five shades, from yellow to grey-brown. We usually use these shades to emphasize the shade intensity in the area around the tooth neck, at contact points and on occlusal surfaces.
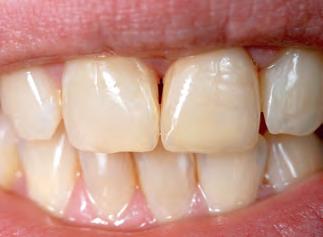
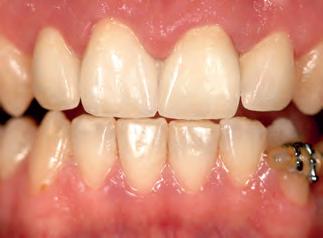
We have also found additional use for BODY STAINS in our work with our patients. Generally these materials allow the degree of light transmission at the incisal edge to be reduced – a solution that can also be used in “emergency situations”. Moreover, the BS03 BODY STAINS (orange) also allow warmer shading to be very discretely applied to the incisal edge (Case study 2: Fig. 4 to 7). The BODY STAINS can also be applied even in broader strokes without any hesitation. The overall result is a smoother, unobtrusive effect that is more pastel in appearance and emphasizes the shades rather than modifying them. The yellow hue BS01 has proven itself an excellent choice for outlining the incisal edge.
When applied to the end of the highly transparent incisal edge, the lower transparency of the BODY STAINS creates a contrast that facilitates a greater dynamic in this area. They subtly emphasize the internal delineation as well as the EFFECT ENAMEL and MAMELON materials that this contains.
4
5
6
7
CASE STUDY 2
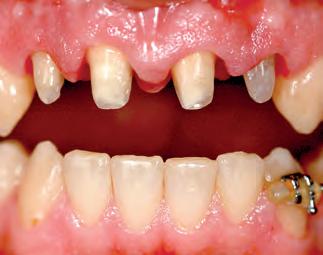
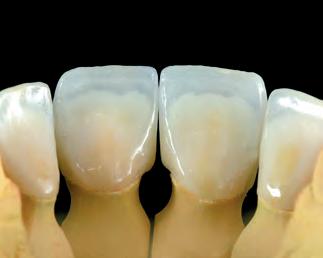
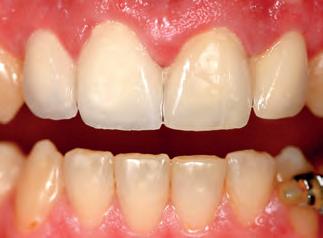
FIG. 4: Initial situation: prepared stumps (12 to 22). FIG. 5: All-ceramic cut-back crowns after firing. As a result of extension using ENAMEL, the incisal edges are too long and transparent. FIG. 6: Crowns 12, 11: the incisal edge that has been extended using ENAMEL can be clearly recognized. FIG. 7: Crowns 21, 22 (modification of the shade): reduction of the chroma in the central area using ES12 (grey-blue). The ENAMEL was only lightly colored using BS01 (yellow) and BS03 (orange), the incisal edge emphasized using BS01.
The materials should not be too watery on application. In order to prevent inadvertent shifting of the ceramic material during insertion, the restoration is pre-dried.
Local characterization and shade adaptation using EFFECT STAINS The extremely fine-grained masking stains (EFFECT STAINS) offer excellent coverage thanks to the intensive appearance of each shade. They are recommended for applying natural surface effects.
In our laboratory, these materials are applied in the area around the tooth neck, on occlusal surfaces and at contact points. Cream (ES02), sunshine yellow (ES04) and orange (ES05) are particularly suited in this case. By adding a little ES03 to ES05, for example, we can create a lovely hue. ES05 (orange) can be used together with ES08 (pink) to shade the incisal edge. In practice, we simply use a small brush for gentle application along the incisal edge.
The broad spectrum of shades from ES09 to ES14 (from dark red, lilac, blue, and grey to black) is only applied to the surface where they act as a shade filter.
Although we initially had doubts with regard to certain shades, in terms of where they should be used, every one of these hues later proved to be necessary and justified in practice. Regulating transparency in the incisal edge area A standard task that we are continually faced with in our daily routine is controlling the degree of translucence along the incisal edge. Thanks to VITA AKZENT PLUS, performing this task is no longer an issue, but a lot more enjoyable now.
There are many options that can be used to modify shades, one of which is ES13 (grey). Where the shade effect must be intensified or refracted, ES13 (grey) or ES14 (black) can be added. Mixing the shades ES08 (pink) + ES12 (grey-blue) + ES13 (grey) is also a good solution in this case.
In order to strengthen the delineation of the incisal edge, and to emphasize the deep mamelon effects from within, I recommend using the pure hue ES12 (grey-blue). Opalescence at the marginal ridges, for example in the case of the central incisors, can be emphasized using ES10 (lilac).
However, these are just some examples and suggestions for initial testing. The more work you carry out using VITA AKZENT PLUS shades, the more possibilities you will discover by yourself.
Clever replication of white effects VITA AKZENT PLUS offers a slightly transparent white shade. It is ideally suited to the creation of “misty” effects.
However, what should be done in situations where a calcification effect or merely a white stroke of color is required? With VITA AKZENT PLUS, ES01 (white) and ES02 (cream) powders are provided. ES01 is a slightly translucent white, which does, however, also include an additional hue as well as a different translucence to the comparable “white” shade provided with VITA AKZENT. It is an excellent solution for cusp tips, as well as for the reproduction of staining and more subtle lines. In order to emphasize the incisal edge, mixing ES01 (white) with just a hint of ES05 is recommended as this creates a lovely effect at the incisal edge. The ES02 (cream) material, on the other hand, unlocks entirely new possibilities. This shade offers a maximum level of opaqueness and is chalky in appearance. It allows calcification, spotting, and cracks to be very easily replicated. The powerful white effect is retained, even when firing has been performed several times (Case study 3: Fig. 8 to 10).
Brightening shades in a completed restoration While we're on the subject of “bright shades”, we should look at an issue that crops up on a regular basis: what can be done in order to brighten the color of a restoration that has already been completed?
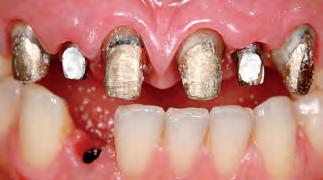
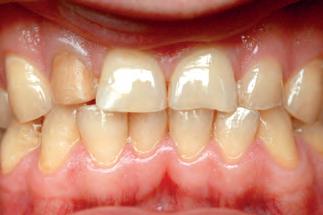
The trick is to mix ES01 (white) and ES02 (cream); this enables the degree of shade brightness to be modified (Case study 4: Fig. 11 to 13). This can therefore be considered a kind of “lifebelt” for the ceramic technician. This
8
10
mixture increases the level of brightness of the entire restoration, while still retaining the purity and depth of the veneer. Increasing brightness in this way is ideal for the central area of crowns.
What if the final veneer is too bright? The complete opposite to brightening the restoration is the situation where the brightness of the shade must be reduced. This is where particular attention should be paid to the ES13 EFFECT STAINS (grey) as they can be used to reduce the level of brightness.
CASE STUDY 4
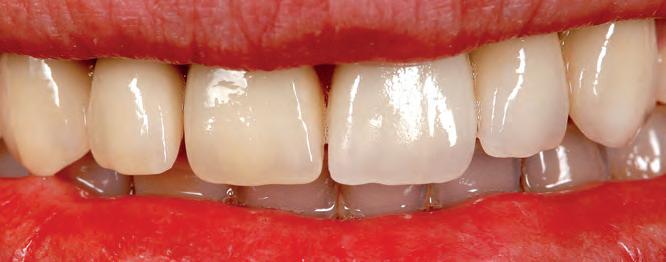
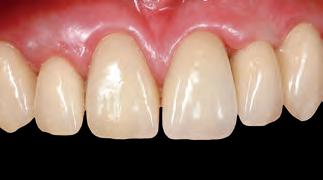
FIG. 11: Initial situation: prepared stumps (13 to 23) fitted with post abutments.
FIG. 12: All-ceramic crowns veneered using VITA VM 9: basic shade is VITA 1M2. The shade was brightened at the request of the patient. The degree of brightness of crowns 21 and 22 was increased with a mixture of ES01/ES02 (white/cream).
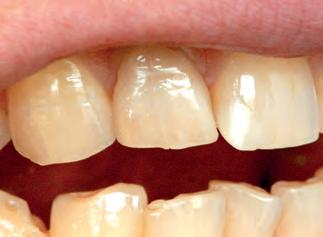
FIG. 13: Result: The brightened crowns are clearly visible here.
9

CASE STUDY 3
FIG. 8: Initial situation (11): incisal pressceramic veneer fabricated from VITA PM 9.
FIG. 9: The dark preparation surfaces were coated using VITA PM 9 in the shade VITA 2M2.
FIG. 10: The veneer was stained using VITA AKZENT PLUS, the incisal edge lightly shaded using ES12 (grey-blue) and enamel cracks applied using ES02 (cream).
Limited space, thin layers, opaque material that shows through, but also flaws in the shade depth: These issues can all be resolved with outstanding results using ES13. This material clearly reduces all of these shade defects while at the same time supporting the threedimensional effect of the restoration. For this purpose, it can simply be applied in its pure form in the central area of the crown.
Summary As there are a variety of glazing techniques and procedures, there is an approach to suit everyone. However, essential in this respect is that VITA AKZENT PLUS shades can be ideally integrated in the ceramic thanks to the lightness and transparence of the material. As they do not interfere with the play of light within the veneer, they help us break away from established patterns of thought that we may still have in regards to how to stain our restorations. Thanks to VITA AKZENT PLUS, crowns that have been fabricated using the simplest of methods can be transformed into vivid restorations with a unique, incredibly dynamic appearance.
Could VITA AKZENT PLUS shades replace the AKZENT shades? They certainly provide us with many new options as well as allowing greater freedom in our work. They are also the answer when it comes to our ongoing search for new ways to express ourselves. Their essence and unique properties offer benefits that everyone must discover for themselves as part of their daily work.
Source: Dental Labor Poland 3/2013, Verlag Neuer Merkur GmbH, Germany.
VITA® and other VITA products mentioned are registered trademarks of VITA Zahnfabrik H. Rauter GmbH & Co. KG, Bad Säckingen, Germany.


