5 minute read
Indoor Gardening–Tomatoes
Indoor Gardening Buckets of Tomatoes
Tomatoes of any variety have always been high on my list of go-to produce items, especially when they’re perfectly ripe and packed with flavor! While my daydreams of plucking fresh tomatoes bursting with color and deliciousness right off the vine are heartwarming, I often find the reality of growing them outdoors to be somewhat more stressful. In most cases, I’m picking them early to ripen off-vine, avoiding any unnecessary exposure to damage in the garden. One pesky squirrel nibbling on every single delicate little developing fruit can easily destroy an entire harvest. Seriously, why can’t they just take a whole tomato and call it good?
Throw in larger animals like deer, racoons and rabbits, bugs like aphids, beetles, cutworms and hornworms, bacterial and fungal pathogens – suddenly it becomes quite overwhelming (for me, at least). All those threats to a bountiful harvest are certainly preventable with a bit of care and planning, but there is another option available that doesn’t require any sacrifice to the quality of the fruit. Grow your tomatoes from seed (or cutting) to harvest, fully indoors.
Even if you’re still planning to grow outside, a small indoor garden can provide fresh tomatoes even in the winter months. Plus, it just makes for a fun project. Getting setup is fairly simple and only requires a few pieces of equipment. For this example, we’re going to use a basic hydroponic system called Deep Water Culture (DWC) that utilizes a bucket to hold the roots of our plant and requires no soil. Note that if you prefer to grow with soil, you can simply substitute a pot with good drainage and a potting soil of your choice for the bucket. All the other principals remain the same.
Start by finding a space in your home where you can keep the temperature consistently between 70°F and 80°F during the day and between 60°F and 75°F at night. Humidity should generally range from 60% to 80%. The size of your space will be dependent on the variety of tomato that you choose to grow. Determinate varieties that grow to a certain size before beginning to flower tend to be shorter and bushier, requiring less space. Indeterminate varieties that continue to grow and put on new fruit perpetually, if conditions are right, can often become very large and require additional support. Either type will work indoors. It’s all a matter of preference and available space.
You’ll need bright light that replicates direct sun exposure for 12 to 18 hours per day. The less intense your light, the more hours you should run it. For one plant, a 260-watt LED light hung 2 feet above the canopy can be run for just 14 hours per day. If you instead had a 100-watt LED, you would likely want it running the full 18 hours. When choosing a light, you want something with a “full spectrum” that includes both cool blue color temperatures and warm reds.
Start your seeds indoors just as if you were getting a head start before transplanting into your outdoor garden. Any type of starter peat pellet or cube will work. I prefer using rockwool cubes or their biodegradable foam counterparts because they are a little less messy.
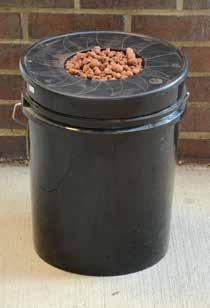
For the Deep Water Culture, you’ll need a regular 5-gallon bucket with a special lid that includes a built-in mesh/net pot to hold your plant. If you don’t have access to this type of lid, you can also take a standard bucket lid, cut a circular hole in the center and place a mesh/net pot in the hole. Fill the mesh pot with clay pebbles (also called LECA – light expanding clay aggregate) and place your seedling, still in its starter cube, between them.
Fill the bucket with water high enough so that bottom of your seedling cube is barely making contact. Just like growing in soil, getting oxygen to the roots of your plant is vital. Without it, the roots will rot and die. In a hydroponic system, this can be achieved with a small air pump and air stone. Place an air pump outside the bucket. Run black poly tubing (usually comes with the pump) through the mesh pot lid and connect it to the air stone. Place the air stone in the water and plug in the pump. You should see bubbles rapidly emitting from the air stone. That means it’s working, and oxygen is making it into the water. You can leave the pump running 24/7.
Mix a liquid fertilizer of your choice into the water in accordance with the proportions stated on the label. I prefer to use the General Hydroponics FloraNova series because it includes not only nitrogen, phosphorous and potassium, but all necessary micronutrients as well. Check the pH of your nutrientwater solution and adjust accordingly to keep it between 5.5 and 6.5. Over time, the water level will slowly drop as it’s used by the plant and as it evaporates. Top it off with more nutrient-water mix so that it remains in contact with at least some of the roots. Eventually, the roots reach all the way to the bottom of the bucket.
When your plant starts to flower, make sure it pollinates itself by shaking it, tapping near the flowers, or resting a running electric toothbrush against the branches. Now is also the time to change your fertilizer mix to one specific for flowering/blooming. In no time, you’ll have buckets of tomatoes from your buckets of tomatoes!

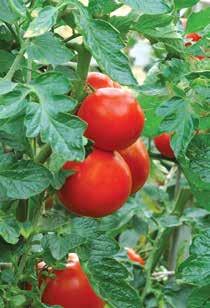
Deep Water Culture hydroponic system uses a 5-gallon bucket with a built-in mesh pot to hold the starter tomato plant. Growing and harvesting tomatoes before wildlife interrupts the process is possible! Try this basic hydroponic system.

JASON MISPAGEL Indoor Gardener
Jason Mispagel is the co-owner and operator of Year-Round Garden, a grower’s supply center serving both home and commercial customers since 2016. To contact Jason, call 816-216-6917 or jason@year-roundgarden.com.


