
7 minute read
Staff InPlace guide
OVERVIEW
The University of Winchester uses InPlace to help you manage your student’s work placement and / or volunteering opportunity.
With InPlace you can:
F View details of your student’s placement, employer, risk assessment and required documents F View employer (InPlace calls this “agency”) and placement details after a placement is submitted F Approve your student’s placement after reviewing their application
LOGGING IN
You can find the InPlace link on the Intranet, relevant Canvas page or by simply following this link:
https://inplace.winchester.ac.uk/inplace
When the page loads, click on the “Staff and Students” button then use your normal University log in to access InPlace.

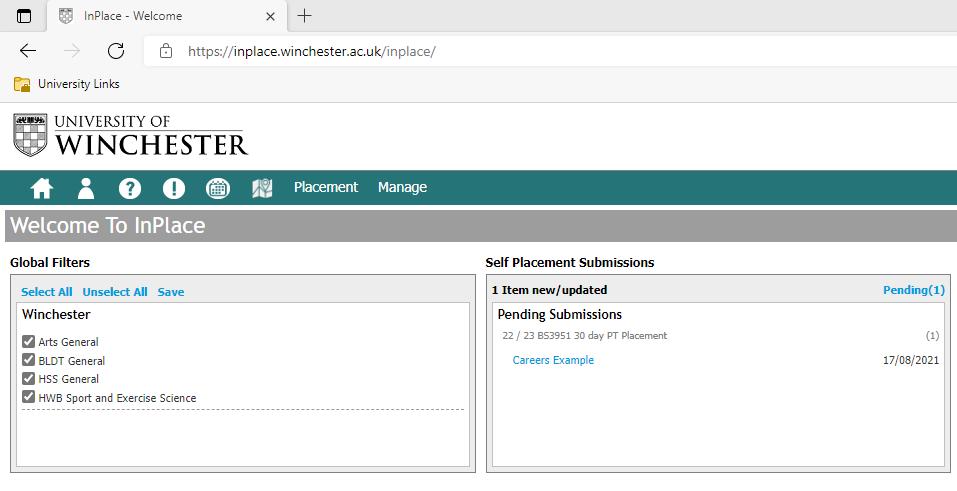
Once logged in the screen above will be displayed. The “Global Filters” tile can be used if you manage students across more than one faculty, so if you just wanted to view submissions from BLDT you would untick the rest. For most users you will only have the one faculty displayed here. This screen shows you an overview of the student placement applications assigned to you which can be found within the “Self Placement Submissions” tile. This tile shows the placement type (usually associated with the module code) and the student name, which in this case is “Careers Example”. To view the placement submission details, click on the student’s name.

This screen will give you an overview of the student placement submission where you can view details of the employer (InPlace calls this “Agency”), the employer contact details, the students Risk Profile and Placement Documents the student has uploaded. If whilst reviewing the above information you notice key fields missing, you can provide quick feedback to the student by using the “Provide Feedback” box as below
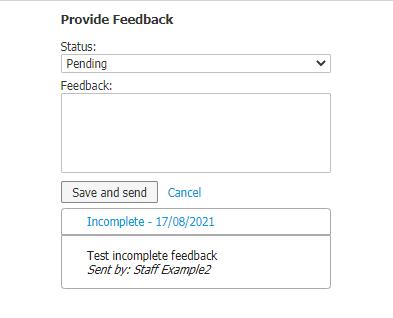
The default status is “Pending” but if you wish to either mark the application as “Incomplete” or “Not Approved”, simply select the option from the drop-down box. If you require minor changes, select “Incomplete”, write suitable feedback in the box provided and then click on the “Save and Send” button. This will notify the student via their InPlace login, with details of the feedback you provided, enabling the student to resubmit the application. If you select and save “Not Approved”, this will reject the application meaning that the student would then have to submit a new application. Scenarios where this may be required is if the employer / job opportunity the student submits fails to meet the requirements of the module. If you are happy with the overview, scroll to the bottom of the screen and click on the “Self Placement Wizard” button.

Step 1 – Match Agency (Employer)
InPlace stores Agencies (Employers) to make the placement application process easier for students and staff. The name of the Agency the student has submitted is displayed in the grey bar at the top of screen under Match Agency. You can now do one of two things, either Add as a new agency (step 2 below) or Merge with an existing record. 1. Match Agency (Merge) – Please note: only merge with a matching record! If the organisation the student will be working for is already in InPlace you can merge with an existing record which can be found under the Matches Found section. Click on the relevant
“Merge” link

Here you can see details of the Existing Agency (already stored within InPlace), the Submitted Agency (the student submitted details) and the Final Merged Agency (the record that will be saved) – select items you wish to merge then click on the Next button. Click OK on the confirmation pop up.
Click on the Next button located in the bottom right of screen to move to Step 2 of the wizard.
2. Add as a new Agency
If no matches can be found, you can add the Agency as a new record. To do this, click on the Add as a new Agency button located in the top right of screen.

The student should have completed most fields here, if any are missing you can add them here. If the Agency Type, Agency Level Template and Agency Level are blank, please select as shown in the above example. Click the Save button when done.
Step 2 – Match Personnel
The student had the option so submit two contacts, an Agency Contact and a Supervisor if these are the same person they will appear twice. In the same way we previously merged or added a new agency, we can also do the same with agency contacts. If the contact doesn’t appear in the “Matches Found” section you will need to add a new contact. To Add a new contact, click on the “Add to Personnel” button as shown here.


Ensure all required fields are completed, for Personnel Type select “Work Based Supervisor”. If the contact is also the supervisor, you can tick the Placement Supervisor box and then make sure both the “Receive Correspondence” and “Student Contact” boxes are ticked. If the contact or supervisor exists in the system, click on the Merge button as before and choose which fields you wish to merge. You will need to tick at least one of the check boxes under the Agency Contact and Supervisor column, if in doubt, you can just tick both on the required row, this will be needed later for the confirmation message. Once you have added or merged, click on the Next button located bottom right of wizard.
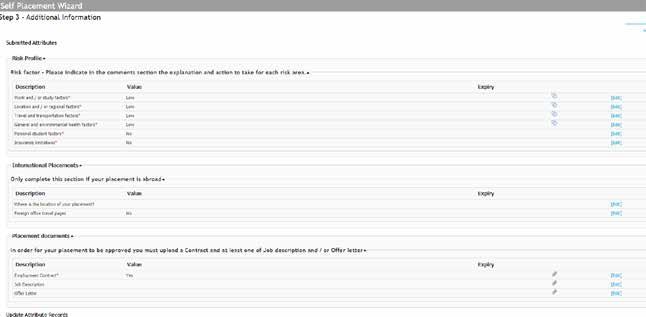
This screen displays the students Risk Profile, Placement Documents uploaded and a section on placements abroad (International Placements). Click on the View button to see the details submitted. For the Placement Documents section, you can click on the paper clip icon to download the files the student attached.
Once done, click on the Next button located bottom right of wizard.
Step 4 – Review & Approve
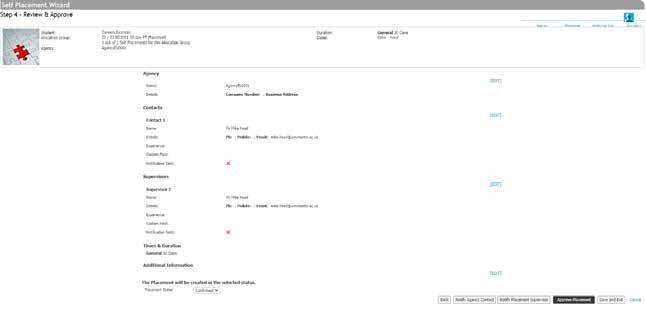
On this screen you can review all the information relating to the employer (Agency) as well as sending notifications to the required Contact or Supervisor (you’ll see a green tick if you have already sent a notification)
1. Depending on who you wish to send a notification to click on either the Notify Agency Contact or Notify Placement
Supervisor button (if a different person, you can send to both if you wish). This will open the communication template below.
This is a pre-populated message so you won’t need to edit. The work placements email address is auto populated into the CC field so we can keep track of placements. You can preview the message that will go out to the employer by clicking on the Preview Message button, when happy click on the Send button, this will send the notification to the employer, thanking them for taking the student. 2. Placement status. The next step to confirm the placement is to make sure “Confirmed” is selected from the drop-down box.

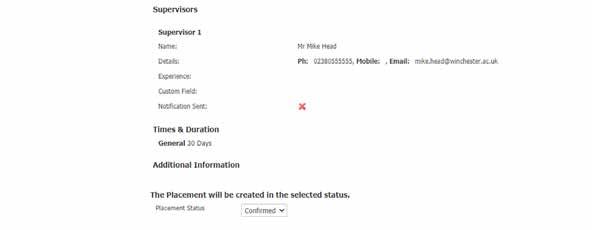
3. Approve Placement
The final step is to click on the Approve Placement button

This will open the communication template to be sent to the student. As above you can preview the message. When happy, click Send.
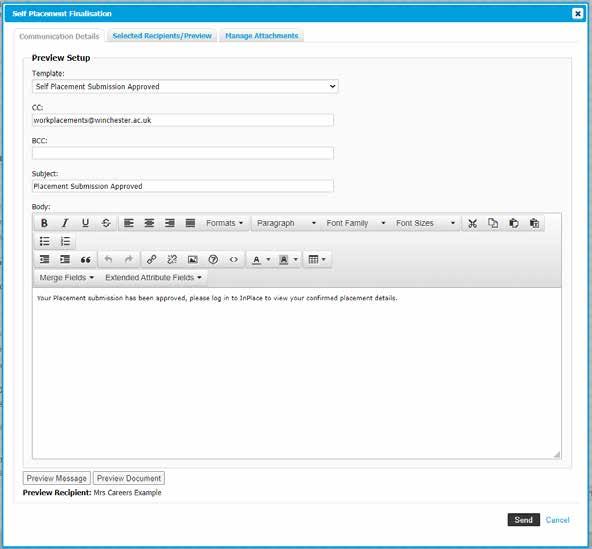
After sending the notification to the student you will see the below screen showing you the status of the placements. This list will also show you any outstanding placement applications that still need approving by you.
If all done, click on the Home icon top left of screen to return to the original screen after log on. The Pending Submission box has now gone, you have no more placements to approve. Check back regularly when you expect students to submit their placements.


If you encounter any issues during the approval process, please email mike.head@winchester.ac.uk
To discuss your placement and employability options, visit the careers office in SAB303 or email
workplacements@winchester.ac.uk

DID YOU KNOW?
We now have a Placement advice form which is to guide you through the process of how to include a placement module into your curriculum. Have a look on the DELTA canvas page from more information. @_UoWcareers
@uowcareers @universityofwinchestercareers 01962 827232 workplacements@winchester.ac.uk


