13 minute read
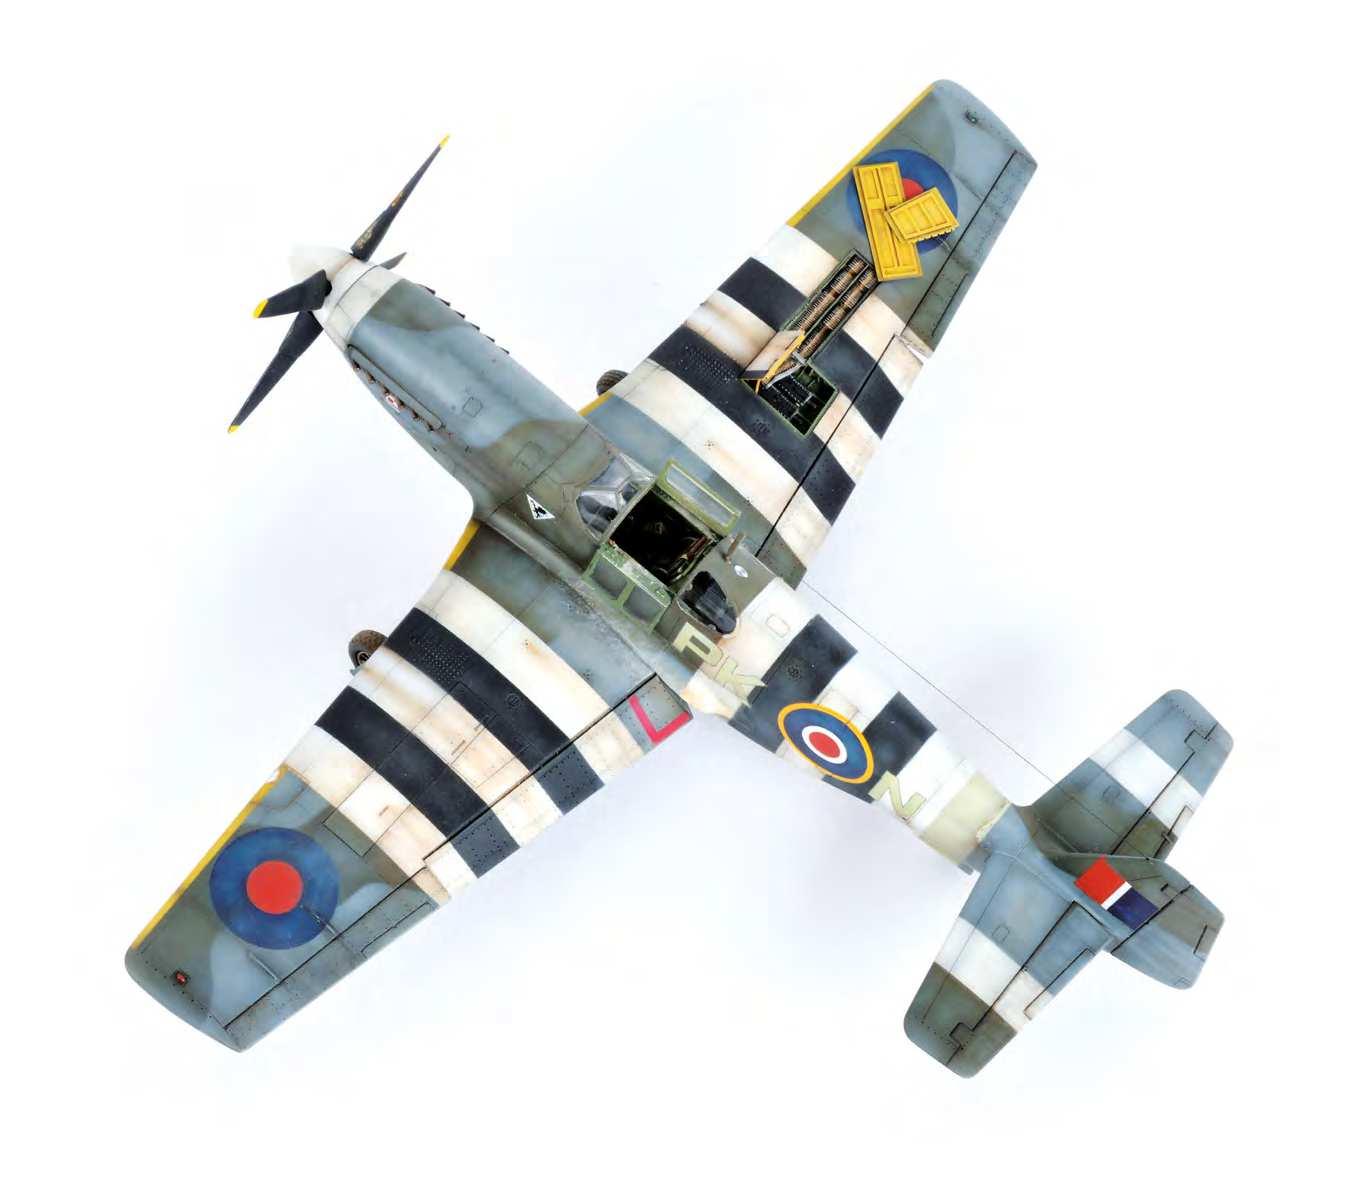
A Magnificent Mustang – 1:48 Tamiya RAF Mustang III
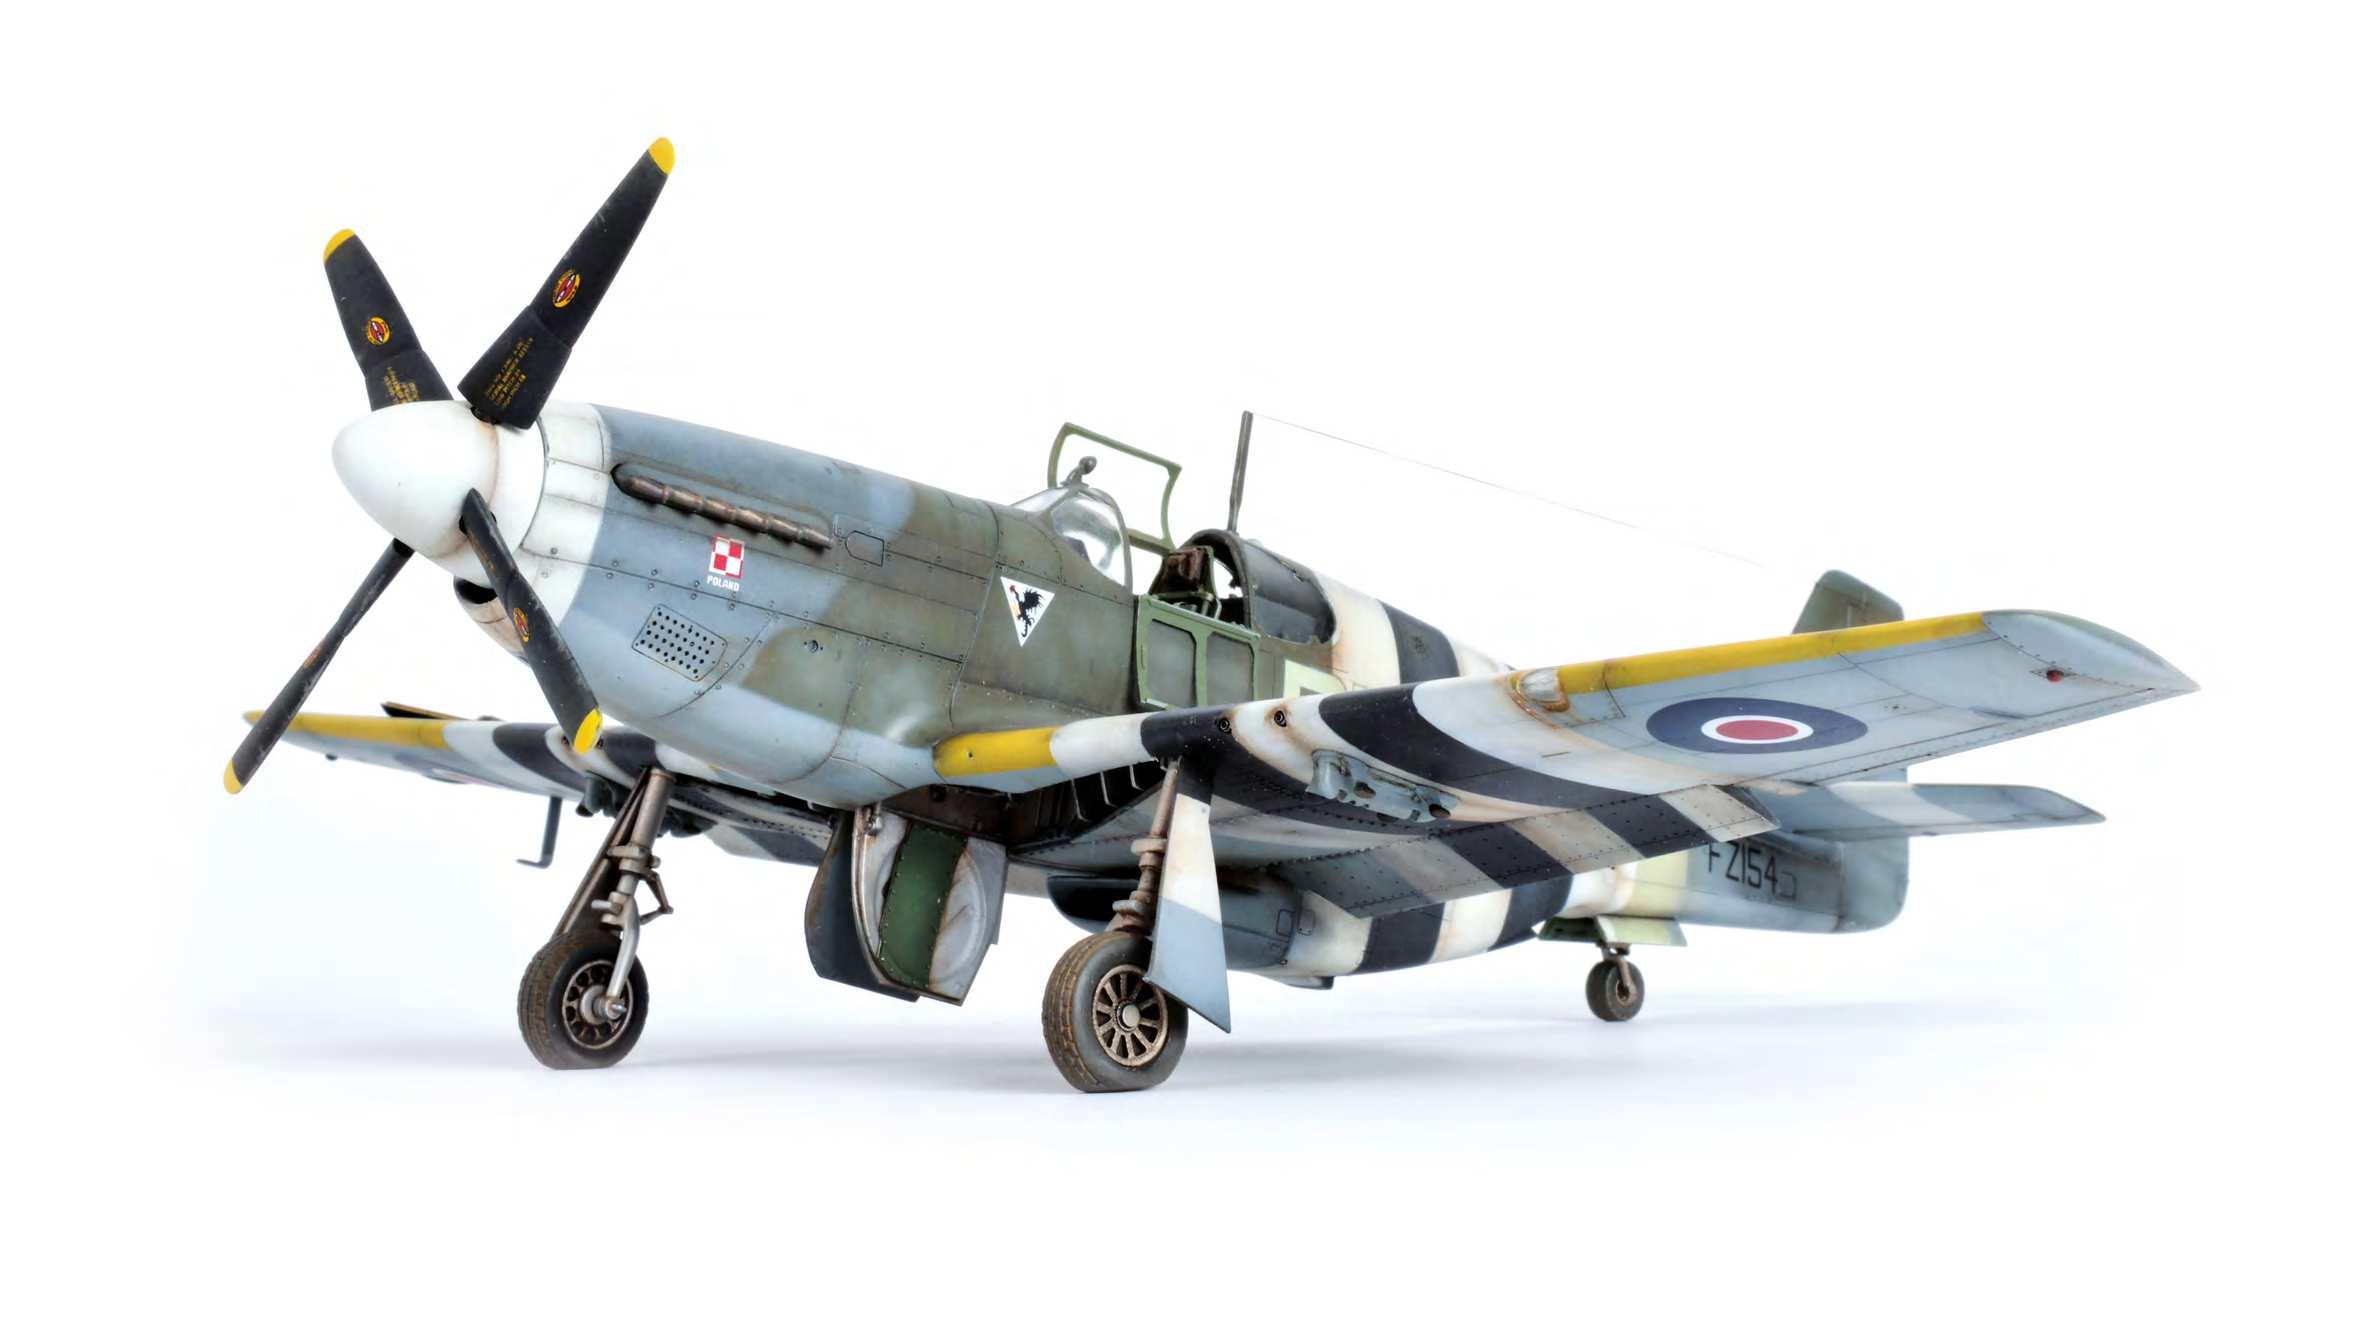
but not of the Merlin powered Mk.III, which had a flat cockpit floor. Luckily there are plenty of after-market detail sets still widely available which means that an inaccurate cockpit floor is a minor inconvenience. Moulded in Tamiya’s familiar mid-grey plastic, the kit parts feature recessed panel lines, which although wonderfully sharp-edged, might appear a little deep to modern eyes. The detailing though, in the form of access panels, grilles and rivets, is wonderfully and subtly done, and is easily comparable to that of today’s top kit manufacturers. Both the blown ‘Malcolm Hood’ and the heavily framed ‘bird cage’ type canopy are included in the kit, though the overall parts count is small at around fifty pieces, and straight from the box Tamiya’s Mustang III appeared to be a simple build. Of course, I intended to make things more difficult for myself by adding some resin detail sets, and indeed, the large number of after-market accessories available for the Tamiya kit are in of themselves confirmation if confirmation were needed, of the kit’s classic status.
Advertisement
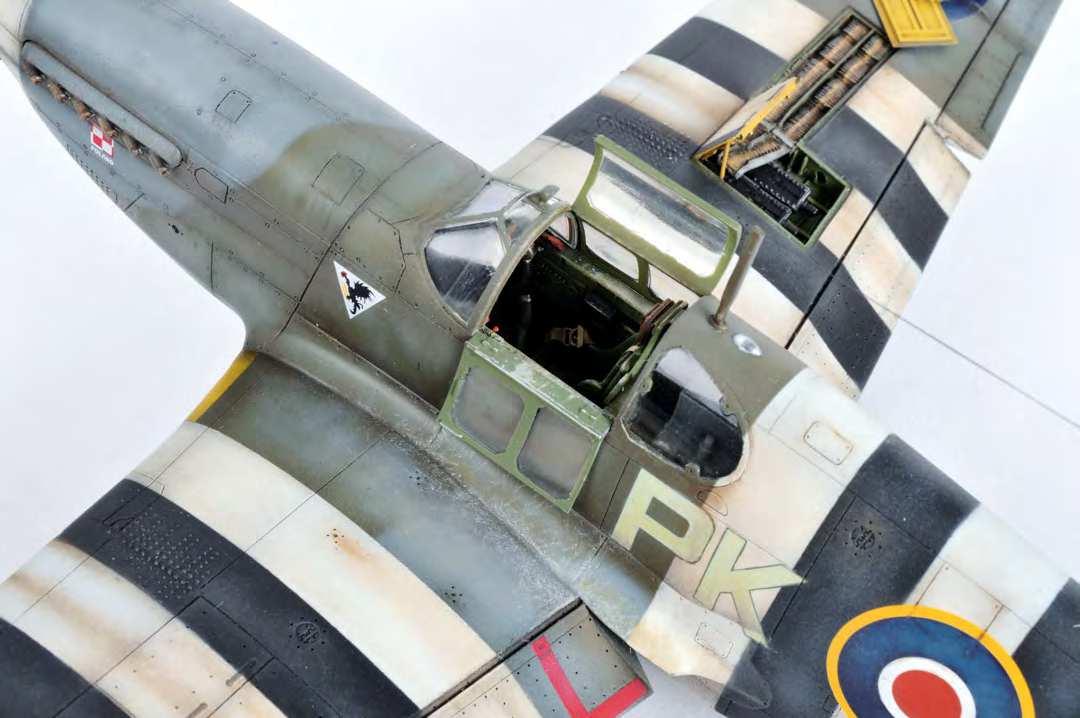
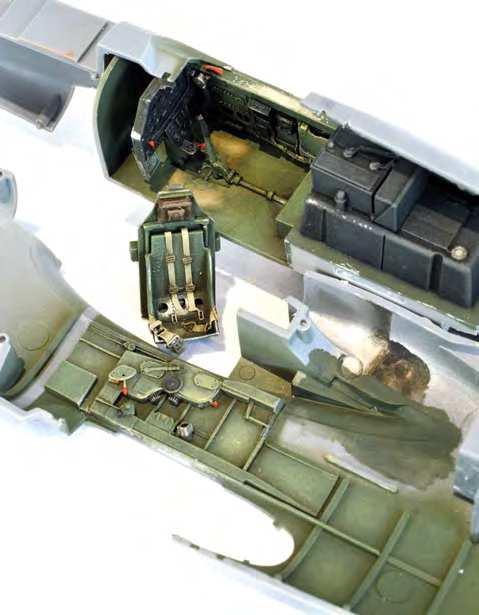
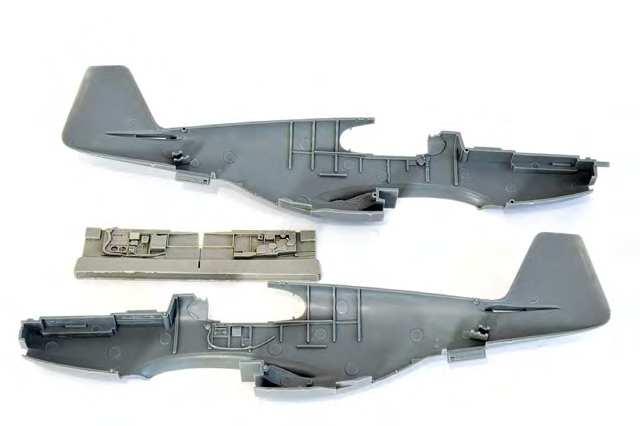
I began work on the Tamiya kit by getting the ‘dirty jobs’ out of the way first. These included removing the interior fuselage detail from the cockpit side-walls, and removing the wheel-bays in their entirety to make way for the after-market sets. Not for the first time however, I found myself questioning the logic of my decisions as the kit detailing, especially that of the main wheel bays, proved to be more than adequate straight from the colourful Tamiya box. Once I had fitted the Aires items though, I was glad once again that I had gone to the trouble. The Czech manufacturer, Aires produce many exquisite detail sets, and the Mustang III cockpit and wheel bay sets are amongst them. On the down side, the Aires detail sets often require a lot of work to make them fit and the instructions are usually rather vague and only of limited use when it comes to positioning some of the smaller resin and etched brass parts. But the sense of achievement one feels once they are installed and painted, more than compensates for the extra research
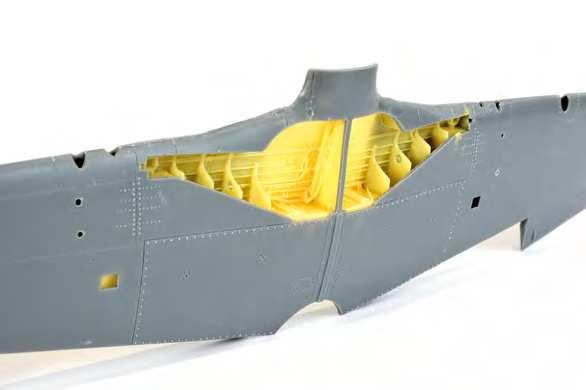
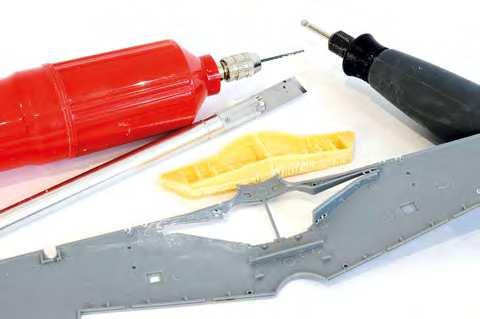
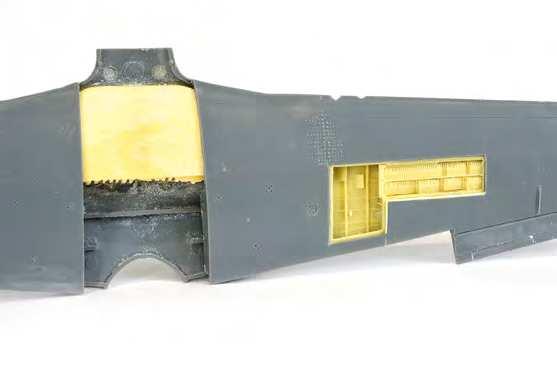
Working on the wheel well detail set… …and installing it into the wing section
one may have to do to make up for their shortcomings. Thankfully the Mustang III Cockpit Set offered no problems, though the single piece wheel bay was a different matter entirely. Removing the kit wheel-bay from the one-piece lower wing was a demanding job that required the use of drills, chisel blades, sanding burrs, wet and dry sandpaper and needle files. Because of the depth of the resin insert, it was necessary to greatly reduce the thickness of the plastic on the interior surfaces of both the upper and lower wing halves before the insert would fit comfortably within the wing-space. The resin insert too needs reducing in size, and the reverse side of the wheel-bay roof was tracing-paper thin before the wings would finally and grudgingly close around it. I did have to do some patching-up work on the wing leading edges once the wings were finally cemented together, especially around the gun-ports, which had been chewed to a ragged appearance. Despite there being a pair of resin gun bays and four resin and etched machine guns included in the Aires detail set, I decided to open-up just one of the wing-mounted gun bays. More drilling and cutting was therefore required to remove the plastic maintenance hatches in the upper starboard wing-half. I had actually intended to open-up the port wing, so both the cockpit and the gun bay would be open to view on the same side of the airframe, but started work on the wrong one by mistake. The wonderfully detailed, one-piece resin wing insert, fitted comfortably against the underside of the upper wing with only a little thinning of the plastic required, though short lengths of plastic strip were needed to fill some noticeable gaps along its edges once it was glued in place. Otherwise the fit was perfect. I also felt it necessary at this stage to hollow-out the exhaust
ALSO USED
ARIES 4186 - MUSTANG WHEEL BAY ARIES 4223 – P-51 B/C COCKPIT SET ARIES 4243 – P-51B/C GUN BAY MONTEX – P-51B MASKS TRUE DETAILS 48025 – P-51 WHEEL SET TECHMOD DECAL SHEET 48002
-51 MUSTANG BUILD 4 – P
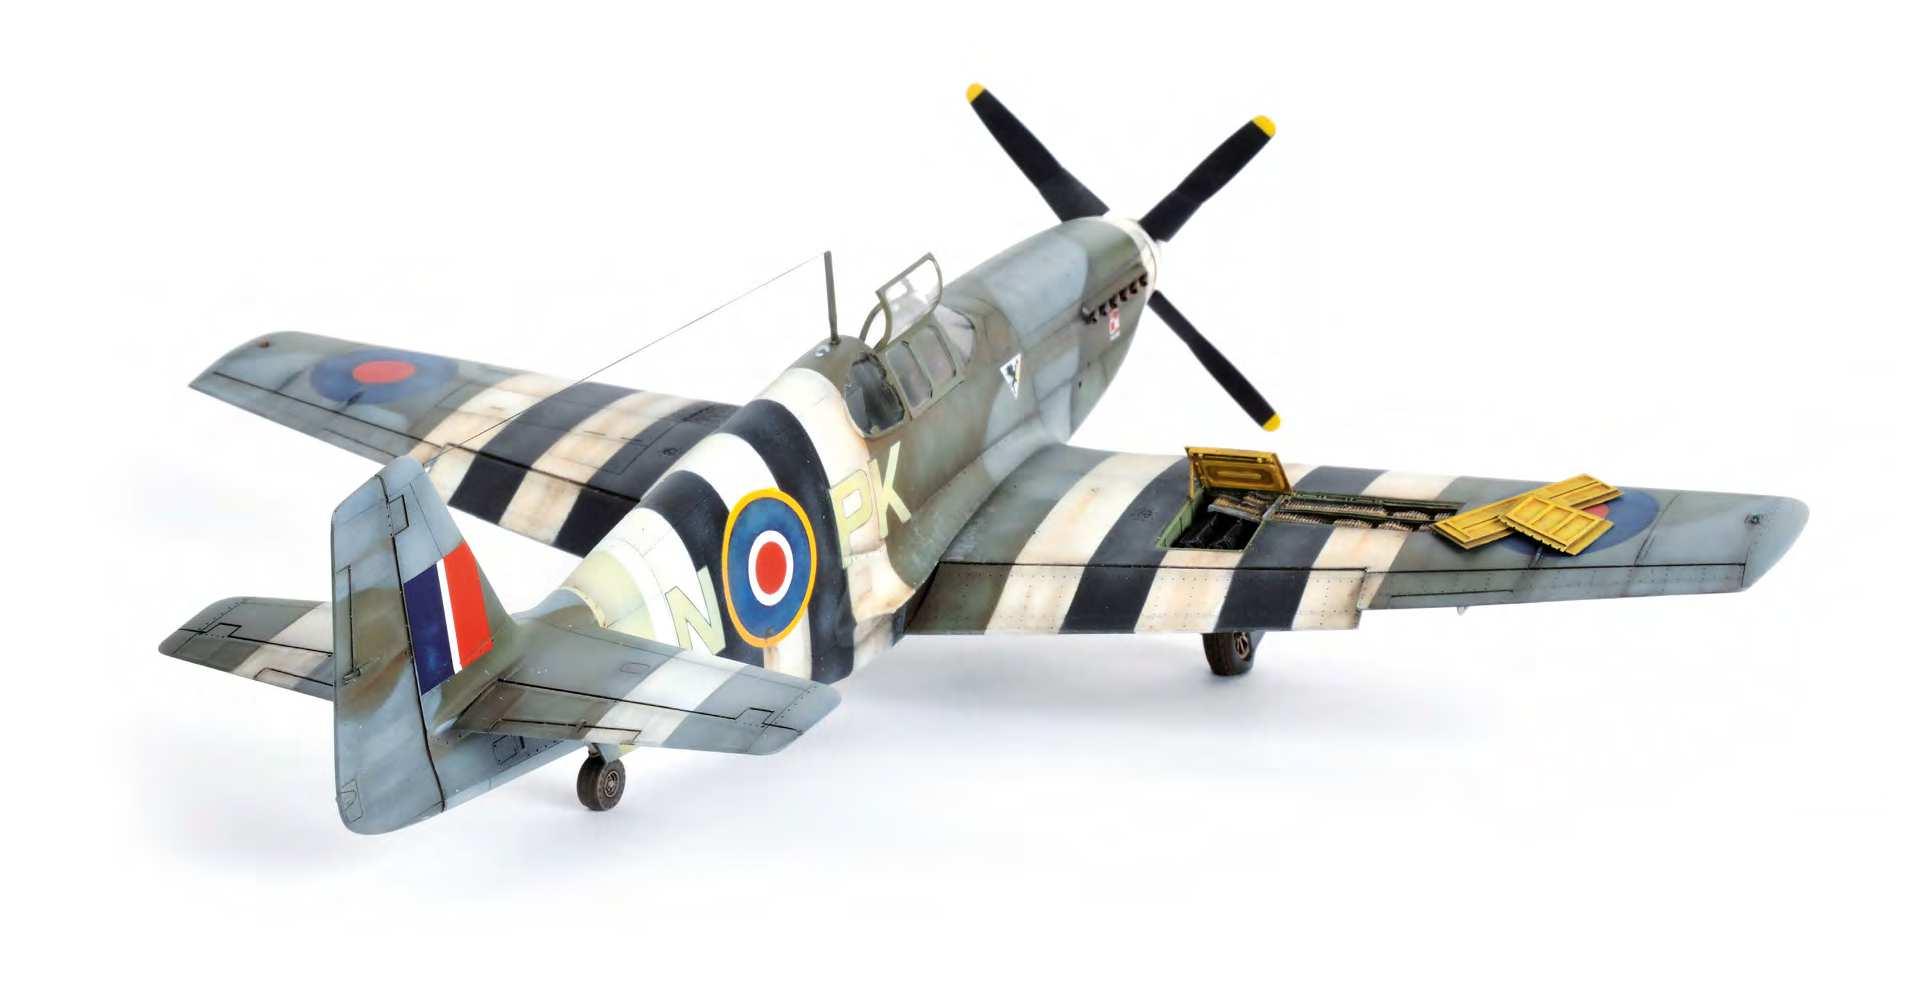

I also decided to open up one of the machine gun panels
stubs – there are two styles of exhaust supplied in the kit, which was achieved using the point of a new scalpel blade. I decided too to replace the kit wheels with resin replacements from the True Details range of accessories. The latter items are noticeably superior to the kit items and benefit from weighted tyres, but they too are rather simplistic in design and feature solid hubs rather than the hollow hubs of the real aircraft. Eduard do now offer far superior, multi part resin alternatives that realistically replicate the hollow nature of the hub centres, but as I had already had the True Details items, I naturally used them.
Perhaps typically for a kit of the Mustang’s vintage, there are no internal bulkheads or structural details beyond the cockpit. The fuselage remains just a hollow shell therefore, as the cockpit is open to the rear, and dry-fitting revealed that daylight was clearly visible filtering through the open tail-wheel bay and the gaping belly intake beyond the cockpit. Some form of internal structure was needed, therefore, and so I created a mid-fuselage bulk-head onto which I built a tail wheel bay using plastic card and plastic strip. I also enclosed the under-belly air intake by the simple expedient of adding a plastic card ‘roof’ above the intake grille. With those simple modifications completed, I could turn my attention to painting the interior. I began the painting process by airbrushing the fuselage interior in Alclad grey primer followed by Alclad Aluminium. Having allowed the Alclad lacquer to dry overnight, I masked-off the lower portion of the fuselage, including the intake and radiator, and sprayed a coat of darkened Colourcoats Interior Green enamel over the resin cockpit-sides and the interior of the
tail wheel bay. Before the darkened green had dried thoroughly, I wiped some of the enamel off the edges of the raised cockpit detail to reveal the silver base-coat beneath to replicate wear. Once the Interior Green was thoroughly dry, I dry-brushed increasingly lighter shades of that colour throughout the cockpit and tail wheel bay to add highlights. The large fuel tank and battery combination that occupies the rear area of the cockpit were airbrushed in a Grey/Black mix, while the cockpit floor was sprayed in a pale Tan enamel. As far as I am aware, the Mustang III had a green-painted wooden floor, and so that was what I intended to replicate. Once the Tan enamel had dried therefore, I over-sprayed the floor area with Interior Green, and to replicated a worn paint effect, I ‘scrubbed’ patches of the green enamel off with a soft, stipple brush dampened with white spirit, to reveal the Tan beneath. Various electrical boxes were picked out using a Black/Grey/Brown mix, and later highlighted with lighter shades of Grey/Brown.
With the cockpit painted and varnished it was time to cement the fuselage halves together, and once the cement had hardened, the Aires resin cockpit floor was offered up to the cockpit side-walls and glued into place. It was now time to complete the airframe. The wings slotted into position with little effort, though there were noticeable gaps along the nose-joint that needed filling. A smear of filler was also required along the length of both wing-roots and various places along

I used an Aires Cockpit Set….
….which painted up very well
Here we see work being done on the exterior paintwork…..

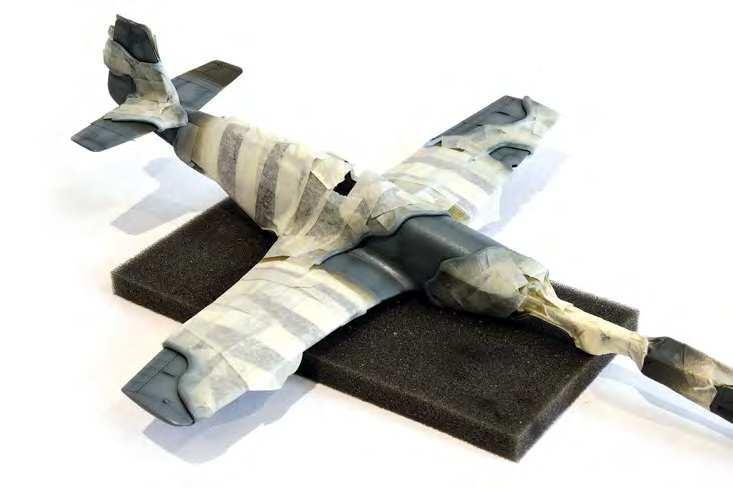
-51 MUSTANG BUILD 4 – P the wing leading edges where I had inadvertently sanded away the plastic during the cleaning-up of the wheel-bay walls as describe above. The machine gun ports also seemed overly large, so these too were filled with Milliput and when the filler was hard, new holes were drilled into the wing leading edges and sanded to shape. Finally, I cemented the flaps to the wing trailing edges in their lowered position, and the one-piece tail planes were slotted into place, and the airframe was complete. After a little corrective work on the wings, and to achieve a flat surface, I used 3,200 grit Micro Mesh sanding cloths wrapped around a sanding block made from the dense, foam packing material to be found inside airbrush cases. Once sanded, the airframe was wiped clean, and a heavy coat of Alclad Grey Pimer was airbrushed over the entire airframe. Once dry the primer too was wet-sanded until smooth, ready for an application of colour. I now airbrushed a shadow-coat of Dark Brown enamel over the entire airframe, followed by a localised Black coat in the areas to be painted with invasion stripes. Once the shadow-coat was completely dry, I utilised pre-measured lengths of masking tape to mark-out the stripes, removing the tape from those areas to be painted white. I used an off-white mix of enamel with which to paint the invasion stripes and identification panels on the nose and tail-planes, leaving the shadow-coat partially visible at the panel edges and in areas of wear on the actual aircraft. With the enamel thoroughly dry, the invasion stripes could now be masked-over entirely and forgotten. Before utilising Blu-Tack ‘sausages’ to mark-out the soft edges of the camouflage, I airbrushed a free-hand pattern of RAF Dark Green across the wings and around the fuselage, using Colourcoats ACRN09, filling the panels one by one as I had done with the white invasion stripes. Having left the green enamel to dry over night, I next rolled-out long, thin ‘sausages’ of Blu-Tack, which were cut to length and positioned across the airframe to follow the camouflage pattern of the particular aircraft I was modelling. These meandering sausages were secured in place with small off-cuts of masking tape, before yet more tape was used to completely mask the green-painted areas of the wings and fuselage. I airbrushed a mix of RAF Ocean Grey and RAF Dark Sea Grey to complete the upper surface camouflage pattern, and lighter grey filters were randomly applied to add highlights to both the grey and the green once the masking had been completely removed. The airframe camouflage was finished with an application of Medium Sea Grey on the lower surfaces, once again utilising Blu-Tack sausages to help create the soft demarcation line between the upper and lower colours.
I then set it aside for a few days to allow the camouflage colours to fully cure, before proceeding with the weathering process. To weather a model, I rely on localised applications of enamel – generally utilising mixes of Black, Grey, Dark Earth and Red-Brown enamels – blended directly onto the painted surface of the model, using a soft brush dampened with White Spirit to create streaks and shadows. This technique is particularly effective on a surface painted with matt enamels but it works too on a glossy surface, though the effect is harder to achieve. What is essential is that the enamel base colours have been allowed the time to thoroughly harden, otherwise the repeated blending washes can lift-off previously applied layers, resulting in a horrible mess. Having studied my photographic references, I decided to apply a heavily weathered finish to my Mustang, and the invasion stripes in particular benefited from several dark blending washes. The Black invasion stripes were weathered using lighter shades of Black/Grey, dry brushed around hatches and filler caps and in areas that might appear worn on the real aircraft. Finally, I used a Black/Brown enamel wash to add depth to the hinge-lines on the rudder, ailerons and elevators, the various inspection hatches, and on the wings and fuselage. Once the weathering process was complete, several coats of gloss, Humbrol enamel varnish were applied, and before decaling, these areas were polished to a high shine using Micro Mesh cloths.
For the decals I used the Techmod decal sheet #48002, containing four options, all of which feature aircraft from No.315 ‘Polish’ Squadron. Three of the aircraft featured have the blown ‘Malcolm Hood’,
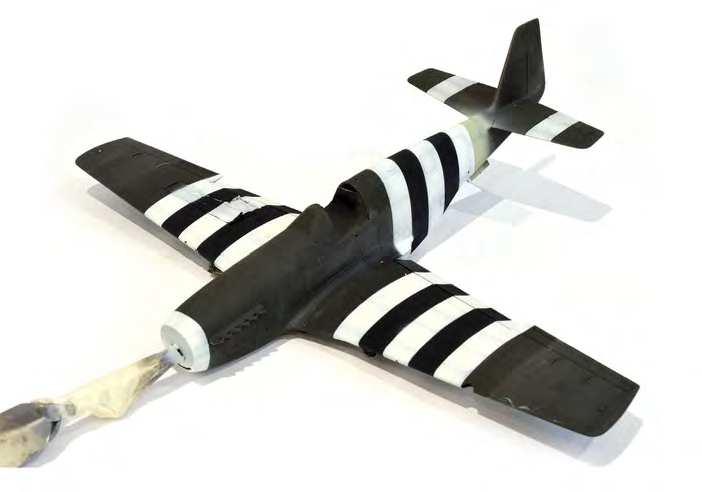
….and using Blu-Tac ‘sausages’ to mask off the camouflage colours

but I chose to model the single option featuring the earlier style ‘bird-cage’ canopy, which I feel adds to the vintage character of the high-backed Mustang. I had some issues with the Techmod roundels, which saw me resorting to my ‘spares-box’ for replacements,
And the found the remainder of the decals were easily torn when chivvied into place on the models’ surface. It was, however, my intention to heavily weather these, that really didn’t matter too much. In particular I intended to over-paint the RAF codes once they had been applied so as to more closely match the shade of Duck Egg Green that I had used to paint the wrap around tail band. Painting over the codes would also allow me to weather them to match their surroundings more closely. Every reference picture I had of these early RAF Mustangs showed them to be heavily weathered and exceedingly shabby, and I wanted my Mustang to look suitably shabby too. With the somewhat protracted weathering process almost complete, I proceeded to airbrush a couple of coats of Matt over the entire model. I used Matt here as my next, and final weathering process involved the use of watercolour pencils, and these work best on a matted surface. Using a sharpened, Silver watercolour pencil on the dry varnish, I now randomly scribbled a patchwork of lines along the wing-roots, paying particular attention to the edges of panels, to replicate a worn and scratched area of bare metal adjacent to the cockpit. This method of replicating scratches works best on larger scale models, but subtly done, it can look effective in 1:48 also. I now built up several coats of Gloss over the entire airframe, which when thoroughly dry were gently and carefully wet-sanded, paying particular attention to the markings and flatting any ridges caused by my brush-painting over the decals – another heart-in-mouth process.
I proceeded now to attach those items that were best left off a model until the very end of the building and paint flatting process, followed by a dusting of quick drying Satin varnish thinned with roughly 80% White Spirit for speedy evaporation, so as to minimise the risks of dust settling onto the tacky surface. The very last jobs involved removing the canopy masks and fitting the remainder of the transparencies, before the propeller was pressed home, and my Mustang III was finished.
