


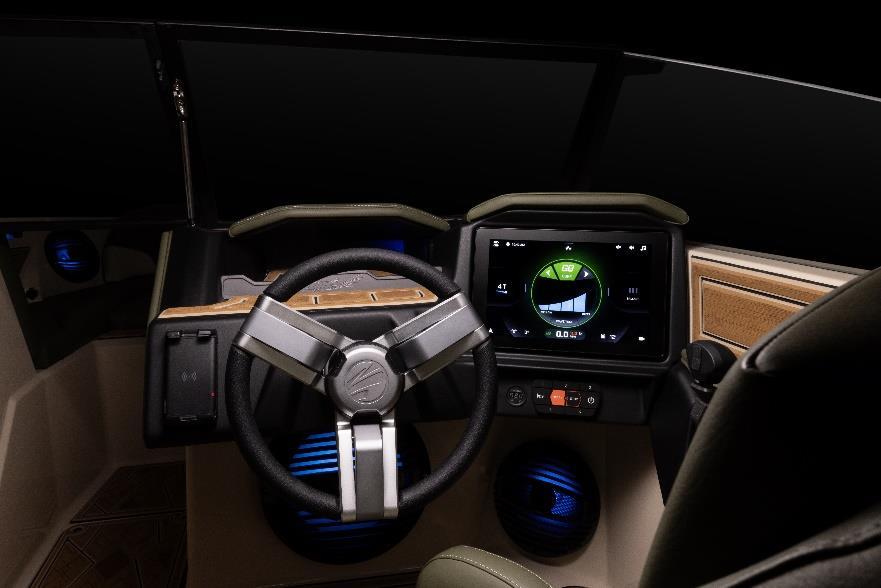
For the many things you do, we have Tigé Clear Horizon — the ultimate driving and riding companion. As the touch screen innovator, we held nothing back for the Tigé Clear Horizon. The sleek, intuitive interface is easy to use as well as advanced and loaded with features. Enclosed in a watertight housing, Tigé Clear Horizon features a smart, next-gen, high-definition 12-inch anti-glare touchscreen with a 1000:1 contrast ratio. Every onboard system and frequently used function, from audio and depth to Speed Set controls, will be right at your fingertips.
Tigé Clear Horizon is available on the Ultré 23ZX, Ultré 25ZX, Z1, Z3, Z5, 22 RZX and 24 RZX models.
General maintenance is not required; however, a soft cloth can be used for cleaning the unit. Window cleaner or alcohol can also be used to clean the glass portion of the display. Do not use harsh or abrasive cleaners on the unit.
All product features are easily accessed through the touch screen.

This screen contains the following controls:
• Ballast settings
• Go Ski/Surf/Wake System
• Zero Off GPS Speed Control® (Cruise)
• Video
• Navigation
• Audio Controls
• Volume Controls
• TAPS Surf System
• Settings
• Lights & Switches (Lighting/Heaters/Blowers/Seat Adjustments)
• Vessel Information

Zero Off allows precise, easy-to-use digital speed control that is useful for maintaining a constant cruising speed. Touch the above screen portion to turn on/off. Adjust the Cruise speed with the – and + buttons.
Closed-loop speed feedback is based on signals received from the worldwide GPS satellite system. For this reason, there is no need for maintenance-intensive and unreliable pitot tubes or paddle wheels to provide a speed measurement. As long as the GPS antenna can see the sky, Zero Off is good to go with speeds controlled to within 0.1 mph at all times... no calibration or set-up procedures required. Using GPS also allows Zero Off to take advantage of position information provided by the satellite signals. Zero Off can use this GPS data and the accelerometer to identify a boat's location on the surface of the earth with sufficient accuracy to map and memorize courses for sports such as slalom and jump competitions.
The Tigé Clear Horizon is shipped from the factory with four profile settings for Ski, Surf, Wake and Go Home. Touch the Go button to view the following:

Go Ski
Touch Ski and this screen will appear.

Choose Beginner, Intermediate or Advanced. The Auto Taps setting will automatically engage at setting 1 for Ski.

On every Go profile page, touch the button to make changes to that profile. The following screens will appear:

Touch this button and then the adjustment screen appears:

This page can also be found within the Settings area and is utilized to adjust the settings for Ski, Surf, Surf Foil, Wake and Go Home. Currently the default mode for Ski is Beginner, but that can be changed to Intermediate or Advanced.
Touch the appropriate mode and then alter the settings for Cruise, TAPS, Port Ballast, Starboard Ballast and Bow Ballast with the – and + buttons. Touch Save when done, or Reset to discard any changes.
Touch the X to return to the Go Ski screen. To choose another Preset touch Go Ski.
Touch Surf and this screen will appear.

Touch a section of the wave between Mellow and Steep to control the intensity. Touch the left or right arrow to select a surf side. Each surf side can have a separate wave setting.
Note: Speed will increase by 0.1 mph as you lower your wave setting and decrease by 0.1 mph as you raise it.
Touch the button to make changes to that profile. The following screens will appear:

Touch this button and then this screen appears:

Select either Default Left or Default Right and adjust the settings for Default Surf Level, Cruise, TAPS, Port Ballast, Starboard Ballast and Bow Ballast.
Touch Save to retain the changes or Reset to discard the changes.
In the screen shown on the previous page and highlighted in orange is the Foil selection. Highlight Foil Left or Foil Right and adjust settings as necessary. When Save is selected, the
Go Surf screen will appear with Foil added to it as shown below:

Touch a section of the wave between Mellow and Steep to control the Foil wave intensity. Touch the left or right arrow to select a Surf side for Foil activities.
Select Wake and this screen will appear.

Choose Beginner, Intermediate or Advanced for the appropriate wave experience. Auto Taps will automatically engage at setting 2T for Wake. As speed increases, manual Taps adjustments will be available.
Touch the button to make changes to the Wake profile as described in the Ski and Surf sections.
To choose another Preset, touch Go Wake.
Go Home
Select Go Home and this screen will appear.

At the end of your boating session, touch Go Home to head back to the dock. ZeroOff GPS Speed Control will turn on. Adjust the Cruise speed and dream of future days on the water.
The TAPS system consists of three adjustable plates.
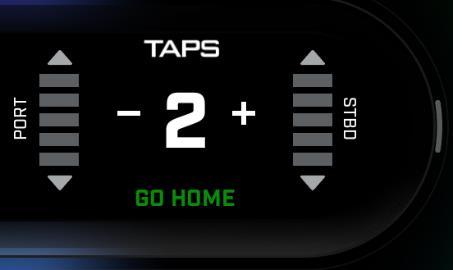
Use the arrows to adjust the port and starboard plates. Use the – and + to adjust the center plate for levels 1 through 5.
When choosing Go Home, TAPS will default to 2.

Vessel Information

When the Vessel Information button or Rudder Position Indicator is touched, the following screen will appear to display the battery voltages, engine hours, coolant temperature, oil pressure, air and water temperatures.

Touch this area again to close the screen.
Touch the Ballast portion of the screen and it will expand to show a screen similar to the following:

The Ballast tanks can be filled or emptied individually by using the up and down arrows, or all at once by choosing Fill All or Drain All. To stop the filling or draining, touch Stop All.
NOTE: Ballast configurations are set by the Dealer and may appear differently than shown above.
Touch the left edge of the Ballast screen to retract it again.
When filling the Ballast tanks and/or changing the Ski/Surf/Wake settings, the following warning will appear:

Touch OK to continue.
The Switches icon will expand to show the Blower and Bilge switches. Touch each one to turn on (orange) or off (gray).
To see the entire screen, touch the arrows in the corner and the following screen will appear:


The availability of switches and lights may vary with boat model or dealer-enabled options. Touch each component to turn on or off.
If equipped, touch Seat Adjust and utilize the arrow buttons on this popup screen for your riding comfort.

Touch the Lights tab and the following page will appear:

All lights may be turned on at the same time by touching All Lights.
Turning on the Nav light will automatically turn on the Anchor light. However, the Anchor light can be turned on by itself when the Nav light is off.
Adjust the intensity of the Courtesy light by touching the – or + buttons.
If equipped, the Underwater, Tower, Blades and Cockpit lights can present alternate colors. Touch Edit for this popup:
Drag the middle circle to the desired color.
Adjust the intensity of the lights by touching the – or + buttons.

Select Solid, Spectrum or Pulse to control the action of the lights.
The audio system included with the Tigé Clear Horizon provides access to FM/AM bands, an Auxiliary source and Bluetooth devices.
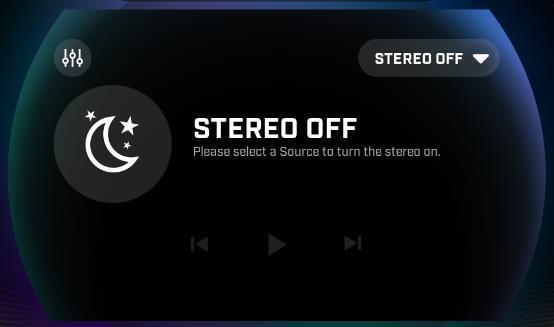
Turn on the Stereo from the pulldown list on the upper right and select the desired source.
Access channels by touching the middle scan or the left and right arrow buttons.

The FM and AM bands each provide five slots to save a favorite channel. Dial in the channel to be saved, press and hold an available/empty slot for approximately three seconds and the current channel will be saved into that slot.

Touch to set audio levels for the various zones on the boat.
Mute or unmute a zone by touching the sound icon for that zone.

Adjust the volume via the – or + buttons or drag the circle on the line to the desired level.
Auto Volume will automatically adjust the volume to overcome wind and engine noise. Turn this on or off by touching Auto Volume at the lower part of the screen.

Touch beside Auto Volume and the Auto Volume Settings screen will appear:
This screen allows the setting of a minimum and maximum speed between which the volume will be raised to overcome wind noise. It also allows the setting of a minimum and maximum volume setting. Touch each square and adjust accordingly with the – and + buttons.

Select AUX from the Source list to access media on nonBluetooth compatible devices or when a longer battery life is desired. Plug your device into the provided pigtail. That device’s contents will then be shown on the screen.
The audio system is Bluetooth compatible. To connect Bluetooth, follow these steps:
1. Touch Bluetooth from the Source list.

2. Touch .
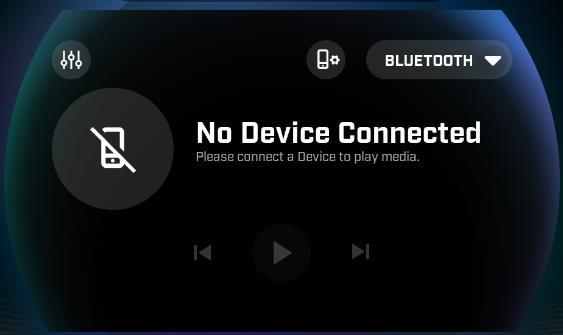
3. This screen appears showing any currently connected mobile device.
4. From here, select Paired Devices to see device names that have been previously connected to the display, or select Add New Device.

If previously paired device names appear in the list, touch the device name and this popup screen below will appear:


Connect will attempt to connect the device. Ensure Bluetooth is on and the device is discoverable.
Promote will move that device name up in the list.
Delete will remove the device name from the list.
5. If the device name is not present, touch Add New Device. The display will request that the device be placed into Pairing mode. Do so, then touch OK.
6. The display will begin polling. Available devices when found will be listed on the screen. Touch the + beside the name to pair with the display.


7. A Pairing Requested screen will appear on both the Tigé Clear Horizon and the device. Acknowledge the pairing request on the device. A message of “Pairing Success” will appear on the display, and then the device will show as “Connected”.


Once paired, music played on the device will be presented on the display.

The volume control symbols appear at the top of the screen:
Touch this symbol to mute and unmute the stereo’s volume.

Touch this symbol and adjust the volume by the + and –buttons or by dragging the orange circle up or down.

The Tigé Clear provides a method for the driver to keep all eyes on the waterway ahead and on the action behind the boat. Touch the Video button and the video feed from the rear of the boat will appear.


If the boat is equipped with two cameras, the screen will appear with this symbol. : Switch between the video feeds by touching an alternate number.
Navigate with ease using the 12-inch full-color display on your Tigé boat.

Touch to display the Navigation feature, and the following screen will appear:

Once displayed, the white icon changes to orange:
All navigation features are easily accessed through the touch screen.


North Up will orient the map to show the direction of North at the top of the display.

Course Up will orient the map to display the direction you are traveling at the top of the display.
Zoom In to get closer to the map features. Also placing two fingers touching onto the screen and then spreading them apart accomplishes a Zoom In.

Zoom Out to see more of the map features. Also placing two fingers apart on the screen and then bringing them together accomplishes a Zoom Out.
Pan allows the dragging of the map from one area to another. Touch the bullseye button to recenter back to the original position.


Waypoints provide the saved map locations for your favorite spots on the water.

To drop a waypoint, touch and the screen below will appear:

Choose a designator for the Waypoint by touching until the desired icon appears.

Type the Waypoint’s name and touch


Note: Ensure the Waypoint name has not been saved previously or you will be asked to type a different name.
The Waypoint will be saved in the Waypoint Manager (described here) and will be displayed on the map similar to what is shown in the next graphic provided this selection is chosen to be displayed in Map Settings:

Tracks will create and save a path taken by the boat.

To create and save a Track, touch A red dot will begin flashing as the boat moves across the water . Touch this button once more to stop the recording of the Track.
Assign a Track name using the keyboard that appears.


Track colors may be changed by touching repeatedly until the desired color appears:
Type the Track’s name and touch
Note: Ensure the Track name has not been saved previously or you will be asked to type a different name.
The Track will be saved in the Track Manager (described here) and will be displayed on the map provided this selection is chosen to be displayed within Map Settings.
Map Settings controls the appearance of the navigation system, and can be displayed by touching
Touch the slider to display (orange) or hide (gray) the following selections on the map:
• Grids
• Text
• Waypoints
• Tracks
• Navigation Aids

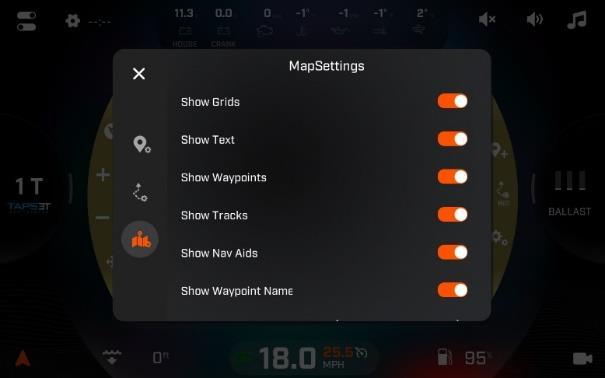
• Waypoint Names
• Position Format choices:
▪ Degrees and Decimal Degrees
▪ Degrees, Minutes, Seconds and Decimal Seconds
▪ Degrees, Minutes and Decimal Minutes
• Depth Contour choices:
▪ All, 66 feet (20 M), 33 feet (10 M), 16 feet (5 M), 6 feet (2 M) or Off
• Safety Contour choices:
▪ 66 feet (20 M), 33 feet (10 M), 16 feet (5 M), 6 feet (2 M) or All
Waypoint Manager
Display the list of saved Waypoints by touching :


Each saved Waypoint will be displayed with its corresponding latitude and longitude Touch a Waypoint on this screen to View, Edit or Delete that Waypoint:

View will show the Waypoint on the Map. Edit changes the Waypoint name or icon designator. Delete removes the saved Waypoint from the list.
Touch to display the list of saved Tracks:


Each saved Track will be displayed with its recorded length. Touch a Track on this screen to View, Edit or Delete that Track:
Editing Capabilities:

View will show the Track on the Map.
Edit changes the Track name or track color.
Delete removes the saved Track from the list.
Touch the Settings button at the top of the display and this screen will appear:

The Display tab contains settings for the following controls:
Instant Wave
Straight-Shot
Brightness
Time (GMT Offset)
Daylight Saving Time
Units
Number of Video Inputs
Low Fuel Warning
When enabled, the surf plate will deploy when Go Surf is active and the engine is running. It will automatically retract if Go Surf is off or engine is off. When disabled the surf plate will not deploy until underway, and you reach speeds of 7mph.
When enabled, this allows for the outer plates to deploy to assist the boat getting up to speed without draining ballast.
• Cruise must be turned on for StraightShot to activate.
o Speed above 3mph
o RPM over 1200
• Customization: Dealers can adjust factory default values in Dealer Settings in the ‘Internal’ page.
Touch the - and + buttons to adjust the screen brightness (0 to 100).
Select the number of hours to offset your time zone from GMT.
Slide the switch to On to enable or Off to disable.
Select U.S. or Metric
Select 1 or 2
A warning will appear when the set minimum fuel percentage is reached. Seek additional fuel soon.
Component Description
Low Depth Warning
River Mode
GO System Defaults
A warning will appear when the set minimum depth has been detected.
Switches between the GPS Puck (off) and the Paddlewheel (on).
Allows the editing of the Ski/Wake/Surf/Home default settings. An additional screen (shown here) will appear to choose the GO level, default level, cruise speed, and TAPS and ballast settings for each of the GO settings of Ski, Wake or Surf.
Firmware
Dealer Settings
User’s Manual
Displays the current firmware version and is used to update the display’s firmware via a USB drive. Insert the USB with the appropriate update file into the USB drive and touch Update, then follow any on-screen prompts.
Restricted area for Dealers only.
Scan this QR code to review the manual for this display.
Previously described here.
This screen establishes the default mode that will appear when each of the water sport profiles is selected, along with settings for each phase of the profile.
1. Select a profile (Ski, Surf [Default or Foil], Wake or Home).
2. For Ski or Wake, choose the default mode that first appears (Beginner, Intermediate or Pro).
3. Select Beginner and use the – and + buttons to adjust the Cruise speed, TAPS setting and Ballast settings.
4. Repeat Step 3 for Intermediate.
5. Repeat Step 3 for Pro.
6. For Surf, select either a Default side or Foil side to adjust, then make the desired changes.
7. Touch Save to save the settings or Reset to clear the changes.

This screen establishes the amount of time it takes to fill or drain each ballast. Adjust each ballast shown using the – and + buttons as desired.
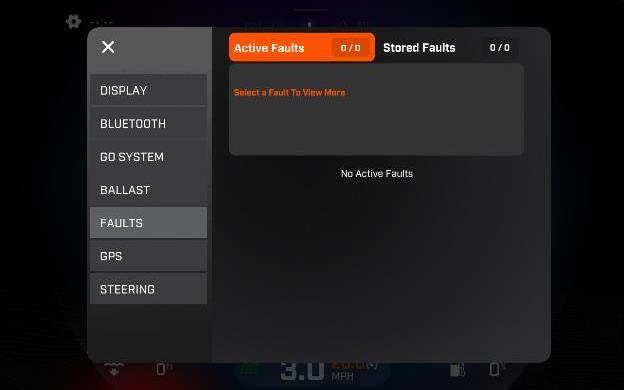
When this screen is opened, the display will query the engine’s ECU and provide feedback on any diagnostic codes that have been activated and stored.
The following is a list of field definitions on Engine Diagnostics:
Field/Button
SPN
FMI
Description Field
Request
Acknowledge (if present)
Description
Suspect Parameter Number - fault code
If not translated into text by the display, see the engine manufacturer's literature for the definition of the SPN number.
Failure Mode Indicator - fault code
The FMI is defined by SAE J1939. If not translated into text, see the SAE standard or the engine manufacturer's literature.
Most common SPNs and FMIs have text for the description stored in the display. If there is no text, then this SPN and FMI must be defined by referring to the engine manufacturer or the SAE J1939 standard.
Selecting the Request button queries the Engine Control Unit (ECU) for feedback on diagnostic codes that have been activated and stored in the ECU for service needs.
Acknowledging a fault will place it in the Stored Faults location to be cleared later.
This screen displays various components used to discover satellites available for GPS tracking.

This option must be enabled within Dealer Settings. If enabled, the following screen will appear within the Settings menu.

There are two new customization options:
o Assist Level gives you either less or more feedback when turning the steering wheel.
o Return to Center will make the wheel automatically turn back to center when you let go of the wheel.
There are five states for the electric steering:
• Assist LVL Low/RTC Off
• Assist LVL High/RTC Off
• Assist LVL Low/RTC Light
• Assist LVL High/RTC Light
• Assist LVL High/RTC Full
Rudder Position Indicator is now displayed in the top middle of the CLEAR Horizon screen and is paired to Electric Steering Assist. If the boat is not equipped with electric steering, then you will not see a Rudder Position Indicator
When equipped with electric steering, the home page will appear as follows:
Rudder Position Indicator

Note: Touch the Rudder Position Indicator to display the Vessel Information. Touch the Vessel Information displayed to return to the Rudder Position Indicator.
Display appears not to work or doesn’t come On.
1. Check for loose connections at battery and display unit.
2. Check for reversed polarity on the power connections.
3. Verify battery has a minimum voltage of 8-9 volts.
Display resets or goes OFF when starting engine.
1. Check display supply wires are connected properly to battery.
2. Verify battery is charged properly.
3. Check battery for efficient starter current.
Display has no backlight.
Contact your Tigé service center.