
4 minute read
Pica Pau og dyrevennerne 3


– Hækl 20 finurlige dyr fra hele verden
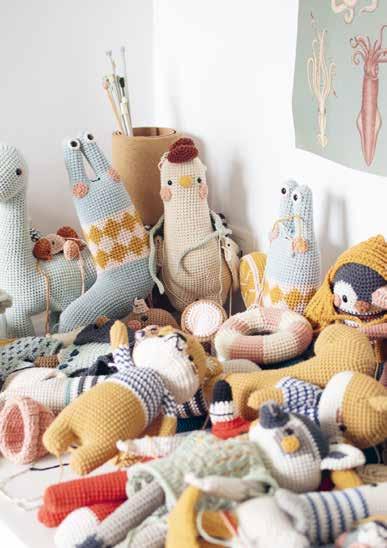
Mød Robert Gravhund, Albert Måge, Horacio Isbjørn, Amalie Giraf og mange andre. Hver og en er et lykkeligt medlem af den travle Pica Pau-familie. De er oprigtige, kærlige og venlige, og så snart du har åbnet bogen, vil du føle dig hjemme.
Advertisement
Legetøjsmageren, karakterdesigneren og hækleren Yan Schenkel har samlet en flok af de mest funklende hæklede dyr. I denne bog deler hun ud af sin ekspertviden om amigurumi med 20 design, og hun røber, hvordan hun skaber hver af sine smukke kreationer.
Alle opskrifter indeholder detaljerede instruktioner, som ledsages af trin for trin-billeder og forklaringer af alle anvendte teknikker, så både begyndere og erfarne hæklere let kan stifte bekendtskab med hendes bedste venner.
ISBN: 9788740693669
PICA PAU OG DYREVENNERNE 3
– Hækl 20 finurlige dyr fra hele verden
Af Yan Schenkel
Oversætter: Charlotte Astrup Beck Vejl. pris: 249,95
Udkommer: 23. august 2023
SINGLE CROCHET (abbreviation: sc)
The single crochet is THE stitch for working crocheted toys because it's the only one that results in a closed and tight fabric. The single crochet not only works excellently to maintain the shape of the toy, but also avoids that stuffing will show through (as long as we don’t stuff it too much).
In rows (flat fabric)
Start from a foundation chain.
1 Insert the hook in the second chain stitch from the hook. Yarn over the hook.
2 Pull the yarn through the chain stitch. Now you have two loops on the hook. Yarn over the hook again.
3 Draw the hook backward to pull the yarn through both loops at once. One loop remains on the hook, and you have completed one single crochet stitch.
4 Insert the hook into the next stitch and continue crocheting into every chain stitch.
5 At the end of a row, make one turning chain and turn the work horizontally to begin the next row. Crochet one single crochet stitch into the next stitch (not counting the turning chain), inserting the hook through both loops of the stitch in the row below. Continue crocheting until the end of the row and repeat.
22
In a spiral (a tube)
Start from a foundation chain. Make sure your chain isn’t twisted and insert the hook in the first chain stitch. Close into a ring by making one slip stitch in the first chain stitch.
7
1 Continue crocheting one single crochet stitch into each chain stitch until you reach the beginning. Work a single crochet stitch into the first single crochet you made (do not close the round with a slst). This is when the stitch marker comes in handy: place it into the last single crochet stitch you made.
2 Continue working single crochet stitches until you reach the stitch marker. Remove the marker and work a single crochet in this stitch. Replace the marker into the stitch you just made and repeat.
INSERT THE HOOK (PLACEMENT OF STITCHES)
With the exception of chains, for all crochet stitches the hook needs to be inserted into existing stitches. The point of the hook must look down or sideways, so the hook doesn’t snag the yarn or the fabric. When picking up stitches, you can insert the hook in three different places: the back loop, the front loop or under both loops.
– BOTH LOOPS: insert the hook under both loops of the stitch in the row or round below. This is the most common way to crochet and the preferred method when the pattern doesn’t specify another way.
– FRONT LOOP ONLY (abbreviation FLO) insert the hook under the one loop closest to you.
– BACK LOOP ONLY (abbreviation BLO): insert the hook under the one loop furthest away from you. This leaves the front loop as a horizontal bar. It’s used for aesthetic effects or to re-join the yarn.
23
EMBROIDERY
Embroidery remains a pending subject for me. I only know – more or less – how to make one embroidery stitch I learned as a child to hand-sew doll dresses: the backstitch It creates a nice line made up of straight stitches.
1 Thread your tapestry needle. Insert the needle from behind your work and make a single straight stitch the same length as your single crochet stitch. I like to use the gaps between the stitches to insert and pass the tapestry needle through.
2 Continue along, as many times as you need, coming up one space ahead and bringing your needle back down into the same hole at the end of the last stitch you've made.
PARTS (SEWING)
JOINING
I’m one of many crocheters who would happily pay someone to do the sewing part for me. But, as there are no volunteers (yet), we better practice a simple and satisfactory method. If you’re having doubts about where to place the parts, you can pin them to see how they look and adjust if necessary. If possible, use the leftover yarn tail from where you fastened off.
Joining open pieces
Use this technique to sew snouts, cheeks, beaks, horns, etc., to an open and unstuffed piece, like a head. Thread the tapestry needle and position the piece. Use pins if you need them! If you are sewing a snout or a beak on a face, I recommend you position it on the opposite side of where your stitch marker is located, for aesthetic reasons. This way your color changes will be at the back of your toy. Make the first stitch, inserting the needle from front to back (inside). Using backstitching, sew passing under both loops of each stitch from the final round of the piece to be attached. Go from back to front and front to back. If the piece has 30 stitches, you’ll have to make 30 backstitches. Before getting to the end, remember to stuff the piece. I try not to stuff the pieces until the very end, to avoid the filling getting entangled in the stitches.
Joining an open end piece with a closed piece
I'll explain how to sew an open piece (with or without stuffing) onto a finished and closed part without closing the opening first. Thread the tapestry needle. Place the pieces on top of each other and try to line up the stitches of one piece with the other, if possible. Insert the needle through one loop of the closed (and stuffed) piece (for example the body). Now pass the needle under both loops of the stitch from the piece to be sewn. Sew around the whole piece and fasten off. Weave in the yarn tail.
39


