SmarterProctoring Faculty Guide
i
Adding the SmarterProctoring Tool Link in Your Blackboard Course Shell……………….………………….1 Faculty Experience – Introduction to SmarterProctoring & Best Practices………………………………….3 SmarterProctoring………………………………..……………….……………………………………………………….3 Best Practices for Using SmarterProctoring…………………………………………………………………….3 Creating an Exam……………………………………………………………………………………………………………………….4 Exam Details…………………………………………………………………………………………………………………..4 Permitted Items & Notes……………………………………………………………………………………………….5 ClassCalc Integration…………..………………….………………………………………………………………………6 Proctor Settings……………………………………..…………………………….……………………………………..…7 Exam Confirmation…………………………………………………………………………………………………………8 Setting up an Accommodation & Reviewing the Recorded Session…..………….……………………………9 Setting up an Accommodation……………………………………………………………………………………….9 Reviewing a Session……………………………………………………………..……………..…….…………………10 System Generated Annotations……………………………………………..………..…….…………………….11 Proctor Added Behavior Annotations……………………………………………………………..…………….12 SmarterProctoring Team Contact Information………………………………………………………….………………12
Table of Contents
Adding the SmarterProctoring Tool Link in Your Blackboard Course Shell
In order to connect to SmarterProctoring from your Blackboard course shell, you must first add the tool link to your course menu
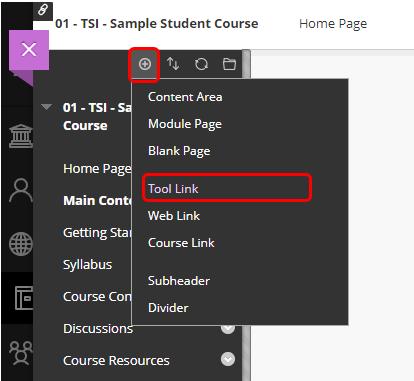
1. In your Blackboard course shell, point to the Add Menu Item button.
2. Click Tool Link.
1
3. Type “SmarterProctoring” in the Name text box.
4. Select SmarterProctoring from the Type drop-down menu.

5. Select the check box for Available to Users.
6. Click Submit.
7. Click SmarterProctoring to access your Course Dashboard in that system.
2
Faculty Experience
Introduction to SmarterProctoring & Best Practices
Smarter Proctoring
● Modalities
○ SmarterServices Live Online Proctoring
● Placed inside LMS as an external tool
● System Requirements
○ Computing Device: Desktop, Laptop or Chromebook
■ NO ipads, tablets, phones or other electronic devices
■ Macs require a minimum of macOS 10.10
■ Windows require a minimum of Windows 7
○ Must be using the most recent version of Google Chrome
■ Update Chrome Browser
○ Webcam (internal or external)
○ Microphone (internal or external)
○ Minimum download speed of 3 Mbps
○ Minimum upload speed of 1 Mbps
● SmarterProctoring Admin, Instructor and Student Support Articles
Best Practices for Using SmarterProctoring
● Highly encourage a practice exam to allow students to test their equipment prior to exam day to eliminate unnecessary anxiety (Contact your Customer Success Manager for instructions - see page 12)
● Be mindful of the exam window to allow for any technical issues that students may experience as they are going through onboarding
● Be specific with notes when creating the exam
○ e.g., Take a bathroom break prior to starting their exam
● Encourage students to watch the student experience video prior to testing and test out calculator functionality if that will be enabled for their exam
● Always encourage students to reach out ASAP if they experience any issues to our 365 24/7 support (see page 12)
3
Creating an Exam
Exam Details
● When creating a practice exam, make sure the title includes [Practice]
○ e.g., [Practice] Student Exam
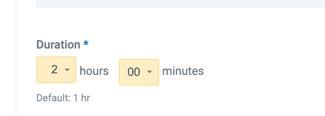
● Requirements: Exam name, Duration, Password,URL, Attempts, Exam Open & Close Dates
○ Password & Exam URL must match what’s inside LMS or Third-Party tool

○ Use a secure password and do not use the same password for multiple exams
○ Exam open is the earliest the student can take the exam
○ The close date is the latest the student can take the exam
○ If the student misses that window, the student will have to have an accommodation added
● Optional: Description & Attachments
○ Up to 5 attachments can be added and highly recommended PDF only
4
Permitted Items & Notes
● Notes - Be specific
○ e.g., 3 x 5 card handwritten and must hold up to camera when completing the room scan
● Calculator - Virtual ClassCalc

○ Scientific, Graphing, Matrix or Four Function Calculator

● Ear plugs - Be specific
○ e.g., No airpods or bluetooth headphones)
● Bathroom Break
○ We can’t verify student did not access non permitted items while stepping away. Recommend adding a note to take bathroom break before they start onboarding.
5
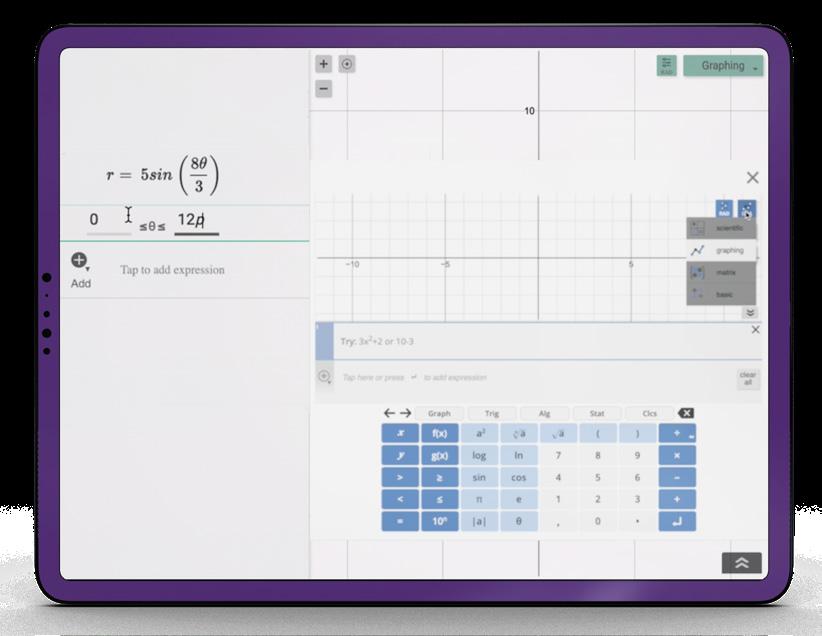
Introducing
ClassCalc is a calculator application that is integrated into SmarterProctoring’s Virtual Proctoring modalities. Enabling the calculator is an optional feature that can be set within each exam’s configuration. Providing the on-screen calculator promotes academic integrity while monitoring test-takers’ calculator use and empowers test-takers with the right tools for greater student success.
Features:
Ability to enable one of four virtual calculators during a test including scientific, graphing, matrix, and four function calculators
Allows test-takers to practice with the calculator application before starting their assessment, including use during regular course work
Benefits
Maintains proper lockdown permissions while allowing the test-taker the ability to move between calculator and exam content

Promotes integrity by monitoring the test-taker’s calculator throughout the exam
Reduces the test-taker’s cost of purchasing expensive calculators
Increases equity by providing all test-takers with the same, on-screen calculator
To schedule a demo or learn more about SmarterProctoring’s ClassCalc integration features, please contact sales@smarterservices.com


6
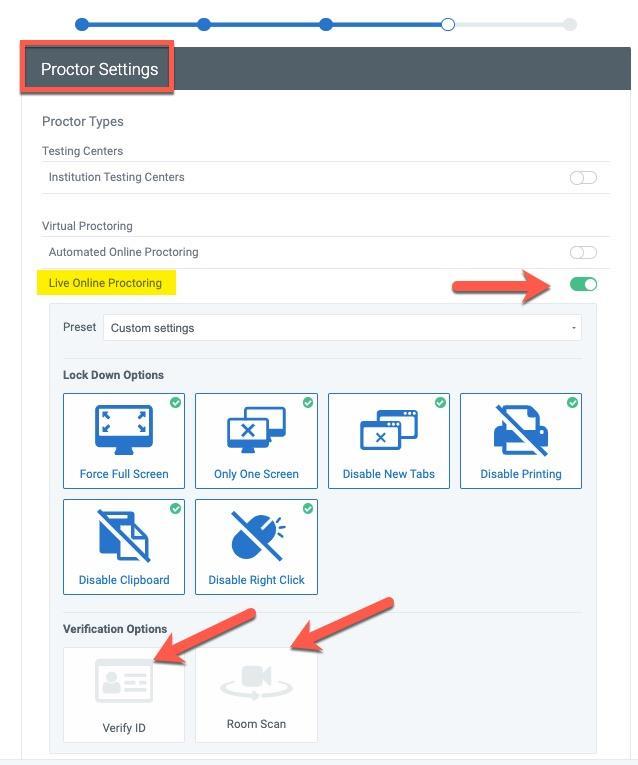
Proctor Settings
● Enable Live Online
Proctoring
● We recommend toggling off both verification options for ID & Room Scan as both are requirements for onboarding and the students will be presented with these requirements during onboarding already
7
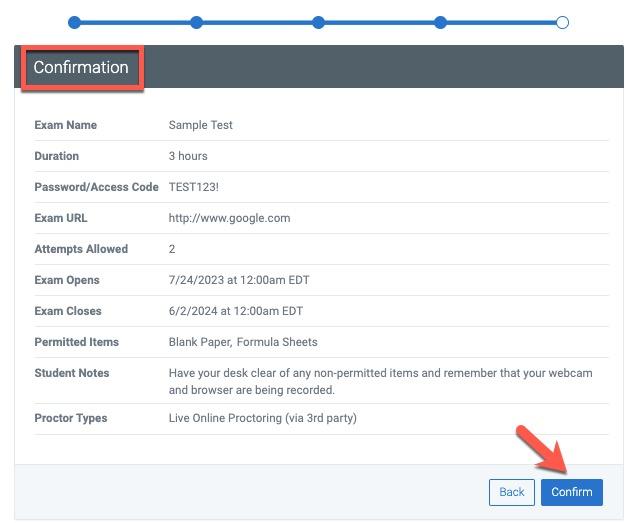
Exam Confirmation
● Review all exam details prior to selecting the confirm button
8
Setting up an Accommodation & Reviewing the Recorded Session

Setting up an Accommodation
● The student must be in “Needs Proctor” status to get an accommodation added
● From the proctoring dashboard select view exam. Use the dropdown menu and select “add accommodation”

9
● Any changes you make for that student will be highlighted in yellow before you confirm the changes
● Once the accommodation is saved, the accommodation flag is listed in the notes section
Reviewing a Session
● In your course dashboard, select view exam to review all sessions for that exam
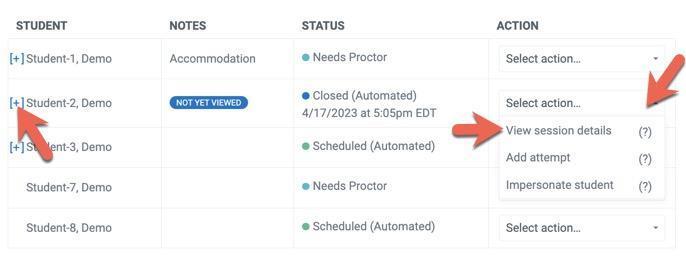

● Closed exams will indicate “not yet viewed” under the Notes column. Use the dropdown menu to view session details. If there is a “+” next to their name, the student has multiple sessions. Select “+” to view all sessions.
10
● In the session details, you can toggle between overview, annotations, images and sharing tabs
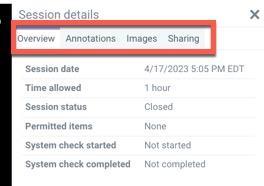
● If you suspect suspicious behavior and need to share the video link, it will be valid for 24 hours and requires a password
System Generated Annotations
● Blocked Apps Running- This means our system is detecting a program running that should have been closed during onboarding.
● Exam Tab Unfocused- This means the student opened a tab that was not allowed for their exam.
● Exam Window Unfocused- This means the student completely navigated away from chrome.
● Fullscreen Escaped- This means the tester minimized the exam window.
● Multiple Displays Detected- This means our system is detecting more than 1 screen since the student completed onboarding.
● Multiple Faces Detected- This means our system feels they are seeing multiple sets of eyes. It is possible that there are other people in the video, however usually what we see is a picture behind the student’s head or a glare on their eyeglasses that is causing this warning.
● No Face Detected- This means our system lost visual of the tester’s eyes. This is very common when the tester has permitted items and they are looking down to write. We also see this a lot when tester’s shift or lean against their arms and don’t realize they are no longer in camera view. This could also be due to poor lighting in the testing space.
● Speech Detected- This means our system registered noise. This could be the student reading the questions to themselves, music/TV playing or other people in the space.
11
Proctor Added Behavior Annotations
● Tester Communicating to Another Person- Added if tester is found to be communicating with another person in the space, chat, email, etc.
● Tester Using a Digital Device- Added if tester is found to be using a cell phone, smartwatch, Alexa, etc.
● Tester Left the Webcam View/Room- Added if tester leaves the webcam view or room without approved accommodation.
● Tester’s Space became Excessively Noisy- Added if the testing space becomes noisy due to tester behavior, background noise, etc.
● Tester became Ill/Injured- Added if the tester is unable to continue testing due to illness or injury.
● Someone Else in the Room During Testing- Added if another person enters the testing space, even if they are not actively communicating with the tester.
● Tester not following Proctor Instructions; Multiple Infractions- Added if the tester has been given multiple warnings and the behavior continues.
● Other- Option for the proctor to add a custom annotation if the behavior does not fit any of the above categories.
SmarterProctoring Team Contact Information
● 365 24/7 Support Team
○ Reach via Chat Button or email support@smarterservices.com
● Claire Skiba - Customer Success Manager (Day to Day contact)
○ Claire@smarterservices.com
12
