Blackboard Ally Training Manual
Ultra Base Navigation (SaaS) Edition Summer 2020
University of Arkansas Fort Smith
Instructional Support

2 Table of Contents Universal Design for Learning and Accessibility.......................................................3 An Overview of Universal Design for Learning (UDL) and Accessibility .................3 Goals and Benefits of UDL and Course Accessibility .............................................4 Web Content Accessibility Guidelines (WCAG 2.0) ...............................................5 Blackboard Ally........................................................................................................6 Introduction.........................................................................................................6 Files Supported ....................................................................................................7 How Ally Works....................................................................................................8 Alternative Formats ...........................................................................................10 How to Correct an Accessibility Issue in Ally 12 Course Accessibility Report................................................................................15 Common Accessibility Issues and How to Address Them.......................................19 Be Proactive – Build Accessible Content.............................................................19 Missing Headings ...............................................................................................20 Images without Alternative Descriptions............................................................26 Tables without Headings....................................................................................32 Untagged PDF Files ............................................................................................34 No Title ..............................................................................................................35 Contrast Issues...................................................................................................36 Support and Contact Information..........................................................................37
Universal Design for Learning and Accessibility
In order to understand how Blackboard Ally works, we first need to come to grips with two concepts: Universal Design for Learning and accessibility.
An Overview of Universal Design for Learning (UDL) and Accessibility
These two concepts are related, but are not the same.
Universal Design for Learning, or UDL, is a conceptual framework that emphasizes flexible design to address the variety of needs that learners have. The goal is to make the learning process useable by all people to the greatest extent.
In addition to accessibility issues, examples include providing content and interactions in various forms to accommodate the different ways students learn, responding to the needs of gifted learners, improving materials for users who speak English as a second language, and developing learning content that facilitates individualized experiences. (For more information about UDL, see: http://udlguidelines.cast.org/)
In other words, UDL is designed to expand and improve the learning experience for all, while also addressing key needs such as accessibility.
Accessibility refers to providing content that learners with disabilities can use individually. This includes, but is not limited to, things like providing closed captions in videos for students with hearing impairments or providing alternative descriptions for images for learners with visual disabilities.
Accessibility is mandated under the law, specifically the Americans with Disabilities Act (or ADA) and Section 508 of the Rehabilitation Act. A lack of compliance can result in legal action (as has happened at Harvard, MIT, and the University of California at Berkeley).
The University of Arkansas System takes a proactive approach to these issues.
3
Goals and Benefits of UDL and Course Accessibility
The primary goal of universal design for learning and accessibility is to provide the maximum usability and access to all learners so that they may participate, regardless of disability.
However, while addressing this goal, UDL and accessibility also produce a number of other benefits, including:
• Course content is presented logically and consistently.
• The use of high contrast colors improves readability
• Closed captions provide several benefits:
o Improved comprehension for all users who use the captions.
o Students who speak English as a second language can review the text
o Students can see the spelling of technical terms.
o Captions allow the content to be searchable.
In other words, designing courses in this way has the broad effect of improving the experience and resources for all learners.
4
Web Content Accessibility Guidelines (WCAG 2.0)
The Web Accessibility Initiative of the World Wide Web Consortium have published accessibility standards for the Web. These standards are used by numerous countries, including the United States, as a measure of online accessibility.
These standards are the Web Content Accessibility Guidelines, or WCAG. The current standard is 2.0 (WCAG 2.0).
These guidelines address four principles (descriptions from the Web Content Accessibility Guidelines (WCAG) 2.0 page at https://www.w3.org/TR/WCAG20/):
• Perceivable – Information and user interface components must be presentable to users in ways they can perceive.
• Operable – User interface components and navigation must be operable.
• Understandable – Information and the operation of the user interface must be understandable.
• Robust – Content must be robust enough that it can be interpreted reliably by a wide variety of user agents, including assistive technologies.
WCAG 2.0 standards are in three tiers or levels of compliance: A, AA, and AAA. Federal legal regulations call for institutions to meet the AA standards, at a minimum (WCAG 2.0 AA).
You can find a handy checklist of the WCAG 2.0 standards at https://webaim.org/standards/wcag/checklist.
The full WCAG 2.0 standards are at https://www.w3.org/TR/WCAG20/.
A new version of the guidelines, version 2.1, is available and is being widely implemented.
5
Blackboard Ally
Introduction
Blackboard Ally is a tool designed to help faculty make their content more universally accessible and to provide a consistent experience across the system.
It does this by scanning and analyzing online course content for accessibility. It is integrated with Blackboard Learn to provide the maximum access and ease of use.
Ally uses machine learning and algorithms to determine how accessible individual content is, based on the WCAG 2.0 AA standards. It then scores the content, assigning each eligible item a percentage score represented by a color-coded indicator next to the item.
Ally also creates alternative versions of content, designed to improve accessibility and address the needs of individual students.
Ally also provides guidance and feedback to instructors, showing how to address the accessibility issues in the content.
Finally, Ally provides institutional reports to the university administration, showing accessibility issues in courses and the progress being made on accessibility.
6
Files Supported
Currently, Ally supports the analysis of certain common file types:
• PDF
• Microsoft Word
• Microsoft PowerPoint
• Open Office/Office Libre
• Image files (JPG, JPEG, GIF, PNG, BPM, TIFF)
• HTML files
Currently, Ally will only scan and evaluate course files and content items that you have deployed into the course content areas. At some point, Blackboard plans to include content generated in the Content Editor.
Course indicators for each file will appear in both the course content areas and the Content Collection. (See “How Ally Works,” below, for more details on indicators.)
7
How Ally Works
Ally begins to work when an instructor deploys a file or creates content in the course content areas. Ally will (currently) not analyze a file until you have linked it in the course content.
Once you have added the file to the content areas, Ally analyzes the file, using an automated accessibility checklist based on the WCAG 2.0 AA standards. Ally also uses machine-learning algorithms as a part of this process. This process can take several minutes to complete.
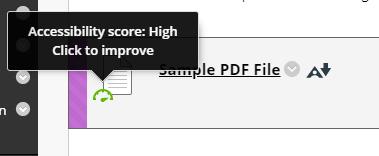
The analysis process generates a percentage score that indicates how accessible the content is. Ally places an indicator icon next to each file to designate the score. The indicators are color-coded:
• Red – A score of 0-33%, the content needs immediate attention.
• Orange – A score of 34-66%, the content needs further attention.
• Green – A score of 67-99%, the content is good but further improvements are possible.
• Dark Green – A score of 100%, the content is fully accessible and no improvement is required.
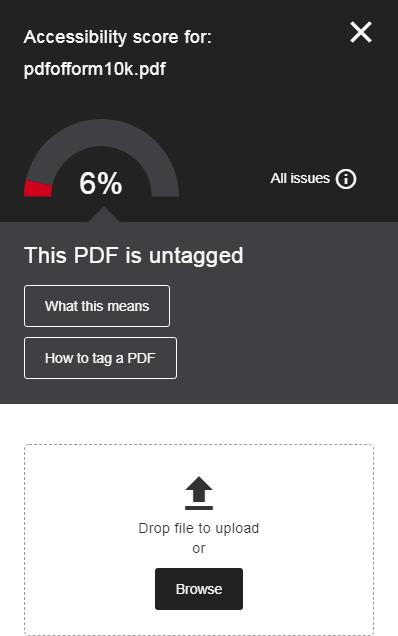
Clicking the indicator will open a page that shows the following:
• A preview of the file, if available
• The exact percentage score for the content
• A button linking to a page listing all accessibility issues for the content
• The primary accessibility issue for the content
• A “What this means” button, linking to an explanation of the accessibility issue
• A button linking to suggested solutions for resolving the accessibility issue in the content
• An upload box and Browse button for uploading updated versions of the file where the accessibility issue is resolved.
• A link to All issues for that specific file.
8
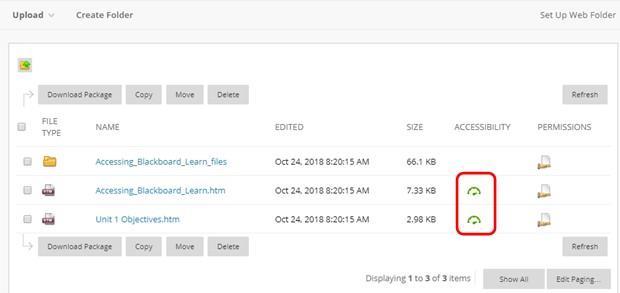
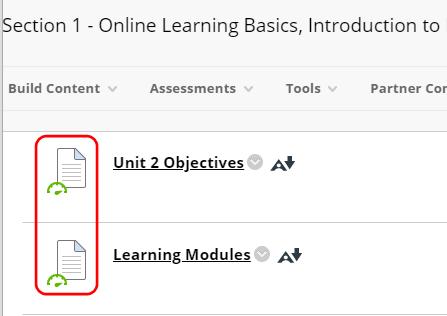
Indicators will appear next to the analyzed content in both the content areas…
…and the Content Collection.
The indicators are only visible to instructors, course builders, and other roles that can build content. Students and guests cannot see them.
Ally will also create different versions of the file using alternative formats.
9
Alternative Formats
Depending on the type of file, Ally will also create some or all of the following downloadable alternative versions:
• ePub – An e-book version of the file that can be read on e-readers, tablets, and smartphones.
• Electronic Braille – A file read using an electronic Braille display.
• Audio – An MP3 file that users can listen to on electronic devices.
• BeeLine Reader – An enhanced HTML version of the file to improve reading. Users can read the file in different color configurations.
The files offer students alternatives that may be more accessible than the current file. However, the alternative versions will not be fully accessible until you resolve all of the issues with the original file.
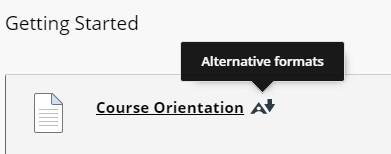
Both instructors and students have access to these files. In content areas (or folders), click the Alternative formats link to access the files. (That link will always be visible to students, but instructors will need to point to the file link to see it.)
10
In learning modules, instructors can access the alternative formats using the link by the name of the file. However, students only see the content one page at a time. At the top of the page, there is a link to open the file, if it does not open automatically. Students should click that link and then click the Alternative formats link.
After you click the link for Alternative Formats, Ally opens a dialog box with a list of available options. (Depending on the file type of the original file, some options may not be available.)

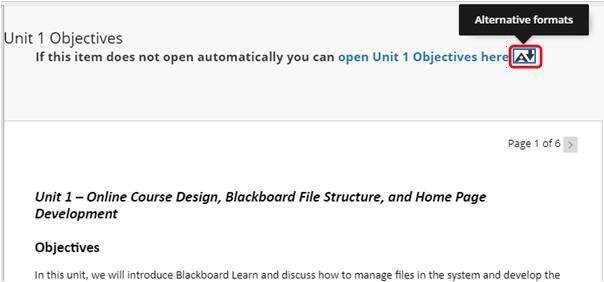
1. Click the option button for the version you want.
2. Click Download.
3. Ally will generate the alternative version.
4. A Save As dialog box opens. Choose the location in which you want to save the file.
5. Click Save.
11
How to Correct an Accessibility Issue in Ally
Once Ally identifies one or more accessibility issues with a file in Blackboard, instructors will need to correct those issues and update the file in their course.
To correct and update a file with accessibility issues:
1. Click the Ally indicator icon, next to the file.
2. Check the accessibility score for the file. The lower the score the more numerous or serious the issues.
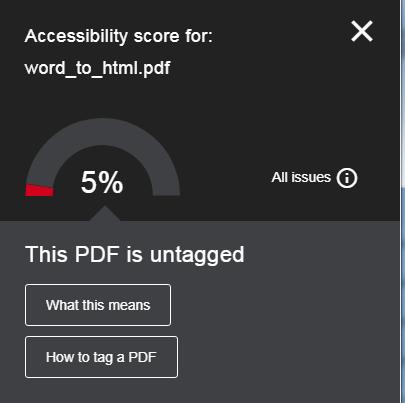
3. Ally will display the primary accessibility issue. (Other issues can be found by clicking the All issues button.)
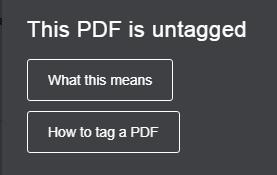
4. Click the “What this means” button, to learn about the nature of the error. This will help you understand how to correct it.
a. Click the close button (X) in the top right corner to return to the accessibility score window.
12
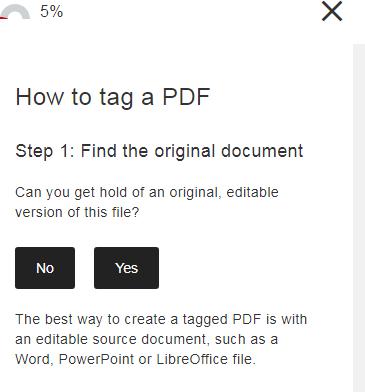
5. Click the “How to” button for the primary issue.
a. Ally will walk you through the process of fixing the issue, step by step. Follow the instructions, answer the questions, and make changes to the document as you go.
b. Most issues will require you to have the original document.
c. You can fix some issues directly in Blackboard.
d. Be sure the fix is for the file type you started with. You should end up with a PDF or HTML file instead of Word files.
13
6. Upload the updated file.
a. Drag the updated file from Windows Explorer or My Computer into the upload box OR

b. Click Browse, navigate to the file, select it, and then click Open.
c. The file will upload and update in Blackboard and Ally.
7. After you have updated the file, check the score again. It should increase to reflect the improvements. If there are other issues that you need to fix, the next most important issue should appear. Repeat the steps above to fix them, one by one.
a. Blackboard does not yet have solutions documentation for a few accessibility issues. As Ally is improved, documentation for those issues should appear.
14
Course Accessibility Report
Instructors can get a view of the overall accessibility of their course, using the Course Accessibility Report. This report shows the types of content in the course, the easiest issues to fix, the lowest scoring content, and a list of all files with accessibility problems.

To access the Course Accessibility Report:
15
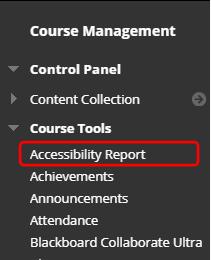
1. In the Control Panel, click Course Tools.
2. Click Accessibility Report.
3. The report will open.
The Accessibility Report has several parts:
• The overall score – This is located at the top and is the score for the entire course.
• The Overview tab. This contains the following sections:

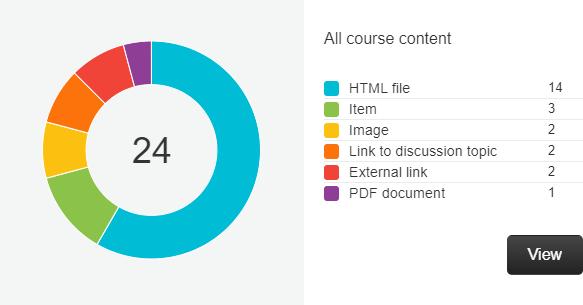
o A breakdown of all course content, by type. Click the View button to go to the Content tab.
16
o The content with the easiest issues to fix. Click Start to go to a page where you can access the file listing.
o A link to fix the content with low scores. Click Start to go to a page where you can access the file listing.


o A list of remaining issues. Click an issue to go to a page with a list of files with that issue.

17
• The Content tab. This tab contains a multipage list of all scored content in the course shell. You can sort the list by name, number of issues, or score. Click an item in the list to go to the accessibility score page for that item.

o Click the page numbers, Next, or Previous, to navigate the list.

18
Common Accessibility Issues and How to Address Them
Ally provides feedback for most of the accessibility issues it identifies. What follows are are a number of common accessibility issues we want to address in this manual, to assist you further in making your course content universally accessible.
Be Proactive – Build Accessible Content
Before addressing the specific issues, it is important to recognize that the best way to provide fully accessible content is to design your content with that in mind. As you review the issues below, keep in mind how you can use these solutions to build your content so it is universal and accessible from the start. Some of the goals you should set for your content include:
• Always use the auto-captioning tool in Ensemble Video to add closed captions to your videos. (See the Ensemble Video manual for details.)
o Blackboard has promised additional tools in the near future for Collaborate and YouTube supports auto-captioning for the YouTube links in the Content Editor.
• Always set up documents to use proper headings
o Use Heading 1, Heading 2, etc. in Word. When you save the file as PDF or HTML, these heading styles remain.
o Use templates in PowerPoint. These identify headings for each slide and remain when you save the presentation as PDF.
• Always add ALT (alternative) text for images in your documents and home page headers. This text describes the image for students who cannot see it.
• Always make sure tables have a header row, and identify this in the table properties in Word and PowerPoint.
• Always provide your documents with a title.
• Make sure all PDF files have tags (See “Untagged PDF Files”).
• Make sure there is high contrast between the text and background colors.
The following sections describe how to correct problems with accessibility and provide a good idea on how to achieve most of the goals above. Remember, that Ally provides feedback for most of these issues and several others.
19
Missing Headings
Headings help users to understand the structure of the document by introducing new sections. Accessibility software looks for specific heading entries: Heading 1, Heading 2, etc. all the way to Heading 6. (For example, the heading for this page is Heading 3.) A well-structured document should not have more than six heading levels.
Headings should stand out and visually separate the different sections. Bold, larger, and italicized text or combinations thereof, are ways to format headings.
If Ally identifies your document as missing headings, here are some steps you can take.
For Word, PDF, and HTML files:
We recommend the use of PDF or HTML files for Blackboard content (although Word files are useful as assignment attachments). However, most PDF and HTML files start as Word files, and you can open HTML files in Word. Therefore, Word is where we’ll start:
1. Locate the original Word file (for PDFs) or the HTML file.
2. Open the file in Word. (For HTML files, click File > Open.)
3. Identify the text best suited as headings in the file, or add headings. Decide which heading style fits best for each.
4. Select/highlight the text that you will format as the first heading.
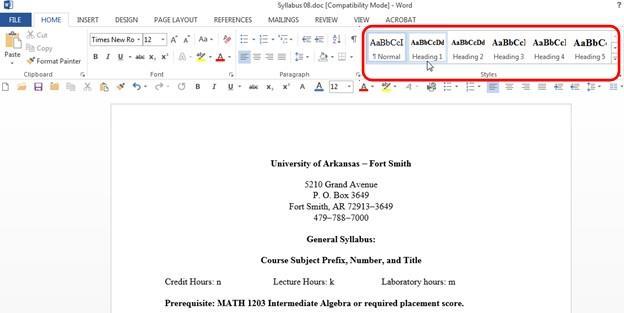
5. On the Home tab, in Word, locate the text styles, on the right.
20
6. If the Heading 1 style is satisfactory, click Heading 1, in the Styles section of the Home tab. This should change the selected text to that style.
a. If the Heading 1 style is unsatisfactory, you have two options:

i. Modify the Heading 1 style:
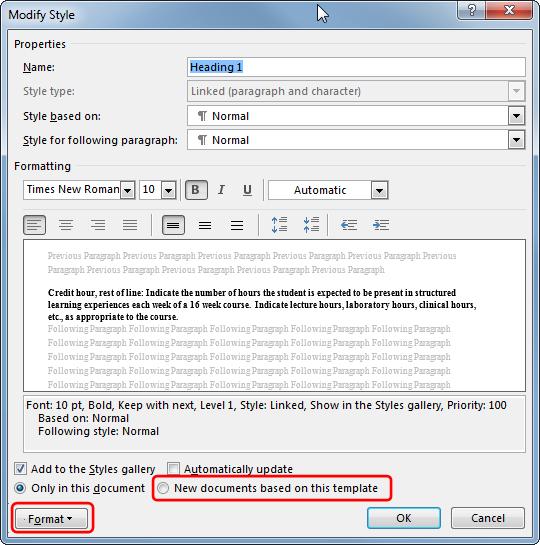
1. Right-click Heading 1
2. Click Modify…
21
3. Change the formatting for that style.
a. Click the Format drop-down menu at the bottom left to access details, such as paragraph details.
4. Click the option button for “New documents based on this template,” if you want to use this style for other documents based on this one.
5. After you have modified the heading style to your satisfaction, click OK.
6. Be sure to save the changes to the file.
22
ii. Change the Heading 1 style to the current style for that text:
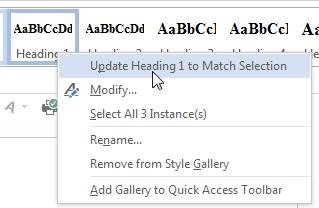
1. Right-click Heading 1
2. Click “Update Heading 1 to Match Selection.” This changes Heading 1 to the formatting the selected text is already using.
3. Be sure to save the change to the file.
7. Highlight the next line of text that you want formatted as Heading 1.
8. Click Heading 1. This will change the formatting of the text to the Heading 1 text.
9. Repeat steps 7 and 8 for all remaining text you want to format as Heading
1. Remember to Save the changes as you go. (You do not need to use Save As for the HTML file, since it is already saved as that file type.)
10.Repeat the overall process for Heading 2, etc. as needed for your document.
11.After you change the text to a heading, you should see a gray triangle beside it. Click this to hide or show the content underneath a heading and lets you know you have successfully formatted the text as a heading.
12. After you have added all the headings you need, Save the file.
13. If you are updating a PDF file:
a. Click File.
b. Click Save As.
c. Select the destination folder in which you will save the file.
d. In the Save as Type drop-down menu, click PDF.
e. Click Save.
f. If Word asks if you want to overwrite the file, click Yes.
23
14. Use the update feature in Ally to update the file and rescore it for accessibility (see “How to Correct an Accessibility Issue in Ally,” above).
For PowerPoint files:
When creating new PowerPoint presentations, be sure to use existing layouts and templates, if possible.
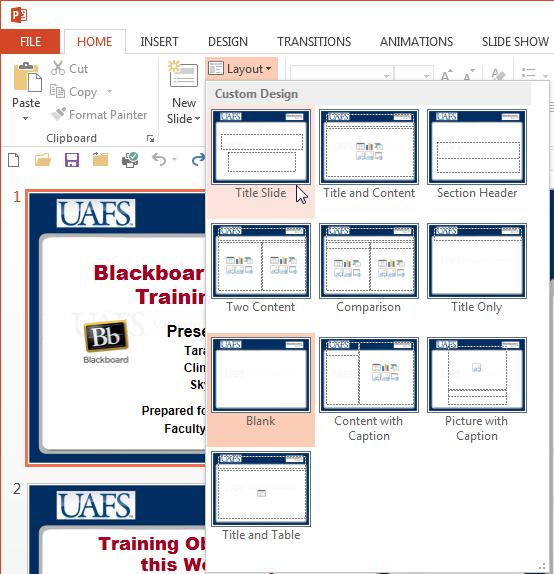
It is difficult to correct PowerPoint files that have not been set up to use headings and templates. However, you can try the following steps.
1. Open the PowerPoint presentation file.
2. Click the first slide with a title.
3. Click the Home tab.
4. In the Slides section, click Layout.
5. Click the layout that most closely fits the slide.
24
6. If your content fits the boxes that appear, then that means it should be using the layout correctly.
7. If your content does not fit the boxes that appear, copy/cut and paste the content into the boxes, making sure the title text goes into the title box.
8. Save the changes.
9. Repeat the process for each of the remaining slides with a title (or heading).
10. Save the file.
11. If the presentation is in PDF form in your course, Save As PDF:
a. Click File.
b. Click Save As.
c. Select the destination folder in which you will save the file.
d. In the Save as Type drop-down menu, click PDF.
e. Click Save.
f. If Word asks if you want to overwrite the file, click Yes.
12. Use the update feature in Ally to update the file and rescore it for accessibility (see “How to Correct an Accessibility Issue in Ally,” above).
25
Images without Alternative Descriptions
Users with visual disabilities rely on alternative descriptions of images to help them know what the image represents.
Always include an alternative description for each image. Descriptions should be concise and call attention to the important aspects of the image. For highly detailed images (diagrams, charts, etc.), we recommend including the details in the actual document text and referring to that in the alternative description. Purely decorative images can have a description of “decorative image” or similar.
For Word, PDF, HTML, or PowerPoint files:
You can add an alternative description to an image, or picture, using Word or PowerPoint. The interface will be somewhat different for .doc and .docx files. See below for details.

1. Right-click the image.
2. Click Format Picture. (Newer versions of Office programs (Office 365) will have an Edit Alt Text option. If available, click that and go to 4. c., below.)
26
3. For a Word 97-2003 documents (.doc)
a. Click the Alt Text tab.
b. Type the Alternative text description in the text box.
c. Click OK.

27
4. For a Word, PowerPoint, or HTML document (.docx, .ppt, .pptx, .htm OR .html)
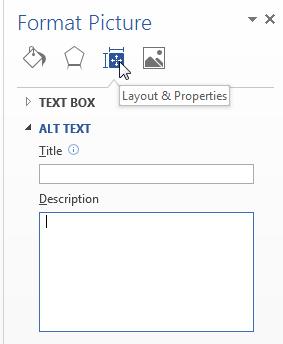
a. Under the Format Picture sidebar on the right, click the Layout and Properties icon. (In PowerPoint, this will read “Size and Properties.”)
b. Click ALT TEXT.
c. Type the alternative description in the Description or Alt Text text box.
d. Save the changes to the document.
5. If replacing a PDF file, use Save As:
a. Click File.
b. Click Save As.
c. Select the destination folder in which you will save the file.
d. In the Save as Type drop-down menu, click PDF.
e. Click Save.
f. If Word asks if you want to overwrite the file, click Yes.
6. Use the update feature in Ally to update the file and rescore it for accessibility (see “How to Correct an Accessibility Issue in Ally,” above).
28
For images in the Home Page banner and other Content Editor-created content:
1. Click the menu icon for Home Page, just below the header/banner (and NOT the one on the Course Menu).
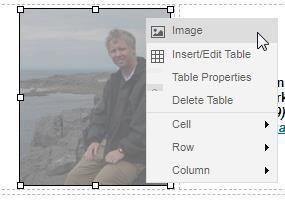

2. Click Page Banner.
a. For Content Editor-created content in other tools, go to the tool in question, click the menu icon, and then click Edit.
3. Right-click the image that needs an alternative description.
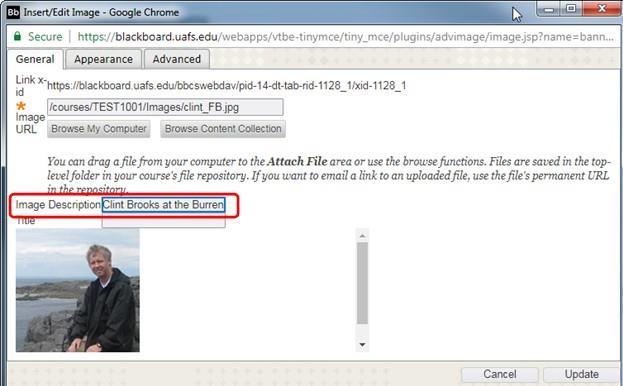
4. Click Image.
29
5. In the Image Description text box, type the alternative description for the image.
6. Click Update.
7. Click Submit, to save the changes to the banner.
30
For image files in the Content Collection:
Ally currently scores images in the Content Collection individually, in addition to, and regardless of whether or not they have an alternative description in the content where they are used. It is a good idea to add an alternative description for the individual images, so the indicators in the Content Collection will be green.
1. In the Content Collection, click the red Accessibility indicator for an image file.
2. If the image is not decorative, type an alternative description in the text box provided for that purpose.
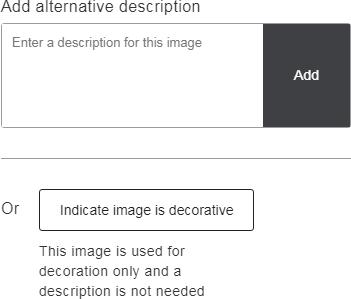
3. Click Add.
4. If the image is purely decorative, click the button for Indicate image is decorative.
31
Tables without Headings
All tables in documents should have a clearly defined heading row This row helps to make the table easier to read and understand.
For users who rely on screen reader software, you will need to take a couple of steps to help their software recognize the heading row.
For Word, PDF, and HTML files:
As with headings in general, you will need to work in Microsoft Word, using the original Word file (for updating Word and PDF files) or the HTML file.
1. Locate the first table in your document.
2. Highlight the entire header row of the table. This should be the top row.
3. A tab for Table Tools should appear in the ribbon, at the top of the page. This tab has two sections: Design and Layout.
4. Click the Design tab.
5. In the section Table Style Options, make sure you have selected the check box for Header Row.

32
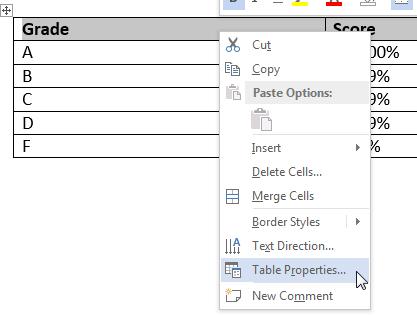
6. Next, right-click the selected header row.
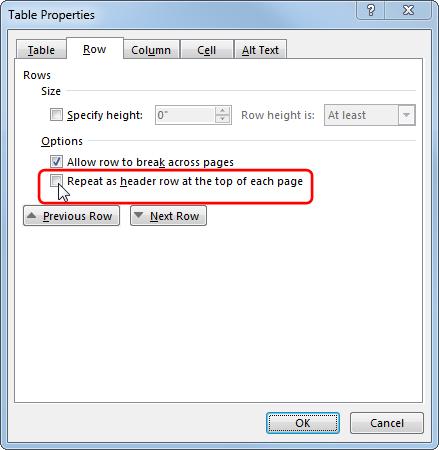
7. Click Table Properties.
8. Click the Row tab.
9. Under Options, select the check box for Repeat as header row at the top of each page.
a. This causes the header row to appear again at the top of each page on which the table appears.
b. This will not work if you divide the table between pages. The table rows must be together in one table.
10. Click OK.
For PowerPoint files, use the same procedure as for Word files, skipping steps 6 through 9, since individual tables do not appear on multiple slides in PowerPoint.
33
Untagged PDF Files
Tags are notations within a document that provide structure to the document. This includes things like headings, alternate descriptions, table layouts, forms, and other content. Tags make it easier for users who cannot see the document to understand the structure when their accessibility software reads it.
Fortunately, resolving many of the other issues that Ally identifies should create tags in your PDF file. However, if this is not happening when you save a Word or PowerPoint file to PDF, it is probably because of an issue in the Save As options. You can correct that by taking the following steps when saving the file as PDF:
1. Click File, and then click Save As, as usual.
2. Choose your destination folder, as usual.
3. In the Save as type drop down list, click PDF, as usual.
4. Click Options.
5. Make sure you select the check box for Document structure tags for accessibility.
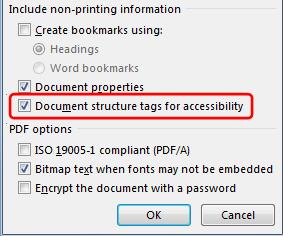

6. Click OK.
7. Click Save.
Making sure the Document structure tags are included in the PDF should resolve the issue with PDF tags. If it does not, please contact instructionalsupport@uafs.edu.
We can examine the PDF file in Adobe Acrobat and address the issue further.
34
No Title
Each document should have a title that appears in the title bar of the window when you open the document. This is different from the file name or a title on the first page of the document.
Titles help users who rely on accessibility software to identify the document.
To add a title using Word or PowerPoint:
1. Open the file in Word or (if needed) PowerPoint.

2. Click File.
3. On the right side of the Info page, click the line that says, “Add a title.”
4. Type the title into that text box.
5. Click Save.
You may need to add the title to a PDF file in the full version of Adobe Acrobat, using the accessibility review process.
NOTE: We have seen that when saving Word as PDF files, the title does not always save as well.
35
Contrast Issues
Contrast issues occur when the color or tint of some content is too close to that of other content. The most common example is a lighter colored text on a darker background.
Contrast issues vary and Blackboard Ally does not yet have feedback to resolve the issue. However, here are some best practices you can apply that will reduce the likelihood of this accessibility error:
• Always make sure there is strong contrast between the text and the background color of a page. Black text on a white background is the standard for a good reason.
• Avoid background images with strong patterns or bright colors. Text is very difficult to read on these backgrounds.
o If you do feel the need to have a background image, use subtle images, such as subliminal or watermark images, or use backgrounds that leave open space in the margins for text.
• Make sure your photos and other images are clear, well composed, and well-focused.
• Consider how students with color-blindness might see an image or text on a page. Avoid color combinations that those users would find difficult to distinguish.
Contrast can be a bigger issue for some users. Be sure your pages have high contrast that benefits all viewers.
36
Support and Contact Information
If you have questions about Blackboard Ally or need assistance with online accessibility issues, please contact the Instructional Support department.
Via e-mail: instructionalsupport@uafs.edu
Via phone:
Clint Brooks, Instructional Designer – (479)788-7335
Dr. Sky Zhang, Instructional Designer – (479)788-7316
37


