Generating Course Offerings Listing Galleys.
Destiny
Follow the steps on page 1 to access the Destiny Marketing module and catalog sequencing templates.
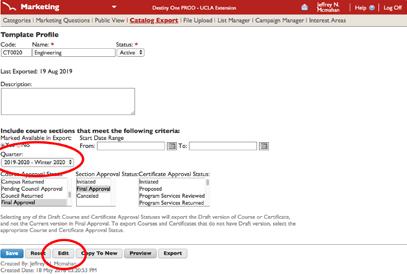
Click the Template Name for the section to be exported from the resulting list.


Click on the Preview Button.
Check the courses in the preview outline.
Correct courses will have the 2nd line with the Course Discipline and Number, the Section Number, and the Project ID in Parentheses, such as HVAC Systems, etc.
Courses that do not have Program ID sections under them, such as Plumbing Systems II and Hospital and Laboratory Plumbing Systems Design under the Program Stream Advance Plumbing Systems Design, need to be fixed by the Program Department.
This issue results from one of the following:
• The Section Profile has not been approved by the Department.
• The Available for Catalog Export Yes button needs to be checked.
• The Section Profile is from a previous quarter and needs to be copied forward into the current quarter.
Contact the Program Rep, requesting them to update the Section Profile for the export and request a response when the task is completed.
It is best not to export without the Section Profiles, unless there is a long delay.
If everything in the template is correct, return to the Template Profile page by clicking the link next to Template: at the top.
Click on the Export button. Depending on the size of the section, compiling the listings may take a minute or two.
3


Department
Accounting & Taxation
Architecture & Interior Design
Business & Management
Design
Digital Technology
Education
Engineering
Entertainment
Environmental Studies & Public Policy
Finance & Investments
Health Care & Counseling
Humanities & Social Sciences
Landscape Architecture & Horticulture
When the export has finished process, Destiny will jump to Recent Export Files page.
Save as an XML text file into _Listings_Destiny\_listings_raw using the standardize section abbreviation (listed below).
Abbreviation
Acct_Tax
Arch_ID
Bus_Mgt
Desgn_Arts
DigTch
Edu
Eng
Ent
Evrn_Pub
Fnc_Invst
HlthCr_Cnsl
HSS
Landscp_Hort
Languages Lang_EIS
Legal Legal
Osher Osher
Real Estate RealEst
Sciences & Math
Writing & Journalism
Sci_Mth
Wrtg_Jrnl
4

Launch the PC application, Visual Studio. It takes several minutes to load.

On the Start Page, left side, click on Recent\XML Reader. This too can take several minutes to load.
Ever Winter quarter the current year needs to be updated to the upcoming year. Search by the current date to replace. There are many of them within the file.


On the commands ribbon, Click on “Start”. After a few seconds, the XML Editor will open.
Click on Load From XML. From L[datafolders]:\Catalog\ _Listings_Destiny\_listings_raw open the XML file from Destiny.
5 Visual Studio

After a moment, the XML Reader pop-up window will open with Export Complete! Click OK.
Process all save Destiny XML Files.
Process As needs to be Course List; Save As needs to be Save as TXT. Click the Save File button.


Copy the processed .txt files to L:\Catalog\_Listings_ Destiny\_listings_raw\ _translated_textFiles.
6
Advanced Find and Replace

Launch the PC application, Advanced Find and Replace.
The setting for this translation program are already locked in place, but can be loaded from L:[datafolders]\ Catalog\_Listings_Destiny\x_AFR_settings. Only do so if the last updated configuration has been “Saved As” into this folder.
Every Winter the year needs to be update to the upcoming year. There replacements are close to the end of the list. Changes are automatically saved.
Click the Execute button. In a few seconds the text files from L:\Catalog\_Listings_Destiny\_listings_raw\ _translated_textFiles will be translated, appearing in the window at the bottom.

7
There are some spacing issues which cannot be corrected through the translation process...out of bloody stubbornness in my opinion. These issues arise when there is no unit number, ie all of Osher’s courses, or when there is no bio for an instructor. To fix these issues without risking altering Paragraph Styles in InDesign, it is best to fix them in Word.
Right-click on the text file in datafolders\Catalog\_Listings_Destiny\_listings_raw\ _translated_textFiles, and Open With Microscoft Word.

Use the default setting for File Conversion; click OK.


It is best to use the Advance Find and Replace function [shown] when fixing multiple files.
Remove return/space/return by leaving the Replace with: field blank.
To remove commas after instructors without bios, replace comma/space/return with a return as shown at left.
Also search for return/return [^p^p] and replace with a single return [^p].
Save the file, clicking Yes in the alert window.
8 Word
On the Mac, open datafolders\Catalog\_Listings_Destiny\_listings_raw.

Launch _listings_TransHdr [for Mac; for Windows _listings_TransHdr_PC], highlight and copy the text.

Open datafolders\Catalog\_Listings_Destiny\_listings_ raw\ _translated_textFiles. Open the translated text files.
Paste the Translation header at the front of each file.
Save and Close.
InDesign

Open datafolders/Catalog/_Libraries_Templates/ Templates_Pages/_Listings_120.indt.
On the Master pages, replace “Section” with the abbreviation for the catalog section.
On page 1, place your cursor in the single column text box. “Place” the final version of the text file from datafolders\Catalog\_Listings_ Destiny\_listings_raw\ _translated_textFiles.

9 Text
Edit
Double/Redundant Locations
Destiny/Translation creates some double locations which need to be deleted.

Copy “UCLA:^p” and paste int eht “Find what:” in Find/Chnage [cntl+F]. Leave “Change to:” black. Click change all.

Copy “UCLA Extension Lindbrook Center in Westwood^p” ” and paste int eht “Find what:” in Find/Chnage [cntl+F]. Leave “Change to:” black. Click change all.
“UCLA Gayley Center in Westwood^p”. will also need to be deleated in the same manner.
For the correct address, both “Campus” and “Building” need to be selected in Schedule Block/ Phycial location: in Destiny.


10
Delete excess pages from the file.
On the last listing page, move the last schedule dates from below the instructor name into the proper position.

Save into the appropriate Listing Galley folder with the standard naming convention, ie “section_1stGal”.


Export the galley as an Interactive PDF. The listing template is set up with the correction parameters.
Make a PDF if working remotely.
1st Galley listings go to the proofreader as a pdf.
11
2nd galleys
Download the updated courses listings following the instructions from pages 3-11. Copy the 1st galley files into the 2ndGalley folder. Import and update courses listings, including any updates that can only be done in inDesign, such as removing duplicate locations or combine multiple meetings [see previous].
Setting up the booklet
Open the page template from:

Save the file to the current quarter Final folder:

Open _deptCvrs_altPg1.indt
This file has alternation quarterly covers, as well as cover for department pdfs if those continue.
Copy the current quarter, i.e. Fall or Spring, and paste in place on the cover the the full_template.
Save the file to the current quarter Final folder:


12
Course Offerings PDF Booklet
Adding the Listings
Navigate the first department page/spread. The second header will be removed depending on whether as section starts on an odd or even page. The headers are size for each side and are not interchangeable.

Open the 2nd galley course listing file and copy the listings. Paste listing into spread and adjust the listings to fit on the page as shown.


Do not break courses across spreads. Use arrows from the catlog library to break courses at the Reg # to the next column. Courses can be continued to the next column in the midst of a long description or bio, but not in the middle of the scheduling information.
13


Delete blank page to start of next section.
When a department section begins on an even page, it is necessary to copy the correct header to the start page.
Delete the 1st header. Go to the next page and cut that head. Go back and paste that header on the even page, aligning correctly to the guidless. Remember that header size differ from the odd to even page and must be set up accordingly.
Continue to through to the last section. Delete the remaining blank pages.
Make a spread PDF to upload to Box/Marketing/ Catalog/zz_catalogsFullPDFs
14
Create cover image.
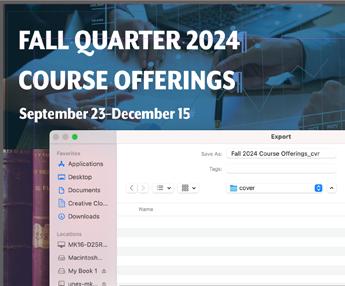
Export the cover as an EPS file into Catalog/_Yearly/20##/X##/z_finalPDFs_X##/_pagePDFs/cover/.

Open the EPS file in Photoshop, set at 300 pixels wide. Export as a jpeg into the same folder.


15
Update Confluence
In /Departments/Marketing & Strategic Communications/Marketing Academic Resources/Catalog/Course Offerings Archive. Add the new quarter with its digital link to the bottom of list.

Update the quarter page title to new quarter. update the digital web version link. Upload and replace the cover with an cover jpeg and link to the digital version.

The digital link comes from Issuu. Provide the Creative Director with a single page full pdf. A designer will upload to Issuu and release a link for that quarter.
16


