LAUNCH EDITION!
Machine Embroidery How to
Stitch on towels Choose the right machine Machine embroidery basics
9 Projects Inside!
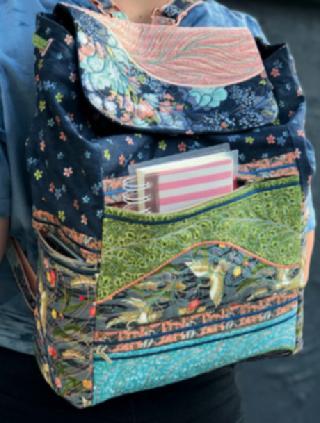
Melba Gumnut Bag
FREE DESIGN
Stabilisers!
DOWNLOADS
Floral Redwork Runner
We explain them all
Award-winning
No. 1
AU $12.95* NZ $15.30* (Both incl. GST)
Machine Embroidery by Suzann Moss
Stella Star Unicorn
RIBBON EMBROIDERY ATTACHMENT CAPABILITY. Easily guide and stitch down ribbon with the optional motorised Ribbon Embroidery Attachment. It has never been easier to create unique one-of-a-kind embroideries!
The new Husqvarna Viking DESIGNER EPIC 2 machine is made with you in mind. It has many innovative and world class features such as: - mySewnet Library - Laser Pictogram Stitches - Integrated Dual Feed Technology - Adjustable Laser Sewing Guidance - 9mm Stitches - Multi-Function Foot Control Capability - Over 650 Built-in Embroidery Designs - Plus Many More Features
THE BEST JUST GOT BETTER!
Head to your nearest authorised retailer today to learn more!
husqvarnaviking.com/au
Just Arrived!
(02) 4337 3737
FREE learn to do “in the hoop” projects Ever wanted to do ‘in the hoop’ machine embroidery but were too scared?
do with Sweet Pea’s easy to follow, detailed instructions.
Do you feel as though you do not get enough ‘use’ out of your embroidery machine?
The folks at Sweet Pea believe that every single design should be able to be made by crafters at all skill levels. Sweet Pea’s instructions come with photos at every step. For visual learners, this is a MUST!
Sweet Pea’s ‘learn to do projects’ can help you become a master of your embroidery machine! You will be amazed by what you and your embroidery machine can
Why not try one of Sweet Pea’s FREE designs and see for yourself why Sweet Pea is the BEST machine embroidery company in the world.
www.swpea.com/collections/free
Fantastic B l o ck o f t h e Mo n t h Q u i l ts
swpea.com Quilts • Table Runners • Tote Bags • Zipper Purses • Stuffed Toys • Coasters and much more!
Australia’s Best Machine Embroidery Designs Sweet Pea is known Worldwide for their perfectly digitised designs with detailed
and easy to follow instructions. Sweet Pea has a massive online presence and has risen to become one of the biggest machine embroidery companies specialising in “in the hoop” designs. They started selling
machine embroidery designs in 2015 and in just 4 years now have over 1000 designs on swpea.com. With hard work and dedication, this once small machine embroidery company from Brisbane has taken over the industry.
Machine
Editor’s note
Embroidery
Need Pattern Sheets? Click the link: www.quilterscompanion. wordpress.com
No.1 2019 EDITOR Deborah Segaert DEPUTY EDITOR Leanne Church TECHNICAL EDITOR Megan Fisher PATTERN ARTIST Kate Podger ART DIRECTOR Kate Podger DESIGNER Bianca de Ocampo PHOTOGRAPHY Ken Brass STYLIST Sandra Hinton ADVERTISING Rob Jordan (02) 9887 0359, 0411 424 196
W
elcome to the very first issue of Machine Embroidery! We are so excited to be sharing projects, advice, guidance and inspiration for your machine embroidery journey. When I set out on this mission I invited Leanne Church to join me as deputy editor. Leanne is an independent machine embroidery consultant and has been in the industry for 25 years in various roles. She is a respected professional (and self-confessed computer geek) and we are fortunate to share her expertise in our bid to bring together this great magazine. With our combined, and complementary, skills and knowledge, I am confident that we have curated a wonderful compilation of projects and articles to inspire and encourage you. We invited our talented friends in the world of machine embroidery to share a wide range of projects, presenting a number of different techniques and outcomes. From a darling three-dimensional unicorn made “in the hoop” through to a table runner that showcases how traditional redwork designs and paint markers can complement machine embroidery, I am sure you are going to find much inspiration in the nine fabulous projects. Equally as important as sharing exciting projects is to share our industry knowledge with you. Articles such as What to Look For When Buying an Embroidery Machine and our All About series featuring books and stabilisers are intended to impart valuable knowledge that you can draw on to improve and grow your hobby, or small business. Without further ado, we invite you to start your journey with us through the pages of this wonderful magazine.
PS: Thank you Leanne — you’ve been a great off-sider!
How to keep in touch Mail: The Editor, Quilters Companion, Universal Media Co. Locked Bag 154, North Ryde NSW 1670 Email: dsegaert@umco.com.au Facebook: https://www.facebook.com/QuiltersCompanion Instagram: http://instagram.com/quilters_companion Pinterest: http://www.pinterest.com/qcmag/ Don’t forget that you can also find us digitally on Zinio and Apple Newsstand.
6
Fax: (02) 9805 0714, email: rjordan@umco.com.au ADVERTISING PRODUCTION Thomas Pena ASSOCIATE PUBLISHER Emma Perera
CHAIRMAN/CEO Prema Perera PUBLISHER Janice Williams CHIEF FINANCIAL OFFICER Vicky Mahadeva ASSOCIATE PUBLISHER Emma Perera FINANCE & ADMINISTRATION MANAGER James Perera CIRCULATION BUSINESS DEVELOPMENT MANAGER Mark McTaggart CREATIVE DIRECTOR Kate Podger MARKETING & ACQUISITIONS MANAGER Chelsea Peters Circulation enquiries to our Sydney head office (02) 9805 0399 Machine Embroidery#1 is published by Universal Magazines, Unit 5, 6-8 Byfield Street, North Ryde NSW 2113. Phone: (02) 9805 0399, Fax: (02) 9805 0714. Melbourne office, Unit 4, Level 1, 150 Albert Road, South Melbourne Vic 3205. Phone (03) 9694 6444, Fax: (03) 9699 7890. Printed by: Times Printers, in Singapore. Distributed by: Gordon and Gotch, Australia. NZ Distributors: Needlecraft Distributors Ltd – ph: 0800 909 600, www.needlecraft.co.nz Netlink: (09) 366 9966 UK Distributors: The Cotton Patch: +44 (0) 121 702 2840, mailorder@cottonpatch.co.uk Manor House Magazines: +44 (0) 167 251 4288, info@manorhousemagazines.co.uk USA Distributors: Quilters’ Resource Inc, toll free 1 800 676 6543, Ph: + 1 773 278 5695, fax: + 1 773 278 1348, website: www.quiltersresource.com. Stonehouse Publications, Ph: + 1 1800 461 1640, fax: + 1 410 584 9166, website: wwwcraftmags.com USA and Canada Distributor:Transmedia Group Ltd, 1915 Clements Road, Unit #7, Pickering, Ontaria L1W3V1, Canada toll free 1800 461 1640 Singapore: Car Kit Pte Ltd: Ph: +65 6 282 1960, fax: + 65 6 382 3021, website: www.magazines1source.com Subscriptions can be purchased from: NZ: Needlecraft UK: The Cotton Patch, Manor House Magazines USA: Quilters Resource & Transmedia Singapore: Car Kit Pte Ltd This book is copyright. Apart from any fair dealing for the purpose of private study, research, criticism or review as permitted under the Copyright Act, no part may be reproduced by any process without written permission. Enquiries should be addressed to the publishers. The publishers believe all the information supplied in this book to be correct at the time of printing. They are not, however, in a position to make a guarantee to this effect and accept no liability in the event of any information proving inaccurate. Prices, addresses and phone numbers were, after investigation, and to the best of our knowledge and belief, up to date at the time of printing, but the shifting sands of time may change them in some cases. It is not possible for the publishers to ensure that advertisements which appear in this publication comply with the Trade Practices Act, 1974. The responsibility must therefore be on the person, company or advertising agency submitting the advertisements for publication. While every endeavour has been made to ensure complete accuracy, the publishers cannot be held responsible for any errors. or omissions. * Recommended retail price ISSN 2652-3663 Copyright © Universal Magazines MMXIX ACN 003 026 944 www.universalmagazines.com.au Please pass on or recycle this magazine. We are a member of
Contents
100
Projects 12
86 8
12
Daisies at the Cabin Zoe Clifton 20 Stella Star Unicorn Holly Nash 32 Classy Christmas Regula Muller 46 Stepping out with Melba Leesa Chandler 56 Roses, Denim & Lace Jacket Tracey Sims 70 Kinky Kate Zoe Clifton 86 Denim Delight Bag Julie Hall 100 Aussie Floral Redwork Runner Dawn Johnson 110 The Emerson Grace Satchel Cath Quinlan
46
120
28
70
Features 28
Embroidery on Towelling Leanne Church 66 Profile: Yasmin Russell 120 Q&A with Suzann Moss
Resources 80
93 106 116 118 126 133 137
What to Look for: Buying an Embroidery Machine All About: Stabilisers Top 10 Embroidery ‘Must Have’ Tools Off the Shelf: Book Reviews Online Resource Guide In The Market Machine Embroidery Basics Stockists
20 9
Innov-is XP1 Luminaire Sewing and Embroidery Machine 27 x 40cm embroidery area. 100 embroidery designs. 821 sewing stitches. WLAN data transfer. 13in from needle to arm, large enough for a king-size quilt. 10.1in touch screen with 34 built in movies.
NEW Essence VE2300 Embroidery Machine 8 x 12” embroidery area. 318 built-in designs, 17 fonts. Droplight positioning maker. Includes 300 x 200mm, 180 x 130mm embroidery hoops.
NEW Stellaire XE1 Embroidery Machine 9.5 x 14” embroidery area. My Design Centre editing features for making your own designs. Plus view your design position before you stitch.
VM5200 Sewing, Quilting and Embroidery Machine 8 x 12” embroidery area. Use the Drop Light Positioning Marker to show you where the needle will drop. Enjoy the easy to use interface and larger 7in LCD touch screen.
NEW Stellaire XJ1 Sewing, Quilting and Embroidery Machine 9.5 x 14” embroidery area. Preview hooped fabric for precise positioning. Create embroidery files from handwriting or a drawing, without a computer.
To custom design a package deal, either visit our shop or call to discuss bellarinesewingcentre.com.au
Kate Fabrics range and Kate Machine Embroidery designed by Zoe Clifton
bellarinesewingcentre.com.au
395-399 Moorabool Street, South Geelong VIC 3220 e. bellarinesewingcentre@outlook.com | p. 03 5221 3034 www.facebook.com/ bellarinesewingcentre
www.instagram.com/ bellarinesewingcentre
www.youtube.com/ channel/UCnffAeikzAWBm UxgcIzOrAQ?reload=9
Daisies
AT THE CABIN Zoe Clifton Bright and happy daisies are a joyful addition to this monochromatic Log Cabin quilt. Mix and match the daisies from the Dancing Daisies design to create your own version, or follow as is to recreate this darling quilt.
Zoe Clifton Designs Bellarine Sewing Centre
12
www.zoecliftondesigns.com.au www.bellarinesewingcentre.com.au
zoecliftondesigns@gmail.com.au bellarinesewingcentre@outlook.com
13
Finished size: 193cm (76in) square
14
Materials 1.55m (1¾yd) solid white fabric (embroidery background) 40cm (½yd) each of two white and yellow print fabrics (daisies) 60cm (¾yd) yellow print fabric (daisies and block frames) 1.4m (15⁄8yd) black tone-on-tone print fabric (block peepers, Borders 3–5 and binding) Four black on white print fabrics: 40cm (½yd) of print #1 (Border 1); 20cm (¼yd) of print #2; 30cm (3⁄8yd) of print #3; and 35cm (3⁄8yd) of print #4 (Log Cabin blocks) Four white on black print fabrics: 2.1m (23⁄8yd) of print #1 (Borders 2 and 6); 20cm (¼yd) of print #2; 30cm (3⁄8yd) of print #3; and 35cm (3⁄8yd) of print #4 (Log Cabin blocks) 4.3m (4¾yd) backing fabric
Preparation and cutting
1
If you are using a Brother ScanNCut machine, download the fcm files for Daisy 1–7 to a USB and then insert it into the ScanNCut. Fuse fusible web to the wrong side of the white and yellow and the yellow print fabrics for the daisies prior to cutting the shapes. Cut the following shapes: five each of Daisy 1–6 and 25 of Daisy 7. If you are not using a ScanNCut machine, trace the appliqué shapes from the design software onto the paper side of the fusible web the number of times indicated on the label. Leave at least ½in between them. They will print in reverse for your convenience. Cut them out roughly outside the lines. Fuse each shape to the wrong side of the white and yellow or yellow print fabric you have chosen for it, then cut the shapes out accurately on the traced lines. From the solid white fabric, cut: two strips, 12in x width of fabric. Cross cut them to yield five squares, 12in (large blocks) four strips, 8in x width of fabric. Cross cut them to yield 20 squares, 8in (small blocks) From the yellow print fabric, cut: one strip, 1in x width of fabric (centre block peeper) five strips, 1½in x width of fabric. Cross cut them to yield eight strips, 1½in x 10½in and eight strips, 1½in x 12½in (large block frames) From the black tone-on-tone print fabric, cut: four strips, 1in x width of fabric (large block peepers) two strips, 1½in x width of fabric. Cross cut them to yield two strips, 1½in x 10½in and two strips, 1½in x 12½in (centre block frame) another 15 strips, 1½in x width of fabric (Borders 3–5) eight strips, 2½in x width of fabric (binding)
2 3 4
Batting at least 203cm (84in) square 9in Dancing Daisies machine embroidery designs — see Note Machine embroidery threads in white, yellow and black Fusible interfacing such as Parlan No-show mesh Stabiliser Hoop — to match design size Brother ScanNCut machine (optional) Water-erasable fabric-marking pen Rotary cutter, ruler and mat Sewing machine with ¼in foot General sewing supplies Note: Available from Bellarine Sewing Centre – see page 18 for details.
From black on white print fabric #1, cut: two strips, 6½in x width of fabric. Cross cut them to yield four strips, 6½in x 12½in (Border 1) From each of black on white print fabric #2 and white on black print fabric #2, cut: five strips, 1½in x width of fabric. Cross cut them to yield 12 strips, 1½in x 8½in and 12 strips, 1½in x 6½in of each fabric (Log Cabin blocks) From each of black on white print fabric #3 and white on black print fabric #3, cut: six strips, 1½in x width of fabric. Cross cut them to yield 12 strips, 1½in x 10½in and 12 strips, 1½in x 8½in of each fabric (Log Cabin blocks) From each of black on white print fabric #4 and white on black print fabric #4, cut: seven strips, 1½in x width of fabric. Cross cut them to yield 12 strips, 1½in x 10½in and 12 strips, 1½in x 12½in of each fabric (Log Cabin blocks) From white on black print fabric #1, cut: four strips, 6½in x width of fabric. Trim each of them to measure 6½in x 24½in (Border 2) another eight strips, 6½in x width of fabric (Border 6)
Large blocks
1
Place stabiliser and interfacing into your embroidery hoop. Fold a 12in square of white fabric in half horizontally and vertically and finger press creases to mark its centre. Line up these creases with the marks on the hoop to centre the fabric on top of the interfacing. Select the Dancing Daisies — Group of 7 in 9in design (or 7in design if you’re using that size). Add a basting stitch. If you are using an embroidery machine that can stitch out a background fill stitch, follow the manufacturer’s instructions to add this feature around your designs. The
2
www.quilterscompanion.wordpress.com
15
finished area for the background fill is 10in square. If your machine does not have this function, you can add quilting to the block background later on. Work on one flower at a time. Begin by stitching out a placement line. Once this is done, remove the hoop from the machine. Peel the backing paper off the appliqué shape and fuse it to the fabric on top of the sewn line. Place the hoop back into the machine and continue with the stitching: the next round is a securing stitch to hold the fabric in place. It is followed by satin stitch to finish the outside edges of the daisy. Finally, the stamen and centre of the flower are stitched in black. Repeat this process to appliqué and stitch the flowers in a mix of fabrics. Then repeat Steps 3 and 4 to make five large blocks all the same. Trim them to measure 10½in square, keeping the design centred. Fold the 1in strip of yellow print fabric in half, wrong sides together and long edges matching. Press. Cross cut it to yield four folded strips, each 10½in long. Pin two folded strips to opposite edges of one large block, raw edges matching. Stitch them in place using a scant ¼in seam. Then pin the remaining two folded strips to the other two raw edges and stitch them in place in the same way. This is the centre block. Repeat Steps 6 and 7 using the four 1in strips of black tone-on-tone print fabric to sew peeper strips to the remaining four large blocks. Now add a frame to each large block. For the centre block, sew a 1½in x 10½in strip of black print fabric to the left and right edges of the block. Press seams outwards. Then sew a 1½in x 12½in strip of black print fabric to the top and bottom edges of the block. Press seams outwards. Your block should now measure 12½in square from raw edge to raw edge. Repeat Step 9 to add frames to the remaining four blocks, but this time use the 10½in and 12½in strips of yellow print fabric.
3 4 5 6 7 8
9 10 11
Small blocks
1
Repeat the steps for making a large block using the 8in squares of white fabric and the Single Daisy 9in design (or 7in if you’re using that size). The background fill stitch area is 6in square. Make 20 blocks in total using a variety of white and yellow and yellow print fabrics for the appliqué. Once the stitching has been completed, trim each block to measure 6½in square, keeping the designs centred.
2 3
Borders 1–3
1 2
Sew a 6½in x 12½in strip of black on white print fabric #1 to the left and right edges of the framed centre block. Press seams outwards. Sew a small appliquéd/embroidered block to each end of the remaining two 6½in x 12½in strips of black on white print fabric #1. Check that all the daisies will be the right way up, then sew these strips to the top and bottom edges of the framed centre block. Press seams outwards.
16
Your quilt top should now measure 24½in square from raw edge to raw edge. Sew a 6½in x 24½in strip of white on black print fabric #1 to the left and right edges of the quilt top. Press seams outwards. Sew a small appliquéd/embroidered block to each end of the remaining two 6½in x 24½in strips of white on black print fabric #1, again checking the orientation of the daisies before stitching these seams. Sew these strips to the top and bottom edges of the quilt top. Press seams outwards. Your quilt top should now measure 36½in square from raw edge to raw edge. Trim two 1½in strips of black tone-on-tone print fabric to measure 1½in x 36½in. Sew them to the left and right edges of the quilt top. Press seams outwards. Trim another two 1½in strips of black tone-on-tone print fabric to measure 1½in x 38½in. Sew them to the top and bottom edges of the quilt top. Press seams outwards. Your quilt top should now measure 38½in square from raw edge to raw edge.
3 4 5 6
Log Cabin blocks
1
To make a Log Cabin block, begin by sewing a 1½in x 6½in strip of black on white print fabric #2 and of white on black print fabric #2 to the top and bottom edges
of a small appliquéd/embroidered block. Press these and all subsequent seams outwards. Next, sew a 1½in x 8½in of black on white print fabric #2 and of white on black print fabric #2 to the left and right edges of the block. Your block should now measure 8½in square from raw edge to raw edge. See Diagram 1. Repeat the process described in Steps 1 and 2 to add the shorter strips, and then the longer strips, of print fabrics #3 to the block. The block should then measure 10½in square from raw edge to raw edge. See Diagram 2. Repeat the process described in Steps 1 and 2 to add the shorter strips, and then the longer strips, of print fabrics #4 to the block. The block should then measure 12½in square from raw edge to raw edge. Refer to Diagram 3. Before making more Log Cabin blocks, study the photo of Zoe’s quilt: there is a group of three Log Cabin blocks in each corner of the quilt. In order to have the appliquéd/embroidered daisy in all three blocks in each corner facing the right way up in the quilt, you need to orient the block differently before you start adding strips to its edges. Diagram 4 illustrates the different position of the strips using a centre image that is more obviously directional than the embroidered daisy. Make three of each kind of block.
2 3
Diagram 1
4 5
Diagram 2
Border 4
1
Lay out the remaining four large Daisy blocks and the Log Cabin blocks around the edges of the quilt top, referring to the photo of the quilt as a guide. Double check the orientation of the blocks: all the Daisies should be facing the same way and the Log Cabin blocks should create a large white area near the corners of Border 3. From three of the remaining 1½in black tone-on-tone print strips, cut eight strips, 12½in. Add two of these strips to each row or column of blocks, positioning them between the corner block and the adjacent Log Cabin block. Sew the black strips, Log Cabin blocks and the large Daisy block along the left edge of the quilt top together in a column. Sew it to the left edge of the quilt top. Press the seam inwards. Repeat to add the blocks adjacent to the right edge of the quilt top. Sew the black strips, Log Cabin blocks and the large Daisy block along the top and bottom edges together in two rows, then sew them to the top and bottom edges of the quilt top. Press seams inwards.
2
Diagram 3
3 4
Borders 5 and 6
1 2
Join the remaining eight 1½in strips of black tone-on-tone print fabric together, end to end, in pairs to make four long strips. Measure your quilt top vertically through the centre. Trim two of the long strips to this measurement. Sew them to the left and right edges of the quilt top. Press seams outwards. Measure your quilt top horizontally through the centre. Trim the remaining two long strips to this measurement. Sew them to the top and bottom edges of the quilt top. Press seams outwards.
3
Diagram 4
www.quilterscompanion.wordpress.com
17
4
Repeat Steps 1–3 with the 6½in strips of white on black print fabric #1 to add Border 6.
Finishing
1 2
Cut the backing fabric into two equal lengths, remove the selvedges and sew the two pieces together, side by side, with a ½in seam. Press the seam open. The quilt top, backing and batting are ready for a longarm quilting machine as they are. If you’re quilting by hand or on a domestic machine, follow the instructions for Preparing the Quilt Sandwich in the free downloadable Basics Guide* to pin or baste the quilt top, batting and backing together. Quilt as desired. This quilt was machine quilted: the daisies were outlined and all the patchwork was stitched in the ditch. Parallel straight lines were worked on Border 6. Trim the excess backing fabric and batting ¼in outside the edge of the quilt top. Follow the instructions in Binding the Quilt in The Basics Guide* to bind the quilt using the eight 2½in strips of black tone-on-tone print fabric.
3 4 5
18
The Dancing Daisies machine embroidery collection has been designed by Zoe Clifton for Bellarine Sewing Centre. To purchase, phone (03) 5221 3034 or email bellarinesewingcentre@outlook.com The Dancing Daisies collection includes 15 daisy designs in satin stitch, in-hoop appliqué and chain stitch. Included in the download are the fcm and svg cutting files for cutting machines. Also included is a template page for those who do not have a cutting machine, to enable you to trace the designs onto fusible web.
* The Basics Guide is available as a free download online from www.cosyproject.com/blog/quilting-guide
HOME USERS
Ricoma EM-1010
Ricoma’s affordable machines are excellent for personal use by embroidery enthusiast and hobbyists alike. Complete your embroidery projects in no time.
START UPS With everything you need to start your business included with the machine, you will be up and running in no time.
Add an extra machine to your current lineup or let us help pick the right setup with a range of multi-head machines.
sales@dewdropinn.com.au | 07 4124 9320 | www.dewdropinn.com.au
Ricoma RCM-1501TC-7S
ESTABLISHED BUSINESSES
Stella Star UNICORN
Holly Nash We all know that finding unicorns is near to impossible, so why not make your own? This fabulous mystical unicorn is made in the hoop. Just download your FREE embroidery design and get stitching!
20
21
FREE DESIGN DOWNLOAD
Finished size: 16.5cm (long) x 16.5cm (tall) x 7cm (across) (6½in x 6½in x 2¾in)
Materials 25cm (10in) square of dark pink print fabric (outer legs) 25cm (10in) square of purple print fabric (inner legs) 25cm (10in) square of orange print fabric (hooves) Fat eighth pale teal print fabric (lower body) 25cm (10in) square of blue print fabric (upper body) 25cm (10in) square of peach print fabric (ears) Two,10cm (4in) squares plain white fabric (wings) Machine embroidery threads: Holly has used Sulky Rayon 40w – choose any colours you would like to use Tear-away stabiliser Cut-away stabiliser 13cm x 18cm (5in x 7in) hoop 10cm (4in) hoop (optional) Tape
22
Mohair Boucle Thread (mane and tail) Strong yarn (Perle 5) and a doll needle Four star buttons, about 10mm (3⁄8in) across Rotary cutter, ruler and mat Sewing/embroidery machine Sewing machine General sewing supplies Paper towel Water container Note: The embroidery design files needed for this project can be downloaded free from https://swpea. com/products/star-queen-the-unicorn-stuffed-toy-5x7and-6x10. Use the code: ausmagunicorn. The project is available for a 13cm x 18cm (5in x 7in) hoop and a 15cm x 25cm (6in x 10in) hoop. The instructions following are for using the 13cm x 18cm (5in x 7in) hoop.
Preparation and cutting
1
Download the files needed for this project from https:// swpea.com/products/star-queen-the-unicorn-stuffedtoy-5x7-and-6x10 – see FREE DOWNLOAD information on previous page From the dark pink print fabric, cut: one rectangle, 6in x 7in (outer legs) From the purple print fabric, cut: one rectangle, 9in x 7in (inner legs) From the orange print fabric, cut: two rectangles, 2½in x 7in (hooves) From the blue print fabric, cut: two rectangles, 4in x 9in (upper body) From the pale teal print fabric, cut: two rectangles, 6in x 9in (lower body) From the peach print fabric, cut: two squares, 4in (ears)
Mane – Step 2
Ears – Step 3
Tail and mane
1 2 3
To make the mane, cut 16 lengths of boucle yarn about 12in long. Create eight bundles of two lengths each for the mane. Fold the lengths in each bundle in half and tape the ends together. To make the tail, cut eight lengths of the boucle yarn, each about 15in long. Bundle all the lengths together, fold them in half and tape the ends together.
Ears – Step 4
Ears
1 2 3 4
Place stabiliser in your hoop and stitch the placement lines for the ears onto it. Place one of the 4in squares of peach print fabric right side facing up on top of the hoop covering the placement lines. Stitch it down. Place the second 4in square of peach print fabric right side down on top of the first square, covering the stitching. Stitch it down with triple stitch. Remove the fabric and stabiliser from the hoop. Remove any stabiliser from the ears. Cut out the ears ¼in outside the stitching and ¾in below the open straight edge. Clip the seam allowance around the curves and at the point. Turn the ears right side out using a chopstick.
Legs
Legs – Step 3
1 2 3
Place stabiliser in your hoop and stitch the placement lines for the outer legs onto it. Place one of the 6in x 7in rectangles of dark pink print fabric right side facing up on top of the hoop covering the placement lines. Stitch it down. Place a 2½in x 7in rectangle of orange print fabric, right side down on the dark pink fabric with one of its long edges lying ¼in above the top line of stitching on the dark pink fabric. Stitch the fabric down. Flip the orange fabric so that it is right side facing up and stitch it down. Repeat Steps 3 and 4 to stitch an orange print rectangle at the bottom of the hoop. Embroider four stars on the dark pink fabric close to the seam lines with the orange fabric.
4 5 6
Legs – Step 4
www.quilterscompanion.wordpress.com
23
7
Lay the rectangle of purple print fabric on top of the hoop, right side facing down. Stitch around the legs using triple stitch – there will be a gap left in each leg for turning them right side out later. Remove the fabric and stabiliser from the hoop. Remove any stabiliser from the legs. Cut out the legs ¼in outside the stitching. Clip the seam allowance around the curves. Turn each leg right side out through the opening using a chopstick. Stuff the legs firmly. Turn the raw edges at the openings in and ladder stitch them closed by hand using thread to match the fabric.
8 9
Horn
1 2
Place two layers of washaway stabiliser in the hoop – you can use a 4in square hoop if you have one. Refer to the photo to follow the embroidery steps – the numbers correspond to the step number. For each step, use the same thread in the bobbin as in the top of your machine as it will be seen – that is, you need to change your bobbin thread every time you change thread colours in the top of the machine. After stitching each step, turn the hoop over and trim any long threads. Remove the stabiliser from the hoop. Trim the excess and any remaining loose threads on the back. Dissolve the rest of the stabiliser in water, following the manufacturer’s instructions. Leave the horn to dry.
Legs – Step 6
3
Wings
1 2 3
Place two layers of washaway stabiliser in the hoop – you can use a 4in square hoop if you have one. Stitch the placement lines for the wings. Place one of the 4in white squares over the placement lines on the stabiliser, wrong side facing up, then place the other 4in square right side facing up. Stitch them down. Remove the hoop from the machine and trim the fabrics about 1mm–2mm (¹/16in) outside the stitching. Trim one layer of fabric at a time – it’s easier and more accurate than trying to trim two layers at once. Embroider the satin stitch around the wing, using the same colour thread in the bobbin as in the top of your machine. Remove the stabiliser from the hoop. Trim the excess fabric and any remaining loose threads on the back. Dissolve the rest of the stabiliser in water, following the manufacturer’s instructions. Leave the wings to dry.
4 5
Legs – Step 7
Horn – Step 2
Horn – Step 3
Body
1 2
Hoop cutaway stabiliser in the hoop. Stitch the placement line for the top of the body. Place a 4in x 9in rectangle of blue print fabric, right side facing up, on top of the placement line and stitch it down. Remove the hoop from the machine and trim the fabric 1mm–2mm (¹/16in) outside the stitching. Don’t trim the fabric in the seams. Stitch the placement line for the ears.
3 4
Fold each ear in half and stay stitch the fold in place on a sewing machine.
24
Wings – Step 2
Wings – Step 3
5
Place an ear on the placement line with the raw edge pointing towards the top right. Make sure the ear doesn’t fall over the top of the outside border line – it must be within the panel. Tape the raw edge in place, then stitch the ear down with your machine set at a low stitch speed. Remove the tape and trim the excess fabric about 2mm–3mm (¹/16in) outside the stitching. Stitch the placement line for the wing. Place the wing on top of the placement line with the raw edge pointing towards the bottom right and with the satin stitches around the wing crossing over the placement line by about 2mm (¹/16in). Tape it in place. Stitch the wing down with your machine set at a low stitch speed. Remove the tape. Check that the stitch-down line is covering the satin stitches around the wing. Remove the hoop from the machine and trim the excess wing fabric about 2mm–3mm (¹/16in) outside the stitching. Tape over the raw edges of the ear and wing so they don’t get in the way. Tape the top of the wing out of the way as well. Stitch the placement line for the bottom half of the body. Place a 6in x 9in rectangle of pale teal fabric on top of the hoop, right side facing up, and stitch it down. Remove the hoop from the machine and trim the fabric about 1mm–2 mm (¹/16in) outside the stitching. Don’t trim the fabric in the seams and be careful not to cut into the ear and wing. Remove any tape. Embroider the satin stitch along the body, taping the wing out of the way if necessary. Embroider the eye: begin with the white, and then embroider the iris, the pupil and sections around the eye and finally the star shines in the eyes. Embroider the three stars. Remove the fabric from the hoop and set it aside. Repeat Steps 1–13 to make the other side of the body.
6 7
Body – Step 11
8
9 10 11 12 13 14 15 16
Body – Step 12 Mane
Horn Tail
Fold the wings and ears down so they lie over the lower body and tape them down to ensure that they don’t get caught in the seams in the next steps. Stitch the placement lines for the body, horn, mane and tail, referring to Diagram 1 below. Diagram 1
17
Place the tail between the two tabs, with the taped ends lying just across the placement line and the bundle of yarn on top of what will be the unicorn’s body. Make sure that all of the tail is within the panel border stitching. Tape the tail in place. Repeat Step 17 with the horn. Then repeat Step 17 with the mane, spreading the taped bundles evenly across the area. Make sure that all of the yarn is within the panel border stitching (the ends with the tape can be over this stitching though). Stitch the tail, horn and mane down, with your machine set on a low stitch speed. You may also need to adjust the height of the foot as you approach the yarn. Leave the second side of the body in the hoop.
18 19 Body – Step 7
www.quilterscompanion.wordpress.com
25
Body – Step 13 Assembly – Step 9
Assembly – Step 2
Assembly
1
Tape down the ear and wing on the first body side. Remove some of the tape from the second body side (still in the hoop) and check that everything is sewn down correctly. Try your best to not have the tape covering the satin stitch line as this is what you will be using to align the two sides of the body. Place the first body side, wrong side up, on top of the second body side, aligning the satin stitches and border corners. Pin in place. Stitch the fabric down with your machine set on the slowest speed; take it slowly and stop the machine before you get to any pins and remove them carefully. The machine will leave an opening for turning. Then stitch the triple stitch to strengthen the seams. Note that there will be one more step after the triple stitch. DO NOT stitch this step: just remove the hoop from the machine and skip this step. Cut out the unicorn ¼in outside the stitching, except at the opening, where you should cut ½in outside. Clip the seam allowance around the curves. Turn the body out the right way with a chopstick. Unpick any placement line stitching you can see. Iron the unicorn.
2 3 4 5 6 26
Assembly – Step 10
7
Stuff the unicorn firmly and hand sew the opening closed. Cut through the loops of the mane and the tail, checking that the yarns are even. If you wish the mane or tail to be shorter, just trim them. Lightly mark the unicorn where you would like to position the centre of each thigh. Cut a long length of strong yarn; thread it on the doll needle and knot the ends together. Starting with the front legs, push the needle through one side of the unicorn’s body at the mark you made. Go right through the body and out the other side at the matching location. Push the needle through the inner leg of the front leg and then through your button. Then go back through the button, the leg and the body to the side where you started. Attach the second leg by going through it with the needle and adding the button. Push the needle and thread back through the body and legs several times until you feel that both legs are securely attached to the body. When you come out of the body the last time, tie off your thread on an inner leg so it is not seen. Repeat Steps 9 and 10 to attach the back legs.
8 9
10 11
®
machine embroidery thread
Vibrant, lustrous threads helping you create beautiful embroidery
How you benefit: 3 High quality threads at very competitive prices. 3 Trusted brand used by home and commercial embroiderers around the world. 3 Fantastic range of 377 silky, rich rayon colours; 306 polyester colours, 24 metallics and 20 variegated and ombre shades. ‘Complete Range of Schmetz Needles’ 3 Colourfast – independently tested by the Australian Textile Testing company. 3 Baby-safe; contains no harmful substances – certified to stringent standards via Oeko-Tex Standard 100, Class 1. 3 Tough – extremely high tensile strength. 3 Considered by textile professionals to be one of the best quality threads for use in high-speed embroidery machines.
Our low wholesale prices – direct to the public: 1,000 metre cone - $ ª (incl. GST)
5,000 metre cone - $ ª (incl. GST)
www.marathonaustralia.com.au Fax: ª ª ME20-05-04
MARATHON AUSTRALIA Pty Ltd Aª&ORDª#RES ª4HORNBURYª6)#ª Ph: (03) 9417 2722 Mob: 0413 129 722 Email: sales@marathonaustralia.com.au
SPECIAL FEATURE:
EMBROIDERY ON
Towelling
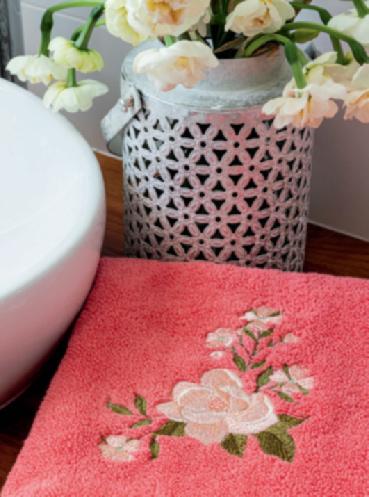
By Leanne Church Towels are one of the most popular items for embroidery. They make fantastic gifts, especially for those who have unusual names, as it’s possible to personalise something that brings a lot of joy to the receiver. If you would like to know more about this technique, here are a few things to consider and some tips and tricks to get great results when stitching on towelling. 28
Things to avoid when stitching on towels Not all designs are appropriate for towelling fabric. The majority of embroidery designs are created for lightweight woven fabric, not thick towelling. Designs with outlines may not line up due to the thickness of the towelling. If you are unsure of this, then maybe avoid this design and find an alternative without outlines. Buy a good-quality towel that won’t shrink, or is preshrunk. If you intend to stitch on the band, your design may not turn out the way you wanted after a few washes as the bands tend to shrink in the wash. If they are gifts or you are selling towels, then you don’t have the option of prewashing. Washing any garment warrants it as second-hand and you technically can’t sell it as a new product. Don’t use quilting designs unless you have a fabric appliqué background or a fill stitch patch at the back. Without a background, or underlay, the stitches will sink into the towelling pile and will not be very appealing. Inbuilt lettering on your machine is created for fabrics without texture. Do not use them for lettering on towelling as they do not have the correct underlay required for stitching on towelling. In fact, there is usually just a run/ travel stitch to each section of the letter and no underlay. Using wash-away stabiliser will not fix this — once it is washed the stabiliser is gone. Those pesky fibres will migrate through the satin stitches if there is an incorrect underlay or none at all. Therefore, you will need to create lettering that is suitable with embroidery software.
Marking the stabiliser in the hoop will allow you to line up the placement of the design. Calculate half of the vertical measurement and half of the horizontal measurement and then calculate the placement on the towel. Mark the towel with a pin and then align both centres. Place the towel on stabiliser that has been sprayed with a temporary adhesive spray such as 505.
Do you use tear-away or cut-away stabiliser on the back of the towel? Cut-away stabiliser is the better option for the back of the towel. It will hold its position and keep your embroidery looking great (even though you may think it doesn’t look good). Simply cut back the cut-away stabiliser very close to the design with a pair of curved appliqué scissors. Tear away is a paper-based stabiliser and once you wash it a few times, it will break down and your embroidery may start to waver. Whichever you use on the back, using water-soluble stabiliser on the top of the towelling will provide an even surface on which to embroider. It can be torn away at the end and, using a damp sponge, you can eliminate the excess. If you use tweezers to pull away the excess, be careful not to pull the towel fibres.
The water-soluble stabiliser should be machine basted prior to stitching out the design.
Where do I place my embroidery? This is a personal choice. If my towel doesn’t have a band, then I align the bottom of the embroidery 2in from the bottom edge of the towel. If there is a band on the towel, then I place it so the base of the embroidery is 1in from the top of the band. I usually print out a template on parchment paper and see what looks best before I begin. The placement will also depend on how you hang your towel on the towelling rail. If it is flat, the centre is fine. If
If you don’t hoop your water-soluble stabiliser in the hoop, you can hold it in place as the machine is stitching with a paintbrush. If you accidently stitch over it, you can easily pull the bristles out. Better than hitting a pair of tweezers or a finger and breaking a needle!
29
h
you fold it in half lengthways, I have the opening to the right. If the towels are for home, take into consideration where the towel rail is located in the bathroom. I make sure the folded towel opening is facing away from the doorway so the embroidery looks nice when you walk into the room.
What is underlay? The design or lettering should include a good underlay. The underlay is the stitching that you cannot see. It forms a base layer of stitching beneath the final design. It prepares your fabric for intricate designs. Underlay will also secure your stabiliser to the back of the fabric. If you do not have a good underlay, especially in lettering, after laundering the towel the water-soluble stabiliser will be gone, towel fibres will come through and your design will look terrible. Using a water-soluble plastic film on top of the towel will hold the fibres in place and allow for smooth stitching. Be aware that not all designs are appropriate for stitching on towelling — filled-in designs like this will create a design that will launder well. the hoop. It is recommended to use the machine’s basting stitch (if it has one) to stitch around the edge to help keep the towel in place as the design sews.
What size needle do I use? It is advisable to stitch lettering with a good underlay to hold the fibres and maintain a smooth design after laundering.
Why do I use a topping on my towel? The plastic-style topping, or Washaway, Solvy or water soluble as they are commonly known, is for holding the fibres down, allowing the design to run smoothly so the fibres don’t get caught in the foot of the machine. Your machine foot height should be only millimetres from the plastic base.
Floating a towel Sometimes it is not possible to hoop a towel because of its thickness, especially on a single-needle machine. If you do hoop a towel in a single-needle hoop you could break it when tightening the screw or it may pop out of the hoop during stitching. In this case it is recommended to use the floating method to stitch out the design. To do this, hoop either a cut-away or tear-away stabiliser (depending on your backing preference). Then draw a line down and across the stabiliser to find the centre of the hoop. Find and mark the centre of the area on the towel that you wish to embroider. Spray the hooped stabiliser with a light adhesive — such as 505 — avoiding the sides of the hoop as much as possible. Line up the drawn line on the stabiliser and the marking on the towel and lightly press the towelling onto
30
There are two needle sizes for embroidery — 75/11 and 90/14. If it is a high-density good-quality towel, I would use a 90/14, but it also depends on your design. Testing and getting to know your machine, fabrics and embroidery designs is a learning curve, and often trial and error is the best way to learn.
What are Knockdown, Smash stitch and Taoru stitch? These words are probably a bit foreign to most, but if you have embroidery software, these stitches are used to stitch out an open weave fill stitch that will hold down the fibres so that you have a flat surface area on which to stitch your embroidery. This means your embroidery will be able to stand out on the towel and not sink into the fibre. This is great for designs that you want to, or must, use but which need that extra background of stitching to make them stand out. You can create this effect with all embroidery software, but some are easier than others. You can use the same colour thread as the towel or sometimes it is nice to have a contrast colour. The Knockdown Stitch by Embrilliance software is a great automatic stitch that will add this feature to the design instantly and place it first in the stitching order. Hatch Software and Wilcom have a similar effect with a few extra steps, and they call this the Smash stitch. I have created this effect in Brother PE-Design, and I have coined the phrase ‘Taoru stitch’, which is the Japanese word for towel. If you would like more information on this, contact your local dealer or search these terms online. There are plenty of videos on YouTube to watch.
After laundering, if the design is narrow or you have no underlay or background stitch, fibres may appear to be coming through the design, making it unappealing. Use a thicker style of lettering to stop this from happening. The top embroidery shows lettering that has Knockdown, Smash or Taoru stitch under the design to hold the fibre down. The lettering at the bottom does not have Knockdown, Smash or Taoru stitch. As you can see by these two examples, you can get great results with either. The second design without the Knockdown, Smash or Taoru stitch will maintain its look as it is using a satin-fill stitch and not a true satin stitch. Wide satin stitch greater than 7mm should be a satin/satin fill so that the stitches will not pull if caught on fingernails, jewellery etc.
There are many ways to embroider a towel and we all have our own ideas on how to do it. Experiment to find what works for you. Float or hoop? Cut away or tear away? What design to use? When you find a method you are happy with, go for it. The worst you can do is muck up a towel and if you do, use that one for testing or cut it up for rags. It’s just a towel and not the end of the world. So if you haven’t embroidered a towel yet, give it a try. There will be someone in your life who will appreciate a personalised gift!
EMBROIDERY THREAD 3000 metres
EMBROIDERY
HEWARD SEWING MACHINES
02 9569 1268 happyembroidery.com.au
31
FREE DESIGN DOWNLOAD
Classy
CHRISTMAS The clever team at Melann’s Fabrics are sharing this Christmas project using the Zundt Design CD book, Christmas Traditions. These books are a popular choice when purchasing embroidery designs as they provide a fabulous range of patterns and projects to inspire you further, not just for Christmas.
Melann’s Fabric & Sewing Centre
32
www.melanns.com.au
melanns@bigpond.com
33
Finished size: 33cm x 45.5cm (13in x 18in)
Materials To make two placemats 45cm (½yd) white tone-on-tone print fabric 10cm (1⁄8yd) green print fabric (peeper border) 15cm (¼yd) solid bright red fabric (binding) 40cm (½yd) backing fabric Thin fusible batting at least 45cm x 102cm (18in x 40in) Tear-away stabiliser Zundt Design’s Christmas Traditions CD and book Machine embroidery design for the quilted frame — FREE DOWNLOAD see note 360mm x 200mm (14in x 8in) hoop Water-erasable fabric-marking pen
34
Machine embroidery threads; Robison-Anton rayon threads were used in this project Cream machine sewing thread Basting spray or quilter’s safety pins Rotary cutter, ruler and mat Sewing machine with ¼in foot General sewing supplies Note: Melann’s Fabrics and Sewing Centre is providing the Quilted Frame design for these placemats free of charge to all Machine Embroidery readers. The design was created by Bernadette Shears using Premiere Plus embroidery software. To download your free design, go to www.melanns.com. au.product-category/machine-embroidery-cds-and-books
Instructions for the Tree Skirt and the Wallhanging (next page) can be found on the Zundt Design's Christmas Traditions CD
Cutting and preparation From the white tone-on-tone print fabric and the fusible batting, cut: one strip, 14in x width of fabric/batting. Cross cut them to yield two rectangles, 14in x 19in From the green print fabric, cut: two strips, 1in x width of fabric From the solid bright red fabric, cut: two strips, 2in x width of fabric From the backing fabric, cut: one strip, 13in x width of fabric. Cross cut it to yield two rectangles, 13in x 18in Fuse the batting to the wrong side of the white fabric, ensuring a good bond. Download the pattern for the Quilted Frame from the Melann’s Fabrics and Sewing Centre website and print it out; when printing, select the ‘Actual size’ option in the Page size and handling section of the Print dialog box. Do
1 2
not select ‘Fit’ or ‘Shrink oversized pages’. Join the pattern pages together as required to give you a full-size pattern.
Machine embroidery
1
Fold the white fabric in half horizontally and vertically and make light marks at the folds to indicate the centre of each edge. Use an erasable fabric-marking pen to rule a horizontal and vertical line through the centre of the fabric. Place stabiliser in your hoop. Baste the pattern for the Quilted Frame in place, using the lines you’ve drawn to ensure that it is centred on the fabric. Remove the hoop from the machine. Carefully cut the tear-away stabiliser from behind the area inside the basting line. This will mean that your finished placemat is not as stiff as it otherwise would be. Return the hoop to the machine and follow the instructions to stitch the grid design.
2 3 4
www.quilterscompanion.wordpress.com
35
5
Remove the hoop from the machine and re-hoop it with stabiliser. Decide which design from the Zundt CD you’re going to use. Use the template to position the design over one edge of the grid, then stitch it out.
Finishing
1 2 3
Remove the excess tear-away from behind the fabric. Press. Trim the placemat to measure 13in x 18in, keeping the quilted grid centred. Fold the two 1in strips of green print fabric in half, wrong sides together and long edges matching. Press. Cross cut two strips, 13in long and two strips, 18in long. Pin the two folded 13in strips to the two short edges of the placemat, raw edges matching. Stitch them in place using a 1⁄8in seam. Then pin the two folded 18in strips to the two long raw edges and stitch them in place in the same way. Thread or spray baste the backing fabric to the back of the placemat, with the wrong side of the backing fabric facing the batting. Follow the instructions in Binding the Quilt in The Basics Guide* to bind the placemat using the 2in strips of bright red fabric. Follow all the steps in the Machine Embroidery and Finishing sections to make a second placemat.
4 5 6
* The Basics Guide is available as a free download online from www.cosyproject.com/blog/quilting-guide
36
e’s ne-stop d i a del ne o op!
A enui ng sh g wi se
@melannsfabrics
Sewing, Quilting and Machine Embroidery Our team is passionate about the latest trends in machine ĞŵďƌŽŝĚĞƌLJ͕ ƋƵŝůƟŶŐ͕ ĐůŽƚŚŝŶŐ ĂŶĚ ĐƌĞĂƟǀĞ ƐĞǁŝŶŐ͘ tĞ ƐƚƌŝǀĞ ƚŽ ŽīĞƌ ŽƵƌ ĐƵƐƚŽŵĞƌƐ ƋƵĂůŝƚLJ ƐĞǁŝŶŐ ŐŽŽĚƐ ĂŶĚ ĐƌĞĂƟǀĞ ƐĂŵƉůĞƐ ƐƟƚĐŚĞĚ ŝŶ ŶĞǁ ĨĂďƌŝĐƐ͘
Sewing, Stitching & Craft fair 2019
DĂĐŚŝŶĞ ĞŵďƌŽŝĚĞƌLJ ŝƐ Ă ƚƌĞĂƐƵƌĞĚ ĐƌĂŌ ŝŶ ŽƵƌ ƐŚŽƉ͘ Ɛ Ă ƌĞƐƵůƚ͕ ǁĞ ŚĂǀĞ ŵĂŶLJ ĞŵďƌŽŝĚĞƌLJ ƉƌŽĚƵĐƚƐ ƐƵĐŚ ĂƐ ƵŶĚƚ ĞƐŝŐŶ ĂŶĚ dƌĂĐĞLJ ^ŝŵƐ Ɛ͕ ZŽďŝƐŽŶ ŶƚŽŶ ĞŵďƌŽŝĚĞƌLJ ƚŚƌĞĂĚƐ͕ &ůŽƌŝĂŶŝ ƐƚĂďŝůŝƐĞƌƐ ĂŶĚ ƵŶĚƚ͛Ɛ ďĞĂƵƟĨƵů ŵĞƚĂůůŝĐ ƚŚƌĞĂĚƐ͘ KƵƌ ƐŚŽƉ ŝƐ ĚĞĐŽƌĂƚĞĚ ŝŶ ĐŽƵŶƚůĞƐƐ ŵĂĐŚŝŶĞ ĞŵďƌŽŝĚĞƌĞĚ ƐĂŵƉůĞƐ ĂŶĚ ǁĞ ĂƌĞ ĂůǁĂLJƐ ƉŽƐƟŶŐ ƚŽ &ĂĐĞŬ ĂŶĚ /ŶƐƚĂŐƌĂŵ ŽƵƌ ůĂƚĞƐƚ ŝĚĞĂƐ ĂŶĚ ĐƵƐƚŽŵĞƌ͛Ɛ ĐƌĞĂƟŽŶƐ͘ tĞ ƐƚŽĐŬ Ă ƌĂŶŐĞ ŽĨ ƋƵĂůŝƚLJ ĨĂďƌŝĐƐ Ͳ ůŝŶĞŶƐ͕ ĐŽƩŽŶƐ͕ ƉĂƚĐŚǁŽƌŬ͕ ƐƚƌĞƚĐŚ ĨĂďƌŝĐƐ ĂŶĚ Ă ǀĂƌŝĞƚLJ ŽĨ ƐŽůŝĚ ĂŶĚ ƉƌŝŶƚĞĚ ĐŽƩŽŶ ƐƚƌĞƚĐŚĞƐ ďLJ ^dK& &ĂďƌŝĐƐ ŽĨ ĞŶŵĂƌŬ͘ DĂŝů ŽƵƚ ŽƌĚĞƌƐ ĂƌĞ ĂŶ ŽƉƟŽŶ ĨŽƌ ŽƵƌ ŝŶƚĞƌƐƚĂƚĞ ĐƵƐƚŽŵĞƌƐ͘
Machine Embroidered lace bowls
ůĂƐƐĞƐ ĂƌĞ ĐŽŵŵŽŶ ĞǀĞƌLJĚĂLJ Ăƚ DĞůĂŶŶ͛Ɛ͕ ďĞŝŶŐ ƚĂƵŐŚƚ ďLJ ĞdžƉĞƌŝĞŶĐĞĚ ƐĞǁŝƐƚƐ ĂŶĚ ƚŚĞ ŽĐĐĂƐŝŽŶĂů ƐƉĞĐŝĂů ŐƵĞƐƚ͘ ^ƵŝƚĂďůĞ ĨŽƌ ŶŽǀŝĐĞ ƚŽ ĞdžƉĞƌŝĞŶĐĞĚ ƐĞǁĞƌƐ͕ ǁĞ ĂƌĞ ĐŽŶĮĚĞŶƚ LJŽƵ ǁŝůů ĮŶĚ Ă ĐůĂƐƐ ƚŽ Įƚ LJŽƵƌ ŶĞĞĚƐ͘ DĂĐŚŝŶĞ ƐĞƌǀŝĐŝŶŐ ĂŶĚ ƌĞƉĂŝƌƐ ŚĂƐ ďĞĞŶ ĂŶ ĂǀĂŝůĂďůĞ ƐĞƌǀŝĐĞ ĨŽƌ ƚŚĞ ƉĂƐƚ Ϯϱ LJĞĂƌƐ Ăƚ DĞůĂŶŶ͛Ɛ͘ ĨƵůů ƟŵĞ͕ ŽŶͲƐŝƚĞ ŵĞĐŚĂŶŝĐ ƉƌŽǀŝĚĞƐ Ă ƋƵŝĐŬ ƐĞƌǀŝĐĞ ƚŽ ĂďƐŽůƵƚĞůLJ Ez Z E ŽĨ ƐĞǁŝŶŐ ŵĂĐŚŝŶĞ ĂŶĚ ŽǀĞƌůŽĐŬĞƌ͘
KŶ ƚŚĞ ƚŽƉŝĐ ŽĨ ŵĂĐŚŝŶĞƐ͕ ǁĞ ƐƚŽĐŬ Ă ǁŝĚĞ ƌĂŶŐĞ ŽĨ ƐĞǁŝŶŐ ŵĂĐŚŝŶĞƐ ĂŶĚ ŽǀĞƌůŽĐŬĞƌƐ ĂŶĚ have been the Number 1 PFAFF dealer in Australia for many years! ƌĂŶĚƐ ƐƵĐŚ ĂƐ WĨĂī͕ ,ƵƐƋǀĂƌŶĂ͕ ĂďLJůŽĐŬ͕ :ƵŬŝ ĂŶĚ ^ŝŶŐĞƌ ŚĂǀĞ ƐŚŽǁŶ ĐŽŶƐŝƐƚĞŶƚ ƋƵĂůŝƚLJ͕ ŵĂŬŝŶŐ ŽƵƌ ƚĞĂŵ ĐŽŶĮĚĞŶƚ ŝŶ ƚŚĞ ŵĂĐŚŝŶĞƐ ǁĞ ƐĞůů͘ tĞ ĂůƐŽ ŽīĞƌ ĨƌĞĞ ĚĞŵŽƐ͕ ĨƌĞĞ ůĞƐƐŽŶƐ ĂŶĚ Ă ĨƌĞĞ ƐĞƌǀŝĐĞ Ăƚ ϭϮ ŵŽŶƚŚƐ ŽŶ Ăůů ƉƵƌĐŚĂƐĞƐ ŽĨ ŵĂĐŚŝŶĞƐ͘ &Z ^,/WW/E' ŝƐ ĂůƐŽ Ă ƉŽƐŝƟǀĞ ĨŽƌ ƉƵƌĐŚĂƐŝŶŐ ŵĂĐŚŝŶĞƐ ŽŶůŝŶĞ ŽƵƌ ǁĞďƐŝƚĞ͘ Kit available!
Our mechanics
The team at Melann’s care equally for every sewing project, whether it’s for functionality or creative hobby.
We hope to see you soon!
850 Lower North East Road, Dernancourt SA 5075 |
Monday to Friday 9am - 5pm |
[08] 8337 7548 | www.melanns.com.au
Saturday 9am - 12:30pm
38
B O O K N OW !
EMBROIDERY CLASSES AVAILABLE
WE STOCK ROBSON ANTON, JANOME, BROTHER, KINGSTAR EMBROIDERY THREADS AND A FULL RANGE OF STABILIZERS
Phone: 02 6552 2092 Email: info@countrypickins.com.au Address: 29 Pulteney St, Taree NSW 2430
www.countrypickins.com.au
How to choose your next machine Just like planning a trip, choosing your next embroidery machine is easiest when you know where you want to go next. Ready to get creative? Imagine the convenience of creating your own designs without having to learn software. Looking to make money from home? You can’t beat the productivity and versatility of a multi-needle machine. Or perhaps you’ve outgrown your current hoop space – there are machines for that too.
When you’re ready to take the next step in your embroidery, Brother has an embroidery machine to get you there. You can count on Brother for value, reliability, ease of use and game-changing technology.
The latest Brother machines are made for all sorts of embroidery adventures, to find out more talk to a Brother dealer today.
START
UP YOUR
HOOP
SIMPLE
NEW Essence VE2300 Embroidery Machine
Innov-is NV180D Sewing and Embroidery Machine
8 x 12” embroidery area. 318 built-in designs, 17 fonts. Droplight positioning maker. Includes 300 x 200mm, 180 x 130mm embroidery hoops.
4 x 4” embroidery area. Compact sewing and embroidery machine. Easy to use. On-screen letter editing, resizing, rotating and combining designs.
pRECISION POSITIONING
GO PRO
NEW Stellaire XE1 Embroidery Machine
9.5 x 14” embroidery area. My Design Centre editing features for making your own designs. Plus view your design position before you stitch.
PR670E 6 Needle Embroidery Machine
BEST VALUE
Innov-is NV800E Embroidery Machine 6 x 10” embroidery area. 138 built-in designs, 11 fonts. On-screen editing. Easy slide on hoops & LCD colour display.
Six needles for increased productivity compared to singleneedle machines. Cylinder arm. On-screen editing. 10.1” LCD touch screen display.
Find your next embroidery adventure at your local Brother dealer today: QLD Tablelands Sewing Centre - Atherton 07 4091 2133 B&R Cribbens Sewing Machines - Ipswich 07 3281 6950 CQ Sewing & Patchwork - North Rockhampton 07 4926 5004 Mackay Sewing and Craft Centre - Mackay 07 49577706 Echidna Sewing (Townsville) - Currajong 07 47716255 Echidna Sewing - Capalaba 07 3390 3600 Echidna Sewing - Mooloolaba 07 5302 6944 Sherlock Holmes Sewing Machines - Chermside 07 3359 6000 Patchwork On Pallas - Maryborough 07 4121 2480 Pleasuresew - Capalaba 07 3245 5303 River City Sewing Machine Centre - Tingalpa 07 3393 5575 Morgan Sewing Machines - Pialba 07 4124 4420 Peter Taylor Sewing Centre 07 49824 982 Sew Patch ‘N Quilt - Gladstone 07 4978 7772 Sherlock Holmes Sewing Machines - Boondall 07 3865 8505 Sewers Delight - Browns Plains 07 3806 9600
The Sewing Wave - Burleigh Heads 07 5520 3288
Eastern Suburbs Sewing Centre - Kingsford 02 9663 2258
Janome Sewing Centre - Everton Park 07 3355 5522
Eastlands Sewing Centre - Lismore 02 6621 7736
Sew Handy - Toowoomba 07 4632 1257
Fortunes And Fairies - Richmond 02 4578 1650
Early May Emporium - Albany Creek 07 3325 4580
Hanging By A Thread - Macksville 02 5509 1664
Quirky Quilts - Springwood 07 3386 0784
Hidden Talent 02 6362 0011
Somethings Country - Kingaroy 07 4162 2040
Hobbysew - Hornsby 02 9477 5885
Quilt Craft - Toowoomba 07 4633 7639 Mike’s Sewing Machine Repairs - Morayfield 07 5359 7177
Hobbysew - Erina 02 4365 1127 Hobbysew - Figtree 02 4229 8188
Sewmasters Service and Support Centre Riverhills 07 31080043
Hobbysew - Belconnen 02 6253 0011
Queensland Sewing Machines - Loganholme 07 32096999
Hobbysew - Kings Park 02 9621 4000
NSW
Hobbysew - Penrith 02 4731 3061
All About Sewing - Wyong 02 4393 2200 Allcraft Sewing Machines Tweed Heads South 07 5524 4697 Bobbin and Ink - Petersham 02 79012581 Cobar Quilt Shop - Cobar 02 6836 3606 Country Pickins - Taree 02 6552 2092 Dubbo Sewing Machines And Patchwork Dubbo 02 6884 3640 Dulwich Hill Sewing Centre - Dulwich Hill 02 9569 2845
Hobbysew - Ryde 02 9877 5067 My Sewing Supplies - Sylvania 02 9522 2340 Nesting Needles - Coramba 0400 055 989 Sew Many Stitches - Campbelltown 02 4628 4437 Statewide Sewing Centre - Albury 02 6041 2027 Stitches and Art - Nelsons Bay 0419429040
Synergy Sewing - Dapto 02 4261 6811
Ringwood Sewing Centre 03 5176 2188
Blackmore & Roy - Bentley 08 9451 2727
The Quilting Patch - South Nowra 02 4423 3352
Pats Centre - Traralgon 03 5176 2188
Carols Of Midland - Midvale 08 9250 2772
Thimbles and Threads - Denman 0429 451 024
Sew Fix Sewing Machine Repairs- Seaford 0406 195 945
Cockburn Sewing Centre - Cockburn Central 08 9417 3444 or 9417 4555
Vera’s Machine Centre - Fairy Meadow 02 4284 5811
Sewing Connection - Pakenham 03 5941 2244
Create And See - Esperance 08 9071 6010
ACT
Sewing Machine City - Bayswater 03 9720 2905
Kraft Daze Sewing World - Maddington 08 9459 7843
Shepparton Sewing Centre - Shepparton 03 5821 2000
Kraft Daze Sewing World - Booragoon 08 6180 5224
Statewide Sewing Centre - Greenborough 03 9435 5330
Sew Connected - Mandurah 08 9534 7188
Statewide Sewing Centre - Ballarat 03 5333 2877
Threadneedle Design Studio - Mandurah 08 9535 8500
Statewide Sewing Centre - Coburg 03 9354 1936
Trish Lang’s Sewing Centre - Bunbury 08 9792 4111
Canberra Sewing - Phillip 02 6281 0342 Sewing Machine Doctor - Belconnen 02 6251 4349 VIC Bayside Sewing - Cheltenham 03 9584 3955 Bellarine Sewing Centre - Geelong 03 5221 3034 Camberwell Sewing Centre - Camberwell 03 98827673 Catharina’s Vintage Stitches - Camberwell 03 5852 3356 Echidna Sewing - Glen Waverley 03 9561 9643 Embroidery Source - Fairfield 1800 137 670 Moonee Ponds Sewing - Moonee Ponds 03 9370 8695
Statewide Sewing Superstore - Bendigo 03 5441 2553 Wm. C. Jackson - Camberwell 03 9417 3131
SA Creatively Sewn - Mount Gambier 08 8725 4933
TAS
Kadina Craft and Sewing Centre - Kadina 08 8821 3738
Easy Sew - Hobart 03 6234 5616
Kornacraft - Gawler 08 8522 3246
Stewart’s Sewing Machine Centre - Devonport 03 6424 5440
Sew Focus 08 7120 6788
WA Bestway Sewing Centre - Willetton 08 9354 4142
Sue’s Sewing World - Rostrevor 08 8365 1005
EMBROIDERY
Toucan2
Wi-Fi Embroidery App with a
Galaxy G l tablet t bl t
STORE, SEARCH & SEND EMBROIDERY DESIGNS TO YOUR BROTHER MACHINE PERFECT FOR BROTHER’S EXCLUSIVE MY DESIGN SNAP MOBILE APP 1700+ EMBROIDERY DESIGNS INCLUDED FROM
RECEIVE TOUCAN 2 FREE WITH SELECTED NEW BROTHER EMBROIDERY MACHINES* Browse all your embroidery designs and easily add/import new designs
''6 ;8!$0 3( @3<8 ;,8'!& 9;!9, !2& create a thread shopping list
'!8$, #@ )£' 2!1'T ,336 9-A'T 9ধ;$, ধ1' 38 !99-+2'& 0'@>38&9
Send designs directly to your Brother machine via Wi-Fi** or USB pp 316!ࣅ#¡' >-;, -d - '2!#¡'& 83;,'8 '1#83-&'8@ 1!$,-2'9
1800 000 360
echidnasewing.com.au
Send an image to the machine with the MY DES IGN S NAP mobile app { ;'££!-8' >-££ $32='8; -; -2;3 9ধ;$,'9 >-;, -;9 #<-£;f-2 M Y D E S I G N C E N T R E
Stellaire Innov-is XE1
Echidna’s Exclusive Package Includes:
Embroidery-only machine
• Wi-Fi enabled • Huge 240mm x 360mm (9.5” x 14”) embroidery area • Large 10.1” HD LCD touch screen display • 727 built-in embroidery designs • Built-in tutorial videos
• Brother Stellaire XE1 embroidery-only machine, valued at $8,999 • Toucan 2 embroidery app with Samsung Galaxy Tab, valued at $799 j 3,2 ''8Z9 1#83-&'8@ '+!$@ [ £ধ1!;' 3££'$ধ32 2” Design Set, valued at $599
PLUS select $1,000 worth of bonus products!
Looking for sewing and embroidery?
Brother Stellaire XE1
$8,999
The Brother Stellaire XJ1 sewing and embroidery $31#-2!ধ32 1!$,-2' -9 !£93 !=!-£!#£' >-;, ;,-9 '?$£<9-=' 6!$0!+' !; T W
bonus value
$2,400
p ø'8 '2&9 !@ 38 >,-¡' 9;3$09 ¡!9;U 2$¡<&'& #32<9'9 !8' 9<#/'$; ;3 $,!2+'U
1800 000 360
echidnasewing.com.au
STEPPING OUT
with Melba
Leesa Chandler The inspiration for the Melba fabric range comes from the 1920s, an age of elegance, class and style. Elements of the designs come from architecture, interior design and textiles from this era. Paired with a contrasting fabric and a black strap, this bag makes quite the statement with its matching stitched-out embroidery.
The Textile Pantry
46
www.thetextilepantry.com
info@thetextilepantry.com
FREE DESIGN DOWNLOAD
47
Materials Embroidery Design: Single Gumnut FREE download — see note 70cm (¾yd) black fabric (front flap, back pocket, strap) 1.10m (1¼yd) contrast fabric (gusset inner and outer) 60cm (¾yd) Melba floral print — Black/Orange (bag front, bag back) Best Press spray starch Cutaway stabiliser — medium-weight Pressing mat
Strap From the black fabric, cut: two 6in strips across the width of the fabric Trim off the selvedge at each end and join the strips end to end to make an 80in strip. Press the strip in half lengthways, wrong sides together.
1 2 3 4 5
Open the strip so it’s flat on the ironing board wrong side up, then fold and press each long raw edge into the centre, using the pressed centre line from Step 3 as a guide. Then press the strip in half again — it is now four thicknesses and approximately 1½in wide. Using black cotton thread, top stitch 1⁄8in from the edge along both long sides. Set aside for later.
48
Paper (to make patterns) Light-weight fusible batting Hoop Transparent parchment (to print embroidery template) Sewing machine and general supplies Scissors Rotary cutter, mat and ruler Note: The Single Gumnut embroidery design, and the Melba by Leesa Chandler fabric range are available from www.thetextilepantry.com
Back pocket and front flap embroideries
1 2 3 4
Trace the patterns for the back pocket and the front flap from the Pattern Sheet onto paper, and cut them out. Pin the patterns to the black fabric, and cut around the shapes, allowing enough excess to hoop the fabric in preparation for the embroidery. Press the fabric using Best Press and steam to slightly shrink the fabric. This helps stabilise the fabric and can help reduce puckering. Mark the design placement by referring to the patterns: for the back pocket, the centre position is 3in from the base of the pattern piece. The front flap design placement is 3in
Free Download Download your FREE Single Gumnut design from www.thetextilepantry.com
from the base of the pattern. If you have a hoop big enough to stitch both designs at once, stitch them in position with a medium-weight cutaway stabiliser at the back. If you do not have a hoop that is big enough to stitch both designs at once, print the single design twice onto transparent parchment paper and tape them together: — for the front flap, cross over the two single designs in the centre so it measures 8in across. — for the back pocket, allow 3⁄8in between the two single designs, with the flowers facing each other — the design size should measure 97⁄8in. Use the grid lines to marry up the patterns. Mark the first design and stitch it with a medium-weight cutaway stabiliser on the back. Remove the stitched design, place it face down on the pressing mat and press it with an iron, before rehooping. Place the pattern back over the embroidered design and make sure the design lines up. Stitch the second design. When you have finished stitching, cut back the cutaway stabiliser and place it, embroidery-side down, on a pressing mat. Press with a dry iron. If you find you have any puckering, you can spray it with Best Press spray starch and give it a light steam with the iron.
5
6 7 8 9
Outer and lining gusset
1 2
Trace the side gusset pattern from the Pattern Sheet onto paper and cut it out. From the contrast fabric, cut: two 5in strips across the width of the fabric (outer and inner gusset) If you are using a directional print, you will need to cut the strip in half, turn one piece around and then join it with the design facing outwards in each direction.) Fold the strip in half and place the pattern on the fold where indicated. Pin in pace and cut out around the pattern, this includes seam allowance. Repeat Steps 2 and 3 to create two gussets — one for the outer bag and one for the inner lining. From the fusible batting, cut one piece using the gusset pattern. Fuse the batting to the wrong side of one of the gussets and set aside for later.
3 4 5
Front and back bag panels
1 2
Trace the front and back panel from the Pattern Sheet onto paper and cut it out. From the feature fabric, cut: two 10½in x 13in rectangles. Leesa has ‘fussy cut’ the pieces so that both feature the flannel flower centred horizontally, with it's top petal 2in from the top edge.
www.quilterscompanion.wordpress.com
49
50
If you are using a directional print, you will need to cut the 5in strip in half, turn one piece around and make a seam at the centre - then place the pattern.
3
From the fusible batting, cut: two 10 ½in x 13in rectangles. Fuse the batting to the wrong side of the two rectangles. Pin the bag front and back panel pattern onto both pieces and cut them out on the dashed line. Set aside for later.
Front flap
1 2 4 5
5 6
Turn the pocket piece right sides out and press well along the seam. Top stitch on the right side, across the top edge. Align the back pocket over the outer bag back panel, both right side facing up and with the bottom edges aligned. Pin to hold in place. Machine tack together 1⁄8in from the raw edges.
Using the flap panel paper pattern, trim the embroidered flap panel, centring the motif vertically and horizontally. Cut out on the dashed line. Cut one flap panel piece from the contrast fabric, and one flap panel piece from the fusible batting. Fuse the batting to the wrong side of the contrast fabric. Trim ¼in around the sides and the curved edge, but not the top straight edge where the flap will attach to the bag. Pin the embroidered flap panel and the batting-backed flap panel right sides together. Sew together with a ¼in seam, leaving the top straight edge open. Turn the flap right side out and press well. Insert the flap+batting piece so its curved edges sit flush against the internal seam.
From the contrast fabric, cut: two back pocket pieces. Place them right sides together and stitch across the straight top edge. These will create the inner pockets. Turn them right sides out, and press. From the contrast fabric, cut: two inner bag linings using the front and back panel paper pattern. Align the inner pocket piece to one of the inner linings, along the bottom and sides, right sides together. Mark the centre of the pocket and sew from the top of the pocket to the bottom edge of the lining to create two internal pockets attached to the lining.
Back pocket
Bag assembly
From the contrast fabric, cut one back pocket piece using the paper pattern. Position the previously embroidered back pocket panel with the motif 1½in from the top finished edge of the piece, and centred horizontally. Cut one back pocket piece from the fusible batting. Fuse it to the wrong side of the embroidered back pocket panel. Place the batting-backed back pocket piece, right sides together with the contrast fabric back pocket piece, and sew them together across the top straight edge.
Mark the centre of the bottom edge of the outer front bag panel. Mark the centre of each long side of the outer gusset. Pin the front outer panel to the gusset at these marks, right sides together. Then pin from these marks around one side of the front panel, easing the gusset around the corner and up to the top of the front panel. Attach a walking foot to your machine and sew the pinned section together.
6
1 2 3 4
Lining and inner pockets
1 2 3 1 2 3 4
www.quilterscompanion.wordpress.com
51
52
5 6 7 8
Repeat steps 2–4 for the other side of the front panel and gusset. Repeat Steps 1–5 to attach the outer back panel to the other side of the gusset. Turn the bag outer right side out, and press the seams well. Then turn right side in again, ready for the next step. Repeat Steps 1–7 to assemble the bag lining. At step 6, leave a 6in gap in the base of the bag lining, on the side without the pocket. This is to turn the bag right side out through later. Turn the lining right side out and press.
14 15 16 17
Stitch right around the top of the bag. Turn the bag right side out through the 6in gap in the lining. Press the bag well to ensure that the top edge and the flap sit flat. Lastly, sew the 6in opening in the lining closed.
9 10
Determine how long you would like the strap to be, by draping it over your shoulder, or across your body if you wish to wear it satchel style. Allow an extra ½in for seam allowances, and trim off the excess. Place the strap inside the bag outer. Make sure the strap is not twisted, and then pin each end to the top edge of the gusset, on either side, centring it across the gusset edges and aligning the raw edges. Place the completed front flap inside the outer bag. Pin the right side of the flap to the right side of the back bag panel, centring along the top edge and aligning raw edges. Pin well. Then, place the lining inside the bag so the inner pocket is right sides together with the front of the bag. Align all side seams and the top raw edges and pin together, taking in the flap and strap edges as well.
11 12 13
New home of exquisite machine embroidery designs captured by Leesa Chandler. C ntac Co ntac nt act us act us now ow to ffiiind nd n d you ourr lo occaal sttoc o kiisstt of desi deesiiggn ns and and pr an prod oduc ucts uc ts! Tel. Te l. 03 995587 87 3958 958 95 iin nfo fo@ @ttheete texxttil text ilep lep epaan ntry. trry. y.co com ww ww w..tth het etexti eexxttiile ilepa lepa le pantry ntry nt ry.ccoom m
Papi Pa appiili lio Ul Ulys yssseeess - Mo Moun unta un tain n Blu lue Cappttu Ca urredd by Leeeessa Ch Chan andler ddlleerr
53
• WE HAVE A MACHINE TO SUIT YO U • PAYMENT PLANS • VERY COMPETITI VE PRICES • FREE INSTORE LE SSONS • REPAIRS ASK ABOUT OUR BONUS EXTRAS
SEW MANY STITCHES THE MACHINE EMBROIDERY SPECIALISTS Shop 4 / Level 2, 147 Queen Street, Campbelltown NSW 2560 | Phone/Fax: 02 4628 4437
www.sewmanystitches.com.au
ROSES, DENIM & LACE
Jacket
Tracey Sims This jacket is made with a commercial jacket pattern, but the same embroidery and embellishment techniques could be used on a store-bought jacket. Remove the cuffs to attach the lace cuffs to the denim using the same techniques as for the custom-made version. If you choose to use a store-bought jacket, back and right front will need to be interfaced with Weaveline and then starched prior to the embroidery being stitched. Techniques include lace making in the hoop, layered machine embroidery and jacket construction. Tracey has also used paint to enhance the embroidery, and attached rhinestones for a little sparkle.
Tracey Sims Designs/Zündt Design traceysimsdesigns/zundtdesign group
56
tracey@traceysimsdesigns.com traceysimsdesigns/zundtdesign
57
Materials Embroidery Design: Roses and Lace Collection by Zündt Design Silver Metallic Zündt Design thread (60wt). Tracey has used Zündt Design fine-weight thread to create subtle highlights — heavier threads will not give the desired result. Robison Anton Rayon Embroidery thread — Midnight Navy — 2387 (2 spools), Pro-Navy — 2625, China Blue — 2523, Lake Blue — 2304, Paris Blue — 2283 Bohin mechanical chalk pencil Butterick Jacket Pattern*: B5616 — Jacket B with Collar A 80cm (7⁄8 yd) floral fabric 1.1m (1¼yd) denim fabric, 127cm (50in) wide 2m (2¼yd) Weaveline interfacing Inspira Aqua Magic (water-soluble stabiliser suitable for lacemaking) Soft, light-weight tear-away stabiliser (if it is
‘crispy’ it will buckle in the hoop) Navy construction thread Navy or black bobbinfil Five buttons 260mm x 200mm (10in x 8in) hoop 360mm x 260mm (16in x 10in) hoop (optional for single hooping) General sewing supplies Scissors Spray starch Four curved quilter's safety pins Non-slip grip drawer liner Double-sided tape Sewing/embroidery machine Spare bobbin case for lace making (optional) Rhinestone applicator and 2mm and 3mm rhinestones Note: *Jacket pattern is current at time of publishing but could be substituted for a similar pattern if unavailable.
Painting supplies ¼in and ½in synthetic-bristle, angled paintbrushes Jo Sonja’s Textile Medium Jo Sonja’s Retarder Medium Water container
Jo Sonja’s Artist Acrylic Paints — Ultra Blue Deep, Paynes Grey and Titanium White Plastic plate or palette Paper towel
Preparation
1
After taking accurate body measurements, cut out the appropriately-sized pattern pieces, making any necessary adjustments. Tracey made adjustments to the pattern — she used a size AU10 (US6) at the top and expanded to a size AU12 (US8) below the waistline. She also lengthened it by 1in in the body. She made only one pocket tab for the left front side of the jacket. Additionally, she did not use the sleeve cuff pattern as she made the cuffs with lace. Pin the pattern pieces onto the fabric observing the grain direction lines. Cut each piece out except the centre back and the right-front side pieces. Use the chalk pencil to draw around the centre back and the right-front side pieces on the fabric, then cut 1in outside the drawn lines. Spray starch these two pieces of fabric and press. Cut two pieces of Weaveline interfacing to the same size as the back and right-side front pieces, and adhere them to the wrong side of these panels. Mark ‘T’ on the top of the centre of the back fabric and rule horizontal and vertical lines through the centre of the pattern area. This will be the central placement point for the large rose design. Mark cross lines 3in from the drawn line on the right and 3½in from the bottom of the front right-side piece. This will be the central placement point for the small rose design.
2 3
Preparation – Step 5
4 5
6 58
Preparation – Step 6
Tracey’s hoop preparation tip To stop the stabiliser moving while embroidering, you can use a product like drawer grip liner. Place the hoop on top of the drawer grip liner. I do this for all my embroidery hoops to help prevent pulling and movement of the fabric. It also keeps the embroideries stable, particularly free-standing lace. Draw a line ½in from the inside of the hoop on all sides to create a rectangle. The inside will be cut away with scissors, and removed, leaving a ½in frame that provides extra grip. Place double-sided tape on the underside of the inner hoop, then place the hoop down onto the grip liner to adhere it.
7
Cut interfacings as instructed in the pattern and press them to the corresponding fabric pieces. Apply all necessary markings to the fabric with the chalk pencil.
Making the Lace – Step 7
Making the lace It is very important when making lace that the machine’s tension is correct. The top stitches need to run directly above the bobbin stitches for the lace to interlock. To view Tracey’s video on making lace, go to the design CD, go online, and follow the links. Fill four bobbins with Midnight Navy — 2387, ensuring the tension of the bobbin is firm. Place one filled bobbin into the bobbin case. Place two layers of Inspira Aqua Magic water-soluble stabiliser over the outer hoop, insert the inner hoop and tighten. Gently and carefully tension the stabiliser so it is taut and there is no puckering. Bring the lace sleeve cuff design into the machine. You will notice it has not been colour sorted. There are three sections for each cuff. It is important when stitching lace to stitch each section separately to avoid thread displacement and keep all stitches interlocked. Add a basting stitch around the combined design to check tensions. Place the hoop in the machine and stitch the basting stitches. Ensure there is no thread pulling in the corners, either to the top or the bottom of the stabiliser. Once tensions are correct, stitch each section of the design, firstly with the Silver Metallic thread, followed by Midnight Navy — 2387. Once the first cuff is complete, repeat for the second. Once both cuffs are complete, cut the stabiliser as close as possible to the embroidery without cutting any stitches. Rinse the cuffs under very hot water to remove any visible stabiliser, then soak them in hot water with a drop of fabric softener. When the water cools, change it and repeat three times before soaking overnight. Place the cuffs flat on a towel to dry.
1 2 3 4 5 6 7 8 9
10
Making the Lace – Step 8
Right side panel
1 2 3 4 5
Change the bobbin back to Bobbinfil.
Bring the Small Rose design into the machine and add a basting stitch. Hoop two layers of tear-away stabiliser in the 26cm x 20cm (10in x 8in) hoop. Place the hoop into the machine. Place the right panel fabric over the hoop, aligning the centre of the hoop with the centre cross lines on the fabric. Secure in place with the curved safety pins. Embroider the design in the following colours in the order listed: 1. Basting Stitches — Lake Blue — 2304
Tracey’s tension adjustment tip If any adjustment is needed, start with the top tension and loosen or tighten as required. Try a couple of times, but if this does not solve the problem, you may need to adjust the bobbin tension.
www.quilterscompanion.wordpress.com
59
60
Back panel in a larger hoop If you have a 360mm x 260mm (14in x 10in) hoop, the embroidery can be done in one hooping using the combined design as follows. Hoop two layers of tear-away and place the hoop into the machine. Place the jacket back panel over the hoop, aligning the centre of the fabric with the centre of the hoop. Secure with curved safety pins.
1 2 3 4 5
Bring the combined Rose design into the machine and add a basting stitch. Tracey dropped her tension slightly for this design. Embroider the design in the following colours in the order listed: 1. Basting Stitches — Lake Blue — 2304 2. Silver Metallic Thread — outline leaves 3. Lake Blue — 2304 4. China Blue — 2523 5. Pro-Navy — 2625 6. Paris Blue — 2283 7. China Blue — 2523 8. Lake Blue — 2304 9. Pro-Navy — 2625 10. Silver Metallic 11. Paris Blue — 2283 Once completed, remove the basting stitches and then carefully remove the excess tear-away, making sure not to break any of the silver outline stitches.
6
Back panel
Back panel - Step 2 2. Lake Blue — 2304 3. China Blue — 2523 4. China Blue — 2523 5. Pro-Navy — 2625 6. Paris Blue — 2283 Once embroidery is finished, remove the basting stitches and the excess tear-away.
6
There are two hoop size options for the centre back panel — one for the 260mm x 200mm hoop (two hoopings) and one for the 360mm x 260mm hoop (one hooping). The following instructions are for stitching out the design on a 260mm x 200mm hoop. The outline designs will need to be stitched in one hooping (sideways) and the blue rose in another (vertical). Print a template of each design. On a table, place the outline design template and then the rose on top so it looks like the image above) Tape them together and place them over the centre jacket back fabric so the centre markings of the rose template align with the drawn cross lines. Carefully remove the rose template, ensuring the leaf template does not move. Mark the centre point and rule the vertical and horizontal cross lines for this design. Hoop two layers of tear-away and place the hoop into the machine. Bring the combined outline leaf design into the machine and add a basting stitch around the design. Place the fabric panel sideways over the hoop, ensuring the leaf design will be facing the top of the fabric panel, marked ‘T’.
1 2 3 4 5 6 7 8
www.quilterscompanion.wordpress.com
61
62
You’ll need
A BIGGER STOCKING! Special offers on the entire range until 31st December 2019 while stocks last. See in-store or online for details.
bernina.com.au • mybernette.com • shop.bernina.com.au
9 10 11 12 13 14 15
Align the centre markings for this design with the centre of the hoop and pin to secure. Baste and then stitch the design with Silver Metallic thread. Once complete, remove the basting stitches and very carefully remove the excess tear-away, ensuring none of the outline stitches is broken. Re-hoop two layers of tear-away and place the hoop into the machine. Bring the Large Rose design into the machine and add a basting stitch around the design. Tracey loosened her tension slightly for this design. Place the hoop in the machine and the fabric, right side up, over the hoop and align the centre of the design with the centre of the hoop. Pin to secure. Embroider the design in the following colours in the order listed: 1. Basting — Lake Blue — 2304 2. Lake Blue — 2304 3. China Blue — 2523 4. Pro-Navy — 2625
5. Paris Blue — 2283 6. China Blue — 2523 7. Lake Blue — 2304 8. Pro-Navy — 2625 9. Silver Metallic 10. Paris Blue — 2283 Remove the basting stitches and excess tear-away.
16
Painting and embellishment To obtain the same results as Tracey, follow these steps. If you choose not to add the painting you will still have a lovely result. If you’re feeling a little unsure of your painting abilities, check out the YouTube link from the CD for Enhancing Embroidery with Paint and see the mixing and application of paint to add painted shadows and highlights to create depth and realism to the embroideries. On the palette, add a small amount of Paynes Grey, Ultra Blue Deep and Titanium White in separate puddles. Add a drop or two of textile medium to each colour and mix well. Also put some retarder medium on the palette. Mix Paynes Grey and Ultra Blue Deep (1:1); this will be referred to as the Dark Mix. Mix Dark Mix with Titanium White (1:4) to make a light blue. Wet the ¼in angled brush and blot any extra moisture on a paper towel. Tip into the retarder medium, again remove any excess, and then tip the brush into the light blue paint. Highlight the leaves on both the back and the side-front panels and the buds on the side-front. Repeat the process, but this time use the ½in angled shader and the Dark Mix to add extra depth to the dark areas on the large rose. Repeat any or all steps if necessary. Allow the paint to dry, and then heat set it, with a pressing cloth between the paint and the iron. Refer to the photos of the jacket on page 62 for placement of the rhinestones, and adhere them in place, following the applicator instructions.
1 2 3 4 5 6 7 8
Constructing the jacket Tracey has used a triple straight stitch for all top stitching worked in Pro-Navy — 2625. She has also used this thread to stitch the buttonholes. Place the back pattern piece onto the embroidered fabric, ensuring the design is centred, and then cut out the fabric. Do the same for the front-right side panel. Sew the sleeve pieces together following the pattern instructions, and then turn under the hem twice by approximately 1cm (½in). Stitch to secure. Place the straight edge of each lace piece over the right side of the sleeve hem, overlapping by ¼in ensuring the right side of the lace is facing outward. Use a small zigzag stitch and Midnight Navy thread, sew the lace in place. Follow the pattern instructions to complete the remainder of the garment.
1 2 3 4 5
64
E A VA N ILA O B W L
Quilters 2020 Diary S P E C I A L CO L L E CTO R ’ S E D I T I O N
Celebrating our Top 100 quilting projects inside this collector’s edition
The 2020 Quilters diary is our special collector’s edition, featuring a selection of our top 100 quilts and projects over our 100 editions of Quilters Companion magazine. This year the diary showcases the very best of handmade items to decorate and adorn your home, from quilted wall hangings, quilts or table runners to cushions from your favourite quilting magazine. You don’t want to miss this one!
ONLY $19.95
nds this year
A gift sew perfect for all your frie
Get your copy now from your local newsagent, call 1300 303 414 or from the following online retailers: paperpocket.com.au | cosyproject.com | universalshop.com.au
Designer Profile
YASMIN RUSSELL “There are so many techniques I want to try — I hope I never stop learning. I think of myself as ‘the poster child of anyone can do it ’.”
66
Y
asmin Russell owns a quiet little shop in Orange, NSW, called Hidden Talent. She works with her “life partner and best friend”, Chris. He is a fully trained sewing-machine technician, and Yasmin is the creative. “The business originally belonged to my grandmother, who passed the business on to Chris and me when she retired almost three years ago,” explains Yasmin. She has a strong background in creativity and gained a Bachelor of Arts at the National Art School in Sydney. “I am a quick learner when my heart is in it, and I love a challenge. This was the beginning of an epic challenge and an amazing opportunity,” says Yasmin. “The shop is full of sewing, embroidery and quilting treasures, with a range of classes running weekly. I teach embroidery, digitising and ScanNCut lessons. I love teaching.” Yasmin’s early embroideries were basic — mostly digitising cartoon characters for family and friends — and Chris’ three children became sources for her endeavours. She would get the kids to draw pictures that she would digitise and stitch to make cushions. This led to converting other children’s drawings for stitching. After that she became “a bit more ambitious, finding images of old muscle cars and spending hours meticulously digitising every detail, capturing as much tonal and colour variation as possible”. After she had created the designs she would stitch them out on her Ricoma machine. “I learnt a lot about push/pull compensation, the limitations of laying and the necessity of simplifying,” says Yasmin. “I stitched that car at least five times, adjusting and tweaking along the way. The finished product was awesome — I still have it displayed today at my store, with over 100,000 stitches in more than 20 colours.” The next significant project she undertook was a photo stitch portrait of her late grandfather, My Pa. It is approximately A3 in size, with more than 400,000 stitches and 47 colours. “I am as proud of this piece today as I was the day I completed it,” she says fondly. After some time, Yasmin’s skills were being recognised by sewing-machine dealers and she was asked to lecture and teach at the Blessington Academy. “I was over the moon! The class was based on the Ricoma (machine) and the lecture was to be about me and my embroidery experience,” she explains. For the following three to four months, preparation was her entire focus. “I designed and created my very first quilt entitled Embroidery Circus, a performance acted out predominantly by embroidery, appliqué combinations, with a side show of airbrushed fabric painting and hand-painted elements. Every embroidery/appliqué character is a circus performer themed with embroidery and sewing elements, like the majestic Bobbin Winding Ballerina.” She also decided to create a free-standing embroidered bouquet of Australian flowers. After much trial and error, the flowers and leaves were completely made of thread and the
h
67
Designer Profile
stems were constructed from florist tape and wire. When her mother visited a few days later, Yasmin showed them to her. “She couldn’t believe her eyes — she thought they were real flowers!” Everything Yasmin made for that event was digitised with Wilcom software. “I wouldn’t have been able to learn and create what I did in such a small space of time without the use of Wilcom,” she says. “This software is incredibly intuitive and versatile. It gave me huge control of my creations with an abundance of tools to help me achieve even the most bizarre ideas.” Since then, Yasmin has been spending a lot of time designing and digitising her own embroidery and appliqué
68
patterns for her Embroidery Circus website. Her favourite place is in front of her laptop, with Wilcom software running. “I love my embroidery machine and all my gizmos and gadgets. Recently I even bought myself a digital drawing tablet to teach myself digital painting and eventually add fabric prints to my website.” For the most part Yasmin is self-taught, although she admits she still has much to learn. “There are so many techniques I want to try — I hope I never stop learning. I think of myself as ‘the poster child of anyone can do it’. If you have been thinking about diving into something completely new and out of your comfort zone, just dive. You will surprise yourself. I did.”
Kinky Kate Zoe Clifton Take a step back in time to the days of corsets and high kicks with this medallion-style quilt. Starting with delicate sprays embroidered in the centre, the inner border is a collection of embroidery designs that have been designed to coordinate with Zoe's fabric range. The outer border features the actual printed fabric from the Kate range. The print was the design idea for the smaller embroidery sprays. Begin by stitching out each embroidery design, then the units go together in a typical quilt construction style.
Zoe Clifton Designs Bellarine Sewing Centre
70
www.zoecliftondesigns.com.au www.bellarinesewingcentre.com.au
zoecliftondesigns@gmail.com.au bellarinesewingcentre@outlook.com
71
Finished size: 123cm (48½in) square
72
Materials 1.2m (13⁄8yd) cream tone-on-tone print fabric (background) 50cm (5⁄8yd) raspberry tone-on-tone stripe print fabric (centre square peeper and binding Fat quarter white print fabric (setting triangles) 35cm (3⁄8yd) green tone-on-tone stripe print fabric (Borders 1, 3 and 4) Two squares, 6in of eight assorted print fabrics (block peepers) 10cm (1⁄8yd) each of eight assorted print fabrics (block borders) 1.2m (13⁄8yd) large-scale floral print on cream fabric (Border 4) 2.8m (3yd) backing fabric Batting at least 140cm (56in) square Kate embroidery design - available from Bellarine Sewing Centre Machine embroidery threads to coordinate with the
Cutting From the cream tone-on-tone print fabric, cut: one square, 22in (centre square) three strips, 7in x width of fabric. Cross cut them to yield 16 squares, 7in (Border 2) From the raspberry tone-on-tone stripe print fabric, cut: two strips, 1in x width of fabric (peeper around the centre square) five strips, 2½in x width of fabric (binding) From the white print fabric, cut: one square, 14¾in. Cut it twice across the diagonals to yield four quarter-square triangles From the green tone-on-tone stripe print fabric, cut: two strips, 1½in x width of fabric. From each strip, cut one strip, 1½in x 19½in and one strip, 1½in x 21½in (Border 1) another five strips, 1½in x width of fabric (Borders 3 and 4). Cross cut one of these strips to yield two strips, 1½in x 10in and two strips, 1½in x 5¾in (Border 4 sashings) From each of the 6in squares of assorted print fabrics, cut: four strips, 1in x width of the square (peeper around the Border 2 blocks) From each of the 10cm (1⁄8yd) lengths of assorted print fabrics, cut: two strips, 1½in x width of fabric. Cross them to yield four rectangles, 1½in x 5½in and four rectangles, 1½in x 7½in of each fabric (Border 2 block borders) From the large-scale floral print on cream fabric, cut: four strips, 53/4in x length of fabric. These strips have been fussy cut so that the same part of the printed pattern was centred on each one
Centre square
1
Use a water-erasable fabric-marking pen to draw a 19in square in the centre of the cream square cut for the centre square. Draw horizontal and vertical lines through the centre
fabrics. Zoe used Robison Anton Threads in Willow (2221), Glow (2234), Burgundy (2249), Pistachio (2250), Smokey (2487), Desert Bloom (2503), Rosewood (2508), Rockport Blue (2536), Pro College Blue (2647) and Pro-Pearl (2741) Fusible interfacing such as Parlan Stabiliser Hoop — to suit embroidery size Water-erasable fabric-marking pen Rotary cutter, ruler and mat Sewing machine with ¼in foot General sewing supplies Note: This quilt was made using the Kate range of fabric designed by Zoe Clifton. Extra yardage has been included in the Materials list to allow for fussy cutting the Border 4 border-stripe print. A full kit to make this quilt using the same fabrics as shown here is available from Bellarine Sewing Centre — see contact details at the end.
of the square. Then draw lines through each diagonal. Add diagonal lines connecting the ends of the horizontal and vertical centre lines, as shown in Diagram 1. On the horizontal and vertical centre lines, make a small mark 5¼in from the centre of the square. This is where the centre of each floral spray will lie. Now draw a line ¼in outside the diagonal square, as shown by the red lines in Diagram 2. This will be your cutting line once the embroidery has been completed. Download the Kate embroidery designs and select the Floral Spray. Place stabiliser in your hoop. Lay the marked cream fabric on top of the stabiliser, aligning the placement lines in the centre of the hoop — the embroidery designs are going to spin around the centre square. Stitch out four Floral Spray designs, working around the centre square and referring to the photo of the quilt as a guide. Select the Single Flower design. Use the fabric-marking pen to make a mark 1¼in from the centre of the 19in square on each of the horizontal, vertical and diagonal lines — they indicate the placement for the eight single flowers. Stitch out a Single Flower design in the centre of the 19in square and then stitch another one on each of the marks you made on the fabric in Step 5. To make the peeper border for the centre square, fold the two 1in strips of raspberry tone-on-tone stripe print fabric in half, wrong sides together and long edges matching. Press. Cross cut these folded strips to yield four strips 14in long. Pin a folded strip to the background fabric with its raw edges matching opposite edges of the outer square on your background fabric — the one marked in red in Diagram 2. Refer to Diagram 3. Stitch them in place using a scant ¼in seam. Repeat Step 8 to sew the remaining two folded raspberry strips to the other two edges of the outer square.
2 3 4 5 6 7 8
9
www.quilterscompanion.wordpress.com 73
10 11
19in
Cut the surplus fabric away from the centre square — cut along the outer (red line) square, which is now also the raw edges of the raspberry folded strips, as shown in Diagram 4. Fold the centre square in half in each direction and finger press creases to mark the centre of each edge. Fold the four quarter-square triangles of white print fabric in half, short edges matching, and finger press a crease to mark the centre of their long edges. Sew a white print quarter-square triangle to opposite edges of the centre square, matching centre creases. Press the seams outwards. Then sew the remaining quartersquare triangles to the other two edges of the centre square and press seams outwards. Your quilt top should now measure 19½in square from raw edge to raw edge.
12
Borders 1 and 2
1 2
Diagram 1
¼in
Sew the 1½in x 19½in strips of green tone-on-tone stripe print fabric to the top and bottom edges of the quilt top. Press seams outwards. Sew the 1½in x 21½in strips of green tone-on-tone stripe print fabric to the left and right edges of the quilt top. Press seams outwards. Your quilt top should now measure 21½in square from raw edge to raw edge. Place stabiliser and interfacing into your embroidery hoop, then ‘float’ a 7in square of cream fabric on top of the interfacing. See Machine Embroidery Basics on page 134 for details on how to float fabric. If you are using an embroidery machine that can stitch out a background fill stitch, follow the manufacturer’s instructions to add this feature around your designs. The finished area for the background fill is 5in square. If your machine does not have this function, you can add quilting to the block background later on. Select the following machine embroidery designs and stitch each one out in the centre of a 7in square of cream fabric: Blue Boot — stitch 2 Red Boot — stitch 2
3
5¼in
4 5¼in
5 Diagram 2
74
Diagram 3
Blue Hat — stitch 2 Red Hat — stitch 2 Umbrella — stitch 2 Corset — stitch 2 Flower with Two Buds — stitch 8. Put four of the Flower with Two Buds blocks aside — they are used later, in the corners of Border 4. Trim each of the remaining blocks to measure 5½in square, keeping the designs centred.
6
Diagram 4
7
To add the border to each of these 16 blocks, select four 1in strips all cut from the same print fabric for the block peeper and two rectangles, 1½in x 5½in and two rectangles, 1½in x 7½in all cut from one of the coordinating print fabrics. Fold the 1in strips in half, wrong sides together and long edges matching. Press. Trim each strip to 5½ long. Pin a folded strip to the left and right edges of the block, raw edges matching. Stitch them in place using a scant ¼in seam. Then
8
75
76
pin the remaining two folded strips to the top and bottom edges of the block and stitch them in the same way. Sew the 1½in x 5½in strips of print fabric for the block border to the left and right edges of the block. Press seams outwards. Then sew the 1½in x 7½in strips to the top and bottom edges of the block and press seams outwards. Your block should measure 7½in square from raw edge to raw edge. Repeat Steps 7–9 for all 16 blocks.
9
10 11
Lay the blocks out around the edge of the quilt top, referring to the photo of the quilt as a guide. Once you have decided on their arrangement, join the three blocks on the left edge of the quilt top together in a column, then sew the column to the left edge of the quilt top. Repeat with the three blocks on the right edge of the quilt top. Join the five blocks on the top edge and on the bottom edge together in rows, then join these rows to the top and bottom edges of the quilt top. Press seams outwards.
12
Borders 3 and 4
1
Measure your quilt top horizontally through the centre. Trim two 1½in strips of green stripe print fabric cut for Border 3 and all four of the 5¾in strips of large-scale floral print fabric cut for Border 4 to this length. Sew a 1½in green strip to the top and bottom edges of the quilt top. Press seams outwards. Then sew a 5¾in strip of large-scale floral fabric to the top and bottom edges of the quilt top. Press seams outwards. Sew a 1½in x 10in strip of green stripe print fabric to one end of the remaining two 1½in strips of green stripe print fabric. Measure your quilt vertically through the centre. Trim these long strips to this length. Sew them to the left and right edges of the quilt top. Press seams outwards. Sew a 1½in x 5¾in rectangle of green stripe print fabric to each end of the remaining two 5¾in strips of floral
2 3 4 78
fabric. Press seams outwards. Trim the four embroidered blocks that you put aside earlier to measure 5¾in square, keeping the design centred. Sew a block to each end of the Border 4 strips, referring to the photo of Zoe's quilt to orient tham correctly. Sew the strips to the left and right edges of the quilt. Press seams inwards.
Finishing
1 2
Cut the backing fabric into two equal lengths, remove the selvedges and sew the two pieces together, side by side, with a ½in seam. Press the seam open. The quilt top, backing and batting are ready for a longarm quilting machine as they are. If you’re quilting by hand or on a domestic machine, follow the instructions for Preparing the Quilt Sandwich in the free downloadable Basics Guide* to pin or baste the quilt top, batting and backing together. Quilt as desired. This quilt was machine quilted in a variety of free-motion and straight-line designs. Trim the excess backing fabric and batting ¼in outside the edge of the quilt top. Follow the instructions in Binding the Quilt in The Basics Guide* to bind the quilt using the 2½in strips of raspberry print fabric.
3 4 5
A full kit is available at Bellarine Sewing Centre using the Kate fabric range designed by Zoe Clifton. Please email or refer to the website for ordering. *The Basics Guide is available as a free download from www.cosyproject.com/blog/quilting-guide
• • • • •
What to look for BUYING AN EMBROIDERY MACHINE By Leanne Church
Checklist
Do I want an embroidery only or a combination machine? Am I going to use this for business purposes? Is the screen easy enough to read? Is it easy to navigate around the screens to edit, move, rotate, size and create the embroidery? How heavy is it? Can I lift it if I need to? What hoops do I get, and do I need a large hoop? Are there other hoops available? What is my budget? What accessories are available that can upgrade me in the future? What designs are on the machine? Do I need software? Do I love my sewing-machine dealer? Do I have a sewing-machine mechanic that knows their stuff?
In my 25 years in the sewing machine industry, I have learnt so much about embroidery machines and software. I receive numerous messages from people with whom I have associated, and then their friends, regarding what brand of machine I recommend. What I have and what you need are two different things. You may have been convinced by your sewing friends that their embroidery machine is the machine you need because everyone else has that one. However, that may not be the case. When I advise people on what machine they need for themselves, there are many factors they may not have considered, so I have created a list of things to look at when purchasing a new embroidery machine.
Sewing-machine dealers The machine itself is important, but having a sewing-machine dealer who you can talk to on the phone or in person is vital. Find a dealer who has lots of knowledge about their products and who also keeps up to date with training on new machines. Yes, there are many YouTube and Facebook
80
Janome Memory Craft 400E, 500E and 550E The 550E is the latest addition to Janome’s embroidery-only range. The 200mm x 360mm embroidery field is the largest yet. It comes with four hoops, 180 built-in embroidery designs and six fonts for monogramming. The MC550E has an extra-wide table to support large embroidery projects. Designs are easily imported via a USB key and edited through the machine’s advanced on-screen editing functions.
articles on all machines, but there is nothing better than having personal service with a smile. Ask the sewing-machine dealer questions as well as your sewing buddies, and if you are on a group on social media, ask if anyone has had a good experience.
Sewing and embroidery machine combination If you have a great general sewing machine, you may want to purchase an embroidery-only machine, or a machine that has the capacity to add an embroidery unit later. I personally like a separate machine because I can multi-task. It is also handy to have one in use when the other is in for a service. But if you do buy a combination, then you have all the bells and whistles in the one unit.
Sewing-machine mechanic Do you have a good sewing-machine mechanic? In my opinion, they are far and few between now, but if you find a good one, share with all your friends. I know of people who travel interstate to have their machines serviced by a reputable mechanic. They are valuable not only for service, but can advise on what brands and models could be suitable for you. They can also get you out of a bind when your machine has a hissy fit.
Try before you buy Not all sewing-machine stores carry all brands, so you may need to do some research online. Check each model and get an idea of what you are looking for in a machine, and visit your local sewing-machine dealer for a test drive. Sewing and craft shows are also good spots to find out about different models. Go in with your list of questions and test drive as many as you want, but you don’t need to buy there and then. Think about your purchase because it is a new family member you are buying. You may laugh but it’s true. My machine is high up on the list: kids, machine, then husband!
something you will have to investigate yourself. You are investing in a great piece of technology that will make your life happier and bring lots of joy when you get the hang of it. It’s like buying a car; you must test drive before you find the right one. Some are like luxury sports cars, some are your medium range for every day and some are compact to get you from A to B. If you look at it logically, embroidery machines are just printers with thread, but some are better than others. Before you toddle off to your sewing-machine dealer or sewing and craft show, here are some points to consider before making your final decision
Price and budget Embroidery machines range from around AU$1000 to AU$20,000 for a single-needle machine. Your budget may determine your purchase. If you find you want a machine that is above your budget, but you have your heart set on it, save. You could buy one that in six months time you have grown out of and then regret your purchase. I have seen that happen numerous times — and if you can get a trade-in on the one you purchased you may be disappointed by the trade-in value.
Which brand
Hobby or business
There are many machine brands on the market — which is the best? Well I am not going to tell you that. This is
If you are considering purchasing an embroidery machine for a business, consider a multi-needle machine, especially if
Bernina 880 PLUS The 880 PLUS is a sewing, quilting and embroidery machine that offers pinpoint placement, enhanced editing functions and total embroidery stitch control. The extended free-arm gives 12in of space to the right of the needle. The machine comes with three hoops, up to 255mm x 145mm embroidery field. The optional Jumbo Hoop, with a maximum embroidery area of 400mm x 260mm, will fit this machine. Design editing allows you to easily position, mirror, rotate, combine and resize motifs. You can create curved lettering effects, alter stitch density, and combine alphabets with embroidery.
Bernina 535 This machine is for sewists, quilters and embroiders: it has 8½in to the right of needle, 1048 stitch package, jumbo bobbin – 70% more thread, 41/3in colour touch screen and is embroidery compatible with the optional 5 Series Embroidery Module. The embroidery module is easy to install, with a practical carrying handle, and it turns the 535 into an embroidery computer that offers an embroidery field of 400mm × 150mm. The module works with all new 5 Series models, but comes standard with B 590 and B 500.
h
81
What to look for you are doing a lot of towels and garments, for example. The free arm will allow you to get articles on so much more easily and the hoops are deeper for thick towels and other items. If you are a beginner, talk to your dealer to see if they have the option to upgrade when you grow out of your single needle. Often when you move to a multi needle you want to keep your single anyway.
How heavy is it? If you intend to just embroider at home without needing to move the machine, then weight is not an issue. If you would like to take it to workshops and groups, and you can’t get it in or out of the car because it is too heavy, then that’s not an option. Most enthusiasts own more than one machine — one that is the best of the best with everything an embroiderer wants, and a smaller one for travelling to social events.
Janome MB7 The MB7 is a home-use, seven-needle embroidery-only machine. This machine is built to work with embroidery formats used by industry professionals such as .jef+, .jef and .dst. With 50 built-in embroidery designs and 10 fonts for monogramming, a USB port to easily import designs and a maximum speed of 800 stitches per minute, the possibilities are endless. It comes with three hoops 240mm x 200mm, 126mm x 110mm and 50mm x 50mm as well as other accessories.
82
Ricoma Perfect for hobbyists, crafters and home-based entrepreneurs! The EM-1010 is a single-head embroidery machine that comes with all the attachments to embroider on caps, flats, finished garments and much more. These machines are perfect for start-ups as they come equipped with the necessary attachments to get your business up and running. The EM-1010 bundle includes a portal and mobile workspace stand, four hoops, Wilcom Hatch embroidery software, starter kit and online training videos.
The Melco EMT16 Plus This is a commercial embroidery machine that has unique features that, combined with precise engineering, allow the machine to reach stitch speeds up to a maximum of 1500 stitches per minute with tremendous stitch quality. Melco also operates from a standard PC or laptop, meaning there is no on-board touchscreen, making it very user friendly. The modular Melco EMT16 Plus design means the system is scalable, so it can easily grow with your business with ultimate flexibility benefits.
Husqvarna Designer Brilliance 80 The Designer Brilliance 80 is a sewing and embroidery machine that is able to instantly set the best stitch, stitch width, stitch length, thread tension/portioning and presser-foot pressure for the technique you’ve chosen. Through the JOYos Advisor feature you will have access to interactive tutorials, sewing and embroidery techniques, sewing instructions, stabiliser guide, quick help and the complete user’s guide – all presented on a 7in multi-touch capacitive display. There is a 10in work area and the machine comes with three hoops, with up to 360mm x 200mm embroidery field, and you can create and embroider designs up to 360mm x 350mm with the optional Majestic hoop.
Hoop size This is one of the most frequently asked questions when buying an embroidery machine. Bigger is better most would say, but not everyone wants or needs bigger embroidery. It will depend on what you are creating on it, but I would look at a machine that has a 200mm-plus hoop. Quilting blocks are mostly 200mm x 200mm (8in) and a decent-size towel is around this size as well. There are machines that can create designs to around 400mm in length and these can produce the most amazing creations in the one hoop. Also ask the demonstrator to show you how to hoop. Some hoops are easier than others and if you struggle to hoop fabric, this could be something to consider if you have weakness in your hands and arms.
Performance Brother Stellaire XE1 With the easy-to-use mobile App you can precisely position your designs. This machine offers 56 square inches of workspace – with 11in from needle to arm. The larger 240mm x 355mm embroidery frame is large enough to combine designs so you can stitch them out in one hooping. There are 727 built-in embroidery designs, including more than 100 Disney designs. You can master your embroidery with the expandable library of built-in tutorial videos. The My Design Snap mobile app allows you to perfectly position your design every time and it allows you to convert line art and illustrations into embroidery with the snap and embroider feature. The Stellaire XE1 has embroidery speeds of up to 1050 stitches per minute
When testing a machine, listen to it: does it purr or sound like a chaff cutter? You will be the one at home listening to it stitch, and if it drives you mad, then you won’t love it and you may lose interest. A smooth and quiet machine is lovely. Be aware that multi-needle machines are noisier — you can’t avoid that.
Designs in the machine Yes, all embroidery machines come with beautiful inbuilt designs, but don’t just buy it for the designs. There are millions of designs in the market and usually you can find something to fit your needs. Copyright designs are beautiful and if you love them and the machine, then by all means buy that machine, but remember they are for private and personal use and cannot be sold to make profit in any form.
h
83
What to look for Software If you just want to embroider, you can use the designs and lettering on the machine. You can buy designs in the machine format and load them to the machine. That’s fairly easy. But if you want to edit a design, take things out, add things in, resize or create your own designs from artwork, then you will need software. Talk to your dealer or contact someone who has used these programs for advice. The software from the same sewing-machine company may not always be right for you and your level of creativity. I would get the machine, use it for a while and then consider software down the track. Learn one thing first. All this information can be lot to take in, but very important nonetheless. As an embroiderer and having worked in this industry for a number of years, I meet many people who are given the wrong information and end up with a machine that doesn’t suit them.
Janome Skyline S9 The Skyline S9 is the first machine in its series to include both sewing and embroidery and its wifi capability allows you to easily send embroidery designs from an iPad or computer straight to the machine. There are six Janome iOS APPS available for the Skyline S9 – AcuEdit, AcuMonitor, AcuDesign, ScreenSaverTool, AcuSetter and AcuSketch. There are 250 embroidery designs, including 40 exclusive designs by Anna Maria Horner, along with 300 built-in stitches. The maximum embroidery field is 170mm x 200mm, with sewing speeds up to 1000 stitches per minute, and an LCD colour touchscreen.
84
Husqvarna Epic 2 With true Wifi connectivity, you can download machine updates and design transfers from anywhere for free. Browse and search for just the right embroidery design via the screen using the industry-first mySewnet Library. The machine comes with three hoops – up to 360mm x 350mm embroidery field, two USB ports and reads multiple design formats, free-motion sewing with decorative stitches and four hoop positions. It is also capable of stitching ribbon embroidery with an exclusive attachment.
PFAFF Creative 4.5 The Pfaff Creative 4.5 brings a combination of functionality and practicality to Pfaff’s Creative range. Not quite as big as their pinnacle machine, the Creative Icon, the Creative 4.5 still delivers an enormous range of embroidery capacity and sewing comfort. Roomy enough for even your biggest projects, and with the capacity to go even bigger with the optional 360mm x 300mm hoop, the Creative 4.5 has 9mm stitch width and a spacious full-colour screen with lots of onboard creative editing features.
Yo-yo’s a la Mode Quilt
Drunkard’s Cabin Quilt
Craft Patterns & Classes Delivered straight to your inbox
Pharaoh Fashion Bag
cosyproject.com Ma Bunny Pincushion
Thimblena Doll Softie
Watt A Table Runner
QUILTING | SE W ING EMBROID E RY | KNITTING C ROCHE TING | TUTOR IA L S
Azulejos Almofada Cross-Stitch Cushion
DENIM
Delight BAG
Julie Hall Julie has designed a 'sneaky' vino bag that doubles as a posh handbag. The embroidery designs she has used are available free from her website. Make one, or more, as gifts for Christmas. Everyone will enjoy them at their summer picnics!
Julie Hall Designs www.juliehalldesigns.com sales@juliehalldesigns.com
86
FREE DESIGN DOWNLOAD
87
Finished size: 31cm x 21cm x 12cm (12¼in x 8¼in x 4¾in)
Materials 50cm (½yd) thick denim or furnishing-weight fabric (outer bag) 50cm (½yd) lining fabric — waterproof optional 35cm (½yd) cork fabric (handles) — see Note 42cm (16½in) zipper to match the outer-bag fabric Bag stiffener (base) 22mm (7⁄8in) magnetic bag clasp Four 25mm (1in) rectangular metal ‘rings’ One curtain grommet, 53mm (21/8in) in diameter 16 rivets, 6mm (¼ in) in diameter Machine embroidery design — see Note Machine embroidery threads — feel free to choose your own colours Machine sewing threads
88
11/75 size machine needle (for stitching on denim) Tear-away stabiliser 100mm x 100mm (4in x 4in) embroidery hoop Rotary cutter, ruler and mat Sewing machine with ¼in foot General sewing supplies Note: Cork fabric is assumed to be 50cm (19¾in)
wide. The two embroidery designs for this project are available free to readers of Machine Embroidery. Download from www.juliehalldesigns.com/freedesigns
Preparation and cutting
1
Trace the bag front and back from the Pattern Sheet onto paper, including the lines that indicate the position of the handles. Cut it out on the line. To use this pattern, pin it to the fabric and cut the fabric next to the edge of the pattern. Lay the thick denim or furnishing-weight fabric with the right side facing up. Fold over one selvedge by 7in and pin the layers together. Pin the pattern for the bag front and back to the fabric, matching the broken line with the fold. Cut the fabric next to the edge of the pattern piece — but don’t cut the folded edge. Repeat to cut a second shape. See Diagram 1. Repeat Step 2 to cut two bag shapes from the lining fabric. From the remainder of the thick denim or furnishing-weight fabric, cut: one rectangle, 9¾in x 5½in (pocket) two rectangles, 6¼in x 45⁄8in (side gussets) two rectangles, 2½in x 16in (zipper gusset) one rectangle, 45⁄8in x 12½in (bag base) one rectangle, 4in x 11¾in (gusset flap) From the remainder of the lining fabric, cut: two rectangles, 6¼in x 45⁄8in (side gussets) two rectangles, 2½in x 16in (zipper gusset) one rectangle, 45⁄8in x 12½in (bag base) one rectangle, 3¾in x 11¾in (bag base lining) From the cork fabric, cut: six strips, 2in x width of fabric
2 3
Place a 1l wine cask inside the bag with the nozzle aligned with the grommet for a go-anywhere 'sneaky vino' bag.
Machine embroidery
1 2
Fold the rectangle cut for the pocket in half, short edges matching, and press. Unfold. Fold the fabric in half, long edges matching, and press. Unfold. Lay the rectangle wrong side up. Fold one short edge to the centre crease and press. Unfold. The fabric should now have one long vertical crease and two horizontal creases, as shown in Diagram 2. Where the creases cross in the lower half of the fabric is where you will centre the embroidery design. Download the embroidery designs from www.juliehalldesigns.com/freedesigns Insert a sharp 11/75 size needle in your machine for stitching on denim. Julie finds that a needle of this size stitches through the thick denim fabric with ease, but it isn't so large that it leaves a hole in the fabric. Place stabiliser in your hoop. Lay the creased fabric on top of the stabiliser, aligning the crease marks with the centre position of the hoop. Use the basting function on your machine to secure the fabric to the stabiliser, keeping the project aligned and free of puckers. (If your machine does not have a basting function, pin the layers together outside the stitching area or use magnetic pins to secure the project to the stabiliser.) Stitch out whichever design you choose to use. The design will indicate the colours to be used. While most embroidery machines have a thread-trimming feature, ensure that all jump stitches have been trimmed between colour changes to avoid “overstitching”, which make removing these jump stitches later difficult. Ensure that you don’t re-size this
7in
Diagram 1
3 4
Centre of embroidery design
5
Front of pocket
Diagram 2
89
Zipper – Step 3 design: because it is a knotted candlewick-style stitch, resizing will cause these knots to bunch up under the machine. Remove the fabric from the hoop and tear away the excess stabiliser. Press.
6
Zipper
1
Lay one of the denim zipper gusset rectangles right side up. Undo the zipper about half way. Match one long edge of the zipper tape with the top raw edge of the fabric, right sides together. Lay one of the zipper gusset rectangles cut from lining fabric on top, raw edges matching and right sides of the two fabric rectangles together. Pin the top edges of all three layers together. Attach a zipper foot to the sewing machine and sew the top edges together as close to the zipper teeth as possible. When you get to the zipper pull, stop with the needle down, lift the foot and bring the zipper pull past the foot. Lower the foot and continue stitching. Turn the lining over so that its wrong side is against the wrong side of the denim rectangle. Press. Top stitch close to the seam/zipper teeth. Repeat Steps 1–3 to join the remaining denim and lining rectangles to the other edge of the zipper tape.
2 3 4
Gusset
1 2
Fold the gusset flap in half, short edges matching and right sides together. Press. Sew down the left and right edges. Trim the corners, and turn the flap right side out. Press. Make a mark on one side of the flap 1in from the fold and centred between the left and right edges. Centre the metal disc (the guard) from the magnetic bag clasp over this mark, then mark the slit on each side with a pen. Remove the disc. Use small sharp scissors, or a seam ripper, to carefully snip through the two slit marks — just enough to allow the prongs to push through.
90
Gusset – Step 6
3
Turn the gusset flap over so that it is right side facing up. Push the prongs of the larger female half of the magnetic bag clasp through the slits. Turn the flap over to the wrong side and place the guard disc over the prongs, then bend the prongs outwards to secure the clasp. (You can bend the prongs inwards if you prefer, although it may be bulky.) Lay a rectangle of lining fabric cut for a side gusset right side up on the table. Lay the zipper and gussets on top of it, right side facing up, with one short edge matching the short raw edge of the lining. Lay a rectangle of denim cut for a side gusset on top, right side facing down, with one short edge matching the short raw edge of the lining. Stitch the layers together. Fold the fabrics so that the wrong side of the lining and denim side gussets are matching. Press. Top stitch close to the seam. Repeat Steps 4 and 5 at the other end of the zipper. This time, lay the gusset flap on top of the denim side gusset before sewing the seam, with the side of the flap that has the clasp on it facing up and centring the flap between the left and right edges of the side gusset. Sew through all the layers, refold them, then topstitch. Fold the flap down over the side gusset and make a light mark on the side gusset, centred between its left and right edges, where the male half of the magnetic clasp needs to be positioned. Lay the curtain grommet on the side gusset that has the flap, centring it between the left and right edges of the gusset and about 1¼in above the mark you’ve made for the magnetic clasp. Trace the inner circle of the grommet onto the right side of the fabric. Use small sharp embroidery
4 5 6 7 8
Assembly – Step 2 Gusset - Step 8
Assembly – Step 3
3
From the long strip, cut four strips, each 6in long. Thread one end of one of these short strips through a rectangular ring. Fold it over the bar, and use two rivets to secure the end to the back of the strip. Repeat with each of the remaining short strips. Fold the embroidered pocket in half, short edges matching and wrong sides together. Position it on one of the denim bag panels, raw edges matching, with the pocket centred between the left and right edges of the bag panel and with the folded edge at the top of the pocket. Position two cork+ring strips from Step 3 on the bag panel, covering the left and right edges of the pocket (as indicated on the pattern) and raw edges matching the bottom raw edge of the bag panel. Topstitch close to each long edge of the cork strips to secure them and the pocket to the bag panel. Topstitch the remaining two cork+ring strips to the other bag panel, ensuring that they are positioned in the same place as those sewn to the bag front panel. Fold the zipper panel in half, short edges matching and finger press creases in each long edge to mark their centre. Fold each bag panel in half, left and right edges matching, and finger press creases in the top edges to mark their centre. Pin one raw edge of the zipper panel to the top edge of the bag front panel, raw edges and centre creases matching. Ease the zipper panel around the curved edge of
4 5 6 7 Gusset - Step 9 scissors to cut the centre of the circle out of the denim and the lining fabrics. Follow the manufacturer’s instructions to install the grommet. Insert the male half of the magnetic clasp at the mark you made in Step 7, working only through the denim this time and not into the lining.
9
8
Assembly
1 2
Join the strips of cork fabric together using 45-degree seams to form a strip at least 2.8m long. Draw a line down the centre of the strip on the back of the fabric. Fold one long raw edge over to meet the line and topstitch it in place close to the raw edge using thread to match the colour of the cork in both the top of the machine and the bobbin. Now fold over the other long raw edge to meet the line and topstitch it in place. Assembly – Step 6
91
the bag panel. Stitch it in place. Match a lining bag panel with the bag front panel, right sides together, sandwiching the zipper panel between them. Stitch the layers together around the sides and top edges, leaving the bottom edge open. Turn the fabrics so that their wrong sides are together. Repeat Steps 8 and 9 to stitch the zipper to the bag back and lining.
9
10
Finishing
1
Trim the base stiffener to the same size as the denim rectangle cut for the bag base. Lay the denim wrong side up, and lay the stiffener on top of it. Using the same technique as you used to insert the magnetic clasp, insert the bag feet, which will protect your bag when you place it on the ground. Julie positioned the feet 1½in from the short and long edges of the base in each corner through both the fabric and stiffener. With the bag turned wrong side facing out, stitch the base to the raw edges of the bag. Start with the long edges, beginning and ending the seams ¼in inside the raw edges of the fabrics and backstitching to secure the stitches. Then use the same method to sew the short edges. Turn the bag right side out. Hand stitch the lining to the base of the bag.
2
3 4
You should have one fabric rectangle remaining, it is your bag base lining. Fold under ¼in on each edge of it and press. Turn the bag inside out and hand stitch the lining to
the base of the bag. This will mean that you won’t have any exposed seams in your bag. From the remainder of the long strip of cork fabric, cut two 27½in lengths. Repeat the process described in Step 3 of the Assembly instructions to thread and rivet them to the rings, checking that their seamed side will face in towards the zipper in the finished bag.
5
Rajmahal
The Luxury of Rajmahal Needlework
THREADS, KITS & MORE Available from your favourite needlework retailer 92
0429 390 427
www.rajmahal.com.au
Travelrite International
E: balwyn@travelrite.com.au www.travelrite.com.au
ALL ABOUT:
Stabilisers When machine stitching on fabrics, you will need to add a stabiliser to bring the fabric to a ‘stable’ condition that ensures that it is firm and taut in the hoop. Stabilisers come in black and white tear-away, and black, white, beige and grey cutaway. Having a selection of each type on hand, along with water-soluble in both plastic and Vilene types, is a good idea. You will also need a can of temporary-adhesive spray such as 505, spray starch such as Best Press and a liquid stabiliser such as Fabric Booster or Terial Magic. It is recommended to pre-wash fabric where possible, to shrink fabric to its natural form. Press all fabric to eliminate creases. Using spray starch when pressing is highly recommended. Keep water-soluble stabilisers in an air-tight environment to eliminate it breaking down, especially in highhumidity regions.
Fabric
Suggested stabiliser
Notes
Batiste Light-weight cotton Linen
Light-weight Tear-away Light-weight Cutaway on garments
Prewash fabric and apply Best Press for added stability Baste the fabric to the stabiliser to help reduce movement Suitable for outline-quilting, redwork and light-density designs – avoid large, heavy-fill designs
Burlap Hessian
Medium-weight Cutaway Water-soluble for topping
This fabric may be hard to hoop due to its thickness: hoop the stabiliser and spray with temporary adhesive spray and adhere the fabric to the stabiliser Baste in the hoop with water-soluble stabiliser on top Designs with fill are suitable – avoid quilting and redwork Because of the open weave you may see the stabiliser – placing organza between the fabric and the stabiliser can help mask the stabiliser
94
Fabric
Suggested stabiliser
Notes
Canvas Moleskin
Medium-weight Cutaway
This fabric can be hard to hoop due to its thickness. Hoop the stabiliser and spray with temporary adhesive spray and adhere the fabric to the stabiliser Baste in the hoop with water-soluble stabiliser on top Large designs may require two layers of stabiliser for density Use caution when hooping thick or heavy fabric: make sure that the material is supported on the machine, so the hoop does not pop out during stitching
Chiffon Organza Georgette
Water-soluble, Vilene-type stabiliser Tear-away if it won’t be visible after stitching is complete Liquid stabiliser such as Tertial Magic, Fabric Booster or a mix of watersoluble stabiliser and water
If stabilising the fabric with a liquid stabiliser, allow it to dry completely Best Press could be used – but do not use it if liquid stabiliser is being used Make sure fabric is on the stiffer side and that the stabiliser can be laundered when complete Light, open and flowy designs are recommended – avoid heavy-fill stitch designs Heavy designs don’t drape very well on these fabrics
Corduroy
Light to medium Cutaway Water-soluble plastic-type for topping
The stabiliser can be adhered with temporary adhesive spray Topper may not be needed for fine corduroy Larger-channel corduroy may need additional knockdown stitching to make the design pop Suitable for designs with fill – avoid quilting and redwork Use a 90/14 embroidery needle for heavier fabric
Denim
Light to medium-weight Cutaway
This fabric may be hard to hoop due to thickness. Hoop the stabiliser and spray with temporary adhesive spray and adhere fabric to the stabiliser Baste in the hoop Any designs are suitable Heavier fabric may require a 90/14 embroidery needle
Fur
Medium-weight Cutaway Water-soluble plastic-type on top
Spray stabiliser with temporary adhesive spray and adhere the fabric to the stabiliser Baste in the hoop with water-soluble stabiliser Suitable for designs with fill – avoid running stitch designs such as quilting and redwork Heavier fabric may require a 90/14 embroidery needle A light knockdown fill stitch may be necessary under the design to hold down the fibre and eliminate fibres coming through after laundering
Fleece
Medium-weight Cutaway Water-soluble plastic-type on top
This fabric may be hard to hoop due to thickness. Hoop the stabiliser and spray with temporary adhesive spray and adhere the fabric to the stabiliser Baste in the hoop Topping may be used for small details such as lettering Suitable for the majority of designs
100% Cotton
Tear-away or Cutaway stabiliser
Best Press can be used for to add support to the fabric fibre Suitable for the majority of designs
95
Fabric
Suggested stabiliser
Notes
Leather Vinyl Oilskin
Light to medium-weight Cutaway
Leather cannot be hooped so a clamp hoop is ideal, or place the stabiliser in the hoop and spray on temporary adhesive spray to adhere the fabric to the stabiliser Do not baste in the hoop Light, open designs such as run stitch and open flowy designs are perfect – avoid heavy fill designs A leather needle may be needed depending on the weight – the larger the needle the larger the needle penetration and larger hole – so use the smallest possible
Lycra Spandex
Light-weight Cutaway or no-show mesh Wash-away Vilene-style and organza (optional)
Spray the no-show mesh stabiliser with temporary adhesive spray and adhere slightly-stretched fabric to the stabiliser If the fabric is to be worn, stretching it a little in the hoop will simulate the wearing of the garment. Pull evenly in the hoop to ensure the weave is even Suitable for light-weight designs with low density Use smaller designs to make up a large design to allow for stretch A Lycra needle may be more suitable The back can be covered with a light-weight, iron-on interfacing to eliminate scratching from the back of the stitches
Silk Satin
Tear-away stabiliser No-show mesh Organza
Best Press spray starch can be used for additional stability
Minky fabric
Light to medium-weight Cutaway Water-soluble plastic-type on top
Spray the backing stabiliser with temporary-adhesive spray and adhere the fabric to the stabiliser. Baste in the hoop with water-soluble stabiliser on top Suitable for the majority of designs – avoid running stitch designs – they will sink into the fibre
Towelling
Tear-away or Cutaway stabiliser Water-soluble plastic-type on top
Spray the stabiliser with temporary adhesive spray and adhere the fabric to the stabiliser Baste in the hoop with a water-soluble stabiliser on top Most designs are suitable – avoid run stitch designs A good underlay may be necessary Heavy towelling may require a 90/14 embroidery needle – refer to Embroidery on Towelling, on page 28, for more information
T-shirt Pique
Light to medium-weight Cutaway Water-soluble plastic-type on top
Water-soluble on top is optional: it is good to use for pique and small lettering Baste water-soluble plastic-type stabiliser to the design area Majority of medium- and light-weight designs are suitable
Wool Polar fleece
Light to medium-weight cutaway Water-soluble plastic-type on top
Majority of designs are suitable – avoid running stitch on thicker fabric with nap Some designs may require underlay For heavy fabric a 90/14 embroidery needle may be needed
Velvet Velour
Light to medium-weight Cutaway Water-soluble plastic-type on top
Hoop burn can occur – using a topper can eliminate this Topping may be used for small detail such as lettering Majority of designs are suitable – avoid run stitch designs Heavy fabric may require a 90/14 embroidery needle
96
Distributed by
Adjustable Multi-Purpose
n o i t a t S e v i t Crea One table does it all. Cut, sew, iron and create!
Electric height adjustment Easy one-touch height adjustment ranging from 61cm to 126cm*, with 3 programmable memory positions. Anti-collision safety feature detects obstructions and prevents damage and injury. European-made electric lifters with a total 140kg maximum lift capacity. *Castors is optional
Storage drawer Keep everything you need at your fingertips with the extra-wide storage drawer featuring heavy-duty soft-close drawer runners. You’ll have space for everything, including extra-long rulers!
Quality materials & construction The Creative Station is proudly Australian made from premium components and a durable High Density Polyethylene (HDPE) table surface. This gives you the confidence your Creative Station will stand the test of time, backed by a standard 10 year conditional warranty.
For more information or purchasing options, call 03 9339 7777 or email info@babylock.com.au
www.babylock.com.au
FREE DESIGN DOWNLOAD
100
Aussie Floral REDWORK RUNNER
Dawn Johnson Dawn is well known for her Australian floral designs and here she combines them with another of her favourite techniques — redwork. The beauty of Australian flora comes to life in this table runner that is a modern take on a 19thcentury art form of redwork embroidery.
www.dawnjohnsondesigns.com
101
The light and airy lines of traditional redwork designs are great when digitised for stitching out on all types of projects — quilt squares, tea towels, napkins, clothing, home decor items and more. While they were traditionally stitched in red thread, you can use any colour your heart desires. Dawn has generously supplied the redwork embroidery design she has used here.
Materials 40cm (½yd) solid cream fabric 40cm (½yd) backing fabric Thin fusible batting at least 44cm x 110cm (15in x 45in) Tearaway stabiliser Pilot Pintor Paint Markers in assorted colours — see note Machine embroidery thread in black Cream machine sewing thread Stabiliser and 130mm x 180mm (5in x 7in) hoop — see note Spray starch Water- or air-erasable fabric-marking pen Rotary cutter, ruler and mat Sewing machine with ¼in foot General sewing supplies Note: The Pilot Pintor Paint Markers are available from Echidna Sewing. Dawn recommends them for this project because they provide a very precise fill and are heat set to make the colour permanent, but can also be blended with a slightly damp cotton bud while the paint is still wet if desired. Other varieties of paints, pens, oil pastels and crayons could be used; just ensure they are permanent and won’t wash out. Instructions are provided for a 130mm x 180mm (5in x 7in) hoop, but the design is also provided for a 200mm x 300mm (8in x 12in) hoop if you’d like to use it in another project. The FREE embroidery design can be downloaded from: https://dawnjohnsondesigns.com/collections/ redwork/products/aussie-floral-redwork-runner Enter the code: GETFREE at the checkout.
Finished size: 38cm x 104cm (13in x 41in)
102
Cutting and preparation
1
Wash the solid cream and backing fabrics. Apply spray starch to the cream fabric and iron it before continuing. From the solid cream fabric, the backing fabric and the thin fusible batting, cut: one rectangle, 13½in x 41½in Fuse the batting to the wrong side of the cream fabric. Ensure a good bond: you will need to re-hoop several times at each end of the runner and it is important that the two layers don’t move when you do this. Download the PDF patterns and instruction file. Print them out; when printing the patterns, select the ‘Actual size’ option in the Page size and handling section of the Print dialog box. Do not select ‘Fit’ or ‘Shrink oversized pages’. Join the pattern pages together as required to give you a full-size pattern. Punch positioning holes in the pattern pages where indicated. Lay the pattern for the End design on one end of the cream fabric, centring it between the left and right edges. Use an erasable fabric-marking pen to mark the fabric thropugh each positioning hole. Repeat at the other end of the fabric.
2 3 4
Machine embroidery
1
Select the End embroidery design. Place stabiliser in your hoop. Use the paper pattern to identify the first segment to stitch. (It is important that the segments are stitched in numerical order.) Float and align the marked cream fabric for the first segment in the hoop. Stitch out the first segment of the design.
2
Remove the fabric from the hoop and carefully tear the stabiliser away. Position the runner for the next segment and stitch it out. Continue in this manner until all the segments have been stitched at one end of the runner. Then repeat to stitch them at the other end. Fold the runner in half horizontally and vertically and finger press creases to mark the centre. Lay the pattern for the Centre design over the creases and mark the positioning holes with a fabric-marking pen. Align the second section of the Centre design in the hoop. Stitch the segments as they are numbered.
3 4
Quilting
1
Lay the backing fabric right side down on the runner. Pin the layers together, then stitch around all four edges using a ¼in seam. Leave an opening of about 4in in one long edge. Trim the corners and then turn the runner right side out through the opening. Turn in the raw edges of the opening and hand stitch them closed. Topstitch around all four edges of the runner about 3⁄8in from the edges using thread to match the cream fabric. Quilt the runner as desired. Dawn stitched straight lines radiating out from the centre oval.
2 3 4
Painting
1 2
Paint the stitched shapes. Blend in shading and highlights to accent the shapes and create the illusion of three dimensions. Allow time for the paint to dry. Press the runner to set the paint; use a pressing cloth between the iron and the fabric.
www.quilterscompanion.wordpress.com
103
104
Melco EMT16 PLUS embroidery systems offer several unique features. These machines are built to produce! REVOLUTIONARY FEATURE: Acti-Feed™ thread feed technology automatically adjusts the amount of thread feed, enabling outstanding quality, speed, and ability to embroider on a wide variety of materials. Also, since this system is automatic, there are no thread tension dials to adjust. The Melco Operating System (MOS) FRQWUROV HYHU\WKLQJ XVLQJ D ¿QHO\ WXQHG VHQVRU built into the machine. REVOLUTIONARY FEATURE: Scalable, modular HPEURLGHU\ V\VWHP FDQ EH FRQ¿JXUHG WR VXLW \RXU production needs. Boost your production capability any time by simply adding more machines to the network! MOS controls each machine from a dashboard on a single computer. Produce the same design, or different designs simultaneously. REVOLUTIONARY FEATURE: Melco EMT16 PLUS machines operate independently of each other on a multi-head network. This means that the operator can stop any machine for any reason, while all other machines will continue to run. This ÀH[LELOLW\ JUHDWO\ LQFUHDVHV SURGXFWLRQ HI¿FLHQF\ A 4-head Melco embroidery machine network has been known to out-produce a traditional 6-head embroidery machine! REVOLUTIONARY FEATURE: Laser alignment for precise control over size and position of embroidery to garment. EXCLUSIVE FEATURE: QHHGOHV IRU PD[LPXP ÀH[LELOLW\ ZLWK FRORU RSWLRQV EXCLUSIVE FEATURE High-speed embroidery at 1,500 stitches per minute. EXCLUSIVE FEATURE MOS is very easy to use. The simple user interface can be learned in less than an hour. Flexible Computer Options: MOS is Microsoft :LQGRZV FRPSDWLEOH (QMR\ WKH ÀH[LELOLW\ WR UXQ the embroidery machines using your preferred computer system.
Find Melco embroidery machines in operation world-wide by companies such as Disney, Nike & New Balance. From around $99 per week – terms apply.
Elizabeth Machines | Sydney/Melbourne/Brisbane/Adelaide | Ph 02-97644455 | graeme@elizabethmachines.com.au | www.elizabethmachines.com.au
TOP 10 EMBROIDERY
‘Must Have’ Tools By Leanne Church As a self-professed gadget girl, I love to test gadgets with the hope they have multiple uses for all of my craft projects. I have even been known to use some measuring tools for cake decorating and scrapbooking. Here are my top 10 embroidery gadgets that are a must-have in your sewing room. They are all readily available from independent sewing and patchwork stores.
1 Stitch eraser
2 Pressing mat
Have you ever made a mistake on your embroidery and need to unpick it but an unpicker just won’t do the job? The Stitch Eraser is an amazing tool that allows you to unpick unwanted embroidery. Don’t just use an unpicker as this will take way too much time. If you have put the embroidery in the wrong place or put in the wrong colour, this device will help you eliminate the problem quickly. TIP: I leave the design in the hoop and the tension keeps it stable. This will make it less likely that you will put a hole in the fabric. Always shave from the back in a sideways and upwards back and forth motion. Pull out the top thread but don’t pull hard as you may distort the fabric and cause holes. If you can’t get all the thread out, use your trusty unpicker (and the tweezers I recommend as you read on) to get all the thread removed.
Have you ever had a little puckering in your embroidery? Pressing on an ironing board is not always the answer. A flat surface doesn’t always allow for the embroidery to sink into the board and allow the fabric to flatten out. Using a pressing mat allows this to happen. Use a pressing mat with the embroidery facing down and press with the iron to eliminate some or all of the puckering. If you have hooped incorrectly or on the bias this may not get all the puckering out, but it can help. Great also for pressing your in-the-hoop appliqué designs. I also love that it is made from Australian wool.
3 Tweezers Unpicking embroidery can be a hassle, but sometimes those small stitches are too hard to get out with your fingers. My favourite tweezers are the ankle type as they have more surface for pulling out those frustrating threads from your fabric. I found these tweezers at hobbytools.com which is located in Braeside, Victoria (a few doors up from Chandler’s Cottage) but ships all over. They also have some other cool tools and gadgets for collectors like me.
106
5 Marking pens
4 Mini irons If you are into appliqué in hoop machine embroidery you need a small iron. There are two that I love using. I use the little Clover mini iron in small hoops and the bigger one from Birch for larger hoops and design elements. Even though the Birch mini iron has steam, it needs to be dry to apply appliqué. Water and appliqué web do not mix as this can cause lifting and the glue not adhering properly. You may also want to invest in a small silicone iron rest mat for when the iron is not in use, so you don’t have any accidents with burning your work area.
I have found these great new pencil and chalk markers from Bohin — here are three that I use. The 0.9mm extra-fine tip (item 91473), which is perfect for marking through template holes and for those who like just a fine white line on fabric or other hobby materials. It can be removed with a slight press of the iron. There is also a three-in-one coloured ceramic marker (item 91472). The mechanical pencil has white, blue and pink leads. Great for all colours of fabric and there is an eraser built in for easy removal. The mechanical three-colour chalk pencil (item 92148) is excellent on fabric. It washes out in water or there is a handy eraser at the top of the pen for easy removal. It also comes with a handy sharpener for refining the point of your chalk. Remember to always test the pens on a scrap piece of fabric before you start your project to make sure it will erase following the manufacturers’ instruction, either with an eraser or ironing. There are great instructions in the packaging so please read carefully.
7 Embroidery wand 6 Embroidery snips Embroidery snips with a curved tip are very handy for trimming those nasty jump stitches. The fine tip can get under small lengths of thread and can be trimmed close to the embroidery. They are also great for small appliqué in the hoop designs when you need that extra fine point to cut those small unruly fibres that just annoy you.
Do you ever have loops in your embroidery? This can happen if your machine has fluff in the tension and it causes a misreading as the thread travels through the machine system to the needle. An embroidery wand is a needle that you pass through from the front to the back of your fabric beside the looped thread. The end of the needle is rough and picks up the thread and pulls it through to the back of the work. Some would cut such threads but that can cause unravelling after time. This is a must have in your gadget stash!
107
h
8 Hooping stations and no slip mats These are great as a stable surface to work on your hoop. Having a sturdy, no-slip area is vital, as a hoop that moves may not have your fabric in properly and can cause your embroidery to be off grain and out of alignment, which can, in turn, cause puckering. The one from Julie Hall Designs is great because it has alignment markings to make sure your hoop is square. There is an angled hooping station from Echidna Sewing Products that has magnets so you can place your hoop into a position where you can repeat the hooping process multiple times. Echidna Sewing Products also has three silicone ironing mats in different sizes that are great for hooping and on which you can also use an iron. The 20cm x 20cm is my favourite for taking to workshops.
9 Double-sided tape Double-sided tape can be used for many things, and when it comes to hooping fabrics, it is another great trick of the trade. I learnt this trick from Kym at The Sewing Revolution, and it has come in handy numerous times. Place thin double-sided tape along the bottom of the inner hoop, remove the backing paper and then place the hoop on your fabric. When you move the fabric to frame it, the tape helps keep the fabric in place, especially when you must keep the grain of the fabric straight. So when you hoop it, it stays in place and stops a little of the movement in the fabric as it stitches. Double-sided tape is also great if you must stick a corner of a collar or corner of a handkerchief on stabiliser. Be mindful that you should not have it near where you are sewing as it can gum up your needle. I avoid the yellow double-sided tape for embroidery as it is very hard to remove from hoops and fabric.
10 Spray stabilisers Fabric Booster, formally known as Terial Magic, is a stabiliser spray that you spray on your fabric and allow to dry for temporary stiffening, with a paper-like effect. It eliminates fraying or wavy results for stretch materials. I love it for sewing on organza when I don’t want a stabiliser to show and for fine appliqué work when you just need your fabric to behave.
505 Temporary Spray Adhesive is an odourless and colourless adhesive that will not make your work too sticky, nor will it gum up your needle. It has no fluorocarbons, it is water-based and it will eventually break down in the environment. You should not use any other spray glues as they may contain stronger ingredients that can damage not only your project, but your machine as well.
Best Press is fabulous if you are working on a very flimsy fabric that requires a little more stability. Sometimes stabilisers are just not enough; I always spray and press with Best Press, so I know my fabric has that little extra body. If your fabric is hooped correctly, then the Best Press can also help eliminate puckering, but that will also depend on the design itself. I try to avoid aerosol products that do a similar job because they are not environmentally friendly.
108
THE EMERSON GRACE
Satchel
Cath Quinlan This classic satchel is perfect for on-the-go tasks, while still being feminine enough to double as a handy satchel for evenings out.
Husqvarna Viking Australia
110
husqvarna_viking_australia
HusqvarnaVikingAustralia
FREE DESIGN DOWNLOAD
111
Finished size: 34.5cm (14in) x 24cm (9¾in)
Materials Embroidery Design: Emerson Grace (EGS01) — see note Embroidery thread: Cath used Superior Fantastico Variegated Thread 10in x 12in green print fabric (centre front panel) 10in x 12in blue print fabric (centre front panel) 9in x 11in solid black fabric (front sides) 11in x 15in solid black fabric (back) 11in x 30in black on white print fabric (lining) 5in x 2½in solid black fabric (zipper tabs) 11in x 30in lightweight fusible batting — H640 Fusible Pellon 11in x 30in lightweight fusible interfacing Fusible web — Heat N Bond Lite 30cm (12in) grey continuous zipper, 1¼in wide
112
Tear-away stabiliser Size 90 embroidery needles 36cm x 26cm (14in x 10in) hoop Rotary cutter, ruler and mat OR GO! Cutter or Big Cutter, AQ55052 GO! 1in strip cutter and AQ55138 GO! 6in x 24in cutting mat Bobbinfil Quilting clips Mini iron Embroidery machine General sewing supplies Note: The embroidery design files, Emerson Grace, required for this project can be downloaded free from http://bit.ly/emerson-grace
Preparation and cutting
1 2 3
Download the Emerson Grace embroidery files needed for this project from http://bit.ly/emerson-grace Cut two rectangles of fusible web, 10in x 12in. Fuse them to the wrong side of the 10in x 12in rectangles of green print and blue print fabrics. If you are using a GO! Cutter, lay the short edge of the green print fabric on the top of the GO! Strip Cutter line with the right side of the fabric against the first right-hand cut line on the die. Lay the cutting mat over the fabric 1in down from the top. This will mean that the cuts won’t go all the way to the end of the fabric. Repeat Step 3 with the blue print fabric but this time cut the 1in strips down the 12in edge. Go to Step 7. If you are not using a GO! Cutter, turn over one short edge of the green print fabric by 1in. Press to crease it. Unfold. Make nine cuts in the fabric, 1in apart, from this crease down to the other short edge. Turn over one long edge of the blue print fabric by 1in. Press to crease it. Unfold. Make 11 cuts in the fabric, 1in apart, from this crease down to the other long edge.
4 5 6
Preparation and cutting – Step 5 (shown in alternate fabric)
113
7 8 9
Cut 9in x 11in solid black fabric into two rectangles, 4½in x 11in. Cut the batting into two rectangles, 11in x 15in. Fuse one of them to the wrong side of the 11in x 15in solid black fabric. Fuse the interfacing to the wrong side of the 11in x 30in black on white print fabric. Then cut the fabric into two rectangles, 11in x 15in for the lining.
Zipper tabs
1 2
Cut 5in x 2½in solid black fabric into four rectangles, 2½in x 1¼in. Lay one of these rectangles right side up. Lay one end of the zipper on top of it, 1¼in edges matching. Lay another fabric rectangle on top, right side down, on top of the first rectangle+zipper. Stitch across the fabric+zipper with a ¼in seam. Fold the fabric rectangles right side facing out and press. Topstitch close to the seam line. Repeat Steps 2 and 3 to sew a tab at the other end of the zipper.
Satchel front – Step 4
3 4
Satchel front
1 2 3
Load the free Emersdon Grace EGS01 design into your embroidery machine. Place tear-away stabiliser in your hoop. Stitch out Colour 1 on the tear-away to serve as a placement line. Lay the remaining piece of fusible batting over the placement line, glue side facing up, and stitch Colour 2 to hold it in place and create guidelines for positioning the strips of green and blue print fabrics. Lay the green print fabric, right side up, over the top of the stitched centre square. It should overhang the line and not extend past the bottom. Stitch Colour 3 to hold the fabric in place along the right edge. The fabric is larger than needed — trim the excess that has not been stitched down on each of the 1in strips. Lay the blue print fabric, right side up, with the uncut edge along the bottom line. Stitch Colour 4 to hold it in place. Remove the hoop from the machine, but do not remove the fabric from the hoop. Carefully weave the two fabrics together, keeping the strips tight and straight. Use a mini iron to fuse the fabrics to the underlying batting. Stitch Colour 5 to hold the top section down. Stitch Colour 6 to hold the left edge in place. Stitch Colour 7 to work the wavy quilt lines over the woven panel. Monitor this stitching closely to ensure that the machine foot doesn’t get caught on the edges of the fabric strips. Trim the edges of the fabric panel ¼in away from the stitched line.
4 5 6 7
Satchel front – Step 6
8 9
Side panels
1
Lay one of the 4½in x 11in rectangles of solid black fabric, right side down, over the satchel front, with its bottom edge overlapping the stitch line by ¼in. Stitch Colour 8 to create the seam. Satchel front – Step 8
114
2 3
Turn the side panel right side up. Stitch Colour 9 to hold it in place and quilt it. Lay the second 4½in x 11in rectangle solid black fabric, right side down, over the satchel front, with its top edge overlapping the stitch line by ¼in. Stitch Colour 9 to create the seam. Turn the panel right side up and stitch Colour 10 to hold it in place and quilt it.
Zipper
1 2 3 4
Find the centre of the zipper and make a light mark on the tape at this point. Lay the zipper right side down along the right edge of the hoop, aligning the edge of the zipper tape with the stitch line. Use the foot control to stitch Colour 11 to hold the zipper in place. You will need to stop and move the zipper pull out of the way during this stitching. Lay one of the interfaced rectangles of black and white print fabric right side down over the hoop, matching it with the underlying layers. (The alignment doesn’t have to be exact, as you will be trimming later.) Stitch Colour 12 to create this seam. Remove the fabrics from the hoop and put them aside.
5
Satchel back
1 2
Load the EGS02 design into your embroidery machine. Place tearaway stabiliser in your hoop. Stitch out Colour 1 on the tearaway to serve as a placement line.
3 4
Layer the 11in x 15in solid black fabric, right side up, over the placement line. Stitch Colour 2 to hold it in place and stitch the quilting design. Open out the satchel front. Lay it over the satchel back with the right side of the zipper matching the satchel back and the stitch lines on the edges of the front and back panels matching. Use the foot control to stitch Colour 3 to hold thr front panel in place. You will need to stop and move the zipper pull out of the way during this stitching. Lay the remaining rectangle of interfaced lining fabric right side down over the hoop, matching it with the underlying layers. (Again, this alignment doesn’t have to be exact.) Stitch Colour 4 to create this seam.
5 6
Finishing
1 2
Trim back to 3⁄8in from the stitch line.
Match the front and back panels right sides together. Match the two lining panels right sides together. Hold the layers together with quilting clips. Check that the zipper tabs are folded towards the front panels, not the lining. Stitch around the satchel using a 3⁄8in seam, leaving the bottom edge of the lining open. Turn the satchel right side out through the open bottom edge of the lining. Stitch the bottom edge of the lining closed using a ½in–¾in seam. Push the lining down into the satchel.
3 4 5
115
OFF THE SHELF:
Book reviews This is a collection of books that share tips and tricks and gorgeous projects
We “Whisk” You a Merry Christmas! Machine Embroidery Version Kimberbell’s new feature quilt is a holiday tribute to sweet Christmas confections and even sweeter traditions. Dimensional elements include flexible foam whipped cream, marshmallow pom poms, a clear vinyl cake dome, and appliquéd glitter countertop mixers. Two colourful canisters are labelled with blank chalkboard fabric so that you can decide the contents, and a cheerful assortment of aprons that have actual pockets for holding tiny embellishments. Bonus projects include Tied with a Bow Pocket Placemats, Baking Memories apron (in child and adult sizes) and two tea towels. The designs are provided on a CD along with a full-colour instruction booklet. Published by Kimberbell.
Modern Machine Embroidery: 11 projects from Pickle Pie Designs with 25 must-have embroidery motifs By Lisa Archer If you’re just starting out with your embroidery machine, this book offers the know-how you need to embroider like a pro. It provides detailed step-bystep instructions along with essential information about stabilisers, threads, fabrics and hooping. You’ll learn how to create appliqué designs and custom monograms, as well as a range of in-the-hoop embroidery projects that take advantage of the capabilities of today’s embroidery machines. Along with the book, you’ll also receive a DVD of 25 embroidery designs, including three inthe-hoop projects and a complete alphabet. Published by Fons & Porter.
116
The Sewing Machine Embroiderer’s Bible: Get the most from your machine with embroidery designs and inbuilt stitches By Liz Keegan We’re always a little wary of books that call themselves a ‘bible’ on any subject: they raise expectations so high and often disappoint. This one, however, might just be the exception that proves the rule. It provides an overview of embroidery machines, software and how to source designs from the internet, the tools and accessories you’ll need – hoops, stabilisers, needles etc – and different kinds of designs and how to use them creatively for fabulous results. It also provides guidance for making use of the built-in embroidery stitches that most sewing machines now offer, but which most of us rarely use. There are step-by-by step instructions for a variety of embroidery designs, including heirloom, three dimensional, lettering and trapunto. Published by Quarto Publishing.
The Art of Annemieke Mien: Wildlife artist in textiles By Annemieke Mien This book is a classic in the field of textiles, embroidery and wildlife art. It was first published in 1992 and has been reprinted more than 20 times. It’s been out of print in recent years, but was republished in hardcover several months ago as part of the Search Press ‘Classics’ Series. If you don’t own a copy – get one now. It is a collection of astonishingly skilled textile artworks combining fabric and paints with hand and machine embroidery, quilting, trapunto, pleating, beading, weaving and felting. Annemieke uses a wide variety of fabrics, such as silk, wool, fur and synthetics to faithfully reproduce insects, birds, amphibians and sea life. There are no project instructions as such, but Annemieke is generous in sharing information about the processes she uses to create her art, accompanied by detailed photographs of work in progress. Published by Search Press.
Artful Machine Embroidery: A visual guide to creating clothing you’ll love to wear By Bobbi Bullard With this guidebook and bonus CD of embroidery designs from award-winning artist, Bobbi Bullard, you’ll learn how to make the most of your machine embroidery to embellish hand-sewn or store-bought clothing and create one-ofa-kind outfits. Bobbi starts with an introduction to the elements and principles of design, then moves on to tips that will help you enhance your machineembroidery skills. She finishes with a description of her own clothing-design process. The CD includes appliqué, border, lace, motif, reverse appliqué and Richilieu designs for you to use. Published by C&T Publishing.
117
Your Machine Embroideruy
Online Resource Guide
Keeping up with those in the know of any craft can be a time-consuming chore. Here we have put together some of the most talented and interesting digitisers, bloggers, Facebook and Instagram enthusiasts in the machine embroidery industry from Australia and overseas.
Australia Bernina Sewing Machines Website: http://shop.bernina.com.au/page/free-projects Instagram: @berninaaustralia Brother Sewing Machines Blog: blog.brothersews.com Instagram: @brothersews, @brotheraustralia CSI – Creative Sewing Inspiration – Leanne Church Instagram: @csicreativesewinginspiration Echidna Sewing Blog: echidnasewing.blog/tag/sewalong/ Instagram: @echidnasewing Husqvarna Viking Blog: www.husqvarnaviking.com/en-AU/Be-Inspired/Blog Instagram: @husqvarnaviking Janome Website: www.janome.com.au Julie Hall Designs Website: www.stitchinbymachine.com Instagram: @juliehalldesigns Sweet Pea Machine Embroidery Website: www.swpea.me Instagram: @swpea.machineembroiderydesigns Wilcom Embroidery Blog: productblog.wilcom.com
118
Overseas Digitising Made Easy – John Deer Website: www.digitizingmadeeasy.com/blog Instagram: @embroiderylegacy Sew Bubbles by Lisa Shaw from Embrilliance Software Blog: www.sew-bubbles.com/category/blog Instagram: @lisasewbubbles Lindee G Designs Website: www.lindeegembroidery.com Facebook: Lindee G Embroidery
Facebook Groups Join a group and share your knowledge and passion Aussie Machine Embroidery Addicts Brilliant Embrilliance Embroidery Chandler Cottage CSI – Creative Sewing Inspiration – Leanne Church Dawn Johnson Echidna Sewing and Embroidery Community Embroidery Machine Help Machine Embroidery Enthusiasts Sweet Pea Machine Embroidery Zoe Clifton Designs Zundt Designs
GET ORGANISED WITH OUR
2 0 2 0 C A L E N DA R S With over 150 wall calendars to choose from, there is something for everyone in the 2020 range
ONLY
$19.95 each
To see the complete diary and calendar range please visit paperpocket.com.au or call 1300 303 414
Profile
Q&A WITH
Suzann Moss www.etsy.com/au/shop/Tiramisue2
120
tiramisue@bigpond.com
Can you tell us about where you live and your family? I live in the outer eastern Melbourne suburb of Mt Evelyn, Victoria. Mt Evelyn borders wine country, cherry orchards and bulb farms — it still has a village feel even though the area is growing. My husband is a very patient soul who encourages me by not constantly asking “what’s for dinner?”, knowing it is quite likely nothing. I have one son who flew the coop recently. We have a grumpy black and white cat called Norman and a very large Irish Wolfhound named Wilson after ‘the volleyball’ — I figured Wilson was a perfect name as I feel I am frequently talking to myself anyway! What crafts did you do as a young person? My mother is a knitter and dressmaker, so fabric and yarn have always been in my world. I really didn’t do much creatively until I left home and had a place of my own to make a mess. In the early stages, I managed to keep it all contained in one room — not so much these days! How did your interests progress to machine embroidery? I started off with a knitting machine — the push-button type — and worked my way up to computer-based machines and programs. I really took to the whole technology thing. I discovered machine embroidery via the knitting machine guy. He had Jenny Haskins coming to his shop for a trunk show so I signed up. I was hooked — stitch no 83 on the 7570 — I had to get myself one of those beauties. This, in turn, meant I discovered the internet. Free designs, more free designs, most of them badly made, but the ideas started to form. My local sewing shop had Tuesday night classes to show what the machines could do, aside from sewing straight lines and clothing. (Leanne Church taught many of these early classes.) My first major quilt was Eileen Campbell’s U is for
Unicorn. We did the blocks each month: everyone started with the same pattern but as the time progressed, everybody realised the pattern wasn’t cast in stone and began making alterations. It was a wonderful way to learn more and more. What other hobbies do you enjoy? As I said, I love technology. I am very keen on photography in particular, anything underwater and macro. I am trying to learn digital painting — I see it as a fantastic way to add colour to fabric and the possibilities are endless. I dabble in digitising — I have an Etsy shop where the more successful ideas go although
121
Profile
I won’t be making a killing at that one — oh, and fabric dyeing, how much fun is that? What are your favourite items to make? I really enjoy making bags. You can run with an idea, try techniques and move on to the next one. I tend to just ‘make’. The occasional sale is a bonus, but tragically I am not great at self-promotion, so I have a mighty fine collection of work stuffed in cupboards and drawers. From where do you get your inspiration? Inspiration varies for me. Our local show always has a theme, so each year I try to complete something with that in mind. Last year it was ‘Bees’ so Liquid Gold was my piece for that. This year it is ‘Lady Birds’. I have a bit of an obsession with fish — I entered two bags into a challenge earlier in the year with a botanical theme, so the goldfish pond was the inspiration for that and I spend hours snorkelling and chasing fish with my GoPro and TG5. I can be inspired by a photo, a piece of clip art or a piece of fabric. When my mind is full to capacity with ideas, a camera can help store those ideas. Pinterest also has a lot to answer for. What has been your best finish? I decided I needed to put myself out there and enter a few competitions. I don’t care what the outcome is, I just want people to see what can be
122
The Tiger Jacket
As the children in our family get older, it gets a little harder to find just the right present. My niece made it easy for me this year. She had a jacket and asked if I could put a tiger on it. She chose Wild Beauty Tiger by Embroidery Library Tiger. I have a fear of embroidering on someone else’s clothing and having a massive ‘oops’ moment, so I have developed a few work arounds — especially when the stitch tally is nearly 400,000 stitches. Method A works well for designs that do not have lots of gaps or are sparsely stitched. Apart from the bamboo design — stitched directly onto the jacket — the fern
done with an embroidery machine besides designs in boxes. I think winning the Embellishment award at this year’s Quilt Convention is my best finish to date. The quilt Sea Change is actually called At the Drop Off but in my usual queen-of-thelast-minute state, I filled out the forms on the run and couldn’t for the life of me remember what I had named it! Do you share your skills with others, teaching etc? I am part of a local quilt group here in Mt Evelyn. Not many people in my circle actually own an embroidery machine, but I do like to throw ideas around and help others with their quilting. I have run a couple of classes — one was an art quilt featuring a ton of ideas — painting fabric, stamps, stencils, bead making — it was a fairly intense two-and-
pieces, flowers and tiger were all stitched using two layers of organza and two layers of medium-weight tear-away stabiliser. After hooping the fabric and stabiliser I added a basting before I started stitching, because the organza can have a mind of its own. Sometimes it is better to match the organza to the colour of the garment and sometimes I match it to the item being stitched. I used green for the fern leaves, white for the tiger and black for the flowers. After it was stitched, I removed the tear away as close as possible to the edges of the embroidery. Some designs will give you a good clean line; in the case of the tiger, there was a more feathery edge so I had to use a needle to try to get as clean an edge as possible. I used small sharp, curved scissors to trim the organza close to the edge of the embroidery. After trimming, it was time to melt the organza away from the design. I like to use a candle over the kitchen sink for this process. I fill the sink with water in case anything catches alight. Holding the flame close to the design edge, but not touching, enabled me to get rid of any furry bits. As the organza melts it also creates a locking system for the stitches. Once all the embroidery pieces were prepared, I put the design together. First I stitched bamboo directly onto the jacket. Then I positioned the other elements and pinned them in place. To reduce bulk behind the tiger, I cut away the pieces of fern that wouldn’t be seen. I started stitching down the pieces from the back to the front of the design. On the lighter areas of the tiger, I ran the stitching in the same direction as the embroidery stitching to feather the appliqué. I didn’t want a big bold satin stitch for this type of work. My aim was to stitch down the pieces in the most invisible manner possible.
a-half days and this year a call went out for some bagmaking tips, in particular using zippers, so I put together a class for that. I like to share things I have learned to help others get their piece of art over the finish line. I want everyone to enjoy fabric art as much as I do. What is the best thing about machine embroidery for you? Once you learn the basics — and there are always things to learn — you can create anything. You don’t need to be able to draw and shade — good designs have got that covered. Machine embroidery and free-motion work bring me happiness. Everything else going on around you is forgotten as the magic with needle and thread starts to unfold.
123
BONUS 2020 CALENDAR AND DIARY w he n yo u su b sc ri be e to Quilters Co Companion mpan i on
TOTAL VALUE
$130.55
The 2020 Quilters Companion diary is our special collector’s edition, featuring a selection of our top 100 quilts and projects over our 100 editions of Quilters Companion magazine. This year the diary showcases the very best of handmade items to decorate and adorn your home, from quilted wall hangings, quilts or table runners to cushions from your favourite quilting magazine. You don’t want to miss this one!
PRODUCT FEATURES: Pages: 184 pages Week View: Weekly Size: 150mm x 211mm - Portrait Additional Features: Ring Bound
SUBSCRIBE NOW To receive this offer, call 1300 303 414 and quote the code: C/QCME01. HURRY! Offer ends 12th M March, h 2 2020 020 02 0
Subscription Offer
1 year of Quilters Companion magazine including 1 BONUS issue of Great Australian Quilts + BONUS 2020 Collector’s Edition Quilters Diary + 2020 Tilda wall calendar
FOR ONLY $79.95 My Personal Details *Mr/Mrs/Miss/Ms First name: *Surname: *Address: *Suburb:
*State:
*Postcode: *Daytime telephone: (
)
*Email:
Gift Subscription To Mr/Mrs/Miss/Ms First name: Surname: Address: Suburb:
State:
Postcode: Daytime telephone: (
)
Email:
ONE YEAR (7 ISSUES) Quilters Companion magazine RRP $90.65
INCLUDING ONE SPECIAL ISSUE Great Australian Quilts
Payment Options Cheque/money order for AU$ (Please make cheques payable to Universal Magazines Pty Ltd)
Please charge my:
American Express
Card number:
Diners
MasterCard
Visa
Expiry date: (must be included)
Cardholder’s name: Cardholder’s signature:
PLUS BONUS 2020 Collector’s Edition Quilters diary
Subscribing Made Easy
RRP $19.95
1300 303 414
SEND COUPON
and quote the code C/QCME01
Subscriptions Department, Reply Paid 75687, North Ryde NSW 1670
AS WELL AS 2020 Tilda wall calendar RRP $19.95
For Only$79.95 *Please note the special edition of Great Australian Quilts will be the future edition, not previous issues
universalshop.com.au and enter code C/QCME01
(02) 9805 0714
mailorder@umco.com.au This offer is only available while stocks last, or until expiration date. T&Cs: Subscriptions will commence with the first available issue. Existing subscriptions will simply be extended. Free gifts arrive separately to the magazine subscription and are sent as soon as possible. Free gift offers do not apply to subscribers currently on the Easy Payment Plan. Offer open to Australian residents only. By subscribing you acknowledge that you understand that ‘tip-ons’ and gifts or bonus issues that may be available with non-subscriber copies of this magazine may not be provided to subscribers and is at the discretion of Universal Magazines Pty Ltd. The Promoter shall not be liable for any loss or damage which is suffered or sustained (including but not limited to, indirect or consequential loss) or for personal injury which is suffered or sustained as a result of taking part in this or any other gift offer. By subscribing, you consent to receive any direct marketing material including emails which inform the recipient of the Promoter’s other publications, products, services or events and to receive promotional material from third parties. Please tick the box if you do NOT wish us to use this information for the purposes stated above . This offer is only available while stocks last, or until expiration date.
IN THE
Market Have a look through the next few pages to discover what fantastic new products, ideas and designs are In The Market to inspire you in your machine embroidery journey.
Freeform Quilted Backpack This ‘in the hoop’ machine embroidery design consists of 11 outside panels. Arrange the embroidered blocks or add more or less pockets as you desire to make yourself a truly unique backpack that is assembled with your sewing machine. Store all you need for a day out in this versatile and boho-cool backpack design with drawstring closure and fold-over flap. Lots of zippered pockets inside and out ensure this will be the bag you grab every day. Full photo instructions and directions are included with your purchase. Sweet Pea Machine Embroidery Designs Email: customer.service@swpea.com Website: www.swpea.com
126
PE Design 11 digitising software Packed with powerful and time-saving features, Brother’s PE Design 11 digitising software is for both the casual hobbyist and the home-based business entrepreneur. Imagine the capability to create your own fonts, stitches and designs – just once – to use many times on hats, pillows, shirts, and other fabrics. Reduce the amount of time spent changing threads by using the Intelligent Color Sort feature. If you own the Luminaire Innov-ís XP1, enjoy wireless LAN connectivity to wirelessly transfer your embroidery designs and sewing stitches. For more information visit your local Brother dealer. Brother Website: brother.com.au
Melco EMT16 Plus These embroidery machines, from Melco USA since 1972, are like no other industrial embroidery machine. The unique features include automatic thread feeding system (no tension knobs that need adjusting), high speed and a small arm. This machine is run by a standard computer and not a small attached screen like other machines. Elizabeth Machines Phone: (02) 9764 4455 Email: graeme@elizabethmachines.com.au Website: www.elizabethmachines.com.au
Creative Icon Our most advanced machine combines our legacy of maximum precision with every bestin-class feature you demand. The result is a feat of technological excellence destined to exceed the aspirations of today’s sewing, quilting and embroidery artisans. PFAFF Phone: (02) 4337 3737 Website: www.pfaff.com/au
127
BERNINA 700 Embroidery-only Machine
Sewing, quilting and embroidery
Beautiful embroidery with the BERNINA 700 bursting with fabulous features; embroider designs up to 400 x 210mm, pinpoint placement, thread away mode, undo and redo, group and ungroup, rearrange stitch sequence and reads multiple formats. There is help on demand with the Embroidery Consultant and built in tutorials, and optional software to enhance or create your embroidery. Plus a 10yr BERNINA Warranty. BERNINA Australia Phone: 1800 237 646 or (02) 9899 1188 Email: bernina@bernina.com.au Website: www.bernina.com.au
Adelaide’s genuine one-stop sewing shop specialises in servicing/repairs to any brand of sewing and embroidery machines and overlockers. We stock dressmaking and quilting fabrics, haberdasheries, notions and machines. Robison Anton threads, embroidery products including Zundt design and threads. Mail out orders available. Melann’s Fabrics and Sewing Centre Phone: (08) 8337 7548 Email: melanns@bigpond.com Website: www.melanns.com.au
Exciting new Designs New from The Textile Pantry, Leesa Chandler is now creating beautiful machine embroidery designs to match her existing fabric ranges. Visit our website or contact us direct for more information and all the exciting designs now available! The Textile Pantry Email: info@thetextilepantry.com Website: www.thetextilepantry.com Phone: (03) 9587 3958
128
Friendly Staff & Great Prices We have a large range of patchwork fabrics and notions and we stock a variety of patterns from Australian and international designers. Our fabric ranges are from the best patchwork and quilting brands such as RJR, Northcott, Quilt Gate, Benartex, Timeless Treasures, Michael Miller and many more. We stock a great range of patchwork and quilting notions including designer threads and fabric art supplies. With friendly staff and great prices, we are your one-stop patchwork and quilting shop. Country Pickin’s at the Corner Store Phone: (02) 6552 2092 Email: info@countrypickins.com.au Website: www.countrypickins.com.au
RICOMA Embroidery Machines This single head, multi needle machine is perfect for startup businesses or embroidery enthusiasts looking to expand their embroidery capabilities. Embroider on finished garments, bags, caps, shoes and much more. Expandable embroidery area of 1200mm x 350mm. Dewdrop Inn Patchwork & Craft Phone: (07) 4124 9320 Email: sales@dewdropinn.com.au Website: www.dewdropinn.com.au
Brother Bobbin Threads Brother bobbin threads are strong, soft and smooth, and perfectly balanced to the needle thread. For best results, use the Brother bobbin thread designed for your machine. 60wt Brother bobbinfill EBT-CEN for sewing/embroidery combo machines, 90wt EBT-PEN Brother bobbinfill for single needle embroidery machines. Available in packs of five spools or as packs of 10 pre-wound bobbins. Heading to class? Keep your bobbins from unravelling while travelling with a set of 10 Brother Bobbins with Clips BCL. For more information visit your local Brother dealer. Brother Website: brother.com.au
129
ScanNCut DX SDX1200
40 Embroidery Thread Pack
The perfect partner to your embroidery, the ScanNCut DX SDX1200 cutting machine will cut accurate fabric appliques, ready to stitch in place. No computer needed. Includes 1303 built-in designs. Also cuts vinyl, card, felt and more. For more information visit your local Brother dealer. Brother Website: brother.com.au
Bring your stitching to life in rich, glorious colour using quality Brother-branded satin-finish embroidery threads. The 40 Embroidery Thread Pack ETS-40N has an array of colourful spools and the selection of brights are ideal for recreating adventure heroes or movie characters. For more information visit your local Brother dealer. Brother Website: brother.com.au
MADEIRA Classic Rayon #40 thread Considered the number-one embroidery thread, Classic Rayon 40 is ideal for most embroidery designs and is known for its high tensile strength and excellent glossy lustre. There are 413 fabulous shades, including ombré tone-on-tone and multi colours. Made from 100% viscose rayon, it is the choice for
130
embroidery on high speed multi-head machines as well as industrial sewing machines and is available in 1000mt and 5000mt cones. Home Sewing Warehouse Ph: 1300 020 639 Website: www.hswoz.com.au
Freestanding Multi-Thread Stand Save time and stay organised with the Brother embroidery freestanding Multi-Thread Stand TS1. Store up to 10 spools. Keep your most commonly used threads at hand. Compatible with all Brother embroidery machines. For more information visit your local Brother dealer. Brother Website: brother.com.au
Tajima SAI Embroidery Machine This machine incorporates big features into a compact machine, making it a great option for home embroiderers who want to take the next step by turning their hobby into a business. Ask about the SAI Start up Turn Key Package, that incorporates software, thread, consumables and accessories and a future trade up to a Tajima industrial machine. It features a LED-lit sewing field of 30cm x 20cm, and eight needles for fast and efficient embroidery. There is also auto thread trimming and thread detection, full colour touch screen control panel. There is basic lettering of six fonts at pre-set sizes and a cross hair laser marker. Designs can be loaded via Lan connection, Barcode or using the USB ports. Home Sewing Warehouse Phone: 1300 020 639 Website: www.hswoz.com.au
131
Border Embroidery Frame Use the spring-loaded Brother 100mm x180mm Border Embroidery Frame BF2 for easier rehooping for continuous embroidery borders. Hoop lifts open to allow you to slide fabric to the next position. Suits Brother NV800E embroidery machine and above. For more information visit your local Brother dealer. Brother Website: brother.com.au
NEW Stellaire XJ1 This amazing sewing, quilting and embroidery machine features a 9½in x 14in embroidery area. You can preview hooped fabric for precise positioning and create embroidery files from handwriting or a drawing, without a computer.
132
Bellarine Sewing Centre Phone: (03) 5221 3034 Email: bellarinesewingcentre@outlook.com Website: www.bellarinesewingcentre.com.au
Machine Embroidery
Basics
Sewing machine embroidery with inbuilt decorative stitches All combination embroidery/sewing machines are capable of freehand embroidery, quilting and appliqué, with most being capable of producing a selection of decorative machine and embroidery stitches. These simple functions can be combined to achieve pleasing results. Sewing machine technology has evolved, with most top-of-the range machines now capable of large hoop embroidery designs along with digitising and software that interfaces with some machines, able to access the internet and literally millions of stitch combinations. These design features allow the creative embroiderer unlimited possibilities for designs.
Design software Many of the latest embroidery machines allow the machine’s hard drive to be updated and upgraded with improvements and additional functions via the internet, to keep the sewing machine aligned with the latest techniques, functions and creative possibilities. An update is free to fix minor bugs or small features in the machine, and an upgrade is a major add-on to the machine that will incur a charge from the sewing machine company.
Machine embroidery with inbuilt decorative stitches There are many ways to embroider by machine. The following explanations categorise the main techniques:
Appliqué: Applying one piece of fabric onto another and securing the edges with decorative embroidery stitches or satin stitch. Freehand embroidery: Achieving a free-moving type of stitching using a straight, zigzag stitch or decorative stitch. The feed dogs are lowered and a freehand, clear-view embroidery foot is attached. When this foot is lowered it sits slightly above the fabric, rather than on it, allowing the fabric to be guided by hand rather than the feed dogs. The fabric is moved under the needle and the foot and can be guided in any direction. Built-in embroidery stitches: With the amazing array of built-in embroidery stitches available in sewing machines today, it is possible to create ribbons, braids, laces and heirloom effects using stitches and stitch combinations. Bobbin work: This particular type of embroidery uses a heavier decorative thread in the bobbin and a matching thread or monofilament in the needle. The bobbin case has the tension loosened so the heavier thread passes easily through the tension dial, while the needle tension may need to be tightened slightly. The stabiliser is on top and then the fabric with the right side facing down on the bed of the machine. The embroidery is sewn from the wrong side of the fabric, thus the heavy-thread embroidery stitching is on the right side of the fabric.
In-the-hoop embroidery Motif embroidery: Created with an embroidery machine capable of using digitised embroidery designs, from USB, cards, disks, CDs or downloaded from the internet. The motif is embroidered in a hoop singularly or combined to create elaborate, intricate designs.
133
h
Basics Embroidered appliqué: It is possible to have appliqué built into an embroidery design. When the design is digitised, allowance is made for the appliqué fabric to be inserted into the design, then the raw fabric edges are embellished with satin, blanket, running or decorative stitches. Three-dimensional embroidery/free standing: Achieved using any of the techniques described in machine embroidery. This could be lace, which is specially digitised so that all of the stitches link together and create a freestanding design, or stitching a motif on organza or badge-making stabiliser to have a singular item that can then be applied onto an item that is difficult to get onto the machine such as a cap, jeans leg or a heavy jacket.
Machine feet All machines come with accessories that include a selection of feet for different functions, such as freehand sewing, utility functions, appliqué, embroidery and quilting. According to the brand, machine feet may have slightly different names, but basically the feet are similar for particular functions. The feet listed below are the most commonly used in decorative machine embroidery, but there are many more; contact your preferred sewing machine dealer for the list of the feet available and how to use them. Open-toe foot: Used for appliqué and stitch building. The foot has an open area in the toe of the foot to allow a clear view of the sewing field; this is ideal for combining rows of stitches, allowing perfect placement and alignment of stitches and rows. ¼in foot: Generally used for an accurate ¼in seam for patchwork. This foot allows the sewer to line up the edge of the foot with the edge of the fabric (keeping it aligned and parallel) with the needle centred to give an exact ¼in seam. Walking foot: This foot allows even feeding of fabric by working in tandem with the feed dogs. The top and bottom fabrics feed through the machine at the same pace. Generally used for quilting, it can also be used for sewing vinyl, leather and velvet fabrics. Large clear-view freehand foot: This is the best foot to use for quilting and freehand embroidery as it holds down a larger area of fabric and provides a clear view of the area being quilted or embroidered. Narrow edge or over-edge foot: Has a groove in the foot for piecing lace and is also great for stitch-in-the-ditch quilting as the groove in the foot moves down the centre of the seam and keeps the stitching/quilting in the seam line. For example, you could use a stitch like a three-step zigzag or fagoting stitch to join lace to a garment Couching/cording foot: Used to feed thicker decorative threads such as perle, thick yarn, thin ribbon or decorative overlocking thread through the foot evenly so they can be couched in place with decorative or utility stitches.
134
Embroidery foot: Designed for embroidery machines that are capable of computer-generated embroidery designs in a hoop.
Hoop sizes Machine embroidery hoops are available in a variety of sizes. They are machine specific and must be designed for the machine you are using. Some generic ones will fit, but you need to check their fit under the foot. Generic hoops may not have their parameters built into the machine and will require you to trace the design in the machine function to make sure the foot does not hit when sewing. Generic hoops will generally not be covered under your warranty if damage is caused to your machine. The size of the hoop is determined by the design to be embroidered. The closer the hoop size is to the design, the less likely there will be any movement of the fabric. Movement of the fabric can result in the stitches being poorly located on the design and registration of outlines may not meet. Many embroidery machines will tell you what size hoop to use when you load the design in the machine. This information is embedded in the embroidery design.
Hooping Once you’ve selected a stabiliser for your project, it is important to hoop it and the fabric correctly to get the best results. Hooping fabric will give you correct tension on the fabric. When positioning embroidery, always hoop your fabric on the straight of grain and rotate the design; hooping on an angle or bias of the fabric will create puckering. Floating fabric is a common practice when the fabric you need to hoop is too thick for the hoop. This technique does not provide the same tension on your fabric and can cause the fabric to shift to the centre while stitching the design, which in turn. can cause puckering. Basting the layers of stabiliser and fabric together is one method to keep the fabric from shifting. The majority of embroidery machines are capable of basting the fabric to the stabiliser while in the hoop, which is a great feature to have. Alternatively, basting can also be added in embroidery software. When embroidering items too small for a hoop, such as a sock, shirt collar or cuffs, hoop the stabiliser first then attach the garment/fabric to the stabiliser. You can use a stick-on stabiliser or adhere the fabric to the stabiliser with temporary adhesive spray. If you use sticky stabiliser, ensure you clean your machine afterwards to avoid damage and broken threads. To ensure the fabric is perfectly aligned on the stabiliser, use the hoop templates that you received with your hoops and use the markings on the hoop for vertical and horizonal
position. If there are no markings on top of your hoop, use a marker or sticker to identify this.
Threads Rayon/polyester 40-weight embroidery thread is the most commonly used thread in machine embroidery. Threads are given grades of denier — the higher the number, the finer the thread — 80 denier being the finest and 30 being the heaviest. Most embroidery designs and stitches are geared for a 35-40-denier thread. Threading metallic thread on a machine spool is not recommended. Use a thread stand that is away from your machine. The thread needs this distance to eliminate the kinks before it gets to the tension mechanism. This is where the thread generally breaks, so eliminating the twist will allow for a smooth transition to the needle and your embroidery. Colours: Those listed in projects are the ones actually used in the design. However, you can use whatever colours you choose. Most embroidery software has major thread brands included and you can visually see the changes. If you are coordinating thread colours with a fabric, match the colour registrations or the dots on the edge (selvedge) to marry up the colours needed for your design. Bobbin thread: Before starting to stitch a new item, make sure you have enough thread on the bobbin to complete it, especially if it will be difficult or impossible to change your bobbin in the middle of the stitch out.
Bobbins There are many-and-varied pre-wound bobbins on the market. The finer the bobbin thread used, the softer the embroidery will be as there is less bulk in the embroidery. Bobbin thread weight can generally range from 60-90. Bobbin areas may need to be altered to accommodate the weight of the thread. In a top-loading bobbin case you can only use pre-wound bobbins that have an actual bobbin — do not use the pre-wound bobbins that are just thread. They can cause tension problems and when near to the end, can get caught up in the bobbin area as they bounce around. If you are winding a bobbin on the machine yourself, do so with a medium speed so the thread isn’t stretched.
Needles There are needles to suit all types of sewing and decorative embroidery stitches. For heirloom use size 60 sharps, universal 75 for general sewing, jeans needles for denim, Microtex needles for microfibres, 75/11 or 90/14 for embroidery, and metallic needles for metallic threads. Metallic needles are slightly longer and have a larger
eye to allow for expansion of the metallic thread due to the friction of the thread passing through the needle. Or, if you don’t have a metallic needle for metallic thread, slow down the machine speed to eliminate the friction and heat of the thread. Generally, with hooped machine embroidery, the majority of the time you would use a 75/11 embroidery needle. A size 90/14 would be used for thicker fabrics such as polar fleece or towelling. Additional effects and techniques can be achieved with twin needles, wing needles, triple needles and twin wing. These can be used with heirloom stitching such as hem stitching and pin tucking, as well as with embroidery stitches. For decorative stitches with twin or triple needles, be mindful of the swing of the needle that you do not hit the plate. Use the fly wheel to see if this will occur. Some machines have the capability of a twin needle safety feature to prevent the needle from breaking and causing damage.
Stabilisers Most fabrics need to be stabilised to ensure that the fabric to be embroidered has stability akin to that of paper. This is either added as a backing and/or as a topper depending on the type of fabric and the thickness and type of design. Refer to special article on stabilisers in this edition on page 93.
Rotary cutter and self-healing cutting mat A rotary cutter is a round, sharp blade attached to a handle that allows the blade to turn, which in turn enables the sewer to achieve continuous cutting. It is used over a self-healing cutting mat in conjunction with a wide, marked quilter’s ruler. To cut fabric with a rotary cutter, fold the fabric in half then in half again, keeping it flat and smooth. Align the fabric either on the horizontal or vertical grid on the cutting mat. Place the quilter’s ruler over the fabric, aligning the grid on the ruler to the last folded edge as well as the grid on the mat to ensure the ruler is square. Use firm pressure with your hand to hold the ruler securely. Align the blade snugly alongside the ruler, and pressing firmly, cut through all layers in one smooth motion away from your body.
Marking tools Embroiderers and quilters use marking tools for many techniques and processes. There are water-soluble marking pens and pencils, air-fading pens, chalk pencils and tailor’s chalk. It is advisable to test a marking tool on the fabric you are embroidering or quilting before you use it on the real thing. h
135
Basics Marking blocks and fabrics to be machine embroidered You may choose to use a square plastic template marked with vertical and horizontal lines that intersect through the centre of the size of the finished block. Use a quilter’s ruler and fabric-marking pen to divide the fabric with vertical, horizontal and diagonal lines that intersect the centre of the fabric/quilt block. If embroidering on a quilt block, place the square template over each block, matching the vertical and horizontal lines with those previously and draw around the square using a fabric-marking pen. This shows where the seam will be on the block — you don’t embroider outside this line. Although the block will shrink, depending on the amount of embroidery, the seam lines will have to be redefined once the embroidery is completed.
Vellum/tracing paper Vellum or tracing paper is used to print out embroidery design templates via the software with a regular printer. Use an eyelet cutter or sharp object to punch holes on either end of the vertical and horizontal lines, on either side of the centre and through the centre, where these lines intersect on the printed vellum template. These placement holes are used when the template is positioned in the desired place over the fabric, then a fabricmarking pen is used to mark through the punched holes, onto the fabric. These dots are then connected using a ruler and fabric-marking pen, thus replicating the lines on the template. In some cases where there are two embroidery designs to be positioned, or a motif is made up of several embroidery
136
designs joined together, you will need to print out several design templates. Place the templates on the fabric in the required positions then mark through the positioning holes in the template and connect the dots to give the correct placement of the embroidery. When two or more embroidery designs are needed to make one large embroidery motif, the templates for each design section are printed, positioned with the punched holes together to make the large embroidery motif. Held together with tape, the large motif is placed over the fabric to be embroidered.
Iron and ironing board A steam iron with water well and ironing board are highly recommended. Always press embroidery from the back, either on a towel or an embroidery pressing mat.
Fusible webbing There are various products on the market that use a steamand-heat-dissolving bond. A hot iron should be used to iron the webbing to the back of the fabric to be used for the appliqué, pressing from the paper side. Remove the backing paper from the appliqué shape before placing it on the fabric that it is to be stitched to, or that is in the hoop to be embroidered, and then iron the shape in place.
Piecing Accurate straight cutting is essential when piecing quilts, so check all measurements as you go before you sew a seam together, and make adjustments if necessary. Check twice — stitch once. With construction thread in the needle and bobbin, use the ¼in foot for all piecing.
Stockists Baby Lock Phone: (03) 9339 7777, Email: info@babylock.com.au Bellarine Sewing Centre Phone: (03) 5221 3034 Website: www.bellarinesewingcentre.com.au Bernina Australia Phone: 1800 237 646 or (02) 9899 1188, Website: www.bernina.com.au Brother Australia Phone: 1300 880 297, Website: www.brother.com.au Carol’s of Midland Phone: (08) 9250 2722, Website: www.carolsofmidland.com.au Country Pickin’s at the Corner Phone: (02) 6552 2092 , Website: www. countrypickins.com.au CraftAlive Phone: (03) 9682 5133, Website: www.craftalive.com.au The Textile Pantry Phone: (03) 9587 3958, Website: www.thetextilepantry.com Dewdrop Inn Patchwork & Craft
Phone: (07) 4124 9320, Website: www.dewdropinn.com.au Echidna Sewing Phone: 1800 000 360, Website: www.echidnasewing.com.au Elizabeth Machines Co Phone: (02) 9764 4455, Website: www.elizabethmachines.com.au Heward Sewing Machines Phone: 1300 786 558, Website: www.happyembroidery.com.au Hidden Talent Phone: (02) 6362 0011, Facebook: Hidden Talent Orange Home Sewing Warehouse Phone: 1300 020 639, Website: www.hswoz.com.au Husqvarna Viking Sewing Machines Phone: (02) 4337 3737, Website: www.husqvarnaviking.com/au Janome Phone: Toll-free 1300 JANOME, or (03) 8586 3100, Website: www.janome.com.au Rajmahal Threads Phone: (03) 5447 7699,
Website: www.rajmahal.com.au Marathon Threads Phone: (03) 9417 2722, Website: www.marathonaustralia.com.au Melann’s Fabric & Sewing Centre Phone: (08) 8337 7548, Website: www.melanns.com.au PFAFF Sewing Machines Phone: (02) 4337 3737, Website: www.pfaff.com/en-AU Quality Always Email: reception@qualityalways.com, Website: www.minijumbuk.com.au Quiltopia Website: www.quiltopia.org Sew Many Stitches Phone: (02) 4628 4437, Email: sewstitches@bigpond.com Sweet Pea Machine Embroidery Email: customer.service@swpea.com, Website: www.swpea.com Travelrite International Phone: (03) 9836 2522, Email: sales@travelrite.com.au, Website: www.travelrite.com.au
COMING FEBRUARY 2020
BLOCK OF THE MONTH R U N OV E R 6 I S S U E S , 1 2 M O N T H S
“The Quilters Holiday” DESIGNED BY TONE FINNANGER Tone Finnanger lives in Norway and is the founder and creative director of TILDA FABRICS. This Block of the Month is a world-first for Tone, and we are excited to share it with our Homespun readers in 2020. FABRIC RANGE Made with Tilda’s latest fabric release, Happy Campers, it takes us on a journey flowing with the excitement of a holiday.
SNEAK PEEK!
QUILT DESIGN The quilt’s finished size is 92½in x 108½in, row-by-row style, featuring mainly appliqué, a little hand embroidery and machine piecing of the rows and borders.
Sign up at www.universalshop.com.au/craft-magazines/homespun-BOM-member
137
SEW WITH CONFIDENCE The SAI Embroidery machine is made by Tajima which has been making the world’s most recognisable Embroidery Machine brand for more than 75 years. Offering the latest technology that will help you to produce the best quality embroidery for your customers. The other advantage of taking up this package Is the back up support of Tajima Australia. With technicians in all major states and our own staff who are fully trained, you can start your new business with confidence.
MAGAZINE LAUNCH SPECIAL SAVE $1,650! Now only $16,500 inc. GST, delivery and installation
INTRODUCING THE SAI MULTI NEEDLE EMBROIDERY MACHINE SAI CAN SEW ON ANYTHING! The Tajima SAI embroidery machine is a compact industrial embroidery machine that is able to embroidery on almost anything. From caps to polo shirts, bags to dog collars this advanced embroidery machine can do it and much more! It provides 8 needles for ample colour options when sewing designs, an easy to use Touch Screen control panel, built in monogram and lettering for those quick and easy names and initial jobs, and a fast 800 rpm speed that enables you to provide a quick and steady work output daily.
SAI CAN SEW ANYWHERE! SAI is light enough to transport in a station wagon or any van to country shows, sporting events, trade shows, car shows and many more other events. SAI lets you go to where the customers are! You’ll be amazed at how people at these events gravitate to you to see how these fantastic, beautiful designs magically appear on their garments, caps and other items.
SEAMLESS SOFTWARE INTEGRATION WITH TAJIMA “WRITER plus” supplied free of charge • Easy design transfer using a LAN connection. • More than 1300 pre-installed embroidery designs • 31 alphabet fonts for embroidery text creation (additional fonts are available for purchase) • Easy text and design combining • Thread colour management synchronised with SAI
Functions of Tajima “Writer Plus” • • • • •
Auto Digitizing function Sketchbook Function Photo Stitch Function Digitizing Function True Type Fonts conversion to satin stitch
SAI Frames
WITH SAI, SEWING IS EASY! The SAI has been designed specifically with new embroiderers in mind, it is packed with great features like: • Easy to use Touch Screen control panel • Colour option 8 Needle • In-built monogram and lettering for easy digitizing • Exceptional speed - 800rpm This authentic Tajima made machine will be sure to help you on the road to success from the very first day!
Standard hoop 100 x100mm
Cap framing equipment
Standard hoop 300mm x 200mm
Contact HSW for details on the extensive frame selection available
Contact us for more information
www.hswoz.com.au / Telephone 1300 020 639
WE CALL IT STITCHVISION TECHNOLOGY AND IT’S SIMPLY LIGHT YEARS AHEAD.
SEE STITCHES AND DESIGNS PROJECTED ON YOUR FABRIC FOR A REALISTIC PREVIEW
ADJUST STITCHES DIRECTLY ON FABRIC OR SCREEN WITH THE DUAL-PURPOSE STYLUS.
PROJECT GUIDELINES AND GRIDS TO SEW PRECISE LINES, ANGLES, CORNERS, AND MORE
Find your local dealer and see the machine in action at luminaire.brother.com.au