13 minute read
Machine Embroidery Basics

All combination embroidery/sewing machines are capable of freehand embroidery, quilting and appliqué, with most being capable of producing a selection of decorative machine and embroidery stitches. These simple functions can be combined to achieve pleasing results.
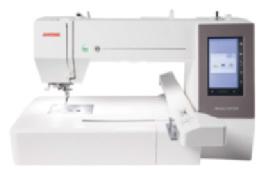
Sewing machine technology has evolved, with most top-of-the range machines now capable of large hoop embroidery designs along with digitising and software that interfaces with some machines, able to access the internet and literally millions of stitch combinations. These design features allow the creative embroiderer unlimited possibilities for designs.
Design software
Many of the latest embroidery machines allow the machine’s hard drive to be updated and upgraded with improvements and additional functions via the internet, to keep the sewing machine aligned with the latest techniques, functions and creative possibilities. An update is free to fi x minor bugs or small features in the machine, and an upgrade is a major add-on to the machine that will incur a charge from the sewing machine company.
There are many ways to embroider by machine. The following explanations categorise the main techniques:
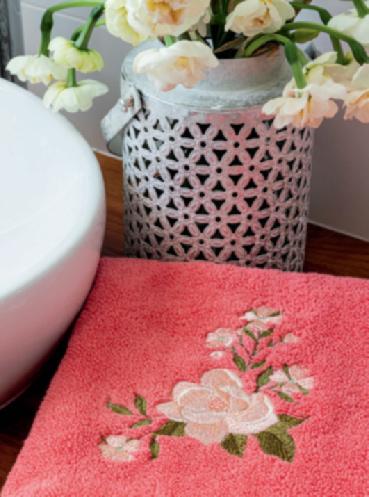
Appliqué: Applying one piece of fabric onto another and securing the edges with decorative embroidery stitches or satin stitch.
Freehand embroidery: Achieving a free-moving type of stitching using a straight, zigzag stitch or decorative stitch. The feed dogs are lowered and a freehand, clear-view embroidery foot is attached. When this foot is lowered it sits slightly above the fabric, rather than on it, allowing the fabric to be guided by hand rather than the feed dogs. The fabric is moved under the needle and the foot and can be guided in any direction.
Built-in embroidery stitches: With the amazing array of built-in embroidery stitches available in sewing machines today, it is possible to create ribbons, braids, laces and heirloom effects using stitches and stitch combinations.
Bobbin work: This particular type of embroidery uses a heavier decorative thread in the bobbin and a matching thread or monofi lament in the needle. The bobbin case has the tension loosened so the heavier thread passes easily through the tension dial, while the needle tension may need to be tightened slightly. The stabiliser is on top and then the fabric with the right side facing down on the bed of the machine. The embroidery is sewn from the wrong side of the fabric, thus the heavy-thread embroidery stitching is on the right side of the fabric.
In-the-hoop embroidery
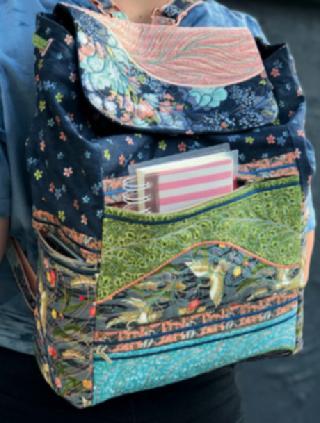
Motif embroidery: Created with an embroidery machine capable of using digitised embroidery designs, from USB, cards, disks, CDs or downloaded from the internet. The motif is embroidered in a hoop singularly or combined to create elaborate, intricate designs.
Basics
Embroidered appliqué: It is possible to have appliqué built into an embroidery design. When the design is digitised, allowance is made for the appliqué fabric to be inserted into the design, then the raw fabric edges are embellished with satin, blanket, running or decorative stitches.
Three-dimensional embroidery/free standing: Achieved using any of the techniques described in machine embroidery. This could be lace, which is specially digitised so that all of the stitches link together and create a freestanding design, or stitching a motif on organza or badge-making stabiliser to have a singular item that can then be applied onto an item that is diffi cult to get onto the machine such as a cap, jeans leg or a heavy jacket.
Machine feet
All machines come with accessories that include a selection of feet for different functions, such as freehand sewing, utility functions, appliqué, embroidery and quilting. According to the brand, machine feet may have slightly different names, but basically the feet are similar for particular functions. The feet listed below are the most commonly used in decorative machine embroidery, but there are many more; contact your preferred sewing machine dealer for the list of the feet available and how to use them.
Open-toe foot: Used for appliqué and stitch building. The foot has an open area in the toe of the foot to allow a clear view of the sewing fi eld; this is ideal for combining rows of stitches, allowing perfect placement and alignment of stitches and rows. ¼in foot: Generally used for an accurate ¼in seam for patchwork. This foot allows the sewer to line up the edge of the foot with the edge of the fabric (keeping it aligned and parallel) with the needle centred to give an exact ¼in seam.
Walking foot: This foot allows even feeding of fabric by working in tandem with the feed dogs. The top and bottom fabrics feed through the machine at the same pace. Generally used for quilting, it can also be used for sewing vinyl, leather and velvet fabrics.
Large clear-view freehand foot: This is the best foot to use for quilting and freehand embroidery as it holds down a larger area of fabric and provides a clear view of the area being quilted or embroidered.
Narrow edge or over-edge foot: Has a groove in the foot for piecing lace and is also great for stitch-in-the-ditch quilting as the groove in the foot moves down the centre of the seam and keeps the stitching/quilting in the seam line. For example, you could use a stitch like a three-step zigzag or fagoting stitch to join lace to a garment
Couching/cording foot: Used to feed thicker decorative threads such as perle, thick yarn, thin ribbon or decorative overlocking thread through the foot evenly so they can be couched in place with decorative or utility stitches.
Embroidery foot: Designed for embroidery machines that are capable of computer-generated embroidery designs in a hoop.
Hoop sizes
Machine embroidery hoops are available in a variety of sizes. They are machine specifi c and must be designed for the machine you are using. Some generic ones will fi t, but you need to check their fi t under the foot. Generic hoops may not have their parameters built into the machine and will require you to trace the design in the machine function to make sure the foot does not hit when sewing. Generic hoops will generally not be covered under your warranty if damage is caused to your machine.
The size of the hoop is determined by the design to be embroidered. The closer the hoop size is to the design, the less likely there will be any movement of the fabric. Movement of the fabric can result in the stitches being poorly located on the design and registration of outlines may not meet.
Many embroidery machines will tell you what size hoop to use when you load the design in the machine. This information is embedded in the embroidery design.
Hooping
Once you’ve selected a stabiliser for your project, it is important to hoop it and the fabric correctly to get the best results. Hooping fabric will give you correct tension on the fabric.
When positioning embroidery, always hoop your fabric on the straight of grain and rotate the design; hooping on an angle or bias of the fabric will create puckering.
Floating fabric is a common practice when the fabric you need to hoop is too thick for the hoop. This technique does not provide the same tension on your fabric and can cause the fabric to shift to the centre while stitching the design, which in turn. can cause puckering.
Basting the layers of stabiliser and fabric together is one method to keep the fabric from shifting. The majority of embroidery machines are capable of basting the fabric to the stabiliser while in the hoop, which is a great feature to have. Alternatively, basting can also be added in embroidery software.
When embroidering items too small for a hoop, such as a sock, shirt collar or cuffs, hoop the stabiliser fi rst then attach the garment/fabric to the stabiliser. You can use a stick-on stabiliser or adhere the fabric to the stabiliser with temporary adhesive spray. If you use sticky stabiliser, ensure you clean your machine afterwards to avoid damage and broken threads.
To ensure the fabric is perfectly aligned on the stabiliser, use the hoop templates that you received with your hoops and use the markings on the hoop for vertical and horizonal
position. If there are no markings on top of your hoop, use a marker or sticker to identify this.
Threads
Rayon/polyester 40-weight embroidery thread is the most commonly used thread in machine embroidery. Threads are given grades of denier — the higher the number, the fi ner the thread — 80 denier being the fi nest and 30 being the heaviest. Most embroidery designs and stitches are geared for a 35-40-denier thread.
Threading metallic thread on a machine spool is not recommended. Use a thread stand that is away from your machine. The thread needs this distance to eliminate the kinks before it gets to the tension mechanism. This is where the thread generally breaks, so eliminating the twist will allow for a smooth transition to the needle and your embroidery.
Colours: Those listed in projects are the ones actually used in the design. However, you can use whatever colours you choose. Most embroidery software has major thread brands included and you can visually see the changes. If you are coordinating thread colours with a fabric, match the colour registrations or the dots on the edge (selvedge) to marry up the colours needed for your design.
Bobbin thread: Before starting to stitch a new item, make sure you have enough thread on the bobbin to complete it, especially if it will be diffi cult or impossible to change your bobbin in the middle of the stitch out.
Bobbins
There are many-and-varied pre-wound bobbins on the market. The fi ner the bobbin thread used, the softer the embroidery will be as there is less bulk in the embroidery. Bobbin thread weight can generally range from 60-90.
Bobbin areas may need to be altered to accommodate the weight of the thread. In a top-loading bobbin case you can only use pre-wound bobbins that have an actual bobbin — do not use the pre-wound bobbins that are just thread. They can cause tension problems and when near to the end, can get caught up in the bobbin area as they bounce around.
If you are winding a bobbin on the machine yourself, do so with a medium speed so the thread isn’t stretched.
Needles
There are needles to suit all types of sewing and decorative embroidery stitches. For heirloom use size 60 sharps, universal 75 for general sewing, jeans needles for denim, Microtex needles for microfi bres, 75/11 or 90/14 for embroidery, and metallic needles for metallic threads.
Metallic needles are slightly longer and have a larger eye to allow for expansion of the metallic thread due to the friction of the thread passing through the needle. Or, if you don’t have a metallic needle for metallic thread, slow down the machine speed to eliminate the friction and heat of the thread.
Generally, with hooped machine embroidery, the majority of the time you would use a 75/11 embroidery needle. A size 90/14 would be used for thicker fabrics such as polar fl eece or towelling.
Additional effects and techniques can be achieved with twin needles, wing needles, triple needles and twin wing. These can be used with heirloom stitching such as hem stitching and pin tucking, as well as with embroidery stitches.
For decorative stitches with twin or triple needles, be mindful of the swing of the needle that you do not hit the plate. Use the fly wheel to see if this will occur. Some machines have the capability of a twin needle safety feature to prevent the needle from breaking and causing damage.
Stabilisers
Most fabrics need to be stabilised to ensure that the fabric to be embroidered has stability akin to that of paper. This is either added as a backing and/or as a topper depending on the type of fabric and the thickness and type of design. Refer to special article on stabilisers in this edition on page 93.
Rotary cutter and self-healing cutting mat
A rotary cutter is a round, sharp blade attached to a handle that allows the blade to turn, which in turn enables the sewer to achieve continuous cutting. It is used over a self-healing cutting mat in conjunction with a wide, marked quilter’s ruler.
To cut fabric with a rotary cutter, fold the fabric in half then in half again, keeping it fl at and smooth. Align the fabric either on the horizontal or vertical grid on the cutting mat. Place the quilter’s ruler over the fabric, aligning the grid on the ruler to the last folded edge as well as the grid on the mat to ensure the ruler is square. Use fi rm pressure with your hand to hold the ruler securely.
Align the blade snugly alongside the ruler, and pressing fi rmly, cut through all layers in one smooth motion away from your body.
Marking tools
Embroiderers and quilters use marking tools for many techniques and processes. There are water-soluble marking pens and pencils, air-fading pens, chalk pencils and tailor’s chalk. It is advisable to test a marking tool on the fabric you are embroidering or quilting before you use it on the real thing. 135
Basics
Marking blocks and fabrics to be machine embroidered
You may choose to use a square plastic template marked with vertical and horizontal lines that intersect through the centre of the size of the fi nished block.
Use a quilter’s ruler and fabric-marking pen to divide the fabric with vertical, horizontal and diagonal lines that intersect the centre of the fabric/quilt block.
If embroidering on a quilt block, place the square template over each block, matching the vertical and horizontal lines with those previously and draw around the square using a fabric-marking pen. This shows where the seam will be on the block — you don’t embroider outside this line. Although the block will shrink, depending on the amount of embroidery, the seam lines will have to be redefi ned once the embroidery is completed.
Vellum/tracing paper
Vellum or tracing paper is used to print out embroidery design templates via the software with a regular printer. Use an eyelet cutter or sharp object to punch holes on either end of the vertical and horizontal lines, on either side of the centre and through the centre, where these lines intersect on the printed vellum template.
These placement holes are used when the template is positioned in the desired place over the fabric, then a fabricmarking pen is used to mark through the punched holes, onto the fabric. These dots are then connected using a ruler and fabric-marking pen, thus replicating the lines on the template.
In some cases where there are two embroidery designs to be positioned, or a motif is made up of several embroidery designs joined together, you will need to print out several design templates. Place the templates on the fabric in the required positions then mark through the positioning holes in the template and connect the dots to give the correct placement of the embroidery.
When two or more embroidery designs are needed to make one large embroidery motif, the templates for each design section are printed, positioned with the punched holes together to make the large embroidery motif. Held together with tape, the large motif is placed over the fabric to be embroidered.
Iron and ironing board
A steam iron with water well and ironing board are highly recommended. Always press embroidery from the back, either on a towel or an embroidery pressing mat.
Fusible webbing
There are various products on the market that use a steamand-heat-dissolving bond. A hot iron should be used to iron the webbing to the back of the fabric to be used for the appliqué, pressing from the paper side. Remove the backing paper from the appliqué shape before placing it on the fabric that it is to be stitched to, or that is in the hoop to be embroidered, and then iron the shape in place.
Piecing
Accurate straight cutting is essential when piecing quilts, so check all measurements as you go before you sew a seam together, and make adjustments if necessary. Check twice — stitch once. With construction thread in the needle and bobbin, use the ¼in foot for all piecing.