5 minute read
Let’s Talk Tactics


The Rewards of Risk
By Jeff Soo
Abbreviations used: blUe, Red, blacK, Yellow
Your rush to the wicket was poor, leaving you a decision: split or take off? The question implies a trade-off: one option must be better in one way but worse in another and vice versa. Otherwise, we shouldn’t even be asking the question.
That tradeoff is, of course, one of risk and reward. Takeoffs are simple to understand and play, and generally give the most control over the striker ball. Split shots involve more variables, making it harder to control the shot. A takeoff reduces the immediate risk of failing to run the wicket. But the split shot may offer the greater potential reward: easier ways to continue the turn and score more points.
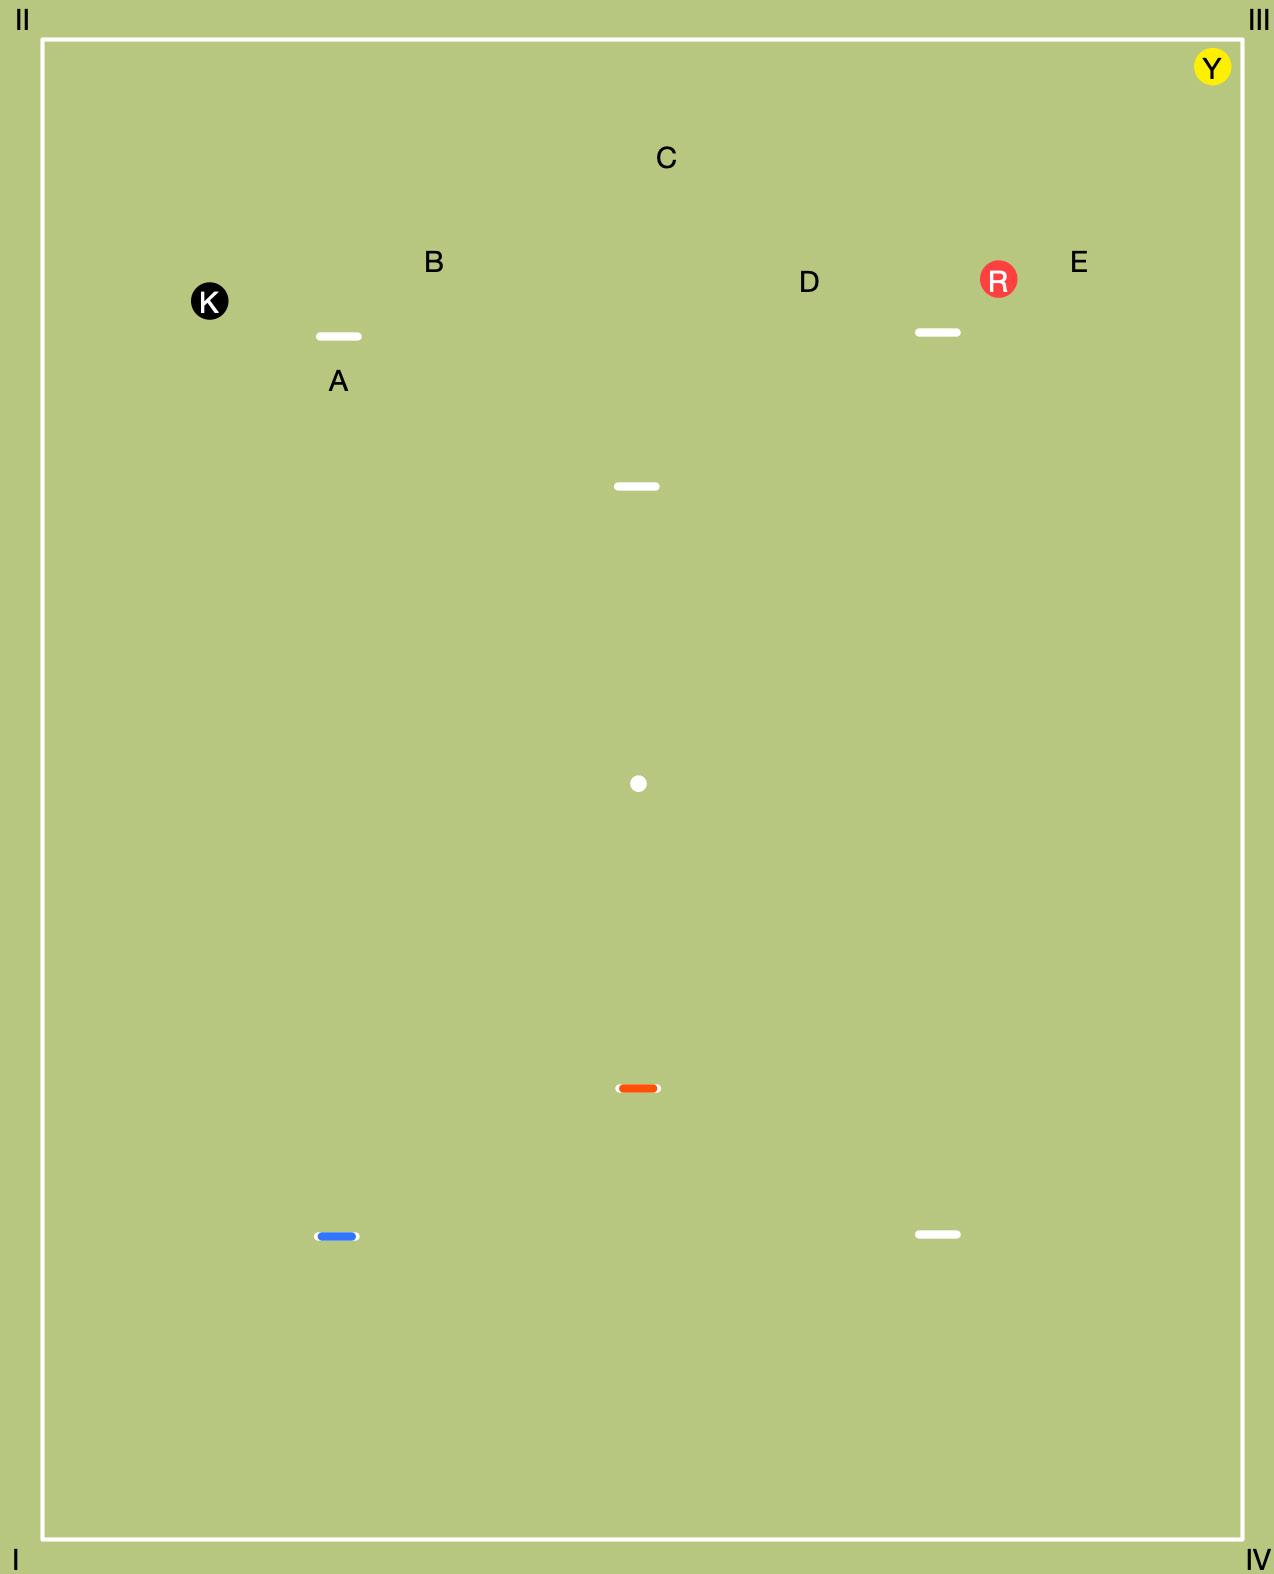
In Figure 1, U is for 2 and is ball-in-hand on K, which it has just rushed to a position three yards wide of the wicket, somewhat to the non-playing side. This is not an easy position from which to get good wicket-running position (shown as point A), even with a takeoff. Why would you even consider the extra risk of a split shot (sending K to point B)? This is a trick question because I’ve left out some vital information: the other clips, the deadness, the state of the game clock, the players’ skill level, the difficulty of the lawn and wickets. Before reading on, try to come up with at least two scenarios where you would play a split shot, and at least two more where you would prefer a takeoff.

FIGURE 1: U is for 2 and is ball-in-hand on K
In doubles games I often hear a partner advising, “play the shot you’re most comfortable with.” But that advice only accounts for one side of the risk-reward equation: most players will naturally choose the “safe” shot, the one with the lowest up-front risk. While that will often be the correct choice, it may mean a missed opportunity. In some endgame situations, that missed opportunity may have been the only realistic chance to win the game.
If U takes off and scores 2, then roquets K again, U has three options: take off to R; split K to 4 while U goes to R; take off to Y. Taking off to R (preferably to point E) is the easiest of these options but leaves no reliable way to continue after scoring 3. Taking off to Y, even on an easy (i.e., flat- and medium-paced) court, is a low-percentage play. The big split shot sending K to 4 and U to R is the likeliest way to score more than two points on this turn.
But that split shot is a mammoth stroke, made more difficult by R’s position “outside the box” (i.e., outside the rectangle bounded by the four corner wickets). Playing that shot, U would do well to get as far as point D. From there, three or four yards away, U will do well to rush R no further than point E. Once again, U will be faced with a difficult approach to the wicket and the dilemma of whether to split or take off. If the goal is a three-ball break, taking off to score 2 only trades one difficulty for another that is even worse.
Back to wicket 2, if U succeeds with the split-shot approach, all the options become easier. If U can rush K to point C, taking off to point E is trivially easy; splitting K to wicket 4 and U to point E is a very manageable drive shot. From point C the takeoff to Y is no longer so desperate, and if U can rush a bit further (to within 30 feet of the corner), that play starts to look reasonable, as long as the boundaries don’t slope outward in that corner. From the corner, it is an easy stop- or drive-shot to send Y to wicket 4 and U to point E, and now U has a four-ball break.
In short, the split shot approach to 2 offers greater potential reward, but at the cost of higher short-term risk. How to choose?
Most non-championship players will not be confident about the split-shot approach to 2 and should nearly always play the takeoff. But exceptions exist. If R and Y are dead on each other and on U, little risk exists either way. Trying the split shot is good practice. If it doesn’t work out, U can safely take position. Conversely, if U is the last ball in last turns and needs to score more than 2 points to tie the game, the takeoff is a nearly certain game-loser and the split shot is the right choice.
Championship players will be more comfortable with the split-shot approach, but even so some scenarios arise where the takeoff is the prudent choice. If R is for 2, alive on U only, and UK is responsible for R, failing the wicket and giving R a wiring lift would be a disaster. Likewise, if Y is clean and for 2: if U fails the wicket or takes position, R plays to Y to set up a three-ball break. (UK might survive that if K is alive on U and is also for 2, but it is a big risk.) Or if U is last ball in last turns and needs one point to tie, two to win.
We can’t eliminate risk; we can only manage it. That, in a nutshell, is the point of tactics. Deferring risk until later is not always a good tradeoff. If one moderately difficult shot has a big potential payoff, that is a risk worth considering.


