7 minute read
Deceptively Simple


By Jeff Soo
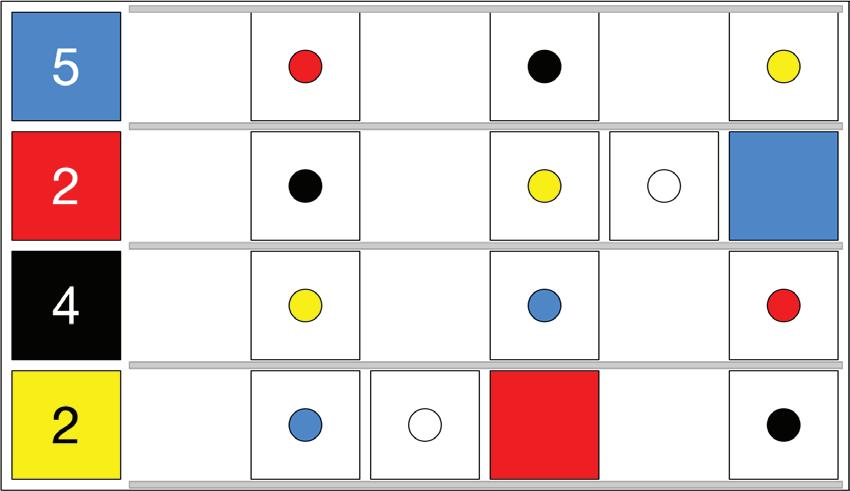
Abbreviations used: blUe, Red, blacK, Yellow
Figure 1 (showing only the northern half of a court) presents a position that arose in a Championship Flight game at the 2023 USCA Southeast Regional. Thanks to Russ Dilley and the USCA Croquet video team for the footage and to the players for inspiring this article.

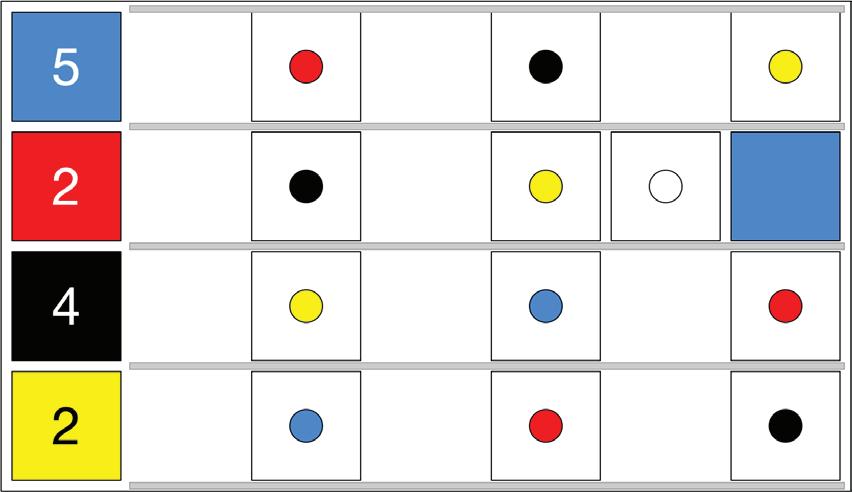
The game, up to this point, was more eventful than you might imagine by looking at the clips and deadness. It started with some out-game play, U and R in the game and K and Y battling at 1. Then K entered, setting up U for a brief three-ball break. A few turns later R hit in to attack for Y (hence R’s deadness on U), still in position at 1, but K hit in to steal the break. K failed 3, and Y and R joined on court at 2. In Figure 1, K has just scored 3 and then taken a shot at R and Y, missing to the boundary; it is Y to play.
What would you do here as RY (or, if you are not yet a Championship Flight player yourself, what would you advise such a player to do)? As usual, think through some options before reading on. This situation is deceptively simple, and there is more to it than first meets the eye.
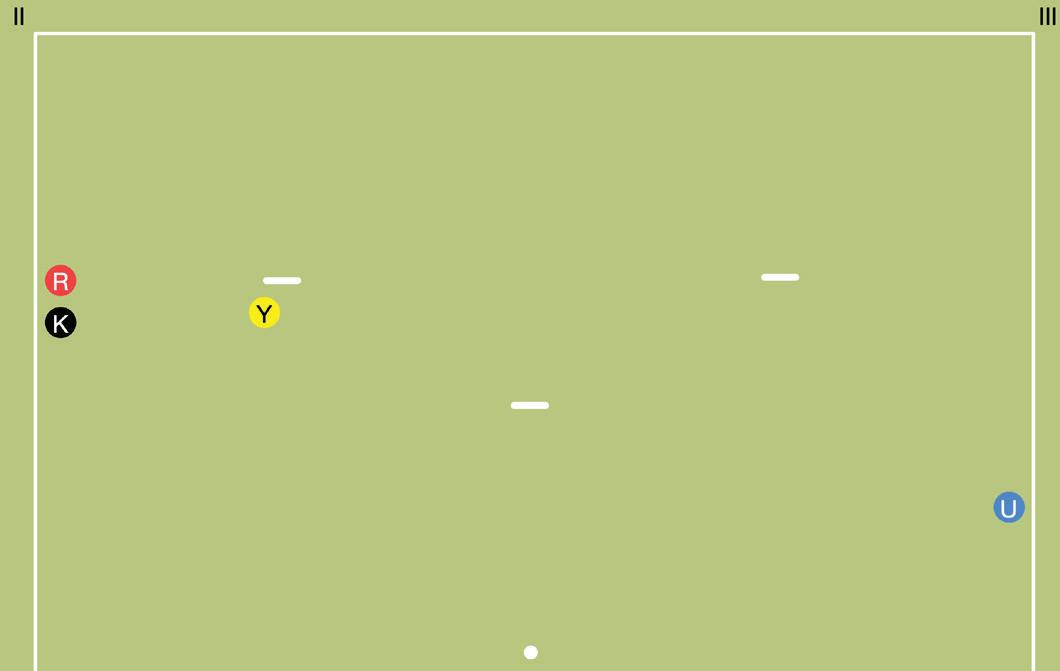
In the video, Dilley notes that K’s shot was risky because of the opportunity for Y to attack with a croquet-out: rush R a couple of yards east, then deliberately send it out of bounds next to K, Y stopping in front of 2. This sets up a three-ball break for R, starting with a potential peel on Y. Figure 2 shows how this might look if Y plays it reasonably well.
R’s deadness on U complicates this, though. If there is much of a gap between R and K, U might be able to shoot out between them to block R from roqueting K. Or U can shoot at Y. If U hits Y, it can send it to 4 (K’s wicket), then try to shoot out between R and K. That would leave a tough start for K’s break, though, so U might prefer a wide split-roll or a thick take-off to send Y well away from 2 while U approaches 5, then take good position at 5 on the continuation shot. At any rate, U has every reason to shoot.
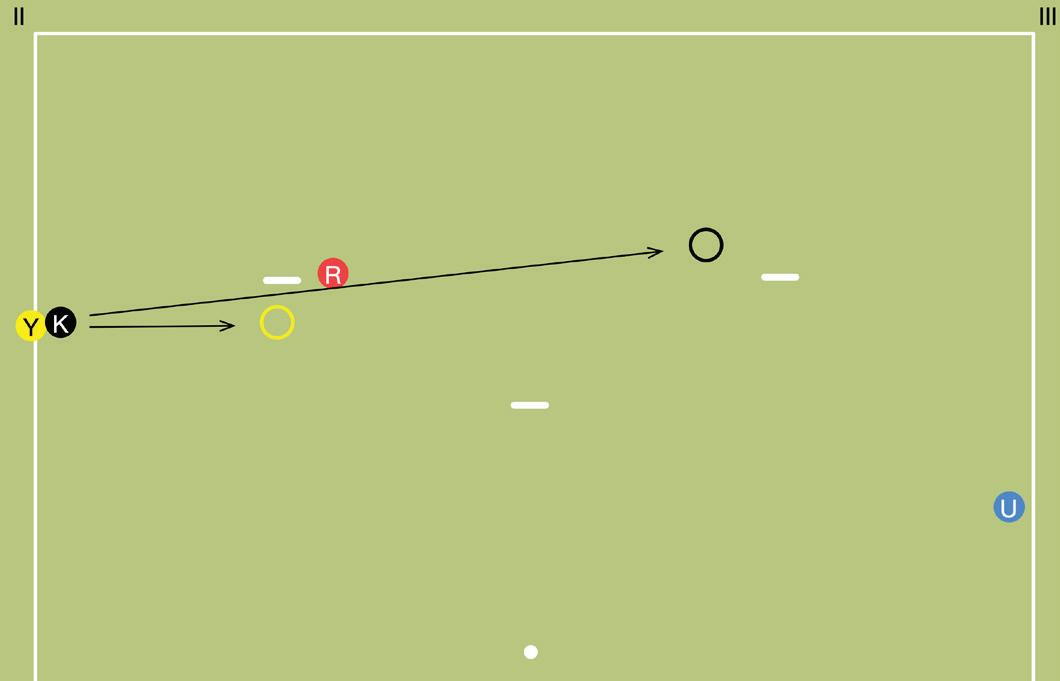
If the boundary next to K seems reasonably flat, Y has a better option: rush R to about four or five feet east of 2 (i.e., not quite as far as when setting up the croquet-out). Send R close to K, but not out of bounds, while stopping Y in front of 2. This is a reasonable play because of the short distances involved and gives Y a good chance to score the wicket on the continuation shot, then hide from U (see Figure 3). With R on court, U can’t easily block it from K. The main risks here are failing to get R close enough to K for a safe roquet or sending R out of bounds by mistake. Also, if you fail to clear 2 on this turn, U has a free shot (free because if U misses, R can’t pick up U until after scoring 2; this is difficult enough that R should leave U where it is until after scoring 6).

Starting from the Figure 1 position, Y also has a more aggressive option: roquet R gently, take off to K (ideally moving R a bit north on the take-off), roquet K, then send it toward 3 while approaching 2. If this load-and-hold play works, Y has an immediate three-ball break, with a good chance to pick up U on the way to 4. And if Y doesn’t get good scoring position at 2, it can still lay up for R and a good chance of the peel.
But there’s a rather obvious problem with this play: Y is sending K dangerously close to U, and the chance of wiring K from U is small. If Y fails to score 2, U has a good chance to hit in. U would have to be much farther away (down toward corner 4, perhaps) for this play to be worth the risk, unless Y is particularly good at the load-and-hold shot.
What about scoring 2 first, then attacking? Y could tap R, then approach 2 sending R past and left of 2. If Y runs 2 with control it can then rush R back toward K. The goal would then be to set up a three-ball break for R, such that K will be the ball R uses to score 2. That gives R a chance of peeling Y at 3. Y could use at least a couple of sequences to set this up, but this play is inferior in almost every way to the one shown in Figure 3. There’s no guarantee of a good rush on R after scoring 2, and Y has very little chance of both clearing itself at 3 and leaving R with a good break set-up.
If RY wants a relatively easy and low-risk play, Y can tap R, approach 2 while attempting to send R to a position wired from U, run the wicket, then play between R and 2, hopefully also wired from U (see Figure 5). R will then have a safe and easy play to score 2 and clear deadness (remember, R is still dead on U). With both Y and R clear and for 3, RY will have the advantageous position of being just behind UK and will likely be able to join in corner 3 before UK has managed to arrange a useful rush (unless U is inclined to attack in corner 3, not very attractive with U for 5 and K for 4).

If you’re a player who likes to give the opponent a chance to try something aggressive and maybe get in trouble doing so, the Figure 5 play is a good option. Just remember that even a “safe” play such as this still represents a trade-off. The main trade-off here is opportunity cost: the Figure 3 play is almost too good to pass up.
If you’re surprised by how many options this “simple” scenario offers, you’re not alone—I was surprised too! Each of the plays described above would make an excellent practice drill, no matter your skill level.