6 minute read
Installation
Sometimes it’s more than the flooring Trouble shooting
As I have done before, I’d like to share photos of some recent flooring installations I visited, and hopefully the problems I saw can help our readers to avoid these types of situations and help their customers avoid them as well. In some cases, troubleshooting goes beyond just the floor covering material and installation. There can be other circumstances.
Advertisement
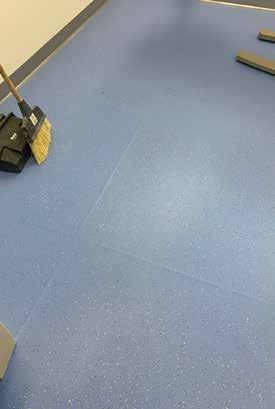
Curling resilient seams (photo 1) In this photograph, a rubber tile was installed in a medical facility over a new concrete slab. The installation happened back in the spring, and at that time the facility did not have any Christopher climate control. Initially everything Capobianco was fine, until a few months later when the project had progressed to the point that the HVAC system was activated. Within a week, all of the tile was curling like what you see in the photo. A flooring contractor was called in to investigate and do some moisture testing. The relative humidity test results (as per ASTMF 2170) were above 95 percent, which is way too high, which explains the condition. Prior to the HVAC going on, the slab and the air were somewhat in equilibrium. However, with the HVAC on, the humidity level in the air came down, so the moisture in the slab naturally moved toward the drier air above, affecting the adhesive at the seams first. They removed all of the tile in one of the rooms to allow the floor to dry out. I got there a week later and, in that room, observed a pattern of lighter gray lines approximately ½-inch wide, which appeared to follow the seams of the tile that was installed previously. This would indicate that the slab was drying at the seams of the tile where the moisture was able to pass upwards and into the air. F2170 tests were repeated in the same locations, had come down from the week before but were still above the allowable limits for the adhesive that was used. Since the facility was almost ready to open, they were embarking on an unusual plan to lift the affected tile and re-apply adhesive to get the edges to go flat. The lesson here is one that I have mentioned several times, and that is the importance of proper site conditions. Construction sites being what they are, we are often asked to install floor covering when the area is not yet at “in service” temperature and humidity as recommended. However, projects like this show the risk of doing so. The fact that the concrete was well above the flooring manufacturer and the adhesive manufacturers recommendations meant that there was no warranty on this floor.
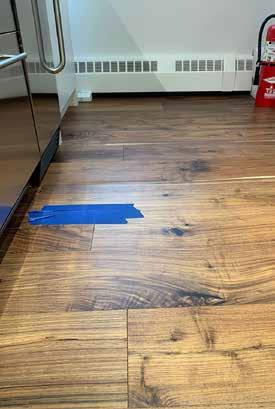
Wood floor buckling (photo 2) I was asked to look at a an eight-month-old, wood-floor installation that was warping. An engineered walnut plank floor had been installed in the employee lounge and pantry area of a corporate office space. There were two areas where the floor is cupping, meaning that the planks appear to be higher on the edges compared to the center of the board, a condition caused by moisture that causes the wood to swell. The first area was against an exterior door and I was told that there had been some water intrusion here. Caulking had been applied on the outside of the metal door saddle, and a thin strip of rubber weather stripping had been screwed to the bottom of the door on the outside. I reached underneath the door itself and found that there was no weather seal attached to bottom of the door. Some doors have this feature, which can serve like a gasket to help seal the door. I suggested that the door manufacturer be consulted to see if this is available on these doors. I did not have a level to check the grade of the patio outside the door, so I am not sure if it is level, pitched toward the building, or pitched away from the building. This is 1
worth investigating as a way of determining if water is flowing toward the door. The area shown in photo 2 was near an under-counter icemaker. Again, it appears that water is the likely cause of the wood being distressed. The owner wanted to know if the flooring product was appropriate for this type of area and asked if the installer was at fault. The answers were yes and no, and I suggested that the first area of examination should be the ice machine. If there if is a leak, that could be causing this problem. Some appliances have available drip pans that are placed underneath to catch small amounts of moisture or condensation. I suggested a consultation with the appliance installer might be in order. Once the water intrusions are corrected for this floor, the damaged flooring can be removed, and hopefully the floor can be given some time to dry out before new planks are installed, using a “high moisture tolerance” adhesive.
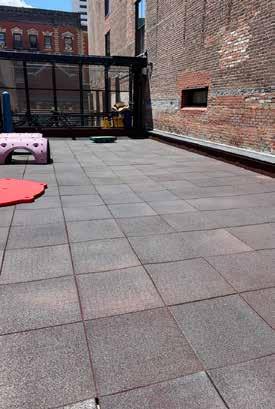
Outdoor rubber tile curling (photo 3) I was asked to look at a rooftop playground where a 2½-inchthick, footed rubber tile was installed. I’ve done a fair amount of

3
this type of work, so I was called in to make some recommendations on repairing or replacing this material. In this area, not all of the tile appears to be lying flat — some of the corners are curling and there appear to be low spots in the center of some tiles. To investigate, I lifted two or three of the tiles — luckily the installer had not used any adhesive on the corners, as recommended. This would appear to be a part of the problem. However, that mistake made it easier to get to the cause and allowed me to see what the tiles looked like on the back. I found that they are in good shape, the feet are intact with no breakage. The unevenness appears to be coming from the substrate — the tiles are installed over a foam panel of some kind. On further examination, it appears to be foam insulation that’s used on vertical surfaces on building exteriors. It’s soft enough to compress under the weight of the rubber tile, so the rubber feet on the back of the tile are sinking into the foam panels. This is contributing to the low spots and also to the curling at the corners of the tile. The substrate is not completely supporting the center of the tiles, so the edges are lifting up. Because they are not adhered, this condition is made worse. In order to remedy this condition, the entire system needs to be removed so that the condition of the roof can be corrected. Hopefully, once a solid substrate is established, the tiles can be re-installed using the correct procedure and the playground can be put back into service.

Christopher Capobianco
has been in the floor covering industry since the 1970s in various roles including retail and commercial sales, technical support, consulting, journalism, education and volunteer work. He currently is part of the sales team for Spartan Surfaces in New York City. You can reach him via christopher@ SpartanSurfaces.com.


