16 minute read
Don’t Miss the Shingle Stagger


The Science Behind Your Inspection
By Tom Feiza, Mr. Fix-It, Inc. HowToOperateYourHome.com
Advertisement
Do asphalt roof shingles really stagger? In my part of the country, they do. Stagger is a term some roofing contractors use for the shingle offset—that is, the spacing between butt joints of adjacent shingles. Some contractors call it “shingle offset” or “edge-to-edge spacing.” I like to call it stagger like the local boys do.
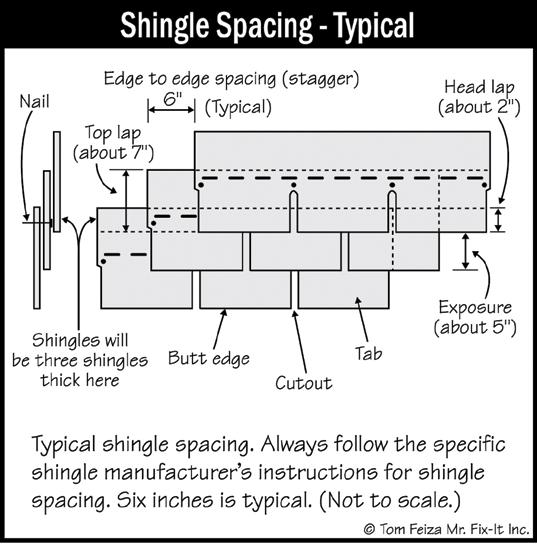
No matter what you call it, maintaining shingle stagger is really important to prevent roof leaks and to conform with manufacturers’ instructions. See Figure 1: Shingle Spacing - Typical and Figure 2: Shingle Spacing, Starter, Deck as these are graphic representations of this technique.
If the shingle stagger is too small—less than 4 inches—water can travel into the shingle butt edge to the butt edge joint of the shingle below (less than 4 inches away) and leak in. You know what leaks cause: rot, mold and lawsuits. Do you check the shingle stagger when you inspect roofs? How do you check it on modern laminated shingles? Checking the old three-tab shingles was easy, but things have changed.
Shingles Have Changed I do miss the good old three-tab shingles! Until a few years ago we were always inspecting three-tab asphalt shingle roofs. Now it seems most of the asphalt shingle roofs consist of laminated or architectural shingles or some type of hybrid made to look like shakes or tile or wood shingles. In my market, about 85 percent of the asphalt shingle sales are some type of laminated shingles.
Why do I miss the three-tabs? Because they were easy to inspect. The tabs were about 12 inches wide and separated by a slot. When installing a roof, the contractor just cut about 6 inches off the edge of the starter of each row of shingles, creating a simple stagger. When there are three-tab shingles on a roof, you can easily see the alignment of the tabs/slots and the edges of the shingles. This makes it easy to check the stagger. (Photo 1: Three–Tab Shingles, Page 28).
In fact, unless there was a really unusual pattern of tabs or slots, I never checked the stagger with three-tab shingles, because it was always right. Maybe the contractors or DIYs got it right because the three-tab shingles were easy to install, or maybe because mistakes with stagger were easy to see. The slots just didn’t look right if the spacing was off…and the DIY’s wife could see it from the ground.
The new laminated shingles (Figure 3: Laminated Shingle Nailing, Page 25 and Photo 2: Laminated Shingles, Page 28) have no tabs and no slots. When the shingles are properly installed, it is
Figure 1: Shingle Spacing - Typical
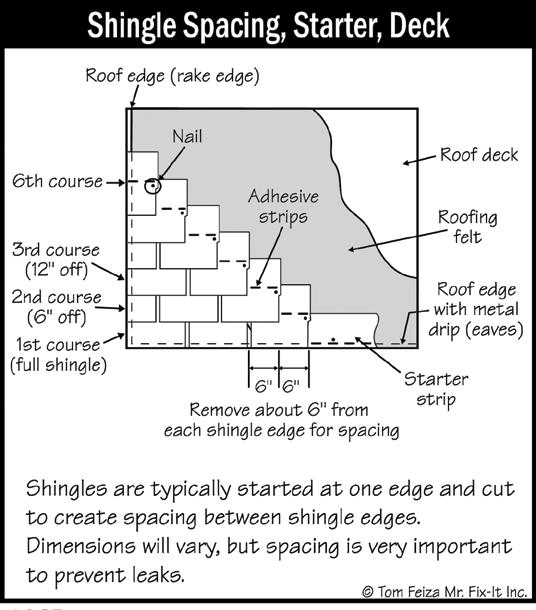
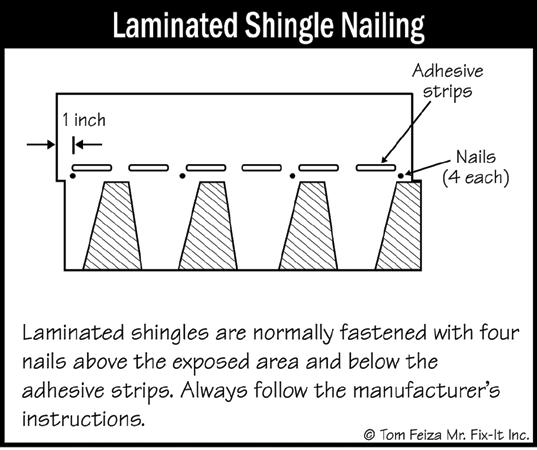
Figure 3: Laminated Shingle Nailing

Figure 4: Shingle Layout and Spacing Problems
very difficult to locate the shingle butt edge. In fact, some shingles seem to have laminations that even cover the butt joint. Improper offset or stagger will allow leaking and will be very hard to detect visually.
Stagger Is important If the stagger (offset) is not adequate, rain can move through the edge of the shingle to the edge of the lower shingle, creating a leak. This is especially problematic in wet climates, areas with heavy rain or areas with freeze-thaw cycles, and with lower slope roofs.
The old “English” measurement three-tab shingles were about 36 inches wide, and the stagger was about six inches. The “metric” shingles are about 40 inches wide, and the stagger is still about six inches. If you mess up the stagger, the shingle tabs/slots will not look properly aligned, (Figure 4: Shingle Layout and Spacing Problems) and this is very easy to spot during a visual inspection.
With laminated shingles, the stagger ranges from six to 15 inches, depending on the type of shingle and the shingle manufacturer’s instructions. In a few cases, manufacturers may allow four inches, but that is not common. With laminated shingles, the appearance might change if the stagger does not follow the manufacturer’s directions, but this is often hard to see during inspection.
Check Offset and Pitch Shingle offset (stagger) of less than four inches makes the roof prone to leaking. On architectural shingles I am always looking for shingle edges and visually measuring the edge-to-edge spacing. In my work as an engineer and roofing consultant, I have seen roofs with stagger of less than four inches, and they leak—random leaks right through the roof.
The pitch of the roof also affects roof leaks when there is a small stagger. The lower the pitch of the roof, the more it is prone to leaks. Remember that asphalt shingles shed water and do not constitute a membrane. Ice on the roof also limits the roof’s ability to shed water and can compound the leak and stagger problem.
What do you do when a roof leaks due to improper stagger? You tear the whole thing off and start over. It’s an expensive defect. It’s also difficult to detect in a laminated shingle unless you know what you’re looking for.
I provided consulting on a huge laminated shingle roof over an indoor pool attached to a 3,500-square-foot home; this amounted to about 7,000 square feet of roof on which the stagger was as little as two inches, and the roof leaked in random locations. Due to leaking, this voided the warranty. The whole roof needed a replacement because the shingles were not properly installed, and also the attorneys made some money.
Inspecting Laminated Shingles To inspect laminated shingles for stagger, locate the edges of shingles in adjacent rows. Often this is difficult, but with a little practice you will notice subtle changes in appearance at the edge. At times I slightly lift an edge to be sure it is an edge and not just a lamination over a base felt. Remember that butt edges are a straight cut, perpendicular to the lower edge of the shingle. Edges of laminations are often cut at an angle.
Measure from edge to edge of adjacent shingles. (Photo 4: Stagger 1.5 inches, Page 28). If it looks too small, use a ruler and
7page 27
start taking pictures. Once you have checked a few shingles, you can almost be assured that the whole horizontal row of shingles will be correct. You must check for stagger on each roof plane.
If the stagger is off, you may also notice an irregular pattern in appearance. At times this is visible from the ground when viewing a larger area.
Always Be Suspicious of “California” Valleys A “California” or “Long Island” valley is one in which a vertical shingle is used to line the edge of the valley. (Photo: 3: California Valley). It could be an open metal valley or a closed cut valley. You will notice a shingle laid parallel to the valley and then rows of shingles laid over the vertical shingle to the rake edge. You will see the laminated edges of the vertical shingle in the valley. I anticipate installation problems with this California valley because the rows of horizontal shingles are often just started in the valley and the stagger is too small. The roofing contractor is saving time and material by not trimming the shingle edge for proper stagger. It looks good, but it can leak.
The Role of Manufacturers Can the manufacturer help? I have found that manufacturers and their local representatives are useful resources for technical information. But when it comes right down to evaluating a shingle installation issue, they are often reluctant to criticize their customer, the roofing contractor. And that makes good business sense. They also may waffle a little with their statements. They guarantee their shingles for performance, but if leaks occur because of improper installation, this voids the warranty. Most manufacturers’ instructions for installing asphalt shingles don’t mention the California valley, but I have seen references to this type of installation in trade journals and instructions.
What’s a Home Inspector to Do? Always check for stagger with laminated shingles. Watch for those California valleys; at least the stagger is easy to see at the edge of the valley. Unfortunately, is it difficult to visually identify a stagger issue unless you are on the roof looking down at the shingles. If the stagger is five inches or less, start to look closely, documenting the condition and warning the buyer. If the stagger is four inches or less, document the condition, suggest that there is a potential for leakage, and refer the condition to a professional roofing contractor for further evaluation. Carefully check the attic and ceilings for leaks.
I suggest that the buyer ask the homeowner to document in writing the type of shingles, the name of the roofer and the installation requirements and warranties. Have the buyer make the seller responsible for the roofing issues. You are not paid to be responsible for improper roof installation. Don’t accept that responsibility. Do a little research. Gather and review a set of shingle manufacturers’ installation instructions for shingles commonly used in your area. You can find these instructions on the manufacturers’ websites. The Asphalt Roofing Manufacturers Association (www.asphaltroofing.org) also provides excellent reference materials. Carry the instructions with you to use as a reference. I provide the manufacturers’ instructions to customers when there is an issue. Installation instructions are also printed on every bundle of shingles. You can often find a spare bundle of shingles in the garage to identify the manufacturer and type of shingle.
Also, review these instructions in detail to see what they say about stagger. They may call it “offset,” but checking the shingle stagger is much more fun! Be knowledgeable about shingle stagger, because some contractors and some DIYs aren’t. WRE
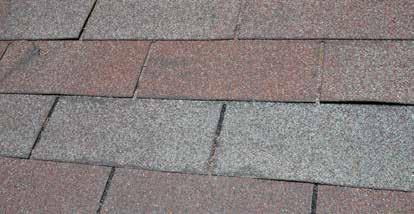
Photo 1: Three-Tab Shingles
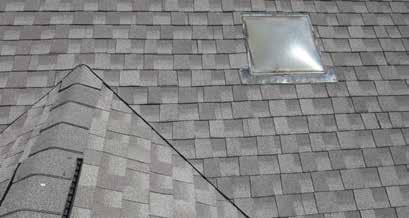
Photo 2: Laminated Shingles
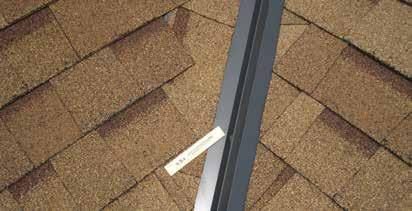
Photo 3: California Valley

Tom Feiza has been a professional home inspector since 1992 and has a degree in engineering. Through HowToOperateYourHome. com, he provides high-quality marketing materials, books for homeowners, and illustrations that help professional home inspectors educate their customers. E-mail Tom (Tom@htoyh.com) with questions and comments, or phone (262) 303-4884. Copyright © 2021 by Tom Feiza, Mr. Fix-It, Inc. Reproduced with permission.

Fuel Oil Tanks
by Reuben Saltzman, Structure Tech
If you’re inspecting a house in the Twin Cities, or possibly elsewhere in the country, if there are pipes sticking up out of the ground in the yard, heads up. You may have a fuel oil tank somewhere at the property. While most homes in the Twin Cities are heated with natural gas, there is still a small percentage of homes that are heated with fuel oil, and there are tons of houses with abandoned fuel oil tanks.
When a home gets converted from fuel oil to natural gas, the fuel oil tank becomes abandoned. Once the tank is abandoned, it needs to be dealt with.
Abandoned Tanks When a fuel oil tank is buried, it needs to be removed or filled in place when it becomes abandoned. If a fuel oil tank is left buried, it could eventually leak. A leaking underground storage tank (LUST) can contaminate the soil as well as the home, creating an environmental hazard that can cost a ridiculous amount of money to clean up. You can visit the EPA’s web site on LUSTs (https://www.epa.gov/ust) for more information.
When a tank is located inside the house but not buried, it needs to be properly disconnected, and sometimes removed.
A fuel oil tank takes up a large amount of room, so most people choose to have them removed, but requirements vary from city to city. For example, once a fuel oil tank is abandoned in Minneapolis, it needs to be removed from the property.
I don’t think I’ve ever seen a fuel oil tank that was less than 200 gallons. The tank shown in Photo 1 is a common 275gallon indoor tank. Another option for an abandoned fuel oil tank is to stick it out in your front yard and paint it like a cow. You think I’m kidding, but I’m not (Photo 2: Outdoor Fuel Tank, Page 32).
I even had another home inspector share a photo with me where someone did this in a basement. Let the good times roll.
Clues to a Buried Fuel Oil Tank The easiest way to spot a potential buried fuel oil tank is to look for a fill pipe and vent pipe at the exterior of the home. Sometimes the pipes will go through the foundation wall of
Reuben Saltzman is a second-generation home inspector with a passion for his work, and is the owner and president of Structure Tech. Visit his blog online at: https://www.structuretech.com/ blog/age-related-home-problems
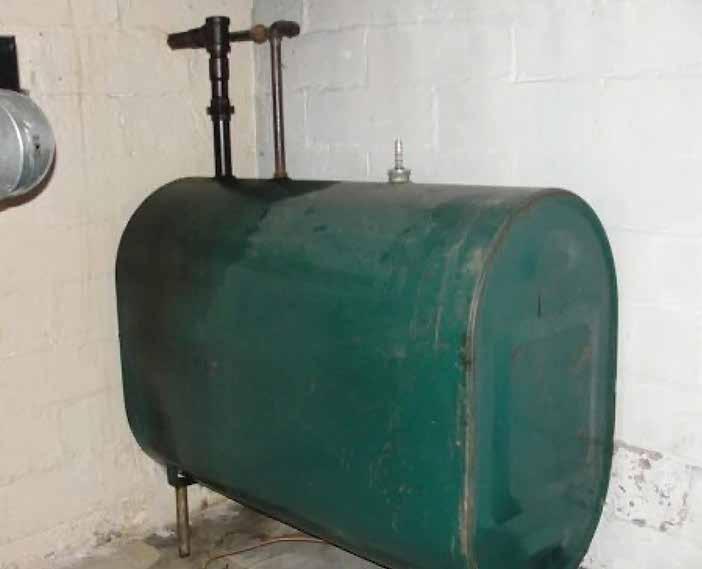
Photo 1: 275 Gallon Indoor Fuel Tank
the home (Photo 3: Buried Fuel Oil Tank, Page 32). Sometimes they just go down into the ground (Photo 4: Vent Pipe, Buried Tank, and Fill Pipe, Page 32). When fuel oil tanks are removed, the fill and vent pipes need to be removed or cut off and filled with concrete. If you find pipes sticking out of the ground or foundation wall like the ones shown in Photo 4, it probably means one of two things: either the tank is still there, or it was removed by a hack. No professional fuel oil tank removal contractor is going to leave the vent and fill pipes looking like that. Why, you ask?
According to Dean Nething of Dean’s Tanks near Minneapolis, Minnesota, there were many “erroneous deliveries” that happened during the 60’s and 70’s, where one house address got confused with another and the oil was delivered to a home after the tank had been removed. About once a year, a basement would get contaminated with hundreds of gallons of fuel oil. In every one of these cases, the contamination was so bad that the fuel oil company, Standard Oil, had to buy the property so they could tear it down and dig out the basement. This is why the fill pipes always need to be removed when the tank is removed.
When the pipes are right next to each other (Photo 4, Page 32) there’s a good chance that the fuel oil tank is (or was) located inside or under the house. When the pipes are separated from each other, there’s probably a buried fuel oil tank in the yard. Photo 4 came from a house in Minneapolis, and these pipes led to a 1,000-gallon tank buried in the yard. I recall another scenario where the fill and vent pipes were located in the front yard behind some bushes at a home. These innocuous, nearly hidden pipes led to an enormous buried tank in the front yard. There was a subtle vent sticking up out of the ground behind some bushes that led to a buried fuel oil tank.
And finally, one of the most non-so-subtle clues that we have
CONNECT WITH MORE AGENTS BECOME A CERTIFIED REAL ESTATE CE INSTRUCTOR FOR JUST $499*


• Attract More Agents • Gain Trust & Credibility • Become the Go-To Expert • Differentiate Yourself


Teach CE classes to agents in a classroom setting or now online via Zoom (in states where it is permitted).
www.InspectionMarketer.com/499/ 888.455.7437
* The initial setup fee is $499. Our monthly service fee is $199. Host an unllimited number of coures.
7page 30

Photo 2: Outdoor Fuel Tank
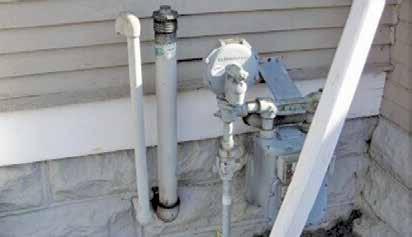
Photo 3: Buried Fuel Oil Tank
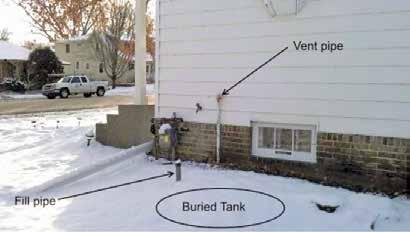
Photo 4: Vent Pipe, Buried Tank, and Fill Pipe
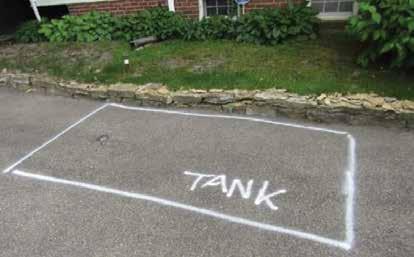
Photo 5: Buried Fuel Oil Tank Clue #2 ever come across was a huge marked-up area on someone’s driveway (Photo 5, Buried Fuel Oil Tank Clue #2).
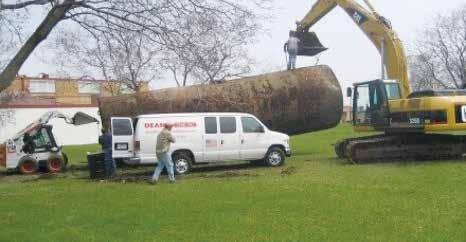
Tank Images There are a few diagrams floating around online that show an indoor style of tank buried in the ground, like the big green one (Photo 1: 275 Gallon Indoor Fuel Tank, Page 30). That type of indoor tank is extremely unusual to find buried, according to Dean’s Tank. The vast majority of buried tanks look a lot more like big drums (Photo 6: Big Drum Tank).
In another case when a fill pipe was sticking out of the ground, it had a cap that could be opened. I stuck my tape measure down the pipe, and it came out soaked in fuel oil. It smelled like fuel oil for the next two weeks, despite my efforts to clean it off. Fuel oil has a strong odor and takes a long time to go away. It’s easy to understand how a leaking tank can create such a nasty problem. The person buying this home had the sellers remove the tank and after it was removed you could no longer see the fill pipe.
What to Do if You Suspect a Buried Oil Tank If you suspect a buried oil tank, call a company that specializes in fuel oil tanks to determine if a fuel oil tank is present.
If you want to confirm the presence of a buried tank quickly, before you call in the expert, one fast and simple way is put your ear to one of the pipes sticking out of the ground, then bang on the other with a hammer. If there’s a buried tank, you’ll be able to hear it; the sound will be really obvious because you’ll hear what sounds like a big, echo-y cavern.
The cost of removing a buried fuel oil tank varies greatly from property to property, but costs in the Minneapolis area typically range from $2,000 to $3,000. Having a tank filled in place has a comparable cost.
Buried Fuel Oil Tanks and Home Inspection Standards Home Inspection Standards of Practice (SOP) specifically state that buried fuel oil tanks are not something that home inspectors are required to inspect. Here’s SOP language from the two largest home inspection organizations:
• ASHI: Inspectors are NOT required to inspect: underground items including, but not limited to underground storage tanks or other underground indications of their presence, whether abandoned or active. • InterNACHI: The inspector is not required to inspect fuel tanks or underground or concealed fuel supply systems.
Does this mean that if a home inspector sees obvious clues that a buried fuel oil tank is present, they should keep their mouth shut? Heck no. A buried fuel oil tank is important to know about when buying a house. If a home inspector has enough experience to suspect a buried fuel tank, they should call for an expert to come out and take a look. While it’s not a requirement, this has become the standard of care for home inspections in many areas. WRE
WHEN TROUBLE COMES...

DON’T SETTLE
FOR JUST ANY INSURANCE COVERAGE
You need a team with experience. Serving home inspectors for over 19 years, OREP includes FREE Pre-Claims Assistance to help shut down unwarranted complaints before they turn into claims. Rest easy knowing you’re protected by an experienced team that will help you avoid complaints, put an end to frivolous claims, and keep your rates low. OREP—Business by the Golden Rule.


