24 minute read
ACTA FACULTATIS XYLOLOGIAE
ZVOLEN, 65(1): 5 21, 2023
Zvolen, Technická univerzita vo Zvolene
Advertisement
DOI: 10.17423/afx.2023.65.1.01
PATTERNS OF CHANGES IN TECHNOLOGICAL ACCURACY OF PLANO-MILLING MACHINES DURING THE PERIOD OF THE CUTTING TOOL WEAR RESISTANCE
Abstract
Polynomial patterns of changes in the technological accuracy of the machine tool over the period of the cutting tool wear resistance were established. The software, which makes it possible to show regression models of the average value and the scattering field of the size of the manufactured parts depending on the degree of the tool wear, was developed. Based on the results of experimental studies of changes in the machining accuracy on six planomilling machines during the wear resistance period of the cutting tool (ρ = 5 − 50 μm), regression models in the form of third-order polynomials were obtained. It was found that to ensure the machining accuracy within the tolerance (± 0.1 mm), the wear resistance period of the cutting tool should not exceed ρ = 30 μm, and the technical specification of the machine should correspond to an exceptionally high accuracy class.
Keywords: regression model, accuracy, machining, machine tool, part.
Introduction
Wood blanks after machining on plano-milling machines must have the appropriate shape, size accuracy and surface roughness (Kiryk 2006). The quality of machining is affected by a number of factors: the characteristics of the material being processed, the parameters of the cutting tool and the cutting mode (Chladil et al , 2019, Bendikiene and Keturakis 2017, Mazur et al., 2011, Vančo et al., 2020, Warcholinski and Gilewicz 2022). The determining indicator of the quality of machining on machine tools is the accuracy of the dimensions of the manufactured parts, compliance with which ensures: interchangeability of parts during the assembly of products; manufacturing accuracy of the whole product; economic efficiency of the entire production. Increased requirements for machining accuracy (±0.1 mm) primarily relate to the manufacture of bar parts on planomilling machines. Compliance with these requirements is currently ensured by performing technological operations for calibrating individual parts or prefabricated products (window and door units), which requires additional raw materials and energy costs.
The source of errors in the dimensions of the parts produced in the cutting process is the dynamic system "machine-cutting tool-workpiece" (McTW) (Pylypchuk 2021, Vukov et al., 2021),whichcontains alargenumberoffactors thathaveboth asystematicandarandom nature of influence on the accuracy of machining. The main indicator of the efficiency of a woodworking machine is its technological accuracy which gradually decreases duringtheoperationofthemachine. The technological accuracyofmachinetools is partially restored due to their periodic adjustment and repair, as well as timely resharpening of the cutting tool. That is, maintaining the required level of machining accuracy on machines requires the development of specific practical solutions to improve or restore the technological accuracy of the machine, and this, in turn, requires conducting research to find the patterns of changes in accuracy.
In the process of operation, the machine tools lose their initial technological accuracy and therefore require timely taking measures to prevent the appearance of defective parts. Accordingtothemanufacturers,theinitialtechnologicalaccuracyofplano-millingmachines corresponds to a particularly high class, which ensures machining accuracy according to IT10-11 qualities (ISO 286-2). During the operation of the machine tool, various types of energy are acting, which causes the occurrence of processes in the components and parts of the machine that change the initial characteristics (Hernande and Fernando de Moura 2002, Kanarchuk et al., 2003). Such processes may be reversible or irreversible. The reversible processes temporarily change the parameters of machine parts and its units within certain limits, for example, elastic and thermal deformations of machine parts and cutting tools. The irreversible processes lead to a gradual loss of machine performance and the onset of parametric failures. Some authors (Pylypchuk et al., 2021) developed a parametric machine failure model based on the accuracy criterion, which makes it possible to determine the duration of the interregulating periods of machine operation.
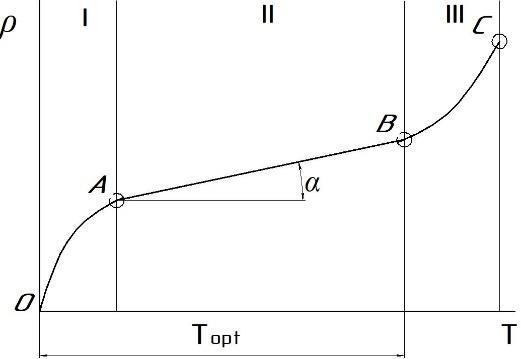
Theprocessesin themachinesalso differin theirspeed (fast, medium-speed and slow), which affects the change in the initial parameters of the machine (Pylypchuk 2021). Medium-speed irreversible processes that occur during continuous operation of the machine and last for several hours include the process of gradual wear and bluntness of the cutter blade (Dobryansky and Malafieiev 2020; Zatulenko and Zaiets 2019), which is of typical character (Fig. 1a). The period of a cutting tool resistance to wear T is determined by the operating time before critical blunting of the cutter blade, during which three stages can be distinguished: I – running in; ІІ – gradual wear; ІІІ – critical (emergency) wear. During roughing, the operation is conducted in zones I and II, that is, according to the criterion of maximum total stability of the cutter blade. When finishing on milling machines, the period of the cutting tool wear resistance is determined by the technological criterion – ensuring the specified quality of machining.
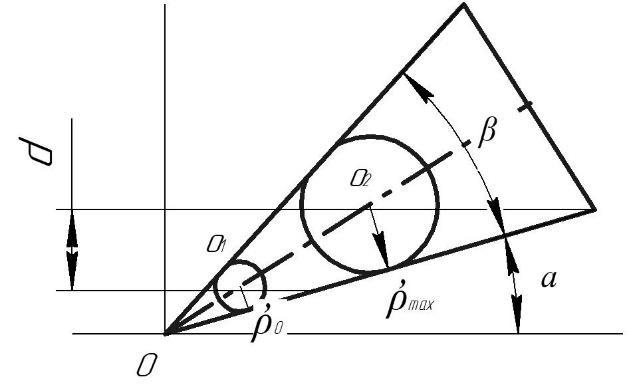
The authors (Kiryk and Hryhoriev 2013) note that the cutting tool after sharpening has a radius of curvature of the cutting edge of 6 4 0 = μm (Fig. 1b). The cutting ability of the tool is gradually lost and becomes critical when the radius of curvature of the cutting edges reaches 60 50 = max μm. The cutting tool period of wear resistance can range from a few minutes to 400 hours of continuous operation, depending on the material of the blade, the properties of the wood and the modes of cutting.
Gradual failure of the cutting tool due to the loss of machining accuracy occurs when deviations in the size of the manufactured parts reach the tolerance field limit (Bustos et al., 2010, Nadolny et al., 2020, Pylypchuk 2021). The main determinant of machining accuracy on plano-milling machines is the actual location of the cutting plane passing through the center of the circle inscribed in the cutting edge of the blade (Fig. 1b). During the process of milling, the blades gradually wear out; accordingly, the radius of the inscribed circle increases, and its center moves along the bisector of the sharpening angle. Therefore, the machining surface is shifted by an amount of d: where:
0 – the radius of rounding of the cutting edge of the initially sharpened tool;
0e relative residual deformation under the cutting surface of wood.
Exceeding the average period of tool life leads to a discrepancy between the dimensions of theworkpieces andthenominalsizes. Inordertopreventtheappearanceofdefectiveworkpieces, itisnecessarytousetheefficientcuttingtoollifeaccordingtothecriterionofmachiningaccuracy, forthedeterminationofwhichfurther researchconducting is necessary.
According to the study results (Vitchev 2019, Vitchev and Gochev 2019), the surface quality of Scots pine wood samples is influenced by the rotation frequency of the cutting tool, the feed rate, and the characteristics of the milling cutter. In the work (Keturakis and Juodeikienė 2007) the influence of the blunting radius of the cutter blades as well as the feed rates and cutting speeds on the surface roughness during longitudinal milling of birch wood was investigated. It was found that the roughness of the machined surface increases as the radius of rounding of the milling cutter blades increases. In the work (Atanasov 2021), based on the results of experimental studies, determined was the dependence of the cutting force on the feed rate and the thickness of the cut chips during longitudinal milling of oak wood, tropical species – meranti, koto, as well as composite materials – medium-density fiberboard and plywood.
In order to obtain high machining accuracy during the cutting tool wear resistance period, it is necessary to prevent the occurrence of excessive vibrations of the "machinecutting tool-workpiece" system, which is confirmed by studies (Kovatchev and Atanasov 2021) of the influence of feed rate and milling area on vibration resistance. The authors (Chunmei et al., 2020) investigated the influence of different shapes of milling tool blades on cutting forces, vibration during cutting, change in chip shape at different feed rates, as well as on the roughness of the machined surface. It was found that the feed rate has a significant effect on the roughness of the machined surface, with an increase in this rate, the roughness increases, and no studies have been conducted regarding the machining accuracy. The work (Li et al., 2022) also investigated the influence of the following factors on the roughness of the machined surface and the cutting power in the process of helical milling of pine wood: the helical angle of the cutter, the rotation speed of the main shaft, and the depth of milling. The influence of the input variables and the quantitative relationship between the input data and the change in the assessment indicators were clearly identified. The results obtained are useful for selecting the mode parameters of helical milling in order to improve the quality of the machined surface and save power consumption.
In the work (Djurković et al., 2019), the influence of the cutting tool blade wear on cutting power and the quality of the machined surface is investigated. The tests were carried out on samples of beech wood of the same density and moisture content and without visible wood defects. It was found that the wear of the tool blades significantly affects the cutting power and the quality of the machined surface, which is important in determining the cutting mode and the period duration of the tool wear resistance. The authors (Bendikiene and Keturakis 2016) also investigated the effect of the cutting tool blade wear on the surface roughness of birch wood blanks in the planing process. It was found that after a cutting length of 3,200 m, a change in the geometry of the tool cutting edge leads to an increase in the surface roughness.
The authors (Skliarov and Prykhodai 2021) note that the introduction of automation tools and the use of robotic systems can improve the productivity and machining accuracy, but these measures cannot exclude the influence of factors such as the cutting tool wear, temperature, elastic and contact deformation of the technological machine systems on the accuracy of manufactured parts. To do this, the machines use active control systems, means of controlling the elastic movements of the machine-cutting tool-workpiece system and automaticadjustment systems, whichprovides anincreasein machining accuracy, sincethey allow periodically adjusting the position of the cutting tool relative to the workpiece and can be used on milling machines. In order to obtain the required productivity, product quality, and energy saving, the authors (Rudenko et al. 2012) proposed using a new automated combined system for controlling the mechanisms of plano-milling machines with the introduction of regulators for the tool drive start-up process, the interaction of the main drive and the feed drive, and the regulator of roughness of the machined surface.
So, based on the analysis of the results of well-known studies on the quality indicators of the cutting process on plano-milling machines, it should be noted that in most works, the roughness of the machined surface and the effect on its value of the main operation factors: cutting speed and feed rate, wood species, area of the cut layer, as well as structural differences of the milling tool and the degree of its bluntness are considered as a quality indicator of processing. Few works are concerned with the study of changes in machining accuracy during the period of the cutting tool wear resistance, when due to the gradual blunting of the tool, a parametric failure according to the criterion of machining accuracy occurs, as a result of which there is a need to restore the working condition of the cutting tool. Therefore, we consider it necessary to conduct scientific research aimed at finding the patterns of changes in the technological accuracy of the machine during the period of the cutting tool wear resistance and developing measures to ensure modern requirements for machining accuracy indicators.
Material And Methods
During the process of machining a batch of parts on a woodworking machine, the dimensions of the manufactured parts are scattered, which is described by a field of scattering of machining errors (Pylypchuk and Burdjak 2009). The scattering field does not remain constant during the production time of a batch of parts, but gradually changes in magnitude and, accordingly, its average value changes. The basis of the methodology for studying changes in the technological accuracy of the machine during the period of manufacturing a batch of parts, which is equal to the period of the cutting tool wear resistance, is the method of instantaneous sampling (Pylypchuk 2010). It was preliminarily found out that ten instantaneous samples of parts in a group, 10 / N n n = , characterize quite accurately the batch of manufactured parts.
The dimensional inaccuracy of the manufactured batch of parts is characterized by the parameters ofthe scattering field and dimensional setting X (Fig. 2). Inmost woodworking machines,themachining accuracyis graduallyreduced during theproduction timeof abatch of parts. Based on the results of studies on changes in sawing accuracy during the period of the cutting tool wear resistance on circular saws (Pylypchuk 2020), it can be argued that it is necessary to apply a polynomial model that takes the form: where: 0C – the coefficient characterizing the initial value of the evaluation parameter; n ...C C1 – coefficients that characterize the nature of changes in the parameter during the period of the cutting tool wear resistance.
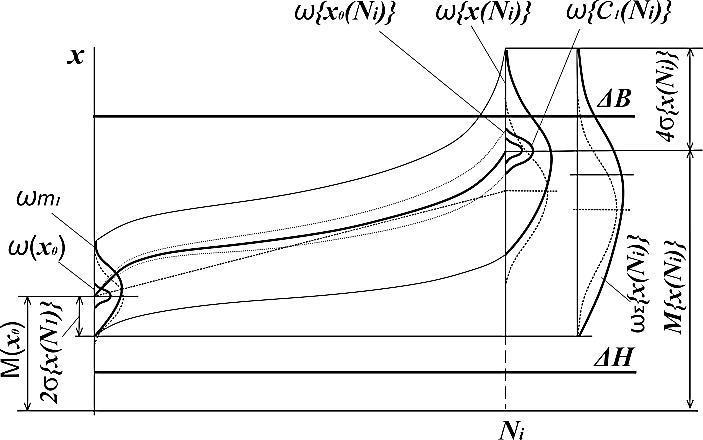
Taking into account the polynomial model (2), the changes in the average size j X and the scattering field j are described by the equations: where: 0 0 , X the initial values of the average size and the scattering field of the part sizes; t – the time of production of a batch of parts during the period of the cutting tool wear resistance; n n ...C C , ...B B 1 1 –coefficients that determine the nature of changes in the average size of parts and the scattering field of part sizes during the period of the cutting-tool wear resistance.
The quantitative characteristic of the cutting tool wear is the degree of blunting of the cutter blades, which is determined by the radius of rounding of the main cutting edge ( µm). During the cutting process, the blunting of the blades of tool cutters is constantly increasing and according to data (Kiryk and Hryhoriev 2013), the value that describes the wear resistance period of milling knives is within ( 50 5 = µm).
To process experimental data from studies of changes in the technological accuracy of the machine tool, the DynToch program has been developed by the authors. It is used to obtain the mathematical dependencies describing the change in machining accuracy indicators over the characteristic periods of machine operation, using a regression equation – a polynomial of the nth degreeandin graphical form.
The program provides the following steps in a logical sequence: input data; calculation of statistical indicators and indicators of changes in the average value and scattering field; obtaining a regression equation based on linear and polynomial models and constructing graphical dependencies ofchanges intheaveragevalueandthescattering field ofthemachining error. The input data table allows processing arrays of ten samples, each of which contains ten measurements of the parts. All the samples are entered into the program in the sequence of their obtaining during the experimental studies. Calculations are performed automatically at all stages of the program, and all calculation results and their graphical representation are also automatically recalculated when each of the input data values is changed. The value of statistical indicators is also determined automatically for each of the samples after entering the input data.
The determined pattern makes it possible to analyze and predict changes in the accuracy of parts machining on any machine. In addition, by knowing the pattern, the state of technological accuracy of woodworking machines during a certain period of their operation can be monitored and the appearance of defective parts can be prevented. The developed technique can be used both to establish the pattern of changes in the technological accuracy of various types of woodworking machine structures, and to predict the machining accuracy on woodworking machines under production conditions over the period of the cutting tool wear resistance.
Determination oftheactual technological accuracyoffour-sideplano-millingmachines
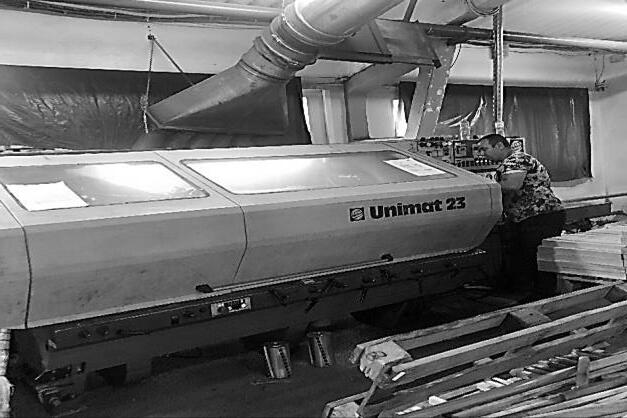
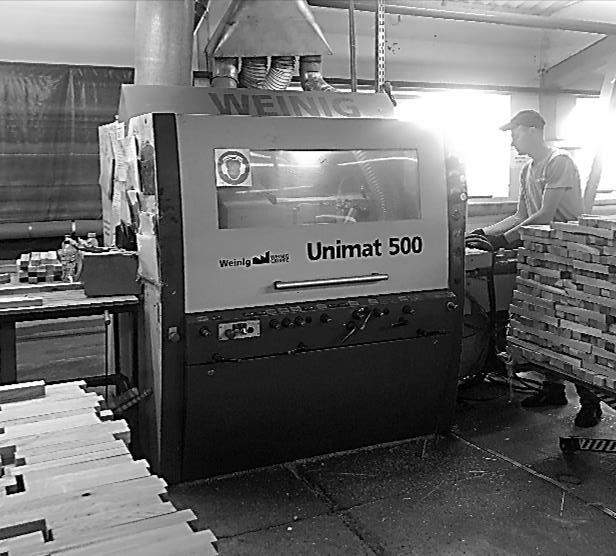
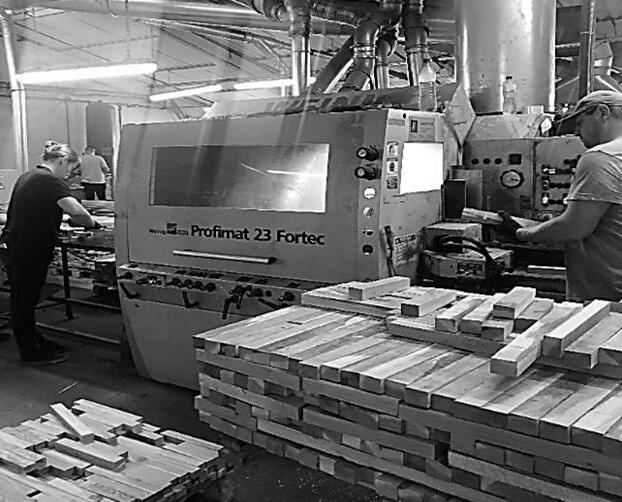
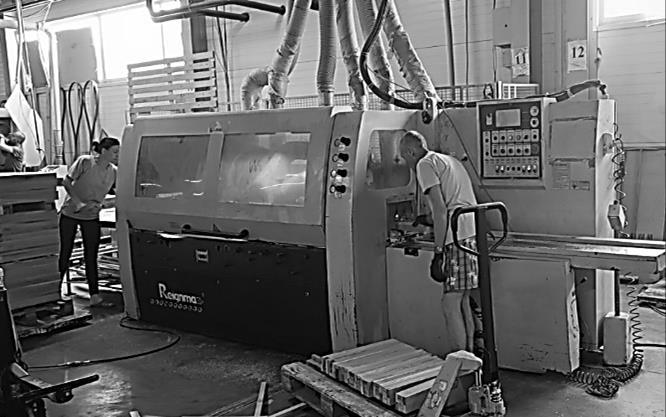
The actual technological accuracy of four-side plano-milling machines was determined on the basis of experimental studies of machining accuracy in the case of eight types of machines operated in woodworking enterprises in Ukraine: Unimat 500, Profimat 23, Unimat 23 EL, Hydromat 1000, Hydromat 2000 from the Weinig company; QMB 620 GH from the Quality Greation Maker company; RMM 623 from the Reignmac company.
The experimental studies were carried out under the following conditions: wood – oak (Quercus); moisture content of the wood – 7–9%; feed rate – 20–25 m/min; spindle rotation speed – 6,000–8,000 min-1; the number of milling cutters – 4 pcs.; the degree of the knives wear ( 50 45 = μm); the number of part size measurements in one sample is
100 (10 parts with 10 width and thickness measurements on each part). The results of the sample data processing and main indicators are shown in Table 1.
Tab. 1. Main indicators of the actual technological accuracy of four-side plano-milling machines
Basedon the analysis oftheresults obtained(Table 1),it is worth notingthe following: under conditions of critical wear of milling knives ( 50 45 = μm), machining errors in all themachines,bothinwidthandthicknessoftheparts,exceeduptotwotimesthepermissible values both during preliminary calibration of workpieces (± 0.2 mm) and during finishing (± 0.1 mm). The largest machining error was observed in the case of the machines of the Chinese manufacturers QMB 620 GH (Quality Greation Maker) and RMM 623 (Reignmac), which in terms of the thickness of the dimensions of the parts exceed the permissible values by 3.7 and 3.3 times,respectively. Thehighest machiningaccuracy (within ± 0.14–0.19mm) was provided by the Weinig machines: Unimat 23, Unimat 23 EL, Unimat 500, Hydromat 1000Hydromat2000,however,allthemachinesdidnotmeetthetechnologicalrequirements for dimensional accuracy (± 0.1 mm), which necessitates conducting further research and development of measures to improve the accuracy of machining in these machines.
Bychecking thehypotheses about thelawofmachining errordistribution, it was found that the distribution does not correspond to the normal law, and the Hnidenko-Weibull law more accurately describes this dependence. The discrepancy between various distributions (which can be used as input flows in the simulation modeling of wood machining processes) and the normal law is typical for such a natural material as wood, in particular, the work (Mysyk et al., 2017)describedthedistributionsofthelengthofdefect-freeareas fordifferent species. To adequately describe such distributions of lengths of defect-free sections, it is more appropriate to use the Log-Logistic and Burr laws. In addition, the distribution of this error according to the Weibull law confirms the presence ofadominant factorinfluencing adecreasein accuracyandtheshift in theaveragesizevalue towards an increase. It means that there is a factor with a systematic nature of the impact, which is the blunting of the cutter blades leading to a decrease in machining accuracy and an increase in the size of the parts.
Thus, according to the results of statistical processing of the experimental studies on the technological accuracy of machines, it can be concluded that the accuracy of surface machining of workpieces using the machine tools is low (within ± 0.14–0.37 mm) and does not meet the technological requirements (± 0.1 mm), which is explained by the long-term operation of machine tools and the maximum wear of knives ( 50 = max μm).
The study of changes in machining accuracy during the period of the cutting tool wear resistance
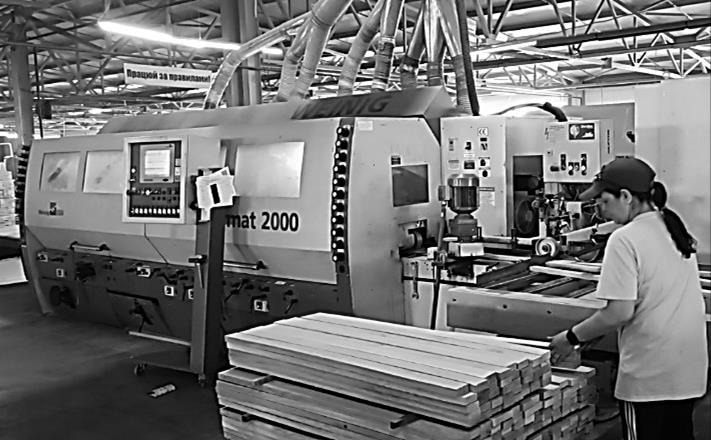
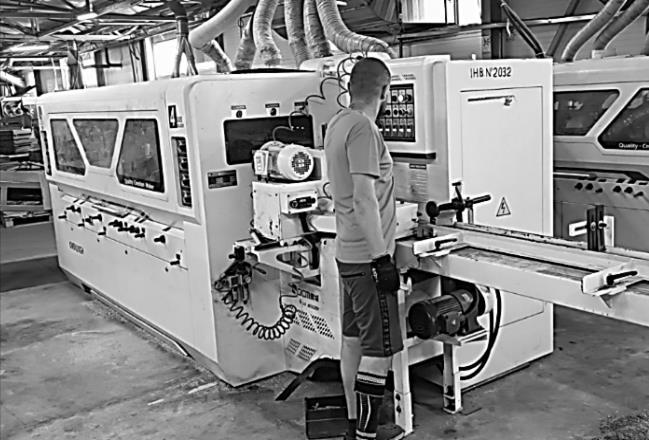
According to the developed methodology, experimental studies on the influence of the degree of knife wear on the accuracy of milling bar workpieces in production conditions on six machines were performed (Fig. 3).
The experimental studies on the technological accuracy of four-side plano-milling machines operating in woodworking enterprises in Ukraine for 5–18 years were carried out under the following conditions: wood – oak; the wood moisture content – 5–7%; workpiece dimensions: length – 730 mm; cross-section – 50 × 50 mm; feed rate – 20 m/min; period of resistance of knives to wear ( 50 5 = µm); layer removal thickness 2.0–4.0 mm, the speed of rotation of the spindles – 6,000 min-1 .
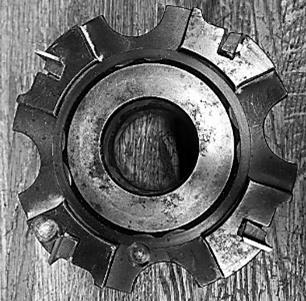
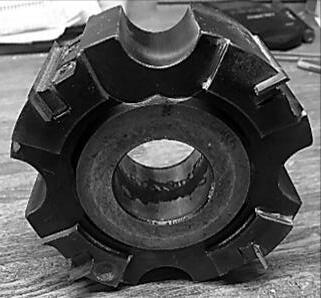
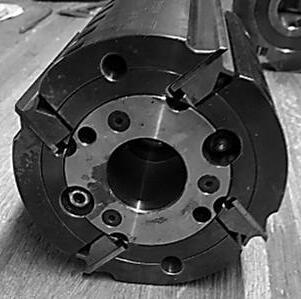
The cutting tools – cylindrical assembled cutters with insert knives (Fig. 4 a, b) with a diameterof125
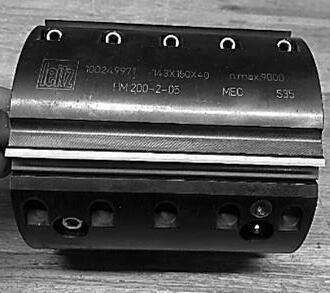
260mm,thenumberofmilling cutterknives –4pcs; thepermissibledegree of knife wear ( 50 µm). Technical specifications of the milling cutters: for horizontal spindles (Fig. 4 a): the manufacturer – Leitz, serial number – 100249971, dimensions –143×150×40 mm, = max n 9,000 min-1, HM 200-2-05, MEC S35; for vertical spindles (Fig. 4 b): UNIMERCO, dimensions – 145×80×40 mm, = max n 9,000 min-1
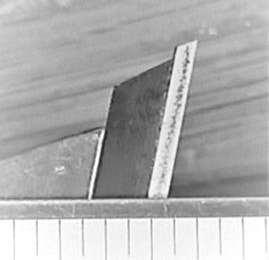
The radius of rounding of the cutting edge, which was periodically measured after performing a given cutting path, was used to quantitatively assess the wear of the blade of the milling cutter. The milling cutter was removed from the machine, the top of the knife was photographed under the object-micrometer OMP No. 652295 with a division value of 0.01 mm (Fig. 5 a, b) and re-installed on the machine for further milling. Simultaneously with photographing the knife blade, a microline was photographed, the distance between divisions being 0.01 mm, which makes it possible to determine the dimensions of the cutter knife with an accuracy of 10 μm. The wear of the cutter knife blade was measured from the obtained photo using the AutoCad computer program.
Measurementsofthedimensionsofthemanufacturedpartsoneachofthemachines weremadebytheirwidthandthickness,andsamplesof100valueswereobtained(10parts with5widthandthicknessmeasurementsoneach).
Indicatorsofmachiningaccuracyonplano-millingmachinesaretheaveragevalueand scatteringfieldofthesizeofthemanufacturedparts,whichisequaltomm.The criterionforevaluatingtheaccuracyofmachiningisthemagnitudeofdeviationoftheactual sizeofthemanufacturedpartsfromthepermissiblevalueofthesizeerror.Sizetolerances ofmanufacturedbarpartsonplano-millingmachineshavethefollowingvalues:preliminary calibrationmm;finishing(final)machiningmm.

Onthebasisofprocessingtheresultsoftheexperimentwiththehelpofthedeveloped program"DynToch",theregressionequationsofthechangeintheaveragevalueandthe scatteringfieldofthethicknessofthepartswereobtainedintheformofthird-order polynomialsforsixmachines,whichtakethefollowingform:
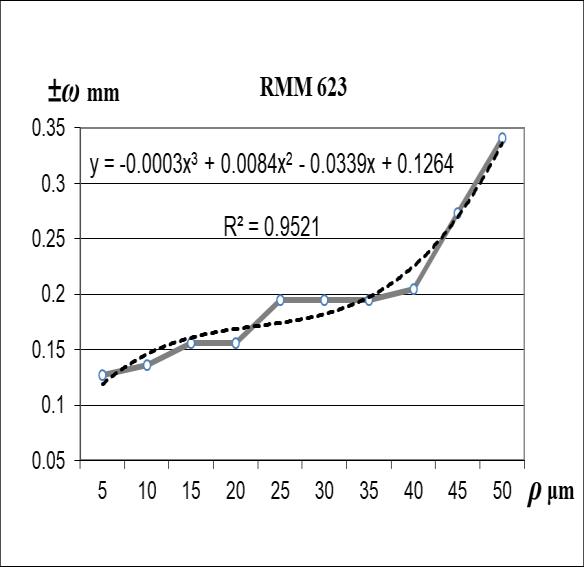
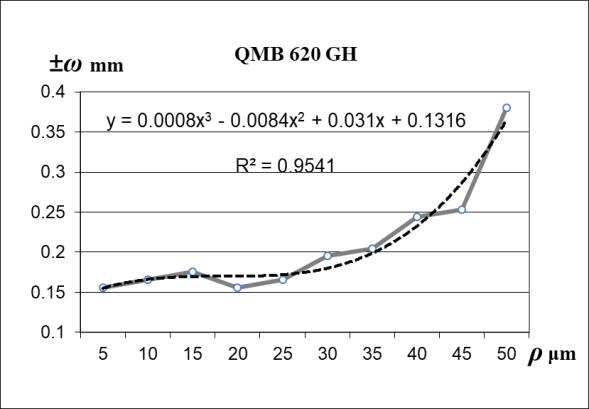
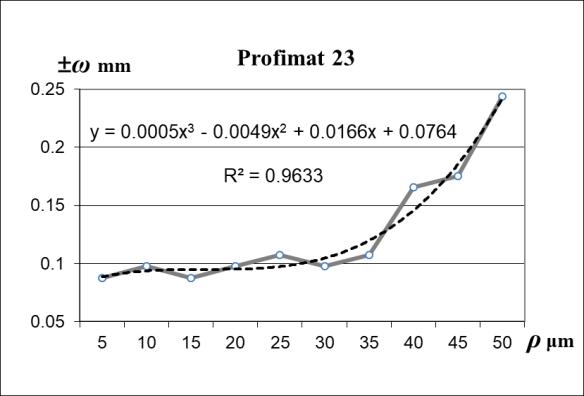
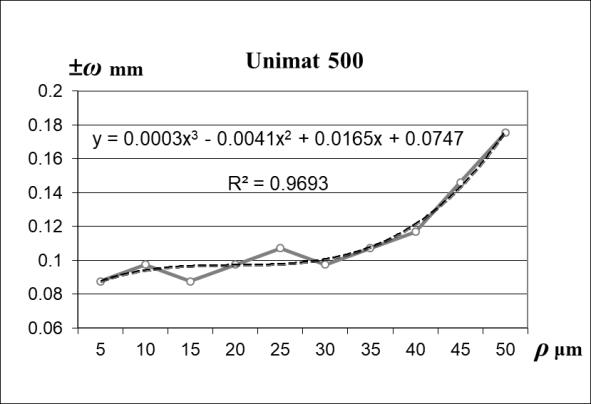
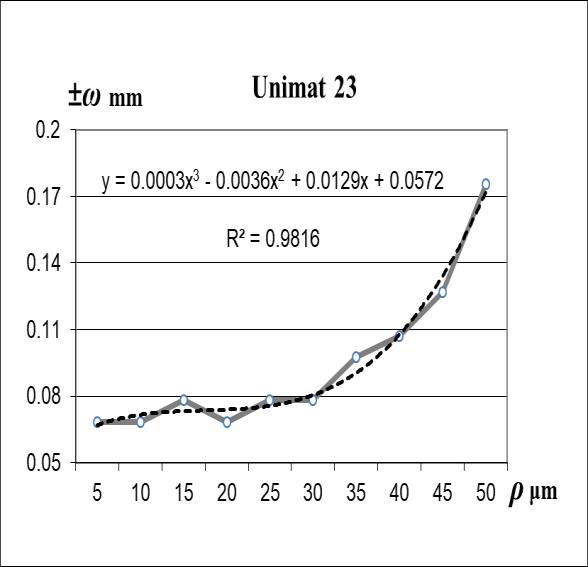
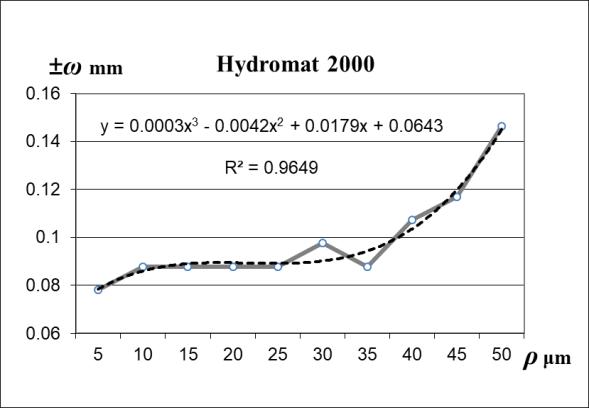
All the regression equations (5-16) of the average value and the scattering field of the size of the manufactured parts describe the increasing dynamics of the growth of machining accuracy indicators during the period of the tool wear resistance. The graphs of the polynomial models of the change in the average value (Fig. 6) and the scattering field (Fig. 7) for six machines show that the empirical dependences of the change in milling accuracy during the period of the tool wear resistance are approximated with high accuracy (R2 = 0.95–0.98) by polynomials of the third degree.
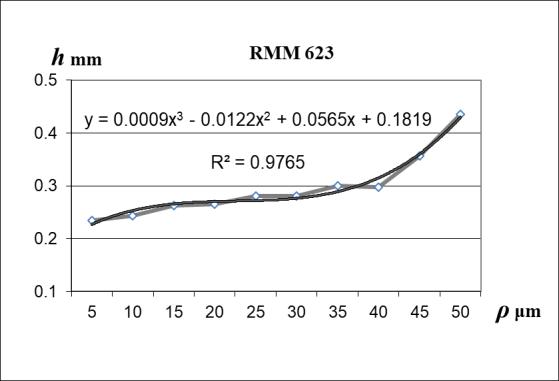
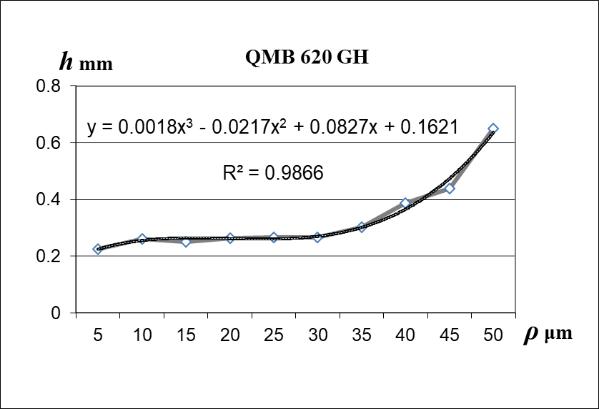
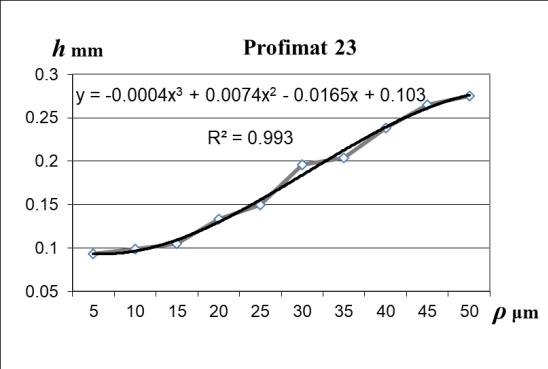
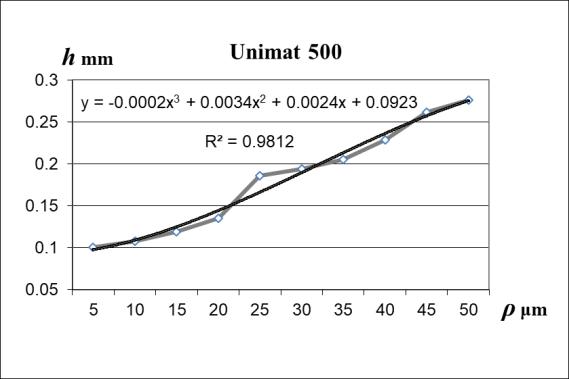
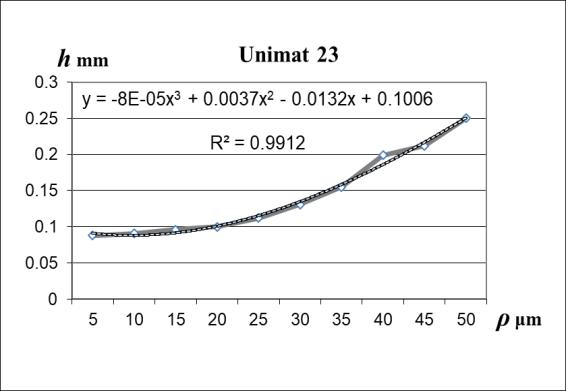
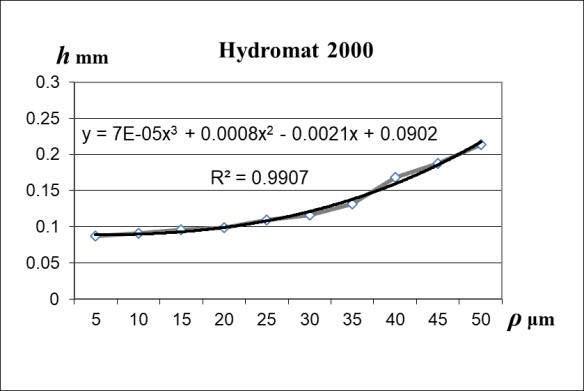
Thus, the obtained regression models in the form of a polynomial of the third degree, which describe the increasing dynamics of the average value and the scattering field of the size of manufactured parts on machines of the following brands: QMB 620 GH, RMM 623, Profimat 23, Unimat 500, Unimat 23 and Hydromat 2000 during the period of knife wear resistance ( 50 5 = µm), allow analyzing and predicting changes in the accuracy of machined parts on each of the machines and identifying the maximum duration of cutting tool wear resistance periods according to the criterion of machining accuracy
Results And Discussion
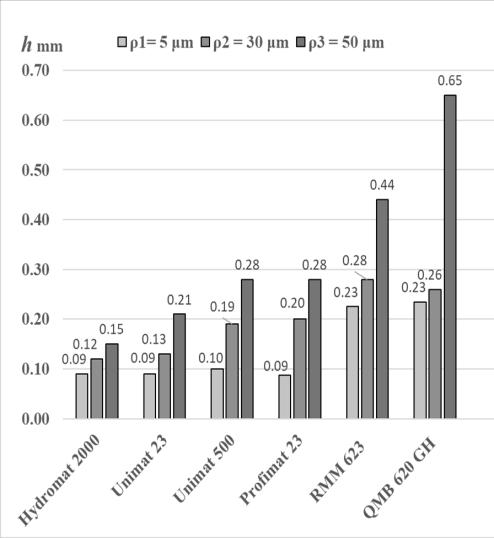
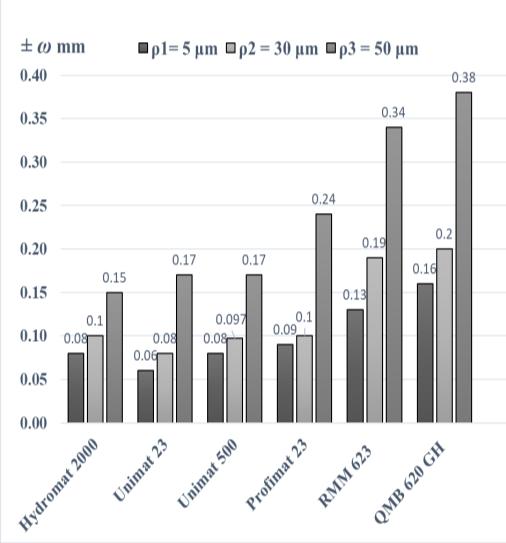
On the basis of the graphs of regression models (Figs. 6–7), for each of the machines, the characteristic phases of the milling cutter knife wear resistance period were determined: initial, sharp knives ( 5 = µm); medium degree of wear of knives ( 30 = µm); critical, maximum wear of knives ( 50 = µm). Based on this, diagrams of the magnitude of the scattering field and the average value of the size of parts for three characteristic values of the periods of the cutter knives wear resistance on each of the six machines were constructed (Figs. 8a, b).
Based on the results of the analysis of changes in machining accuracy in the case of the Unimat 500 and Profimat 23 machines (Fig. 8 a), it was found that the scattering field of the size of the manufactured parts increases three times ( 24 0 08 0 = mm) during the entire period ofknifewearresistance,andthemillingaccuracywithinthetolerance(±0.1mm)isprovidedonly at the initial and middle phases of the knife wear resistance period, i.e. under the condition of 30 µm. On the Unimat 23 and Hydromat 2000 machines, the cutting accuracy during the knife wear resistance period ( 50 µm) is also reduced by 2.4 times ( 17 0 07 0 = mm), but slower compared to the Unimat 500 and Profimat 23 machines. The tolerance of machining accuracy (±0.1 mm) on these machines is provided under the condition of 40 µm, which confirms thehighgeometricaccuracyandstiffness of machinestructures.
ItwasfoundthatthemachiningerroronthemachinesQMB620GH,RMM623ofChinese manufacturers (Fig. 8 a) duringthe periodof wear resistanceof the knives increases most rapidly ( 38 0 13 0 = mm), that is, by 3.7 times, and the tolerance requirements (±0.1 mm ) are not provided even in the initial phase of the milling period ( 0.16 0.13 = mm). On these machines,duringtheperiodofkniveswearresistance 30 µm,machiningaccuracyisensured within ± 0.2 mm, which meets the requirements only for the preliminary calibration of the workpiecesandconfirmsthenon-complianceofthemachinespecificationwithaparticularlyhigh class ofaccuracy.
Theaveragevalueofthesizeerrorofmanufactured partsinthecaseofallthemachines during the period of knife wear resistance (Fig. 8b) also increases in accordance with the increase in the scattering field of the size of the parts. On the Weinig machines, during the middle phase of the knife wear resistance period 30 µm, the average value of the part size changes within 19 0 09 0 . . h = mm, i.e. the thickness of the parts increases by 0.1 mm, and with the maximum wear of the knives ( 50 = µm) 28 0 09 0 h = mm, i.e. the size increases to 0.2 mm. Thus, the Unimat 500, Profimat 23, Unimat 23, and Hydromat 2000 machines will ensure machining accuracy according to two criteria during the middle phase of the knife wear resistance period ( 30 µm): the average value of up to 0.1 mm and the scattering field (± 0.1 mm).
On the Chinese-made QMB 620 GH, RMM 623 machines, during the period of wear resistance of the knives ( 50 5 μm), the average value of the thickness of the parts changes within the range of 65 0 23 0 h = mm, that is, the size increases by 0.42 mm. A significant increase in the size of the parts indicates insufficient rigidity of the "machinecutting tool-workpiece" system and the need for additional dimensional adjustment of the machine before the beginning of the critical phase of wear resistance of knives ( 50 30 μm).
Based on the results of the analysis, it was found that in order to ensure machining accuracy in plano-milling machines within the tolerance (± 0.1 mm), the wear of the cutter knives should not exceed 30 = μm, and the technical specification of the machine should correspond to a particularly high accuracy class.
Conclusions
On the basis of experimental studies in the production conditions of Ukrainian enterprises, the indicators of the actual technological accuracy of plano-milling machines of various manufacturers were determined and it was found that under the conditions of maximum wear of milling knives ( 50 = µm), the size errors of the manufactured parts in the case of all the machines exceed the permissible values (± 0.1 mm) by up to four times, which makes it necessary to establish a pattern of changes in machining accuracy during the period of the cutting tool wear resistance.
The algorithm for mathematical prediction of changes in machining accuracy in machine tools over the period of tool wear resistance was improved. Software that makes it possible to obtain regression models of the change in the average value and the scattering field of the size of manufactured parts in the form of polynomials of the n-th degree and to predict the change in the accuracy of machining on the machine during a certain period of operation was developed. Moreover, it can be used to establish the allowable duration of the period of the wear resistance of the cutting tool according to the criterion of machining accuracy and to prevent the appearance of defective parts.
According to the results of experimental studies of changes in the accuracy of machining on machine tools during the period of tool wear resistance ( 50 5 = μm), regression models in the form of polynomials of the third degree were obtained. These models describe the change in machining accuracy on machine tools during the period of the cutting tool wear resistance with accuracy 0.95 2 R . It was found that in order to ensure the machining accuracy within the tolerance (±0.1 mm), the period of the cutting tool wear resistance should not exceed 30 = µm, and the technical specification of the machine should correspond to a particularly high accuracy class.
The proposed mathematical model for predicting the change in machining accuracy during the cutting tool wear resistance period makes it possible to determine the duration of the cutting tool wear resistance period, which ensures the required accuracy of machining. The developed methodology and the obtained results are the basis for further research on the implementation of systems of active control over the size of manufactured parts and the development of systems for automatic dimensional adjustment of machine tools.
References
Atanasov, V. 2021. Experimental research on the cutting force during longitudinal milling of solid wood and wood-based composites. Acta Facultatis Xylologiae Zvolen. Vol. 63(2), pp. 73−84.
https://doi.org/10.17423/afx.2021.63.2.06 https://doi.org/10.1007/s10086-017-1656-x https://doi.org/10.15376/biores.14.2.3495-3505
Bendikiene, R., Keturakis, G. 2016. The effect of tool wear and planning parameters on birch wood surface roughness. Wood Research. Vol. 61 (5), pp. 791-798.
Bendikiene, R., Keturakis, G., 2017. The influence of technical characteristics of wood milling tools on its wear performance. Journal of Wood Science, Vol. 63, pp. 606-614.
Bustos, C., Moya, C, Lisperguer, J., Viveros, E. 2010. Effect of Knife Wear on the Gluability of Planed Surfaces of Radiata Pine, Wood and Fiber Science: Journal of the Society of Wood Science and Technology. Vol. 42(2), pp. 185-191.
Chladil, J., Sedlák, J., Rybářová, E., Kučera, M., Dado, M. 2019. Cutting conditions and tool wear when machining wood-based materials. BioResources. Vol. 14(2), pp. 3495-3505.
Chunmei, Y., Qingwei, L., Ting, J., Mingliang, S., Yan, M., & Jiuqing, L. 2020. Test analysis and verification of the influence of milling cutter blade shape on wood milling. In Wood Research. Vol. 65(2), pp. 313-322. https://doi.org/10.37763/wr.1336-4561/65.2.313322
Djurković, M., Miric Milosavljević, M., Mihailović V., Danon, G. 2019. Tool wear impacts on cutting power and surface quality in peripheral wood milling. In International Journal – Wood, Design & Technology. Vol. 8, no. 1, pp. 9-17.
Dobrianskyi, S.S., Malafieiev, Yu.M. 2020. Technological foundations of mechanical engineering: text book. Kyiv: Igor Sikorsky Kyiv Polytechnic Institute. 379 p.
Hernande, R., Fernando de Moura, L. 2002. Effects of knife jointing and wear on the planed surface quality of northern red oak wood, Wood and Fiber Science: Journal of the Society of Wood Science and Technology. Vol. 34(4), pp. 540-552.
ISO 286-2:1988 ISO system of limits and fits – Part 2: Tables of standard tolerance grades and limit deviations for holes and shafts.
Kanarchuk, V.Ie., Polianskyi, S.K., Dmytriiev, M.M. 2003. Machine reliability: text book. Kyiv: Lybid. 424 p.
Keturakis, G., Juodeikienė, I. 2007. Investigation of milled wood surface roughness. In Materials science (Medžiagotyra). Vol. 13, No. 1: pp. 47-51.
Kiryk, M.D., Hryhoriev, A.S. 2013. Preparation of wood-cutting tools for work and their operation. Lviv: UNFU. 342 p. ISBN 978-966-96826-8-0.
Kiryk, M.D. 2006. Mechanical processing of wood and wood materials: text book. Lviv : KN. 412 p. ISBN 966-8800-07-9.
Kovatchev, G., Atanasov,V. 2021. Determination of vibration during longitudinal milling of woodbased materials. Acta Facultatis Xylologiae Zvolen. Vol. 63(1), pp. 85−92. https://doi.org/10.17423/afx.2021.63.1.08
Li, R., Yang, F., Wang, X. 2022. Modeling and predicting the machined surface roughness and milling power in scot’s pine helical milling process. Machines. Vol. 10, 331, pp. 1-13. https://doi.org/10.3390/machines10050331
Mazur, M.P., Vnukov Yu.M., Dobroskok V.L.,Zaloha V.O., Novosolov Yu.K.,Yakubov F.Ia. 2011. Fundamentals of the theory of cutting materials: text book. Lviv: Novyi svit-2000, 2nd Edition. 422 p.
Mysyk, M., Matsyshyn, Ya., Mayevskyy, V., Ray, Ch., Kurka, R., Sopushynskyy, I. 2017. Identification of the length distribution of lumber defect-free areas. In Wood and Fiber Science. The Sustainable Natural Materials Journal – Published quarterly by The Sheridan Press Hanover, Pennsylvania. Vol. 49, no 4, pp. 396–406
Nadolny, K., Kapłonek, W., Sutowska, M., Sutowski, P., Myśliński, P., Gilewicz, A. 2020. Experimental Studies on Durability of PVD-Based CrCN/CrN-Coated Cutting Blade of Planer Knives Used in the Pine Wood Planing Process. Materials. Vol. 13(10), 2398, https://doi.org/10.3390/ma13102398
Pylypchuk, M.I., Burdjak, М.P. 2009. Exactness sawing research method of logs on "JasenBarakuda" roundsaw machine-tool. In Scientific bulletin of UNFU. Vol. 19(8), pp. 156-161.
Pylypchuk, M., Dziuba, L., Rebezniuk, I., Chmyr, O., Burdiak, M. 2021. Modeling parametric failuresofwoodworkingmachinesaccordingtothetechnological precisioncriterion.Inselected papers from the 3rd Grabchenko’s International Conference on Advanced Manufacturing Processes. InterPartner-2021, LNME, pp. 119-126. https://doi.org/10.1007/978-3-030-913274_12
Pylypchuk, M.I. 2010. Development of the research methodology of technological accuracy of woodworking machines. Agricultural machines: Coll. of sci. art. Lutsk: LNTU. Vol. 20: pp. 259-265.
Pylypchuk, M.I. 2020. Methodology for studying the dynamics of technological accuracy of woodworking machines. Proceedings of the 4th International science-practice conference, April 1
3, Ivano-Frankivsk, Academy of Technical Sciences of Ukraine. Ivano-Frankivsk: Vasyl Stefanyk Prykarpattia National University. Vol. 1: pp. 70-71.
Pylypchuk, M.I. 2021. Development of scientific and technical bases for ensuring the accuracy of woodworking on machines. Doctoral dissertation, Ukranian National Forestry University, Lviv, Ukraine.
Rudenko, T.H., Ermolaev, Yu.O., Shalimov, V.O. 2012. Development of an automated control system for wood machining on plano-milling machines. In Technology in agricultural production, industrial machine building, automation. Vol. 25, part 2: pp. 272-275.
Skliarov, R.A., Prykhodai, D.A. 2021. Methods for increasing the machining accuracy of metal cutting machines In Book of abstracts of the X International scientific and practical conference of young researchers and students "Current issues in modern technologies", November 24-25. Ternopil: TNTU, p. 56.
Vančo, M., Korčok, M., Barcík, Š., Koleda, P., Gochev, Zh. 2020. Analysis of Factors Effecting on Qualitative Parameters of Surface when Planar Milling Heat-treated Oak Wood, Scientific Journal „Innovation in Woodworking Industry and Engineering Design“, Vol. 2 (18), pp. 1528.
Vitchev, P. 2019. Evaluation of the surface quality of the processed wood material depending on the constructionofthewoodmillingtool.ActaFacultatisXylologiaeZvolen.Vol.61(2),pp.81−90. https://doi.org/10.17423/afx.2019.61.2.08
Vitchev, P., Gochev, Zh. 2019. Influence of the cutting mode on the surface quality during longitudinal plane milling of articles from Scot pine, Science journal "Innovations in Woodworking Industry and Engineering Design". Vol. 8, № 2, pp. 66-72.
Vukov, G., Slavov, V., Vitchev, P., Gochev, Zh., 2021. Forced Spatial Vibrations of a Wood Shaper, caused by the Wear of the Cutting Tool, Scientific Journal "Innovation in Woodworking Industry and Engineering Design", Vol. 10, № 2, pp. 51-62.
Warcholinski, B., Gilewicz, A. 2022. Surface Engineering of Woodworking Tools, Applied Science, 2022, Vol. 12 (20), 10389. https://doi.org/10.3390/app122010389
Zatulenko, A.S., Zaiets, S.S. 2019. The influence of the process of wear of the cutting tool on the accuracyofmachining. Proceedings of the XIIAll-Ukrainian scientific and practical conference of students, postgraduates and young scientists "Looking into the future of instrument engineering", May 15-16. Kyiv: Ihor Sikorsky Kyiv Polytechnic Institute. pp. 152-154.
AUTHORS’ ADDRESS
Mariya Pylypchuk Doktor of Technical Sciences, Associate Professor https://orcid.org/0000-0002-7684-1821, Volodymyr Mayevskyy Doktor of Technical Sciences, Professor https://orcid.org/0000-0001-5820-9454
Vasyl Taras PhD in Technical Sciences https://orcid.org/0000-0001-5159-998X, Mykhailo Burdiak PhD in Technical Sciences https://orcid.org/0000-0002-9669-1680, Zoya Kopynets PhD in Technical Sciences https://orcid.org/0000-0001-8977-6953, 79057, 103, Gen. Chuprynky St., Lviv
Ukraine


