1 Login
1.1 How to login
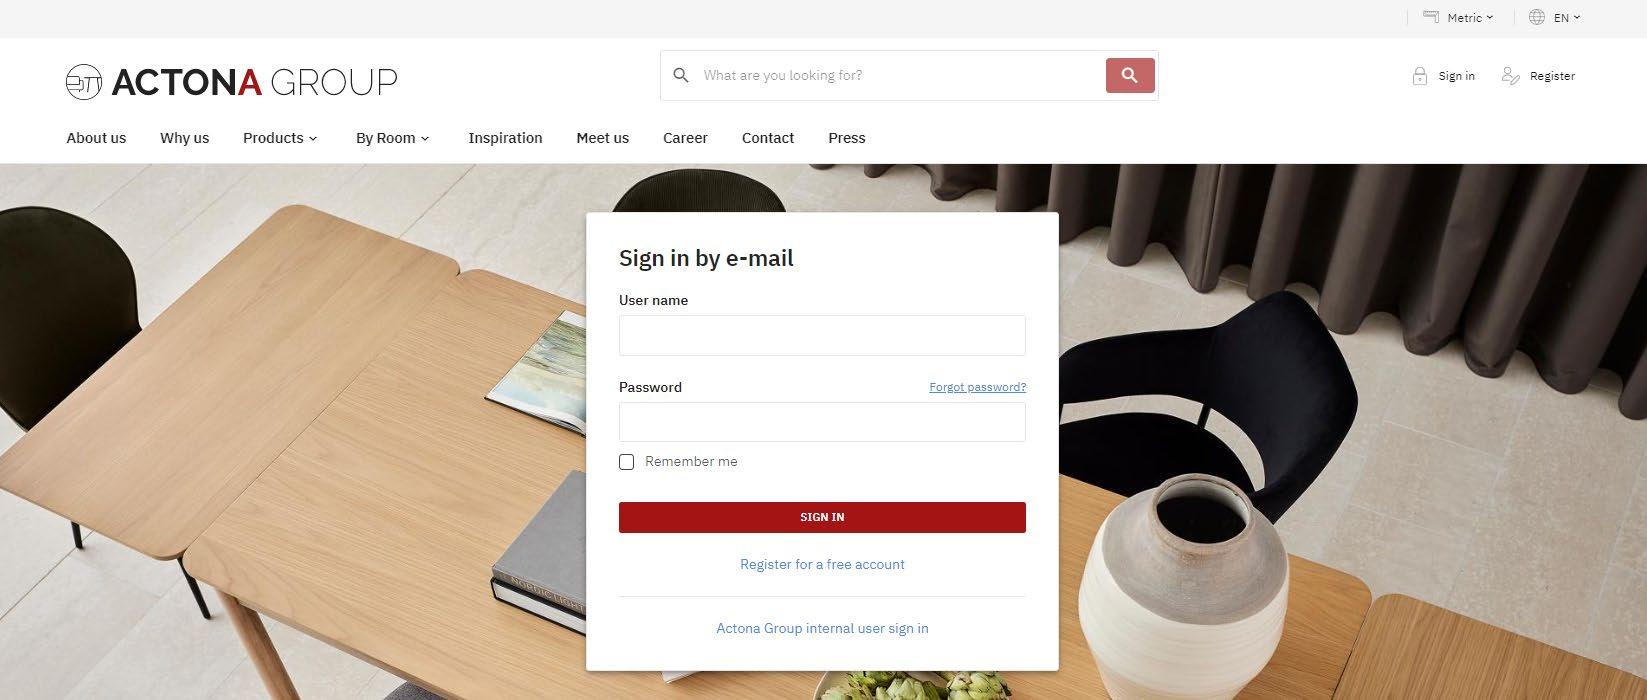
Tap “sign in” in the upper right-hand corner. When clicking “sign in”, you will be directed to the login page where you can enter your login information. Your login information will be provided to you by noreplyweb@actonagroup.com

Enter your username and password and click “sign in”.

1.2 Expired password
Every six months your password will expire. When that happens and you are trying to log in, the below pop up with the message to reset your password will show
Click “reset password” and enter your new password
Confirm the email that has been sent to you to verify your new login information.

1.3 How to reset your password
If you have forgotten your password, you can create a new one by clicking “forgot password?” Then you will be directed to a new page where you must submit your email address to reset.
1.3.1 A step-by-step guide to reset your password
Step 1: Click “Forgot password?”
Step 2: Enter your email address and submit it to reset

Step 3:
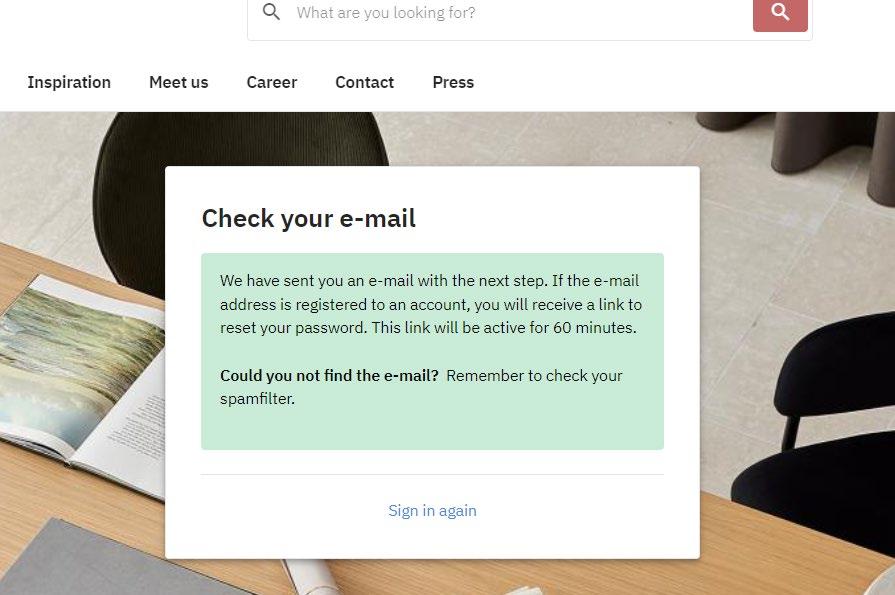
When you have submitted your email address you will be forwarded to the following site.
Now, go to your email inbox and check the email that you received from Actona Group. If you can’t find the email, please check for it in your spam inbox.

Click the link as shown below:
Please note: If the link in your email is not clickable, you just copy-paste the link into a browser.
Step 4:
Type in a new password
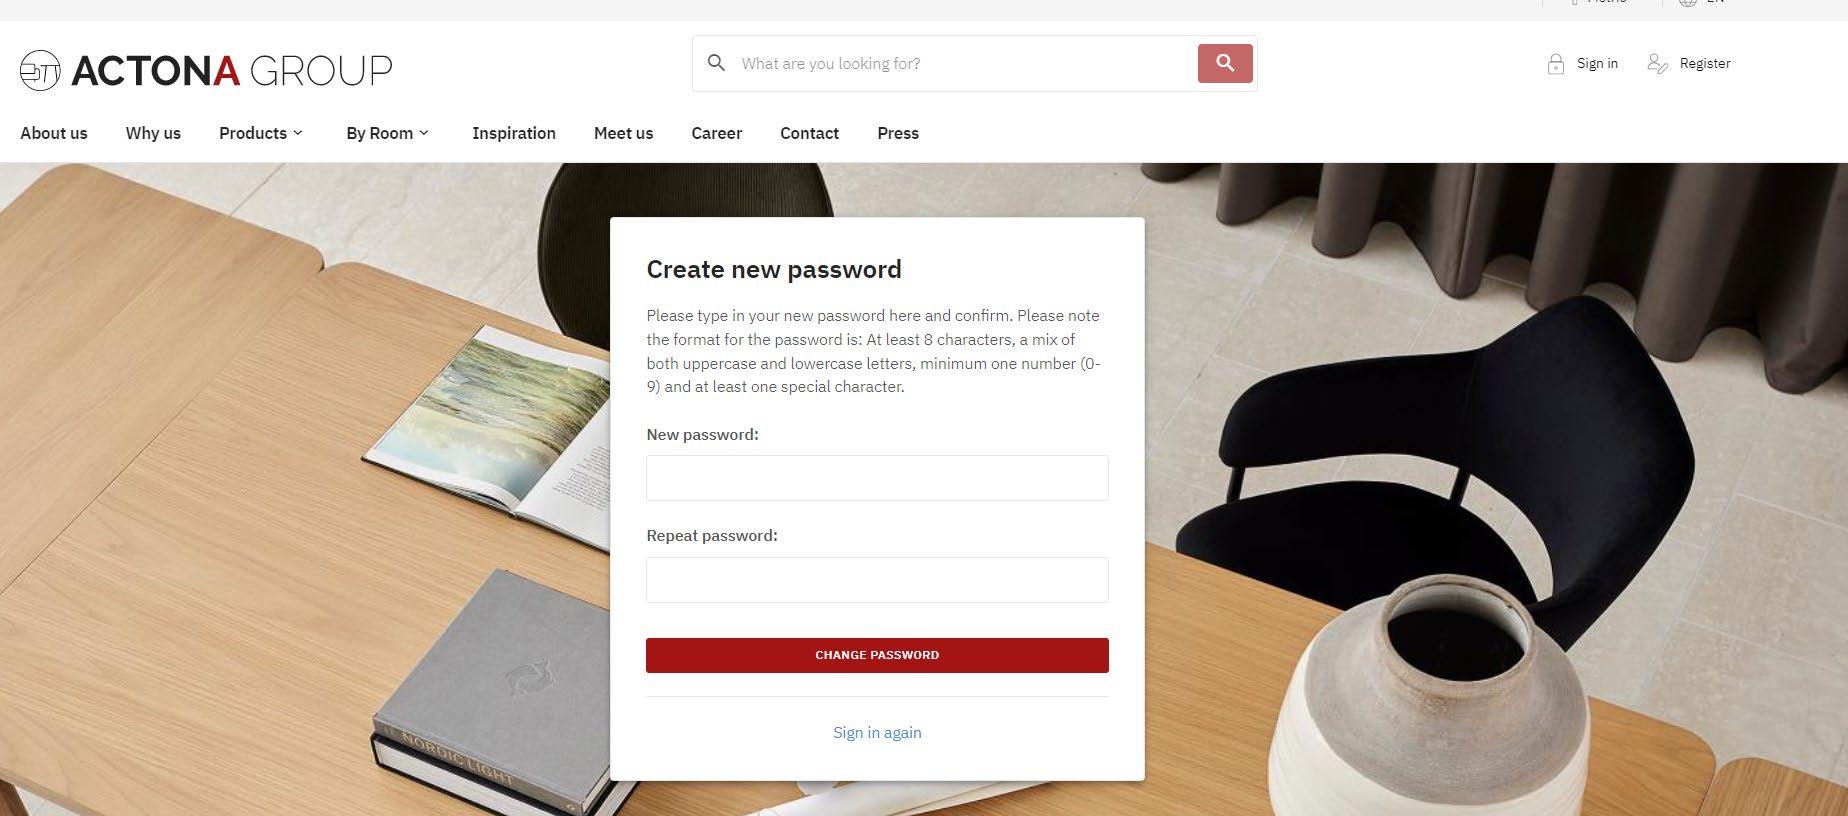
When clicking the link, the below page will occur. Now, all there is left to do is type your new password and click “change password”.
Please note the following requirements for the password:
- At least 8 characters
- A mix of both uppercase and lowercase letters
- Minimum one number (0-9)
- At least one special character
When you see the below page, you’re all set, and your password is changed.

1.4 How to change your password
When you are logged in you can change your password
Click on “My Account” in the upper right-hand corner and choose “My profile”. You are then directed to the site where you can change your password
Click “edit password”
When clicking on “edit password” you will be directed to the below page where you can change your password

2 Account settings
2.1 How to change the language
In the upper right-hand corner, you can easily adjust the view to your preferences.
If you click on “EN”, you can change the language on the site to either English, Danish or German.

2.2 How to hide prices
If you wish to hide the prices you can easily do so by clicking on “hide prices” at the top of the page.


2.3 Open orders
You can always view your open orders as well as your invoices under your profile. Click “My Account”, then “Open orders” or “Invoices” to view your orders and invoices
2.4 How to change to imperial measures
In the upper right-hand corner, you can easily adjust the view to your preferences.
When you click on “Metric” you can change between metric or imperial measurements

3 Filters
3.1 Main filters
We have two main filter options: Factory and Delivery method
These two options allow you to narrow down your view to a specific part of our product range The special thing about these filters is that they will overwrite all the other filters you may have applied. They will also follow you through the entire webshop
A red box will show every time you apply these filters in the upper right-hand corner.
If you wish to remove the filters again, just click on the “x” in the red boxes at the top of the page.
3.1 How to filter by a specific factory
Do you want to narrow down your search to a specific factory? Then unfold “Factory” from the filter menu and select a factory from the dropdown menu.

3.2 How to filter by products only available from the warehouse
Do you want to narrow down your search to only warehouse items? Then simply click on “warehouse” under “Delivery method” in the filter menu
3.2 Feature filters
Every product category has many different feature filters available These filters will always show on the left side of the product menu. The filters make it easy for you to quickly find the products you are looking for.
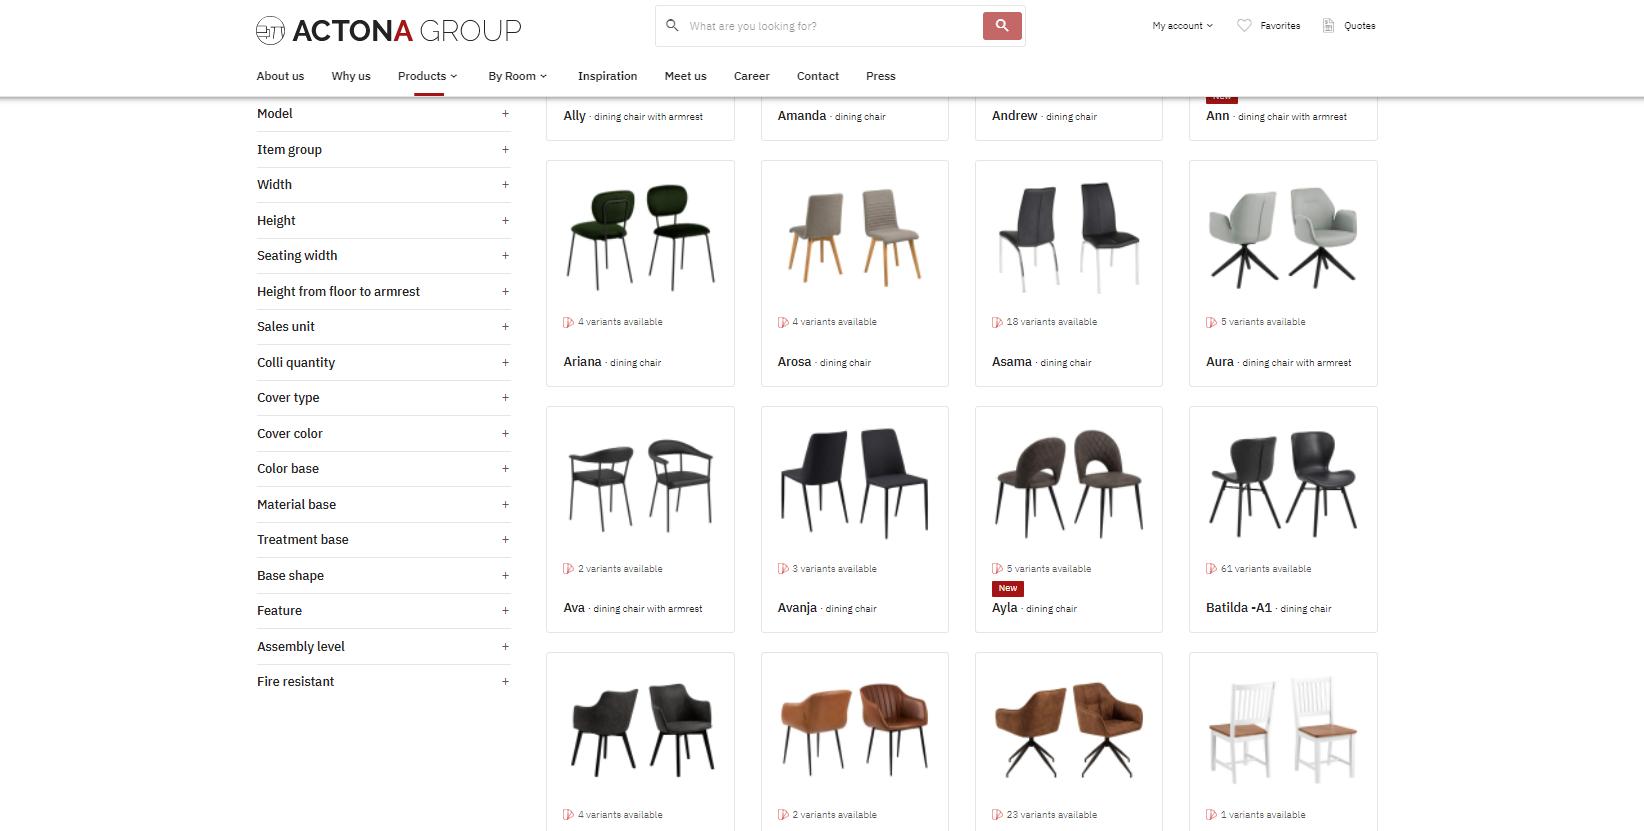
If you unfold a filter, e.g., cover colour, the subcategories will appear. Here you can use the filter even further, to narrow down your result. For instance, if you click on “anthracite”, only the anthracite-coloured dining chairs will show.

3.3 How to view your own range
If you wish to view your company’s selection of products, simply click on the “Range” filter option situated in the filter menu on the left side of the product menu. When applying this filter, you will also be able to see your own model names should you have your own specific item descriptions in our system.
4 Search function
There is a search function at the top of the page, where you can search for product name, item number, EAN code, fabric type, colour, material and much more.

5 Sort by function
When browsing through our products it is possible to sort how the items are shown. Depending on which results you would like to appear first, you can either choose to sort by models, factories, item groups, new products or alphabetical.

Models: Products sorted by model name from A-Z
Factories: Products sorted by factory ranging from lowest to highest factory number
Item group: Products sorted by item groups
New product: Products sorted ranging from newest to oldest items
Alphabetical: Products sorted by name from A-Z
6 Product selection
The website has a funnel function that makes it easy for you to quickly get an overview of the wide product range and find the product you are searching for


6.1 Level 1 – model selection
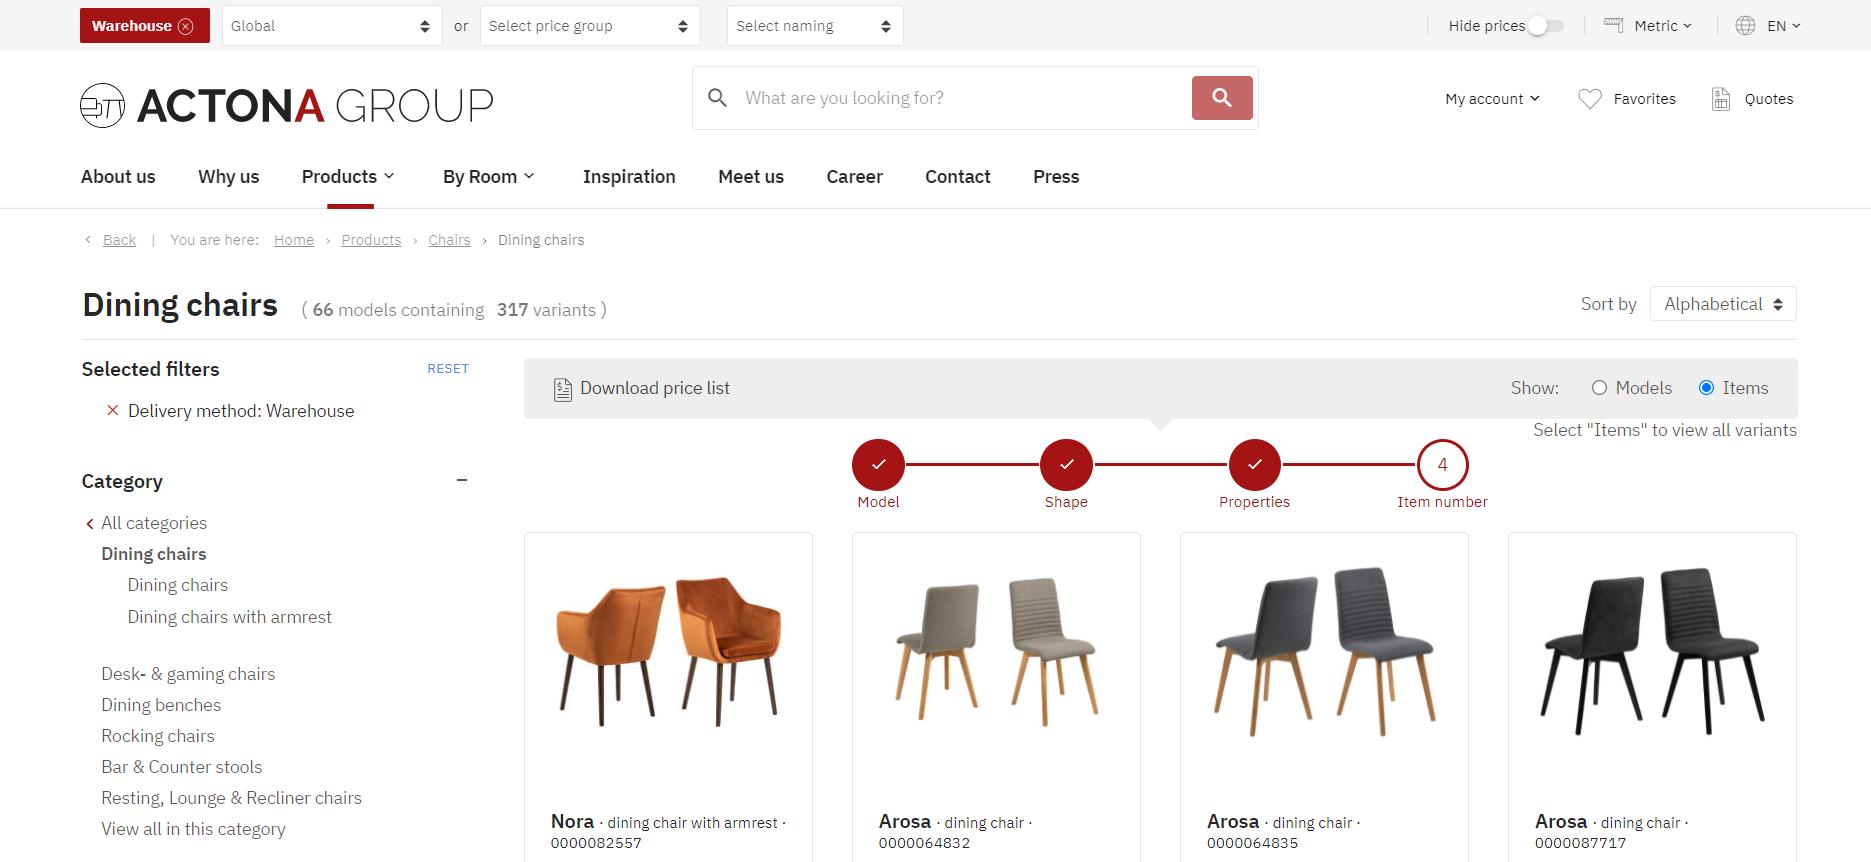
The 1st level of the funnel is the model level. Here, you get a clear overview of the available models in the chosen category
6.2 Level 2 – shape selection
The 2nd level is shape. At this level, you choose between the different shapes available for this model
6.3 Level 3 – properties selection
The 3rd level, properties, differentiate on product features such as material, shelves, drawers, doors or even special functions So, here you choose what features you want the product to have.

6.4 Level 4 – item number selection
The 4th and final level are item number, and all there is left to do at this level is to choose your favourite colour variant When you have chosen an item number, you will be let to the product detail page

6.5 Models versus Items level
If you wish to skip the first, second and third levels just click on “items”, and you will be sent directly to the 4th level.

6.6 Product detail page
When you open a specific item, the below page will show. Here you can view product images, and lifestyle images and see all colour options

6.6.1 Description
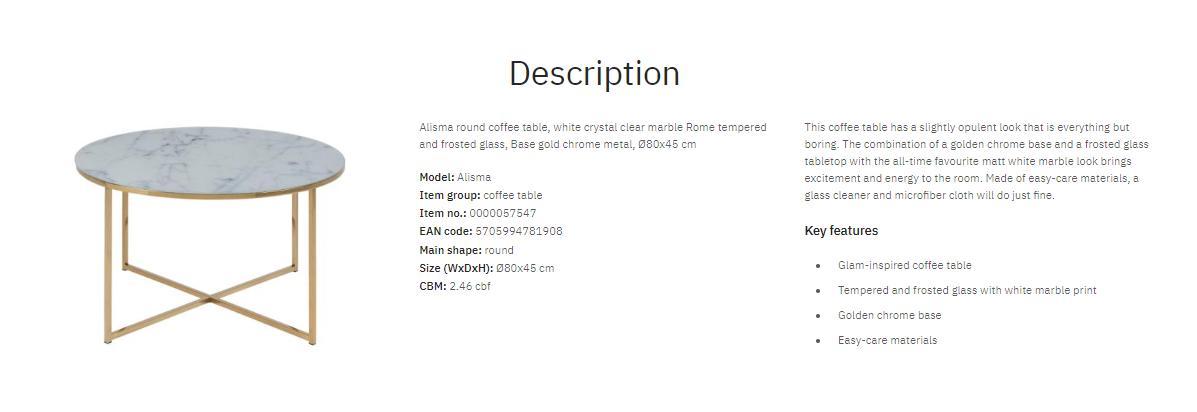
If you scroll down on the site, you will get to the description section. Here you will see detailed information on the item
6.6.2 Details and specifications
After the description information, further details and specifications will show. To view the different information, unfold the tab of the subject you want to know more about by clicking on the subject line.

6.6.3 Downloads
If you keep scrolling, you will meet the download section. Here you can download various data and media simply by clicking on the icons. You can download a PDF of the page, family members of the item, assembly instructions, line art with measures, Product data and high-res images

6.6.3.1 How to download high-res images

If you wish to download high-res images, click on the “Media and data” icon
When clicking “Media and data” the below box will pop up, and here you can specify your download. Choose a language, file formal, and which type of media files you would like to receive. At last, type in your email address to receive a link where you can download the media and data.
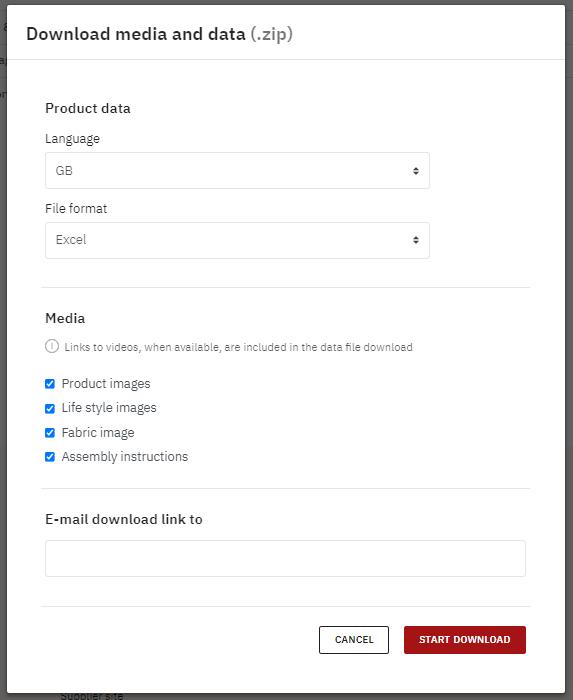
When clicking “start download” you will see the following pop-up. Click “close” and await an email with a link to download your media and data.

Open the email and follow the instructions described in the email.
6.6.4 Family group items
At last, you get to see the other items available within the same “family group”.

7 Favourites
The favourite function allows you to save your favourites and group them into favourite lists. You can either add products to an existing favourite list, or you can create a new one and add them there.
If you find a product you want to save for later when browsing through products on the 4th level – item number selection, simply click on the heart button as shown below and add the product to your favourites
You can also add products to your favourite list from the product detail page. All you must do is click the little heart button situated on the right-hand side of the product detail page
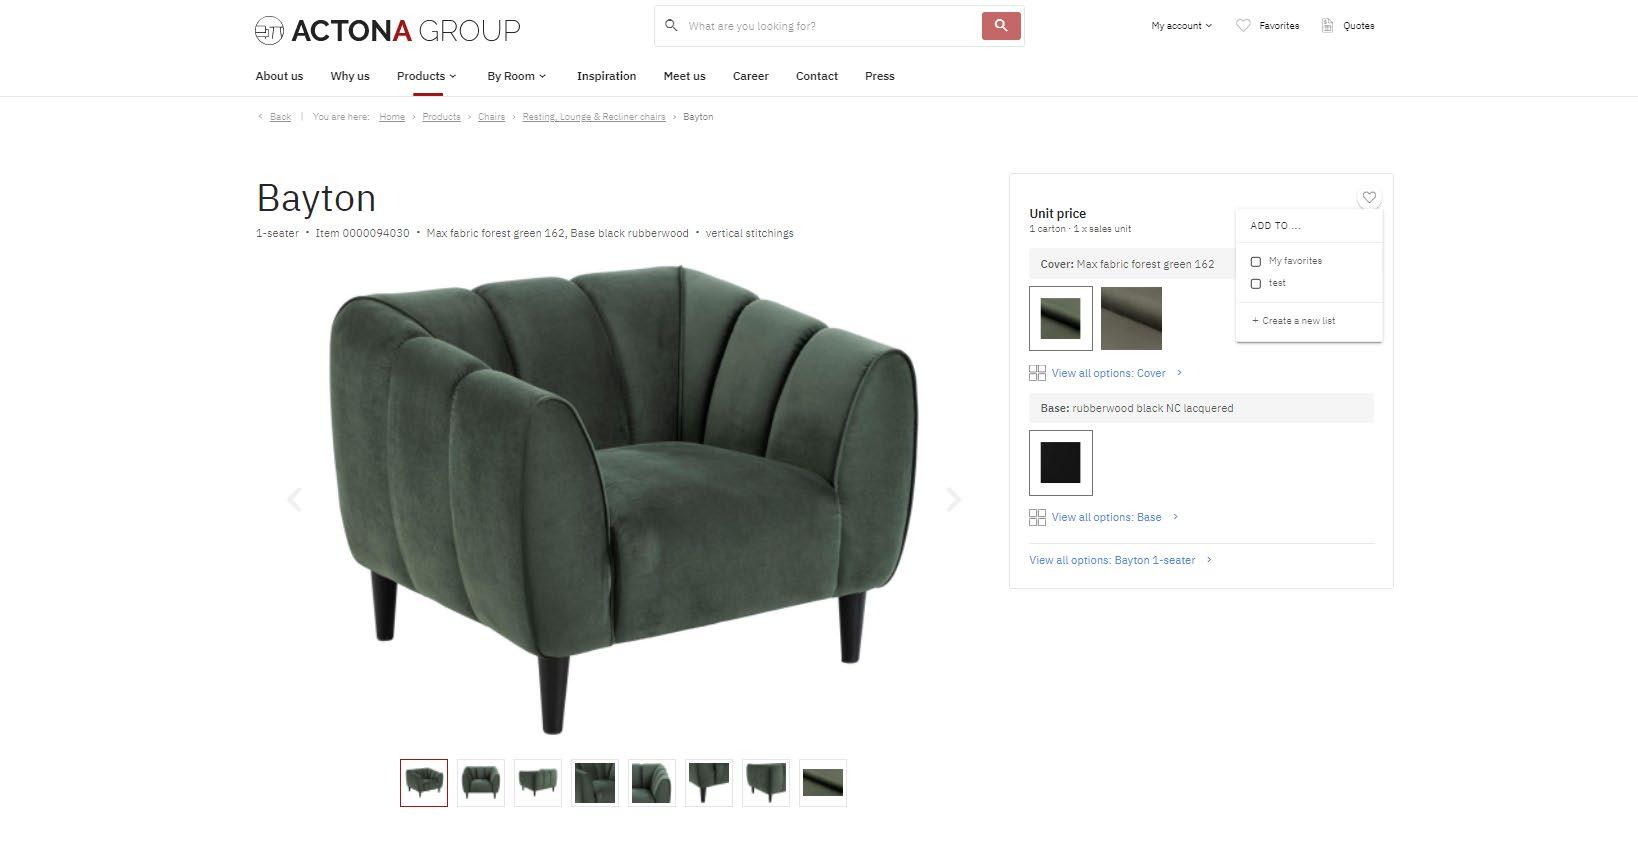

To see your favourite lists just look for the heart icon in the upper right-hand corner at the top of all pages.
Once your favourite list is open, you can always edit it
You can even download a price list and a media and data folder on all the products from your list
You can also delete a list, by clicking “Delete” at the top of the list.

If you click on open orders under my account, you will be directed to a page, which gives you an overview of all the orders you have in progress.

On this page, you can see the following:
- Date
- Document number
- Reference
- Status
- Expected shipping date

- Amount
If you open an order, you will see more detailed information about the exact order, including item number, description, unit price and quantity.
On this page, you can click “show product” to get more information, or you can download an order list.
8 Webshop – how to order
There are two ways to shop on our website. You can either shop containers or items from our warehouse
You are not necessarily set up for both, but if you wish to be so, it can easily be done. Just contact your internal sales contact at Actona Group.
If you are set up to shop both, the “add to cart” button will be visible together with the “how to order a container”.
8.1 How to order from the warehouse
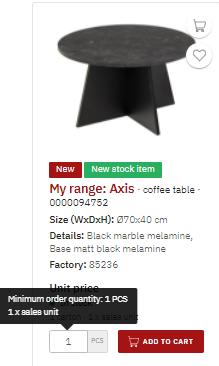
When adding a product to your cart, all you must do is type in the number of pieces you wish to purchase and click “add to cart”.
The minimum order quantity will always show when you click on the number field. E.g., if you have a dining chair that comes as 2 units per carton, it will show a minimum order quantity of 2 pieces.
You can either add a product to the cart from the search window or the product detail page

When you have added a product to your cart, you can either choose to continue shopping or to check out and go to the cart.

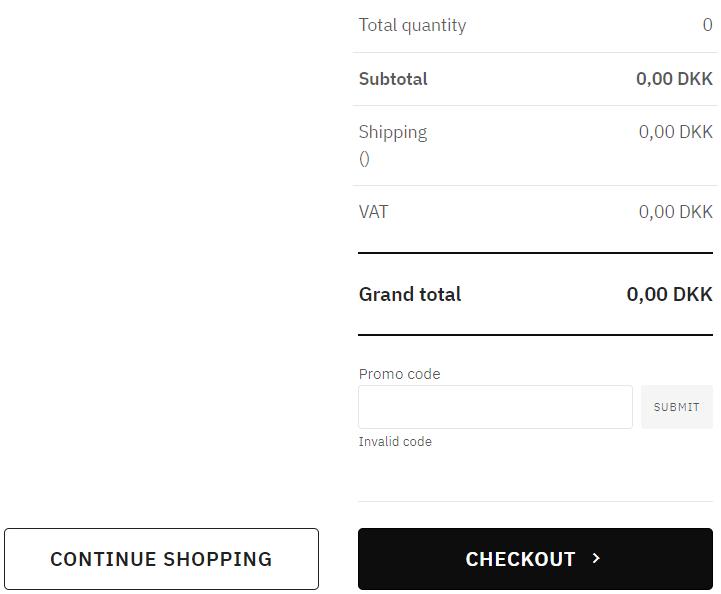
If you choose to go to the cart, the following page will appear

Below the checkout, you will also be shown related products that you may find interesting.
If you are done shopping, click “checkout”.

When clicking “checkout” you will be directed to the below page. Then follow the 3 simple steps to complete your order.
Step 1 - shipping
Fill out the delivery address and your requested time of delivery.
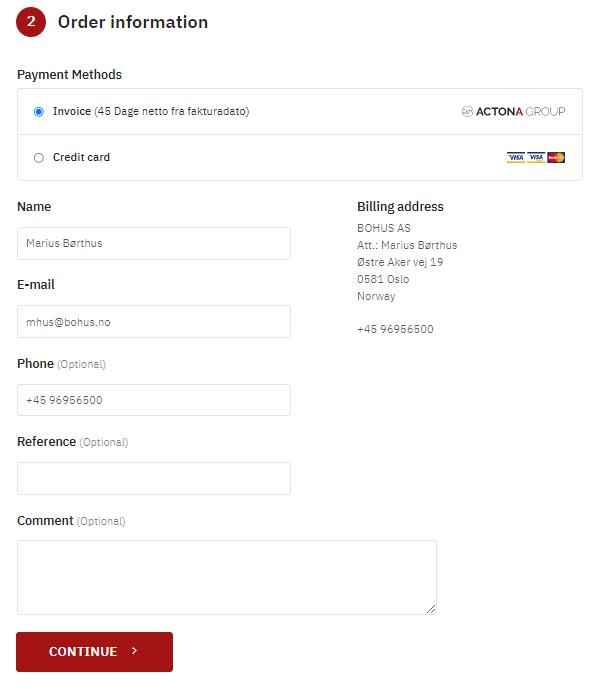
Step 2 – Order information
Choose the payment method. You can either pay by invoice or with a credit card. If not already filled out, type in your contact information and potential comments you may have.

Step 3 – Review your order and click “send order”

Place a checkmark next to “Terms of Sale and Delivery” to send your order.
When you have completed the 3 steps and sent your order you will receive an email from our back office with the final order confirmation.
8.2 How to order a container
Start by setting the “delivery method” filter to “Direct” to get an overview of which items you can buy via container

When clicking “how to order a container” the below pop-up page will appear. Here you can read a specific guide on how to complete your container order.


When adding a product to your cart, all you must do is type in the number of pieces you wish to purchase and click “add to cart”.
The minimum order quantity will always show when you click on the number field. You can either add a product to the cart from the search window or the product detail page
When you have added a product to your cart, you can either choose to continue shopping or to check out and go to the cart.
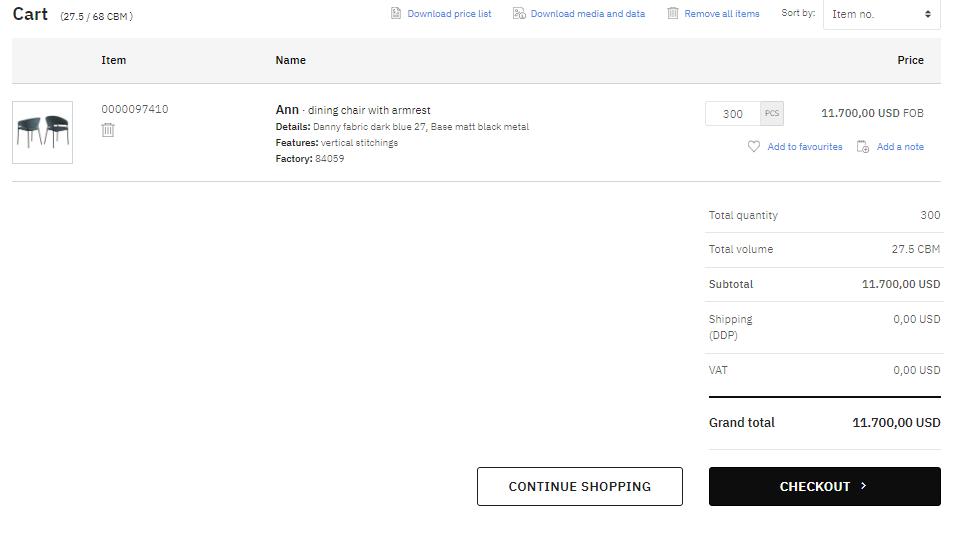

If you choose to continue shopping, it will now only be possible to add products from the same factory. This is because the items are to be combined in the same container
If you choose to go to the cart, the following page will appear.
If you are done shopping, click “checkout”.
When clicking “checkout” you will be directed to the below page. Then follow the 3 simple steps to complete your order.
Step 1 - shipping
Fill out the shipping method, delivery address and your requested time of delivery.

Step 2 – Order information
Choose the payment method. You can either pay by invoice or with a credit card. If not already filled out, type in your contact information and potential comments you may have.
Step 3 – Review your order and click “send order”
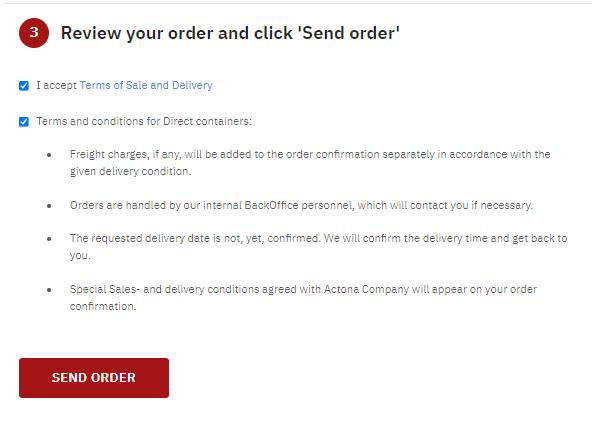

Place check marks next to “Terms of Sale and Delivery” and “Terms and conditions for Direct containers” to send your order.
When you have completed the 3 steps and sent your order you will receive an email from our back office with the final order confirmation.
8.3 Promo code
If you have received a promo code, you can enter your code before checking out. Just enter the code, press “submit” and go to “checkout”.
